DELTA DORE CLE 8000 TYXAL+ User manual

www.deltadore.com
Instructions
Important
Product
Informations
CLE 8000 TYXAL +
EN Wireless outdoor keypad
* Jusqu’à 10 ans, valable dans les conditions d’utilisation précisées dans
les notices d’installation et les Conditions générales de Vente
* Up to 10 years valid under the conditions of use specied in the
installation instructions and the General Conditions of Sale
* Hasta 10 años siempre y cuando se respeten las condiciones de
uso especicadas en el manual de instalación y en la Condiciones
Generales de Venta
* Fino a 10 anni, in base alle condizioni di utilizzo precisate nelle
istruzioni di installazione e nelle Condizioni Generali di Vendita
* Bis zu 10 Jahren unter den in der Bedienungsanleitung und den AGB
angegebenen Nutzungsbedingungen
* Tot 10 jaar, geldig onder de gebruiksvoorwaarden gespeciceerd in de
installatie-handleidingen en de algemene verkoopsvoorwaarden
* aż do 10 lat, przy użytkowaniu zgodnym z opisem w instrukcji
instalowania oraz Generalnymi warunkami Sprzedaży
LS14500 – 3,6V - Lithium
Consumption stand-by : 2.5 µA
Consumption : 25 mA max..
868 - 868.6 MHz / 868.7 - 869.2 MHz
100 m Ý 300m
Maximum power radio < 10 mW,
receiver category: 2
-10°C / +70°C
-25°C / +70°C
IP IP 64
75%
77 x 112 x 27 mm - 313 gr.
Important product
information (Ë Ì)
Contenu / Contents / Inhalt
Contenuto / Contenido / Inhoud
Zawartość

- 10 - - 11 -
1. Presentation
2. Location
CLE 8000 TYXAL+ is an outdoor keypad that can be associated with a DELTA
DORE X3D wireless alarm system and/or an X3D control system receiver.
Before using your keypad, if you want to:
A) Control the alarm, you must associate the keypad with the alarm system:
Read system installation guide
B) Control the control systems:
Ê Select the operating mode: , , or
Ë Associate the control system receivers.
Ì Create the 4-digit access codes to be able to control them.
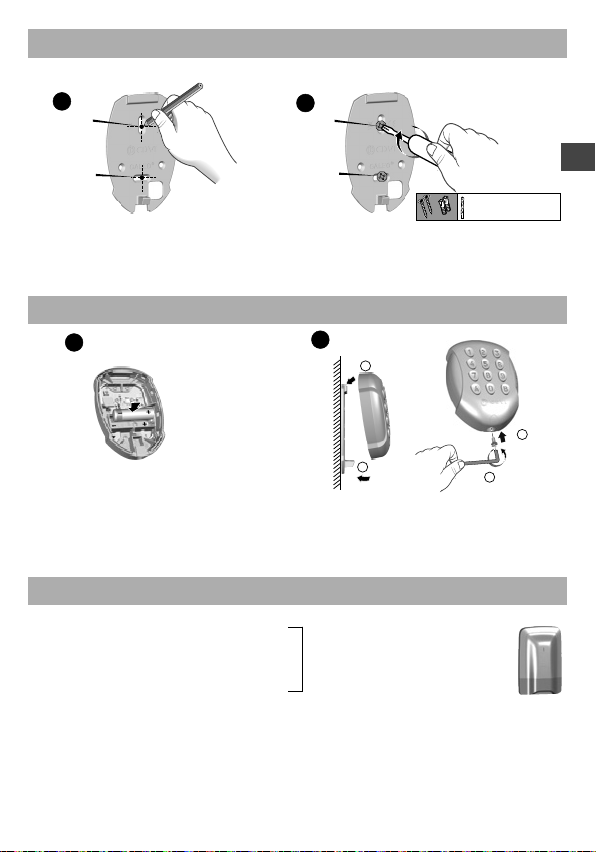
Ê Separate the 2 parts of the unit. Ë Glue the seal to the rear panel of
the base.
3. Mounting
1
3
4
C
V2
V1
D2
D1
1
23
2
The radio range between the CLE 8000 TYXAL+ (outdoors) and the CS 8000
TYXAL+ (indoors), or the control system receiver, depends on the environment
and installation conditions.
The installation mounting can affect the radio range. The keypad must not be
mounted on a metal surface, otherwise the range will be affected.
The average range is 20 m. It will be optimised if the device is mounted at
height (e.g. 1.50 m from the oor).
3. Mounting
Ì Mark and drill holes D1, D2.
1
3
4
C
V2
V1
D2
D1
1
23
2
4. Activation
Ê Fit the battery, observing
the right polarity.
• Association with an alarm system
• Selection of triggering method
• Test
5. Operation with an alarm system
1
3
4
C
V2
V1
D2
D1
1
23
2
EN
- 10 - - 11 -
1. Presentation
2. Location
CLE 8000 TYXAL+ is an outdoor keypad that can be associated with a DELTA
DORE X3D wireless alarm system and/or an X3D control system receiver.
Before using your keypad, if you want to:
A) Control the alarm, you must associate the keypad with the alarm system:
Read system installation guide
B) Control the control systems:
Ê Select the operating mode: , , or
Ë Associate the control system receivers.
Ì Create the 4-digit access codes to be able to control them.
Ë Glue the seal to the rear panel of
the base.
3. Mounting
1
3
4
C
V2
V1
D2
D1
1
23
2
The radio range between the CLE 8000 TYXAL+ (outdoors) and the CS 8000
TYXAL+ (indoors), or the control system receiver, depends on the environment
and installation conditions.
The installation mounting can affect the radio range. The keypad must not be
mounted on a metal surface, otherwise the range will be affected.
The average range is 20 m. It will be optimised if the device is mounted at
height (e.g. 1.50 m from the oor).
1
2
Lithium battery - AA
LS 14500 3,6 V
3
4
12
3. Mounting
Ì Mark and drill holes D1, D2. Ì Mount the base using screws V1, V2.
1
3
4
C
V2
V1
D2
D1
1
23
2
1
3
4
C
V2
V1
D2
D1
1
23
2
Ø max = 3 mm
4. Activation
Ê Fit the battery, observing
the right polarity.
Ë Close and lock the unit.
1
2
Lithium battery - AA
LS 14500 3,6 V
3
4
1
2
• Association with an alarm system
• Selection of triggering method
• Test
Read system installation
guide
5. Operation with an alarm system
- 12 - - 13 -
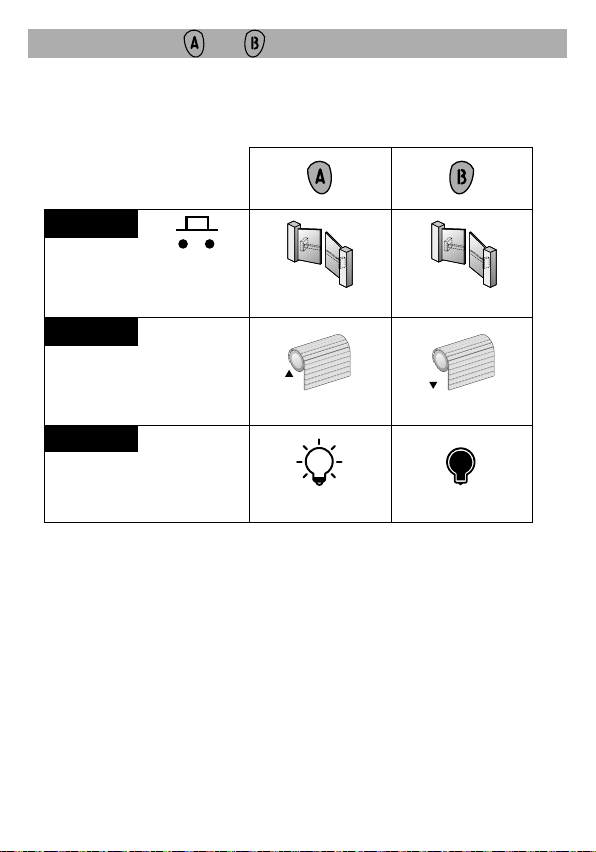
6. Customise the and buttons.
There are 3 modes: D, E and F.
Pulse control of a control
system or one lighting group
Channel 1
Channel 2
ON / OFF
Roller shutter control
Raise Lower
ON / OFF
Control of several lighting
groups On Off
Tryb E
Tryb F
Tryb D
Modo E
Modo F
Modo D
Modalità E
Modalità F
Modalità D
Modus E
Modus F
Modus D
Mode E
Mode F
Mode D
Tryb E
Tryb F
Tryb D
Modo E
Modo F
Modo D
Modalità E
Modalità F
Modalità D
Modus E
Modus F
Modus D
Mode E
Mode F
Mode D
Tryb E
Tryb F
Tryb D
Modo E
Modo F
Modo D
Modalità E
Modalità F
Modalità D
Modus E
Modus F
Modus D
Mode E
Mode F
Mode D
6. Customise the and buttons for a control
system receiver
ÊPress and hold the
button for 5
seconds.
The LED ( button)
is green, switches
off then ashes to
indicate the operating
mode.
12
... ... ...
... ... ...
... ... ...
> 5s
Mode F
Mode E
Mode D 3
> 5s

EN
- 12 - - 13 -
6. Customise the and buttons.
Pulse control of a control
system or one lighting group
Channel 1
Channel 2
ON / OFF
Roller shutter control
Raise Lower
ON / OFF
Control of several lighting
groups On Off
6. Customise the and buttons for a control
system receiver
ÊPress and hold the
button for 5
seconds.
The LED ( button)
is green, switches
off then ashes to
indicate the operating
mode.
Ë Press the button, then
select the required operating
mode by briey pressing
the button as many times as
12
... ... ...
... ... ...
... ... ...
> 5s
Mode F
Mode E
Mode D
3
> 5s
necessary:
- 1 ash (
... ... ...
... ... ...
... ... ...
)
= D mode (e.g. gate)
- 2 ashes (
... ... ...
... ... ...
... ... ...
)
= E mode (roller shutter)
- 3 ashes (
... ... ...
... ... ...
... ... ...
)
= F mode (e.g. lighting)
Ì To conrm
and exit the
mode, press the
button, for 5
seconds.

- 14 - - 15 -
7. Associate the and buttons for 1 control system
receiver
3
OK
12
>5s
or
>3s
OFF
OFF
>5s >5s
Example Example
Ê Set the receiver
to association
wait mode
(refer to guide).
ËOn the keypad, press the
button for 5 seconds. The
keypad emits a beep.
The LED ( button) is green,
switches off then ashes to
indicate the operating mode.
Press the button to associate
(or , refer to detail be-
low) for 5 seconds, the keypad
emits a 2nd beep. Release.
Ì Check that the
receiver has
acknowledged the
request
(refer to the guide).
On the keypad, the
LED ashes red
(button) then
green.
Tryb E
Tryb F
Tryb D
Modo E
Modo F
Modo D
Modalità E
Modalità F
Modalità D
Modus E
Modus F
Modus D
Mode E
Mode F
Mode D
Press then for channel 1.
Press then for channel 2.
Press then or
ËDetail: Tryb E
Tryb F
Tryb D
Modo E
Modo F
Modo D
Modalità E
Modalità F
Modalità D
Modus E
Modus F
Modus D
Mode E
Mode F
Mode D
Tryb E
Tryb F
Tryb D
Modo E
Modo F
Modo D
Modalità E
Modalità F
Modalità D
Modus E
Modus F
Modus D
Mode E
Mode F
Mode D
8. Congure the alarm and control system access codes
Alarm access code:
Control system access code:
The CLE 8000 TYXAL+ uses 2 types of access code:
Your CLE 8000 TYXAL + is compable with Tydom,
to automate your Smart Home.

EN
- 14 - - 15 -
7. Associate the and buttons for 1 control system
receiver
3
OK
12
>5s or
>3s
OFF
OFF
>5s >5s
Example
Ì Check that the
receiver has
acknowledged the
request
(refer to the guide).
On the keypad, the
LED ashes red
( button) then
green.
Press then or
8. Congure the alarm and control system access codes
Ê Enter your access code (1234 by default)
ËOn the keypad, press the button for 5 seconds.
The redLED ( button) will come on.
Ì Enter the new access code (4 digits), then press .
The green LED comes on for 3 seconds, then red.
To conrm and exit the mode, press the button, for 5
seconds.
Alarm access code:
• Upon activation, the installer code is
,
• To create, modify or delete an access code,
refer to the system installation guide
Control system access code:
• Upon activation, the user code is ,
• To change the default access code or create
a new access code:
The CLE 8000 TYXAL+ uses 2 types of access code:
You can create up to 9 different control system access codes.
Beyond this input is refused and the keypad emits aseries of
beeps.
• To create, modify or delete an access code
(installer or user),refer to the system installation guide.
Your CLE 8000 TYXAL + is compable with Tydom,
to automate your Smart Home.

- 16 - - 17 -
9. Operation
Tryb E
Tryb F
Tryb D
Modo E
Modo F
Modo D
Modalità E
Modalità F
Modalità D
Modus E
Modus F
Modus D
Mode E
Mode F
Mode D
Tryb E
Tryb F
Tryb D
Modo E
Modo F
Modo D
Modalità E
Modalità F
Modalità D
Modus E
Modus F
Modus D
Mode E
Mode F
Mode D
or
or
Example
Press the button for channel 1 or for channel 2.
The LED ( button) changes from red to green.
Press the button to raise the
roller shutter.
Press the button to lower the
roller shutter.
During the raising or lowering op-
eration, pressing stops the roller
shutter. (Do not enter the 4-digit
access code).
Enter your 4-digit code, then:
Enter your 4-digit code, then:
Press the button to switch on. Press the button to switch off.
or
The LED ( button) changes from red to green.
Tryb E
Tryb F
Tryb D
Modo E
Modo F
Modo D
Modalità E
Modalità F
Modalità D
Modus E
Modus F
Modus D
Mode E
Mode F
Mode D
On
Off
On
Off
or
Enter your 4-digit code, then:
The LED ( button) changes from red to green.
1
2
3
45
>10s
1 2
11. Battery replacement
1
2
3
4
Lithium battery - AA
LS 14500 3,6 V
The LED ashes red( button) whenever it is pressed. The battery is dead.
Before opening the unit, the alarm control unit must be in Maintenance mode
(refer to system installation guide).
10. Remove the association with a control system receiver
and the control system access codes

EN
- 16 - - 17 -
9. Operation
Press the button for channel 1 or for channel 2.
The LED ( button) changes from red to green.
Press the button to lower the
roller shutter.
Press the button to switch off.
On
Off
1
2
3
45
>10s
1 2
Ë Separate the product from
its base unit.
Ë Press the button located inside the
keypad for 10 seconds.
The keypad emits a beep when pressed,
then a second beep after 10 seconds.
Release.
11. Battery replacement
1
2
3
4
Lithium battery - AA
LS 14500 3,6 V
The LED ashes red( button) whenever it is pressed. The battery is dead.
Before opening the unit, the alarm control unit must be in Maintenance mode
(refer to system installation guide).
10. Remove the association with a control system receiver
and the control system access codes

www.deltadore.com
This manual suits for next models
1
Table of contents
Other DELTA DORE Keypad manuals

DELTA DORE
DELTA DORE TYXAL 6413204 User manual

DELTA DORE
DELTA DORE CLT 8000 TYXAL+ User manual

DELTA DORE
DELTA DORE CLT 8000 TYXAL+ User manual

DELTA DORE
DELTA DORE CLE 8000 TYXAL+ User manual

DELTA DORE
DELTA DORE CLS 8000 Tyxal+ User manual

DELTA DORE
DELTA DORE CLT 8000 TYXAL + User manual

DELTA DORE
DELTA DORE CLLX User manual


