DELTA DORE TYXAL 6413204 User manual
Because of changes in standards and equipment, the characteristics given in the text and the illustrations
of this document are not binding unless confirmed by Delta Dore.
CLSX 270 0636 Rev.5
Simulated shutdown
If the access code must be entered under coer-
cion, you can shutdown the protection system
while calling for help with Tyxal telephone trans-
mitter (without the siren going off).
example:
access code 9264 --> --> coercion code 0264
access code 0827 --> coercion code 1827
To use the simulated shutdown with the main
access code 3 5 8 6
- enter the first number of the main access code
increased by 1, then the 3 others unchanged,
- press OFF.
The coercion access code is the main access
code + 1 on the first number.
Full start
- enter the main access
code, then press ON.
Shutdown the system
- enter the main access
code, then press OFF.
Set partial operation 1 or 2
- enter the main access code,
then press the relevant partial
operation button (1 or 2).
8
53 6
1
2
OR
Set partial operation 1 to 4
Set the system’s detectors, integrated into one of
the partial operation zones 1 to 4, to surveillance
mode:
- enter the main access code,
- press the “config” button
then the relevant partial
operation button (1, 2, 3, 4).
3
8
53 6
4
2
1
OR
8
54 6
OFF
OFF
CE declaration
DELTA DORE TALCO
Bonnemain - 35270 COMBOURG
To test the radio transmission, the keypad must
be recorded (see § “LEARNING”).
The test is carried out by starting or shutting
down the protection system by the control key-
pad (see § “USE”), the control unit confirms by
emitting one or more beeps depending on the
case.
To return to normal operation, switch off the
products of the system (control unit last of all).
TEST
8
TECHNICAL
CHARACTERISTICS
9
Distributeur / Distributor's name : Delta Dore TALCO
Type / Type : Emetteur / Transmitter
Déclare que le produit référencé ci-dessus est conformite aux exigences essentielles
de la directive R&TTE 1999/5/CE : (declares that the above equipment comply with the essential
requirement of the Directive R&TTE 1999/5CE)
3.1 a : Sécurité électrique / Safety
NF EN60950 (oct 2000)
3.1b : Compatibilité électromagnétique / electro magnetic compatibility :
EN301489_3 V1.4.1 (août 2002)
NF EN50130_4 (avril 1996) + A1 (1998)
Article 3.2 : (utilisation efficace du spectre radioélectrique /effective use of radioelectrical spectrum
EN300-220_3 V1.1.1 (sept 2000)
Déclare que les essais radio essentiels ont été effectués
(declares that the essential radio tests have been done)
Le marquage CE est apposé sur le produit
The CE marking is printed on the equipment
Déclaration CE constructeur / CE declaration manufacturer : N˚ 01-046_4
Date / date: 05 May 2006
DECLARATION DE CONFORMITE R& TTE
DECLARATIONS OF CONFORMITY R&TTE
Désignation / Brand name : Clavier de commande CLSX / Control keypad CLSX
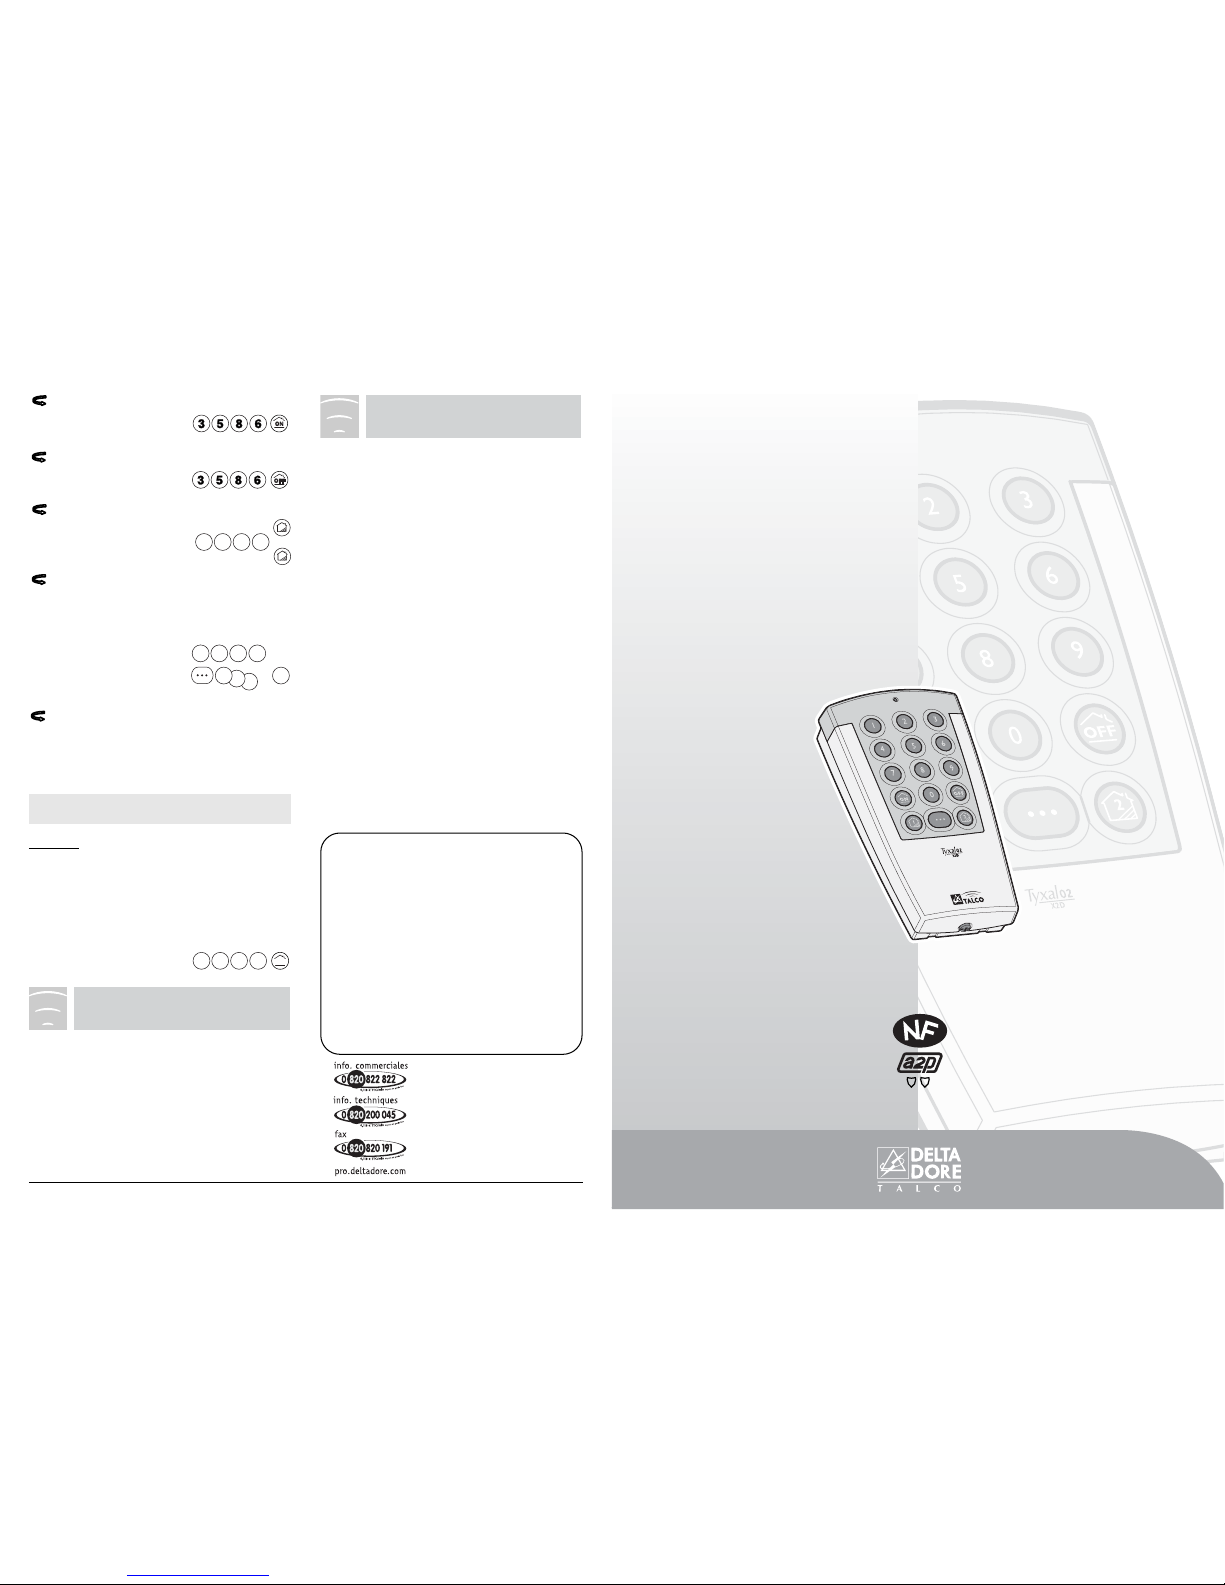
TYXAL Indoor
control
keypad
installation
and User Guide
CLSX code: 6413204
- Radio range:
• inside: depending on environment
• outside: 200 to 300 m depending on environment
- Radio frequency: 868 MHz
- Power supply: Two LR6 or AA type 1.5 Volts
alkaline batteries supplied
- Stand-by mode consumption: <30 µA
- Average consumption for transmission: ≤15 mA
- Access code: 1 main, 1 secondary
- Security: 1 minute lock for search
- Autonomy: 3 years for normal use
- Tamper alarm: in case of opening or removal of
unit
- Protection index: IP30 - IK04
- Use: dry interior only
- Dimensions: 142 x 77.5 x 33 mm
- Operating temperature: +5°C / +55°C
- Casing: ABS-PC
- Weight (with batteries): 180 gr
- NF&A2P type 2 associated with the CSX40
control unit
Certificate: No. 1120060640 A0
CNMIS S.A.S - 75017 PARIS
Tel. +33 (0)1 53 89 00 40 - Fax. 01 45 63 40 63
e-mail: [email protected]
3
The control keypad enables 2 different access
codes to be used (4 figures).
The main code on starting up is 1 2 3 4.
The main access code allows all the function
available on the system to be used (use and confi-
guration).
The secondary code gives access only to starting
(full or partial) and shutting down. This is a useful
feature if someone foreign to the protected area
must be given occasional access (maintenance
personnel, etc.).
Entering the code wrongly 3 times will lock the
keypad for 1 minute. Any new attempt during this
period will extend this security time by a further
1 minute.
Associate the CLSX keypad with the
system
Go to the “Product” menu on the control unit
- Press the "ON" button of a keypad or remote
control that is already recognized
for 5 seconds
.
The control unit emits a beep and the front
panel indicator light is steady.
Record the keypad
- Enter the main code (1234 by
default), then press the “ON” but-
ton for more than 5 seconds. The
control unit emits a beep and the
front panel “2” (remote control +
keypad) indicator light comes on.
This indicator will be on already if
an element has been recorded.
Changingthe main access code
Example: replacing the code 1 2 3 4 by 3 5 8 6
- go to the code configuration mode on the keypad,
- senter the code to change, then press OFF
within 10 seconds,
- enter the new code twice in
succession,
- press ON.
Addingthe secondary access code
Example: add the secondary code 2 7 9 8
- go to the code configuration mode on the keypad,
- enter the code to be added
twice one after the other,
- press ON.
Accessingthe access code control
- enter the main access
code (1 2 3 4 by default),
- press the keypad button for longer than 5
sec. This action is confirmed by a beep.
Removingthe secondary access code
Example: remove the secondary code 2 7 9 8
- go to the code configuration mode on the keypad,
- enter the secondary code,
- press OFF.
The control unit emits several beeps if the
product is recorded incorrectly, at the limit of
the radio range or if the maximum number of
control devices has been reached.
If the new code is not entered within 10
seconds after pressingthe OFF button, the
keypad is reset automatically.
Once a code is validated, the code is not
modified if an error was made.
To change it, first remove the old code then add
the new code.
After each code entered correctly, the keypad
emits a validation beep.
Wait for 10 seconds before carryingout any
other action. The code 2798 is now removed. If
an error occurs, the secondary code will not be
removed.
4
31 2
8
53 6
8
53 6
ON
9
72 8
9
72 8
1
2
3
4
5
alarm
tamper alarm
battery
supervision
point of entry
is open
remove test
Associate the detectors with a partial
operation. See the explanations on the
CSX control unit.
CODE CONFIGURATION
- set the control unit to Maintenance mode.
- open the unit then remove the batteries.
- wait for around ten seconds,
- put the batteries back, pressing
the 3 buttons (config, partial 1
and 2 ) at the same time. After a few seconds,
the keypad emits several beeps and the code
returns to 1234. Important: if a secondary code
was added, it will also be deleted.
Returningto the factory code 1234
(product reset)
12
Returningto MAINTENANCE mode
This is done automatically after 5 minutes or by
using the “stop” function of a control device.
The keypad led indicates a valid control
sequence. Several beeps (3) mean that the
wrongcode was entered.
In the following examples the main access code
is 3586.
ACCESS CODES
6
USE
7
2
The control unit must be in MAINTENANCE
mode.
Note: If no control device has been learnt by
the control unit, goingto the “product” menu
will record this keypad.
The CLSX control unit is mounted on a wall and
used to start or switch off the TYXAL alarm
system after entering an access code.
Contents
- radio control keypad (batteries supplied),
- installation and user guide,
- packet of screws.
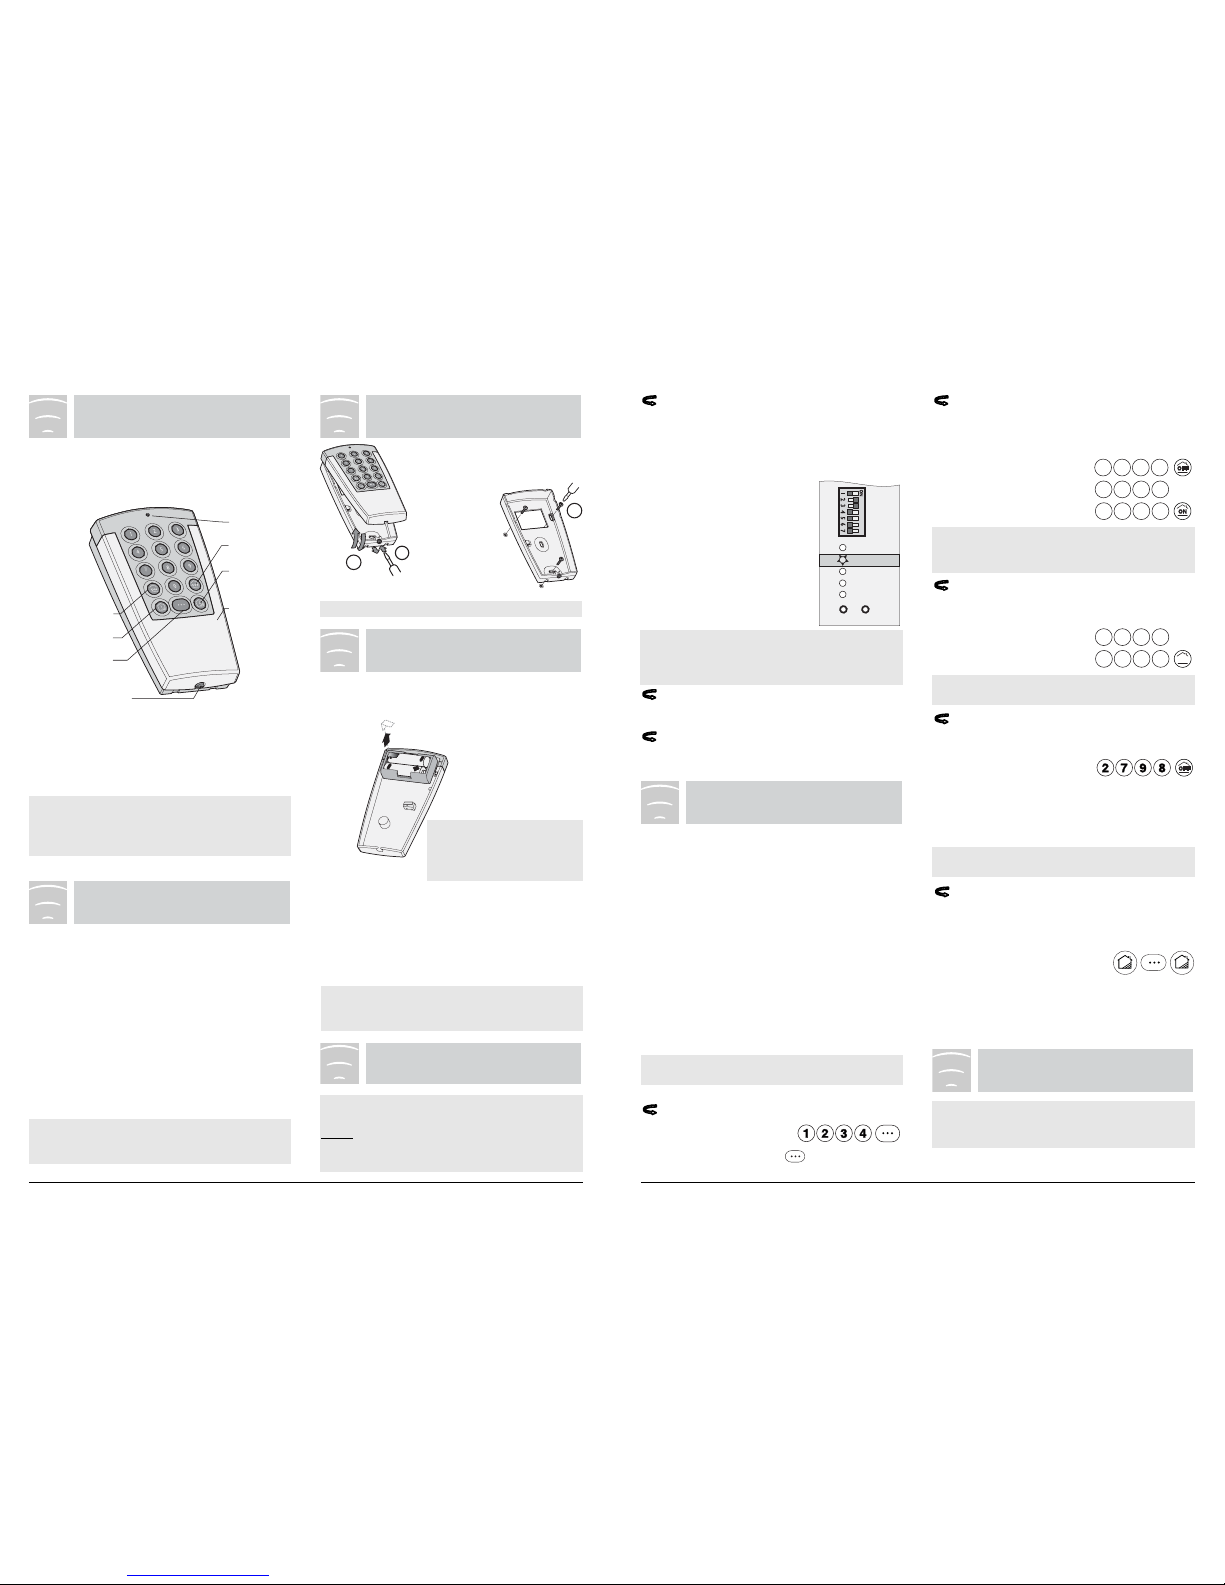
- Loosen the unit closing
screw.
- Remove the front cover.
- Fit the base of the
keypad using the
screws provided.
Place the control keypad in the entrance to the
protected room and at an accessible height for
entering the access code.
Installation precautions for transmitting
correctly
In dwellings, the propagation of radio waves is
reflected and attenuated by the structures
encountered.
This propagation can be altered, so avoid installing
products near large metal masses (beams) or
an electrical switchboard.
It is therefore advisable to test the radio
transmission before definitively fixingthe
keypad (see the “TEST” chapter).
3
Set the control unit to MAINTENANCE mode
to replace the batteries (see the control unit
guide).
If you install the keypad in an area with an
IRX infrared movement detector or a COX
door/window magnetic contact, ensure that
the detector is set to delayed triggering.
The CLSX keypad must be mounted indoors.
indicator
light
total
shutdown
partial
operation
2
total
operation
partial
operation 1
config button
/ partial
operations 1 to 4
unit closing
screw
front
cover
2
1
-If the batteries need
replacing, fit 2 new LR6
alkaline batteries, from
the same source and
same date, ensuring
that the polarities are
correct.
2 LR6
(or AA)
type
batteries
Remove
the battery
cover
- Fit the front cover back onto the base and
tighten the unit closing screw.
Never throw away flat batteries. They must be
taken back to the point of purchase.
Low battery indication
A series of 3 short beeps at each emission.
The keypad buzzer must
emit 2 beeps, otherwise
check the battery polari-
ties.
Fittingor changingbatteries
- Remove the battery cover.
PRESENTATION
1
INSTALLATION
3
PREPARATION
2
POWER SUPPLY
4
LEARNING
5
Other DELTA DORE Keypad manuals

DELTA DORE
DELTA DORE CLS 8000 Tyxal+ User manual

DELTA DORE
DELTA DORE CLT 8000 TYXAL+ User manual

DELTA DORE
DELTA DORE CLE 8000 TYXAL+ User manual

DELTA DORE
DELTA DORE CLT 8000 TYXAL + User manual

DELTA DORE
DELTA DORE CLE 8000 TYXAL+ User manual

DELTA DORE
DELTA DORE CLLX User manual

DELTA DORE
DELTA DORE CLT 8000 TYXAL+ User manual


