manuals.online logo
Brands
  1. Home
  2. •
  3. Brands
  4. •
  5. Delta-Opti
  6. •
  7. Car Video System
  8. •
  9. Delta-Opti ATE-NTFT10-T3 User manual

Delta-Opti ATE-NTFT10-T3 User manual

Manufactured in China for:
DELTA-OPTI Monika Matysiak,
60-713 Poznan, 10 Graniczna St., Poland
www.shopdelta.eu
User Manual
ATE-NTFT10-T3
CONTENT
SPECIFICATION
Chipset Hi3520D V300
Screen Size 10.1INCH
Screen ratio 16:9
Black Light Luminance LED,500cd/m2
Resolution 1024*600
Operation Langue Chinese/English/Spanish etc
Viewing Angle Hor: L(70) R(70); Ver: UP(50) DOWN(70)
Image reversion UP/Down and Left/Right
Power requirement 12 / 24V DC , Range 11-32V DC
Power consumption <8W
Shockproof level 10G
Chipset HI3520D V300
DVR FEATURES
MONITOR SPECIFICATION
Language Chinese/English
System System Linux
Interface Visual GUI,Support Mouse
Record
Video Standard PAL/NTSC
Video Input 4-CH AHD Input
Resolution 1080P/720P
Image Quality 4 levels adjustable
Record Mode Boot Record
1. SPECIFICATINS 2.WIRE DRAWING 3. REMOTE CONTROL
4. MONITOR BUTTON 5.MENU INTRODUCTION
6.NOTE 7.BACK UP INTRODUCTION 8. FQA
Audio Input 1-CH Audio input
Audio Audio recording Audio & Video synchronized recording
Audio Compression G.711u
Video Search Recent 3 days/1 week/2 weeks etc
Playback ,search by time
4-CH Playback Support
Fast /Back Forward Support 2x/4x/8x Fast/Back forward Playback
SD Card Slot Support Max 512GB SD Card
Interface USB Port Support Mouse/USB Backup
I/O Input 4-CH I/O Alarm input
Reverse Line Support
Others
Voltage DC8-36V
Working Temperature -30℃ to +70℃
Humidity 20% to 80%
Dimension 150mm*88mm
Weight 0.78Kg
WIRE DRAWING
REMOTE CONTROL
MONITOR BUTTON
10.1 INCH
Menu AV1/AV2 — OK + Power IR
BUTTON DECRIPTION
Menu
Login/Logout Menu
AV1/AV2
-
IR
OK
+
Switch AV1/AV2 Video Input
Turn Over Main Menu Page
Go up in the sub menu
Reduce Number Value setup
Confirm Button
Left/Right Move
Go Down in the sub menu
Add Number Value Setup like time setup
Power
Press for a time, Shutt Off the Screen
Press for Long time, Shut Down Monitor
IR Led light for Remote control
Login Menu Button
ON/OFF Monitor Button
Function-01:Switch channels
1=CH1,2=CH2,3=CH3.....
Function-02: Input Number
to Setup time
Return/Canel/Exit Button
Login Info Menu
LEFT/RIGHT/UP/DOWN button
“OK” Confirm button
Login Playback Menu
Stop,Pause/Play,
Fast backward,Fast
Forward Buttons
MENU INTRODUCT
MENU-01: Login Monitor=> Main Menu
MENU-02: Click into “Record” To Playback/Backup the recorded videos
DESCRIPTION:
“Search for date”: Last three days,last 1 week, last 2 weeks,last 1 month or ALL to search out recorded videos
“Export”: Choose one day, like 2019-11-21,to back up the whole day video by USB Port
“Playback”:Playback the recorded video(Support Fast/back Forward,Stop etc Operation)
“Lock”: Check recorded videos=>Click “Lock” which will show red lock,the lock videos will not be overwrite.
“Unlock”: Unlock Locked Videos
“Backup”: Backup the checked videos
MENU-03: Click into “General Setting” To setup date time,date format,Video format etc
DESCRIPTION:
“Video Format”: PAL/NTSC Optional
“Time show”: Enable/Disable watermark the time into the recorded videos
“Resolution”: Video record resolution
“Quality”: Normal,Standard,Clear ,Clearest 4 Classes adjustable.
“Plate Number”: Enable to OSD plate number info into the recorded videos
MENU-04: Click into “Control Setting” To setup date time,date format,Video format etc
DESCRIPTION:
A. Always Output: After booting, Keep showing videos on Monitor
B.Trigger Output: After booting, Only alarm trigger to show videos on Monitor
C. Smart Output: After booting,Showing video on monitor, Will auto shut off without any operation in 15s
“Display switching”: After Alarm trigger Off, Video showing time
“Auto sequence”: The video image auto sequence time
“Record For Park”: Delay off time setup after engine off to keep recording. While voltage is lower DC10.5V,Montior will
auto shut down totally.
“Audio Recording”: Diable/Enable to record audio with video
“Video Output”:
MENU-05: Click into “Image Setting” To setup Guide line,Screen Margine, Mirror config etc
DESCRIPTION:
“Guide Line”: Reverse Line setup to guide the driver for reversiong
“Screen Margin”: To adjust screen Margin to full screen-(Less use)
“Color Config”: To adjust Channel videos Chroma,Sharp, brightness,Contrast etc
“Mirror Config”: To Adjust camera rotation direction.
“Record Mode”:The video Mode while video recording
“Power on Mode”:The video Mode while Vehicle Starting
“Display Mode”:Use remote control or ’Mode” button to switch Video Modes.
SUB-01: Guide Line Setup GUI
SUB-02: Screen Margin setup GUI
SUB-03: Color config Setup GUI
SUB-04: Mirror config Setup GUI
MENU-06: Click into “System Setting” To format SD Card,upgrade etc function
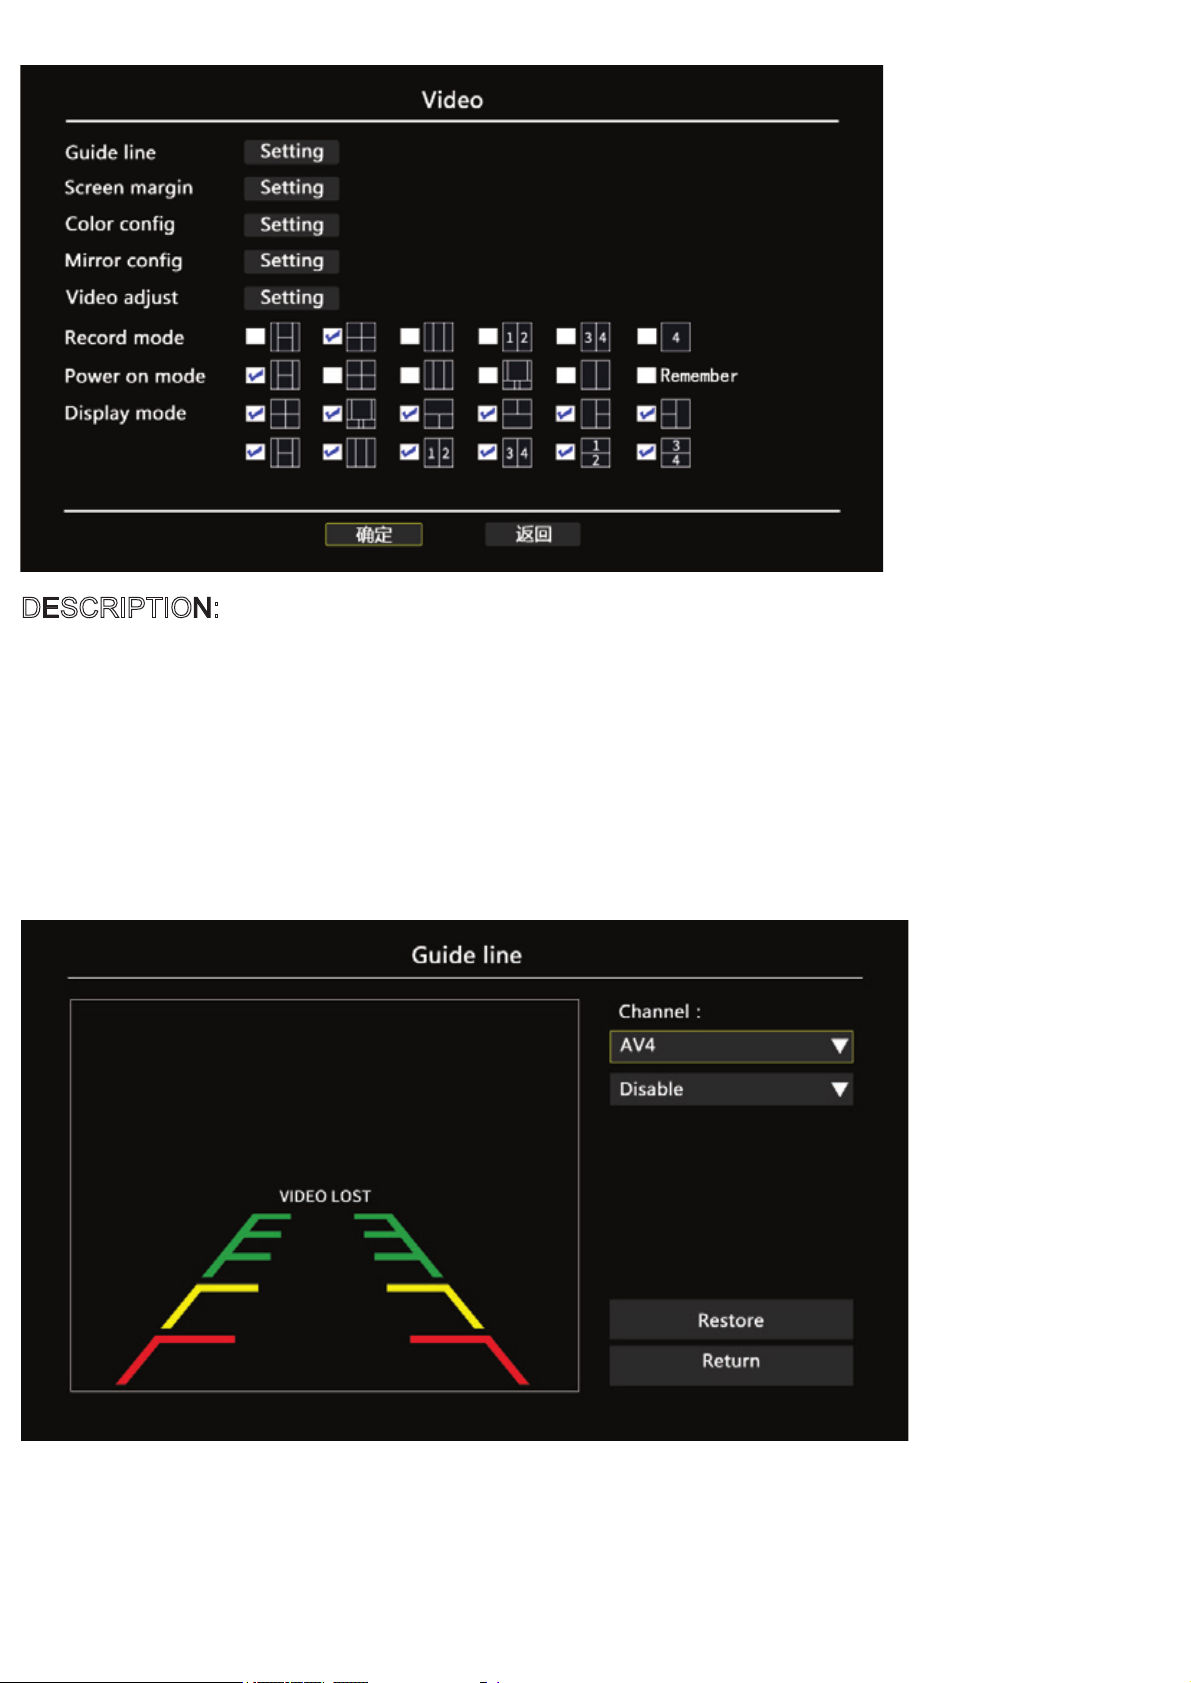
DESCRIPTION:
“Format”: Must Format SD Card for 1st time using
“Upgrade”: To upgrade Record Monitor via USB Port
“Restore”: Click “Confirm” to default factory setup
“Param config”: A. Export: Export Record Monitor parameters by USB Port
B. Import: Import the parameters into Record Monitor by USB Port
NOTED
1.Format SD Card:
2.Car Battery protection
Re:When insert new SD Card for 1st time use,Must format SD Card in the System Setting
Re:DVR can detect Car battery via ACC Port and while car battery voltage is lower DC10.5V,the DVr
will auto shut down to protect the car battery
Re:When we try to back up the recorded video in Dvr, Please kindly format U-Disk on computer in
3.Format U-Disk on Computer to back up:
advance but not format U-Disk on DVR.
Re:When connect I/O Sensor with turning trigger, when alarm trigger, relative video channels will be
4.I/O Trigger for Reversing,Turing etc Operation
full screen, whiel alarm trigger off, relative videos will auto back to normal video mode
Re: The DVR recorded videos without any encryption and can playback 4-ch videos at the same time
5.4-CH record videos to playback at the same time by any player software
by any players, Like media Player software,VLC etc
BACKUP BY USB
STEP-01: Insert USB Disk Into Computer=> Format By Fat32
STEP-02: After Format=>Insert into USB Port Of Monitor => Setup a detail date=> Click “Export” to back up whole
day recorded videos or Search Out videos list=>”Check”=> Click” Backup” button to back up
the recorded videos
Choose a detail day like
2019-11-21
After the date setup, Click ‘export”
to Export the whole day videos
Check Videos list that
you want
Click Backup button to
back up the checked videos
FQA
FAQ-01: Why Start Monitor and then Insert SD Card,Shows “Error” on Monitor?
Feedback: It is Normal because the Monitor Recorder does not support Hot plugin/plug out
Solution: Restart Monitor to recongnize the SD Card
FAQ-02:Why Monitor Record is working,Plugout/Plugin SD Card,The Monitor will auto Restart?
Feedback: A. while working and plugout SD Card, The Monitor Restart to protect Record data Completely
and no video data loss.
B.While working and Plugin SD Card, The Monitor Restart to recongnize the SD Card
FAQ-03: Why format U-Disk on Monitor and can not back up recorded videos
Feedback: When Format U-Disk on Monitor, it will take U-Disk as storage disk for video recording, so it can
not work with video back up. So please kindly format U-Disk on computer and then go on video back up but
must not format on Monitor.
FAQ-04:How to Restart Monitor by Manual when we need?
Feedback: Press “ Power” button on Monitor for 5 seconds, The Monitor will restart.
FAQ-05: How to Playback Recorded videos from SD Card on Computer
Feedback: Needs a Player software to playback the recorded videos
FAQ-06: USB Port for what and can connect with mouse?
Feedback: Yes, The USB Port can work with Mouse to control the Monitor and also can use for video back
up and software upgrade.

Popular Car Video System manuals by other brands

Soundstream VRCPAA-106M owner's manual

Soundstream

Soundstream VRCPAA-106M owner's manual

Kia AVB40D5AN user manual

Kia

Kia AVB40D5AN user manual

Vizualogic Advantage installation manual

Vizualogic

Vizualogic Advantage installation manual

JVC KW-AV71BT Installation & connection manual

JVC

JVC KW-AV71BT Installation & connection manual

VDO MS 5000 - user manual

VDO

VDO MS 5000 - user manual

Phonocar VM012 quick start guide

Phonocar

Phonocar VM012 quick start guide

Polaris ToyotaLUXX user manual

Polaris

Polaris ToyotaLUXX user manual

Rosen Z-Series installation guide

Rosen

Rosen Z-Series installation guide

Rosen AV8900H installation guide

Rosen

Rosen AV8900H installation guide

Emerald QVL-A4L-V6 Specifications & installation

Emerald

Emerald QVL-A4L-V6 Specifications & installation

Advent LCDM40 user manual

Advent

Advent LCDM40 user manual

Bose Soundtouch 525 Service manual

Bose

Bose Soundtouch 525 Service manual

Boss Audio Systems BV7948B user manual

Boss Audio Systems

Boss Audio Systems BV7948B user manual

Hyundai Tucson manual

Hyundai

Hyundai Tucson manual

Farenheit MD-1510CM instruction manual

Farenheit

Farenheit MD-1510CM instruction manual

Blaupunkt DVP 01C operating instructions

Blaupunkt

Blaupunkt DVP 01C operating instructions

Pioneer Super Tuner IIID AVH-P4100DVD Operation manual

Pioneer

Pioneer Super Tuner IIID AVH-P4100DVD Operation manual

Pioneer AVH-P7480DVD owner's manual

Pioneer

Pioneer AVH-P7480DVD owner's manual

manuals.online logo
manuals.online logoBrands
  • About & Mission
  • Contact us
  • Privacy Policy
  • Terms and Conditions

Copyright 2025 Manuals.Online. All Rights Reserved.