Delta Regis DR-TB9K User manual

Delta Regis Tools Inc.
7370 Commercial Circle
Fort Pierce, FL 34951
www.deltaregis.com
1
USER MANUAL
DR-TB9K, DR-TB15K, DR-TB22K, DR-TB30K,
DR-TB40K, DR-TB50K, DR-TB60K, DR-TB70K


Delta Regis Tools Inc.
7370 Commercial Circle
Fort Pierce, FL 34951
www.deltaregis.com
3
Model Capacity Stroke Weight
DR-TB9K 4.5-9.0 kg
9.9-19.8 lbs
1.3 m
4.3
3.4 kg
7.49 lbs
DR-TB15K 9.0-15.0 kg
19.8-33.0 lbs
1.3 m
4.3
3.8 kg
8.37 lbs
DR-TB22K 15.0-22.0 kg
33.0-48.0 lbs
1.5 m
5.0
7.2 kg
15.87 lbs
DR-TB30K 22.0-30.0 kg
48.0-66.0 lbs
1.5 m
5.0
8.5 kg
18.74 lbs
DR-TB40K 30.0-40.0 kg
66.0-88.0 lbs
1.5 m
5.0
9.8 kg
21.60 lbs
DR-TB50K 40.0-50.0 kg
88.0-110.0 lbs
1.5 m
5.0
10.4 kg
22.93 lbs
DR-TB60K 50.0-60.0 kg
110.0-132.0 lbs
1.5 m
5.0
11.6 kg
25.57 lbs
DR-TB70K 60.0-70.0 kg
132.0-154.0 lbs
1.5 m
5.0
11.8 kg
26.01 lbs
Specicaons
• Read all instrucons before operang tool.
• Keep this instrucon manual with your tool.
• These specicaons and design may be changed for improvement without
prior noce.

Delta Regis Tools Inc.
7370 Commercial Circle
Fort Pierce, FL 34951
www.deltaregis.com
4
Contents
1. SAFETY INSTRUCTIONS
1-1. Spring Balancer Installaon......................................................................... 5
1-2. Direcons for the use of Spring Balancer..................................................... 5
1-3. Maintenance and Inspecon....................................................................... 6
1-4. Disposal....................................................................................................... 6
2. USAGE............................................................................................................................... 6
3. CHECK THE CONTENTS OF THE PACKAGE ......................................................................... 6
4. INSTALLATION
4-1 Spring Balancer Installaon (Figure-1)......................................................... 6
4-2 Tool and device aachment & Tension adjustment (Figure-2)..................... 7
4-3 Secure work space ....................................................................................... 7
5. OPERATING INSTRUCTIONS
5-1 Manual Stop Replacement (Figure-3)........................................................... 7
5-2 Tool or Device Replacement ........................................................................ 8
5-3 Cable Replacement (Figure-4)...................................................................... 8
5-4 Safety Device................................................................................................ 9
6. TROUBLESHOOTING
6-1 Safety Device Lock Issues............................................................................. 9
6-2 Soluon for Cable trapped between Drum and Case ................................... 9
6-3 Disassembly and Assembly (Figure-5)........................................................... 9
7. MAINTENANCE AND INSPECTION (Figure-6).................................................................... 10

Delta Regis Tools Inc.
7370 Commercial Circle
Fort Pierce, FL 34951
www.deltaregis.com
5
* Before using your new spring balancer, please read this manual carefully to ensure proper use and
prolong the life of the unit.
The following safety notaons are used throughout the manual to highlight safety precauons for
the user and for the machine.
!
!
!
DANGER
WARNING
CAUTION
DANGER indicates a potenally hazardous situaon which, if not
avoided by following the instrucons given, could result in death or
serious injury .
WARING indicates a potenally hazardous situaon which, if not
avoided by following the instrucons given, could result in death or
serious injury.
CAUTION indicates a potenally hazardous situaon which, if not
avoided by following the instrucons given, could result in injury or
material damage.
1. SAFETY INSTRUCTIONS(Spring Balancer)
Important safety instrucons for all spring balancers. When using spring balancers,
basic safety precauons should always be followed to reduce risk of personal injury.
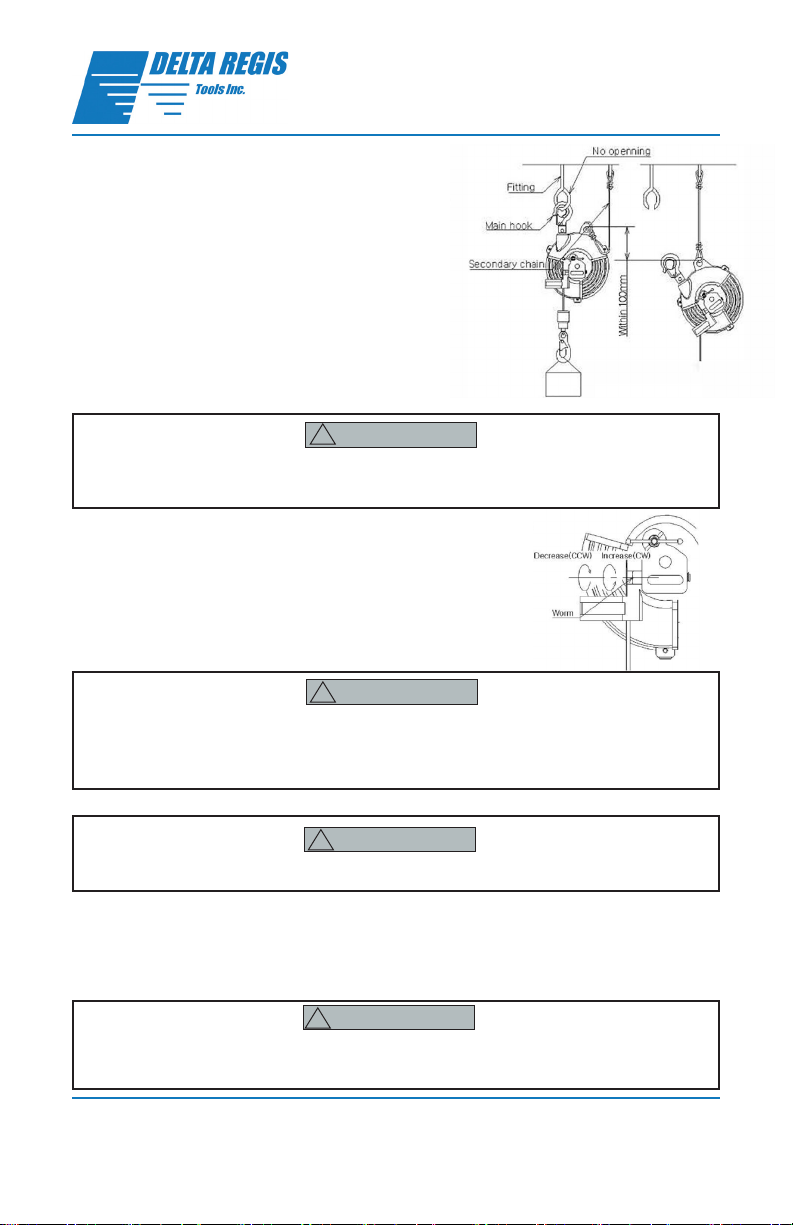
1-1 Spring Balancer Installaon
• Install the balancer correctly. Incorrect installaon could cause personal injury or damage to
the Spring Balancer or other equipment.
• Install secondary wire rope or chain to the spring balancer. If the spring balancer’s main
hanger of ng link is damaged, it could protect workers’ safety from accidents.
• Make sure that the assist wire rope or secondary chain should be mounted
to a dierent locaon than the Spring Balancer’s main hanger.
• Make sure that there is enough slack in assist wire rope or secondary chain, so that it is able
to move freely. ln this installaon, if the main hanger breaks or falls down,
make sure to leave only a small amount of slack to avoid injury.
• Install stronger ng link than the maximum capacity of the Spring Balancer.
• The ng link must be closed so that it does not fall when even Spring Balancer’s shakes.
• Do not x the main hanger of Spring Balancer. Make sure it can swivel freely.
1-2 Direcons for the use of Spring Balancer
• Never pull down the cable while releasing spring tension.
• Never remove the tool from the Spring Balancer’s hook while the cable is extended. The
fast winding of cable could cause personal injury when you let go of the cable.
• Never work right under the suspended spring balancer and tool.
• Never Alter the Spring Balancer.
!WARNING
!WARNING

Delta Regis Tools Inc.
7370 Commercial Circle
Fort Pierce, FL 34951
www.deltaregis.com
6
• Always use within the capacity range of the Spring Balancer.
• Always adjust the spiral spring tension before using the Spring Balancer.
• Do not pull down the cable over its maximum weight.
• Cable should only be pulled straight down.
• Do not use more than two tools for one unit Spring Balancer.
1-3 Maintenance and Inspecon
• Be sure to inspect the Spring Balancer on a regular basis.
• Stop using, if there is abrasion or damage on Cable or Hook.
• Never alter or disassemble the Spring Balancer.
• There is a coil spring in the body of Spring Balancer. If disassembled, the sudden expansion of
the coil spring can cause personal injury.
• If you need your Spring Balancer repaired, contact your sales agency or Delta Regis Tools Inc.
directly
1-4 Disposal
• Contact your disposal dealer, in case of disuse Spring Balancer. There is a sudden expansion of
the coil spring then the balancer is disassembled which can cause injury or damage to property
2. USAGE
A Spring Balancer is a device which suspends a tool above the work area helping to balance the
weight of the tool.
3. CHECK THE CONTENTS OF THE PACKAGE
When you pick the new balancer out from the box, you should check the contents and the
condion such as breakages or oil leakages during transportaon. You may refer the contents to the
part list of manual. If you have any problem with our Spring Balancer, contact your sales agency or
Delta Regis Tools Inc. directly.
4. INSTALLATION
4-1 Spring Balancer Installaon (Figure-I)
• You should install the Spring Balancer that has proper strength and strong ng link for its
capacity range. Anchor should hold at least 10 mes of the strength of the Spring Balancer’s
maximum capacity.
• The ng link must be closed so that it does not fall when even spring balancer is moved.
• Make sure that there is enough slack in assist wire rope or secondary chain, so that the spring
balancer it is able to move freely.
• Do not x the main hanger of spring balancer. Main Hanger should be able to swivel freely.
!CAUTION
!WARNING
!WARNING
!WARNING

Delta Regis Tools Inc.
7370 Commercial Circle
Fort Pierce, FL 34951
www.deltaregis.com
7
1) Aach the main hook of the spring balancer to the
ng link.
2) Make sure the Spring Balancer can move (rotaon or
gradient) freely.
3) Aach an end of the wire rope or secondary chain to
the spring balancer’s body.
4) Aach the other end of the wire rope or secondary
chain to a separate ng link which does not support
the spring balancer.
5) Check the spring balancer is working smoothly with
suspended tool. <Figure-1>
• Use only weights within the capacity range of the Spring Balancer. In this case, calculate
the total weight of tool and accessories (Air hose., wire etc) including the Spring Balancer’s
weight.
4-2 Tool and device aachment & Tension adjustment
1) Make sure that the tool or device weight including accessories
are within the Spring Balancer’s specied range.
2) Adjust the coil spring tension to be in balance with tool or device.
• Adjust the spiral spring tension with Hex. socket screw key(4mm).
• Turn clockwise for increasing the spiral spring tension, and tum
counter-clockwise for decreasing it.
3) Li up the Tool or Device to the ng link. <Figue-2>
• Make sure that there is no person or object under the hook, when you aach the hook or
release the manual stopper lock. lf the weight of the tools or device hanging on the hook is
heavier than the maximum spring tension, it could drop and cause personal injury.
4-3 Secure work space
• Excessive cable’s exposure or the maximum stroke of the cable could cause damage to the Spring
Balancer and its life would be shortened.
• Check that the working range is within cable stroke range.
• If necessary, adjust the height of Spring Balancer or use a suitable Jig between the
hook and tool.
5. OPERATING INSTRUCTIONS
5-1 Manual stop operaon
• Make sure lock is engaged securely. You will hear a click if lock is engaged properly.
!CAUTION
!WARNING
!CAUTION
!DANGER

Delta Regis Tools Inc.
7370 Commercial Circle
Fort Pierce, FL 34951
www.deltaregis.com
8
• Lock operaon
I. Pull out the spring pin, turn it counter-clockwise and
posion in groove.
II. Re-adjust coil spring tension unl you achieve desired
tool balance.
III. Move suspended tool up or down unl spring pin
enters groove and locks.
IV. Move tool again to make sure drum is locked. <Figure-3>
• Release operaon
I. Pull out the spring pin and turn clockwise unl it is back in release groove.
II. when spring pin moves into release groove the drum is released.
5-2 Tool or device replacement
• Never remove the suspended tool or device before making sure the drum lock is engaged
• Never release drum lock when the spring balancer is unloaded. If released, the fast winding of
the cable can lead to injury.
I. Lock the drum similar to “5-1 Manual Stop Operaon” and remove the suspended tool
or device.
II. Before aaching, ensure total weight of new tool or device, including all accessories, are
within the specied weight capacity of the spring balancer.
III. Adjust the coil spring tension at the same me turning the worm gear with wrench and
refer to gauge scale. Clockwise for increasing tension and counter-clockwise
for decreasing tension.
5-3 Cable replacement
• Cable replacement can be done without the product disassembly. If you need to disassemble
refer to “6-3 Disassembly and Assembly (Figure-5)”.
I. Pull down the cable to the maximum cable travel and
then engage manual stop.
II. Aer making sure the drum is locked, remove the tool
or device.
III. Remove the cable set bolt (plug) and pull out the cable
from the drum.
IV. Separate the collar and shock absorber from old cable
and assemble the new cable.
V. Aach the cable to the drum on inside of the housing.
VI. Assemble the cable set bolt (plug)
VII. Aer aaching the tool or device to the hook,
release the drum lock by using the manual stop.
!DANGER
!CAUTION

Delta Regis Tools Inc.
7370 Commercial Circle
Fort Pierce, FL 34951
www.deltaregis.com
9
5-4 Safety Device
• Never remove the spiral spring from the spring case. Contact your sales agency or Delta Regis
Tools Inc. directly for repair or replacement.
6. TROUBLESHOOTING
• Stop working and take precauons when you have trouble in using Spring Balancer.
• Never release Tool or Device unl you nd out the cause of trouble.
Condition Cause Solution
Cable is not moving
e manual stop has been
engaged
Release manual stop (Refer to
item 5-1)
e cable is stuck between
drum and housing
Release the tension of the coil
spring and wind cable again.
(Refer to item 6-1)
Cable is only moving slightly
e tension of the coil spring
is set too low and the safety
device lock is in use
Release safety device lock
(Refer to item 6-1)
e spring is damaged and the
safety device lock is in use
Replace coil spring (Refer to
item 5-4)
6-1 Soluons for Safety Device Lock
Safety lock will engage if it senses low tension of the Coil Spring.
I. Check that the scale of gauge was not set at less than the minimum weight.
II. Move the suspended tool upward and downward and turn the worm gear in
clockwise direcon to raising the tension of the spiral spring unl it escapes LOCK point.
III. Conrm that the safety device is not locked in any secon of the stroke.
IV. When the safety device pin is locked under the minimum weight, the capacity range
of coil spring is too high for the weight of the tool. You should then change to a balancer
that has a lower weight capacity.
In the case that the coil spring is damaged.
I. Conrm the scale of the gauge is set inside of the capacity range.
II. Replace the coils spring. Refer to item “6-3 Cover Disassembly”
6-2 Soluon for cable stuck between drum and case
I. Pull down the cable when the tool is suspended on it.
II. Once cable is extended you can replace the cable aer disassembly (Refer to 6-3).
III. Replace cable if any signs of wear and tear occur.
6-3 Disassembly and assembly
I. Adjust the worm unl the tension of spring is situated at zero
II. Remove the E-RING at the end of the worm gear.
III. Release the bolt which connects the case and the cover and
disassemble the cover.
IV. The assembly is in reverse order of disassembly.
!WARNING
!WARNING

Delta Regis Tools Inc.
7370 Commercial Circle
Fort Pierce, FL 34951
www.deltaregis.com
10
7. MAINTENANCE & INSPECTION
Periodically (Recommended every 30 days) inspect balancer and replace any damaged parts


Delta Regis_DR-TB9-70K_M_0.0
Delta Regis Tools Inc.
7370 Commercial Circle
Fort Pierce, FL 34951
www.deltaregis.com
This manual suits for next models
7
Table of contents
Other Delta Regis Tools manuals
Popular Tools manuals by other brands

Redback
Redback RB202 Instruction & maintenance manual

Marsh
Marsh R owner's manual

pela tools
pela tools 489050 manual

Clarke
Clarke Metalworker CPTN1 Operation & maintenance instructions

Würth
Würth BMH 45-XE operating instructions

Christie
Christie Easy Petrol Post Driver CHPD78-1 Safety, operation & maintenance instructions