K-Rain KR1125 User manual

3 of 16
Contents
Overview 4
Introduction 4
Safety Warnings 4
Main Components 5
Features 6
Installation 7
Plan your Hose Reel Installation 7
Adjusting Guide Arm 8
Attaching the Tap-to-Reel Hose 9
Mounting Hose the Reel 9
Operation 12
Locking the Hose Reel 12
Retracting the Hose Reel 12
Maintenance 13
Heavy Duty Hose 13
Warranty 14
2 Year Replacement Warranty - Reel 14
10 Year Replacement Warranty - Hose 15
Product code: KR1125
Made from premium
materials and ideal for
vehicle mount, this Hose
Reel is built with
landscapers in mind.
Scan to learn more.
RETRACTABLE
HOSE REEL 20m
THE LANDSCAPER’SCHOICE

4 of 16
Overview
Introduction
Your K-RAIN 20m Heavy Duty Retractable Hose Reel uses
a 12mm Premium 20m Trade Hose with a PVC core and woven
reinforcing for added strength and durability, rated to 700kPa.
®This instruction manual contains useful information on the proper use
and care of this product. Please read through all instructions before
attempting to use the 20m Heavy Duty Retractable Hose Reel.
Please keep this user guide handy for future use
Safety Warnings
ÁDo not exceed the maximum working pressure of 700kPa
ÁDo not leave the tap on–turn tap off after use and release
excess pressure before retracting hose back into Hose Reel
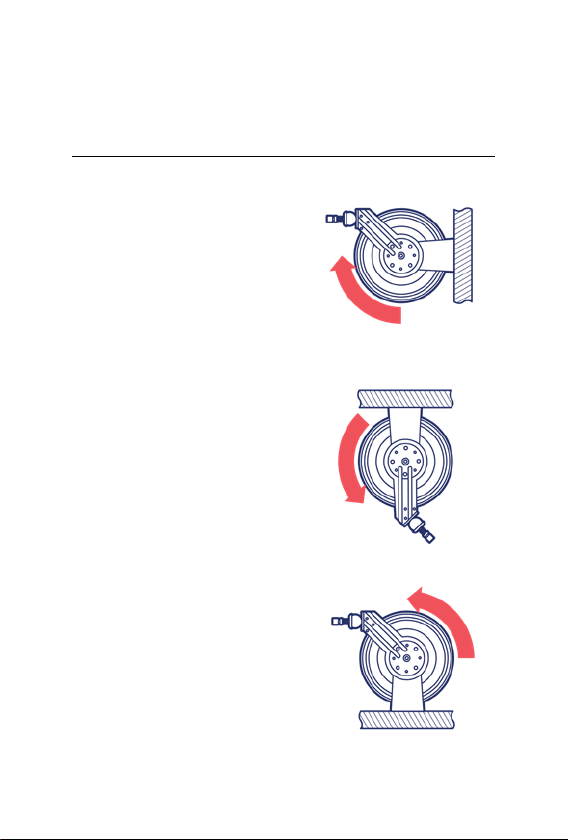
ÁMake sure the Hose Reel is mounted to
a stable surface before use
ÁDo not allow the hose to retract without
controlling the recoil speed
ÁDo not let go of the hose when rewinding
ÁKeep children clear of work areas at all times
Á3°C minimum working temperature

5 of 16
Main Components
1. Mounting Bracket
2. 20m Outlet Hose
3. 2m Tap-to-Reel Hose
4. Guide Arm
5. Stopper
6. 2× 12mm Hose Connectors
7. 20/25mm Tap Adaptor
8. Threaded Connector
9. 4× 14mm Metal Sleeves
10. 4× M10 80mm
Mounting Bolts
11. 4× 10mm Washers
12. 4× 10mm Spring Washers
13. 4× M10 Hex Nuts
1
2
6
910 11
12 13
5
4
7
8
6
3
Overview (Continued)

6 of 16
Overview (Continued)
Features
LHeavy duty metal
construction
LIdeal for vehicle mount
in utes or work vans
LReconfigure mount
angles for wall, floor
or ceiling mount
LSpring loaded rewind
assist mechanism
LRatchet locking mechanism
to lock in any position
LPremium 20m Trade
Hose includes PVC core
with woven reinforcing
LTap-to-reel leader
hose included

7 of 16
Installation
Plan your Hose Reel Installation
®Your Hose Reel should
be installed nearest to
your water source for
convenience of use
1. Hose Reel can be mounted
on the floor, ceiling or wall
®Mount Hose Reel to a load-
bearing structure capable
of supporting the combined
weight of your reel, hose,
and forces caused by pulling
or manoeuvring the hose
2. Consult the chart on
the left and choose the
diagram that most closely
matches your mounting
position. If necessary,
adjust GUIDE ARM position
to match diagram
Wall
Ceiling
Floor/Bench

8 of 16
Installation (Continued)
Adjusting Guide Arm
1. Pull out 1 metre of hose
and allow Hose Reel
to lock in position
2. Remove the four
bolts connecting
GUIDE ARM [a] to
MOUNTING BRACKET [b]
3. Rotate GUIDE ARM in
90° increments to desired
position. Replace four
bolts and tighten
b
a
1m

9 of 16
Installation (Continued)
Mounting Hose the Reel
1. Check the TAP-TO-REEL
HOSE can reach your
tap prior to installing the
MOUNTING BRACKET
2. Mark inside the centre of
each of the bracket holes
to prepare for drilling
3. Use the table below to
select the correct drill
bit for your Hose Reel
®It is very important to use the correct size drill bit, for
a very secure fit of the MOUNTING BRACKET
SLEEVE 14.0mm
MASONRY DRILL 14.0mm
BOLT 15.0mm
MAX 2m
Attaching the Tap-to-Reel Hose
®To connect the hose reel
to a tap, first assemble
the Tap-to-Reel Hose
onto the side inlet
®Use a 17mm or shifting
spanner to ensure the hose
is tight and leak-free

10 of 16
Installation (Continued)
Mounting the Hose Reel (continued)
4. When ready, drill all four
holes, then hammer
MOUNTING BOLTS
and METAL SLEEVES [a]
gently into wall
(if attaching to a wall)
®If using bolts and plugs
that were not included
with your Hose Reel,
drill slightly under size
as masonry materials all
have different properties
which will ensure the wall
plugs have a secure fit
5. Tighten HEX NUTS [b]
onto MOUNTING BOLTS
to splice METAL SLEEVES
and secure MOUNTING
BOLTS to wall
6. Loosen HEX NUTS [c]
and remove to attach
MOUNTING BRACKET
a
b
c

Installation (Continued)
Mounting the Hose Reel (continued)
7. Put MOUNTING
BRACKET[d] on
MOUNTING BOLTS [e] and
fit SPRING WASHERS[f],
WASHERS[g] and
HEX NUTS [h]
8. Tighten HEX NUTS [i] using
a spanner to secure to wall
9. Connect TAP-TO-REEL
HOSE to your water source
i
d
fh
eg

12 of 16
Operation
Locking the Hose Reel
1. To check if the Hose Reel is
working properly, pull on
the hose slowly. The reel
will click at every half
revolution of the drum
2. To lock the Hose Reel, pull
on the hose and allow it to
retract after 1 to 3 clicks
Retracting the Hose Reel
1. To retract the Hose Reel,
turn off the tap and press
the level on watering
gun (not included) to
release water pressure
®This makes the retraction
of the hose a lot easier
and prolongs the life
of your Hose Reel
2. Pull the hose until the
clicking stops. Control
the hose as it retracts
ÁDo not let go of the hose
when rewinding, always
guide back into Hose Reel
®Feed hose from left to right
to evenly layer hose when
retracting hose back into reel

13 of 16
Heavy Duty Hose
®Maintain the product with care. Inspect hose periodically and,
if damaged, have it repaired by an authorized technician
ÁDo not leave the water turned on with the
hose under pressure when not in use
ÁAlways turn the water off and release all of
the water from the hose after use
ÁDo not attempt to pull Hose Reel apart
ÁAlways guide the HEAVY DUTY HOSE back into the Hose Reel
Maintenance

14 of 16
2 Year Replacement Warranty - Reel
Holman offers a 2 year
replacement guarantee
with this product.
In Australia our goods come
with guarantees that cannot be excluded
under the Australian Consumer Law. You
are entitled to a replacement or refund
for a major failure and compensation for
any other reasonably foreseeable loss or
damage. You are also entitled to have the
goods repaired or replaced if the goods
fail to be of acceptable quality and the
failure does not amount to a major failure.
As well as your statutory rights referred
to above and any other rights and
remedies you have under any other laws
relating to your Holman product, we also
provide you with a Holman guarantee.
Holman guarantees this product against
defects caused by faulty workmanship and
materials for 2 years domestic use from the
date of purchase. During this guarantee
period Holman will replace any defective
product. Packaging and instructions
may not be replaced unless faulty.
In the event of a product being replaced
during the guarantee period, the
guarantee on the replacement product
will expire 2 years from the purchase
date of the original product, not 2
years from the date of replacement.
To the extent permitted by law, this Holman
Replacement Guarantee excludes liability
for consequential loss or any other loss or
damage caused to property of persons
arising from any cause whatsoever. It
also excludes defects caused by the
product not being used in accordance with
instructions, accidental damage, misuse,
or being tampered with by unauthorised
persons, excludes normal wear and tear
and does not cover the cost of claiming
under the warranty or transporting the
goods to and from the place of purchase.
Warranty
2
REEL
WARRANTY

15 of 16
10 Year Replacement Warranty - Hose
Holman offers a 10 year
replacement guarantee
with this product.
In Australia our goods come
with guarantees that cannot be excluded
under the Australian Consumer Law. You
are entitled to a replacement or refund
for a major failure and compensation for
any other reasonably foreseeable loss or
damage. You are also entitled to have the
goods repaired or replaced if the goods
fail to be of acceptable quality and the
failure does not amount to a major failure.
As well as your statutory rights referred
to above and any other rights and
remedies you have under any other laws
relating to your Holman product, we also
provide you with a Holman guarantee.
Holman guarantees this product
against defects caused by faulty
workmanship and materials for 10
years domestic use from the date of
purchase. During this guarantee period
Holman will replace any defective
product. Packaging and instructions
may not be replaced unless faulty.
In the event of a product being replaced
during the guarantee period, the
guarantee on the replacement product
will expire 10 years from the purchase
date of the original product, not 10
years from the date of replacement.
To the extent permitted by law, this Holman
Replacement Guarantee excludes liability
for consequential loss or any other loss or
damage caused to property of persons
arising from any cause whatsoever. It
also excludes defects caused by the
product not being used in accordance with
instructions, accidental damage, misuse,
or being tampered with by unauthorised
persons, excludes normal wear and tear
and does not cover the cost of claiming
under the warranty or transporting the
goods to and from the place of purchase.
Should you suspect your product may
be defective and need some clarification
or advice please contact us directly:
1300 716 188
support@holmanindustries.com.au
11 Walters Drive, Osborne
Park 6017 WA
If you are certain your product is
defective and is covered by the terms
of this warranty, you will need to
present your defective product and
your purchase receipt as proof of
purchase to the place you purchased
it from, where the retailer will replace
the product for you on our behalf.
Warranty (Continued)
10
HOSE
WARRANTY

We really appreciate having you
as a customer and would like to
say thank you for choosing us.
We recommend registering your new
product on our website. This will ensure
we have a copy of your purchase
and activate an extended warranty.
Keep up to date to with relevant
product information and special offers
available through our newsletter.
Scan here, or visit
k-rain.com.au/register
for more info
Table of contents
Popular Tools manuals by other brands

Princess auto
Princess auto mr.blacksmith owner's manual

Westfalia
Westfalia 67 59 34 instruction manual

Atlas Copco
Atlas Copco PRO P2536-H instructions

Wolfcraft
Wolfcraft MASTER cut 1000 Translation of the original operating instructions

EINHELL
EINHELL NRTC 800 UL operating instructions

Komet
Komet DIHART DAH 50 HS Operating instruction