manuals.online logo
Brands
  1. Home
  2. •
  3. Brands
  4. •
  5. OEM Tools
  6. •
  7. Tools
  8. •
  9. OEM Tools 25727 Service manual

OEM Tools 25727 Service manual

UNPACKING
After unpacking the unit, inspect carefully for any damage that
may have occurred during transit. Check for loose, missing,
or damaged parts. If any damage is observed, a shipping
damage claim must be filed with the carrier. DO NOT use
the OEMTOOLS™25727 Mini Grease Gun if broken, bent,
cracked or damaged parts (including labels) are noted. Any
Grease Gun that appears damaged in any way, operates
abnormally or is missing parts should be removed from
service immediately. If you suspect that the Grease Gun was
subjected to shock load (a load that was dropped suddenly,
unexpectedly, etc.), immediately discontinue use until it has
been checked by a factory authorized service center.
Please read and save these instructions. Read through this owner’s manual carefully before using product. Protect yourself and
others by observing all safety information, warnings, and cautions. Failure to comply with instructions could result in personal
injury and/or damage to product or property. Please retain instructions for future reference.
The following safety information is provided as a guideline to help you operate your Grease Gun under the safest possible
conditions. Any tool or piece of equipment can be potentially dangerous to use when safety or safe handling instructions are
not known or not followed. The following safety instructions are to provide the user with the information necessary for safe
use and operation. Please read and retain these instructions for the continued safe use of your Grease Gun. Failure to follow
instructions listed below may result in serious injury. In addition, make sure that anyone who uses the equipment understands
and follows these safety instructions as well.
Operating Instructions and Parts Manual 25727
FOR CUSTOMER SERVICE
Technical Question?
CALL 1-866-458-2472
[email protected]
Thank you very much for choosing an OEMTOOLS™Product!
For future reference, please register your new tool at www.oem-tools.com and complete the owner’s record below:
Model: _______________ Purchase Date: ___________
Save the receipt, warranty and these instructions. It is important that you read the entire manual to become familiar with this product
before you begin using it. This product is designed for certain applications only. OEMTOOLS™cannot be responsible for issues
arising from modification. We strongly recommend this product is not modified and/or used for any application other than that for
which it was designed. If you have any questions relative to a particular application, DO NOT use the product until you have first
contacted customer service to determine if it can or should be performed on the product.
Explanation of Safety Signal Words
WARNING:Indicates a potentially hazardous situation which, if not avoided, could result in death or serious injury.
CAUTION:Indicates a potentially hazardous situation which, if not avoided, may result in minor or moderate injury.
CAUTION:Used without the safety alert symbol indicates a potentially hazardous situation which, if not avoided, may result
in property damage.
NOTES:Provide clarity and helpful information.
MINI GREASE GUN
1
3/18
2018 OEMTOOLS™
WARNING
2
Operating Instructions and Parts Manual 25727
3/18
2018 OEMTOOLS™
MINI GREASE GUN
IMPORTANT INSTRUCTIONS
AND SAFETY RULES
1. Know your product. Read this manual carefully. Learn
the product’s applications and limitations, as well as
potential hazards specific to it.
2. Keep work area clean and well lit. Cluttered or dark
work areas invite accidents.
3. Keep children away. All children should be kept away
from the work area. Never let a child handle tools or
equipment without strict adult supervision.
4. DO NOT operate this product if under the influence of
alcohol or drugs. Read warning labels on prescriptions
to determine if your judgment or reflexes are impaired
while taking drugs. If there is any doubt, DO NOT
attempt to operate.
5. Use safety equipment. Eye protection should be
worn at all times when operating this tool. Use ANSI
approved safety glasses. Everyday eyeglasses are
NOT safety glasses. Dust mask, non-skid safety
shoes, hard hat or hearing protection should be used
in appropriate conditions.
6. Wear proper apparel. Loose clothing, gloves, neck-ties,
rings, bracelets or other jewelry may present a potential
hazard when operating this product. Keep all apparel
clear of the product.
7. DO NOT overreach. Keep proper footing and balance
at all times when operating this product.
8. Check for damage. Check equipment regularly. If
part of the product is damaged, it should be carefully
inspected to make sure that it can perform its
intended function correctly. If in doubt, discontinue
use of product.
9. Keep away from flammables. DO NOT attempt to
operate this product near flammable materials or
combustibles. Failure to comply may cause serious
injury or death.
10. Store this product out of the reach of children and
untrained persons. This product may be dangerous in
the hands of untrained users.
11. Keep this product dry and clean.
12. Use only accessories that are recommended by the
manufacturer for your model. Accessories that may be
suitable for one product may become hazardous when
used on another product.
13. Service must be performed only by qualified repair
personnel. Service or maintenance performed by
unqualified personnel could result in a risk of injury.
14. When servicing a product, use only identical
replacement parts. Use of unauthorized parts or
failure to follow maintenance instructions may create
a risk of injury.
15. Maintain a safe working environment. Keep the work
area well lit. Make sure there is adequate surrounding
workspace. Keep the work area free of obstructions,
grease, oil, trash, and other debris. Do not use this
product in a damp or wet location.
16. Maintain labels and nameplates on this product. These
carry important information. If unreadable or missing,
contact OEMTOOLS™for a replacement.
17. Keep this product dry, clean, and free from brake fluid,
oil, and grease.
18. Avoid accidental fire. DO NOT smoke near this product.
19. The warnings, precautions, and instructions discussed
in this manual cannot cover all possible conditions
and situations that may occur. The operator must
understand that common sense and caution are factors
which cannot be built into this product, but must be
supplied by the operator.
20. We believe the information contained herein to be
reliable. However, general technical information is given
by us without charge and the user shall employ such
information at their own discretion and risk. We assume
no responsibility for results or damages incurred from
the use of such information in whole or in part.
21. The manufacturer declines any and all responsibility
for property damage or injury if said damage is the
result of unskillful handling by the operator or of
failure to observe the basic safety rules set forth in the
instruction manual.
22. The procedures documented in this manual are to
serve as guidelines for the use of this equipment.
23. The use of this equipment is simple and straightforward
if you follow the instructions. When operating this
equipment, use common sense, and only use this
equipment for its intended purpose.
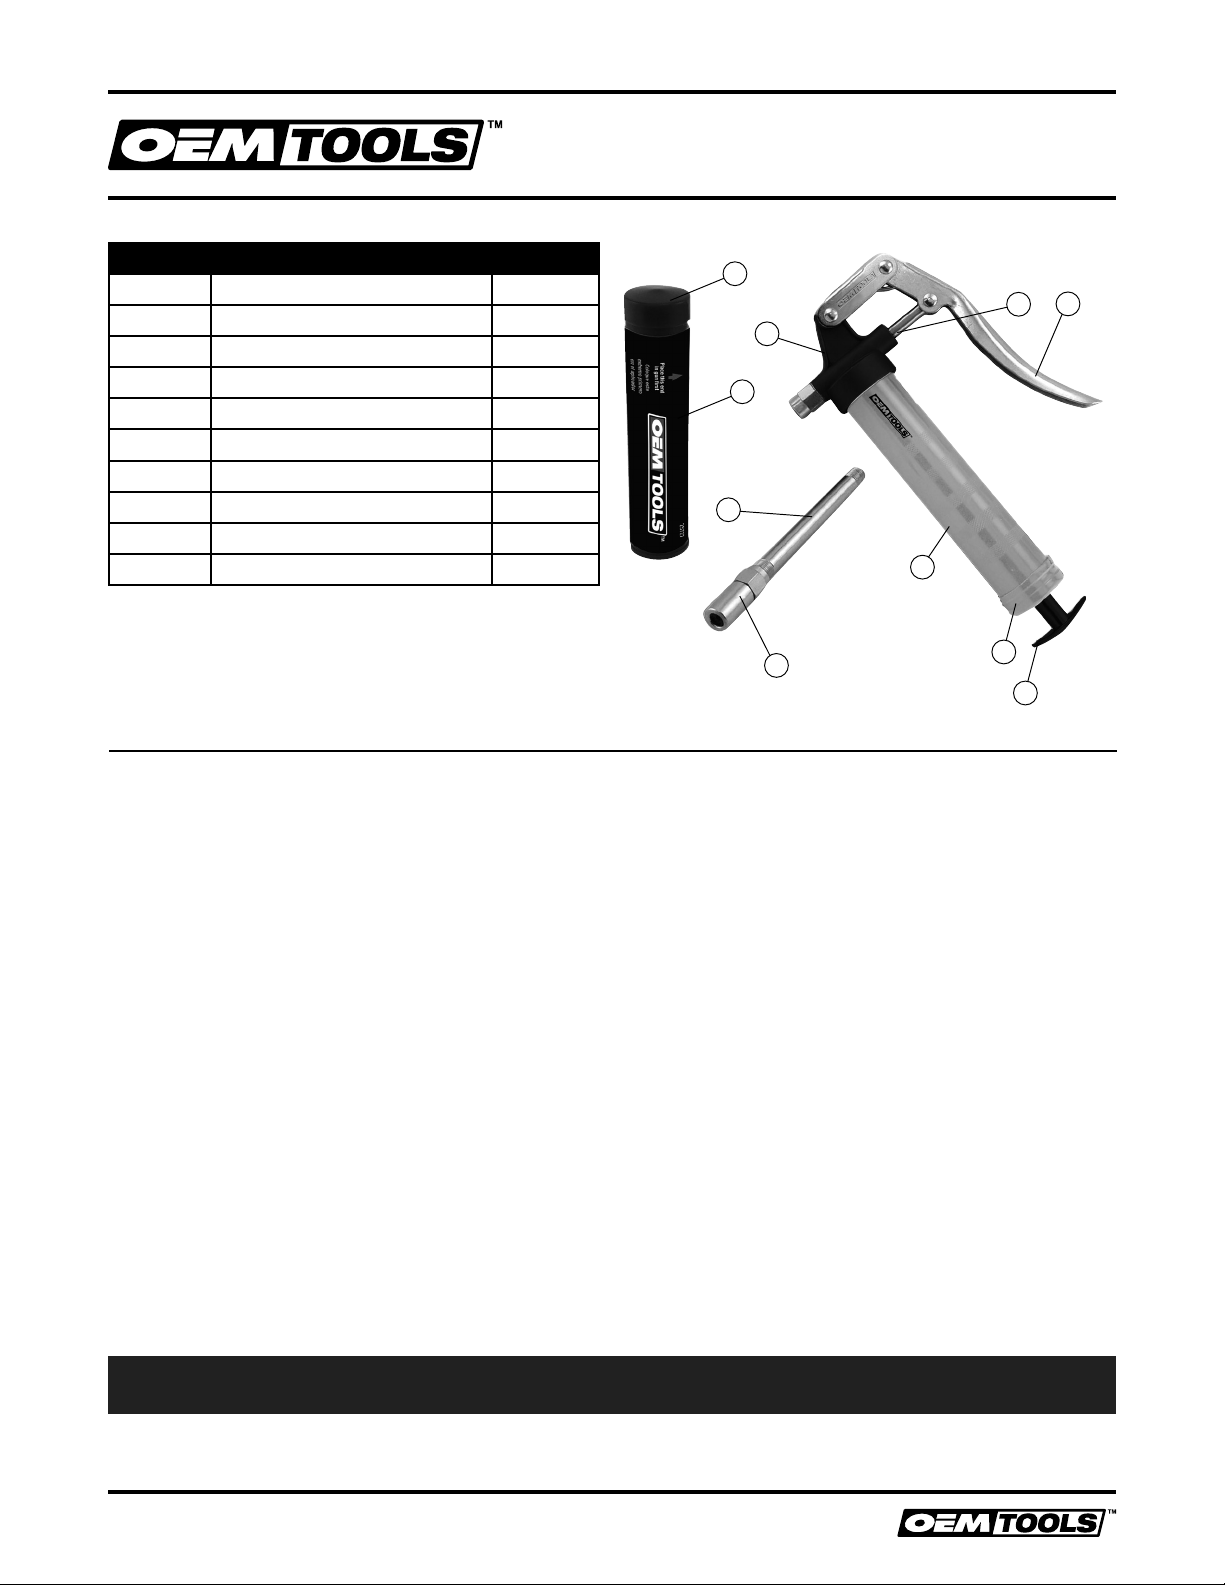
PRODUCT DESCRIPTION
The OEMTOOLS™25727 Mini Grease Gun is designed
to get into tight areas that cannot be serviced by regular
grease guns. The set includes the OEMTOOLS™25727
Mini Grease Gun and a 3 Oz. standard cartridge of yellow
lithium grease for light duty applications.
PRODUCT SPECIFICATIONS
Grease Capacity 3 Oz.
Grease Type Yellow Lithium
(3 Oz. cartridge included)
Adapters Included 4.75" Extension
(total length including coupler)
Pressure Rating 1,500 PSI
Grease Application Light duty farm, automotive,
industrial and construction
equipment
Dimensions 9.5" (L) x 5" (W) x 1.5"
(cylinder diameter)
Product Weight 1.5 Lbs.
(3 Oz. Grease Cartridge included)
CONTENTS
(1) Mini Grease Gun, (1) Extension, (1) 3 Oz. Yellow
Lithium Grease Cartridge, (1) Instruction Manual
SPECIFIC SAFETY INSTRUCTIONS
WARNING:Thoroughly read and understand the
product manual prior to attempting use.
WARNING:Do not use near an open flame.
3
Operating Instructions and Parts Manual 25727
3/18
2018 OEMTOOLS™
MINI GREASE GUN
WARNING: If lubricating automotive parts, always
reference the vehicle maintenance manual prior to use.
WARNING: If lubricating automotive parts, always be
cautious of moving parts and pinch points.
WARNING: If lubricating automotive parts, park the
vehicle on a level surface, turn the vehicle off, and chock
all wheels prior to performing vehicle maintenance.
WARNING: Pressure will build within the Grease
Gun during normal use. Keep extremities clear of the
extension or adapters during use, as pressure may cause
these fittings to burst or abruptly detach from the Head
Assembly.
GREASE GUN CARTRIDGE INSTALLATION
INSTRUCTIONS
1. Unscrew the Head Assembly from the Cylinder of the
Grease Gun.
2. While supporting the Cylinder with one hand, slowly
pull back the Follower Rod until fully extended. There is
a narrow groove at the end of the Follower Rod that will
lock into the End Cap of the Cylinder.
3. While supporting the Follower Rod with constant
tension, allow the Follower Rod to lock into place.
WARNING:DO NOT place fingers between the
Follower Rod and End Cap. If the locking mechanism fails
or the Follower Rod is released prematurely, the spring-
loaded Following Rod will recoil rapidly which may cause
personal injury.
4. Remove the Plastic Cap from the Grease Cartridge.
Insert the open end into the open Cylinder of the
Grease Gun. Allow the bottom of the Cartridge to
contact the lower rim of the Cylinder.
5. Remove the seal from the top of the Grease Cartridge.
6. Screw the Head Assembly back onto the Cylinder.
Tighten completely, then unscrew about 1.5-2 turns.
NOTE: The Head Assembly needs to be loose to allow air
to bleed from the Cylinder.
7. Pull the Follower Rod and release locking mechanism.
Carefully allow the Follower Rod to retract into the
Cylinder.
NOTE: Air will leave the Cylinder as the grease is pushed
to the Head Assembly.
8. Once air is released completely, tighten the Head
Assembly completely.
9. Pump the Lever Handle repeatedly, pressure will build
and grease will begin to flow from the Coupler.
PRODUCT MAINTENANCE
1. Prior to each use, inspect the Grease Gun for damage
and misaligned/leaking connections. Discontinue use
if any damage that will affect the performance of the
Grease Gun is noted.
2. Check Coupler for any dirt or debris. Use a clean, dry
cloth to remove.
3. After each use and extended periods of storage, use a
clean, dry cloth to wipe all grease and debris from the
Grease Gun.
DISPOSAL
At the end of the useful life of the OEMTOOLS™ Mini
Grease Gun, dispose of the components in accordance
with all federal, state and local regulations.
TROUBLESHOOTING
Problem Causes Solutions
Grease Gun fails
to dispense grease
Cold grease Allow grease to warm
(DO NOT attempt to heat Grease Gun)
Air is trapped in Cylinder Loosen head, repeatedly pull the Follower Rod and
allow to retract. This will “bleed” the trapped air.
Grease Gun Coupler/
Extension is blocked
Clean dirt and debris from the Head Assembly and
Coupler/Extension
No suction/tension when
the Lever Handle is operated Piston is damaged Replace Grease Gun
Grease leaks from the back
of the gun
Grease is too thin
for use with this Grease Gun Use a thicker grease
4
Operating Instructions and Parts Manual 25727
3/18
2018 OEMTOOLS™
MINI GREASE GUN
PARTS DESCRIPTION
PRODUCT LAYOUT
CONTACT US
3580 E. Raines Road, Suite 3, Memphis, TN 38118
Tel: 1-866-458-2472
www.oem-tools.com
OEMTOOLS™Limited Lifetime Warranty
For as long as you own this OEMTOOLS™product, if you find any defect in material or workmanship, through normal
usage, return it to the place of purchase or to OEMTOOLS™for repair or replacement at our discretion. In order to
obtain this service, send your tool and proof of purchase (transportation pre-paid) to:
OEMTOOLS™Q.A. Dept., 3580 E. Raines Road #3, Memphis, TN 38118.
We will not be responsible for lost or damaged goods during transportation; please insure your package. If our
inspection verifies the defect, we will either repair or replace the product, or we may elect to refund the purchase price
if we cannot readily and quickly provide you with a replacement. We will return repaired products at our expense, but if
we determine there is no defect, or that the defect resulted from causes not within the scope of our warranty, then you
must bear the cost of returning the product.
OEMTOOLS™does not provide warranty for products labeled other than OEM®or OEMTOOLS™. OEMTOOLS™will
not provide any warranty for products subjected to abnormal use. Abnormal use includes (but is not limited to) abuse,
accident, alteration, neglect, and unauthorized or unreasonable use or repairs. This warranty does not cover bits,
blades, files, batteries, or calibration. We recommend that you maintain your tools and sharpen or replace blades, bits,
files, and batteries as necessary. OEMTOOLS™reserves the right to make any changes in construction or design at
any time without any obligation in incorporating such changes to tools or equipment previously sold.
OEMTOOLS™makes every effort to ensure that its products meet high quality and durability standards, and warrants
to the original purchaser that this product is free from defects in materials and workmanship for the period of one
year from the date of purchase. This warranty does not apply to damage due directly or indirectly to misuse, abuse,
negligence or accidents, repairs or alterations outside our facilities, criminal activity, improper installation, normal wear
and tear or to lack of maintenance.
We shall in no event be liable for death, injuries to persons or property, or for incidental, contingent, special or
consequential damages arising from the use of our product. Some states do not allow the exclusion or limitation of
incidental or consequential damages, so the above limitation of exclusion may not apply to you. THIS WARRANTY
IS EXPRESSLY IN LIEU OF ALL OTHER WARRANTIES, EXPRESS OR IMPLIED, INCLUDING THE WARRANTIES OF
MERCHANTABILITY AND FITNESS. This warranty gives you specific legal rights, and you may also have other rights,
which vary from state to state.
Don’t forget to register your new OEMTOOLS™product at www.oem-tools.com.
Figure Description Quantity
A Head Assembly 1
B Piston 1
C Lever Handle 1
D Cylinder 1
E End Cap 1
F Follower Rod 1
G Extension 1
H Coupler 1
I 3 Oz. Grease Cartridge 1
J Grease Cartridge Cap 1
J
I
G
A
H
D
F
E
BC

Other OEM Tools Tools manuals

OEM Tools 27400 Service manual

OEM Tools

OEM Tools 27400 Service manual

OEM Tools 24449 Service manual

OEM Tools

OEM Tools 24449 Service manual

OEM Tools 24415 Service manual

OEM Tools

OEM Tools 24415 Service manual

OEM Tools 24562 Service manual

OEM Tools

OEM Tools 24562 Service manual

OEM Tools 27402 Service manual

OEM Tools

OEM Tools 27402 Service manual

OEM Tools 25136 Service manual

OEM Tools

OEM Tools 25136 Service manual

OEM Tools 24219 Service manual

OEM Tools

OEM Tools 24219 Service manual

OEM Tools 87030 Service manual

OEM Tools

OEM Tools 87030 Service manual

OEM Tools 87009 Service manual

OEM Tools

OEM Tools 87009 Service manual

OEM Tools 24820 Service manual

OEM Tools

OEM Tools 24820 Service manual

OEM Tools 25818 Service manual

OEM Tools

OEM Tools 25818 Service manual

OEM Tools 25106 Service manual

OEM Tools

OEM Tools 25106 Service manual

OEM Tools ViperFlex 24424 User manual

OEM Tools

OEM Tools ViperFlex 24424 User manual

OEM Tools 27407 Service manual

OEM Tools

OEM Tools 27407 Service manual

OEM Tools 24794 Service manual

OEM Tools

OEM Tools 24794 Service manual

Popular Tools manuals by other brands

ICON 58117 Owner's manual & safety instructions

ICON

ICON 58117 Owner's manual & safety instructions

Hilti DX 5 GR manual

Hilti

Hilti DX 5 GR manual

UllMann E-CART-1 Quick user guide

UllMann

UllMann E-CART-1 Quick user guide

Leigh FMT PRO ADJUSTMENTS

Leigh

Leigh FMT PRO ADJUSTMENTS

Eurotops 44161 manual

Eurotops

Eurotops 44161 manual

Signode Josef Kihlberg JK35T590 operating instructions

Signode

Signode Josef Kihlberg JK35T590 operating instructions

HOLZMANN MASCHINEN HOB305PRO-SMW2 manual

HOLZMANN MASCHINEN

HOLZMANN MASCHINEN HOB305PRO-SMW2 manual

Neogen Ideal Prima 332240 instruction manual

Neogen

Neogen Ideal Prima 332240 instruction manual

Nederman 883 user manual

Nederman

Nederman 883 user manual

Arrow Master 1350 Service manual

Arrow Master

Arrow Master 1350 Service manual

Milwaukee M12 FPTR Operator's manual

Milwaukee

Milwaukee M12 FPTR Operator's manual

Marathon 105-DT01 quick start guide

Marathon

Marathon 105-DT01 quick start guide

Bostitch 750S5 Operation and maintenance manual

Bostitch

Bostitch 750S5 Operation and maintenance manual

Z.R. Tools ZL90-1 Operation manual

Z.R. Tools

Z.R. Tools ZL90-1 Operation manual

Hitachi S 18SB parts list

Hitachi

Hitachi S 18SB parts list

Beta 1948 instructions

Beta

Beta 1948 instructions

Goodyear 27517152G instruction manual

Goodyear

Goodyear 27517152G instruction manual

iKoustic MuteClip Installation guides

iKoustic

iKoustic MuteClip Installation guides

manuals.online logo
manuals.online logoBrands
  • About & Mission
  • Contact us
  • Privacy Policy
  • Terms and Conditions

Copyright 2025 Manuals.Online. All Rights Reserved.