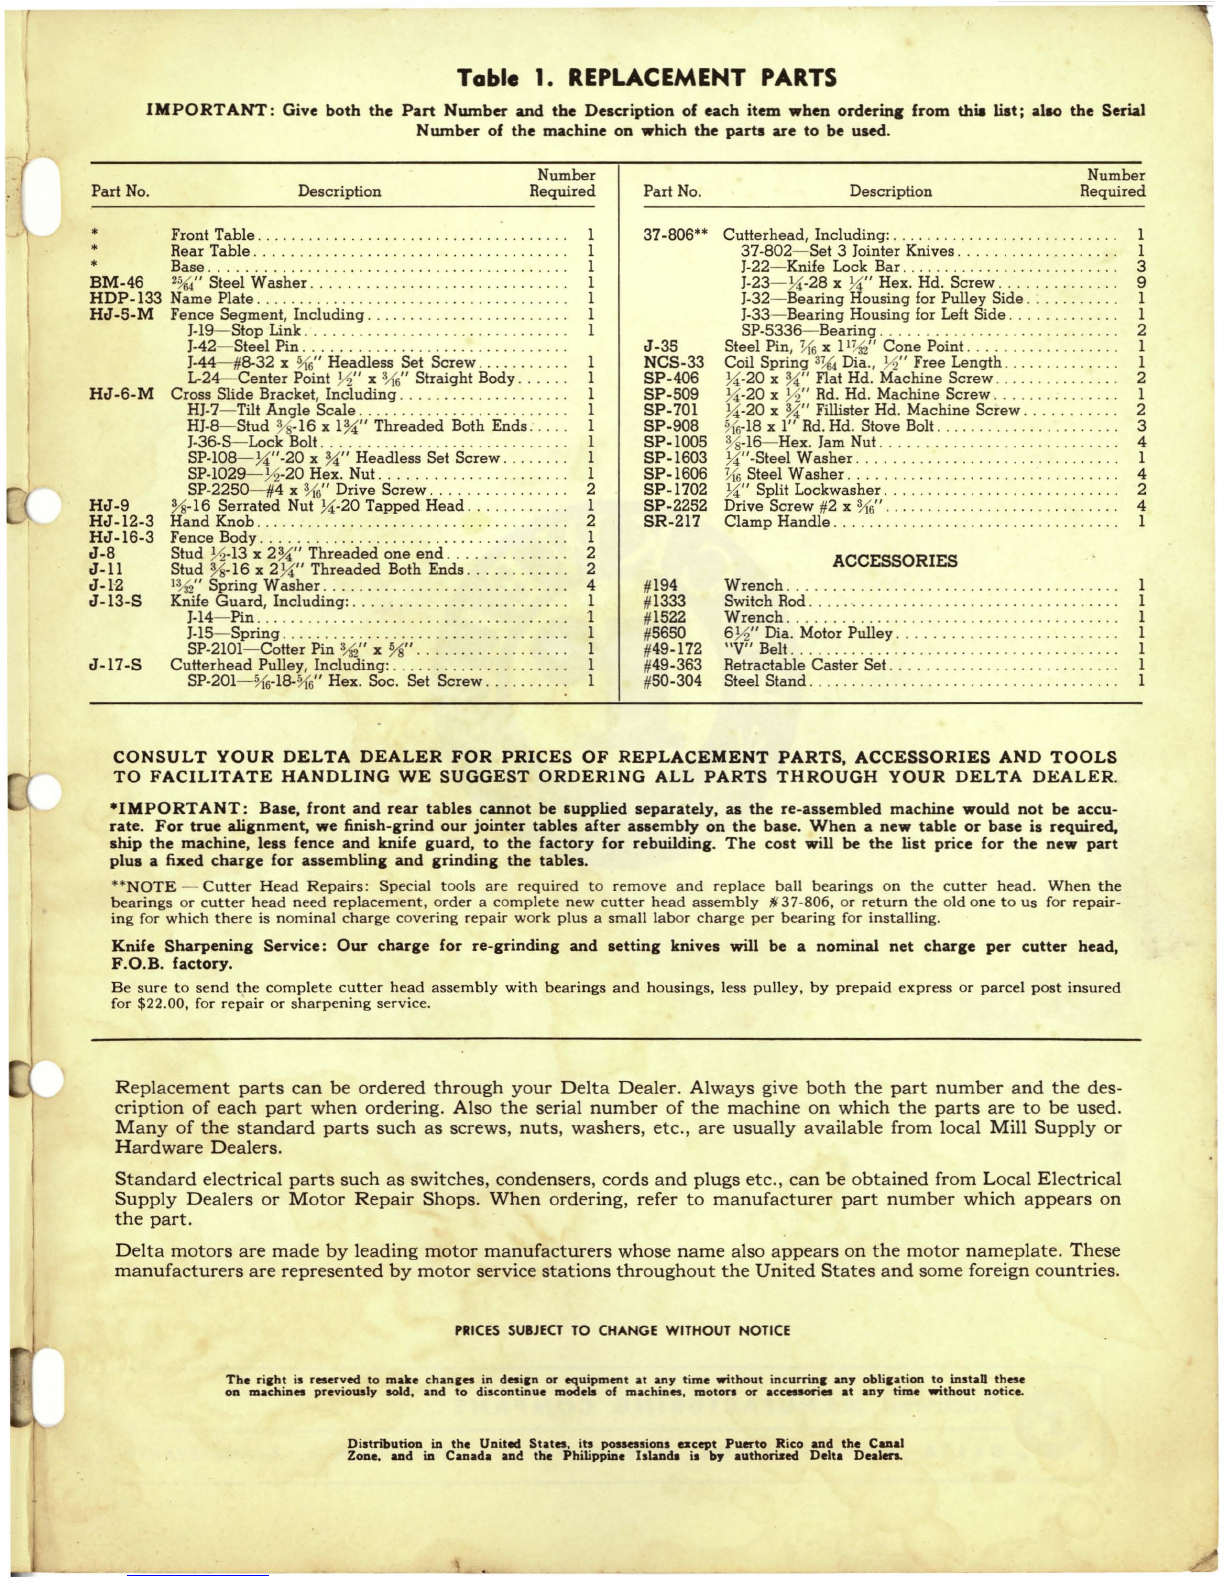
Delta Rockwell 37-110 Manual

For
heavy
duty
work
use a
No.
62-413,
~
H.
P.
1725
R.
P.
M.
capacitor
motor,
60 cycle, single
phase,
115
volts,
alternating
current
only.
PM-1697
U.
S.
Poteat
No.
1,790,288;
1,967,791;
1,975,562;
~
•.
156,923
37-8:
Jointer
Instruction
Manual
Revised:
8-15-58
4" JOINTER
Instructions
MOTOR,
PULLEYS
AND
BELT
We
recommend
our
No.
60-013
~
H.
P.,
11'5
volt,
60
cycle, 1725
R.
P.
M.
bronze
bearing
motor
with
Y2"
shaft
for
medium
duty
work.
HOMECRAFf
and Maintenance
Power
Tools
No.
37-110
Operating
_
....
Each
jointer
is
inspected
and
tested
before
shipment.
These
machines
will
give
excellent
results
if
properly
used
and
maintained.
The
adjustments
for
various
operations
are
described
below;
read
and
follow
the
instructions
carefully.
The
Homecraft
4"
Jointer
is
an
accurate
machine,
ideal
for
the
home
workshop.
Its
maximum
depth
of
cut
is
~-inch.
CONSTRUCTION
FEATURES
Consult
your
Delta
dealer
for
the
correct
motor
if
the
electric
current
available
is
different
from
that
indicated
above.
The
cutter
head
of
this
jointer
runs
in
sealed
ball
bearings
which
need
no
lubrication
throughout
their
life.
It
carries
three
high
speed
steel
knives
which
are
easily
adjusted
and
securely
locked
in
their
dove-tail
grooves.
The
fence
is
finish
ground
to
increase
accuracy,
and
is
heavily
ribbed
for
rigidity
and
to
prevent
warping.
The
fence
can
be
easily locked
in
any
position
across
the
table,
and
can
be
tilted
45°
right
or
left.
It
is also
.provided
with
an
adjustable
stop
so
the
fence
can
be
returned
at
right
angles
to
the
table.
FroRt
and
,rear
tables
are
finish
ground
after"
as-
sembly
on
the
base.
This
additional
operation
assures
the
true
alignment
necessary
for
accurate
work
and
is
a
feature
usually
found
only
in
the
larger
and
more
expensive
.machines.
Speed
of
the
cutter
head
should
be
about
4000
rpm
for
best
results.
The
correct
speed
is
obtained
with
the
No.
60-013
or
62-413
motor
by
using
the
6Y2-inch
motor
pulley
No.
5650
in
conjunction
with
the
2~-inch
cutter
head
pulley
J-17-S which is
furnished
on
the
jointer.
For
any
other
motor,
order
a
pulley
of
the
correct
bore
to
fit
the
shaft,
give
the
speed
of
the
motor,
and
sper;[
that
you
want
the
right
diameter
for
running
a
2~.
ch
drive
pulley
at, 4000
rpm.
The
cutter
head
must
rotate
forward
on
top.
If
your
motor
runs
in
the
wrong
direction,
reverse
it
according
to
the
manufacturer's
instructions,
or
in
the
case
of
a
double-shaft
motor,
turn
it
end
for
end.
The
No.
49-172 V-Belt, offered for use
with
this
jointer,
has
an
outside
circumference
of
59%
inches.
It
will
accommodate
the
usual
install
as.
Consult
your
Delta
dealer
if
you
need
a
belt
of
other
length
to
fit special
conditions.
MOUNTING
AND
ASSEMBLING
The
jointer,
shown
in
Fig.
1, is
shipped
complete
in
a
single
package
marked
No.
37-110.
It
consists
of
two
units,
the
body
and
the
fence.
The
knife
guard
and
a
wrench
for
the
lock screws
of
the
cutter
head
are
included.
The
motor
and
other
items
of
your
order
are
supplied
in
separate
packages.
In
choosing
a
location
for
the
machine,
be
sure
to
allow
clearance
in
front
of
and
behind
the
tables
for
jointing
long
pieces
.
A
portable
unit
can
be
made
by
mounting
the
jointer
and
motor
on
a 2 x 12-inch
dressed
pJank 30 inches long.
It
may
be
placed
on
any
convenient
work
table
for opera-
tion
and
stored
on
a
shelf
when
not
in
use. 2-inch blocks
must
be
inserted
under
the
jointer
base
for
such
mount-
ing,
to
raise
the
machine
so
that
the
motor
can
be
placed
directly
back
of
the
rear
table
and
to
allow
removal
of
chips.
Use
long
bolts
through
the
base, blocks
and
plank.

Some
operators
prefer
to
mount
the
motor
on
a
shelf
below
the
bench.
In
such
installation,
run
the
belt
through
a
slot
in
the
bench
top,
or
locate
the
machine
and
motor
so
that
the
pulleys
extend
beyond
the
edge.
Arrange
a
chute
for
the
chips,
so
that
they
do
not
fall
onto
the
motor.
Having
decided
upon
the
arrangement
most
suitable
for
your
needs,
set
the
jointer
body
in
its
proposed
position.
Install
the
motor
pulley
and
drive
belt.
Locate
the
motor
so
that
the
pulleys
are
in
line,
with
the
shafts
parallel
and
the
belt
tight
enough
to
prevent
slipping.
Mark
and
drill
the
mounting
holes.
Use
ordinary
carriage
bolts
of
proper
length
for
fastening
the
machine
and
motor.
Mount
the
fence
on
the
jointer
by
slipping
the
cross
slide
bracket
HJ-6
into
the
slot
under
the
front
table.
Install
the
knife
guard
J-13-S
on
the
front
table,
con-
necting
the
coil
spring
as
shown
in
Fig.
1.
The
machine
is
now
ready
for
adjustment
and
operation.
OPERATING
ADJUSTMENTS
Although
the
jointer
is
carefully
adjusted
at
the
factory,
it
should
be
checked
before
it
is
put
into
opera-
tion.
Any
inaccuracies
due
to
parts
shifting
in
transit
:an
easily
be
corrected
by
following
these
directions:
Rear
Table
and
Knife
Adjustment
For
accurate
work
in
most
jointing
operations,
the
rear
table
must
be
exactly
level
with
the
knives
at
their
highest
point
of
revolution.
This
means,
of
course,
that
the
knives
must
be
parallel
to
the
table
and
project
equally
from
the
cutter
head.
METHOD
FOR
CHECKING
REAR TABLE ELEVATION
AND
KNIFE ALIGNMENT
Fit.
2.
To
check
the
adjustment,
place
a
steel
straight
edge
on
the
rear
table,
extending
over
the
cutter
head
as
shown
in
Fig.
2.
Rotate
the
cutter
head
by
hand.
The
blades
should
just
touch
the
straight
edge.
If
a
knife
is
high
or
low
at
either
end,
loosen
its
lock
screws
J-23
slightly,
shift
the
blade
until
it
just
touches
the
straight
edge,
and
tighten
securely.
Raise
or
lower
the
rear
table
as
required,
by
turning
the
hand
knob
HJ-12.
After
it
has
been
set
at
the
correct
height,
it
should
not
be
changed,
except
for
special
operations
and
after
sharpening
knives.
2
K2~~
....
_-------.:=_===
REAR
TABLE
Too
HIGH
Fit.
3.
If
the
rear
table
is
too
high,
the
result
will
be
as
shown
in
Fig.
3;
the
finished
surface
will
be
curved.
When
the
rear
table
is
too
low,
the
condition
will
be
as
illustrated
in
Fig.
4;
the
.wcrk
will
be
gouged
at
the
end
of
the
cut.
R<2«3J
....
J
REAR TABLE
ToO
Low
Fig.
4.
As
afinal
check
of
the
rear
table
adjustment,
run
a
piece
of
wood
slowly
over
the
knives
for
6
to
8
inches;
it
should
rest
firmly
on
both
tables,
as
shown
in
Fig.
5,
with
no
open
space
under
the
finished
cut.
e27?1
'""-------------~
REAR TABLE AT
CORRECT
HEIGHT
Fit. 5.

Depth
of
Cut
The
amount
of
material
removed
by
a
single
cut
can
be
any
thickness
from
a
very
thin
shaving
to
~
inch.
Adjust
for
depth
of
cut
by
raising
or
lowering
the
front
table,
using
the
hand
knob
HJ-12
on
the
front
of
the
base.
Fence
Adiustments
The
fence
may
be
set
at
any
position
within
the
width
of
the
table.
Lock
it
by
turning
the
bolt
J-36-S
into
the
cross
slide
bracket
HJ-6
from
below.
To
tilt
the
fence,
loosen
the
segment
HJ-5
by
turn-
ing
the
handle
SR-217.
When
tilting
to
the
left,
flip
the
stop
link
J-19
out
of
the
way
to
pass
the
stop
screw
SP-I08.
Set
the
fence
to
the
desired
angle
on
the
tilt
scale
and
lock
it
by
means
of
the
handle.
SR-217.
This
handle
is
adjustable
on
the
serrated
nut
HJ-9
so
that
it
can
be
set
to
the
most
convenient
position.
The
face
of
the
fence
should
stand
exactly
square
with
the
tables
when
the
stop
SP-I08
is
against
the
stop
link
J-19.
Check
this
with
a
mechanics'
square.
Joint
two
adjacent
faces
of
a
piece
of
work,
being
careful
to
keep
the
first face
firmly
against
the
fence
while
the
second
is
being
jointed.
Check
the
angle
between
the
finished faces.
If
not
exactly
at
right
angles,
make
the
correction
by
turning
the
s.top
screw
against
th'e
link,
or
backing
away,
as
required.
When
the
setting
is
correct,
lock
the
stop
screw
by
means
of
its
hexagon
nut
SP-I029.
Set
the
pointer
L-24
to
zero
on
the
tilt
scale.
The
scale
will
then
indicate
correctly
any
angle
to
which
the
fence
is
tilted,
and
the
fence
will
return
to
the
square
position
when
the
stop
screw
is
brought
into
contact
with
the
stop
link.
LUBRICATION
The
use
of
sealed
bearings
on
the
cutter
head
elimi-
nates
the
need
for
lubrication
of
these
parts.
It
is
advisable
to
protect
the
finished
surfaces
of
the
fence
and
tables
from
rusting,
by
using
"Stop
Rust"
after
each
days
use.
Apply
a
drop
or
two
of
light
machine
oil
to
the
table
ways
and
the
sliding
parts
of
the
fence
so
that
these
parts
will
operate
freely.
WHETTING
KNIVES
FI,.6.
3
CUTTER
HEAD
MAINTENANCE
After
considerable
use,
the
knives
will
become
dull
and
it
will
not
be
possible
to
do
accurate
work.
Unless
badly
damaged
by
running
into
metal
or
other
hard
material,
they
may
be
sharpened
as
follows:
Whetting
Knives
Use
afine
carborundum
stone;
cover
it
partly
with
paper
as
indicated
in
Fig.
6,
to
avoid
marking
the
table.
Lay
the
stone
on
the
front
table,
lower
the
table
and
tum
the
cutter
head
forward
until
the
stone
lies
flat
on
the
bevel
of
the
knife,
as
shown.
Hold
the
cutter
head
from
turning,
and
whet
the
bevelled
edge
of
the
knife,
stroking
lengthwise
by
sliding
the
stone
back
and
forth
across
the
table.
Do
the
same
amount
of
whetting
on
each
of
the
three
blades.
Jointing
Knives
Knives
may
also
be
sharpened
and
brought
to
a
true
cutting
circle
by
"jointing"
their
edges
while
the
cutter
head
is
revolving.
To
do
this,
place
the
car-
borundum
stone
on
the
rear
table
as
shown
in
Fig.
7.
JOINTING
KNIVES
Fig. 7.
Be
sure
that
the
rear
table
is
at
the
highest
point
of
the
cutting
circle.
Start
the
machine
and
move
the
stone
forward
until
it
projects
over
the
knives;
then
move
it
across
the
table
so
that
the
knives
are
jointed
their
entire
length.
Keep
the
stone
flat
on
the
table.
If
the
stone
does
not
touch
the
knives
at
all
points,
lower
the
rear
table
one
or
two
thousandths
of
an
inch
and
repeat.
When
this
operation
is
carefully
done.
the
knives
will
cut
very
smoothly.
Setting
Knives
If
the
knives
have
been
removed
from
the
cutter
head,
care
must
be
used
in
re-setting
them.
Each
knife
should
be
placed
in
its
groove
so
that
the
rear
edge
of
the
bevel
projects
1/16
inch
beyond
the
surface
of
the
cutter
head.
Slip
the
knife
lock
bars
J-22
into
place
and
tighten
the
lock
screws
J-23
lightly.
Adjust
the
knives
for
true
cutting
circle.
using
the
straight
edge
as
described
under
"Rear
Table
and
Knife
Adjust-
ment."
Check
all
lock
screws
to
be
sure
that
they
are
tight.
Joint
the
knives
lightly
before
running
any
work.
Cutter
Head
Repairs
When
the
knives
cannot
be
properly
sharpened
by
the
methods
described
above,
they
must
be
ground
to
a
new
bevel
edge.
In
such
case,
or
when
bearings
need

replacement,
remove
the
entire
cutter
head
with
bear-
ings
and
housings
from
the
base
and
return
it
to
the
factory.
Back
out
the
fillister
head
screws
SP-70l
from
the
bearing
housings
J-32
and
J-33,
inside
the
base,
to
release
the
cutter
head
assembly.
When
installing
the
cutter
head
in
the
jointer,
be
sure
to
clean
the
curved
seats
of
the
base
and
tighten
the
SP-70l
screws
firmly
into
the
bearing
housings.
MAINTENANCE
Gum
and
Pitch
which
collects
on
the
blades
causes
excessive
friction
as
the
work
continues,
resulting
in
over
heating
the
blades,
less
efficient
cutting,
and
con-
sequently
loss
of
blade
life.
Use
"Delta
Gum
and
Rust
Remover"
to
wipe
this
off
the
blades.
When
these
blades
become
dull
enough
so
that
it
is
noticeable
when
cutting,
they
should
be
resharpened.
A
sharp
blade
works
easier
and
results
in
longer
blade
life.
The
penalty
paid
for
a
dull
blade
is
less
blade
life
and
greater
wear
and
tear
on
all
parts
of
the
machine.
In
time
rust
will
appear
on
the
table
and
fence
and
other
parts
of
the
jointer,
resulting
in
less
efficiency
and
accuracy
of
the
machine.
Use
"Stop
Rust"
which
can
be
applied
to
prevent
rust
formation.
If,
however,
rust
has
already
formed
on
these
parts
use
"Delta
Rust
Remover"
which
will
restore
the
machine
to
its
original
accuracy
when
applied.
Using
"Stop
Rust"
after
each
time
you
use
the
machine
will
put
afilm
on
the
parts
it
is
applied
to,
preventing
rust
formation.
OPERATION
The
following
directions
will
give
the
beginner
a
start
on
jointer
operations.
Use
scrap
pieces
of
lumber
to
check
settings
and
to
get
the
feel
of
the
operations
before
attempting
regular
work.
Jointing
an
Edge
This
is
the
most
common
operation
for
the
jointer.
Set
the
guide
fence
square
with
the
table.
Depth
of
cut
should
be
the
minimum
required
to
obtain
a
straight
edge.
Hold
the
best
face
of
the
piece
firmly
against
the
fence
throughout
the
feed.
Use of
Hands
While
Feeding
At
the
start
of
the
cut,
the
left
hand
holds
the
work
firmly
against
the
front
table
and
fence,
while
the
right
hand
pushes
the
work
toward
the
knives.
After
the
cut
is
under
way,
the
new
surface
rests
firmly
on
the
rear
table
as
shown
in
Fig.
S.
The
left
hand
should
press
down
on
this
part,
at
the
same
time
maintaining
flat
contact
with
the
fence.
The
right
hand
presses
the
work
forward
throughout,
protecting
the
operator
against
kick-back
from
the
knives.
..
",A
Fig.
8.
Push
Blocks.
4
Jointing
Warped
Pieces
If
the
wood
to
be
jointed
is
dished
or
warped,
take
light
cuts
until
the
surface
is
flat.
Avoid
forcing
such
material
down
against
the
table;
excessive
pressure
will
spring
it
while
passing
the
knives,
and
it
will
spring
back
and
remain
curved
after
the
cut
is
completed.
Jointing
Short
or
Thin
Work
When
jointing
short
or
thin
pieces, use a
push
block
to
eliminate
all
danger
to
the
hands.
Two
types
are
shown
in
Fig.
8.
They
are
easily
made
from
scrap
material.
Direction
of
Grain
Avoid
feeding
work
into
the
jointer
against
the
grain
as
shown
in
Fig.
9;
the
result
will
be
chipped
and
splintered
edges.
Feed
with
the
grain
as
in
Fig.
10
to
obtain
a
smooth
surface.
WRONG
FEED -
AGAINST
THE GRAIN
Fig.
9.
CORRECT FEED -WITH THE GRAIN
Fig.
10
•
Rabbeting
The
arm
of
the
front
table
and
ledge
of
the
rear
table
provide
for
cutting
rabbets
up
to
7.;l
inch
deep
and
4
inches
wide.
The
operation
is
illustrated
in
Fig.
11.
The
knife
guard
must
be
removed.
Set
the
fence
to
control
the
width
of
rabbet,
measuring
from
the
end
of
the
knives
to
the
face
of
the
fence.
Lower
the
front
table

Fig.
12.
CLAMP
STOP
BLOCK
r----
_
FENCE
BoTH
TABLES ARE LOWERED EQUALLY
FOR
STOP
CHAMFERING
Stop
Chamfering
Figure
12
shows
the
cutting
of
a
stop
chamfer,
an
operation
for
which
the
rear
table
must
be
lowered
from
its
usual
position.
The
tables
must
be
set
to
the
same
level.
Depth
of
chamfer
is
determined
by
the
amount
the
tables
are
lowered.
The
stop
block
clamped
to
the
front
end
of
the
fence
prevents
kick-back.
Locate
it
to
start
the
chamfer
at
the
right
place,
and
use
a
similar
stop
block
at
the
rear
end
of
the
fence
to
control
length
of
cut.
These
settings
should
be
made
before
the
machine
is
started.
Roughness
caused
by
cutting
against
the
grain
at
the
end
of
the
chamfer
may
be
smoothed
by
sanding,
or
the
cut
may
be
run
half
way
and
reversed.
The
true
stop
chamfer
is a
bevel
cut,
and
is
made
with
the
fence
tilted
to
the
required
angle.
The
method
is,
however,
as
shown
in
Fig.
12
for a
square
cut.
this
very
carefully,
as
the
piece
will
span
the
knives,
and
they
will
take
a
"bite"
from
the
work.
with
a
tendency
to
kick
back
unless
the
piece
is
firmly
held.
Now
push
the
work
forward
as
in
ordinary
jointing.
The
effect
is
to
plane
off
all
the
stock
in
front
of
the
knives.
to
increasing
depth,
leaving
a
tapered
surface.
The
ridge
left
by
the
knives
when
starting
the
taper
may
be
removed
by
taking- a
very
light
cut
according
to
the
regular
method
for
jointing.
with
the
front
table
raised
to
its
usual
position.
Practice
is
required
in
this
operation.
and
the
be-
ginner
is
advised
to
make
trial
cuts
on
waste
material.
Taper
cuts
over
part
of
the
leng-th
and
a
number
of
other
special
operations
can
easily
be
done
by
the
ex-
perienced
craftsman.
Taper
Cuts
One
of
the
most
useful
jointer
operations
is
cutting
an
edge
to
a
taper.
The
method
~an
be
used
on
a
wide
variety
of
work.
Tapered
legs
of
furniture
are
a
com-
mon
example.
Instead
of
laying
the
piece
on
the
front
table,
lower
the
forward
end
of
the
work
onto
the
rear
table.
Do
Fig.
11.
Cu"ing
a
Rabbet.
Beveling
To
cut
a
bevel,
lock
the
fence
at
the
required
angle
and
run
the
work
across
the
knives
while
keeping
it
firmly
against
the
fence
and
tables.
Several
passes
may
be
necessary
to
arrive
at
the
desired
result.
When
the
angle
is
small,
there
is
little
difference
whether
the
fence
is
tilted
to
the
right
or
left.
How-
ever,
at
greater
angles,
approaching
45
degrees,
it
is
increasingly
difficult
to
hold
the
work
properly
when
the
fence
is
tilted
to
the
right.
The
advantage
of
the
double-tilting
fence
is
appreciated
under
such
condi-
tions.
When
tilted
to
the
left.
the
fence
forms
a V
-shape
with
the
tables.
and
the
work
is
easily
pressed
into
the
pocket
while
passing
it
across
the
knives.
If
the
bevel
is
laid
out
on
the
piece
in
such
direction
that
this
involves
cutting
against
the
grain.
it
will
be
better
to
tilt
the
fence
to
the
right.
to
determine
the
depth
of
cut.
Feed
slowly
when
making
a
deep
cut,
to
avoid
splitting
the
wood.
For
wide
cuts,
make
two
or
more
passes
at
increasing
depths.
Use
a
push
block
when
rabbeting
the
end
of
narrow
stock.
,
5

No,
37-110
HOMECRAFT
4"JOINTER
SP-2252
(2)
SP_40:P-li~j2"
\\--flR.m--_SP-I005
(4)
(2)
J-12
SP-701 '
(4)
(2)
jl.1522
&--~
Fig. 13.
6

IMPORTANT:
Give
both
the
Part
Number
and
the
Description
of
each
item
when
orderinc
from
thia
list;
allO
the
Serial
Number
of
the
machine
on
which
the
parts
are
to
be used.
Table
1. REPLACEMENT PARTS
1
1
3
9
1
1
2
1
1
2
1
2
3
4
1
4
2
4
1
Number
RequiredDescription
ACCESSORIES
Wrench
.
Switch Rod .
Wrench.
. . . .
..
..
. .
6>-'2"
Dia. Motor Pulley .
"V"
Belt .
Retractable
Caster
Set.
. . . . . . . . . . . . . . . . . .
..
Steel Stand .
Cutter
head,
Including: .
37-802-Set
3Jointer Knives .
J-22-Knife
Lock Bar .
J-23-74:-28
x
74:"
Hex. Hd.
Screw
.
J-32-Bearing
Housing for Pulley Side .
J-33-Bearing
Housing for Left Side .
SP-5336-Bearing
.
Steel Pin,
?1'6
x 11
}f"
Cone
Point. .
Coil
Spring
3~
Dia.,
>-'2"
Free
Length
.
74:-20
x
~"
Flat Hd.
Machine
Screw
.
74:-20
x
>-'2"
Rd. Hd.
Machine
Screw
.
74:-20
x
~"
Fillister Hd.
Machine
Screw
.
Yt6-18
x1" Rd. Hd. Stove Bolt .
%-16-Hex.
Jam Nut .
74:"
-Steel
Washer.
. . . . . . . . . . . . . . " .
?1'6
Steel
Washer
.
74:"
Split Lockwasher .
Drive
Screw
#2 x
Vt6"
.
Clamp
Handle
.
Part
No.
#194
#1333
#1522
#5650
#49-172
#49-363
#50-304
J-35
NCS-33
SP-406
SP-509
SP-70l
SP-908
SP-1005
SP-1603
SP-1606
SP-1702
SP-2252
SR-217
37-806**1
1
1
1
1
1
1
1
1
1
1
1
1
1
1
2
1
2
1
2
2
4
1
1
1
1
1
1
Number
Required
DescriptionPart
No.
HJ-9
HJ-12-3
HJ-16-3
J-8
J-ll
J-I-2
J-13-S
Front Table .
*Rear Table .
*
Base
.
BM-46
2%4"
Steel
Washer
.
HDP-133
Name Plate .
HJ-5-M
Fence
Segment,
Including
.
J-19-Stop
Link .
J-42-Steel
Pin .
J-44-#8-32
X
Yt6"
Headless
Set
Screw
.
L-24-Center
Point
>-'2"
x
%"
Straight Body .
HJ-6-M
Cross Slide Bracket,
Including
.
HJ-7-Tilt
Angle
Scale
.
HJ-8-Stud
%-16
x
1~"
Threaded
Both Ends .
J-36-S-Lock
Bolt .
SP-108-74:"-20
x
~"
Headless Set
Screw
.
SP-1029->-'2-20 Hex. Nut .
SP-2250-#4
x
%"
Drive
Screw
.
%-16
Serrated
Nut
74:-20
Tapped
Head
.
Hand
Knob.
. .
Fence
Body .
Stud
>-'2-13
x
2~"
Threaded
one
end
.
Stud
%-16
x274:"
Threaded
Both Ends .
1%"
Spring
Washer
.
Knife
Guard,
Including:
.
J-14-Pin
.
J-15-Spring
.
SP-210l-Cotter
Pin
%"
x%" .
Cutterhead
Pulley,
Including:
.
SP-20l-%-I8-Yt6"
Hex. Soc. Set
Screw
.
J-17
-S
CONSULT
YOUR
DELTA
DEALER
FOR
PRICES
OF
REPLACEMENT
PARTS.
ACCESSORIES
AND
TOOLS
TO
FACILITATE
HANDLING
WE
SUGGEST
ORDERING
ALL
PARTS
THROUGH
YOUR
DELTA
DEALER.
*IMPORTANT:
Base.
front
and
rear
tables
cannot
be supplied
separately,
as
the
re-assembled
machine
would
not
be accu-
rate.
For
true
alignment,
we
finish-grind
our
jointer
tables
after
assembly
on
the
base.
When
a
new
table
or
base
is
required.
ship
the
machine,
less
fence
and
knife
guard.
to
the
factory
for
rebuilding.
The
cost
will be
the
list
price
for
the
new
part
plus
afixed
charge
for
assembling
and
grinding
the
tables.
""NOTE
-
Cutter
Head
Repairs:
Special
tools
are
required
to
remove
and
replace
ball
bearings
on
the
cutter
head.
When
the
bearings
or
cutter
head
need
replacement,
order
a
complete
new
cutter
head
assembly
fIi
37-806,
or
return
the
old
one
to
us
for
repair-
ing
for
which
there
is
nominal
charge
covering
repair
work
plus
a
small
labor
charge
per
bearing
for
installing.
Knife
Sharpening
Service:
Our
charge
for
re-grinding
and
setting
knives will be a
nominal
net
charge
per
cutter
head,
F.O.B.
factory.
Be
sure
to
send
the
complete
cutter
head
assembly
with
bearings
and
housings,
less
pulley,
by
prepaid
express
or
parcel
post
insured
for
$22.00,
for
repair
or
sharpening
service.
Replacement
parts
can
be
ordered
through
your
Delta
Dealer.
Always
give
both
the
part
number
and
the
des-
cription
of
each
part
when
ordering.
Also
the
serial
number
of
the
machine
on
which
the
parts
are
to
be
used.
Many
of
the
standard
parts
such
as
screws,
nuts,
washers,
etc.,
are
usually
available
from
local
Mill
Supply
or
Hardware
Dealers.
Standard
electrical
parts
such
as
switches,
condensers,
cords
and
plugs
etc.,
can
be
obtained
from
Local
Electrical
Supply
Dealers
or
Motor
Repair
Shops.
When
ordering,
refer
to
manufacturer
part
number
which
appears
on
the
part.
Delta
motors
are
made
by
leading
motor
manufacturers
whose
name
also
appears
on
the
motor
nameplate.
These
manufacturers
are
represented
by
motor
service
stations
throughout
the
United
States
and
some
foreign
countries.
PRICES
SUBJECT
TO
CHANGE
WITHOUT
NOTICE
The
richt
is
reserved
to
make
chanles
in
de-ieD
or
equipment
at
any
time
without
incurrinl
any
oblilation
to
instan
these
OD
machines
previously
sold.
and
to
discontinue
models
of
machines,
motor.
Of'
accessories
at
any
time
without
notice.
DistributiOD
iD
the
UDited
States.
its
_SiODI
acept
Puerto
Rico
...
d
the
C
....
I
ZODe.
...d
iD
C.Dad.
aDc!
the
PhilippiDe
bl&Dda
il
by
.uthorised
Delt.
Dalen.

;
~
Rockwell
MANUFACTURING
COMPANY
.~
DELTA
POWER
TOOL
DIVISION
'ITTsaUIGH
.,
'INNSYLVANIA
5M·WGJ·8·58
Printed
in
U.S
.....
Table of contents