Rotational Limit Stop
�Tope de Limite de Girar
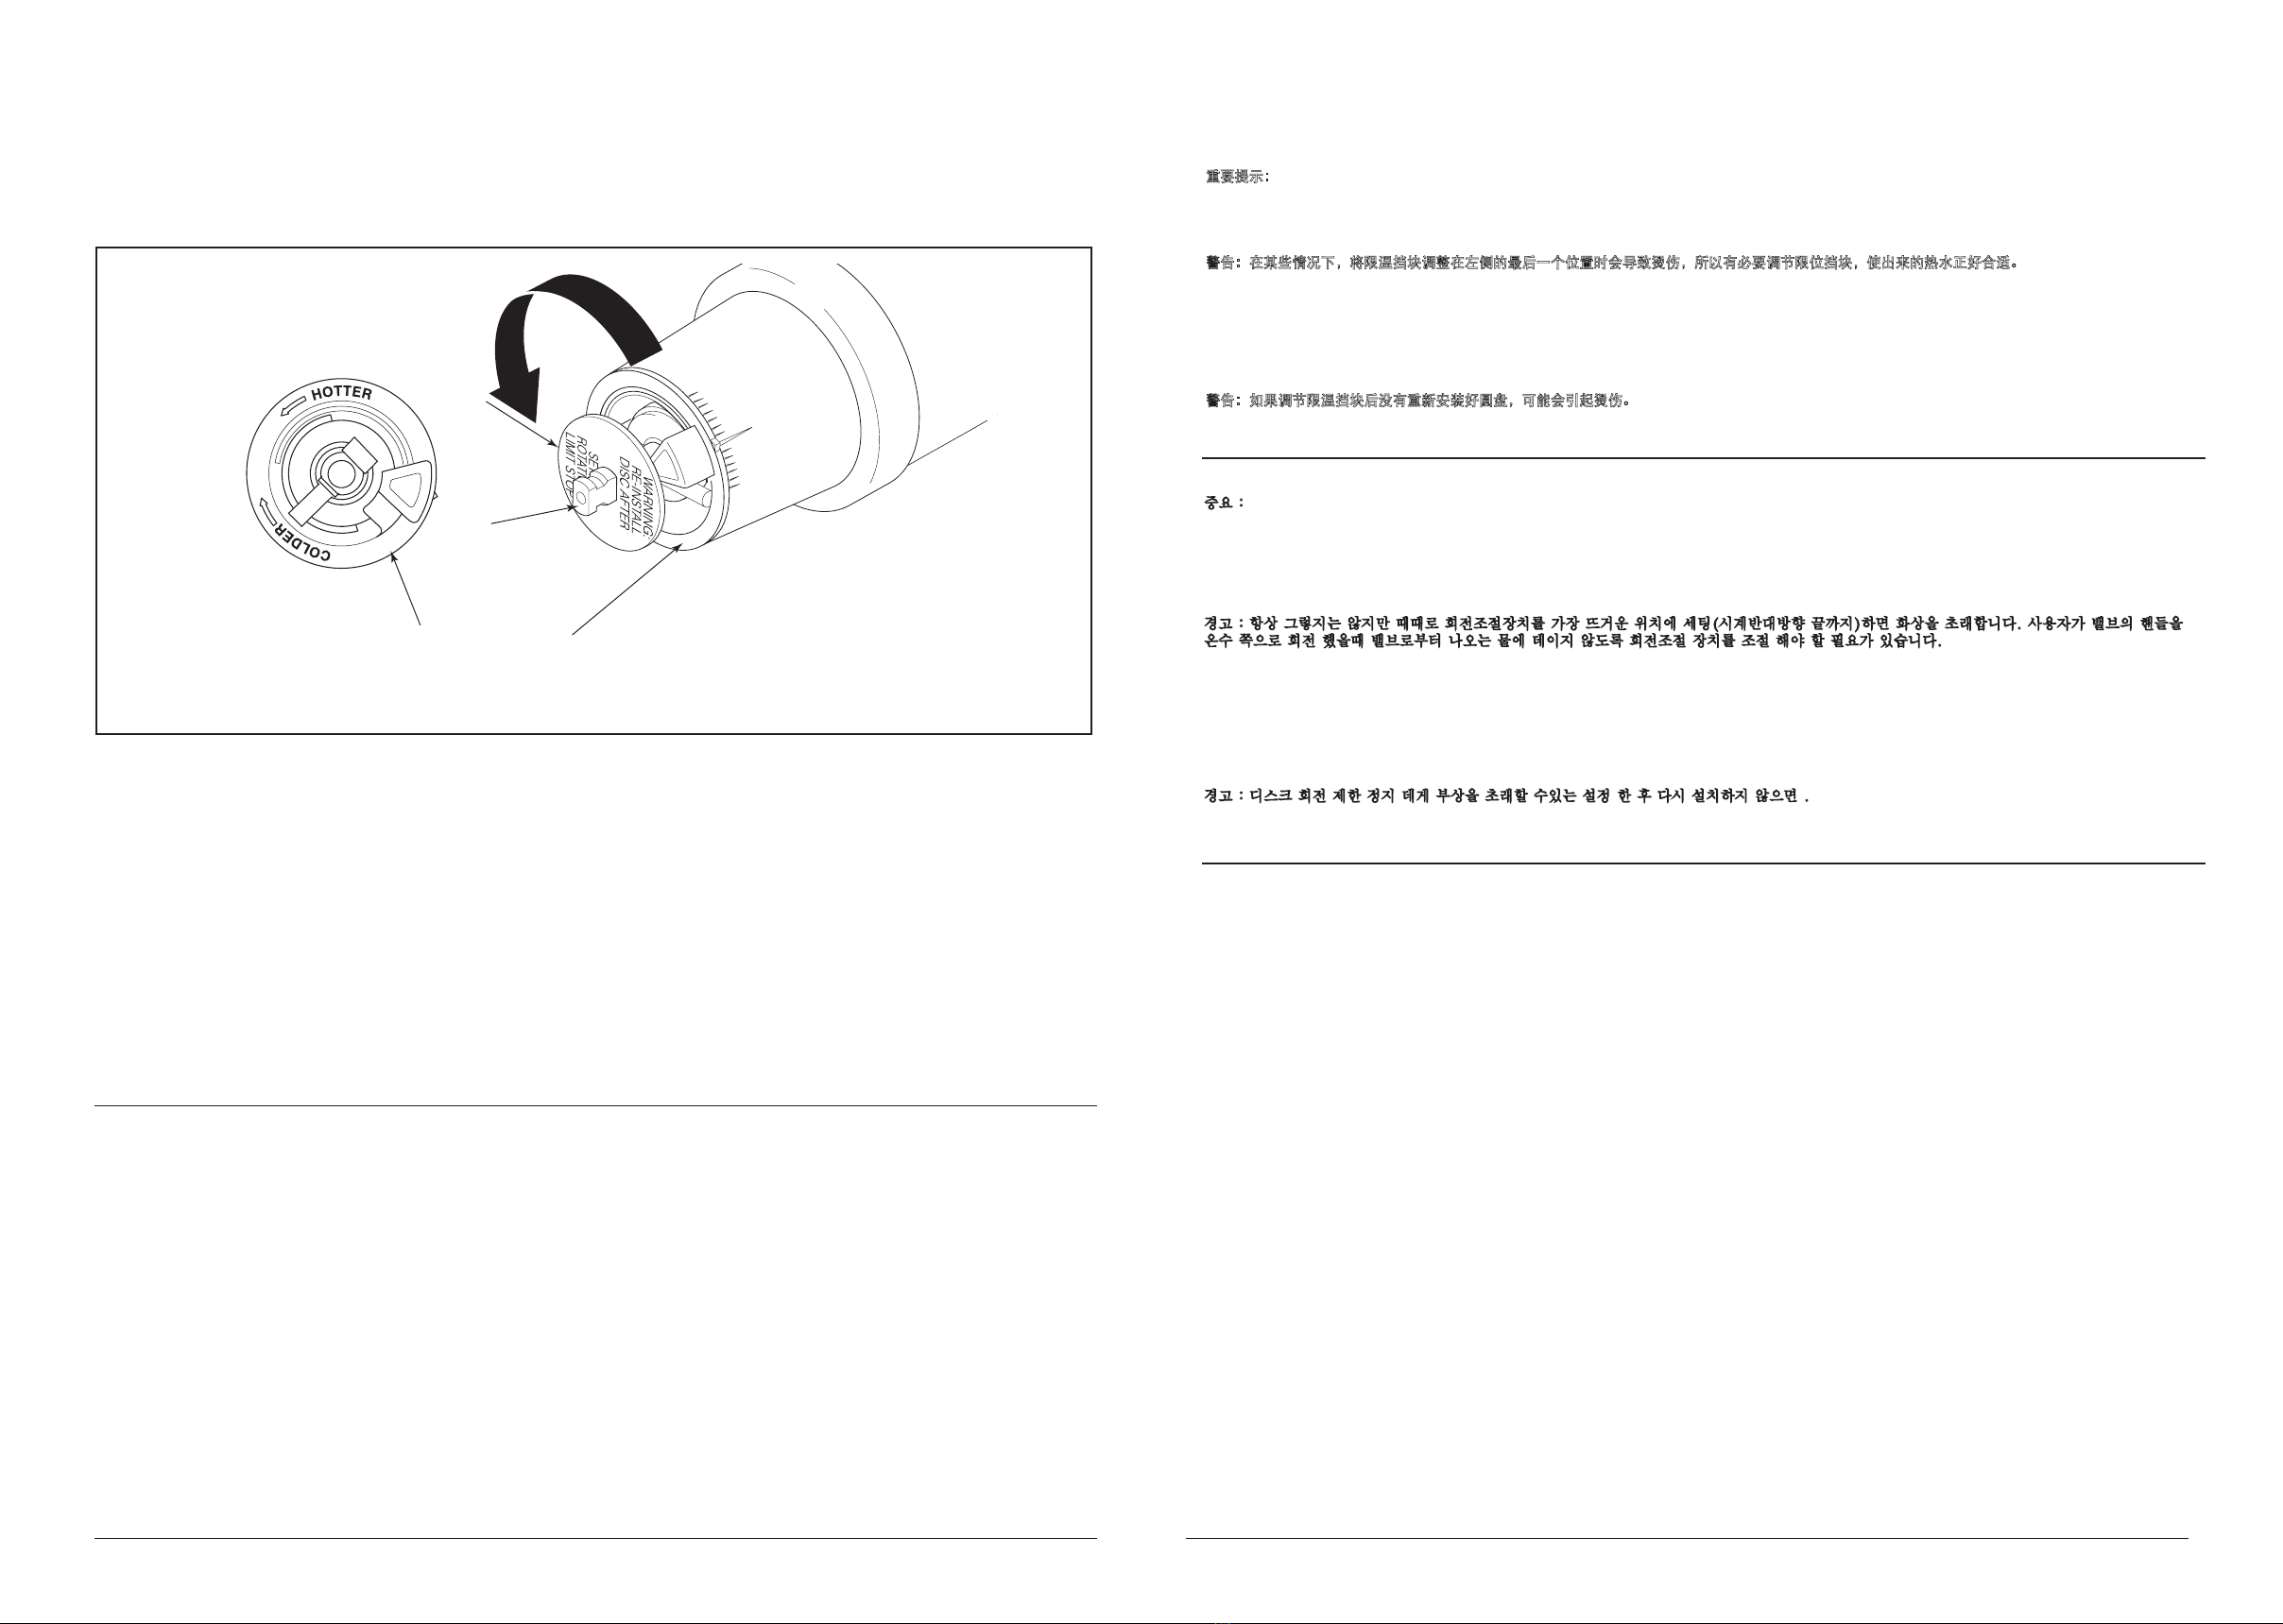
旋转限温挡块
회전제한기 위치로 이동시켜
Rotação do limite de parada
Hotter
加热
Más Caliente
더워
Quente
Disc
Disco
圆盘
디스크
Disco
Stem
Unidad del Vástago
阀芯杆
줄기
Haste
IMPORTANT:
The Rotational Limit Stop is used to limit the amount of hot water available such that, if set properly, the user will not be scalded if the handle accidentally is
rotated all the way to “hot” when a person is showering or filling a tub. The first position allows the LEAST amount of hot water to mix with the cold water in
the system. In the first position the water will be the coldest possible when the handle is turned all the way to hot. As you move the Rotational Limit Stop
counterclockwise, you progressively add more and more hot water in the mix. The last position to the left will result in the greatest amount of hot water to the
mix, and the greatest risk of scald injury if someone accidentally turns the valve handle all the way to the hot side while showering or filling a tub.
WARNING: In some instances, setting the Rotational Limit Stop in the hottest position (full counterclockwise) could result in scald injury. It is
necessary to adjust the Rotational Limit Stop so that the water coming out of the valve will not scald the user when the handle of the valve is
rotated to the hot side.
Place a thermometer in a plastic tumbler and hold in the water stream. If the water temperature is above 120°F, the Rotational Limit Stop must be repositioned
clockwise to decrease valve outlet water temperature tobe less than 120°F or to meet the requirements of your local plumbing codes.
• To adjust the temperature of the water coming out of the valve, pull the disc back to a position where it is possible to remove the Rotational Limit Stop and
readjust the teeth engagement position to the desired temperature. Clockwise will decrease the outlet temperature, counterclockwise will increase the outlet
temperature. Temperature change per tooth (notch) could be 4° - 16°F based on inlet water conditions. Repeat as necessary. Push disc until fully seated.
WARNING: Failure to re-install Disc after setting Rotational Limit Stop could result in scald injury.
Instruction sheet for adjusting the Rotational Limit Stop
Hoja de Instrucciones para ajustar el Bolqueo de Rotación
调节限温挡块说明页
회전조절장치 조정 지침서
Folha de instrução para ajuste do Travão de Limite Rotacional
IMPORTANTE:
El Ajuste del Tope que Limita la Rotación se usa para limitar la cantidad de agua caliente disponible de manera que, si ajustado apropiadamente, el usuario
no se quemará si la manija se gira accidentalmente completamente a “hot” (“caliente”) cuando una persona se está duchando o llenando la bañera. La primera
posición permite la cantidad MÍNIMA de agua caliente mixta con la fría en el sistema. En la primera posición el agua estará lo más fría posible cuando la
manija se gira completamente a caliente. Mientras que mueve el Ajuste del Tope que Limita la Rotación en dirección contrario a las manecillas del reloj,
progresivamente aumentará el agua caliente en la mezcla más y más. La última posición a la izquierda es la de mayor cantidad de agua caliente en la mezcla,
y tiene el mayor riesgo de lesión por quemadura si alguien accidentalmente abre la manija de la válvula completamente a la posición caliente mientras que se
baña o llena la bañera.
ADVERTENCIA: En algunos casos, ajustar el Ajuste del Tope que Limita la Rotación en la posición más caliente (completamente en el sentido
contrario a la dirección de las manecillas del reloj) puede resultar en lesión por quemadura. Es necesario ajustar el Tope que Limita la Rotación de
manera que el agua que sale de la válvula no queme o escalde al usuario cuando la manija de la válvula se gira al lado caliente.
Coloque el termómetro en un vaso plástico y sosténgalo bajo el chorro de agua. Si la tem-peratura de agua está por encima de 120°F el tope que limita la
rotación debe ajustarse otra vez moviéndolo en sentido de las manecillas del reloj para reducir la temperatura del agua de salida de la válvula a menos de
120°F o para que cumpla con los requisitos de sus códigos locales de plomería.
• Para ajustar la temperatura del agua que sale de la válvula, hale el disco otra vez a la posición donde se puede remover el Tope del Límite Rotacional y
reajuste el engranaje de los dientes a la posición para la temperatura deseada. Al mover en dirección de las manecillas del reloj reducirá la temperatura del
agua de salida, y al contrario aumentará la temperatura del agua de salida. El cambio de temperatura por cada diente (muesca) puede ser de 4°F-16°F
dependiendo de la condición del agua de entrada. Si es necesario repítalo. Presione el disco hasta que está asentado completamente.
ADVERTENCIA: Si no reinstala el Disco después de hacer el ajuste del Tope del Límite Rotacional pudiera escaldarse con agua demasiado caliente.
重要提示:
旋转限温挡块是用来限制的热水的水量大小,如果设置正确,用户则不会在淋浴过程中因为手柄突然转到热水最高挡位而被意外烫伤,如果将限温挡块设置在
最右边第一刻度线的位置时,允许最少的热水与冷水混合,当手柄转到热水的最高挡位,水温有可能也不是很高。当慢慢的逆时针旋转限温挡块时,热水的水
量会慢慢增加,对应刻度最左边的最后一个位置将混合最大量的热水,如果此时有人在淋浴过程中突然的将手柄旋转到热水的最高挡位时就有可能会烫伤。
警告:在某些情况下,将限温挡块调整在左侧的最后一个位置时会导致烫伤,所以有必要调节限位挡块,使出来的热水正好合适。
建议用以下方式测量出水温度,首先,在一个水杯中放置一支温度计,将手柄调到热水的最高挡位,待出水一段时间后接一杯热水,如果水的温度 超过48.9℃,
需要重新顺时针调整限流挡位,使出来的热水低于 48.9℃
调节水温时,需要将圆盘向后拉出并调节限温挡块上对应的刻度。顺时针转动会减小出水水温,逆时针转动会增加出水水温。每个刻度的温差大约在2℃-9℃
之间,调节好后请重新固定好圆盘。
警告:如果调节限温挡块后没有重新安装好圆盘,可能会引起烫伤。
중요 :
회전조절장치는 사용하고자 하는 온수의 양을 조절 하는데 사용됩니다. 즉 적절히 세팅하면 사용자가 샤워를 하거나 욕조에 담글 때 예상치 못하게
손잡이가 계속 ‘온수’쪽으로 향하더라도 데이지 않도록 하는데 사용됩니다. 첫 번째 조절 위치는 시스템에서 냉수와 섞이는 온수의 양을 최소로
해줍니다. 첫 번째 위치는 손잡이가 온수 쪽으로 계속 향해 있더라도 가장 차가운 위치일 것입니다. 회전조절장치가 시계 반대방향으로 향한 정도에
따라 점점 더 뜨거운 물의 양이 많아질 것입니다. 좌측 최종 마지막 위치는 온수의 양이 최대가 되며 만일 누군가가 예상치 못하게 샤워나 욕조에 있을
경우 온수 쪽으로 밸브 손잡이를 향하게 해 놓으면 화상의 위험이 가장 큽니다.
경고 : 항상 그렇지는 않지만 때때로 회전조절장치를 가장 뜨거운 위치에 세팅(시계반대방향 끝까지)하면 화상을 초래합니다. 사용자가 밸브의 핸들을
온수 쪽으로 회전 했을때 밸브로부터 나오는 물에 데이지 않도록 회전조절 장치를 조절 해야 할 필요가 있습니다.
플라스틱 텀블러에 온도계를 장착하여 물속에 넣어둡니다. 만일 물의 온도가 120°F 를 초과하면 회전조절장치는 시계방향으로 작동되어 밸브 출구쪽
물의 양을 감소시켜 120°F이하 또는 여러분이 요구하는 온도에 맞게 줄여야 져야 한다.
밸브 나오는물의온도를 조정 확대 가회전 정지 제한 을 제거 하는 것이 가능하다위치로디스크를 끌어 하려면 원하는 온도로 치아 의 맞물림 위치를
다시 조정합니다 . 시계 방향으로 출구 온도 를 감소 하고, 반 시계 방향으로 출구 를 증가 온도 . 유입수 조건에 따라 16° F - 치아 ( 노치 ) 당 온도
변화가 11° 가 될 수 없습니다. 필요 를 반복합니다. 완전히 장착 될 때까지 디스크를 밀어 넣습니다.
경고 : 디스크 회전 제한 정지 데게 부상을 초래할 수있는 설정 한 후 다시 설치하지 않으면 .
IMPORTANTE :
O Travão de Limite Rotacional é utilizado para limitar a quantidade de água quente disponível de forma a que, se estiver correctamente definido, o utilizador
não será escaldado se o puxador for acidentalmente rodado completamente para “quente” quando estiver a tomar banho ou quando estiver a encher a
banheira. A primeira posição permite a MENOR quantidade de água quente ser misturada com a água fria do sistema. Na primeira posição, a água será o
mais fria possível quando o puxador estiver completamente virado para quente. Conforme for virando o Travão de Limite Rotacional para a esquerda, irá
adicionar progressivamente mais água quente à mistura. A última posição para a esquerda irá resultar na maior quantidade de água quente na mistura, e o
risco de ferimento por água quente é maior caso alguém girar a válvula completamente para o lado quente enquanto tomar banho ou encher a banheira.
ATENÇÃO: Em alguns casos, a definição do Travão de Limite Rotacional para a posição mais quente (completamente para a esquerda) pode
resultar em ferimento por água quente. É necessário que ajuste o Travão de Limite Rotacional para que a água que sai da válvula não queime o
utililizador quando a mesma é rodada para o lado quente.
Coloque um termómetro num copo de plástico e mantenha-o na corrente da água. Se a temperatura for acima de 120°F, o Travão de Limite Rotacional
deve ser reposicionado para a direita para diminuir a temperatura da saída de água para menos de 120°F, ou até cumprir com os requisitos dos códigos
de canalização locais.
Para regular a temperatura da água que sai da válvula , retirar o disco de volta para uma posição onde é possível retirar a rotação do limite de parada e
reajustar a posição dos dentes de noivado para a temperatura desejada. No sentido horário vai diminuir a temperatura de saída , sentido anti-horário vai
aumentar a tomadatemperatura . Mudança de temperatura por dente ( notch ) poderia ser de 4 ° - 16 ° F com base nas condições da água de entrada .
Repita conforme necessário . Empurre o disco até que esteja totalmente encaixado.
ATENÇÃO: A falta de re-instalar depois de definir Disco de rotação limite de parada pode resultar em ferimentos escaldadura .
87266 Rev. B
487266 Rev. B
5