DEMON ELECTRIC THUNDERBOLT SL User manual

Thunderbolt sl
Installation Manual
Scan to watch
assembly video

OWNER’S MANUAL
Table of contents
First of all, we would like to thank you for choosing the THUNDERBOLT SL electric bike.
We warmly welcome you to our Demon Electric family. We wish you enjoy the numerous kilometers and
happy moments with your new bike.
After the initial shipment we have made many improvements and modifications for the THUNDERBOLT SL
including:
•
•
•
•
•
Suspended seat post - Takes the shock out of the big bumps, without the cost or complexity of suspension.
Adjustable handlebar stem- Provides up to 1 1/2” of rise and reach adjustment, for fully customizable
riding position.
Upgraded Shimano derailleur- Rigid cast aluminum construction gives smoother, more precise shifting.
New gearing, with taller top gear for relaxed touring, plus a lower low gear for tight, technical riding.
Demon Electric E-Bikes can be upgraded with additional accessories, such as water bottle holders, phone
mounts, etc.
ASSEMBLY INSTRUCTIONS ......................................................................................................3
INSTALL KICKSTAND .....................................................................................................................4
INSTALL HEADLIGHT AND FENDER .......................................................................................5
INSTALL FRONT WHEEL ..............................................................................................................6
INSTALL HANDLE BARS ...............................................................................................................7
INSTALL PEDALS .............................................................................................................................8
INSTALL SEAT.....................................................................................................................................9
CONNECT CONNECTORS ...........................................................................................................9
INSTALL TAIL LIGHT .....................................................................................................................10
REMOVING BATTERY .................................................................................................................10
BATTERY CHARGING ...................................................................................................................11
BATTERY CHARGING TIPS ........................................................................................................11
OPERATION ......................................................................................................................................11
DISPLAY ............................................................................................................................................12
FEATURES ........................................................................................................................................12
TFT SCREEN INSTRUCTIONS .................................................................................................13
ERROR CODE DEFINE .................................................................................................................20
WARNINGS AND SAFETY .........................................................................................................21

BELOW ARE THE GUIDELINES FOR THE INITIAL
BATTERY CHARGING PROCESS:
• Before using the e-bike for the first time, we strongly recommend that you conduct a preliminary battery
check-up and perform a full charge for optimal performance.
• To charge the battery, before riding connect the e-bike to the charger and allow the battery to reach full
capacity. According to the manufacturer’s instructions, the initial charge typically takes between 48 to 72
hours prior to your first ride.
• During the charging process, keep an eye on the LED indicator or display on your battery charger. This will
give you insights into the charging progression. If you encounter any problems, don’t hesitate to reach out to
the manufacturer for assistance.
• After the battery has been fully charged, it’s recommended to take your e-bike out for a test ride. Pay at-
tention to its performance, including the speed, range, and power-assistance levels. Any significant discrep-
ancies might imply that the battery capacity is compromised and needs further attention.
• Even when the e-bike is not being used frequently, it’s crucial to regularly charge and discharge the bat-
tery. This practice helps to prevent battery degradation during periods of storage.

2
Thunderbolt SL Manual |
IMPORTANT
Electric Bikes can be dangerous to use. The user or consumer assumes all risk of personal injuries, damage,
or failure of the bicycle or system and all other losses or damages to themselves and others and to any
property arising as a result of using the bicycle.
As with all mechanical components, the bicycle is subjected to wear and high stresses. Different materials
and components may react to wear or stress fatigue in different ways.
If the design life of a component has been exceeded, it may suddenly fail possibly causing injuries to the rider.
Any form of crack, scratches or change of coloring in highly stressed areas indicate that the life of the com-
ponent has been reached and it should be replaced.
Please do not hesitate to contact us. If any problems may occur, please email us at customersupport1@
pdintl.ca for any customer service solutions such as replacement parts, technical information, and any other
issues.
All new E-Bike purchases come with a 2-year warranty, the warranty card must be filled in and
registered in order to qualify for warranty.
For any other commercial or general inquires please contact Demon Powersports at 905 881 9510 or
DO NOT DISASSEMBLE, MODIFY OR
REPLACE ELECTRICAL PARTS.
PLEASE NOTE: THIS MANUAL IS NOT INTENDED
AS A DETAILED USER, SERVICE, REPAIR OR
MAINTENANCE MANUAL. PLEASE SEEK
ASSISTANCE FROM A QUALIFIED TECHNICIAN FOR
SERVICE, REPAIRS OR MAINTENANCE.

3
Thunderbolt SL Manual |
ASSEMBLY INSTRUCTIONS
Your bike has been pre-assembled and requires only a few simple steps to get it ready for you to ride:
Remove the outside carton after cutting the nylon bands. Remove all the inside cardboard protection and
bubble wrap. Carefully remove your bike from the carton and gently rest it in place. Be careful not to cut
any wires when cutting the zip ties.
Remove brake pad holders when installing, avoid squeezing the brakes when removing the pad holder.
Ensure the following pieces are included in the package. If there are any missing parts, please contact
Demon for help replacing missing pieces.
i) Bike
iv) Pedals v) Charger
ii) Front Wheel iii) Front Wheel Axle
vi) Assembly Tools
vii) Key for Battery viii) Tail Light ix) Kickstand x) Seat
3 mm
10 mm
15 mm
8 mm
13 mm
4 mm
5 mm
6 mm
Wrench
Set
Screw
Driver
Allen Key
Set

4
Thunderbolt SL Manual |
INSTALL KICKSTAND
Install kickstand with the 5mm Allen key.
Ensure kickstand is behind the bracket on the left side of the bike during installation.
Bracket on left
side of the bike.
Turn bolts clock-wise to tighten.
5 mm

5
Thunderbolt SL Manual |
Install fender support to the bracket on the fork using the 4 mm allen key and 8 mm wrench.
INSTALL HEADLIGHT AND FENDER
Install the headlight and fender to the front fork with the given long bolt and nut, tighten with the 5mm Allen
key and 10mm wrench.
5 mm
4 mm
10 mm
8 mm
Long bolt
fender support bracket on fork for
fender support
Nut

6
Thunderbolt SL Manual |
INSTALL FRONT WHEEL
Install the front wheel on the front fork, make sure to align the brake disk with the brake caliper, Avoid
squeezing brakes and ensure the brake disc is not rubbing against the wheel.
Fasten the wheel hub using the quick release handle.
Ensure brake disk and
brake caliper are aligned.
Smaller side of spring
to be facing the wheel.
Open quick release
handle.
Closed quick release
handle.

7
Thunderbolt SL Manual |
INSTALL HANDLE BARS
Tighten the 4 pinch screws with 4mm Allen key. Loctite is recommend on the screw. Align the brake
controls so they are facing slightly downward. Make sure the handlebar is centered.
Fine tune the position to align with your arm when seated, stem rise angle can be adjusted by loosen the big
side screw with 6mm Allen key.
6 mm
4 mm

8
Thunderbolt SL Manual |
INSTALL PEDALS
Using the 15mm wrench provided in the toolkit, attach, and tighten the pedals. PLEASE NOTE – The pedals
are marked “L” for Left and “R” for Right.
L R
The left pedal is attached by turning it counter clockwise and the right pedal is tightened by turning it clock-
wise. Make sure the pedals are tightly attached to the crank arms to prevent stripping.
(See picture below)
15 mm

9
Thunderbolt SL Manual |
INSTALL SEAT
Make sure the seat is tight enough so that you cannot twist it out of alignment. Pull the seat clamp handle
away from the seat post and slide the seat up or down to adjust it. Move the clamp handle inward toward
the seat post so it is held tight by the clamp.
CONNECT CONNECTORS
Connect the connectors near handle bar, make sure arrows are pointing towards each other when
connecting. Locate the battery key near handle bar and cut the key from zip tie.
Be sure the minimum insertion marks do not go past the top of the seat clamp and are not visible.

10
Thunderbolt SL Manual |
INSTALL TAIL LIGHT
Place the tail light anywhere on the rear of the bike, fasten the bolt using the provided screw driver.
REMOVING BATTERY
To remove the battery, insert and turn the provided key (located on the handebar) to unlock, and pull the
lever out.
Pull battery up to
remove.
The serial number is
located behind the
battery.

11
Thunderbolt SL Manual |
BATTERY CHARGING
Included with your new THUNDERBOLT SL is a lithium ion battery, along with a charger, which plugs into
a standard household electric receptacle. A lithium ion battery requires specially designed chargers. You
should never charge your battery with a substitute charger that is not designed for this use.
Your THUNDERBOLT SL battery arrives with 70% charge. It is recommended that you fully charge the
battery before your first use. The Thunderbolt battery may be charged while on the bike or removed and
charged at a location away from the Thunderbolt. To charge the battery please follow the steps below:
• Remove the rubber cover on the charging socket
• Place the charger in a flat, secure place, and connect the DC output plug from the charger (round barrel
connector) to the charging port on the side of the battery pack.
• The indicator light on the charger will be red / orange when battery is charging and will turn green when
fully charged.
The charger will charge a fully depleted battery in 3— 4 hours. If the battery will not be used for an extended
period of time, charge it fully and recharge it every 2 months. Store it in a cool, dry place. If you
experience unusual sounds or odors coming from the charger or the battery, unplug charger immediately
and contact Demon Powersports customer service.
BATTERY CHARGING TIPS
• Recharge battery after every use. This will keep the battery in good shape for longer time.
• Do not allow any liquids near or inside the battery charger.
• Do not charge the battery with any other chargers then what was originally supplied with your
THUNDERBOLT SL
• Fully charge the battery before each use to extend the life of the battery and help to reduce the chance of
over discharging the battery pack.
• Do not place the battery near fire or corrosive substances.
• Make sure the charging socket and plug are dry before connecting and charging the battery, and make
sure the charger connector is tightly inserted all the way into the socket. Failure to do so may result in HRC
(high resistance connection) which could lead to danger of overheating and possible fire hazard.
• Charge the battery in a dry place (indoor) and ensure there is sufficient ventilation.
OPERATION
Your THUNDERBOLT SL is equipped with an LCD meter that monitors pedal assist, speed, odometer, trip
distance, riding time, and battery energy level. To turn the meter on, make sure the battery is fully inserted
into the THUNDERBOLT SL battery holder.
12
Thunderbolt SL Manual |
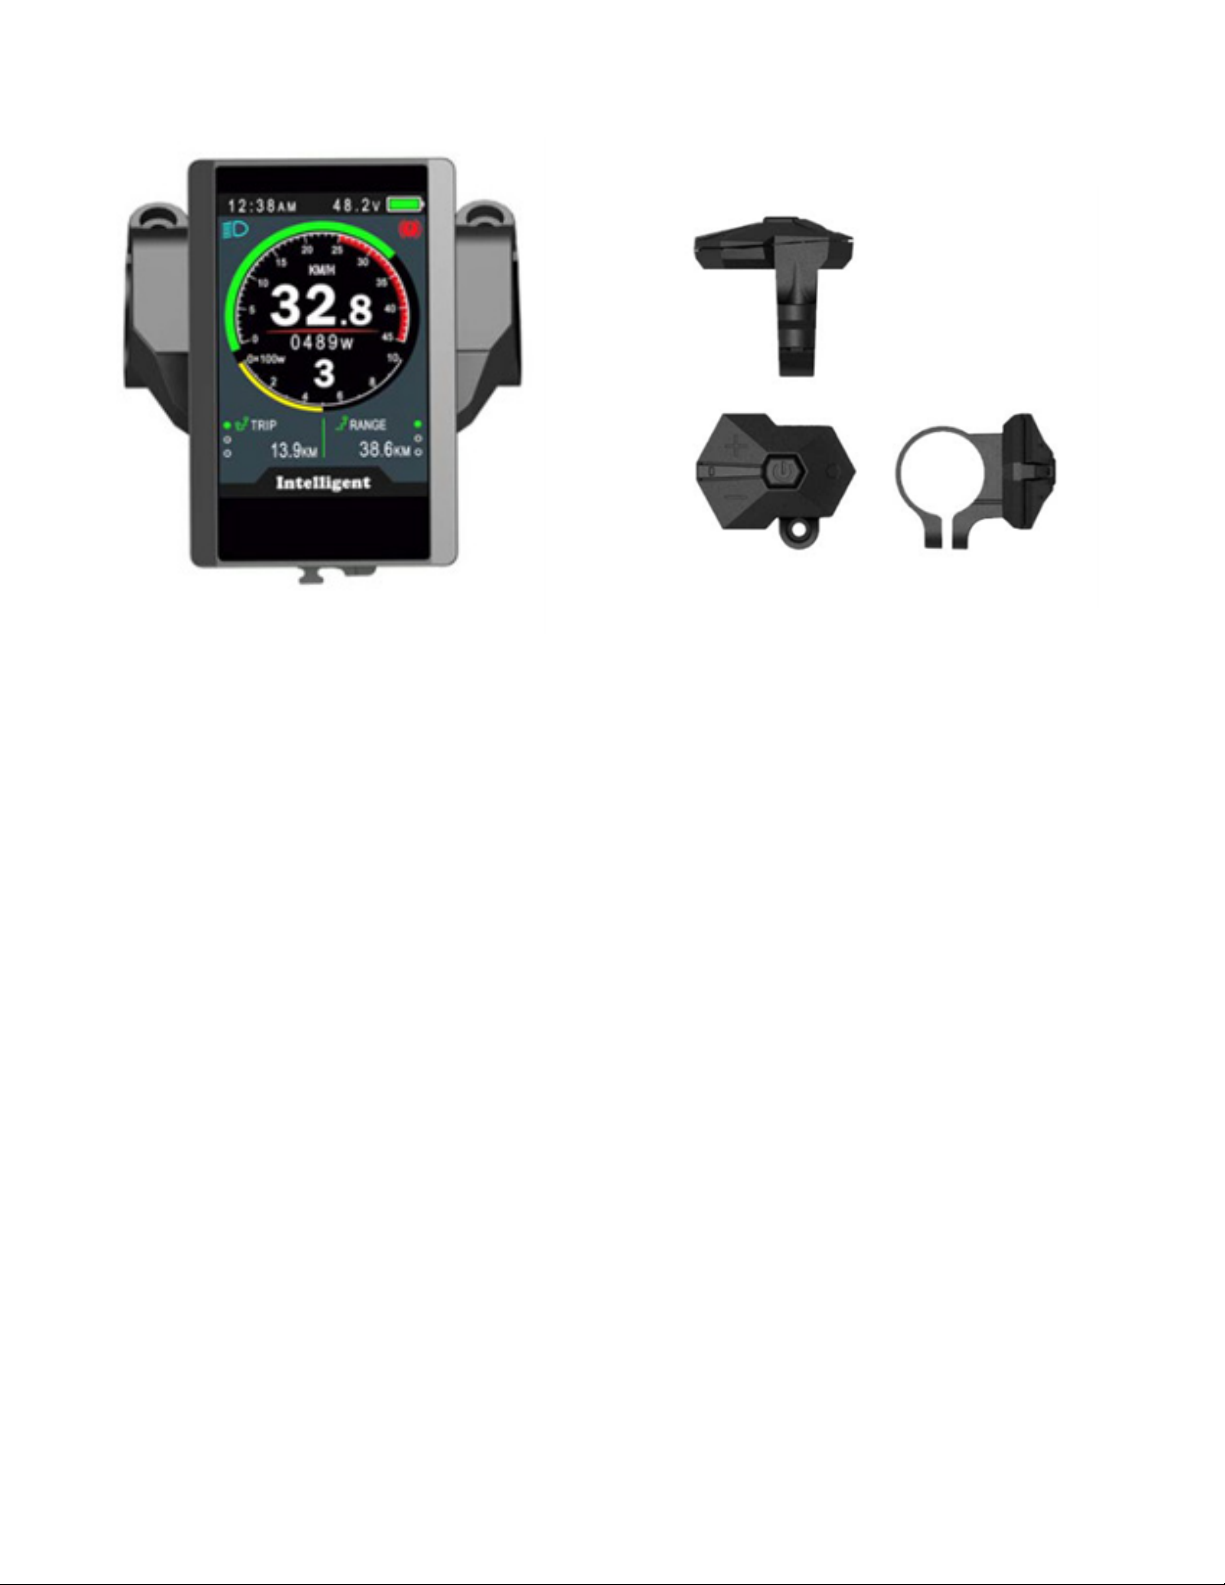
DISPLAY
FEATURES
• Suitable for low temperature, Max -20 °C.
• High-contrast 3.2inch IPS colorful matrix screen.
• Ergonomic external button design, easy to operate.
• Speed display: AVG SPEED, MAX SPEED, SPEED(Real-time).
• Kilometer / Mile: Can be set according to customers’ habits.
• Smart battery indicator: Provide a reliable battery indicator.
• 9-level Assist: 3-level/5-level/9-level optional.
• Mileage indicator: Odometer/Trip distance/ Clock/ Riding time.
• Power indicator: real time power indicator, digital or analog.
• Battery information (needs to be supported by battery communication)
• DST indicator (needs to be supported by battery communication)
• Self-Testing
• Speed limit value indicator
• Error code indicator.
• Light sensor (Optional)
• Software upgraded: Software can be upgraded through UART.
• USB charging port: 5V/500mA

13
Thunderbolt SL Manual |
Power On/Off
Press and hold Power button for 1 second can turn on/off the display. The Display can automatically shut
down when there is no operate & ride for X minutes (X could be0~9).
*If the display has been set password power on, you need to input the right password before start.
Assist level operating
Short press UP/DOWN button can change the assist level. Top assist level is 9, 0 for neutral. Level
quantities can be adjusted according to the customer requirements.
TFT SCREEN INSTRUCTIONS
Your THUNDERBOLT SL is equipped with an LCD meter that monitors pedal assist, speed, odometer, trip
distance, riding time, and battery energy level. To turn the meter on, make sure the battery is fully inserted
into the THUNDERBOLT SL battery holder.

14
Thunderbolt SL Manual |
Speed & Mileage mode switch
Short press POWER button can change the speed and mileage mode, TRIP >ODO >RANGE >TRIP > TIME
>MAX SPEED >AVG SPEED
Headlight On/Off
Press and hold UP button for 1 second can turn on/off the headlight, and the screen will switch to the
corresponding mode.
*The motor does not work when the battery voltage is low, display still can keep the headlight on for a while
when E-bike is in riding.
**If there is no operation for 5 seconds, display will return Speed (Real-Time) display automatically.
Daytime Mode Night Mode

15
Thunderbolt SL Manual |
Walking Mode (6 KM)
Press and hold DOWN button for 2 second can get into walking mode, out of the mode when releases the
button.
Data cleanup
Press and hold UP & DOWN buttons together for 1 second can reset several temporary data, temporary
data include AVG Speed / MAX Speed / Trip / Time.
Parameter setting
Double press POWER button (press interval less than 0.3 second) can get into setting menus, press UP/
DOWN buttons to change the parameter setting, press POWER button can switch to next item. Double
press POWER button will exit from menu.
* Display will automatically quit menu when there is no operation for 30 seconds.
* For safety reasons, display can’t get into MENU when riding.
* Display will quit MENU when start riding.
The e order of parameters is as follow.
* This feature needs to be supported by controller.
* These temporary data can’t be erased by power off.

16
Thunderbolt SL Manual |
Language: Default EN, Unadjustable
System: Press Up / Down button to switch between Metric / Imperial.

17
Thunderbolt SL Manual |
Brightness: Press Up / Down button to change the brightness of the backlight, is
darkness is brightness.
Auto off: Press UP/DOWN button to change the auto power off time, from 1 to 9, the
number represent time (minutes) to shut down, default value is 5 minutes.
Scenes: Press UP/DOWN button to change the scenes, Digital / Analog(default).

18
Thunderbolt SL Manual |
Battery Ind: Press UP/DOWN button to change the battery indicator, Voltage /
Percentage / OFF.
*Accurate percentage needs communication with battery.
Pow Ind: Press UP/DOWN button to change the Power indicator, Power / Current.
* This data represents power output of the battery (not motor).
This manual suits for next models
1
Table of contents
Other DEMON ELECTRIC Bicycle manuals

DEMON ELECTRIC
DEMON ELECTRIC ARGO User manual

DEMON ELECTRIC
DEMON ELECTRIC 6IX User manual

DEMON ELECTRIC
DEMON ELECTRIC REBEL User manual

DEMON ELECTRIC
DEMON ELECTRIC ESCAPE User manual

DEMON ELECTRIC
DEMON ELECTRIC BLACKTAIL User manual

DEMON ELECTRIC
DEMON ELECTRIC PHANTOM User manual

DEMON ELECTRIC
DEMON ELECTRIC PILOT User manual

DEMON ELECTRIC
DEMON ELECTRIC TRONIO User manual

DEMON ELECTRIC
DEMON ELECTRIC OUTLAW User manual


