Denon DVD-1940 User manual

DVD AUDIO-VIDEO / SUPER AUDIO CD PLAYER
DVD-1940
E6GG0EDG1ED(EN)0601.indb1E6GG0EDG1ED(EN)0601.indb1 2007/06/0115:00:082007/06/0115:00:08

– 2 – EN
CAUTION
RISK OF ELECTRIC SHOCK
DO NOT OPEN
CAUTION:
TO REDUCE THE RISK OF ELECTRIC SHOCK, DO NOT REMOVE
COVER (OR BACK). NO USER SERVICEABLE PARTS INSIDE.
REFER SERVICING TO QUALIFIED SERVICE PERSONNEL.
The lightning flash with arrowhead symbol, within an
equilateral triangle, is intended to alert the user to the
presence of uninsulated “dangerous voltage” within the
product’s enclosure that may be of sufficient magnitude
to constitute a risk of electric shock to persons.
The exclamation point within an equilateral triangle is
intended to alert the user to the presence of important
operating and maintenance (servicing) instructions in
the literature accompanying the appliance.
WARNING: TO REDUCE THE RISK OF FIRE OR ELECTRIC SHOCK, DO NOT EXPOSE
THIS APPLIANCE TO RAIN OR MOISTURE.
PRECAUTIONS
This unit employs a laser. Only a qualified service person should remove the cover or attempt to service this device, due to
possible eye injury.
CAUTION: USE OF CONTROLS OR ADJUSTMENTS OR PERFORMANCE OF PROCEDURES OTHER THAN THOSE
SPECIFIED HEREIN MAY RESULT IN HAZARDOUS RADIATION EXPOSURE.
CAUTION: VISIBLE AND INVISIBLE LASER RADIATION WHEN OPEN AND INTERLOCK DEFEATED. DO NOT
STARE INTO BEAM.
LOCATION: PRINTED ON THE BACK
Nonuse periods - Turn the unit off when it is not in use. Unplug the unit from the household AC outlet if it is
not to be used for a long time. Unplug the unit during lightning storms.
Please read this operating instructions carefully before using your DVD video player,
and keep this for future reference.
We declare under our sole responsibility that this product, to which this declaration relates, is in conformity with the following
standards:
EN60065, EN55013, EN55020, EN61000-3-2 and EN61000-3-3. Following the provisions of 89/336/EEC and 2006/95/EC
Directive.
Use only discs marked with logos listed on page 6.
The main power supply is engaged when the main plug is plugged in a 230V, 50Hz AC outlet. To operate the unit, press the
ON/STANDBY button and turn on the unit.
Laser Safety
Declaration of Conformity
Power Supply
Important
E6GG0EDG1ED(EN)0601.indb2E6GG0EDG1ED(EN)0601.indb2 2007/06/0115:00:082007/06/0115:00:08

– 3 – EN
PRECAUTIONS
English
To avoid fire or electric shock, do not expose this unit to rain
or moisture.
WARNING:
LIVE PARTS INSIDE.
DO NOT REMOVE ANY SCREWS.
For safety and optimum performance of this unit:
• Do not stand up the unit vertically. Install the unit in a
horizontal and stable position. Do not place anything
directly on top of the unit. Do not place the unit directly on
top of the TV.
• Shield it from direct sunlight and keep it away from sources
of intense heat. Avoid dusty or humid places. Avoid places
with insufficient ventilation for proper heat dissipation.
Do not block the ventilation holes on the sides of the
unit. Avoid locations subject to strong vibration or strong
magnetic fields.
• Be sure to remove a disc and unplug the AC power cord
from the outlet before carrying the unit.
Noise or disturbance of the picture may be generated
if this unit or any other electronic equipment using
microprocessors is used near a tuner or TV.
If this happens, take the following steps:
• Install this unit as far as possible from the tuner or TV.
• Set the antenna wires from the tuner or TV away from this
unit’s power cord and input/output connection cords.
• Noise or disturbance tends to occur particularly when
using indoor antennas or 300
Ω
/ohms feeder wires. We
recommend using outdoor antennas and 75
Ω
/ohms coaxial
cables.
NOTE:
• For heat dispersal, do not install this equipment in a
confined space such as a book case or similar unit.
Moisture condensation may occur inside the unit when it is
moved from a cold place to a warm place, or after heating a
cold room or under conditions of high humidity. Do not use
the DVD Player at least for 2 hours until its inside is dry.
• Do not handle the power cord with wet hands.
• Do not pull on the power cord when disconnecting it from
AC wall outlet. Grasp it by the plug.
• If, by accident, water is spilled on this unit, unplug the
power cord immediately and take the unit to our Authorised
Service Centre for servicing.
1) Do not attempt to open the cabinet. There are no parts
you can service inside. Refer all servicing to qualified
service personnel.
2) Slot and openings in the cabinet and at the side or
bottom are provided for ventilation. To ensure reliable
operation and to protect the unit from overheating
these opening must not be blocked or covered. Avoid
enclosed spaces such as book cases unless proper
ventilation is provided.
3) Keep the unit away from the radiator heat sources.
4) Avoid using near strong magnetic fields.
5) Do not push objects of any kind into this through the
cabinet slot as they could touch current carrying parts
or short circuit parts resulting in a fire or electric shock.
6) Never spill liquid of any kind on this unit.
If liquid is spilled into the unit, consult qualified service
engineer.
7) Use this unit in a horizontal (flat) position only.
8) This equipment is in Stand-by mode when it is turned
off whilst the power cord is connected.
9) Keep the set free from moisture, water and dust.
10) Sufficiently ventilate the place of installation.
If the unit is left in a room full of the smoke from
cigarettes, etc., for long periods of time, the surface of
the optical pickup could get dirty, in which case it will
not be able to read the signals properly.
11) Store the operating instructions in a safe place.
After reading the operating instructions, store them in a
safe place as they could come in handy in the future.
12) Handle the power cord carefully. Hold the plug when
unplugging the cord.
13) All the safety cautions and operating instructions
should be read before the DVD player is operated.
14) Use caution not to pinch your finger in the disc slot.
15) Do not put heavy objects on the AC power cord.
16) Keep the AC power cord away from heat appliances.
17) Be sure to remove a disc and unplug the AC power
cord from the outlet before carrying the DVD player.
18) Do not put any pressure to the DVD player when
carrying.
19) Do not use the DVD player outdoors.
20) Do not place any combustible objects on the device
(candles, etc.).
21) Disconnect the mains plug to shut off when find
troubles or not in use.
22) The mains plug shall remain readily operable.
23) Read both manual instructions to ensure correct and
safe installation and interconnection of the unit in
multimedia systems.
24) Keep the distances 20 cm around apparatus of
ventilation openings.
25) To completely disconnect this product from the mains,
disconnect the plug from the wall socket outlet. The
mains plug is used to completely interrupt the power
supply to the unit and must be within easy access by
the user.
Warning Caution
Installation Location
Cautions on Installation
Dew Warning
Avoid the Hazards of Electrical Shock and Fire
10 cm or more
Wall
E6GG0EDG1ED(EN)0601.indb3E6GG0EDG1ED(EN)0601.indb3 2007/06/0115:00:082007/06/0115:00:08

– 4 – EN
TABLE OF CONTENTS
CPRECAUTIONS . . . . . . . . . . . . . . . . . . . . . . . . . . . 2
Laser Safety . . . . . . . . . . . . . . . . . . . . . . . . . . . . . . . . . . . 2
Declaration of Conformity. . . . . . . . . . . . . . . . . . . . . . . . . 2
Important . . . . . . . . . . . . . . . . . . . . . . . . . . . . . . . . . . . . . 2
Power Supply . . . . . . . . . . . . . . . . . . . . . . . . . . . . . . . . . . 2
Warning . . . . . . . . . . . . . . . . . . . . . . . . . . . . . . . . . . . . . . 3
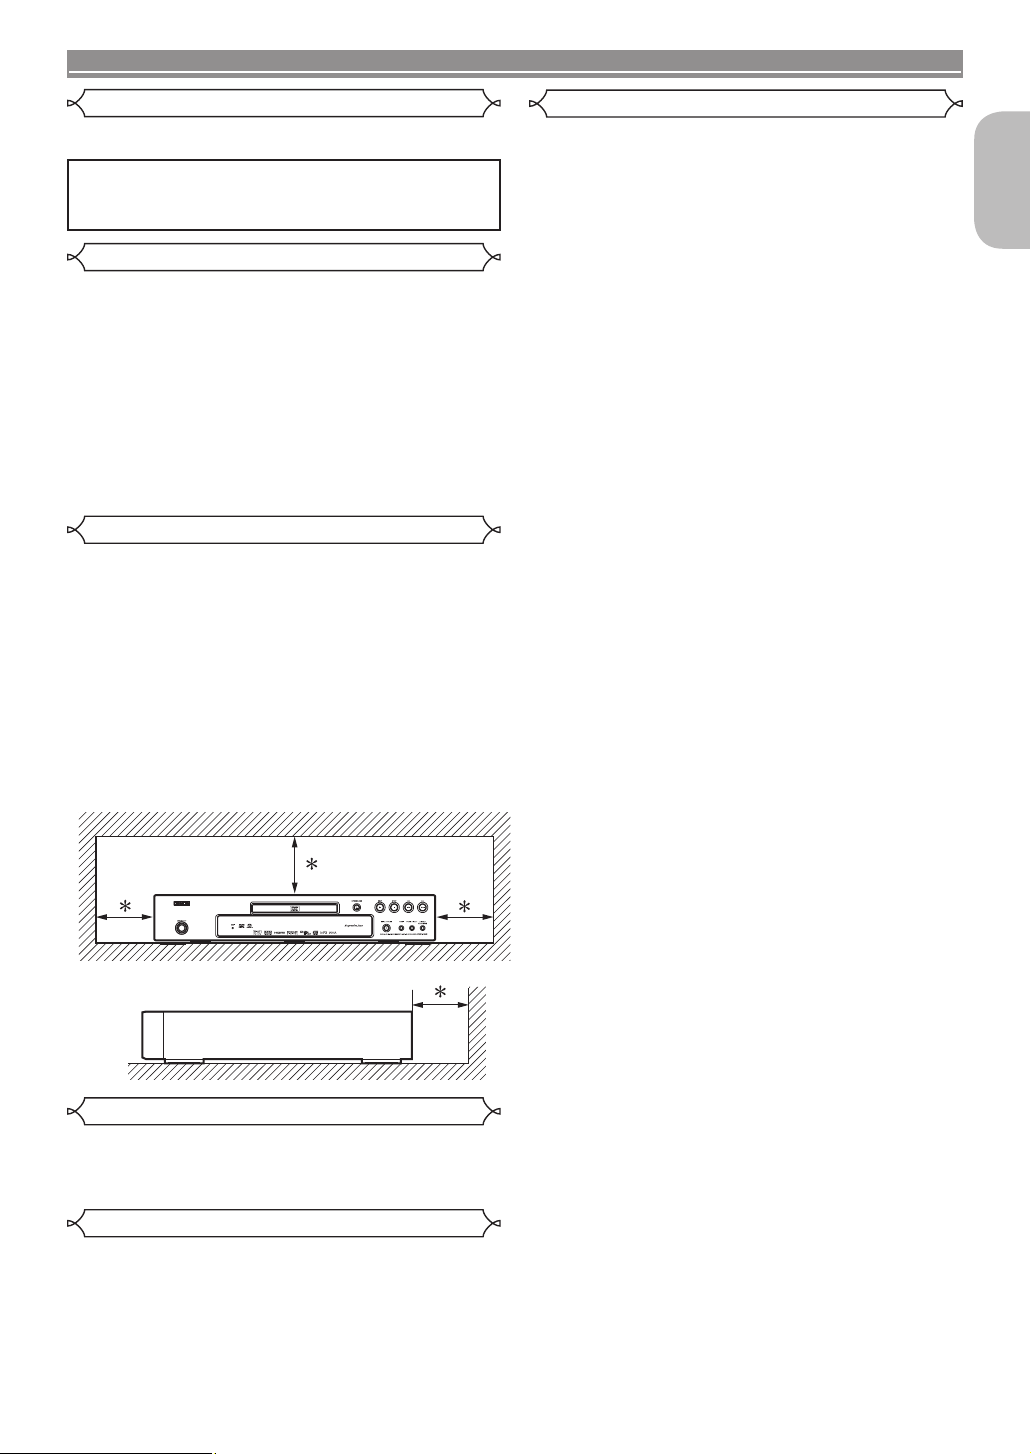
Installation Location . . . . . . . . . . . . . . . . . . . . . . . . . . . . . 3
Cautions on Installation . . . . . . . . . . . . . . . . . . . . . . . . . . 3
Dew Warning . . . . . . . . . . . . . . . . . . . . . . . . . . . . . . . . . . 3
Avoid the Hazards of Electrical Shock and Fire. . . . . . . . 3
Caution . . . . . . . . . . . . . . . . . . . . . . . . . . . . . . . . . . . . . . . 3
CINTRODUCTION. . . . . . . . . . . . . . . . . . . . . . . . . . . 5
About Copyright . . . . . . . . . . . . . . . . . . . . . . . . . . . . . . . . 5
Notice for the Progressive Scan Outputs . . . . . . . . . . . . . 5
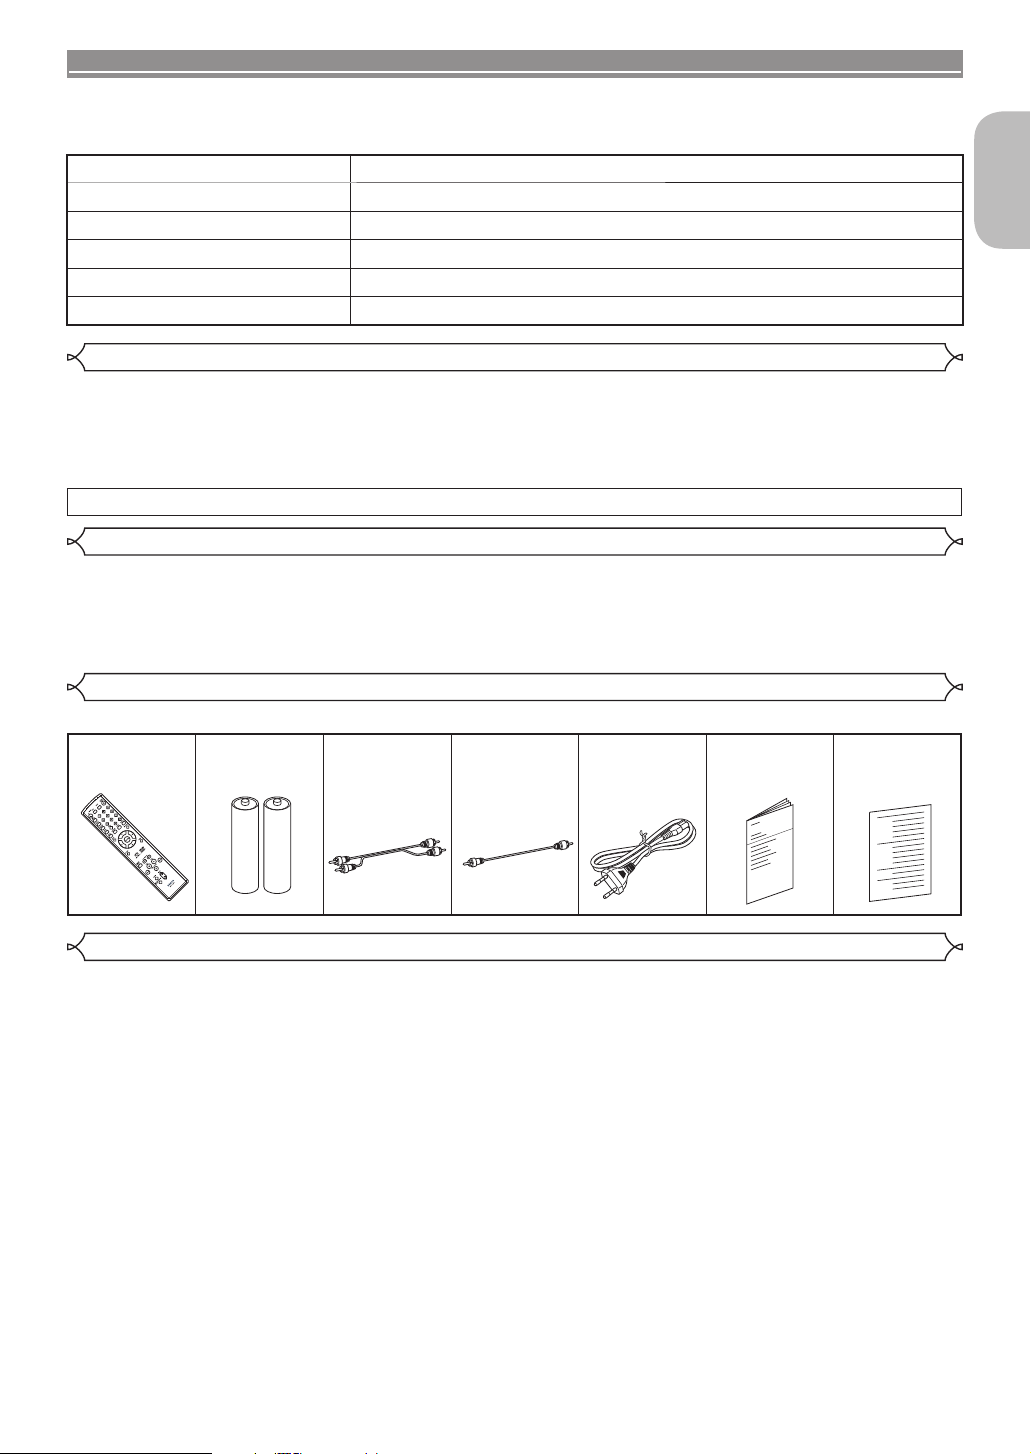
Supplied Accessories . . . . . . . . . . . . . . . . . . . . . . . . . . . . 5
Symbols Used in this Manual. . . . . . . . . . . . . . . . . . . . . . 5
CABOUT THE DISCS . . . . . . . . . . . . . . . . . . . . . . . . 6
Playable Discs . . . . . . . . . . . . . . . . . . . . . . . . . . . . . . . . . 6
CFEATURES . . . . . . . . . . . . . . . . . . . . . . . . . . . . . . . 7
CFUNCTIONAL OVERVIEW. . . . . . . . . . . . . . . . . . . 8
FRONT PANEL. . . . . . . . . . . . . . . . . . . . . . . . . . . . . . . 8
REMOTE CONTROL . . . . . . . . . . . . . . . . . . . . . . . . . . 8
Loading the Batteries . . . . . . . . . . . . . . . . . . . . . . . . . . . . 8
Tour of the Remote Control . . . . . . . . . . . . . . . . . . . . . . . 9
Front Panel Display . . . . . . . . . . . . . . . . . . . . . . . . . . . . 11
Displays during Operation . . . . . . . . . . . . . . . . . . . . . . . 11
Using a Remote Control . . . . . . . . . . . . . . . . . . . . . . . . . 11
CCONNECTIONS . . . . . . . . . . . . . . . . . . . . . . . . . . 12
Description - Rear Panel . . . . . . . . . . . . . . . . . . . . . . . . 12
Connection to an Audio System. . . . . . . . . . . . . . . . . . . 13
Connection to 5.1-channel Surround Sound System. . . 14
Connection to a TV (for video) . . . . . . . . . . . . . . . . . . . . 15
Connection to a TV with an HDMI Compatible Port. . . . 16
Connecting the AC Cord . . . . . . . . . . . . . . . . . . . . . . . . 16
CDISC PLAYBACK . . . . . . . . . . . . . . . . . . . . . . . . . 17
Basic Playback . . . . . . . . . . . . . . . . . . . . . . . . . . . . . . . . 17
CANCELLING AND CALLING BACK
PBC FUNCTION. . . . . . . . . . . . . . . . . . . . . . . . . . . . . 17
HDMI Setup . . . . . . . . . . . . . . . . . . . . . . . . . . . . . . . . . . 17
Pure Direct Mode . . . . . . . . . . . . . . . . . . . . . . . . . . . . . . 17
Brightness of the Front Panel Display . . . . . . . . . . . . . . 17
TV TYPE. . . . . . . . . . . . . . . . . . . . . . . . . . . . . . . . . . . 17
General Features . . . . . . . . . . . . . . . . . . . . . . . . . . . . . . 18
Disc Menu. . . . . . . . . . . . . . . . . . . . . . . . . . . . . . . . . . . . 18
Title Menu. . . . . . . . . . . . . . . . . . . . . . . . . . . . . . . . . . . . 18
CALLING UP A MENU SCREEN DURING
PLAYBACK. . . . . . . . . . . . . . . . . . . . . . . . . . . . . . . . . 18
DVD Audio Playback . . . . . . . . . . . . . . . . . . . . . . . . . . . 18
PLAYBACK OF ALL GROUPS. . . . . . . . . . . . . . . . . . 18
PLAYBACK FROM A DESIRED GROUP . . . . . . . . . 18
PAGE SELECTION . . . . . . . . . . . . . . . . . . . . . . . . . . 18
PLAYBACK OF THE BONUS GROUP . . . . . . . . . . . 18
Still / Pause . . . . . . . . . . . . . . . . . . . . . . . . . . . . . . . . . . 19
Resume . . . . . . . . . . . . . . . . . . . . . . . . . . . . . . . . . . . . . 19
Fast Forward / Reverse Search . . . . . . . . . . . . . . . . . . . 19
Slow Forward / Slow Reverse . . . . . . . . . . . . . . . . . . . . 19
Step by Step Playback . . . . . . . . . . . . . . . . . . . . . . . . . . 19
Picture Control . . . . . . . . . . . . . . . . . . . . . . . . . . . . . . . . 19
Zoom . . . . . . . . . . . . . . . . . . . . . . . . . . . . . . . . . . . . . . . 19
Dialog Speed . . . . . . . . . . . . . . . . . . . . . . . . . . . . . . . . . 20
Slide Show Mode . . . . . . . . . . . . . . . . . . . . . . . . . . . . . . 20
Title / Chapter Search . . . . . . . . . . . . . . . . . . . . . . . . . . 20
BY USING THE SEARCH MODE BUTTON . . . . . . . 20
BY USING THE SKIP BUTTONS HG. . . . . . . . . 20
Track Search . . . . . . . . . . . . . . . . . . . . . . . . . . . . . . . . . 20
BY USING THE SEARCH MODE BUTTON . . . . . . . 20
BY USING THE SKIP BUTTONS HG. . . . . . . . . 21
Time Search . . . . . . . . . . . . . . . . . . . . . . . . . . . . . . . . . . 21
Marker Setup Screen . . . . . . . . . . . . . . . . . . . . . . . . . . . 21
Repeat . . . . . . . . . . . . . . . . . . . . . . . . . . . . . . . . . . . . . . 21
REPEAT TITLE / CHAPTER . . . . . . . . . . . . . . . . . . . 21
REPEAT TRACK / GROUP / ALL . . . . . . . . . . . . . . . 21
A-B REPEAT . . . . . . . . . . . . . . . . . . . . . . . . . . . . . . . 22
Programme Playback . . . . . . . . . . . . . . . . . . . . . . . . . . . 22
Random Playback . . . . . . . . . . . . . . . . . . . . . . . . . . . . . 22
MP3 / JPEG / WMA Playback . . . . . . . . . . . . . . . . . . . . 23
DivX®Playback . . . . . . . . . . . . . . . . . . . . . . . . . . . . . . . . 24
DivX®Subtitle . . . . . . . . . . . . . . . . . . . . . . . . . . . . . . . . . 25
Changing the On-Screen Display. . . . . . . . . . . . . . . . . . 25
Audio Language . . . . . . . . . . . . . . . . . . . . . . . . . . . . . . . 27
Subtitle Language. . . . . . . . . . . . . . . . . . . . . . . . . . . . . . 27
Camera Angle. . . . . . . . . . . . . . . . . . . . . . . . . . . . . . . . . 28
Virtual Surround . . . . . . . . . . . . . . . . . . . . . . . . . . . . . . . 28
Sound Mode . . . . . . . . . . . . . . . . . . . . . . . . . . . . . . . . . . 28
Stereo Sound Mode . . . . . . . . . . . . . . . . . . . . . . . . . . . . 28
Super Audio CD Setup . . . . . . . . . . . . . . . . . . . . . . . . . . 28
CDVD SETUP . . . . . . . . . . . . . . . . . . . . . . . . . . . . . 29
Language Setting . . . . . . . . . . . . . . . . . . . . . . . . . . . . . . 29
Display Setting . . . . . . . . . . . . . . . . . . . . . . . . . . . . . . . . 29
Audio Setting . . . . . . . . . . . . . . . . . . . . . . . . . . . . . . . . . 30
Speaker Setting for ANALOG AUDIO . . . . . . . . . . . . . . 31
Speaker Setting for HDMI AUDIO . . . . . . . . . . . . . . . . . 32
Ratings Control. . . . . . . . . . . . . . . . . . . . . . . . . . . . . . . . 32
RATING LEVEL . . . . . . . . . . . . . . . . . . . . . . . . . . . . . 32
IF YOU FORGET THE PASSWORD . . . . . . . . . . . . . 33
CONTROL LEVELS . . . . . . . . . . . . . . . . . . . . . . . . . . 33
Others Setting. . . . . . . . . . . . . . . . . . . . . . . . . . . . . . . . . 33
Reset to the Default Settings
(except for RATINGS and VIDEO OUT) . . . . . . . . . . . . 34
Language Code List . . . . . . . . . . . . . . . . . . . . . . . . . . . . 34
CMAINTENANCE . . . . . . . . . . . . . . . . . . . . . . . . . . 34
CTROUBLESHOOTING GUIDE . . . . . . . . . . . . . . . 35
CSPECIFICATIONS . . . . . . . . . . . . . . . . . . . . . . . . 37
CPIN CONNECTION (AV1). . . . . . . . . . . . . . . . . . . 37
Make your contribution to the environment!!!
• Used up batteries do not belong in the dust bin.
•
You can dispose of them at a collection point for used up batteries or special waste. Contact your council for details.
A NOTE ABOUT RECYCLING:
This product’s packaging materials are recyclable and can be reused. Please dispose of any materials
in accordance with the local recycling regulations.
When discarding the unit, comply with local rules or regulations.
Batteries should never be thrown away or incinerated but disposed of in accordance with the local
regulations concerning chemical waste.
This product and the accessories packed together constitute the applicable product according to the
WEEE directive except batteries.
E6GG0EDG1ED(EN)0601.indb4E6GG0EDG1ED(EN)0601.indb4 2007/06/0115:00:082007/06/0115:00:08

– 5 – EN
INTRODUCTION
English
The serial number of this product may be found on the back of the DVD player. No others have the same serial
number as yours. You should record the number and other vital information here and retain this book as a
permanent record of your purchase to aid identification in case of theft. Serial numbers are not kept on file.
Date of Purchase
Dealer Purchase from
Dealer Address
Dealer Phone No.
Model No.
Serial No.
Unauthorized copying, broadcasting, public performance and lending of discs are prohibited.
This product incorporates copyright protection technology that is protected by U.S. patents and other intellectual
property rights. Use of this copyright protection technology must be authorised by Macrovision, and is intended
for home and other limited viewing uses only unless otherwise authorised by Macrovision. Reverse engineering
or disassembly is prohibited.
U.S. Patent Nos. 4,631,603; 4,819,098; 4,907,093; 5,315,448; and 6,516,132.
Consumers should note that not all high definition television sets are fully compatible with this product and may
cause artifacts to be displayed in the picture. In case of picture problems with 480(525) or 576(625) progressive
scan output, it is recommended that the user switch the connection to the ‘standard definition’ output. If there
are questions regarding your TV set compatibility with this 480p(525p) or 576p(625p) DVD player, please
contact our customer service centre.
Please check to make sure the following items are included with the main unit in the carton.
Remote control
···················· 1 “R6P” (AA)
batteries······ 2 Audio cable
···················· 1 Video cable
···················· 1 AC cord
···················· 1 Operating
Instructions
···················· 1
Service
Station List
···················· 1
The following symbols appear below in some headings and notes in this manual, with the following meanings.
1: Description refers to playback of DVD-Video discs (including DVD-R/RW discs).
2: Description refers to playback of DVD-Audio discs.
3: Description refers to playback of Video CDs.
4: Description refers to playback of Super Audio CDs.
5: Description refers to playback of Audio CDs.
6: Description refers to playback of discs formatted with MP3.
7: Description refers to viewing of JPEG discs.
8: Description refers to playback of discs formatted with WMA.
9: Description refers to playback of discs formatted with DivX®.
Symbols Used in this Manual
Supplied Accessories
About Copyright
Notice for the Progressive Scan Outputs
E6GG0EDG1ED(EN)0601.indb5E6GG0EDG1ED(EN)0601.indb5 2007/06/0115:00:082007/06/0115:00:08

– 6 – EN
ABOUT THE DISCS
Playable
discs Mark (logo) Region code Recorded
signals Disc size Disc types
DVD-Audio
* 1, 2, 4 −
Digital audio
+
Digital video
(MPEG2)
12 cm
or
8 cm
DVD-Video
* 1, 2, 4
or
Digital video
(MPEG2)
MP3,
JPEG,
WMA*9,
DivX®
12 cm
or
8 cm
DVD-R
DVD-RW
* 1, 2, 3, 4,
5, 6, 7, 9
Video CD
* 2, 4, 8 −
Digital video
with
audio
12 cm
or
8 cm
Super
Audio CD
* 2, 4
−Digital audio
Audio CD
* 2, 4 −Digital audio
CD-R
CD-RW
* 2, 3, 4, 6,
7, 9
−
Digital audio
MP3
WMA*9
Digital picture
(JPEG)
DivX®
Picture CD
* 2, 3, 4, 6,
7
−JPEG 12 cm
is a trademark of DVD Format/Logo Licensing Corporation. is trademark of Eastman Kodak Company.
DivX, DivX Ultra Certified, and associated logos are trademarks of DivX, Inc.
and are used under license.
If you cannot play back a disc which bears one of the marks above, check the following notes.
*1: Certain DVD discs do not operate as described in this manual due to the intentions of the disc’s producers.
*2: Scratched or stained discs may not be played back.
*3: Some discs cannot be played back because of incompatible recording conditions, characteristics of the recorder or
special properties of discs.
*4: You can play back discs which bear the marks above. If you use nonstandardised discs, this unit may not play them
back. Even if they are played back, the sound or video quality will be compromised.
*5: Only the discs recorded in the video format and finalised can be played back.
Unfinalised discs cannot be played back. Depending on the recording status of a disc, the disc may not be played back
at all or normally (the picture or sound may be distorted, etc.).
*6:
If there is too much recordable space left on a disc (the used portion is less than 55 mm across), it may not be played back properly.
*7: Do not glue paper or put stickers on to the disc. These may damage the disc, and the unit may not read it correctly.
*8: This unit conforms to ver.1.1 and ver.2.0 of Video CD standard, with PBC function.
Ver.1.1 (without PBC function): You can enjoy playback picture as well as music CD.
Ver.2.0 (with PBC function): While using a Video CD with PBC function, “Pbc” appears on the screen and the display.
NOTE: When playing back Video CDs with PBC function, some operations (e.g., track search and repeat tracks) cannot
be performed. Cancel PBC function temporarily to perform those operations (refer to page 17).
*9: This player cannot play back the disc contents protected by Windows Media Digital Rights Management (DRM).
What is PBC? “PBC” stands for Playback Control.
You can play back interactive software using menu screens. Refer to instructions in the Video CD.
•NEVER play back the following discs. Otherwise,
malfunction may result!
DVD-RAM / CD-i / Photo CD / DVD with region codes other
than 2 or ALL / DVD-ROM for personal computers / CD-
ROM for personal computers
•Any other discs without compatibility indications
Playable Discs
Example GROUP 1 GROUP 2
Track 1 Track 2 Track 3 Track 4 Track 1 Track 2
(DVD-R/RW only)
Example GROUP 1 GROUP 2
Track 1 Track 2 Track 3 Track 4 Track 5 Track 6
MP3,
JPEG,
WMA,
DivX®
Example Title 1 Title 2
Chapter 1 Chapter 2 Chapter 3 Chapter 4 Chapter 1 Chapter 2
Example
Track 1 Track 2 Track 3 Track 4 Track 5 Track 6
Video CD,
Super
Audio CD,
Audio CD
Example
Track 1 Track 2 Track 3 Track 4 Track 5 Track 6
MP3,
JPEG,
WMA,
DivX®
GROUP 1 GROUP 2
CAUTION:
• Use caution not to pinch your finger in the disc slot.
• Be sure to remove a disc and unplug the AC power
cord from the outlet before carrying the DVD player.
E6GG0EDG1ED(EN)0601.indb6E6GG0EDG1ED(EN)0601.indb6 2007/06/0115:00:092007/06/0115:00:09

FEATURES
English
– 7 – EN
•Progressive Scan system
The progressive scan system provides less flickering and
images in higher resolution than that of traditional 480i
(525i), 576i (625i) or multi television signals through the
interlace scan system.
• TV Type
Use this to set your TV’s video format (MULTI, NTSC or
PAL).
•
Analogue 5.1-channel Dolby and DTS surround
output
This player is equipped with analogue Multi-channel Dolby
and DTS surround audio out jacks for playback.
•HDMI (High-Definition Multimedia Interface)
You can enjoy clearer video output when connecting this
player to a display equipment with an HDMI-compatible
port.
•Dialog Speed
Playback in slightly faster or slower speed while keeping
the sound quality as in the normal playback.
Dialog speed is available only on discs recorded in the
Dolby Digital format.
•Still/Fast/Slow/Step playback
Various playback modes are available including still
pictures, fast forward/reverse, slow motion and step
frames.
•Still Mode
The resolution of pictures while in the still (pause) mode is
adjusted.
•Random Playback for Super Audio CD, Audio CD,
MP3, JPEG, DVD-Audio and WMA
This player can shuffle the playback order of tracks in
random sequence.
•Programme Playback for Super Audio CD, Audio
CD, MP3, JPEG, DVD-Audio and WMA
You can programme the playback order of tracks in a
desired sequence.
•DVD menus in a desired language
You can display DVD menus in a desired language if the
language is available on the DVD.
•Auto Power Off
The power turns off automatically if there is no activity at
the player or its remote control for more than 30 minutes
(refer to page 33).
•Subtitles in a desired language
You can select a language for subtitles if the language is
available on the DVD and DivX®.
•Selecting a camera angle
You can select a desired camera angle if a disc contains
sequences recorded from different angles.
•Choices for audio language and sound mode
You can select a desired audio language and sound mode
if different languages and modes are available on the disc.
•Ratings Control (Parental lock)
You can set the control level to limit playback of discs
which may not be suitable for children.
•
Super Audio CD multi-channel playback
compatibility
In addition to playing DVD-Video and DVD-Audio discs,
this player can play multi-channel Super Audio CDs and a
maximum of 5.1 channels can be output.
•Automatic detection of discs
This player automatically detects if a loaded disc is DVD-
Video, DVD-Audio, Video CD, Super Audio CD, Audio CD,
MP3, JPEG, WMA or DivX®.
•Pure Direct
The sound quality of analogue audio output is improved by
turning off HDMI output, video signal output, and the front
panel display.
•Direct Search
You can search a desired title, chapter, and track with
numeric button during playback or in stop mode.
•On-screen display
Information about the current operation can be displayed
on the TV screen, allowing you to confirm the currently
active functions (such as programme playback), using the
remote control.
•Dimmer
The brightness of the display can be adjusted.
•Screen Saver
The screen saver programme starts if there is no activity
at the player or its remote control for more than 5 minutes.
The brightness of the display is darken by 75%. The
programme is inactivated when there is any activity.
•Picture Control
Picture Control adjusts brightness, contrast, colour,
gamma correction and sharpness of the specific display.
•Search
Chapter search: Search for a desired chapter.
Title search: Search for a desired title.
Group search: Search for a desired group.
Page search: Search for a desired page.
Track search: Search for a desired track.
Time search: Search for a desired time point of a title
or track.
•Repeat
Chapter: Repeated playback of a chapter of the disc.
Title: Repeated playback of a title of the disc.
Track: Repeated playback of a track of the disc.
All: Repeated playback of the entire disc.
(exclude DVD-Video)
A-B: Repeated playback of a part between two points.
Group: Repeated playback of a folder of the DVD-Audio/
MP3/JPEG/WMA/DivX®disc.
•Zoom
2-time or 4-time magnified image can be displayed.
•Marker
Electronic reference point designated by user can be
called back.
•Resume Playback
You can resume playback from the point at which the
playback has been stopped.
•COMPONENT VIDEO OUT Jacks
Jacks located on the back of the DVD Player which are
used to send high-quality video to a TV via Component
Video In Jacks.
•Bit rate indication
•DRC (Dynamic Range Control)
You can control the range of sound volume.
•MPEG sound
This player can handle a disc that supports MPEG audio
when it is connected to an MPEG decoder.
•Displaying a JPEG picture
Kodak Picture CDs can be played back. Still images
stored in JPEG format on DVD-R/RW or CD-R/RW can
also be played back.
•Reproducing WMA data
You can enjoy WMA files which are recorded on DVD-R/
RW or CD-R/RW.
•Playing back an MP3 disc
You can enjoy MP3 files which are recorded on DVD-R/
RW or CD-R/RW.
•Reproducing DivX®data
You can enjoy DivX®files which are recorded on DVD-R/
RW or CD-R/RW.
• Official DivX®Ultra Certified product
• Plays all versions of DivX®video (including DivX®6)
with enhanced playback of DivX®media files and the
DivX Media Format.
“WMA” (Windows Media Audio) is an audio
codec developed by Microsoft®in the United
States of America.
E6GG0EDG1ED(EN)0601.indb7E6GG0EDG1ED(EN)0601.indb7 2007/06/0115:00:092007/06/0115:00:09

– 8 – EN
FUNCTIONAL OVERVIEW
REMOTE CONTROL
1 2 3 4 5
6/25
7/29
1213 11 10 98
14
15
16
17
19
20
21
22
24
5
1
36
3
33
34
32
31
30
29
11
28
7
4
35
18
6
23
25
26
27
FRONT PANEL 1. POWER ON/OFF (ON/STANDBY) Buttons [page 17]
2. Disc loading tray
3. OPEN/CLOSE Button [page 17]
4. PLAY Button [page 17]
5. STOP Button [page 17]
6. H(SKIP DOWN) Button [page 20]
7. G(SKIP UP) Button [page 20]
8. DIMMER NTSC/PAL Button [page 17]
9. PURE DIRECT Button [page 17]
Press to activate Pure Direct function to reduce noise
level.
10. HDMI Button [page 17]
Press to set the HDMI connector’s video signal output
mode.
11. STILL/PAUSE Button [page 19]
12. Display, Remote Sensor Window
13. HDMI indicator [page 17]
Lights up when there is video signal output from the
HDMI OUT jack.
14. A-B REPEAT Button [page 22]
15. REPEAT Button [page 21]
16. RANDOM Button [page 22]
17. ZOOM Button [page 19]
18. CLEAR Button [page 21]
19. ANGLE Button [page 28]
20. MENU Button [page 18]
21. ENTER Button [page 18]
22. Cursor Buttons [page 18]
23. RETURN Button [page 18]
24. SEARCH MODE Button [page 20]
25. h(Fast Reverse SEARCH) Button [page 19]
Press more than 2 seconds when you use the front
panel button for this function.
26. GROUP Button [page 18]
27. SUPER AUDIO CD SET UP Button [page 28]
28. PAGE Buttons [page 18]
29. g(Fast Forward SEARCH) Button [page 19]
Press more than 2 seconds when you use the front
panel button for this function.
30. SETUP Button [page 29]
31. SUBTITLE Button [page 27]
32. TOP MENU Button [page 18]
33. DISPLAY Button [page 25]
34. AUDIO Button [page 27]
35. Numeric Buttons [page 17]
36. MODE Button [page 19]
1. Open the battery compartment cover.
2. Insert two “R6P” (AA) batteries, with
each one oriented correctly.
3. Close the cover.
Cautions On Batteries
• Use “R6P” (AA) batteries in this remote control unit.
• Replace the batteries with new ones approximately once a year, though this
depends on the frequency with which the remote control unit is used.
•
If the remote control unit does not function within a close proximity of the main
unit, replace the batteries with new ones, even if less than a year has passed.
• The included batteries are only for verification purpose. Replace them with
new batteries as soon as possible.
• When inserting the batteries, be careful to do so in the proper direction,
following the /and =marks in the remote control unit’s battery
compartment.
• To prevent damage or battery fluid leakage:
•
Do not mix a new battery with an old one.
•
Do not mix two different types of batteries such as alkaline and manganese.
•
Do not short-circuit, disassemble, heat or dispose of batteries in flames.
• Remove the batteries when not planning to use the remote control unit for a
long period of time.
• If the batteries should leak, carefully wipe off the fluid from the inside of the
battery compartment, then insert new batteries.
The buttons with circled numbers can only be operated with
the remote control.
Loading the Batteries
E6GG0EDG1ED(EN)0601.indb8E6GG0EDG1ED(EN)0601.indb8 2007/06/0115:00:092007/06/0115:00:09

– 9 – EN
FUNCTIONAL OVERVIEW
English
Buttons on remote control work in different ways for DVD-Video, DVD-Audio, Video CD, Super Audio CD, Audio CD, MP3,
JPEG, WMA and DivX®.
Refer to the following table for correct use.
DVD-Video, DVD-Audio
Video CD Super Audio CD, CD,
MP3, JPEG, WMA DivX®
POWER ON/OFF Buttons
• To turn on or standby the
unit. • To turn on or standby the
unit.
A-B REPEAT Button • To mark a segment
between A and B for
repeated playback.
• To mark a segment
between A and B for
repeated playback.
• To mark a segment
between A and B for
repeated playback.
(Super Audio CD, CD)
• To mark a segment
between A and B for
repeated playback.
REPEAT Button • To repeat playback of a
title, chapter, group or
track.
• To repeat playback of a
track or disc.
• To repeat playback
of a track or disc.
(Super Audio CD, CD)
• To repeat playback of
a track, group, or disc.
(MP3, JPEG, WMA)
• To repeat playback of
a track, group or disc.
(DivX®media files)
• To repeat playback of a
title or chapter. (DivX®
video files)
RANDOM Button • To shuffle the playing
order of groups and
tracks. (DVD-Audio)
• To play back tracks in
random order.
MODE Button
• To set Picture Control.
• To activate the
3D sound (Virtual
surround system).
• To set Dialog Speed.
• To programme a
specific playback order.
(DVD-Audio)
• To play all groups.
(DVD-Audio)
• To set Picture Control.
• To activate the
3D sound (Virtual
surround system).
• To programme a
specific playback order.
• To activate the
3D sound (Virtual
surround system).
(CD, MP3, WMA)
• To activate the Slide
Show mode. (JPEG)
• To set Picture Control.
ZOOM Button • To magnify part of the
picture (x2/x4). • To magnify part of the
picture (x2). • To magnify part of the
picture (x2). (JPEG) • To magnify part of the
picture (x2).
ANGLE Button • To select a camera angle
on the disc. • To rotate a picture.
(JPEG)
SUBTITLE Button • To select a subtitle
language on the disc. • To select a subtitle
language on the disc.
AUDIO Button • To access various audio
functions on the disc. • To select STEREO, L-ch
or R-ch. • To select STEREO, L-ch
or R-ch. (CD) • To access various audio
functions on the disc.
DISPLAY Button • To display the current
disc or HDMI mode. • To display the current
disc or HDMI mode.
SEARCH MODE Button
• To search for a
title, chapter, track,
time or marker.
• To rapidly return to a
location on the disc.
• To search for a track,
time or marker.
• To rapidly return to a
location on the disc.
• To search for a track.
• To search for time or a
marker.
(Super Audio CD, CD)
• To rapidly return to a
location on the disc.
(Super Audio CD, CD)
• To search for a track or
time. (DivX®media files)
• To search for a chapter,
title or time. (DivX®video
files)
OPEN/CLOSE Button
• To open or close the disc
tray. • To open or close the disc
tray.
Numeric Buttons
• To select a title, chapter,
group or track directly. • To select a track directly. • To select a track directly.
• To select a track directly.
(DivX®media files)
• To select a chapter or
title directly. (DivX®video
files)
Tour of the Remote Control
E6GG0EDG1ED(EN)0601.indb9E6GG0EDG1ED(EN)0601.indb9 2007/06/0115:00:102007/06/0115:00:10

– 10 – EN
FUNCTIONAL OVERVIEW
DVD-Video, DVD-Audio
Video CD Super Audio CD, CD,
MP3, JPEG, WMA DivX®
CLEAR Button
• To clear the markers.
• To clear the most
recently entered track
for the programme
playback. (DVD-Audio)
• To clear the numbers
entered incorrectly.
• To cancel the A point
for A-B Repeat.
• To clear the markers.
• To clear the numbers
entered incorrectly.
• To cancel the A point
for A-B Repeat.
• To clear the markers.
(Super Audio CD, CD)
• To clear the most
recently entered track
for the programme
playback.
• To clear the numbers
entered incorrectly.
• To cancel the A point
for A-B Repeat.
(Super Audio CD, CD)
• To clear the numbers
entered incorrectly.
• To cancel the A point
for A-B Repeat.
MENU Button • To call up the menu on
a disc. • To call up the file list.
(MP3, JPEG, WMA) • To call up the file list.
TOP MENU Button • To call up the top menu
on a disc.
• To return to the first
item in the highest
hierarchy of the file list.
(MP3, JPEG, WMA)
• To call up the menu on
a file. (DivX®video files)
• To return to the top file
in the highest hierarchy
of the file list.
ENTER, Cursor Buttons
• To move the cursor and
determine its position. • To move the cursor and
determine its position.
RETURN Button • To return to the
previous operation in
the setup menu.
• To return to the
previous operation in
the setup menu.
• To return to the
previous operation in
the setup menu.
• To return to the
previous operation in
the setup menu.
SETUP Button • To call up the setup
menu. • To call up the setup
menu.
SKIP Buttons • To skip titles/chapters/
tracks. • To skip tracks. • To skip tracks.
• To skip tracks. (DivX®
media files)
• To skip chapters. (DivX®
video files)
SEARCH Buttons • To search forward/
backward through a
disc.
• To begin slow forward/
slow reverse.
• To search forward/
backward through a
disc.
• To begin slow forward.
• To begin fast forward/
reverse search.
(except JPEG)
• To search forward/
backward through a
disc.
• To begin slow forward.
STOP Button
• To stop playback. • To stop playback. • To stop playback. • To stop playback.
PLAY Button
• To begin playback. • To begin playback. • To begin playback. • To begin playback.
STILL/PAUSE Button • To pause playback.
• To advance playback
frame by frame.
• To pause playback.
• To advance playback
frame by frame. • To pause playback. • To pause playback.
• To advance playback
frame by frame.
GROUP Button • To begin playback from
a desired group.
(DVD-Audio)
SUPER AUDIO CD
SET UP Button • To select the Super
Audio CD setup.
(Super Audio CD)
PAGE Buttons
• To select a desired
background display
image for playback.
(DVD-Audio)
Tour of the Remote Control
E6GG0EDG1ED(EN)0601.indb10E6GG0EDG1ED(EN)0601.indb10 2007/06/0115:00:102007/06/0115:00:10

– 11 – EN
FUNCTIONAL OVERVIEW
English
Keep in mind the following when using the remote control:
• Make sure that there are no obstacles between the remote
control and the remote sensor on the unit.
• Remote operation may become unreliable if strong sunlight
or fluorescent light is shining on the remote sensor of the
unit.
• Remote control for different devices can interfere with
each other. Avoid using remote control for other equipment
located close to the unit.
• Replace the batteries when you notice a fall off in the
operating range of the remote control.
• The maximum operable ranges from the unit are as
follows:
- Line of sight: approx. 7m
- Either side of the centre: approx. 5m within 30°
- Above: approx. 5m within 15°
- Below: approx. 3m within 30°
Power on
Power off
Tray open
Tray closed
Loading the Disc
No disc inserted or
cannot read
HDMI output mode
(480p/576p) is
selected. (576p is
displayed after 480p)
HDMI output mode
(720p) is selected
HDMI output mode
(1080i) is selected
HDMI output mode
(1080p) is selected
HDMI output mode
(OFF) is selected
Super Audio CD setup
(2CH AREA) selected
Super Audio CD setup
(MULTI-CH AREA)
selected
Programme playback
is set
Programme playback
setting group (folder) is
selected
Programme playback
setting ALL CLEAR is
selected
Random playback is
set
All group playback
setting
NOTES:
• The front panel display has blinked while setting the
programme playback.
• “P**-●●●” is displayed in the front panel display while
setting the programme playback. (“**” is programme
number, “●●●” is track number.)
• “A” is displayed in front panel display while selecting the
audio file (CD, MP3, WMA, DVD-Audio).
• “F-***” is displayed in the front panel display while selecting
the group (folder). (“***” is group (folder) number.)
• “A-CLEAr” is displayed in the front panel display while
selecting ALL CLEAR.
• “SHUFFLE” is displayed in the front panel display while
setting the random playback.
• “A-PLAY” is displayed in the front panel display while
setting the all group playback.
Displays during Operation
Lights up when the progressive scan system is activated.
Lights up when the disc playback comes to a pause.
Lights up when playing back in slow mode.
(DVD, Video CD, DivX®)
Lights up when the inserted disc is being play back.
The present display state is shown.
• TL./GR.: Title or Group
• TR./CP.: Track or Chapter
To change to the display of a title
please press the DISPLAY button in
the state of Resume.
Displays the chapter (title) or track number.
In case the chapter (title) or track number
is over 100, displays “– –”.
Displays a type of the disc which is on the tray.
• DVD: DVD-Video, MP3, JPEG, WMA, DivX®on DVD-R/RW
• DVD A: DVD-Audio
• SACD: Super Audio CD
• CD: Video CD, Audio CD, MP3, JPEG, WMA, DivX®on CD-R/RW
Lights up when the repeat function is on.
Lights up when the ALL repeat function is on.
Lights up when the A-B repeat function is on.
Lights up when you have selected the audio
file (CD/MP3/WMA/DVD-Audio) on the
programme screen.
Displays the elapsed time of the chapter (title) or track.
(The display of 10 hours or more cannot be performed.)
Selected HDMI output mode is displayed.
Front Panel Display
5m
30° 7m 5m
30°
Using a Remote Control
E6GG0EDG1ED(EN)0601.indb11E6GG0EDG1ED(EN)0601.indb11 2007/06/0115:00:102007/06/0115:00:10

– 12 – EN
CONNECTIONS
1. AC IN Terminal
Connects the AC cord to supply the power.
2. DIGITAL OUT Jacks (OPTICAL, COAXIAL)
Use either an optical or coaxial digital cable (commercially available) to connect to an AV amplifier with a built-in decoder
(AV control centre).
3. HDMI OUT Jack
Use an HDMI connection cable (commercially available) to connect to a display with an HDMI compatible port.
4. AUDIO OUT Jacks
Use an Audio cable to connect to the Audio input jacks of A/V-compatible TV, wide screen TV or Stereo system.
5. VIDEO OUT Jack
Use a video cable to connect one of the jacks to Video input on your A/V-compatible TV or wide screen TV.
6. COMPONENT VIDEO OUT Jacks
Use a Component Video cable (commercially available) to connect these jacks if you have a TV with Component Video
in jacks. These jacks provide CB/PB, CR/PRand Y video. Along with S-Video, Component Video provides the best quality
picture.
7. S-VIDEO OUT Jack
Use an S-Video cable (commercially available) to connect this jack to the S-Video jack on your A/V-compatible TV or
wide screen TV for a higher quality picture.
8. AV1 Jack
Use a Scart cable (commercially available) to connect to the 21-pin scart jack of a TV.
9. 5.1ch AUDIO OUT Jacks
Use speaker cables (commercially available) to connect these jacks to the 5.1ch Audio input jacks of your AV amplifier
with 5.1-channel input terminals.
NOTE:
• When changing the VIDEO OUT setting (SCART, COMPONENT INTERLACE or COMPONENT PROGRESSIVE), connect
to a Video jack or an S-Video jack on the TV. If the setting is changed, for example, to SCART while Component Video
jacks are connected to the TV, a distorted video signal may be output (refer to page 30).
CAUTION:
•
Do not touch the inner pins of the jacks on the rear panel. Electrostatic discharge may cause permanent damage to the player.
Selecting Progressive Scan (480p/576p or Interlaced 480i/576i) Playback
• If your TV is compatible with progressive scanning (480p/576p), connect the TV to the COMPONENT VIDEO OUT jacks of the
DVD player and set VIDEO OUT to COMPONENT PROGRESSIVE in the display setting. Next, set your TV to the progressive
scan mode. Refer to page 30 for instructions on changing the display setting. P.SCAN will appear on the display of the unit.
• If your TV is not compatible with progressive scan, set VIDEO OUT to COMPONENT INTERLACE by changing the display
setting (refer to page 30). Make sure that P.SCAN on the display of the unit lights off.
• Use a commercially available adaptor if the video input jacks of your TV or monitor is the BNC type.
• Progressive video signal will not be output from the COMPONENT VIDEO OUT while using the HDMI OUT jack.
What is Progressive Scanning?
• Unlike conventional interlace scanning, the progressive scan system provides less flickering and images in higher resolution
than that of traditional (480i/576i) television signals.
The DCDi (Directional Correlational Deinterlacing) system of this DVD player produces smooth and
natural video images, even if really dynamic, by eliminating the jagged edges. *“DCDi” is a trademark
of Faroudja, a division of Genesis Microchip Inc.
Manufactured under license from Dolby Laboratories. “Dolby” and the double-D symbol are
trademarks of Dolby Laboratories.
“DTS” and “DTS Digital Surround” are registered trademarks of DTS, Inc.
1 2 3 4 5 6 7 98
Description - Rear Panel
E6GG0EDG1ED(EN)0601.indb12E6GG0EDG1ED(EN)0601.indb12 2007/06/0115:00:112007/06/0115:00:11

– 13 – EN
CONNECTIONS
English
The following shows examples of connections commonly used to connect the DVD player to TV and other
components. If using this DVD player to play back a DVD in a Dolby Digital Multi-channel surround or DTS
surround format, the DVD player outputs a Dolby Digital or DTS data stream from its OPTICAL or COAXIAL
DIGITAL OUT jacks. By connecting the player to a Dolby Digital, DTS or MPEG decoder, you can enjoy more
convincing, realistic ambience with powerful and high-quality surrounding sound of a professional standard
which can be heard in movie theatres. Use an Optical (commercially available) or Audio Coaxial Digital cable
(commercially available) for the audio connections.
NOTES:
• Be sure to turn off the power to all components in the system before connecting another component.
• Refer to the Instruction Manuals for your TV, stereo system and any other components to be connected to the DVD player.
Stereo system
Method 1 Method 2
AV amplifier with a built in decoder
(AV control centre),
Dolby Digital decoder,
DTS decoder, MPEG decoder,
MD deck or DAT deck
AUDIO
DVD
Audio Input
Jacks
AUDIO OUT
(analogue)
Audio Cable
(supplied)
Digital Audio
Input Jacks
DIGITAL OUT
Optical Cable
(commercially
available)
or
Audio Coaxial
Digital Cable
(commercially
available)
• Method 1 DVD Player + Stereo system
• Method 2 DVD Player + AV amplifier with a built in decoder (AV control centre), Dolby Digital decoder, DTS decoder,
MPEG decoder, MD deck or DAT deck
NOTES (for Method 2 only):
• When using an AV amplifier with a built-in decoder (AV control centre), Dolby Digital, DTS, or MPEG decoder as shown in
the Method 2, set DOLBY DIGITAL, DTS or MPEG to BITSTREAM accordingly for audio output in the setup menu (refer
to page 30). Set it to PCM for the decoder that is not used currently. Playing back a DVD using incorrect settings may
generate noise distortion, and may also damage the speakers.
• The audio source on a disc in a Dolby Digital Multi-channel surround format cannot be recorded as digital sound by an MD
deck or DAT deck.
• Set DOLBY DIGITAL, DTS and MPEG to PCM, for audio output in the setup menu for connecting to an MD deck or DAT
deck (refer to page 30).
• Harsh noise that could harm your ears or the speakers is generated when a DVD recorded in DTS is played back while
using a decoder, etc., that is not DTS-compatible.
• When playing back a copyright-protected 96kHz linear PCM DVD, the digital sound will be down sampled at 48kHz, even if
you set LPCM SELECT to OFF (refer to page 30).
• Super Audio CD sound is not output from the DIGITAL OUT jacks.
Optical cable (commercially available)
• Optical cable (commercially available) may be damaged when bent at sharp angles. Ensure cables are coiled in loops
with a diameter of 15 cm or more when storing them.
• Use a cable which is 3 m or shorter.
• Insert cable plugs firmly into the connectors when making connections.
• If a plug has dust or is dirty, clean it with a soft cloth before inserting it into a connector.
Connection to an Audio System
E6GG0EDG1ED(EN)0601.indb13E6GG0EDG1ED(EN)0601.indb13 2007/06/0115:00:112007/06/0115:00:11

– 14 – EN
CONNECTIONS
Analogue 5.1-channel audio signals can be output from the DVD player.
The multichannel audio signals recorded in packed PCM and the multichannel Super Audio CD can be played
back when an AV amplifier equipped with analogue 5.1-channel audio inputs is connected.
NOTES:
• For 5.1-channel connections, set ANALOG AUDIO to MULTI CHANNEL in the setup mode and adjust Speaker
Configuration, DELAY TIME and CHANNEL LEVEL settings (refer to pages 31-32).
• You can enjoy high-quality analogue sound by cutting off the video signal. Press the PURE DIRECT button on the front
panel.
AUDIO
DVD
To 5.1-channel
Audio Input
Jacks
5.1ch
AUDIO OUT
Speaker Cable
(commercially
available)
Connection to 5.1-channel Surround Sound System
AV amplifier
with
5.1-channel
audio input jacks
Front speaker
(left)
Centre speaker
Subwoofer
Surround
speaker
(right)
Front speaker
(right)
Surround
speaker
(left)
E6GG0EDG1ED(EN)0601.indb14E6GG0EDG1ED(EN)0601.indb14 2007/06/0115:00:112007/06/0115:00:11

– 15 – EN
CONNECTIONS
English
Basic
Audio Good
picture
Method 2
Basic
Connection
Method 1
Better
picture
Method 3
Best
picture
Method 4
DVD
21-pin Scart jack
S-VIDEO IN
VIDEO IN
LR CB/PBYCR/PR
COMPONENT
VIDEO IN
TV
Video Cable
(supplied) S-Video Cable
(commercially
available)
Scart Cable
(commercially
available)
Component
Video Cable
(commercially
available)
AUDIO OUT
(analogue) VIDEO OUT S-VIDEO OUTAV1 OUT COMPONENT
VIDEO OUT
Audio Cable
(supplied)
orand or
Connection to a TV (for video)
• Method 1 DVD Player + TV with 21-pin Scart Input Jack
• Method 2 DVD Player + TV with Video Input Jack
• Method 3 DVD Player + TV with S-Video Input Jack
• Method 4 DVD Player + TV with Component Video Input Jacks
NOTES:
• Connect the DVD player directly to a TV. If the Audio/Video cables are connected to a VCR, pictures may be distorted due
to the copy protection system.
• S-Video output connector
The video signals are divided into colour (C) and brightness (Y) signals, achieving a clearer picture.
If the TV is equipped with an S-Video input connector, we recommend connecting it to this unit’s S-Video output connector
using a commercially available S-Video connection cord.
HOW TO CONNECT TO A TV WITHOUT AUDIO/VIDEO INPUT JACKS
Even if your TV does not have RCA type audio and video input jacks, it is still possible to connect this DVD player
to your TV’s 75 ohm coaxial antenna terminal using an optional Stereo Audio/Video RF Modulator (commercially
available). Connect the audio and video outputs of the DVD player to the audio and video inputs on the RF
Modulator, and then connect the coaxial output of the RF Modulator (usually marked “TO TV”) to the 75 ohm coaxial
antenna terminal on your TV. Follow the instruction supplied with the RF Modulator for more details.
If your TV’s 75 ohm coaxial antenna terminal is already occupied by an antenna or cable box connection, remove
that cable from your TV’s antenna terminal and reconnect it to the coaxial antenna input terminal of the RF Modulator
(usually marked “ANT IN”), then connect the RF modulator to your TV’s antenna terminal as described above.
NOTE:
• The picture quality from DVD discs will not be as good if the DVD player is connected to the TV’s antenna terminal
through an RF Modulator.
E6GG0EDG1ED(EN)0601.indb15E6GG0EDG1ED(EN)0601.indb15 2007/06/0115:00:122007/06/0115:00:12

– 16 – EN
CONNECTIONS
A simple 1-cable connection (using a commercially available cable) with a device having an HDMI (High-
Definition Multimedia Interface) connector allows digital transfer of the digital images of DVD-Video and other
sources, DVD-Video, and the multi-channel sound of DVD-Audio.
CActual output modes by media
HDMI AUDIO Setting
2 CHANNEL MULTI CHANNEL
DOLBY DIGITAL/DTS/MPEG Setting DOLBY DIGITAL/DTS/MPEG Setting
Audio Recording Format BITSTREAM *1 PCM BITSTREAM *1 PCM *2
DVD-Video
Dolby Digital Dolby Digital 2 channel PCM Dolby Digital Multi PCM
DTS DTS 2 channel PCM DTS Multi PCM
MPEG MPEG 2 channel PCM MPEG Multi PCM
LPCM 2 channel PCM 2 channel PCM Multi PCM Multi PCM
DVD-Audio
LPCM or PPCM (with CPPM) *3 *5
2 channel PCM 2 channel PCM Multi PCM Multi PCM
LPCM or PPCM (without CPPM) 2 channel PCM 2 channel PCM Multi PCM Multi PCM
DivX®Dolby Digital Dolby Digital 2 channel PCM Dolby Digital 2 channel PCM
MP3/MP2 2 channel PCM 2 channel PCM 2 channel PCM 2 channel PCM
Audio CD 2 channel PCM 2 channel PCM 2 channel PCM 2 channel PCM
Video CD 2 channel PCM 2 channel PCM 2 channel PCM 2 channel PCM
MP3/WMA 2 channel PCM 2 channel PCM 2 channel PCM 2 channel PCM
Super
Audio
CD
MULTI-CH AREA *4
2CH AREA *4
CD AREA 2 channel PCM 2 channel PCM 2 channel PCM 2 channel PCM
*1 If the connected equipment is not compatible with HDMI BITSTREAM, signals are output on PCM.
*2 If the connected equipment is not compatible with HDMI Multi PCM, signals are output on down mixed PCM.
*3 If the connected equipment is not compatible with HDMI ver. 1.0, signals are not output.
*4 Sounds recorded on the MULTI-CH/2CH AREA of Super Audio CDs are not output.
*5
Transfer of signal from DVD audio discs that are copyright-protected by CPPM is only possible if both devices are HDMI Ver.1.1 compatible.
This player is HDMI Ver.1.3 compatible.
Copyright protection system
To play back the digital video images of a DVD via an HDMI connection, it is necessary that both the player and the display equipment
(or an AV amplifier) support a copyright protection system called HDCP (High-bandwidth Digital Content Protection System). HDCP is
copy protection technology that comprises data encryption and authentication of the connected AV equipment.
This player supports HDCP. Please read the operating instructions of your display equipment (or AV amplifier) for more information.
*HDMI: High-Definition Multimedia Interface
NOTES:
• When using HDCP-incompatible display equipment, the image will not be viewed properly.
•
When the PURE DIRECT button on the front panel is turned on, not only HDMI images but sounds are not output (refer to page 17).
• Among the devices that support HDMI, some devices can control other devices via the HDMI connector; however, this
player cannot be controlled by another device via the HDMI connector.
• The audio signals from the HDMI connector (including the sampling frequency, the number of channels and bit length) may
be limited by the equipment that is connected.
• When playing a Super Audio CD with an HDMI connection, audio cannot be transferred beyond the CD layer. Make an
analogue connection for this.
• Among the monitors that support HDMI, some do not support audio output (for example, projectors). In connections with
equipment such as this, audio signals are not output from the HDMI output connector.
• When the set’s HDMI connector is connected to a DVI-D compatible monitor (HDCP compatible) with an HDMI-DVI
converter cable (commercially available), the signals are output in digital RGB.
“HDMI, the HDMI logo and High-Definition Multimedia Interface are trademarks or registered
trademarks of HDMI Licensing LLC.”
After you made all necessary connections, connect the AC cord to the AC inlet. Then connect the AC cord to
the AC outlet.
Connection to a TV with an HDMI Compatible Port
A display equipment with
an HDMI compatible port
To HDMI Input
Connector HDMI cable
(commercially available)
Connecting the AC Cord
E6GG0EDG1ED(EN)0601.indb16E6GG0EDG1ED(EN)0601.indb16 2007/06/0115:00:122007/06/0115:00:12

– 17 – EN
DISC PLAYBACK
English
123456
789
Getting started
• Turn on the power of the TV, amplifier and any other
components which are connected to the DVD player.
• Make sure the TV and audio receiver (commercially
available) are set to the correct channel.
1Press the POWER ON button.
• P-ON will appear briefly on the display
panel.
2Press the OPEN/CLOSE button to
open disc loading tray.
3Place the disc on the tray, with the
label facing up.
4Press the PLAY button.
•
The tray will close automatically, then playback will start
from the first chapter or track of the disc. If the playback
does not start automatically, press the PLAY button.
•
When you play back the DVD with a title menu, it may appear
on the screen. In this case, refer to “Title Menu” on page 18.
5Press the STOP button to stop playback.
NOTES:
• A “prohibited icon” may appear at
the top-right on the TV screen during
operation, warning that a prohibited
operation has been encountered by the
DVD player or the disc.
• With DVDs that use some titles for playback programme
signals, playback may start from the second title, or it
may skip these titles.
• During the playback of two layered disc, pictures may
stop for a moment. This happens when the 1st layer
switches to the 2nd layer. This is not a malfunction.
• The operation may vary when you play back DVDs with
disc menu or Video CDs with PBC or DivX®video files.
Refer to the manual accompanying the disc for details.
CANCELLING AND CALLING BACK PBC FUNCTION
3
1Insert a Video CD.
2Press the STOP button.
3Press the Numeric buttons to enter the desired
Track number.
• PBC function is now cancelled and the playback of the
Video CD will start.
4To call back PBC function, press the STOP button
twice, and then press the PLAY button.
• The title menu will appear on the TV screen.
1Press the HDMI button on the front panel to select
the HDMI output mode.
The output mode changes as follows every time the
HDMI button is pressed.
• The HDMI indicator on the front panel lights up when
HDMI output mode is on.
480P/576P (Default):
Video output from the HDMI OUT jack at 480p/576p.
720P: Video output from the HDMI OUT jack at 720p.
1080: Video output from the HDMI OUT jack at 1080i.
1080P: Video output from the HDMI OUT jack at 1080p.
OFF: No video outputs from the HDMI OUT connector.
NOTES:
• Video and audio signals may be distorted temporarily
when switching to/from the HDMI output mode.
• Use a display equipment with an HDMI-compatible port.
• The HDMI indicator on the front panel flashes when
you select the HDMI output mode but there is no HDMI
cable.
• If you turn on the pure direct mode, both video and
audio signals through the HDMI output will be cut off
(press the PURE DIRECT button again to recover).
• You can check the HDMI connection status by pressing
the DISPLAY button during playback with the HDMI
output mode (refer to page 26).
• If the TV is not compatible with newly selected HDMI
output mode, the actual output mode will be kept the
one before changing the selection. When this occurs,
the newly selected mode will appear on the front
panel display (refer to page 11) while the actual output
resolution will be indicated by performing the on-screen
display as described in NOTE FOR HDMI DISPLAY on
page 26.
• Actual output signals for each HDMI mode vary with the
compatibility of the connected display device.
• You cannot select the HDMI output mode when the
setup menu is on the TV screen.
1Press the PURE DIRECT button on the front
panel to output an analogue audio signal only (no
analogue video and HDMI signals will be output
and the display will be turned off). The higher
quality sound will be achieved.
NOTES:
• When the buttons below are pressed, the pure direct
mode will be released.
OPEN/CLOSE button (on both the remote and the front
panel), SETUP or DISPLAY button (on the remote),
ON/STANDBY or PURE DIRECT button (on the front
panel).
• The PURE DIRECT button will not function while
displaying the setup menu.
• If you turn on the pure direct mode while selecting
HDMI mode, both video and audio signals will not be
output.
1Press the DIMMER NTSC/PAL button on the front
panel to select the desired brightness of the front
panel display. (BRIGHT, DIMMER or OFF)
• The default setting is BRIGHT.
NOTES:
• The brightness of the front panel display can be
adjusted from the setup menu. Details are on page 33.
• When you turn on the power next time, the brightness
of the front panel display will be as set in setup menu.
TV TYPE
Select a suitable video system according to the format of the
TV you connected.
1Stop playback.
2Press the DIMMER NTSC/PAL button on the front
panel more than 3 seconds.
The video system will be displayed on the front
panel display and TV screen.
Pure Direct Mode
HDMI Setup
Basic Playback
1080 1080P480P/576P 720P OFF
>
Brightness of the Front Panel Display
NTSC PALMULTI
E6GG0EDG1ED(EN)0601.indb17E6GG0EDG1ED(EN)0601.indb17 2007/06/0115:00:122007/06/0115:00:12

– 18 – EN
DISC PLAYBACK
NTSCMULTI PAL
3Press the DIMMER NTSC/PAL button within 5
seconds, and select the desired video system. The
video system will be changed as follows every time
the DIMMER NTSC/PAL button is pressed.
•
If it is left untouched for more than 5 seconds or any other buttons
are pressed, the unit will switch back to the normal status.
NOTES:
• If the video system setting does not fit to the TV you
connected, the picture will be distorted.
•
If you turn off the unit, the video system will go back to the one
set for the TV TYPE on the display menu (refer to page 29).
129
DVD and DivX®video file may contain menus to navigate the disc
and access special features. Press the appropriate Numeric buttons
or use the Cursor buttons (K/ L/ s/ B) to highlight your selection
in the DVD main menu and press the ENTER button to confirm.
NOTES:
• Unless otherwise stated, all operations described are
based on remote control use. Some operations can be
carried out using the menu bar on the TV screen.
•
The Numeric buttons are invalid in menu of DivX®video file.
1
1Press the MENU button.
• The DVD main menu will appear.
2If the feature is not available, >symbol may
appear on the TV screen.
3If disc menu is available on the disc, audio
language, subtitle options, chapters for the title and
other options will appear for selection.
4
Press the Cursor buttons (K/ L/ s/ B) to select an
item, and the ENTER button to confirm the selection.
12
1Press the TOP MENU button.
• The title menu will appear.
2If the feature is not available, >symbol may
appear on the TV screen.
3
Press the Cursor buttons (K/ L/ s/ B) to select an
item, and the ENTER button to confirm the selection.
• Playback will begin at the selected title. 3
1When playing back a Video CD with PBC function,
the title menu will appear automatically.
2
Press the Numeric buttons to select the desired title.
• Playback will begin at the selected title.
3
Press the RETURN button to go back to the title menu.
9
1Press the Cursor buttons (Kor L) to choose a
track, then press the PLAY or ENTER button.
2Press the TOP MENU button.
• Title menu will appear.
3If the title menu is available on the file, audio
language, subtitle options, chapter for the title and
other options will appear for selection.
4
Press the Cursor buttons (K/ L/ s/ B) to select an
item, and the ENTER button to confirm the selection.
CALLING UP A MENU SCREEN DURING PLAYBACK
129
• Press the MENU button to call up the DVD main menu
(DVD-V).
• Press the TOP MENU button to call up the title menu.
NOTES:
• Contents of menus and corresponding menu
operations may vary among discs. Refer to the manual
accompanying the disc for details.
• During playback or resume stop state on the DivX®
video file, it is possible to call up a menu.
2
PLAYBACK OF ALL GROUPS
1In stop mode, press the MODE
button.
• The ALL GROUP screen appears.
2Press the PLAY button to begin
playback.
NOTE:
• “A-PLAY” is displayed in the front panel display at step
1.
PLAYBACK FROM A DESIRED GROUP
1During playback or in the stop
mode, press the GROUP button.
2Press the Numeric buttons to
select a group.
• The group will be located and
playback will start.
PAGE SELECTION
Some DVD-Audio discs that include
still images feature a selection of
images you can choose from.
1During playback, press the
PAGE +or –button to select
a desired page number to be
displayed.
PLAYBACK OF THE BONUS GROUP
Some discs are recorded with the Bonus Group that can be
played back by entering a password. Refer to the disc jackets.
1In stop mode, press the GROUP
button to open the group search
screen.
2Press the Numeric buttons to
select a bonus group number.
• The password popup window
appears.
3Press the Numeric buttons to enter the 4-digit
password.
• When the correct password is entered, playback starts
from the top of the bonus group.
NOTES:
• In some cases the password window is displayed on
the menu screen. Follow the instructions given on the
screen.
• Once the password is entered, playback will be
repeated until the disc is removed from the disc tray.
General Features
Disc Menu
Title Menu
DVD Audio Playback
ALL GROUP
DVD-AUDIO TOTAL 2:05:55
All Group Playback
--no indication--
1/12
1/12
BONUS GROUP
DVD-AUDIO
Please enter a 4-digit password.
1
E6GG0EDG1ED(EN)0601.indb18E6GG0EDG1ED(EN)0601.indb18 2007/06/0115:00:122007/06/0115:00:12

– 19 – EN
DISC PLAYBACK
English
123456
789
1During playback, press the
STILL/PAUSE button.
• Playback will pause and sound
will be muted.
2To continue playback, press the PLAY button.
NOTE:
• On DVDs, set STILL MODE to FIELD on the display
menu if pictures in the pause mode are blurred (refer to
page 29).
123456
789
1During playback, press the
STOP button.
• Resume message will appear on
the TV screen.
2Press the PLAY button,
playback will resume from the
point at which playback was stopped.
• To cancel resume, press the STOP button again.
NOTES:
• Some Video CDs with PBC function resume playback
from the beginning of the track.
• For MP3, JPEG or WMA, playback will resume from the
beginning of the current track.
• The resume information will be saved on even when the
power is turned off.
123456
89
1During playback, press the hor gbutton
repeatedly to select a desired forward or reverse
speed.
• For DVDs, fast forward or reverse search speed is
different depending on the disc. The approximate speed
is 1(x2), 2(x8), 3(x20), 4(x50) and 5(x100).
• For Video CDs, Super Audio CDs, Audio CDs, MP3,
WMA and DivX®, the approximate speed is 1(x2), 2(x8)
and 3(x30).
• For Super Audio CDs, Audio CDs, MP3 and WMA,
sound will be output at any speed of fast forward and
reverse search.
2To return to normal playback, press the PLAY
button.
NOTE:
• For some DivX®files, Fast Forward/Reverse Search
may not function.
1239
1During playback, press the
STILL/PAUSE button.
2Press the hor gbutton.
• Slow motion playback will begin and
sound will be muted.
3Press the hor gbutton
repeatedly to select a desired speed.
• Slow forward or reverse speed is
different depending on the disc.
The approximate speed is 1(1/16), 2(1/8), and 3(1/2).
4
To return to normal playback, press the PLAY button.
NOTES:
• On DVDs, set STILL MODE to FIELD on the display
menu if pictures in the slow playback mode are blurred
(refer to page 29).
• Only Slow Forward is available when playing back
Video CD and discs with DivX®files.
1239
1During playback, press the
STILL/PAUSE button.
• Playback will pause and sound
will be muted.
2The disc advances frame by frame each time the
STILL/PAUSE button is pressed.
3
To exit step by step playback, press the PLAY button.
NOTE:
• On DVDs, set STILL MODE to FIELD on the display
menu if pictures in the pause mode are blurred (refer to
page 29).
1239
Picture Control adjusts Brightness, Contrast, Colour, Gamma
Correction and Sharpness of the specific display.
1During playback, press the
MODE button.
2Press the Cursor buttons
(Kor L) to switch among items.
3
Press the ENTER button or the Cursor buttons
(sor B) to adjust the selected item to a desired level.
• -6, -5, -4, -3, -2, -1, 0, +1, +2, +3, +4, +5, +6 can be
selected.
4To return to normal playback, press the RETURN
button.
NOTES:
•
The default settings for all items in Picture Control are “0”.
•
The setting display will disappear in 10 seconds of no use.
• This function cannot be used during Dialog Speed (refer
to page 20).
• If you return all items to the default settings, select
“INITIALIZE” at step 2.
12379
This function allows you to enlarge the video image and to
pan through the zoomed image.
1Press the ZOOM button during playback.
• Playback will continue.
Zoom
Step by Step Playback
Picture Control
F
Still / Pause
Resume
Fast Forward / Reverse Search
Slow Forward / Slow Reverse
<Example: DVD>
Resume ON
Press ‘PLAY’ to play from here.
To play the beginning,
press ‘STOP’ first and then ‘PLAY’.
Button
3
2
1
Button
Button
13245
13
4
25
Only Moving Picture
Only Moving Picture
F
s B
BRIGHTNESS +1
Only Moving Picture
E6GG0EDG1ED(EN)0601.indb19E6GG0EDG1ED(EN)0601.indb19 2007/06/0115:00:132007/06/0115:00:13

– 20 – EN
DISC PLAYBACK
2Press the ZOOM button repeatedly to select a
desired zoom factor: x2, x4 or off.
•
Only x2 zoom is available on Video CDs, JPEG and DivX®.
3Use the Cursor buttons (K/ L/ s/ B) to move
the zoomed picture across the screen.
4To exit the zoom mode, press the ZOOM button.
NOTES:
•
Zoom function does not work while the disc menu is shown.
• x4 zoom is not available on some discs.
• Navigation screen is not available on JPEG.
• You cannot pan through the zoomed picture on some
JPEG files.
12
Available only on discs recorded in the Dolby Digital format,
Dialog Speed plays back in slightly faster or slower speed
while keeping the sound quality as in the normal playback.
1During playback, press the
MODE button repeatedly
until the Dialog Speed setting
appears.
• OFF appears on the TV screen.
2Press the ENTER button or the Cursor buttons
(sor B) to switch among ?? (x1.3), ?(x0.8) and
OFF.
?: Plays back approximately at 0.8 times of normal
playback.
?? : Plays back approximately at 1.3 times of normal
playback.
3
To return to normal playback, press the PLAY button.
NOTES:
• Every time you press the STOP button, the setting will
be turned OFF.
• Subtitles can be viewed during this function.
• Picture Control, Audio Language and Virtual Surround
setting cannot be changed while using this mode.
•
Virtual Surround does not function while using this mode.
• This feature may not work at some point on a disc.
•
When using digital audio connection (COAXIAL, OPTICAL
or HDMI), the LPCM sound (2 channel) will be output.
• When using Dialog Speed function with Multi-channel
digital outputting, the analogue output sound will be
fixed at 2 channel.
• When using digital audio connection, only the Dolby
Digital sound will be available.
• This feature does not work when the video format of the
inserted disc does not match to the output video format
setting of this unit (playing NTSC disc while TV TYPE is
set to PAL etc.).
7
You can switch to slide show mode during playback.
1
Press the MODE button once during playback.
• The slide show mode screen will appear.
•
You cannot switch the slide show mode when it is stopped,
or from the file list screen or the Picture CD menu screen.
2Press the ENTER button.
• The slide show mode will change.
CUT IN/OUT: The entire image appears in one time.
FADE IN/OUT: The image appears and disappears
gradually.
3Press the MODE button to exit.
19
BY USING THE SEARCH MODE BUTTON
1Press the SEARCH MODE
button repeatedly until the
chapter search or the title
search screen appears during
playback.
2Enter the desired chapter/title
number with the Numeric buttons.
BY USING THE SKIP BUTTONS HG
During playback, press the SKIP Gbutton to move to
the next chapter. Press it repeatedly to skip to subsequent
chapters. Press the SKIP Hbutton to go back to the
beginning of the current chapter. Press it repeatedly to go to
the previous chapters.
• Chapter number will appear briefly on the front panel
display during playback DVD. Track number keeps being
displayed during playback DivX®video file.
• If the SKIP Hor Gbutton is pressed while the playback
is paused, the playback after skipping to the next chapter
will be also paused.
NOTES:
• Depending on the disc, the Numeric buttons can
be used to search for a desired chapter by entering
the chapter number directly. Refer to the manual
accompanying the disc.
• The SKIP Hand Gbuttons are not available when
playback is stopped.
• A disc that does not contain chapters within titles, the
SKIP Hand Gbuttons change the titles.
234567
89
There are two ways to begin playback a disc at a specific track.
BY USING THE SEARCH MODE BUTTON
1
Press the SEARCH MODE
button.
•
The track search display appears.
2Within 30 seconds, select a desired track number
using the Numeric buttons.
• For the disc with less than 10 tracks, press the track
number directly.
• For discs with 10 or more but less than 100 tracks, to
play back a single-digit track, press 0first, then the
track number (e.g. for track 3, press 0, 3). To play back
a double-digit track, press the track number.
Dialog Speed
x2 x4
Slide Show Mode
Title / Chapter Search
Track Search
OFF
/29
/15
Only Moving Picture
E6GG0EDG1ED(EN)0601.indb20E6GG0EDG1ED(EN)0601.indb20 2007/06/0115:00:132007/06/0115:00:13
Other manuals for DVD-1940
1
Table of contents
Other Denon CD Player manuals

Denon
Denon DCD-1700NE User manual

Denon
Denon DCD-500AE User manual

Denon
Denon DCD-F107 User manual

Denon
Denon DN-C680 User manual

Denon
Denon DCD-50 User manual

Denon
Denon DCD-2500NE User manual

Denon
Denon DCM-5000 User manual

Denon
Denon DCD-1510AE User manual

Denon
Denon DCD-201SA User manual

Denon
Denon DVM-1845/745 User manual

Denon
Denon DCM-5000 User manual

Denon
Denon Nippon DN-600F User manual

Denon
Denon DVM-2845CI User manual

Denon
Denon DCD-2010AE User manual

Denon
Denon DN-501C User manual

Denon
Denon DCT-950R User manual

Denon
Denon DCD-A100 User manual

Denon
Denon DCD-50 User manual

Denon
Denon DCD-SA1 User manual

Denon
Denon DVM-745 Instruction Manual