Denon DVD-2200 User manual

ENTER
1
7
0
2
8
+
10
3
9
456
TOP MENU DISPLAY
MARKERRANDOM
PAGE
A-B
ZOOM
DIMMER PIC.ADJ
REPEAT
SETUP
NTSC / PAL
CALL RETURN
SKIP SLOW / SEARCH
POWER
ANGLE SUBTITLE AUDIO
SEARCH MODE
PLAY
STILL /
PAUSE
STOP
PROG / DIR
CLEAR
SRS.TS
OPEN /
CLOSE
RC-962
ON OFF
T. MENU
DISP.
MENU
DVD AUDIO-VIDEO/SUPER AUDIO CD PLAYER
DVD-2200
OPERATING INSTRUCTIONS
BEDIENUNGSANLEITUNG
MODE D’EMPLOI
ISTRUZIONI PER L’USO
INSTRUCCIONES DE OPERACION
GEBRUIKSAANWIJZING
BRUKSANVISNING
FOR ENGLISH READERS PAGE 004 ~ PAGE 034
FÜR DEUTSCHE LESER SEITE 035 ~ SEITE 117
POUR LES LECTEURS FRANCAIS PAGE 037 ~ PAGE 118
PER IL LETTORE ITALIANO PAGINA 040 ~ PAGINA 119
PARA LECTORES DE ESPAÑOL PAGINA 121 ~ PAGINA 203
VOOR NEDERLANDSTALIGE LEZERS PAGINA 123 ~ PAGINA 204
FOR SVENSKA LÄSARE SIDA 126 ~ SIDA 205

2
ENGLISHDEUTSCHFRANCAISITALIANO
NOTE ON USE / HINWEISE ZUM GEBRAUCH /
OBSERVATIONS RELATIVES A L’UTILISATION / NOTE SULL’USO
• Avoid high temperatures.
Allow for sufficient heat dispersion when installed on
a rack.
• Vermeiden Sie hohe Temperaturen.
Beachten Sie, daß eine ausreichend Luftzirkulation
gewährleistet wird, wenn das Gerät auf ein Regal
gestellt wird.
• Eviter des températures élevées
Tenir compte d’une dispersion de chaleur suffisante
lors de l’installation sur une étagère.
• Evitate di esporre l’unità a temperature alte.
Assicuratevi che ci sia un’adeguata dispersione del
calore quando installate l’unità in un mobile per
componenti audio.
• Handle the power cord carefully.
Hold the plug when unplugging the cord.
• Gehen Sie vorsichtig mit dem Netzkabel um.
Halten Sie das Kabel am Stecker, wenn Sie den Stecker
herausziehen.
• Manipuler le cordon d’alimentation avec précaution.
Tenir la prise lors du débranchement du cordon.
• Manneggiate il filo di alimentazione con cura.
Agite per la spina quando scollegate il cavo dalla presa.
• Keep the set free from moisture, water, and dust.
• Halten Sie das Gerät von Feuchtigkeit, Wasser und
Staub fern.
• Protéger l’appareil contre l’humidité, l’eau et lapoussière.
• Tenete l’unità lontana dall’umidità, dall’acqua e dalla
polvere.
• Unplug the power cord when not using the set for long
periods of time.
• Wenn das Gerät eine längere Zeit nicht verwendet
werden soll, trennen Sie das Netzkabel vom
Netzstecker.
• Débrancher le cordon d’alimentation lorsque l’appareil
n’est pas utilisé pendant de longues périodes.
• Disinnestate il filo di alimentazione quando avete
l’intenzione di non usare il filo di alimentazione per un
lungo periodo di tempo.
• Do not obstruct the ventilation holes.
• Die Belüftungsöffnungen dürfen nicht verdeckt werden.
• Ne pas obstruer les trous d’aération.
• Non coprite i fori di ventilazione.
* (For sets with ventilation holes)
• Do not let foreign objects in the set.
• Keine fremden Gegenstände in das Gerät kommen
lassen.
• Ne pas laisser des objets étrangers dans l’appareil.
• E’ importante che nessun oggetto è inserito all’interno
dell’unità.
• Do not let insecticides, benzene, and thinner come in
contact with the set.
• Lassen Sie das Gerät nicht mit Insektiziden, Benzin oder
Verdünnungsmitteln in Berührung kommen.
• Ne pas mettre en contact des insecticides, du benzène
et un diluant avec l’appareil.
• Assicuratevvi che l’unità non venga in contatto con
insetticidi, benzolo o solventi.
•Never disassemble or modify the set in any way.
•Versuchen Sie niemals das Gerät auseinander zu
nehmen oder auf jegliche Art zu verändern.
•Ne jamais démonter ou modifier l’appareil d’une manière
ou d’une autre.
•Non smontate mai, nè modificate l’unità in nessun
modo.
•DECLARATION OF CONFORMITY
We declare under our sole responsibility that this product, to
which this declaration relates, is in conformity with the following
standards:
EN60065, EN55013, EN55020, EN61000-3-2 and EN61000-3-3.
Following the provisions of 73/23/EEC, 89/336/EEC and
93/68/EEC Directive.
•ÜBEREINSTIMMUNGSERKLÄRUNG
Wir erklären unter unserer Verantwortung, daß dieses Produkt,
auf das sich diese Erklärung bezieht, den folgenden Standards
entspricht:
EN60065, EN55013, EN55020, EN61000-3-2 und EN61000-3-3.
Entspricht den Verordnungen der Direktive 73/23/EEC,
89/336/EEC und 93/68/EEC.
•DECLARATION DE CONFORMITE
Nous déclarons sous notre seule responsabilité que l’appareil,
auquel se réfère cette déclaration, est conforme aux standards
suivants:
EN60065, EN55013, EN55020, EN61000-3-2 et EN61000-3-3.
D’après les dispositions de la Directive 73/23/EEC, 89/336/EEC et
93/68/EEC.
•DICHIARAZIONE DI CONFORMITÀ
Dichiariamo con piena responsabilità che questo prodotto, al
quale la nostra dichiarazione si riferisce, è conforme alle seguenti
normative:
EN60065, EN55013, EN55020, EN61000-3-2 e EN61000-3-3.
In conformità con le condizioni delle direttive 73/23/EEC,
89/336/EEC e 93/68/EEC.
QUESTO PRODOTTO E’ CONFORME
AL D.M. 28/08/95 N. 548
ATTENZIONE: QUESTO APPARECCHIO E’ DOTATO DI DISPOSITIVO
OTTICO CON RAGGIO LASER.
L’USO IMPROPRIO DELL’APPARECCHIO PUO’ CAUSARE
PERICOLOSE ESPOSIZIONI A RADIAZIONI!
CLASS 1 LASER PRODUCT
LUOKAN 1 LASERLAITE
KLASS 1 LASERAPPARAT
ADVARSEL: USYNLIG LASERSTRÅLING VED ÅBNING, NÅR
SIKKERHEDSAFBRYDERE ER UDE AF FUNKTION.
UNDGÅ UDSAETTELSE FOR STRÅLING.
VAROITUS! LAITTEEN KÄYTTÄMINEN MUULLA KUIN TÄSSÄ
KÄYTTÖOHJEESSA MAINITULLA TAVALLA SAATTAA
ALTISTAA KÄYTTÄJÄN TURVALLISUUSLUOKAN 1
YLITTÄVÄLLE NÄKYMÄTTÖMÄLLE LASERSÄTEILYLLE.
VARNING- OM APPARATEN ANVÄNDS PÅ ANNAT SÄTT ÄN I
DENNA BRUKSANVISNING SPECIFICERATS, KAN ANVÄNDAREN
UTSÄTTAS FÖR OSYNLIG LASERSTRÅLNING SOM
ÖVERSKRIDER GRÄNSEN FÖR LASERKLASS 1.
,
CLASS 1
LASER PRODUCT,
,,
CAUTION
RISK OF ELECTRIC SHOCK
DO NOT OPEN
CAUTION:
TO REDUCE THE RISK OF ELECTRIC SHOCK, DO NOT
REMOVE COVER (OR BACK). NO USER SERVICEABLE
PARTS INSIDE. REFER SERVICING TO QUALIFIED
SERVICE PERSONNEL.
The lightning flash with arrowhead symbol,
within an equilateral triangle, is intended to
alert the user to the presence of uninsulated
“dangerous voltage” within the product’s
enclosure that may be of sufficient magnitude
to constitute a risk of electric shock to persons.
The exclamation point within an equilateral
triangle is intended to alert the user to the
presence of important operating and
maintenance (servicing) instructions in the
literature accompanying the appliance.
CAUTION:
• The ventilation should not be impeded by covering
the ventilation openings with items, such as
newspapers, table-cloths, curtains, etc.
• No naked flame sources, such as lighted candles,
should be placed on the apparatus.
• Please be care the environmental aspects of
battery disposal.
• The apparatus shall not be exposed to dripping or
splashing for use.
• No objects filled with liquids, such as vases, shall
be placed on the apparatus.

3
FRONT PANEL
FRONTPLATTE
PANNEAU AVANT
PANNELLO FRONTALE
PANEL DELANTERO
VOORPANEEL
FRONT PANELEN
REAR PANEL
RÜCKWAND
PANNEAU ARRIERE
IL PANNELLO POSTERIORE
PANEL TRASERO
ACHTERPANEEL
BAKSIDAN
qw rty u i o !0 !1e
!9 !8 !3!5
!4 !2!7
!6
@0
@2@1 @3
@7 @8
@4 #0@9
@5 @6
ENGLISH DEUTSCH FRANCAIS ITALIANO ESPAÑOL NEDERLANDS SVENSKA

ENGLISH
4
—TABLE OF CONTENTS —
zFeatures...............................................................4
xDiscs ....................................................................5
cCautions on Handling Discs .................................6
vConnections....................................................6~ 9
bPart Names and Functions.................................10
nRemote Control Unit..........................................11
mLoading Discs.....................................................12
,Changing the Default Settings.....................12~20
.Playback.......................................................21~23
⁄0 Adjusting the Picture Quality .......................23, 24
⁄1 Using the On-Screen Display.............................25
⁄2 Playing Repeatedly.......................................25, 26
⁄3 Playing Tracks in the Desired Order...................26
⁄4 Playing Tracks in the Random Order..................27
⁄5 MP3 Playback ..............................................27, 28
⁄6 Playing Still Picture Files (JPEG format).......28, 29
⁄7 Using the Multiple Audio,
Subtitle and Angle Functions .......................30, 31
⁄8 Using the Menus .........................................31, 32
⁄9 Marking Scenes you want to see again.............32
¤0 Playing in the Zoom Mode.................................33
¤1 Troubleshooting .................................................33
¤2 Main Specifications............................................34
•ACCESSORIES
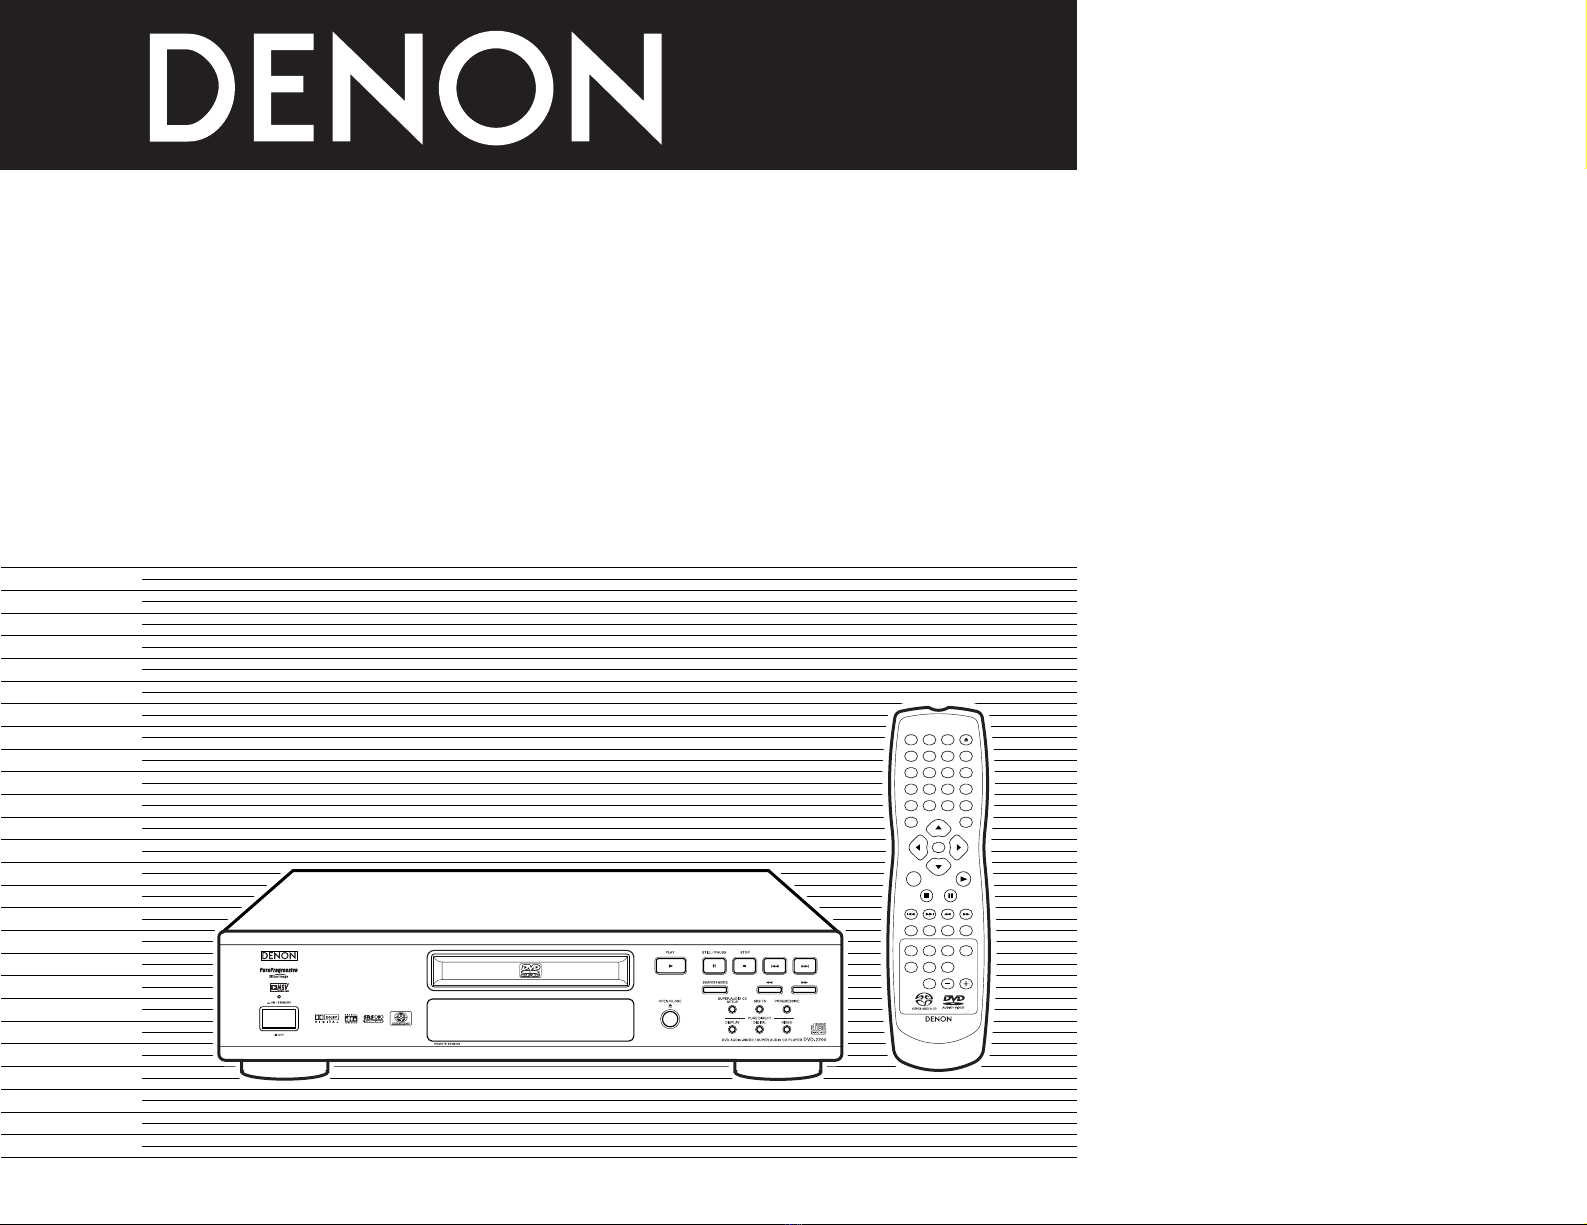
Please check to make sure the following items are included with the main unit in the carton:
qAudio video cord …………………………………1
wRemote control unit (RC-962) ……………………1
eR6P/AA batteries …………………………………2
rPower supply cord ………………………………1
tOperating instructions ……………………………1
yService station list…………………………………1
qw er
1. Super Audio CD multi-channel playback
compatibility
In addition to playing DVD audio and video discs,
the DVD-2200 can play multi-channel Super Audio
CDs with a playback frequency range covering
100 kHz and a dynamic range of 120 dB or greater
within the audible frequency range, and a
maximum of 5.1 channels can be output.
2. High precision 24-bit D/A converter
The audio playback circuit includes an advanced
segment type D/A converter with the top technical
specifications in the business, manufactured by
Burr-Brown, a company with an established
reputation for D/A converters. This high performance
D/A converter allows not only input of the 24-bit/
192 kHz data of DVD-Audio discs, it also includes
an analog pure FIR filter for ideal DSD playback of
Super Audio CDs. Furthermore, the same DAC is
used unsparingly for the surround, center and LFE
channels to provide optimum sound quality during
multi-channel playback as well.
3. Dolby Digital (AC-3)/DTS decoder (NOTE 2)
The DVD-2200 is equipped with a built-in Dolby
Digital (AC-3) /DTS decoder, allowing you to recreate
the atmosphere of a movie theater or concert hall
when using the DVD-2200 in combination with an
AV amplifier and speakers.
4. Progressive Scan circuit “Pure Progressive™”
(NOTE 3)
The DVD-2200 is equipped with a high precision
Progressive Scan circuit “Pure Progressive™”
allowing it to reproduce movies and other images
on DVDs with a quality near that of the original.
5. 12-bit/108 MHz video D/A converter (NOTE 4)
The DVD-2200 uses a video D/A converter that
conducts D/A conversion of all video signals at 12
bits and allows 4X oversampling in the progressive
mode to achieve the high quality picture that DVDs
are meant to provide. In addition, NSV technology
reduces noise upon D/A conversion.
6. Anti-interference design through isolation of
blocks
The DVD-2200 uses a 5-block architecture with
the different functions (power supply, video
circuitry, audio circuitry, etc.) on separate circuit
boards to minimize mutual interference.
7. Thorough vibration-resistant design
The pickup mechanism is positioned at the center to
reduce the effects of external vibrations.
1
FEATURES
IMPORTANT TO SAFETY
WARNING:
TO PREVENT FIRE OR SHOCK HAZARD, DO
NOT EXPOSE THIS APPLIANCE TO RAIN OR
MOISTURE.
CAUTION:
1. Handle the power supply cord carefully
Do not damage or deform the power supply cord.
If it is damaged or deformed, it may cause electric
shock or malfunction when used. When removing
from wall outlet, be sure to remove by holding the
plug attachment and not by pulling the cord.
2. Do not open the top cover
In order to prevent electric shock, do not open the
top cover.
If problems occur, contact your DENON DEALER.
3. Do not place anything inside
Do not place metal objects or spill liquid inside the
DVD audio-video/Super audio CD player.
Electric shock or malfunction may result.
Please, record and retain the Model name and serial
number of your set shown on the rating label.
Model No. DVD-2200 Serial No.
NOTE:
This DVD audio-video/Super audio CD player uses the
semiconductor laser. To allow you to enjoy music at a
stable operation, it is recommended to use this in a
room of 10°C (50°F) ~ 35°C (95°F).
Copyrights
2It is prohibited by law to reproduce, broadcast, rent
or play discs in public without the consent of the
copyright holder.
8. Multiple functions
(1) Picture CD playback function (NOTE 5)
Kodak Picture CDs and Fujifilm Fujicolor CD
can be played on the DVD-2200.
Still images stored in JPEG format on CD-
R/RWs can also be played.
(2) Multiple audio function
Selection of up to 8 audio languages.
(The number of languages offered differs from
DVD to DVD.)
(3) Multiple subtitle function
Selection of up to 32 subtitle languages.
(The number of languages offered differs from
DVD to DVD.)
(4) Multiple angle function
The angle of view can be changed.
(For DVDs on which multiple angles are
recorded.)
(5) GUI (Graphical User Interface) function
The display button on the remote control unit
can be used to display player and disc
information on the TV screen.
(6) Marker function
The positions of up to five scenes can be
stored in the memory, so you can watch your
favorite scenes whenever you want.
(7) Playback disable function
This function can be used to disable playback
of DVDs you do not want children to watch.
NOTES:
1. Manufactured under license from Dolby Laboratories.
“Dolby” and the double-D symbol are trademarks
of Dolby Laboratories. Confidential unpublished
work. ©1992 – 1998 Dolby Laboratories. All rights
reserved.
2. “DTS” and “DTS Digital Surround” are registered
trademarks of Digital Theater Systems, Inc.
3. “Pure Progressive” is a trademark of Silicon Image,
Inc.
4. “NSV” is a trademark of Analog Devices, Inc.
5. “KODAK” is a trademark of Eastman Kodak
Company.
“Fujicolor CD” is a trademark of FUJI PHOTO
FILM CO., LTD.

5
ENGLISH
2
DISCS
• The types of discs listed on the table below can be
used on the DVD-2200.
The marks are indicated on the disc labels or jackets.
Usable
discs Mark (logo) Recorded
signals Disc
size
DVD video
DVD audio
(NOTE 1)
DVD-R
DVD-RW
(NOTE 2)
Digital audio +
digital video
(MPEG2)
12 cm
8 cm
12 cm
8 cm
12 cm
8 cm
Digital audio +
digital video
(MPEG1)
Digital audio
MP3
Digital picture
(JPEG)
Video CD
(NOTE 1)
CD
CD-R
CD-RW
(NOTE 3)
Recordable
ReWritable
12 cmJPEGPicture CD
R
R
R
W
R
W
2The following types of discs cannot be played
on the DVD-2200:
• For European model:
DVDs with region numbers other than “2” or “ALL”
• DVD-ROM/RAMs
• CD-ROMs
• CVD/VSDs
• CDVs (Only the audio part can be played.)
• CD-Gs (Only the audio is output.)
• Photo CDs
NOTE 1: Some DVD audio, DVD video and video CD
discs do not operate as described in this
manual due to the intentions of the discs’
producers.
NOTE 2: Playing DVD-R and DVD-RW discs
DVD-R and DVD-RW discs recorded in video
format on a DVD recorder can be played on
the DVD-2200.
Discs that have not be finalized cannot be
played.
Depending on the disc’s recording status,
the disc may not be accepted or may not be
played normally (the picture or sound may
be not be smooth, etc.).
NOTE 3: According to recording quality, some CD-R/
RW cannot be played.
2Disc terminology
•Groups and tracks (DVD-audios)
DVD-audios are divided into several large sections
called “groups” and smaller sections called
“tracks”.
Numbers are allotted to these sections. These
numbers are called “group numbers” and “track
numbers”.
For example:
Group 1 Group 2
Track 1 Track 2 Track 3 Track 1 Track 2
•Titles and chapters (DVD-videos)
DVD-videos are divided into several large sections
called “titles” and smaller sections called “chapters”.
Numbers are allotted to these sections. These
numbers are called “title numbers” and “chapter
numbers”.
For example:
Title 1 Title 2
Chapter 1 Chapter 2 Chapter 3 Chapter 1 Chapter 2
•Tracks (Super audio CDs, video and music CDs)
Super audio CDs, video and music CDs are divided
into sections called “tracks”.
Numbers are allotted to these sections. These
numbers are called “track numbers”.
For example:
Track 1 Track 2 Track 3 Track 4 Track 5
•Playback control (video CDs)
Video CDs including the words “playback control”
on the disc or jacket are equipped with a function
for displaying menus on the TV screen for selecting
the desired position, displaying information, etc., in
dialog fashion.
In this manual, playing video CDs using such menus
is referred to “menu playback”.
Video CDs with playback control can be used on the
DVD-2200.
NOTE:
• This DVD player is designed and manufactured to
respond to the Region Management Information
that is recorded on a DVD disc.
If the Region number described on the DVD disc
does not correspond to the Region number of this
DVD player, this DVD player cannot play this disc.
2
For European model:
The Region number for this DVD
player is 2.
12 cmDigital audio
Super audio
CD
12 cmJPEG
Fujicolor
CD
Stereo
Multi-
ch

ENGLISH
3
CAUTIONS ON HANDLING DISCS
Discs
Only the discs including the marks shown on page 5
can be played on the DVD-2200.
Note, however, that discs with special shapes (heart-
shaped discs, hexagonal discs, etc.) cannot be played
on the DVD-2200. Do not attempt to play such discs,
as they may damage the player.
Holding Discs
Avoid touching the surface of discs when loading and
unloading them.
Be careful not to get
fingerprints on the signal
surface (the side which
shines in rainbow colors).
Cleaning Discs
2Fingerprints or dirt on the disc may lower sound and
picture quality or cause breaks in playback. Wipe off
fingerprints or dirt.
2Use a commercially available disc cleaning set or a
soft cloth to wipe off fingerprints or dirt.
Wipe gently from the
middle outwards.
Do not wipe with a circular
motion.
NOTE:
• Do not use record spray or antistatic. Also do not
use volatile chemicals such as benzene or thinner.
Record
spray
Thinner Benzene
Cautions on Handling Discs
• Do not get fingerprints, grease or dirt on discs.
• Be especially careful not to scratch discs when
removing them from their cases.
• Do not bend discs.
• Do not heat discs.
• Do not enlarge the center hole.
• Do not write on the labeled (printed) side with a ball-
point pen or a pencil.
• Water droplets may form on the surface if the disc is
moved suddenly from a cold place to a warm one. Do
not use a hairdryer, etc., to dry the disc.
Cautions on Storing Discs
• Always eject discs after playing them.
• Keep discs in their cases to protect them from dust,
scratches and warping.
• Do not put discs in the following places:
1. Places exposed to direct sunlight for long periods
of time
2. Humid or dusty places
3. Places exposed to heat from heaters, etc.
Cautions on Loading Discs
• Only load one disc at a time. Loading one disc on top
of another may result in damage or scratch the discs.
• Load 8 cm discs securely in the disc guide, without
using an adapter. If the disc is not properly loaded, it
may slip out of the guide and block the disc tray.
• Be careful not to let your fingers get caught when
the disc tray is closing.
• Do not place anything but discs in the disc tray.
• Do not load cracked or warped discs or discs that
have been fixed with adhesive, etc.
• Do not use discs on which the adhesive part of
cellophane tape or glue used to attach the label is
exposed, or discs with traces of tape or labels that
have been peeled off. Such discs may get stuck
inside the player, resulting in damage.
6
VIDEO IN S-VIDEO IN
AUDIO IN
L
R
4
CONNECTIONS
• Read the manuals of all the components when
making connections.
• Keep the power supply cord unplugged until all
connections have been completed.
• If the power is on when connections are made,
noise may be generated and damage the speakers.
NOTES:
• Be sure to connect the left and right channels
properly, L (left) to L, R (right) to R.
• Plug the power supply cord securely into the power
outlet. Incomplete connection may result in noise.
• Binding the power supply cord together with
connection cords may result in humming or noise.
(1) Connecting to a TV
• Use the included audio video cord to connect the TV’s video input connector and audio input connectors to the
DVD-2200’s VIDEO OUT or S-VIDEO OUT and AUDIO OUT.
DVD-2200
S-Video output connector
The video signals are divided into color (C) and brightness (Y) signals, achieving
a clearer picture.
If the TV is equipped with an S-Video input connector, we recommend connecting
it to the DVD-2200’s S-Video output connector using a commercially available
S-Video connection cord.
To power outlet
TV
• Connect the DVD-2200’s video outputs to the TV
either directly or through an AV amplifier. Do not
connect it via a VCR (video cassette recorder).
Some discs contain copy prohibit signals. If such
discs are played via a VCR, the copy prohibit
system may cause disturbance in the picture.
• Set the “TV TYPE” in “VIDEO SETUP” in “SETUP“
to comply with your TV's video format. When the
TV is PAL formated, set to PAL. (See page 16.)
NOTES:
• To use with 2-channel audio output, set “2
CHANNEL” in “AUDIO CHANNEL” in “AUDIO
SETUP” in “SETUP” at the initial settings. (See
page 17.)
• Set the “TV ASPECT” in “VIDEO SETUP” in
“SETUP” to comply with your TV’s aspect. (See
page 16.)

ENGLISH
(2) Connecting to a TV or Monitor Equipped with Color Component Input
Connectors
COMPONENT VIDEO IN
PR/CRPB/CBYAUDIO IN
LR
Color component output connectors (PR/CR, PB/CBand Y)
The red (PR/CR), blue (PB/CB) and brightness (Y) signals are output independently, achieving
more faithful reproduction of the colors.
• The color component input connectors may be marked differently on some TVs or monitors
(PR, PBand Y/R-Y, B-Y and Y/CR, CBand Y, etc.). For details, refer to the TV’s operating
instructions.
•Connect in this way if your TV is compatible with Progressive Scan.
DVD-2200
To power outlet
NOTES:
• Use the three commercially available video cords to connect the DVD-2200’s color component output
connectors to the TV or monitor.
• Set the “TV TYPE“ in “VIDEO SETUP“ in “SETUP“ to comply with your TV's video format. When the TV
is PAL formated, set to PAL. (See page 16.)
• Set the “VIDEO OUT” in “VIDEO SETUP” in “SETUP” to comply with Progressive TV. (NTSC formated
only)
• To use with 2-channel audio output, set “2 CHANNEL” in “AUDIO CHANNEL” in “AUDIO SETUP” in
“SETUP” at the initial settings. (See page 17.)
• Set the “TV ASPECT” in “VIDEO SETUP” in “SETUP” to comply with your TV’s aspect. (See page 16.)
TV
CONSUMERS SHOULD NOTE THAT NOT ALL HIGH DEFINITION TELEVISION SETS ARE FULLY COMPATIBLE
WITH THIS PRODUCT AND MAY CAUSE ARTIFACTS TO BE DISPLAYED IN THE PICTURE. IN CASE OF
525 PROGRESSIVE SCAN PICTURE PROBLEMS, IT IS RECOMMENDED THAT THE USER SWITCH THE
CONNECTION TO THE “STANDARD DEFINITION” OUTPUT.
7
(3) Connecting to a TV with 21-pin SCART Terminal
• Use the commercially 21-pin SCART cable to connect the TV’s 21-pin SCART terminal to the DVD-2200’s 21-
pin SCART terminal (AV1).
DVD-2200
To power outlet
TV
21-pin SCART terminal
• Set the “TV TYPE“ in “VIDEO SETUP“ in “SETUP“
to comply with your TV's video format. When the
TV is PAL formated, set to PAL. (See page 16.)
NOTES:
• Some discs contain copy prohibit signals. If such
discs are played via a VCR, the copy prohibit system
may cause disturbance in the picture.
If necessary,
connect the video
terminals, referring
to page 6.

ENGLISH
(4) Connecting to a AV amplifier with a Built-in decoder
The same data is output from both digital audio output connectors (COAXIAL and OPTICAL). Connect to one or
the other connector, according to your system.When DVDs recorded in Dolby Digital or DTS are played, Dolby
Digital or DTS bitstream signals are output from the DVD player’s digital audio output connectors. If a Dolby
Digital or DTS decoder is connected, you can achieve sound with the power and sense of presence of a movie
theater or concert hall.
PHONES
DIRECT STEREO
ANALOG EXT. IN
DOLBY
SURROUND DTS
SURROUND WIDE
SCREEN
CINEMA/
MUSIC 6.1/ 7.1
SURROUND VIDEO
ON/ OFF
STATUS
M-ZONE1
FUNCTION CONTROL
INPUT
MODE
5CH/ 7CH
STEREO DSP
SIMULATION
TONE
DEFEAT
MODE
SELECT
REC/
M-ZONE2
SURROUNDMODE
INPUT RECSELECT / M-ZONE
MULTIFUNCTION
DVD-2200
Digital audio input
connector
(OPTICAL)
Optical fiber cable
(commercially
available)
75 Ω/ohms
pin-plug cable
(commercially
available)
Front speaker (left)
Center speaker
Front speaker (right)
Digital audio
input connector
(COAXIAL)
Subwoofer
Surround speaker (left)
AV amplifier with a built-in decoder
(AV control center)
Surround speaker (right)
NOTES:
• Harsh noise that could harm your ears or damage the speakers is generated when a DVD recorded in DTS
is played while using a decoder, etc., that is not DTS-compatible.
• When playing copyright-protected linear PCM or packed PCM DVDs, in consideration of copyrights, no digital
signals are output for sources exceeding 48 kHz/16 bits. When playing such sources, either set “LPCM
(44.1 kHz/48 kHz)” under “AUDIO SETUP” at “SETUP” to “ON” (see page 18) or make analog connections.
(See page 9.)
• When making digital connections to an AV amplifier that is not compatible with 96 kHz/88.2 kHz signals, set
“LPCM (44.1 kHz/48 kHz)” under “AUDIO SETUP” at “SETUP” to “ON”. (See page 18.)
• With Super audio CDs, digital audio signals cannot be output. Use analog connections. (See page 9.)
8
2Sound output from the DVD-2200’s digital audio output connectors
In the case of bit stream output
NORMALAudio recording format
Dolby Digital
DTS
MPEG Audio
DIGITAL OUT
2 channels PCM
(48 kHz / 16 bit)
2 channels PCM
(48 kHz / 16 bit)
2 channels PCM
(48 kHz / 16 bit)
PCM
DVD video
Dolby Digital bitstream
DTS bitstream
2 channels PCM
(48 kHz / 16 bit)
Settings
In the case of PCM output
OFF
DVD
audio
Audio recording format
Linear
PCM
Video CD
Music CD
MP3 CD
44.1 kHz / 16 bit PCM
192 kHz / 16 ~ 24 bit
176.4 kHz / 16 ~ 24 bit
MPEG 1
44.1 kHz / 16 bit Linear PCM
MP3 (MPEG-1 Audio Layer 3)
96 kHz / 16 ~ 24 bit
88.2 kHz / 16 ~ 24 bit
48 kHz / 16 ~ 24 bit
44.1 kHz / 16 ~ 24 bit
96 kHz / 16 ~ 24 bit
48 kHz / 16 ~ 24 bit
LPCM SELECT
48 kHz / 16 bit PCM
44.1 kHz / 16 bit PCM
48 kHz / 16 bit PCM
44.1 kHz / 16 bit PCM
48 kHz / 16 bit PCM
44.1 kHz / 16 bit PCM
48 kHz / 16 bit PCM
48 kHz / 16 bit PCM
ON
DVD
video
44.1 kHz / 16 bit PCM
No output data
No output data
No output data
No output data
No output data (*1)
No output data (*2)
No output data
No output data (*1)
44.1, 48 kHz / 16 bit PCM
Copy protection ON
88.2 kHz / 16 ~ 24 bit PCM
96 kHz / 16 ~ 24 bit PCM
88.2 kHz / 16 ~ 24 bit PCM
48 kHz / 16 ~ 24 bit PCM
96 kHz / 16 ~ 24 bit PCM
Copy protection OFF
44.1, 48 kHz / 16 bit PCM
48 kHz / 16 ~ 24 bit PCM
44.1 kHz / 16 ~ 24 bit PCM
96 kHz / 16 ~ 24 bit PCM
Linear PCM or
Packed PCM
Settings
*1 Only 48 kHz/16 bit sources are output.
*2 Only 44.1 kHz/16 bit sources are output.
*3 44.1 kHz/16-bit PCM signals are output during CD layer playback.
• Down-mixed to 2 channels for multi-channel PCM sources. (Only the front left and right channels are output for
sources for which down-mixing is prohibited.)
• When “OFF” is selected, digital signals are not output from the digital audio output at this time.
• Linear PCM audio is a signal recording format used for music CDs.
While signals are recorded at 44.1 kHz/16 bit for music CDs, for DVDs they are recorded at 44.1 kHz/16 bit to
192 kHz/24 bit, providing higher sound quality than music CDs.
• Packed PCM signals are high sound quality compressed PCM signals that are decompressed with virtually no
loss of data.
To power outlet
Super
audio CD No output data (*3)DSD (DIRECT STREAM DIGITAL) No output data (*3)
The same data is output from both digital audio output
connectors (COAXIAL and OPTICAL). Connect to one or
the other connector, according to your system.

9
ENGLISH
(6) Connecting to a Digital Recorder (MD Recorder, DAT Deck, etc.)
89
B
✽Set the “AUDIO SETUP” default setting as shown below. (See page 18.)
• “DIGITAL OUT” →“PCM”
“LPCM (44.1 kHz / 48 kHz)” →“ON”
Playing DVDs with incorrect settings may result noise that could damage your ears or the speakers.
The same data is output from both digital audio output connectors (COAXIAL and OPTICAL). Connect to one or
the other connector, according to your system.
DVD-2200
75 Ω/ohms pin-plug cable (commercially available)
Optical fiber cable (commercially available)
Digital audio
input
connector
(COAXIAL)
Digital audio input
connector (OPTICAL)
(7) Connecting to a Stereo Component
DVD-2200 Stereo component
NOTE:
• When connecting to a 2-channel audio stereo device, set “AUDIO CHANNEL” under “AUDIO SETUP” at
“SETUP” to “2 CHANNEL” (see page 17). For multi-channel sources, the signals are down-mixed into two
channels (analog).
(Only the front left and right channels are output for sources for which down-mixing is prohibited.)
(5) Connecting a basic 5.1-channel surround system
Analog 5.1-channel audio signals can be output from the DVD-2200.
The multichannel audio signals recorded in packed PCM and the multichannnel Super audio CDs can be played
when an AV amplifier equipped with analog 5.1-channel audio inputs is connected.
PHONES
DIRECT STEREO
ANALOG EXT. IN
DOLBY
SURROUND DTS
SURROUND WIDE
SCREEN
CINEMA/
MUSIC 6.1/ 7.1
SURROUND VIDEO
ON/ OFF
STATUS
M-ZONE1
FUNCTION CONTROL
INPUT
MODE
5CH/ 7CH
STEREO DSP
SIMULATION
TONE
DEFEAT
MODE
SELECT
REC/
M-ZONE2
SURROUNDMODE
INPUT RECSELECT / M-ZONE
MULTIFUNCTION
DVD-2200
To power outlet
Front speaker (left)
Center speaker
Front speaker (right)
Subwoofer
Surround speaker (right)
AV amplifier with 5.1-channel
input terminals
Surround speaker (left)
FRONT
SUBWOOFER
SURROUND
CENTER
NOTES:
• For multi-channel connections, set “AUDIO CHANNEL” under “AUDIO SETUP” at “SETUP” to “MULTI
CHANNEL” and make the “SPEAKER CONFIGURATION”, “CHANNEL LEVEL” and “DELAY TIME” settings.
• The delay time setting is not valid when playing Super audio CDs.
• Set the “SUPER AUDIO CD” setting under “AUDIO SETUP” to “MULTI”.
• When playing DVDs recorded in MPEG audio format, the audio signals are down-mixed to 2 channels for
output.
• With the DVD-2200, we recommend turning the digital output off and only outputting analog signals in order
to keep interference from the digital output circuitry to the minimum and allow you to enjoy high bit, high
sampling frequency, high quality multi-channel sound.
NOTE:
• Digital audio signals cannot be output when playing Super Audio CDs. Use analog connections to record
Super Audio CDs.
If necessary, connect the video terminals, referring to page 6.

10
ENGLISH
5
PART NAMES AND FUNCTIONS
(1) Front Panel
See page 3.
qPower button
• Press once to turn the power on.
• Press again to set to the “OFF” position and
turn the power off.
• Set the power to the standby mode by pressing
the POWER OFF button on the remote control
unit while the power is on.
• Turn the power on from the standby mode by
pressing the POWER ON button on the remote
control unit.
wPower indicator
• This indicator lights when the power is on and
when the power is in the standby mode.
eDisc tray
• Load discs here. (See page 12.)
• Press the OPEN/CLOSE button !8 to open and
close the disc tray.
• The disc tray is also closed when the PLAY
button ris pressed.
rPLAY button (1)
• Press this button to play the disc. (See page 21.)
tSEARCH MODE button
• Press this to change the search mode to
search for groups or titles, tracks or chapters
when selecting sections of discs directly
using the number buttons or SKIP buttons.
ySTILL/PAUSE button (3)
• Press this button to pause images or music or
to play images frame by frame. (See page 22.)
uSTOP button (2)
• Press this to stop the disc. (See page 22.)
iSkip button (8)
• Press this to move back to the beginning of the
current track (or chapter).
• Press again to move back to the beginning of
the previous track (or chapter). (See page 22.)
oSkip button (9)
• Press this to move ahead to the beginning of
the next track (or chapter). (See page 22.)
!0 Slow/Search button (6)
• Press this to set the slow play mode and to
search in the reverse direction. (See page 22.)
!1 Slow/Search button (7)
• Press this to set the slow play mode and to
search in the forward direction. (See page 22.)
!2 PROGRESSIVE button
• Press to switch the progressive video output
mode between progressive and interlace.
(See psge 16.)
✽This function does not work when a CD is
playing.
!3 PURE DIRECT VIDEO button
• Press to switch the video output between on
and off.
• When the power is turned off, the setting is
restored to the default value.
(The default value is ON.)
!4 SRS TS button
• Sets the virtual surround sound.
(Functions when playing DVD-videos or VCDs
only. See page 23.)
!5 PURE DIRECT DIGITAL button
• Press to switch the audio output between on
and off.
• When the power is turned off, the setting is
restored to the default value.
(The default value is ON.)
!6 PURE DIRECT DISPLAY button
• Press to switch the indicate in Display of the
main unit between on and off.
• When the power is turned off, the setting is
restored to the default value.
(The default value is ON.)
• Even when the display is turned off, it lights
for about 2 seconds when any button other
than the DIMMER button is pressed.
!7 Setting the playback area/layer of
Super audio CD
(SUPER AUDIO CD SETUP)
• Switch the area/layer of the Super audio CDs
played with priority.
!8 OPEN/CLOSE button (5)
• Press this button to open and close the disc
tray.(See page 12.)
!9 Display
• Information on the disc that is currently playing
is shown on the display. (See page 10.)
@0 Remote control sensor
(2) Rear Panel
@1 Component video output connectors
(COMPONENT VIDEO OUT)
• Connect using video cords (available in stores).
@2 Video output connector (VIDEO OUT)
• Connect using the included audio video cord.
@3 S-Video output connector
(S-VIDEO OUT)
• Connect using an S-Video connection cord
(available in stores).
@4 Audio output connectors
(AUDIO OUT)
• Connect using the included audio video cord.
@5 Digital audio output connector
(COAXIAL)
• Connect using an digital audio cord. Connect a
commercially available 75 Ω/ohms pin-plug cord.
• Digital data is output from this connector.
@6 Digital audio output connector
(OPTICAL)
• Connect using an optical fiber cable (available in
stores).
• Digital data is output from this connector.
@7 Control output connector
(ROOM TO ROOM/OUT)
• This is the output connector for wired remote
control.
Consult your DENON dealer if you wish to use
this connector.
@8 Control input connector
(ROOM TO ROOM/IN)
• This is the input connector for wired remote
control.
Consult your DENON dealer if you wish to use
this connector.
@9 21-pin SCART terminal (AV1)
• Connect using a 21-pin SCART cable (available
in stores).
#0 Power input (AC IN)
• Connect to AC power supply using the included
power supply cord.
(3) Display
Lights when the audio signals can
be down-mixed.
Lights during playback of multiple angles disc.
Lights to indicate the currently playing disc.
These light to indicate the names of the
sections of the disc being played.
Lights to indicate the currently playing
audio format.
Lights to indicate the currently playing
audio channel.
L: Front left channel
C: Center channel
R: Front right channel
SL: Surround left channel
S: Mono surround channel
SR: Surround right channnel
LFE: Low frequency effect
Lights to indicate the
currently playing video
type.
F: Film source
V: Video source
G: Graphic source
Lights during playback, flashes when the resume play memory function is activated.
Lights in the programmed play mode.
Lights in the still/pause mode.
Displays the title, track number
and elapsed time during
playback.
These light to indicate
the time display mode.
Lights when progressive video
signals are being output.
Lights in the repeat play mode.
Lights in the random play mode.
Lights when SRS TruSurround is on.

11
ENGLISH
6
REMOTE CONTROL UNIT
2The DVD-2200 can be controlled from a distance using the included remote control unit (RC-962).
(1) Inserting Batteries
qRemove the remote control unit’s rear cover.
wPlace two R6P/AA batteries in the battery
compartment in the direction indicated by the
marks.
eClose the rear cover.
Cautions On Batteries
• Use R6P/AA batteries in this remote control unit.
• Replace the batteries with new ones approximately
once a year, though this depends on the frequency
with which the remote control unit is used.
• If the remote control unit does not operate from
close to the main unit, replace the batteries with
new ones, even if less than a year has passed.
• The included battery is only for verifying operation.
Replace it with a new battery as soon as possible.
• When inserting the batteries, be careful to do
so in the proper direction, following the <and
>marks in the remote control unit’s battery
compartment.
• To prevent damage or battery fluid leakage:
• Do not use a new battery with an old one.
• Do not use two different types of batteries.
• Do not short-circuit, disassemble, heat or
dispose of batteries in flames.
• Remove the batteries when not planning to use
the remote control unit for a long period of time.
• If the batteries should leak, carefully wipe off the
fluid from the inside of the battery compartment,
then insert new batteries.
(2) Using the Remote Control Unit
30°
30°
Approx. 7 meters
• When operating the remote control unit,
point it at the remote control sensor as
shown on the diagram.
• The remote control unit can be used from a
direct distance of approximately 7 meters.
This distance will be shorter, however, if
there are obstacles in the way or if the
remote control unit is not pointed directly
at the remote control sensor.
• The remote control unit can be operated at
a horizontal angle of up to 30° with respect
to the remote control sensor.
NOTES:
• It may be difficult to operate the remote control unit if the remote control sensor is exposed to direct sunlight
or strong artificial light.
• Do not press buttons on the main unit and on the remote control unit at the same time. Doing so will result
in malfunction.
(3) Names and Functions of Remote Control Unit Buttons
qPOWER ON/POWER OFF buttons
Press this to switch the power between on and standby.
wNumber buttons
Use these to input numbers.
Use the +10 button to input numbers of 10 or over.
Example: To input 25
eTOP MENU button
The top menu stored on the disc is displayed.
rCursor buttons/ENTER button
Use the •and ªbuttons to select in the vertical direction.
Use the 0and 1buttons to select in the horizontal direction.
Press the ENTER button to select the item selected with
the cursor buttons.
tMENU button
The DVD menu stored on the disc is displayed.
ySTOP button (2)
uSKIP buttons
iANGLE button
Press this to switch the angle.
oSUBTITLE button
Press this to switch the DVD’s subtitle language.
!0 A-B repeat button (A-B)
Use this to repeat sections between two specific points.
!1 REPEAT button
Press this to play tracks repeatedly.
!2 SETUP button
Press this to display the default setting screen.
!3 DIMMER button
Use this to adjust the brightness of the main unit’s display.
Can be switched in 4 steps, from OFF to always on.
!4 ZOOM button
Press this to enlarge the image.
!5 Picture adjust button (PIC. ADJ)
Press this to adjust the picture quality to suit your tastes.
!6 NTSC/PAL button
Use this to switch the set’s video output format (NTSC/PAL).
!7 OPEN/CLOSE button
!8 PROGRAM/DIRECT button (PROG/DIR)
Press this to switch between the normal play, programmed
play.
!9 CLEAR button
Press this to clear numbers that you have input.
@0 SRS TS button
Sets the virtual surround sound. (Functions when playing
DVD-videos or VCDs only. See page 23.)
@1 RETURN button
Press this to return to the previous menu screen.
@2 DISPLAY button
Press this to display the ON-SCREEN.
@3 CALL button
Press this to check the program contents.
@4 PLAY button (1)
@5 STILL/PAUSE button (3)
@6 SLOW/SEARCH buttons
@7 SEARCH MODE button
Press this to change the search mode to search for groups
or titles, tracks or chapters when selecting sections of
discs directly using the number buttons or KIP button.
ENTER
1
7
0
2
8
+
10
3
9
456
TOP MENU DISPLAY
MARKERRANDOM
PAGE
A-B
ZOOM
DIMMER PIC.ADJ
REPEAT
SETUP
NTSC / PAL
CALL RETURN
SKIP SLOW / SEARCH
POWER
ANGLE SUBTITLE AUDIO
SEARCH MODE
PLAY
STILL /
PAUSE
STOP
PROG / DIR
CLEAR
SRS.TS
OPEN /
CLOSE
RC-962
ON OFF
T. MENU
DISP.
MENU
q!7
w
e
r
t
y
u
i
o
!0
!1
!2
!4
!5
!3
!8
!9
@0
@1
@2
@4
@5
@6
@7
@8
@9
#0
#1
@3
!6
@8 AUDIO button
For DVDs, press this to switch the audio language. For
video CDs, press this to switch the channel between “LR”,
“L” and “R”.
@9 RANDOM button
Press this to play the tracks on the video or music CD in
random order.
#0 MARKER button
Press this to mark places you want to see again.
#1 PAGE -/PAGE + buttons
Use these to selected the desired still picture on DVD
audio discs containing browseable still pictures.
2Button not explained here function in the same way as the corresponding buttons on the main unit.
5+10 +10

NOTES:
• Be sure to turn on the power before opening and
closing the disc tray.
• Do not strike on the button with a pencil, etc.
12
ENGLISH
8CHANGING THE DEFAULT SETTINGS
1
2
In the stop mode, press the SETUP button.
• The setup (default settings) screen appears.
NOTE: For some menus, the initial values can be changed
during playback.
DISC SETUP
Use this to set the language to be used when playing the disc.
If the set language is not offered on that disc, the discs default
language is set.
OSD SETUP
Use this to set the language for the default setting screen and
messages displayed on the TV screen (“PLAY”, etc.).
VIDEO SETUP
Use this to set the DVD-2200’s screen mode.
(TV aspect, TV type and AV1 video output.)
AUDIO SETUP
Use this to set the DVD-2200’s audio output mode.
(Digital and LPCM output settings.)
RATINGS
Use this to disable playback of adult DVDs so that children
cannot watch them. Note that playback of adult DVDs cannot
be disabled if the rating level is not recorded on the DVD, but
that it is possible to disable playback of all DVDs.
OTHER SETUP
These include special settings CAPTIONS and COMPRESSION.
3
Use the 0and 1cursor buttons to select the desired setting
item, then press the ENTER button.
Select “DISC SETUP”. (See page 13.)
Select “OSD SETUP”. (See page 15.)
Select “VIDEO SETUP”. (See page 15.)
Select “AUDIO SETUP”. (See page 17.)
Select “RATINGS”. (See page 19.)
Select “OTHER SETUP” (See page 20.)
D I SC SE TUP
SELECT: DECISION:ENTER BUTTON
DIALOG
D I SC MENUS
EXIT SETUP
SUBT I TL E
ENGL ISH
OF F
ENGL ISH
✽To exit the setup mode
Use the ªcursor button to select “EXIT SETUP”, then press the ENTER button. It is also possible to quit
by pressing the SETUP button on the remote control unit.
SETUP
Remote control unit
2Make the initial settings to suit your usage conditions before starting playback.
The initial settings are retained until they are next changed, even
if the power is turned off.
ENTER
1
7
0
2
8
+
10
3
9
456
TOPMENU DISPLAY
MARKERRANDOM
PAGE
A-B
ZOOM
DIMMER PIC.ADJ
REPEAT
SETUP
NTSC / PAL
CALL RETURN
SKIP SLOW / SEARCH
POWER
ANGLE SUBTITLE AUDIO
SEARCH MODE
PLAY
STILL /
PAUSE
STOP
PROG / DIR
CLEAR
SRS.TS
OPEN /
CLOSE
ON OFF
T. MENU
DISP.
MENU
3
1
2
ON
POWER
1Turn on the power.
• Press the power button, the power indicator lights and the
power turns on.
¢ON / STANDBY
£OFF
Main unit Remote control unit
ENTER
Remote control unit
7
LOADING DISCS
2Set discs in the disc tray with the labeled (printed)
side facing up.
8 cm disc
guide
12 cm disc guide
Disc tray
NOTE:
• Do not move the DVD-2200 while a disc is playing.
Doing so may scratch the disc.
(1)
Opening and Closing the Disc Tray
qTurn on the power.
wPress the OPEN/CLOSE button.
Disc tray
Power button
OPEN/CLOSE
button
(2) Loading Discs
Figure 1
Outer disc tray
12 cm disc
Figure 2
Inner disc tray
8 cm disc
NOTES:
• If a foreign object is caught in the disc tray during
closing, simply press the OPEN/CLOSE button
again and the tray will open.
• Do not press the disc tray in by hand when the
power is off. Doing so will damage it.
• Do not place foreign objects in the disc tray.
Doing so will damage it.
• Pick up the disc carefully so as not to touch the
signal surface and hold it with the labeled side
facing up.
• With the disc tray fully open, set the disc in the disc
tray.
• Set 12 cm discs in the outer tray guide (Figure 1), 8
cm discs in the inner tray guide (Figure 2).
• Press the OPEN/CLOSE button.
The disc is automatically loaded.
• The disc tray can also be closed automatically to load
the disc by pressing the PLAY button.
Light
Remote control unit

13
ENGLISH
When “DISC SETUP”is selected
ENTER
1
7
0
2
8
+
10
3
9
456
TOPMENU DISPLAY
MARKERRANDOM
PAGE
A-B
ZOOM
DIMMER PIC. ADJ
REPEAT
SETUP
NTSC / PAL
CALL RETURN
SKIP SLOW / SEARCH
POWER
ANGLE SUBTITLE AUDIO
SEARCH MODE
PLAY
STILL /
PAUSE
STOP
PROG / DIR
CLEAR
SRS.TS
OPEN /
CLOSE
ON OFF
T. MENU
DISP.
MENU
1, 2, 3
1
1
2
Use the •and ªcursor buttons to select the desired setting,
then press the ENTER button.
DIALOG
Use this to set the language of the sound output from the
speakers.
SUBTITLE
Use this to set the language of the subtitles displayed on the
TV.
DISC MENUS
Use this to set the language of the menus recorded on the
disc (top menu, etc.).
D I SC SE TUP
SELECT: DECISION:ENTER BUTTON
DIALOG
D I SC MENUS
EXIT SETUP
SUBT I TL E
ENGL ISH
OF F
ENGL ISH
1See page 12.
Remote control unit
ENTER
Remote control unit
Remote control unit
ENTER
Remote control unit
3
Use the •and ªcursor buttons to select the desired setting,
then press the ENTER button.
qWhen “DIALOG” is selected:
ENGLISH (Factory default)
Select this when you want to play the DVD with the sound
in English.
FRENCH
Select this when you want to play the DVD with the sound
in French.
SPANISH
Select this when you want to play the DVD with the sound
in Spanish.
GERMAN
Select this when you want to play the DVD with the sound
in German.
ITALIAN
Select this when you want to play the DVD with the sound
in Italian.
OTHERS
Use the number buttons to input the language number.
(See “Language code list” on page 14.)
D I SC SE TUP
SELECT: DECISION:ENTER BUTTON
DIALOG
D I SC MENUS
EXIT SETUP
SUBT I TL E
ENGL ISH
FRENCH
SPANI SH
ITALIAN
GERMAN
OTHERS
Setup items for use
Bold characters indicate factory defaults.
DISC SETUP
DIALOG
SUBTITLE
DISC MENUS
ENGLISH
FRENCH
SPANISH
GERMAN
ITALIAN
OTHERS
OFF
ENGLISH
FRENCH
SPANISH
GERMAN
ITALIAN
OTHERS
ENGLISH
FRENCH
SPANISH
GERMAN
ITALIAN
OTHERS
OSD SETUP
OSD LANGUAGE
WALL PAPER
ENGLISH
FRANÇAIS
ESPAÑOL
DEUTSCH
BLUE
GRAY
BLACK
PICTURE
VIDEO SETUP
TV ASPECT
TV TYPE
VIDEO OUT
STILL MODE
BLACK LEVEL
AV1 VIDEO OUT
PROGRESSIVE
MODE
4:3 PS
4:3 LB
WIDE (16:9)
NTSC
PAL
MULTI
PROGRESSIVE
INTERLACED
FIELD
FRAME
AUTO
DARKER
LIGHTER
VIDEO
S-VIDEO
RGB
MODE 1
MODE 2
AUDIO SETUP
AUDIO CHANNEL
SUPER AUDIO CD
DIGITAL OUT
LPCM
(44.1 kHz/48 kHz)
BASS ENHANCER
(2 CHANNEL)
MULTI CHANNEL
2 CHANNEL
MULTI
STEREO
CD
NORMAL
PCM
OFF
ON
OFF
ON
SPEAKER
CONFIGURATION
CHANNEL LEVEL
DELAY TIME
FRONT SP
CENTER SP
SUBWOOFER
SURROUND SP
FILTER
TEST TONE
FRONT Lch
CENTER
FRONT Rch
SURROUND Rch
SURROUND Lch
SUBWOOFER
SW +10dB
DISTANCE
FRONT Lch
FRONT Rch
CENTER
SURROUND Lch
SURROUND Rch
SUBWOOFER
DEFAULT
LARGE
SMALL
LARGE
SMALL
NONE
YES
NO
LARGE
SMALL
NONE
ON
OFF
OFF
AUTO
MANUAL
0 dB
0 dB
0 dB
0 dB
0 dB
0 dB
OFF
ON
METERS
FEET
3.6 m
3.6 m
3.6 m
3.0 m
3.0 m
3.6 m
ON
RATINGS
RATING LEVEL
PASSWORD CHANGE
1
2
3
4
5
6
7
8
NO LIMIT
OLD PASSWORD
NEW PASSWORD
COMFIRM PASSWORD
OTHER SETUP
PLAYER MODE
CAPTIONS
COMPRESSION
AUTO POWER
MODE
SLIDE SHOW
AUDIO
VIDEO
OFF
ON
OFF
ON
OFF
ON
5 SEC

14
ENGLISH
3
wWhen “SUBTITLE”is selected:
OFF (Factory default)
Select this if you do not want to display the subtitles.
(For some discs it is not possible to turn off the subtitle
display.)
ENGLISH
Select this when you want to play the DVD with the
subtitles in English.
FRENCH
Select this when you want to play the DVD with the
subtitles in French.
SPANISH
Select this when you want to play the DVD with the
subtitles in Spanish.
GERMAN
Select this when you want to play the DVD with the
subtitles in German.
ITALIAN
Select this when you want to play the DVD with the
subtitles in Italian.
OTHERS
Use the number buttons to input the language number.
(See “Language code list”on page 14.)
eWhen “DISC MENUS”is selected:
ENGLISH (Factory default)
Select this when you want to display the menus in English.
FRENCH
Select this when you want to display the menus in French.
SPANISH
Select this when you want to display the menus in Spanish.
GERMAN
Select this when you want to display the menus in German.
ITALIAN
Select this when you want to display the menus in Italian.
OTHERS
Use the number buttons to input the language number.
(See “Language code list”on page 14.)
✽To exit the setup mode
Use the ªcursor button to select “EXIT SETUP”, then press the ENTER button. It is also possible to quit
by pressing the SETUP button on the remote control unit.
D I SC SE TUP
SELECT: DECISION:ENTER BUTTON
DIALOG
D I SC MENUS
EXIT SETUP
SUBT I TL E
ENGL ISH
FRENCH
SPANI SH
ITALIAN
GERMAN
OTHERS
OFF
D I SC SE TUP
SELECT: DECISION:ENTER BUTTON
DIALOG
D I SC MENUS
EXIT SETUP
SUBT I TL E
ENGL ISH
FRENCH
SPANI SH
ITALIAN
GERMAN
OTHERS
Language code list
Code
6565
6566
6570
6577
6582
6583
6588
6590
6665
6669
6671
6672
6678
6679
6682
6765
6779
6783
6789
6865
6869
6890
6976
6978
6979
6983
6984
6985
7065
7073
7074
Code
7079
7082
7089
7165
7168
7176
7178
7185
7265
7273
7282
7285
7289
7365
7378
7383
7384
7387
7465
7473
7487
7565
7575
7576
7577
7578
7579
7583
7585
7589
7665
Code
7678
7679
7684
7686
7771
7773
7775
7776
7778
7779
7782
7783
7784
7789
7865
7869
7876
7879
7982
8065
8076
8083
8084
8185
8277
8279
8285
8365
8368
8372
8373
Language
Afar
Abkhazian
Afrikaans
Ameharic
Arabic
Assamese
Aymara
Azerbaijani
Bashkir
Byelorussian
Bulgarian
Bihari
Bengali; Bangla
Tibetan
Breton
Catalan
Corsican
Czech
Welsh
Danish
German
Bhutani
Greek
English
Esperanto
Spanish
Estonian
Basque
Persian
Finnish
Fiji
Language
Faroese
French
Frisian
Irish
Scots Gaelic
Galician
Guarani
Gujarati
Hausa
Hindi
Croatian
Hungarian
Armenian
Interlingua
Indonesian
Icelandic
Italian
Hebrew
Japanese
Yiddish
Javanese
Georgian
Kazakh
Greenlandic
Cambodian
Kannada
Korean
Kashmiri
Kurdish
Kirghiz
Latin
Language
Lingala
Laothian
Lithuanian
Latvian, Lettish
Malagasy
Maori
Macedonish
Malayalam
Mongolian
Moldavian
Marathi
Malay
Maltese
Burmese
Nauru
Nepali
Dutch
Norwegian
Oriya
Panjabi
Polish
Pashto, Pushto
Portuguese
Quechua
Rhaeto-Romance
Romanian
Russian
Sanskrit
Sindhi
Serbo-Croatian
Singhalese
Code
8375
8376
8377
8378
8379
8381
8382
8385
8386
8387
8465
8469
8471
8472
8473
8475
8476
8479
8482
8484
8487
8575
8582
8590
8673
8679
8779
8872
8979
9072
9085
Language
Slovak
Slovenian
Samoan
Shona
Somali
Albanian
Serbian
Sundanese
Swedish
Swahili
Tamil
Telugu
Tajik
Thai
Tigrinya
Turkmen
Tagalog
Tonga
Turkish
Tatar
Twi
Ukrainian
Urdu
Uzbek
Vietnamese
Volapük
Wolof
Xhosa
Yoruba
Chinese
Zulu

15
ENGLISH
When “OSD SETUP”is selected
ENTER
1
7
0
2
8
+
10
3
9
456
TOPMENU DISPLAY
MARKERRANDOM
PAGE
A-B
ZOOM
DIMMER PIC.ADJ
REPEAT
SETUP
NTSC / PAL
CALL RETURN
SKIP SLOW / SEARCH
POWER
ANGLE SUBTITLE AUDIO
SEARCH MODE
PLAY
STILL /
PAUSE
STOP
PROG / DIR
CLEAR
SRS.TS
OPEN /
CLOSE
ON OFF
T. MENU
DISP.
MENU
1, 2, 3
1
1
2
Use the •and ªcursor buttons to select the desired setting,
then press the ENTER button.
OSD LANGUAGE
Use this to set the language for the default setting screen and
messages displayed on the TV screen (“PLAY”, etc.)
WALL PAPER
Use this to select the image to be shown on the screen in the
stop mode and CD play mode.
1See page 12.
3
Use the •and ªcursor buttons to select the desired setting,
then press the ENTER button.
qWhen “OSD LANGUAGE”is selected:
ENGLISH (Factory default)
Select this to set the OSD language to English.
FRANÇAIS
Select this to set the OSD language to French.
ESPAÑOL
Select this to set the OSD language to Spanish.
DEUTSCH
Select this to set the OSD language to German.
OSD SETUP
SELECT: DECISION:ENTER BUTTON
OSD LANGUAGE
EXIT SETUP
W
AL L PAPE R BUL E
GRAY
BLACK
PICTURE
3
wWhen “WALL PAPER”is selected:
BLUE (Factory default)
Select this to display a blue background on the TV display.
GRAY
Select this to display a gray background on the TV display.
BLACK
Select this to display a black background on the TV display.
PICTURE
Select this to display the wallpaper on the TV display.
✽To exit the setup mode
Use the ªcursor button to select “EXIT SETUP”, then press the ENTER button. It is also possible to quit
by pressing the SETUP button on the remote control unit.
Remote control unit
ENTER
Remote control unit
OSD SETUP
SELECT: DECISION:ENTER BUTTON
OSD LANGUAGE
EXIT SETUP
W
AL L PAPE R
ENGL ISH
BLUE
Remote control unit
ENTER
Remote control unit
OSD SETUP
SELECT: DECISION:ENTER BUTTON
OSD LANGUAGE
EXIT SETUP
W
AL L PAPE R
ENGL ISH
FRANÇAIS
ESPAÑOL
DEUTSCH
When “VIDEO SETUP”is selected
ENTER
1
7
0
2
8
+
10
3
9
456
TOPMENU DISPLAY
MARKERRANDOM
PAGE
A-B
ZOOM
DIMMER PIC.ADJ
REPEAT
SETUP
NTSC / PAL
CALL RETURN
SKIP SLOW / SEARCH
POWER
ANGLE SUBTITLE AUDIO
SEARCH MODE
PLAY
STILL /
PAUSE
STOP
PROG / DIR
CLEAR
SRS.TS
OPEN /
CLOSE
RC-962
ON OFF
T. MENU
DISP.
MENU
1, 2, 3
1
1
2
Use the •and ªcursor buttons to select the desired setting,
then press the ENTER button.
TV ASPECT
Use this to set the shape of your TV’s screen.
TV TYPE
Use this to set your TV’s video format (NTSC, PAL or MULTI).
VIDEO OUT
Use this to select either the progressive image output or
interlace image output.
STILL MODE
The play DVD video, select the desired video mode (“FIELD”,
“FRAME”, “AUTO”).
BLACK LEVEL
To select the black level of the picture, “DARKER”or
“LIGHTER”.
AV1 VIDEO OUT
To select whether composite video signals or S video signals
or RGB signals will be output from the AV1 SCART terminals.
PROGRESSIVE MODE
Select the film source and video source detection method
recorded on the DVD.
Normally select “MODE 1”(level detection mode).
(only valid for progressive output during DVD video playback)
1See page 12.
Remote control unit
ENTER
Remote control unit
V IDEO SE TUP
SELECT: DECISION:ENTER BUTTON
TV ASPECT
TV TYPE
V I DE O OUT
ST I L L MODE
W
IDE(16:9)
MULTI
PROGRESS I VE
AUTO
BL ACK L EVE L DARKER
AV1 V I DE O OUT VIDEO
PROGRESS I VE MODE
EXIT SETUP
MODE 1

16
ENGLISH
3
Use the •and ªcursor buttons to select the desired setting,
then press the ENTER button.
qWhen “TV ASPECT”is selected:
4:3 PS
Select this to play wide DVDs in the pan & scan mode
(with the sides of the picture cut off). Discs for which pan
& scan is not specified are played in the letter box mode.
4:3 LB
Select this to play wide DVDs in the letter box mode (with
black strips at the top and bottom).
WIDE (16:9) (Factory default)
Select this to play wide DVDs in the full-screen mode.
wWhen “TV TYPE”is selected:
NTSC
Select this when your TV’s video format is NTSC.
If NTSC is selected, output format is fixed to NTSC.
PAL
Select this when your TV’s video format is PAL.
If PAL is selected, output format is fixed to PAL.
MULTI (Factory default)
Select this when your TV is compatible with both the NTSC
and PAL formats.
If you play the disc recorded NTSC format, signal from
video output terminal will be switched to NTSC is selected,
output format is fixed to NTSC.
NOTE:
•If “TV TYPE”is set to a format other than a registered TV
format, the image may no longer be smooth and the top
and bottom of the image may be cut off.
eWhen “VIDEO OUT”is selected: (NOTES)
PROGRESSIVE (Factory default)
Select this when using the DVD-2200 connected to a
progressive type TV.
INTERLACED
Select this when using the DVD-2200 connected to an
interlace type TV.
NOTE:
•For the component output only, it is possible to switch
between interlace image output and progressive image
output. It is not possible to specify progressive image
output for the Video output connectors or S-Video output
connector.
rWhen “STILL MODE”is selected:
FIELD
This position is suited for when the image shakes when
“AUTO”is set.
FRAME
This position is suited for when small letters or patterns
are hard to see when “AUTO”is set.
AUTO (Factory default)
In this position, the mode switches automatically between
FIELD and FRAME.
BL ACK L EVE L
AV1 V I DE O OUT
PROGRESS I VE MODE
EXIT SETUP
V IDEO SE TUP
SELECT: DECISION:ENTER BUTTON
TV ASPECT
TV TYPE
V I DE O OUT
ST I L L MODE
NTSC
PAL
M
ULT I
BL ACK L EVE L
AV1 V I DE O OUT
PROGRESS I VE MODE
EXIT SETUP
V IDEO SE TUP
SELECT: DECISION:ENTER BUTTON
TV ASPECT
TV TYPE
V I DE O OUT
ST I L L MODE
PROGRESSI VE
INTERLACED
BL ACK L EVE L
AV1 V I DE O OUT
PROGRESS I VE MODE
EXIT SETUP
V IDEO SE TUP
SELECT: DECISION:ENTER BUTTON
TV ASPECT
TV TYPE
V I DE O OUT
ST I L L MODE
AUTO
F IELD
FRAME
Remote control unit
ENTER
Remote control unit
BL ACK L EVE L
AV1 V I DE O OUT
PROGRESS I VE MODE
EXIT SETUP
V IDEO SE TUP
SELECT: DECISION:ENTER BUTTON
TV ASPECT
TV TYPE
V I DE O OUT
ST I L L MODE
4 : 3 PS
4 : 3 LB
W
IDE(16:9)
3
tWhen “BLACK LEVEL”is selected:
DARKER (Factory default)
Sets the video output signal’s black level to the standard
level.
LIGHTER
Reduces the standard level of the video output signal’s
black level.
Set this if the image on the TV is far too dark.
yWhen “AV1 VIDEO OUT”is selected:
VIDEO (Factory default)
Composite video signals will be output from the AV1
SCART terminal.
S-VIDEO
S video signals will be output.
RGB
RGB signals will be output.
uWhen “PROGRESSIVE MODE”is selected:
MODE 1 (level detection mode)
(Factory default)
This is a mode for high precision detection of the source
type from the level of the video signals recorded on the
DVD.
For DVDs on which the flag (identification signal) data is
recorded incorrectly, the picture quality may decrease
when flag detection is conducted.
This mode is effective in such cases.
MODE 2 (flag detection mode)
This is a mode for detecting the source type from the
source flag (identification signal) recorded on the DVD.
In dark scenes, distinguishing between video signals and
noise signals with level detection is difficult and the picture
quality may decrease.
This mode is effective in such cases.
BL ACK L EVE L
AV1 V I DE O OUT
PROGRESS I VE MODE
EXIT SETUP
V IDEO SE TUP
SELECT: DECISION:ENTER BUTTON
TV ASPECT
TV TYPE
V I DE O OUT
ST I L L MODE
DARK ER
L IGHTER
BL ACK L EVE L
PROGRESS I VE MODE
EXIT SETUP
V IDEO SE TUP
SELECT: DECISION:ENTER BUTTON
TV ASPECT
TV TYPE
V I DE O OUT
ST I L L MODE
VIDEO
S-VIDEO
RGB
AV1 V I DE O OUT
BL ACK L EVE L
AV1 V I DE O OUT
PROGRESS I VE MODE
EXIT SETUP
V IDEO SE TUP
SELECT: DECISION:ENTER BUTTON
TV ASPECT
TV TYPE
V I DE O OUT
ST I L L MODE
MODE 1
MODE 2
✽To exit the setup mode
Use the ªcursor button to select “EXIT SETUP”, then press the ENTER button. It is also possible to quit
by pressing the SETUP button on the remote control unit.

17
ENGLISH
When “AUDIO SETUP”is selected
ENTER
1
7
0
2
8
+
10
3
9
456
TOPMENU DISPLAY
MARKERRANDOM
PAGE
A-B
ZOOM
DIMMER PIC.ADJ
REPEAT
SETUP
NTSC / PAL
CALL RETURN
SKIP SLOW / SEARCH
POWER
ANGLE SUBTITLE AUDIO
SEARCH MODE
PLAY
STILL /
PAUSE
STOP
PROG / DIR
CLEAR
SRS.TS
OPEN /
CLOSE
ON OFF
T. MENU
DISP.
MENU
1, 2, 3
1
1
2
Use the •and ªcursor buttons to select the desired setting,
then press the ENTER button.
AUDIO CHANNEL
Use this to adjust for the connected speaker systems.
SUPER AUDIO CD
Super Audio CDs include separate areas for stereo and multi-
channel signals.
Hybrid discs have a two-layered structure consisting of one
Super Audio CD layer and one CD layer.
The area/layer to be played with priority can be set.
DIGITAL OUT
Use this to select the digital output’s signal format.
LPCM (44.1 KHz / 48 kHz)
Use this to set the digital audio output when playing DVDs
recorded in linear PCM audio.
BASS ENHANCER (2 CHANNEL)
Set whether or not to output audio signals from the
subwoofer when playing two-channel audio signals.
✽The BASS ENHANCER settings do not apply to digital
outputs.
3
Use the •and ªcursor buttons to select the desired setting,
then press the ENTER button.
qWhen “AUDIO CHANNEL”is selected:
BUse the •and ªcursor buttons to select the item to be
set, then press the ENTER button.
MULTI CHANNEL (Factory default)
Select this for systems in which three or more speakers
are connected.
When MULTI CHANNEL is set, the speaker settings
(SPEAKER CONFIGURATION), speaker output level
adjustment (CHANNEL LEVEL) and speaker distances
(DELAY TIME) can be set.
2 CHANNEL
Select this for systems in which only two speakers are
connected.
1See page 12.
Remote control unit
ENTER
Remote control unit
AUD I O S ETUP
SELECT: DECISION:ENTER BUTTON
AUD I O CHANNE L
D I G I TA L OU T
LPCM(44.1kHz/48kHz)
EXIT SETUP
BASS ENHANCER(2 CHANNEL)
M
UL T I CHANNEL
SUPER AUDI O CD
M
UL T I
NOR
M
AL
OFF
OFF
Remote control unit
ENTER
Remote control unit
AUD I O S ETUP
SELECT: DECISION:ENTER BUTTON
AUD I O CHANNE L
D I G I TA L OU T
SUPER AUDI O CD
LPCM(44.1kHz/48kHz)
EXIT SETUP
BASS ENHANCER(2 CHANNEL)
M
UL T I CHANNEL
2 CHANNEL
3
BWhen “MULTI CHANNEL”is selected, use the •and ª
cursor buttons to select the item to be set, then press the
ENTER button.
SPEAKER CONFIGURATION
Use this to select the types of the different speakers.
CHANNEL LEVEL
Use this to adjust the output level of the different speakers.
DELAY TIME
Use this to set the distance from the different speakers to
the listening position.
✽To exit the SPEAKER SETUP mode
Use the ªcursor button to select “AUDIO SETUP”then
press ENTER button.
✽The SPEAKER CONFIGURATION settings only apply to
analog outputs.
BWhen “SPEAKER CONFIGURATION”is selected, use the
•and ªcursor buttons to select the speaker to be set then
press the ENTER button.
•The type of speaker used for the front speakers, center
speaker, subwoofer and surround speakers can be set.
Use the •and ªcursor buttons to select the speaker
type, then press the ENTER button.
LARGE: Select this when a large speaker is connected.
SMALL: Select this when a small speaker is connected.
NONE: Select this when no speaker is connected.
YES: Select this when a subwoofer is connected.
NO: Select this when no subwoofer is connected.
BWhen “FILTER”is selected:
ON (Factory default)
Set to “ON”to play sources in the Dolby Digital and PCM
multi-channel modes.
OFF
DTS recommended all-channel full band playback setting.
(Note however that the subwoofer volume increases by 5
dB, by 15 dB when playing Super audio CDs.)
Set this to play DVD audio 6-channel sources recorded in
all-channel full band frequencies.
When “OFF”is set, the speaker size is set to “LARGE”for
all the speakers and the subwoofer setting is set to “YES”.
To play this type of disc, read the disc’s instructions carefully
and make analog connections.
✽Press the RETURN button to return to the “SPEAKER
SETUP”menu.
BWhen “CHANNEL LEVEL”is selected, use the •and ª
cursor buttons to select the speaker to be adjusted, then
use the 0and 1cursor buttons to set the level.
SW +10 dB
Depending on the connected amplifier, it may not be
possible to increase the subwoofer level to balance it with
the level of other channels. In this case, the SW +10 dB
function can be used to boost the subwoofer output.
When turned on, the subwoofer output is increased by
+10 dB.
✽Never play at high signal levels (full scale or near full
scale) when the SW +10 dB mode is turned on. The
signal level could exceed the amplifier’s tolerance input
level, resulting in noise that could damage the speakers.
If the sound of the subwoofer is too loud or distorted,
either turn the SW +10 dB mode off or lower the gain.
The SW +10 dB function does not work when “FILTER”
at “SPEAKER CONFIGURATION”is set to “OFF”.
Remote control unit
Remote control unit
ENTER
Remote control unit
SP EAKE R SETUP
SELECT: DECISION:ENTER BUTTON
SPEAK ER CONF I GURAT I ON
CHANNEL L EV EL
DE LAY T I
M
E
AUDIO SETUP
SP EAKE R SETUP
SELECT: DECISION:ENTER BUTTON
SPEAK ER CONF I GURAT I ON
FRONT SP
CENTER SP
SUB
W
OOF ER
SURROUND SP
FILTER
LARGE
S
M
ALL
SP EAKE R SETUP
SELECT: DECISION:ENTER BUTTON
CHANNEL L EV EL
TEST TONE
F RONT L ch
CENTER
FRONT Rch
OFF
0dB
0dB
0dB
0dB
0dB
0dB
SURROUND Rch
SUR ROUND L ch
SUB
W
OOF ER
OFF
SW 10dB
+

18
ENGLISH
3
TEST TONE
•Use the 0and 1cursor buttons to select auto or
manual.
Adjust so that the volume of the test tones output
from the different speakers sounds the same.
•The volume level output from the front speakers
(left and right channels), center speaker, surround
speakers (left and right channels) and subwoofer can
be adjusted.
•The volume level can be adjusted between 0 and -10
dB in steps of 1 dB.
✽Press the RETURN button to return to the
“SPEAKER SETUP”menu.
BWhen “DELAY TIME”is selected
With 5.1-channel surround sound, ideally the distance
between the listening position and all the speakers
aside from the subwoofer should be the same. The
delay time setting can be used to make the sound
from the different speakers reach the listening position
at the same time.
Use the •and ªcursor buttons to select the setting
item, then press the ENTER button.
•When “DISTANCE”is selected:
METERS (when the 0cursor button is pressed):
The unit of distance is set to meters (“m”).
FEET (when the 1cursor button is pressed):
The unit of distance is set to feet (“ft”).
•When “FRONT Lch”, “FRONT Rch”, “CENTER”,
“SURROUND Lch”, ”SURROUND Rch”,
“SUBWOOFER”is selected:
Use the 0and 1cursor buttons to set the distance
from the listening position to the different speakers.
✽The distance can be set within the range of 0 to
18 meters (60 feet).
✽The maximum difference in speaker distance for
which adjustment is possible is 4.5 meters (15 feet).
✽The delay time setting is not valid when playing
Super audio CDs.
•When “DEFAULT”is selected:
When “DEFAULT”is selected and the ENTER button
is pressed, all the items are restored to their factory
default settings.
✽When digital connections are made with an AV amplifier,
make the speaker settings on the AV amplifier.
For DVD audio discs, the disc’s settings are given
priority, so the sound may not be produced as set with
the above speaker mode setting.
✽Press the RETURN button to return to the “SPEAKER
SETUP”menu.
Remote control unit
ENTER
Remote control unit
ENTER
Remote control unit
SP EAKE R SETUP
SELECT: DECISION:ENTER BUTTON
DE LAY T I
M
E
D I S TANC E
F RONT L c h
CENTER
FRONT Rch
METERS
3.6m
3.6m
3.6m
3.6m
3.0m
3.0m
ON
SURROUND Rch
SUR ROUND L ch
SUB
W
OOF ER
DEFAULT
SP EAKE R SETUP
SELECT: DECISION:ENTER BUTTON
DE LAY T I
M
E
D I S TANC E
F RONT L c h
CENTER
FRONT Rch
ON
SURROUND Rch
SUR ROUND L ch
SUB
W
OOF ER
DEFAULT
METERS
3.6m
3.6m
3.6m
3.6m
3.0m
3.0m
SP EAKE R SETUP
SELECT: DECISION:ENTER BUTTON
DE LAY T I
M
E
D I S TANC E
F RONT L c h
CENTER
FRONT Rch
ON
SURROUND Rch
SUR ROUND L ch
SUB
W
OOF ER
DEFAULT
METERS
3.6m
3.6m
3.6m
3.6m
3.0m
3.0m
3
✽To exit the setup mode
Use the ªcursor button to select “EXIT SETUP”, then press the ENTER button. It is also possible to quit
by pressing the SETUP button on the remote control unit.
Remote control unit
ENTER
Remote control unit
AUD I O S ETUP
SELECT: DECISION:ENTER BUTTON
AUD I O CHANNE L
SUPER AUD I O C D
D I G I TA L OU T
LPCM(44.1kHz/48kHz)
EXIT SETUP
BASS ENHANCER(2 CHANNEL)
NOR
M
AL
PC
M
AUD I O S ETUP
SELECT: DECISION:ENTER BUTTON
AUD I O CHANNE L
SUPER AUD I O C D
D I G I TA L OU T
LPCM(44.1kHz/48kHz)
EXIT SETUP
BASS ENHANCER(2 CHANNEL) ON
OFF
wWhen “SUPER AUDIO CD”is selected:
MULTI (Factory default)
When playing Super audio CDs, the multi-channel area is
played with priority.
STEREO
When playing Super audio CDs, the stereo area is played
with priority.
CD
When playing Super audio CDs, the CD layer is played with
priority.
✽When playing discs that do not contain the selected
area/layer, another layer/area is played automatically.
eWhen “DIGITAL OUT”is selected:
NORMAL (Factory default)
When playing DVDs recorded in Dolby Digital or DTS,
bitstream signals are output from the digital audio output
terminals. When playing DVDs recorded in linear PCM or
packed PCM, linear PCM signals are output.
Select “NORMAL”when making digital connections to
an AV amplifier with built-in Dolby Digital and DTS decoder.
PCM
When playing Dolby Digital/DTS bitstream signals or DVDs
recorded in linear PCM or packed PCM, the signals are
converted into 48 kHz/16-bit PCM (2-channel) signals and
output from the digital outputs. When playing DVDs
recorded in PCM, linear PCM signals are output.
rWhen “LPCM (44.1 kHz / 48 kHz)”is selected:
OFF (Factory default)
When playing linear PCM or packed PCM DVDs that are
not copyright-protected, for 2-channel PCM audio signals
up to 96 kHz, linear PCM signals are output as such
without being converted from the digital outputs. (176.2
kHz and 192 kHz signals are converted to 88.2 kHz and
96 kHz, respectively.)
PCM signals of 48 kHz/16 bits and lower are output,
regardless of whether they are copyright-protected or not.
For DVDs containing multi-channel PCM signals, the digital
signals are down-mixed for output into two channels, front
left and right. (Only the front left and right channels are
output for sources for which down-mixing is prohibited.)
When playing copyright-protected linear PCM or packed
PCM DVDs, in consideration of copyrights, no digital
signals are output for sources exceeding 48 kHz/16 bits.
When playing such sources, either set to “ON”or make
analog connections. (See page 9.)
ON
Linear PCM and packed PCM signals are converted to
44.1 kHz or 48 kHz and output. (The PCM digital audio
output signals are converted to 48 kHz or less in
consideration of copyrights.) When making digital
connections to an AV amplifier that is not compatible with
96 kHz/88.2 kHz signals, set to “ON”.
tWhen “BASS ENHANCER (2 CHANNEL)”is selected:
OFF (Factory default)
No sound is produced from the subwoofer.
ON
Sound is produced from the subwoofer.
In this case, set the subwoofer to “YES”at the speaker
settings.
AUD I O S ETUP
SELECT: DECISION:ENTER BUTTON
AUD I O CHANNE L
SUPER AUD I O C D
D I G I TA L OU T
LPCM(44.1kHz/48kHz)
EXIT SETUP
BASS ENHANCER(2 CHANNEL)
ON
OFF
AUD I O S ETUP
SELECT: DECISION:ENTER BUTTON
AUD I O CHANNE L
D I G I TA L OU T
SUPER AUD I O C D
LPCM(44.1kHz/48kHz)
EXIT SETUP
BASS ENHANCER(2 CHANNEL)
M
UL T I
STEREO
CD

19
ENGLISH
When “RATINGS”is selected
ENTER
1
7
0
2
8
+
10
3
9
456
TOPMENU DISPLAY
MARKERRANDOM
PAGE
A-B
ZOOM
DIMMER PIC.ADJ
REPEAT
SETUP
NTSC / PAL
CALL RETURN
SKIP SLOW / SEARCH
POWER
ANGLE SUBTITLE AUDIO
SEARCH MODE
PLAY
STILL /
PAUSE
STOP
PROG / DIR
CLEAR
SRS.TS
OPEN /
CLOSE
ON OFF
T. MENU
DISP.
MENU
1, 2, 3
3
1
1
2
Use the •and ªcursor buttons to select the desired setting,
then press the ENTER button.
RATING LEVEL
Use this to restrict playback of adult DVDs you do not want
children to view. Note that even with adult DVDs, viewing
cannot be restricted unless the restriction level is recorded
on the disc.
PASSWORD
Use this to change the password.
The set’s password is set to “0000”by default.
3
Use the •and ªcursor buttons to select the desired setting,
then press the ENTER button.
qWhen “RATING LEVEL”is selected:
1
Select this to play only DVDs for children. (Adult and
general audience DVDs cannot be played.)
2 to 7
Select this to play DVDs for general audiences and
children. Adult DVDs cannot be played.
8and NO LIMIT (Factory default)
Select this to play all DVDs.
1See page 12.
Remote control unit
ENTER
Remote control unit
RAT I NGS
SELECT: DECISION:ENTER BUTTON
RA T I NG L EVEL
PASS
W
ORD
EXIT SETUP
NO L IMI T
Remote control unit
ENTER
Remote control unit
RAT I NGS
SELECT: DECISION:ENTER BUTTON
RA T I NG L EVEL
PASS
W
ORD
EXIT SETUP
1
2
3
4
5
6
7
8
NO L IMI T
RAT I NGS
SELECT:0-9,+10 DECISION:ENTER BUTTON
RA T I NG L EVEL
PASS
W
ORD
PASS
W
ORD
PL EAS E ENTE R PASS
W
ORD
----
3
Use the number buttons to input a 4-digit password, then
press the ENTER button.
✽The set's password is set to “0000”by default.
✽Do not forget the password.
✽The setting cannot be changed without inputting the correct
password.
wWhen “PASSWORD”is selected:
Use the 1cursor button to select the “CHANGE”, then
press the ENTER button.
Use the number buttons to input a OLD (current) 4-digit
password.
✽The set’s password is set to “0000”by default.
Use the number buttons to input a new 4-digit password.
Use the number buttons to input a new 4-digit password
again. (for the confirmation.)
Then press the ENTER button.
✽Do not forget the password.
✽The setting cannot be changed without inputting the
correct password.
RAT I NGS
SELECT:0-9,+10 DECISION:ENTER BUTTON
RA T I NG L EVEL
PASS
W
ORD
OLD PASS
W
ORD
PL EAS E ENTE R NE
W
PASS
W
ORD
XXXX
XXXX
NE
W
PASS
W
ORD
CONF I RM PASS
W
ORD ----
RAT I NGS
SELECT:0-9,+10 DECISION:ENTER BUTTON
RA T I NG L EVEL
PASS
W
ORD
OLD PASS
W
ORD
PL EAS E ENTE R NE
W
PASS
W
ORD
XXXX
XXXX
XXXX
NE
W
PASS
W
ORD
CONF I RM PASS
W
ORD
Remote control unit
4 5 6
1
7
0
2
8
3
9
ENTER
Remote control unit
RAT I NGS
SELECT:0-9,+10 DECISION:ENTER BUTTON
RA T I NG L EVEL
PASS
W
ORD
PASS
W
ORD
PR ES S E NTER T O CONT I NUE
XXXX
RAT I NGS
SELECT:0-9,+10 DECISION:ENTER BUTTON
RA T I NG L EVEL
PASS
W
ORD
OLD PASS
W
ORD
PL EAS E ENTE R O L D PA SS
W
ORD
XXXX
NE
W
PASS
W
ORD ----
CONF I RM PASS
W
ORD ----
RAT I NGS
SELECT: DECISION:ENTER BUTTON
RA T I NG L EVEL
PASS
W
ORD
EXIT SETUP
CHANGE
✽To exit the setup mode
Use the ªcursor button to select “EXIT SETUP”, then press the ENTER button. It is also possible to quit
by pressing the SETUP button on the remote control unit.

20
ENGLISH
When “OTHER SETUP”is selected
ENTER
1
7
0
2
8
+
10
3
9
456
TOPMENU DISPLAY
MARKERRANDOM
PAGE
A-B
ZOOM
DIMMER PIC.ADJ
REPEAT
SETUP
NTSC / PAL
CALL RETURN
SKIP SLOW / SEARCH
POWER
ANGLE SUBTITLE AUDIO
SEARCH MODE
PLAY
STILL /
PAUSE
STOP
PROG / DIR
CLEAR
SRS.TS
OPEN /
CLOSE
ON OFF
T. MENU
DISP.
MENU
1, 2, 3
1
1
2
Use the •and ªcursor buttons to select the desired setting,
then press the ENTER button.
PLAYER MODE
The DVD video play mode can be set to play the DVD video
contents included on a DVD audio disc.
CAPTIONS
Use this to set whether or not to display the closed captions
recorded on DVDs.
COMPRESSION
Use this to set the dynamic range output when playing discs.
AUTO POWER MODE
To save power, DVD-2200’s can automatically be set to the
standby mode when it is not used for long periods of time.
SLIDE SHOW
The time interval for switching to the next still picture when
playing slide shows of still pictures (in JPEG format) can be
set.
3
Use the •and ªcursor buttons to select the desired setting,
then press the ENTER button.
qWhen “PLAYER MODE”is selected:
AUDIO (Factory default)
Set this to play the DVD audio signals as such.
VIDEO
Set this to play the DVD video contents included on a DVD
audio disc.
1See page 12.
Remote control unit
ENTER
Remote control unit
OTHER SE TUP
SELECT: DECISION:ENTER BUTTON
PLAYER
M
ODE
CAPT I ONS
CO
M
PRE SS I ON
AUTO PO
W
ER
M
ODE
SL I DE SHO
W
EXIT SETUP
AUDIO
OFF
OFF
OFF
5SEC
Remote control unit
ENTER
Remote control unit
OTHER SE TUP
SELECT: DECISION:ENTER BUTTON
PLAYER
M
ODE
CAPT I ONS
CO
M
PRE SS I ON
AUTO PO
W
ER
M
ODE
SL I DE SHO
W
EXIT SETUP
AUDIO
VIDEO
3
wWhen “CAPTIONS”is selected:
OFF (Factory default)
Select this when you do not want to display the captions
on the screen when playing DVDs containing English
captions.
ON
Select this to display the captions on the screen when
playing DVDs containing English captions.
eWhen “COMPRESSION”is selected:
OFF (Factory default)
Select this for the standard range.
ON
Select this to achieve powerful sound even when the
volume is low. This setting is suited for watching DVDs
late at night with the volume low. (This setting is only
valid for DVDs recorded in Dolby Digital.)
rWhen “AUTO POWER MODE”is selected:
OFF (Factory default)
The power does not automatically switch to the standby
mode.
ON
The DVD-2200’s power turns off and the standby mode
is set if the DVD-2200 remains in the stop mode for
approximately 30 minutes.
tWhen “SLIDE SHOW”is selected:
Use the •and ªcursor buttons to set the time interval.
The time interval can be set within 5 and 15 seconds.
(The factory default setting is 5 seconds.)
OTHER SE TUP
SELECT: DECISION:ENTER BUTTON
PLAYER
M
ODE
CAPT I ONS
CO
M
PRE SS I ON
AUTO PO
W
ER
M
ODE
SL I DE SHO
W
EXIT SETUP
OFF
ON
OTHER SE TUP
SELECT: DECISION:ENTER BUTTON
PLAYER
M
ODE
CAPT I ONS
CO
M
PRE SS I ON
AUTO PO
W
ER
M
ODE
SL I DE SHO
W
EXIT SETUP
OFF
ON
OTHER SE TUP
SELECT: DECISION:ENTER BUTTON
PLAYER
M
ODE
CAPT I ONS
CO
M
PRE SS I ON
AUTO PO
W
ER
M
ODE
SL I DE SHO
W
EXIT SETUP
OFF
ON
OTHER SE TUP
SELECT: DECISION:ENTER BUTTON
PLAYER
M
ODE
CAPT I ONS
CO
M
PRE SS I ON
AUTO PO
W
ER
M
ODE
SL I DE SHO
W
EXIT SETUP
5SEC
✽To exit the setup mode
Use the ªcursor button to select “EXIT SETUP”, then press the ENTER button. It is also possible to quit
by pressing the SETUP button on the remote control unit.
NOTES:
•An English caption decoder is required to display English captions.
•DVDs with caption signals are indicated by the , , mark.
English captions cannot be displayed when playing DVDs which do not contain caption signals.
•The characters in which the captions are displayed (capital letters, small letters, italics, etc.) depend on the
DVD and cannot be selected with the DVD-2200.
Table of contents
Other Denon DVD Player manuals

Denon
Denon DVD-910 User manual

Denon
Denon DVD-1730 Instruction Manual

Denon
Denon DVD DVD-1930 User manual

Denon
Denon DVD-3930CI User manual

Denon
Denon 1815 - DVM DVD Changer User manual

Denon
Denon DVD-2930CI User manual

Denon
Denon DVD-3910 User manual

Denon
Denon DVD-1600 User manual

Denon
Denon DVD-2800II User manual

Denon
Denon DVD-556 User manual

Denon
Denon DVM-715S User manual

Denon
Denon DVD-1910 User manual

Denon
Denon DN-V300 - Professional DVD Player User manual

Denon
Denon DVD1800BD - Blu-Ray Disc Player User manual

Denon
Denon DVM-2815 User manual

Denon
Denon DVD-1710 User manual

Denon
Denon DVD-2910 User manual

Denon
Denon DVM-1815 User manual

Denon
Denon DVM-2815 User manual

Denon
Denon DVD-9000 User manual