dental X DOMINA PLUS B User manual
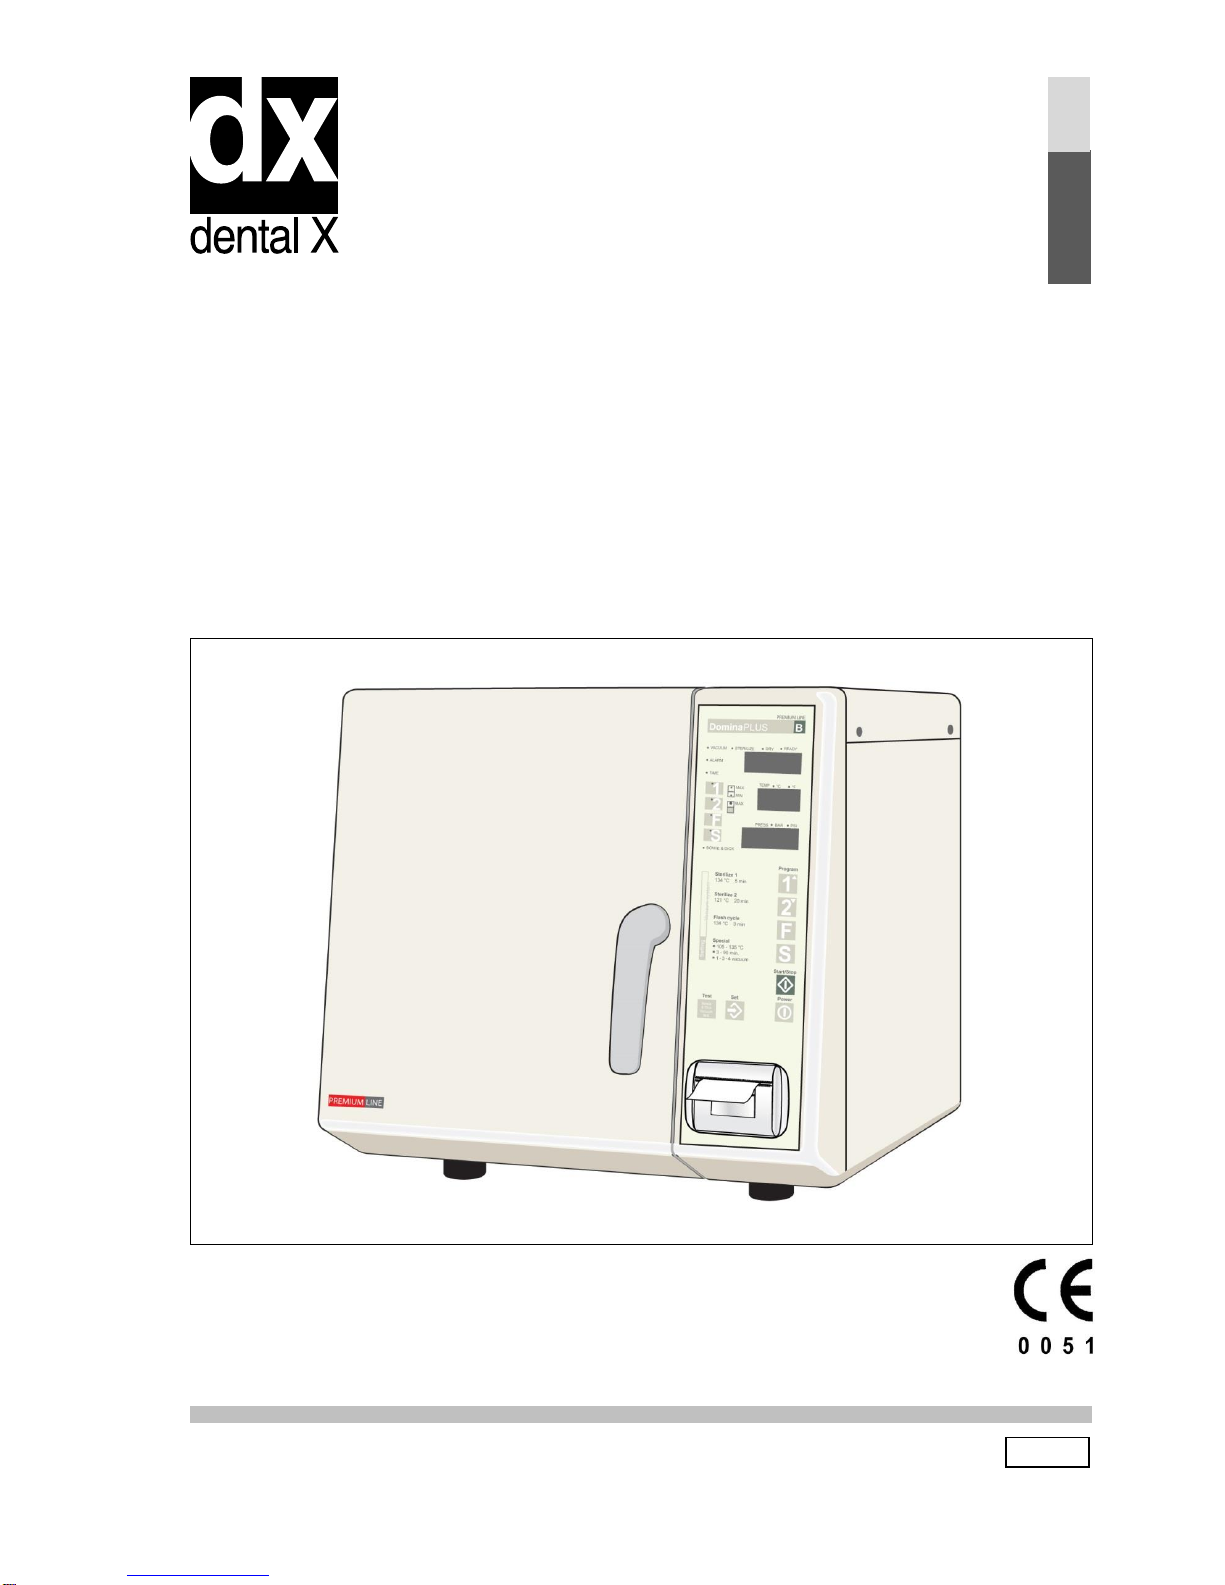
DOMINA PLUS B
Water Steam Sterilizer
User Manual
Rev. 8
Date: March 2017
PREMIUM
LINE
OM1004U

Domina Plus B fulfills all the directions in force concerning the safety, and the built-in parameters has been
properly set by the manufacturer in order to warranty effective sterilization if proper loading conditions are
followed.
Please, read carefully this manual before using the machine; an improper utilization of the sterilizer should
carry on defective sterilization with unattended consequences.
In case of doubt or questions, please call the agent.
Thanks for the confidence given.
All rights reserved
No portion of this publication can be printed, transmitted, rewritten, stored in a data recovery system, trans-
lated in any foreign or computer language, in any form or through any devices, without written consent by
DentalX.
Information in this manual is subject to change without any warning or prior notice by Dental X and does not
represent a commitment for the vendor.
Domina Plus B is trademark of Dental X.
DENTAL X S.p.A.
Via Marzotto 11
36031 Dueville (VI) Italy
Tel. +39 0444 367400
Fax +39 0444 367436
http://www.dentalx.it

DentalX
Domina Plus B 1
TABLE OF CONTENTS
1. GENERAL.....................................................................................................................................................2
1.1 INTRODUCTION ..................................................................................................................................2
1.2 CONFORMITY TO EUROPEAN DIRECTIVES ....................................................................................2
2. FAMILIARIZATION.......................................................................................................................................3
2.1 PACKAGE DIMENSIONS AND WEIGHT.............................................................................................3
2.2 UNPACKAGING ...................................................................................................................................3
2.3 OVERALL DIMENSIONS......................................................................................................................4
2.4 USABLE SPACE IN THE CHAMBER...................................................................................................4
2.5 SAFETY FEATURES............................................................................................................................5
2.6 PRECAUTIONS AND INTENDED USE................................................................................................6
2.7 FRONT AND REAR VIEW....................................................................................................................8
2.8 STANDARD ACCESSORIES ...............................................................................................................9
2.9 ENVIRONMENTAL CONDITIONS FOR OPERATION AND STORAGE..............................................9
2.10 TECHNICAL SPECIFICATIONS.........................................................................................................10
3. INSTALLATION..........................................................................................................................................11
3.1 BASIC REQUIREMENTS...................................................................................................................11
3.2 GETTING STARTED..........................................................................................................................12
3.3 NOTES ON ALTITUDE COMPENSATION.........................................................................................13
4. OPERATING INSTRUCTIONS...................................................................................................................14
4.1 FRONT PANEL COMMAND/SIGNALING ..........................................................................................14
4.2 RUNNING A STERILIZAZION CYCLE...............................................................................................15
4.2.1 The available sterilization cycle..........................................................................................15
4.2.2 Starting a sterilization cycle................................................................................................16
4.3 STOPPING THE CYCLE....................................................................................................................17
4.4 TOPPING UP AND DRAINING THE TANKS......................................................................................18
4.4.1 Topping up the main tank...................................................................................................18
4.4.2 Draining the used water tank .............................................................................................18
5. PROGRAMMING........................................................................................................................................19
5.1 DATE AND TIME................................................................................................................................19
5.2 MEASUREMENT UNIT AND OPTIONS.............................................................................................19
5.3 SPECIAL CYCLE S5 ..........................................................................................................................20
6. MAINTENANCE..........................................................................................................................................21
6.1 USER MAINTENANCE.......................................................................................................................21
6.2 AUTOMATIC PERIODIC CLEANING CYCLE....................................................................................21
6.3 CLEANING THE INSTRUMENTS BEFORE THE STERILIZATION...................................................21
6.4 CLEANING/REPLACING THE WATER INLET FILTER .....................................................................22
6.5 REGULAR STERILITY TESTS...........................................................................................................22
6.5.1 Bowie & Dick test...............................................................................................................22
6.5.2 Vacuum Test......................................................................................................................22
7. TROUBLESHOOTING................................................................................................................................23
7.1 MANUAL DIAGNOSIS........................................................................................................................23
7.2 INITIAL AUTO-TEST ..........................................................................................................................24
7.2.1 Water quality check............................................................................................................24
8. ALARMS.....................................................................................................................................................25
8.1 GENERAL...........................................................................................................................................25
8.2 WARNING MESSAGES .....................................................................................................................25
8.3 PRE-WARNING ALARMS..................................................................................................................26
8.4 ABORTED CYCLE ALARMS..............................................................................................................26
8.5 CLASS B ADDITIONAL ALARMS ......................................................................................................27
9. CONNECTIONS..........................................................................................................................................28
9.1 CONNECTION TO AN EXTERNAL PRINTER ...................................................................................28
9.2 INTEGRATED PRINTER (OPTION)...................................................................................................28
9.3 CONNECTION TO A COMPUTER (ONLY FOR SERVICE)...............................................................29
10. OPERATOR’S NOTES ...............................................................................................................................30
APPENDIX: SERVICE BOOK
DentalX
2 Domina Plus B
1. GENERAL
1.1 INTRODUCTION
Object of this manual is to supply instructions for the operators in order to allow:
correct installation
right use
proper maintenance of the sterilizer
The machine must be installed and operated according to the procedures described in this manual.
The user is responsible for what concerns the fulfillment in the legal subject concerning installation and
operation of the sterilizer.
If the machine is not correctly installed and operated or the appropriate maintenance is not carried out,
the manufacturer cannot be considered responsible for any possible breaks and malfunctions.
Please, check for the packing integrity and no evident damages or missing parts (see delivery note).
IN CASE OF DAMAGES OR MISSING PARTS, PLEASE IMMEDIATELY INFORM AND IN DETAIL THE
FORWARDER, DENTAL X AND ITS AREA AGENT.
1.2 CONFORMITY TO EUROPEAN DIRECTIVES
Domina Plus B is produced by Dental X and conforms to electromagnetic compatibility standards in ac-
cordance with the Medical Devices Directive 93/42/EEC, with European Standard EN 13060 and with the
Pressure Equipment Directive (PED) 97/23/CE.
This equipment has been developed and manufactured using high quality material and parts that can be
recycled and reused.
This symbol means that electrical and electronic equipment, at the end of their lifetime,
must be disposed separately from the household waste. Dispose this unit by carrying it to
the local collection/disposal centre. Sanctions are applied in case the regulations concern-
ing waste disposal are not met.
Help us to preserve the environment in which we live!
Mark CE 0051 applied on the rear panel points out the conformity with the Directive
93/42/CEE and warrants the customer that the equipment is safe and according with the in-
ternational standards .
DentalX
Domina Plus B 3
2. FAMILIARIZATION
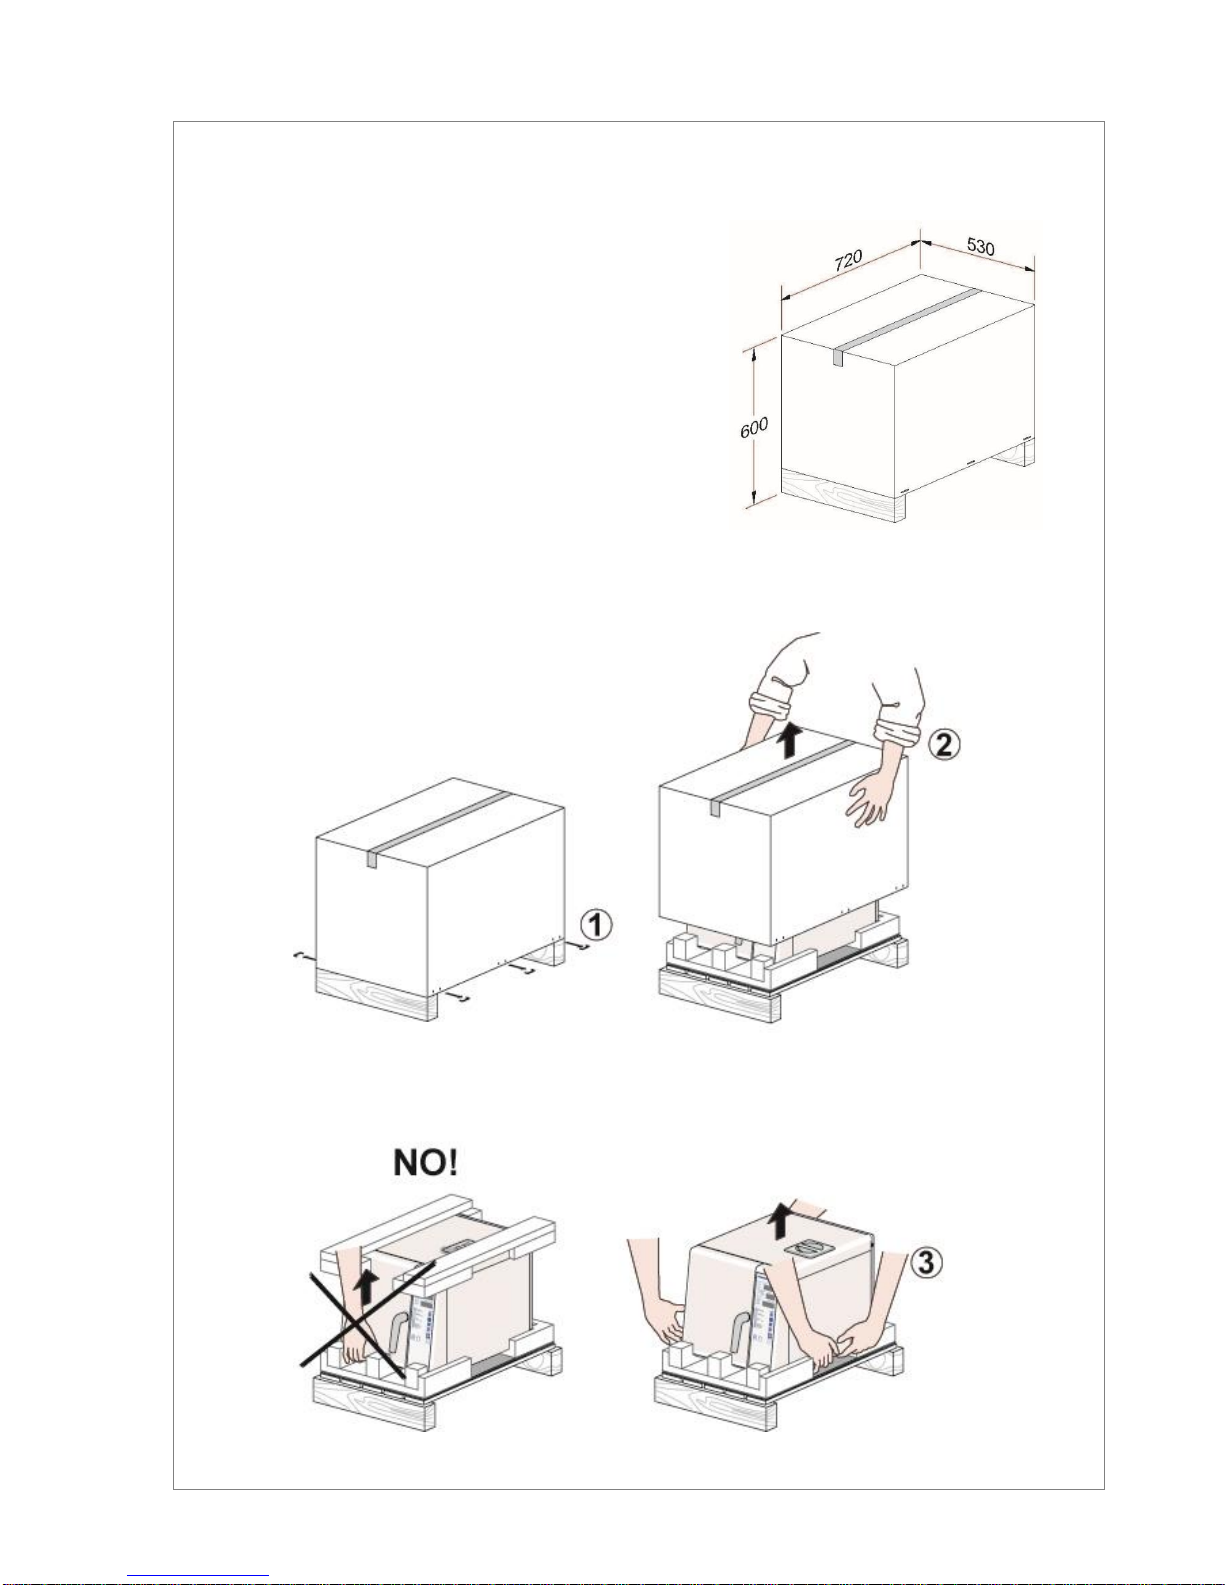
2.1 PACKAGE DIMENSIONS AND WEIGHT
Total weight: 55 Kg
Store the package for future shipment.
2.2 UNPACKAGING
Table of contents
Other dental X Laboratory Equipment manuals

Popular Laboratory Equipment manuals by other brands


Belden
Belden HIRSCHMANN RPI-P1-4PoE installation manual

Koehler
Koehler K1223 Series Operation and instruction manual

Globe Scientific
Globe Scientific GCM-12 quick start guide

Getinge
Getinge 86 SERIES Technical manual

CORNING
CORNING Everon 6000 user manual

Biocomp
Biocomp GRADIENT MASTER 108 operating manual


