DENTAURUM desktopCompact 090-578-50 User manual

Instructions for use
EN
More than 20 years of Dentaurum laser welding technology.
M
M
Turnstr. 31 I 75228 Ispringen I Germany I Phone + 49 72 31 / 803 - 0 I Fax + 49 72 31 / 803 - 295

1
EN
Contents
1. General information .............................................................................................................................. 3
2. Safety information ................................................................................................................................ 4
2.1 Symbols and information .......................................................................................................................... 4
2.2 Intended use............................................................................................................................................. 4
2.3 Warranty and liability................................................................................................................................ 4
2.4 Employer‘s obligations .............................................................................................................................. 5
2.5 Personnel‘s obligations ............................................................................................................................. 5
2.6 Laser safety officers .................................................................................................................................. 5
2.7 Protection of the eyes against laser radiation ............................................................................................ 6
2.8 Protection of the skin against laser radiation ............................................................................................. 7
2.9 Further important safety issues, welding fume extraction .......................................................................... 8
2.10 Service and maintenance .......................................................................................................................... 8
2.11 Laser warning signs .................................................................................................................................. 9
2.12 Location of laser warning signs ............................................................................................................... 10
3. Basics of the laser and the welding process...................................................................................... 11
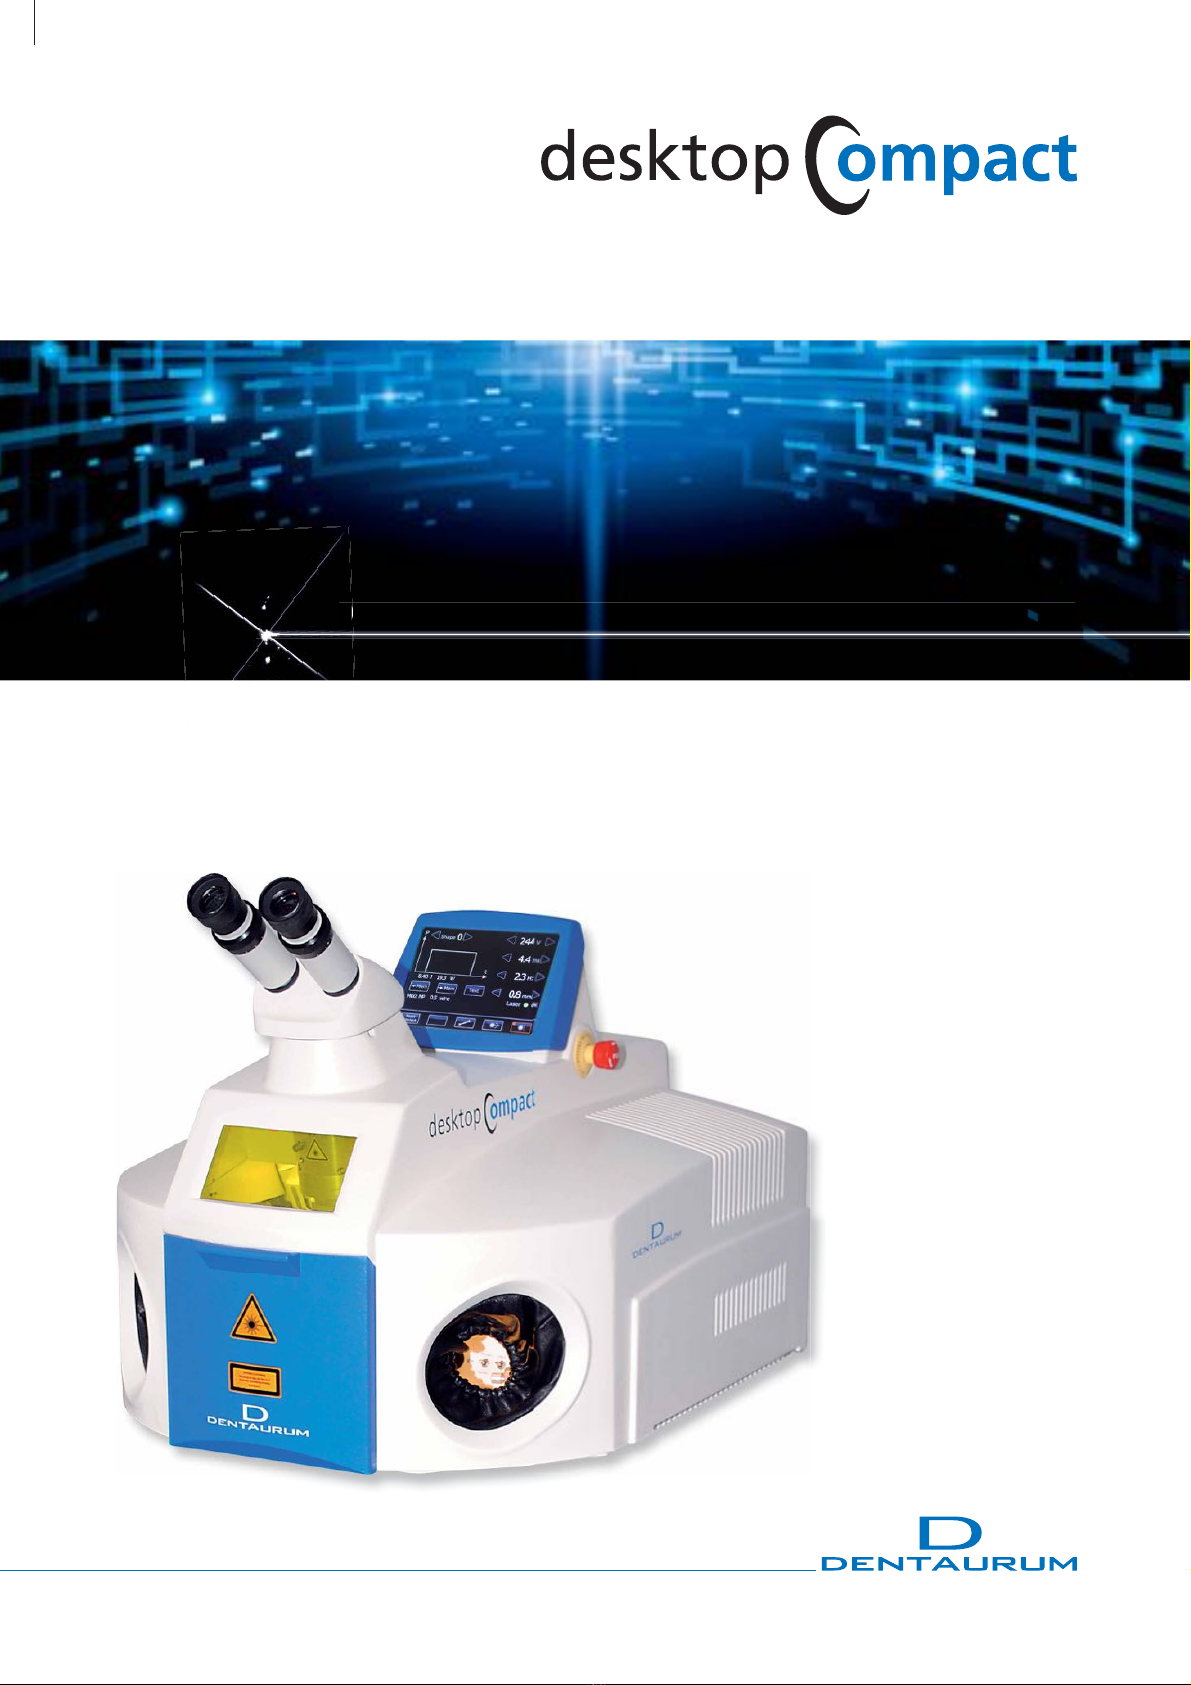
4. Machine description ............................................................................................................................ 12
4.1 Overview ................................................................................................................................................ 12
4.2 The working chamber............................................................................................................................. 14
4.3 Design of the desktop Compact.............................................................................................................. 15
4.4 External connections............................................................................................................................... 16
4.5 Installation and commissioning ............................................................................................................... 17
4.6 Operating the desktop Compact............................................................................................................. 18
5. The stereo microscope......................................................................................................................... 20
6. Setting the pulse parameters ............................................................................................................. 22
7. Operating the touchscreen / working chamber ................................................................................ 25
7.1 Setting pulse parameters on the touchscreen.......................................................................................... 25
7.2 Opening/closing safety shutter on touchscreen ....................................................................................... 26
7.3 Saving/loading parameter sets on touchscreen or in working chamber.................................................... 26
7.4 Resetting error message on touchscreen ................................................................................................. 28
7.5 Displaying and modifying basic settings on touchscreen.......................................................................... 29

2
EN
8. Welding ................................................................................................................................................ 30
9. Turning off the system ........................................................................................................................ 30
10. Maintenance information ................................................................................................................... 31
10.1 Checklists 1, 2 and 3 .............................................................................................................................. 32
10.2 Testing laser adjustment and beam path ................................................................................................. 33
10.3 Changing the lens protective glass.......................................................................................................... 33
10.4 Checking and replacing the filter for welding fumes ............................................................................... 34
10.5 Opening the desktop Compact ............................................................................................................... 35
10.6 Changing cooling water and particle filter .............................................................................................. 36
10.7 Adjusting the laser welding spot on the reticule in the stereo microscope ............................................... 37
11. Possible faults, causes and elimination.............................................................................................. 38
12. Spare parts list ..................................................................................................................................... 42
13. Environment and disposal .................................................................................................................. 42
14. Technical data....................................................................................................................................... 43
15. EC declaration of conformity .............................................................................................................. 44
16. Confirmation of instruction ................................................................................................................ 45
17. Annex

3
EN
1. General information
Thank you for choosing the Dentaurum laser welding unit. In order to enjoy your new laser welding unit for a long
time, please observe all the information in these Instructions for use. According to EC guidelines, the Dentaurum
laser welding unit is a piece of work equipment. It has been developed specifically for use in the dental laboratory.
Unit identification
Make: Laser welding unit (Nd: YAG laser wavelength 1064 nm)
Type: desktop Compact – REF 090-578-50
Company name: Dentaurum GmbH & Co. KG
Turnstr. 31
75228 Ispringen
Germany
The parts to be welded are manually arranged, positioned and laser-welded under a stereo microscope in the
welding chamber.
The required shielding gas and the laser pulse are switched on or activated via a two-stage foot switch. During and
after the processing, the welding fumes are automatically extracted.
mCaution: The unit must be installed and put into operation by authorized, qualified personnel or
Dentaurum service technicians.
Before switching on the unit, you must read and understand the Instructions for use.
Only then switch on the unit!
Before using the unit for the first time, the relevant (industrial) authorities must be
informed.

4
EN
2. Safety information
2.1 Symbols and information
The following symbols indicating danger are used in the Instructions for use:
mWarning: Indication of a possible threat to the life and health of persons. Failure to observe this information
can lead to serious health effects, including life-threatening injuries.
mCaution: Indication of a potentially dangerous situation.
Failure to observe this information may result in minor injuries or damage to property.
2.2 Intended use
The desktop Compact laser is intended exclusively for welding metals. To use it for any other purpose or for
anything beyond this is to use it improperly. Dentaurum is not liable for damages caused by improper use. The
intended use also includes observing all information in these Instructions for use as well as regular inspections and
maintenance work.
mCaution: The processing of non-metallic materials, in particular the processing of plastics, consti-
tutes improper use.
2.3 Warranty and liability
Our general terms and conditions of sale and delivery apply. Warranty and liability claims in respect of injury or
damage to persons and property are excluded if they are caused by one or more of the following:
· Improper putting into operation, operating, mounting and maintenance of the laser
· Improper use of the laser
· Operating the laser with safety facilities that are defective or improperly installed or with inoperable safety and
protective precautions
· Failure to observe the information in the Instructions for use regarding transport, storage, installation, operation
and maintenance of the laser
· Lack of monitoring of wear parts
· Unauthorized structural modifications to the laser, in particular to the safety devices
· Improperly performed repairs.

5
EN
2.4 Employer‘s obligations
The employer is obliged to only allow personnel to work with this unit who
· are familiar with the regulations on occupational safety and accident prevention and are instructed in the handling
of the unit
· have read and understood the safety instructions and Instructions for use and have signed confirmation of this
(see chapter Confirmation of instruction)
· have been instructed in accordance with the regulations on accident prevention for laser radiation, and the
regulations of the trade associations, as valid in the country of operation
· Before using the unit for the first time, the relevant authorities for industrial safety (e.g. labor inspectorate)
must be informed.
2.5 Personnel's obligations
Before starting to work, all personnel who work with the unit must
· observe the basic regulations on occupational safety
· read and understand the safety instructions and Instructions for use and confirm this with their signature
(Confirmation of instruction).
2.6 Laser safety officers
For the use of a Class 4 laser, a competent laser safety officer must be appointed in writing by the employer. The
laser safety officer should have training and experience in the field of laser radiation. The laser safety officer should
fully understand the safety procedures and equipment used. He is responsible for the safe operation and the safety
measures of the unit.

6
EN
2.7 Protection of the eyes against laser radiation
The unit is equipped with measures to protect the eyes of the operator and other personnel in the vicinity of the
unit.
Safety shutter
The safety shutter prevents the generation of laser pulses or the unintended emission of laser radiation from the
laser beam source and closes
· if the feed flap is open
· if the laser parameters are changed
· if there is no control voltage at the safety shutter.
The laser pulse is only operational
when the feed flap is closed
· and no laser parameters are set
· and the recharging of the energy reservoir has finished
· and the foot switch has been pressed down to level 2.
Other eye protection devices
· The unit has a large observation window made from a laser protection polymer for safe and direct observation
of the welding process
· The unit has an automatic glare protection in the beam path of the stereo microscope, which is activated during
welding
· The entire laser beam path is optically sealed to the outside.
The unit fulfills all stipulations for total eye protection!
This fulfils part of the stipulations of a Class I laser.
The unit does not fulfill the second part of the stipulations for a class I laser, i.e. protection of the skin against
laser radiation.

7
EN
2.8 Protection of the skin against laser radiation
The unit has been developed for dental applications. The working process cannot be automated because each
workpiece represents an individual piece. The dental workpiece must be held with your hands , as a large number
of various materials with different measurements, shapes, surface qualities and fitting tolerances are connected
together in various combinations or have to be processed at their surfaces. At the moment protective gloves
against laser radiation technically cannot be realized and would hinder or even make it impossible to work on
the very small parts. The same problem exists for the use of holders, tweezers, etc. Therefore this laser has to be
classified as work equipment for the dental laboratory that bears the threat of minor injuries.
Due to the design of the unit, the area of danger is limited to the operator's hands and arms only. In case of false
operation the tissue of the skin can be slightly burned by laser exposure. In case of severe burns the operator
should seek medical treatment.
mCaution: Invisible laser radiation!
To avoid direct laser radiation to your hands:
· Do not hold your hands directly under the reticule and thus in the laser beam.
· Look through the stereo microscope and position the workpiece so that the welding point appears sharp within
the reticule.
· Take care that the hands do not appear – if possible – in the field of view of the stereo microscope!
· Keep your hands calm while releasing the laser pulse with the two-stage foot switch!
· Look frequently through the stereo microscope and control the position of your hands and the position of the
workpiece.
mCaution: Scattered laser radiation
To avoid scattered laser radiation to your hands:
Especially objects with shiny surfaces can scatter or deflect the laser radiation so that even at longer distances from
the welding point there is a certain local danger of burning.
If possible, do not wear any jewelry on your arms and fingers while working with laser radiation and do not hold
any shiny surfaces directly into the laser beam.

8
EN
2.9 Further important safety issues, welding fume extraction
· The instructions must always be kept with the unit
· This unit is designed to weld dental metals and alloys using a pulsed laser beam; it must not be used for any other
purposes
· Never place flammable or explosive substances into the welding chamber
· During the welding procedure, health endangering vapors may be produced
Therefore, in order to maintain clean breathable air, trade associations recommend the use of a suitable welding
fume extractor during welding work with the laser.
The extraction unit, integrated in the desktop Compact is only permitted to extract laser welding fumes.
It must not be used for other purposes, such as the extraction of
· highly flammable or explosive gases
· liquids of any kind
· organic substances (e.g. plastics)
The vent slots for intake and exhaust air (see Figure 2 on page 12) must always be kept clear. The welding fume
extractor must only be operated with the original spare filter and never without a filter.
Emergency off button
The emergency off button is located to the right of the touchscreen (see Figure 2 on page 12). If a dangerous
situation should occur, the desktop Compact laser can be switched off by pressing hard against this button.
To restart, turn the switch in the direction of the arrow; it will automatically jump back into place.
Electrical safety
The desktop Compact laser is driven by AC voltage 1-phase, 200 - 240 V / 50 - 60 Hz, 10 A. In the laser unit,
there are voltages of up to 400 V.
The unit must only be operated with a three-conductor mains cable with integrated protective conductor.
To avoid a short circuit, only deionized cooling water with a conductivity < 2.5 µS / cm may be used.
mCaution: Make sure the mains plug is removed before opening the device.
2.10Service and maintenance
mCaution: Never work alone when carrying out service or maintenance activities!
Various work on electrical parts, optical components and structure of the machine
may only be carried out by authorized, qualified personnel or by the Dentaurum service
technicians.
A second person, who should be familiar with the risks posed by laser radiation and high-voltage, should always
be present during service and repair activities.
mWarning: Life-threatening high voltage!
To ignite the flash lamp, this laser runs with high-voltage capacitors. Therefore, after having turned off or dis-
connected the device, current-carrying components could still be live.

9
EN
2.11 Laser warning signs
Invisible laser radiation
Avoid eye or skin exposure
to direct or scattered radiation
Laser Class 4
Avoid exposure to radiation
Emission of invisible laser radiation
➀
➁
➂

10
EN
2.12 Location of laser warning signs
➂Indication of
outlet opening
Figure 1: Location of the laser warning signs
Laser warning lamp
➀
➀, ➁On the
feed flap

11
EN
3. Basics of the laser and the welding process
LASER = Light Amplification by Stimulated Emission of Radiation
The light amplifier of the laser is a rod shaped crystal of neodymium-doped yttrium aluminum garnet (Nd: YAG)
stimulated by a light pulse from an external rod-shaped flash lamp. A suitable high-performance reflector
guarantees a high efficiency and coupling-in rate of the lamp light into the laser crystal. In order to send out
amplified and directive laser light, two mirrors are arranged outside the crystal so that the light coming from the
crystal is reflected in itself and back to the crystal (resonator). One of the mirrors is semi-reflecting and releases
a strongly directive laser radiation from the resonator. The wave length range of this radiation is narrowly limited
to 1064 nm. It is the strong directional dependence and the narrow wave length range that make the extreme
concentration of the laser energy on the workpiece possible (focusing via a suitable lens). This energy concentration
exceeds the concentration of usual light sources many times.
The laser pulse facilitates welding by heating the workpiece in the focal area beyond the melting temperature and
liquefying the materials that are to be connected. After a relatively short laser exposure time (0.5 ms to 20 ms), the
melted materials solidify again and are tightly connected together.
Thanks to the high, short-term concentration of the laser energy to a limited volume, heat is only produced where
it is needed. This property makes the laser an excellent tool for the dental laboratory.

12
EN
4. Machine description
4.1 Overview
The desktop Compact laser welder is a very compact table-top unit for manual use. It supplies short, energy-rich
invisible laser pulses at a wavelength of 1064 nm for welding metals. Figure 2 shows a view of the device with all
the essential controls.
The workpieces are fed through the front feed flap into the integrated laser-safe working chamber (see fig. 3
on page 13). The workpiece is positioned manually under the stereo microscope through the two side openings
and held by hand to be welded. When both of your hands are inserted into the leather cuffs of the hand-access
openings, the laser radiation cannot exit the device.
Figure 2: Front view of the desktop Compact laser
Key-operated
switch (covered)
Touchscreen
Hand-access
opening left
Laser protection
window for
observing the
working chamber
Feed flap
Stereo microscope
Emergency off
button
Two-stage foot switch
Hand-access
opening right
Vent slots
for exhaust air
Vent slots intake

13
EN
Figure 3: desktop Compact with open feed flap
Any shielding gas that may be required as well as the laser pulse are turned on and triggered using a two-stage foot
switch. During and after processing, the welding fume is automatically drawn off and filtered.
All of the important functions and settings are displayed on the touchscreen. These parameter settings can be
modified using the touchscreen. They can also be modified in the working chamber (see fig. 4 on page 14).
Important laser parameters can be directly adjusted using the joysticks in the chamber without having to remove
your hands out of the working chamber.

14
EN
4.2 The working chamber
The working chamber of the desktop Compact contains all controls necessary for easy manual laser welding. To
provide a view of all of them, the working chamber in fig. 4 is shown from below.
At the top middle, the laser beam leaves through a focusing lens protected by protective glass.
The working chamber and the workpiece are illuminated from the right and left side of the laser exit by two
powerful halogen lamps.
The swivel nozzle for the shielding gas can be swung forward and backward. When the nozzle is in its rear position,
the flow of gas is interrupted. The height of the nozzle opening can be adjusted 5 mm by turning the nozzle.
When the swivel nozzle is in its front position, it marks the focus point of the laser. The flexible nozzle on the left
side is used to guide the shielding gas precisely to the welding spot.
There is also a compressed air nozzle on the right that can be used to cool the workpiece in the working chamber
with compressed air.
Figure 4: View from below into the working chamber
The intake openings for the welding fumes filter are in the top of the chamber behind the laser exit.
The controls (2 joysticks and 2 toggle switches) are easily accessible at the bottom rear of the chamber, and they
can be monitored through the observation window.
Fastening screw
filter holder (2x)
Welding fume
extraction
swivel shielding
gas nozzle
(Height
adjustable
by turning)
Joysticks for internal
parameter selection
Flexible shielding
gas nozzle
Halogen lamp
chamber light (2x)
Compressed air
nozzle
Toggle switch
Laser beam outlet,
lens protective glass

15
EN
4.3 Design of the desktop Compact
All functions for operating the desktop Compact are integrated in the compact housing. Figure 5 shows a block
diagram of the construction.
The heart of the unit is a solid-state laser. It is pumped with a flash lamp operated by a power supply with a high
electrical efficiency. The laser flash is guided along a carefully adjusted beam path through the stereo microscope
to the workpiece.
Power
supply
Flash lamp
Cooling circuit with reservoir,
particle filter and circulating pump
Monitoring and
control electronics
Laser
Housing
Workpiece
holder and
positioning
Protection,
safety
Beam guidance
Process gas
control
Exhaust cleaning
Figure 5: Schematic layout of the desktop Compact
A newly developed control unit precisely manages the laser pulses and monitors all of the functions necessary for
safe welding.
The filtered and purified cooling water is pumped in a closed circuit through the pumping chamber of the laser and
thereby cools the flash lamp and laser rod. The arising heat is removed to the surrounding air by a heat exchanger
and fan.
The shielding gas (such as argon) necessary to protect the weld seam is supplied from the outside by a connection
at the rear of the unit (see fig. 6 on page 16). The shielding gas can be directly guided to the welding point via a
flexible and a swivel nozzle in the working chamber. The flow of gas is controlled by the two-stage foot switch.
The welding fumes arising during welding are drawn out of the welding chamber and thoroughly filtered (see fig. 4
on page 14).

16
EN
4.4 External connections
All of the external connectors are located on the rear of the unit (see Figure 6). The type plate shows the serial
number of the unit as well as the properties of the laser source.
Figure 6: Rear connections of the desktop Compact
The gas connections have a connector for tubes with a diameter of 6 mm.
Shielding gas:
Recommended shielding gas: Argon 4.6 (99.996 % purity) according to DIN EN ISO 14175:2008-06.
Compressed air nozzle:
The maximum permissible compressed air pressure is 6 bar.
Power connection:
Power is supplied through the provided standard power cable.
The unit is operated with 200 - 240 V / 50 - 60 Hz, 10 A, single-phase
Two-stage foot switch:
The provided two-stage foot switch is connected to the 15-pin sub D socket (female). When the two-stage foot
switch is not or insufficiently connected, the status indication “Laser OK“ will light up red on the touchscreen.
Type plate
Connection for
shielding gas
supply
(Argon)
Mains supply
230 V 10 A
Fuses
2 x 10 A
Connection for
two-stage foot switch
Compressed air
for cooling

17
EN
4.5 Installation and commissioning
Initial inspection
Please check the packaging and the device for any visible damage. If the packaging is damaged, report it
immediately to the shipping agent. Document the damage for later claims.
The desktop Compact weighs 50 kg. It takes two people to move or transport the device.
Check the shipment for completeness.
Only undamaged units may be used.
Setup
The surface under the unit must be flat. Compensate for small unevenness with non-slip material.
The device should be placed in a dust-free location protected from direct sunlight.
Base: 560 mm wide x approx. 700 mm deep.
Cooling water
De-ionized cooling water must be poured into the reservoir for the cooling circuit before initial startup.
See the chapter “Changing cooling water and particle filter” on page 36.
To prevent damage from leaking cooling water, drain the cooling water container each time you move the unit.
Electrical connections
Before connecting to the mains, make sure that the mains power supply is appropriate for the desktop Compact.
The unit is operated with 200 - 240 V / 50 - 60 Hz, 10 A, single-phase.
Connect the two-stage foot switch to the 15-pin socket next to the power connection. When the two-stage foot
switch is not or insufficiently connected, the status indication “Laser OK” will light up red on the touchscreen.

18
EN
4.6 Operating the desktop Compact
The desktop Compact was designed to be very easy to use. You will quickly achieve successful welding results
when you observe the following points. The subsequent chapters offer detailed descriptions of each step.
Quick start for experienced users
BEFORE YOU TURN THE UNIT ON you must read and understand the instructions for use, especially the
safety instructions. ONLY THEN MAY YOU TURN ON THE UNIT.
1. Turn the key operated switch to start the laser (emergency off button must be released). Once "Laser OK"
lights up green on the touchscreen (see fig. 2 on page 12), the laser is ready to use.
2. Position the workpiece under the laser head.
3. If you need shielding gas, connect the gas bottle to the shielding gas supply connection and adjust the
appropriate gas flow with the pressure regulator. Open the gas supply. Recommended flow: 6 - 8 l / min.
4. Insert the workpiece into the working chamber and close the feed flap.
5. Adjust the stereo microscope to your personal preference.
6. Set the desired parameters for the welding process using the touchscreen or the joystick in the working
chamber.
7. Open the safety shutter by pressing the “Shutter open” key on the touchscreen (see chapter 7.2 on page 26).
The key must light up green.
8. Direct the stereo microscope on the site to be welded on the workpiece. The stereo microscope cannot
be moved. You need to move the workpiece into the line of vision and adjust the sharpness by changing
the distance.
9. Direct the appropriate shielding gas nozzle to the welding site.
10. Press the two-stage foot switch to the first switching point, and the shielding gas will flow. When you press the
two-stage foot switch all the way down, the laser will emit pulses at the set value, and you can start welding.
Turning on the unit
Open the bottle with shielding gas.
Turn the key-operated switch to I.
(If you have changed the flash lamp or cooling water, wait for approximately 1 minute until all the air bubbles have
left the cooling water circuit).

19
EN
Shielding gas
The connection for the shielding gas supply is on the back of the unit (see fig. 6 on page 16).
The flow of gas to the workpiece is turned on as long as the two-stage foot switch is pressed to the first stage.
The shielding gas can be directed to the welding point through a flexible and a swivel nozzle in the working
chamber (see fig. 4 on page 14). The swivel nozzle for the shielding gas can be swung forward and backward.
When it is in the rear position, the gas flow is stopped. The height of the nozzle opening can be adjusted 5 mm
by turning the nozzle.
The flexible nozzle can be shut off with a turncock.
Please note the following regarding the gas supply:
· Gas bottle 200 l or smaller (at least 10 l)
· The gas bottle can be placed in a lying position if it is secured from rolling away and the argon fitting is protected
· Standing bottles must be secured in accordance with regulations
· The pressure regulator for argon can be adjusted within a range of 6 - 8 l/min
· The gas hose diameter is 6 mm (outer ø)
· Do not forget: After you have finished working, close the valve on the gas bottle.
The two-stage foot switch
The two-stage foot switch is connected to the rear of the device (see fig. 6 on page 16). It switches in two stages.
In the first switching stage, the shielding gas is released.
In the second switching stage, the laser pulses are released.
This allows the shielding gas to displace the air around the welding point before welding starts to ensure an oxide-
free weld seam.
Table of contents
Popular Welding System manuals by other brands

ABB
ABB MigRob 500 product manual

Fujikura
Fujikura CB-08 quick start guide

Vector Welding
Vector Welding AC/DC WIG 200D operating instructions

REHM
REHM TIGER 170 DC operating instructions

Elektra Beckum
Elektra Beckum 170 - 230 Amp Models Notice d'utilisation

Thermal Arc
Thermal Arc PAK 5XT instruction manual

Lincoln Electric
Lincoln Electric LF-72/74 Service manual

STAMOS
STAMOS S-WIGMA 180 user manual

Vector Welding
Vector Welding PLASMA CUTTING Series operating instructions

ESAB
ESAB Aristo Origo Feed 3004 instruction manual

ESAB
ESAB A2 SF instruction manual

Thermal Arc
Thermal Arc ARCMASTER 300 AC/DC Service manual