Denver Electronics DENVER DAB-39 User manual

Instruction manual
DAB+/DAB FM Radio
DENVER DAB-39
COPYRIGHT DENVER ELECTRONICS A/S
www.denver-electronic .com
www.facebook.com/denverelectronic
ENG-1

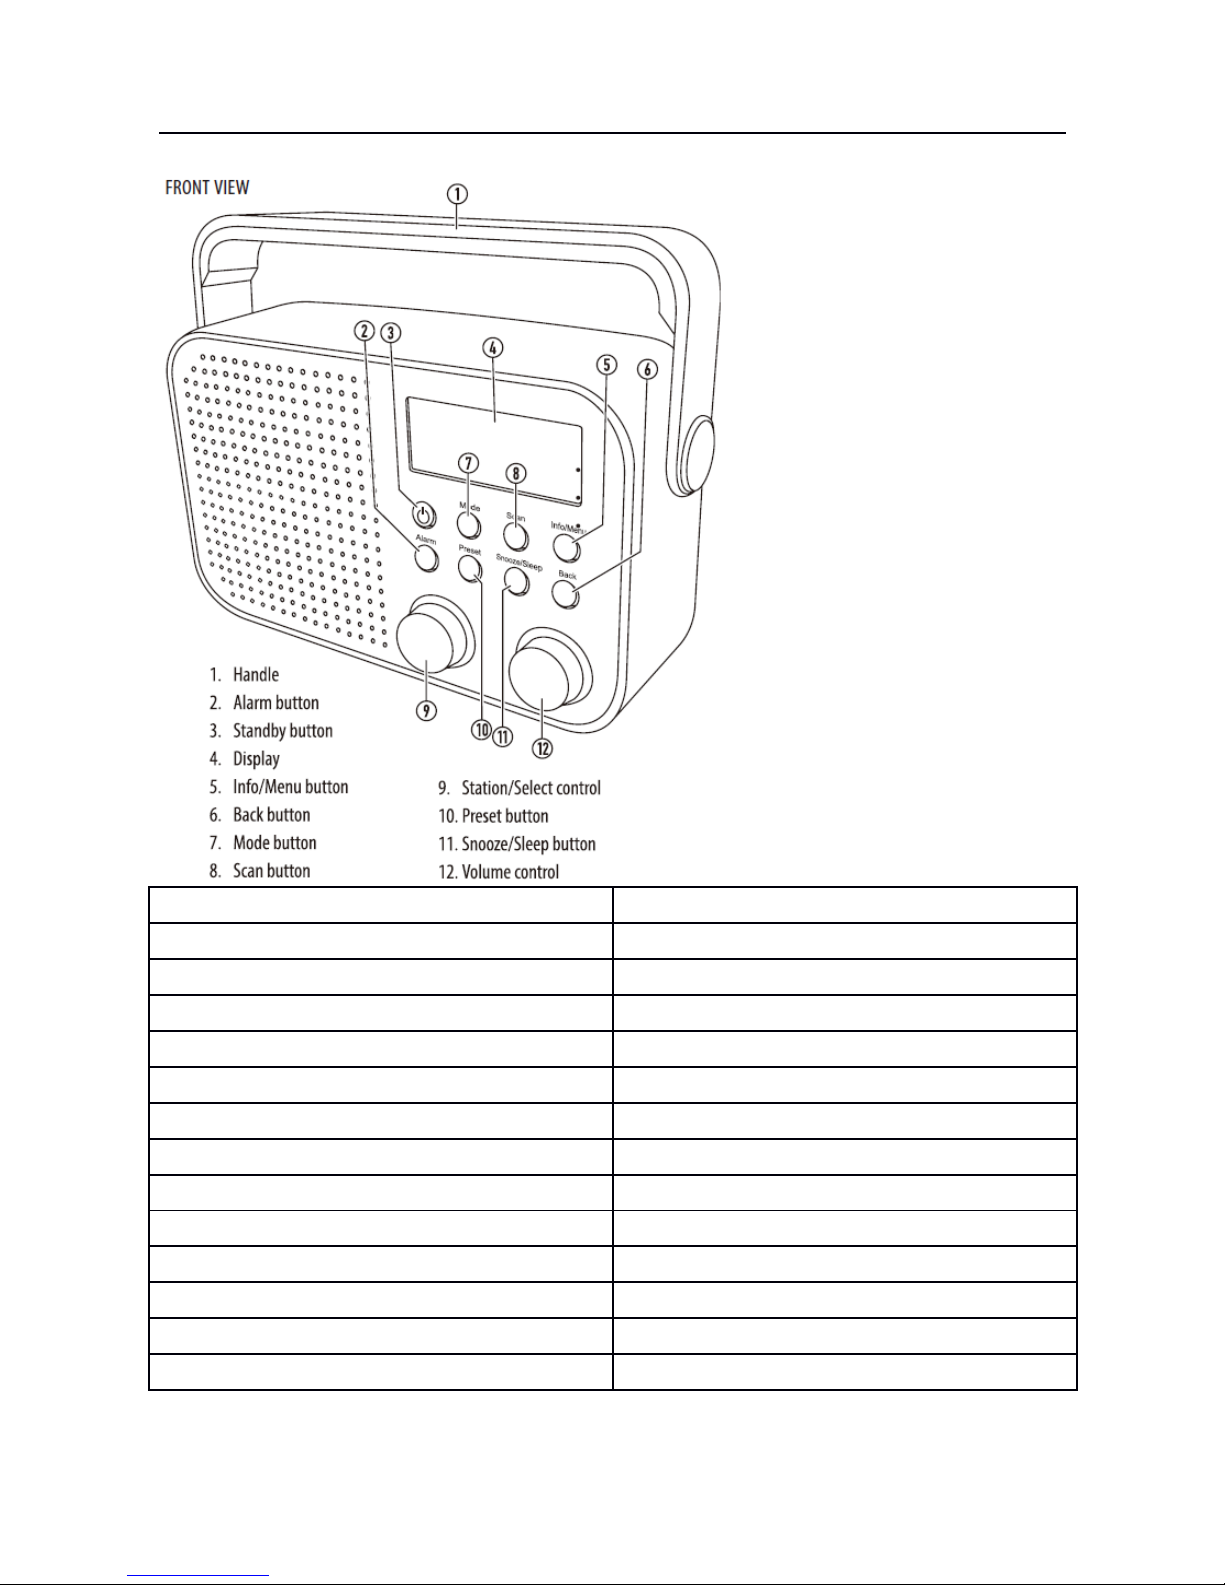
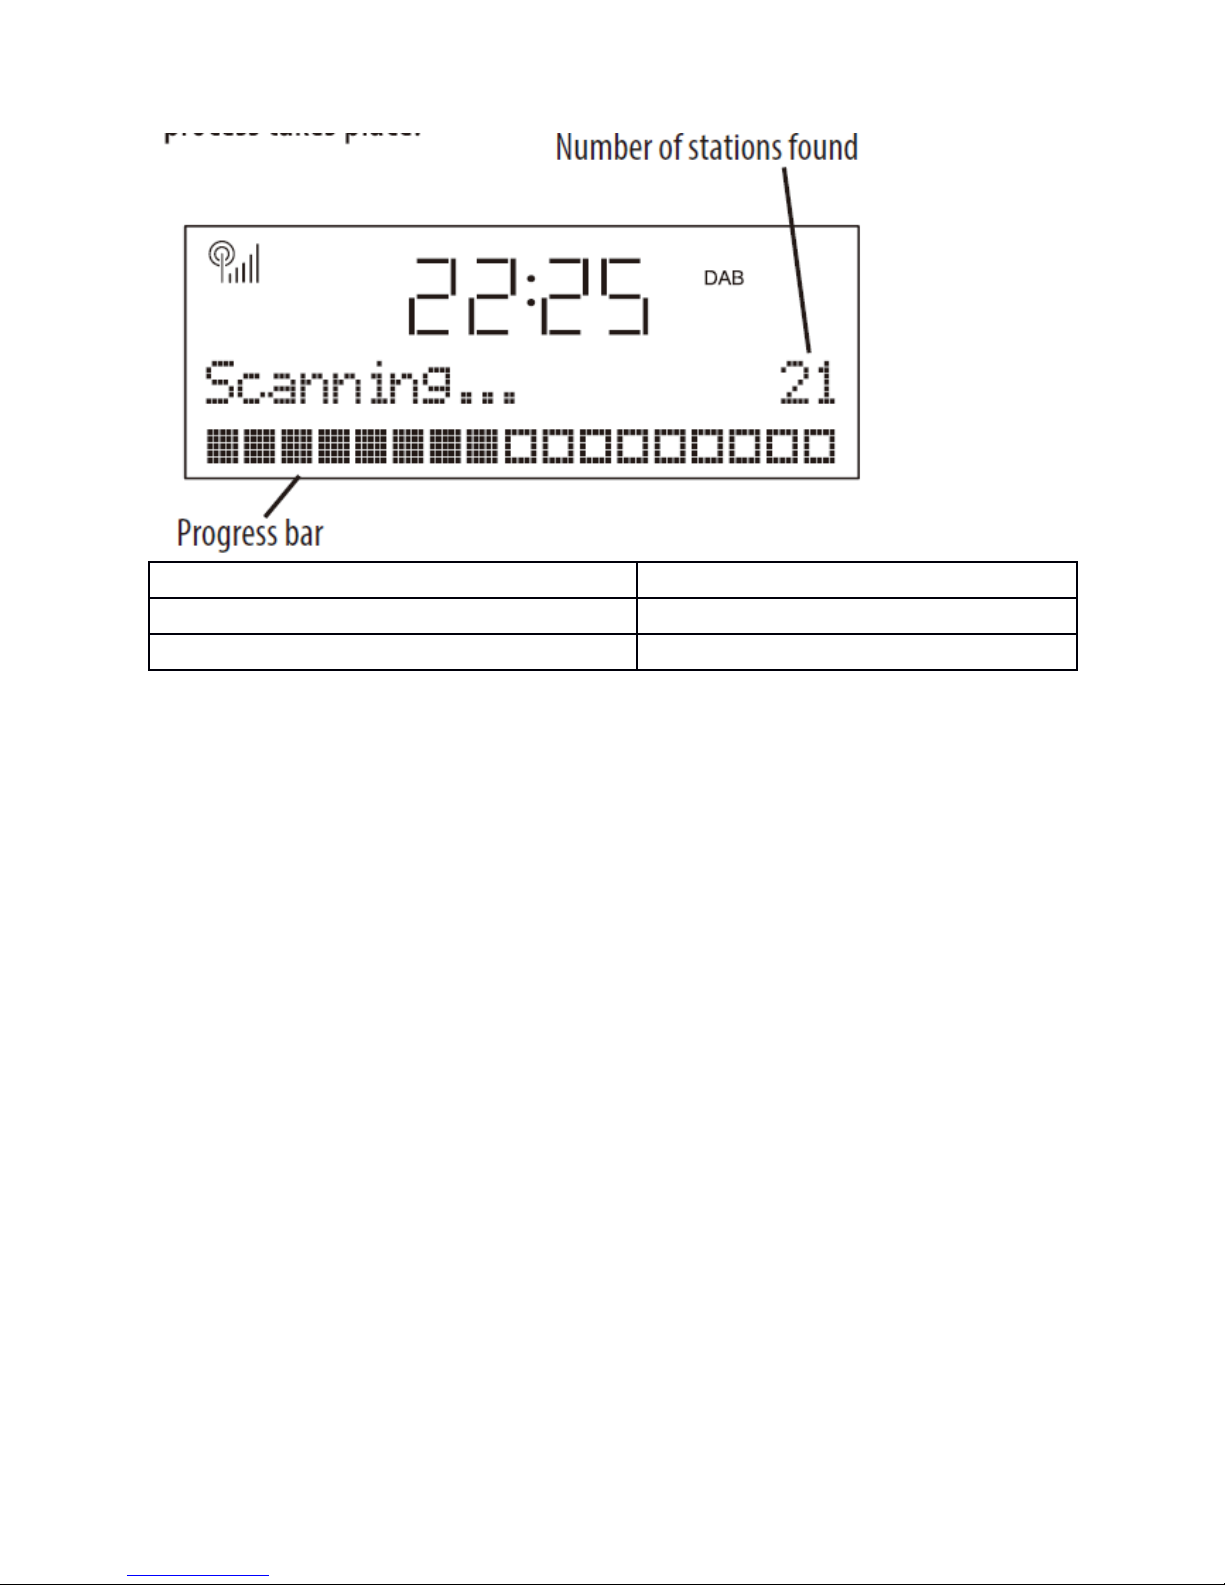
IMPORTANT AFETY INFORMATION
EN
CAUTION!
RI K OF ELECTRIC HOCK
DO NOT OPEN
TO REDUCE THE RI K OF ELECTRIC
HOCK
DO NOT REMOVE COVER (OR BACK)
Thi ymbol indicate that there are important operating and maintenance
in truction in the literature accompanying thi unit.
Thi ymbol indicate that dangerou voltage con tituting a ri k of electric hock
i pre ent within thi unit.
Read the e in truction .
Keep the e in truction .
Heed all warning .
Follow all in truction .
Do not u e thi apparatu near water.
Clean only with a dry cloth.
Do not block any ventilation opening .
In tall in accordance with the manufacturer’ in truction .
Do not in tall or operate near any heat ource uch a radiator , tove , or other
apparatu that produce heat.
Unplug thi apparatu during lightning torm or when unu ed for long period of time.
Refer all ervicing to qualified ervice per onnel.
Servicing i required when the apparatu ha been damaged in any way, uch a the
power- upply cord or plug i damaged, liquid ha been pilled or object have fallen into
the apparatu , the apparatu ha been expo ed to rain or moi ture, doe not operate
normally, or ha been dropped.
Warning: To reduce the ri k of fire or electrical hock, do not expo e thi product to rain or
moi ture. The product mu t not be expo ed to dripping and pla hing and no object filled
with liquid uch a a va e of flower hould be placed on the product.
No naked flame ource uch a candle hould be placed on the product.
Batterie (a battery pack or in talled batterie ) hall not be ubject to exce ive heat uch
a un hine, fire or the like.
Caution: Change or modification not expre ly approved by the manufacturer could
void the u er’ authority to operate thi device.

Caution: U age of control or adju tment or performance of procedure other than tho e
pecified herein may re ult in hazardou expo ure.
To prevent po ible hearing damage, do not li ten at high volume for long
period .
IMPORTANT
Thi equipment generate , u e and can radiate radio frequency energy and, if n not
in talled and u ed in accordance with the in truction , may cau e harmful interference to
radio communication. However, thi i no guarantee that interference will not occur in a
particular in tallation. If thi equipment doe cau e harmful interference to radio or
televi ion reception, which can be determined by turning the equipment off and on, the
u er i encouraged to try to correct the interference by one of the following mea ure :
•Reorient or relocate the receiving antenna.
•Increa e the eparation between the equipment and receiver.
•Connect the equipment into an outlet on a circuit different from that to wihch the
receiver i connected.
•Con ult the dealer or an experienced radio/TV technician for help.
ELECTRICAL INFORMATION
U e thi appliance only with the upplied AC Adapter.
U ing non-approved power upplie will void the warranty.
The MAINS plug i u ed a the di connect device, the di connect device hall remain
readily operable.
ENG-3

CONTROL & CONNECTION
EN
FRONT VIEW
Handle
Alarm button
Standby button
Di play
Info/Menu button
Back button
Mode button
Scan button
Station/Select control
Pre et button
Snooze/Sleep button
Volume control

En
BACK VIEW
Aerial
Earphone jack
DC In jack
AUX In jack
Battery compartment (Batterie not
included)
ENG-5

GETTING TARTED
DAB/FM AERIAL
Before u ing your radio for DAB or FM reception, alway fully extend the tele copic aerial.
The tele copic aerial ha a wivel ba e to enable it to be adju ted to different po ition for
the cleare t ound.
CONNECTING POWER
Before connecting the power, check that the main voltage on the rating plate of the AC
adapter i the ame a the voltage in your area.
•Connect the mall plug into the DC-ln jack on the back of the unit.
•Plug the AC adapter into the wall ocket and witch the main power on.
The unit is now ready for use.
NOTE: - The AC adapter may become warm during operation - thi i normal.
ETTING THE CLOCK
The clock on your radio i automatically et when fir t u ed from the time ignal broadca t
with DAB radio tation .
If a DAB tation i not available, the clock may be et manually via the MENU y tem.
POWER CONTROL
To turn the radio on
•Pre the button.
The radio will switch on.
To turn the radio off
•Pre the button.
The radio will switch off. The display will remain on to display the time unless battery
powered.
INITIAL CAN
When your radio i witched on for the fir t time the canning di play will be hown while
the canning proce take place:

En
Number of tation found
Progre bar
The radio can all u able tation (full can) and tore them alphanumerically -1 Radio,
2 Radio, AA Radio, AB Radio... The initial can will take a few minute . After the can, the
radio will play the fir t tation in the equence. To brow e for another tation, refer to the
next ection.
AUTO TANDBY
Your radio include an automatic power- aving tandby feature.
The radio will automatically et to Standby if AUX mode i elected and no ound ha
played for 15 minute .
BROW ING FOR A TATION
To browse for another DAB station
•Turn the tation/ elect control to earch the tation li t for a tation.
•When you ee the tation you want to play, pre the tation/ elect control.
After a short delay, the radio will tune to the station.
ADJU TING THE VOLUME
•Turn the Volume control to adju t the volume, clockwi e to increa e and anti-
clockwi e to decrea e.
The volume bargraph will be displayed.
ENG-7

En
Volume bargraph
DAB CANNING
RE- CANNING FOR DAB TATION
When fir t u ed, your radio canned the DAB band for available tation .The tation
ervice found were then tored in your y tem' memory.
You can re- can the band at any time if you move to a different area or ju t to refre h the
tored li t of available tation .
To scan for DAB stations manually
While playing DAB radio:
•Pre the can button.
The scanning process will take a few minutes. The number of services found during the
scan will be shown at the right side of the display.
After the can, the radio will re-tune to the la t tation playing if it i available. If thi tation
i not available, the fir t tation in the equence will play.
Alternatively, you can continue to brow e for another tation a de cribed in the previou
column.
LI TENING TO FM RADIO
Your radio can al o receive FM band radio tation and di play RDS data (where
broadca t).
To change to the FM band
•Pre the Mode button repeatedly to elect FM mode.
To auto-tune to FM stations
•Pre the can button briefly to earch up the band for the next tation, or
•Pre and hold the can button to earch down the band for the next tation.
The radio will search and the tuning frequency will be displayed whilst searching.
When a usable station is detected the radio will stop tuning and play the station. If R S
data is present, the station name and scrolling radio text will be displayed. If R S data is
not present, the tuned frequency will be displayed

To manually tune to FM stations
•Turn the Station/Select control clockwi e to tune up the band or anti-clockwi e to tune
down the band.
The frequency will change in 50kHz steps.
Mono reception
When li tening to a weak or di tant FM tation in tereo via earphone , there may be a
high level of background noi e. In thi ca e, etting mono reception may reduce the level
of background noi e. Refer to in truction to et mono reception.
FM DI PLAY MODE
FM DI PLAY MODE OPTION
The bottom line of the di play can be witched to how different item of information that
may be tran mitted with an FM tation.
To change the display mode
•Pre the Info/Menu button repeatedly to change the information di played while
playing an FM radio tation.
The full range of di play option are hown below. Some tation may not broadca t all of
the e option .
En
RDS Radiotext
Programme type
Frequency
Stereo/Mono
ENG-9

Time
Date Date
RD Radiotext: Thi i a crolling me age giving realtime information - ong title , new
headline , etc.
PROGRAMME TYPE: Thi de cribe the tyle of the programme being broadca t.
FREQUENCY: Thi option will di play the tation frequency.
TEREO/MONO: Thi option di play the audio mode for the tation playing.
TIME AND DATE: Time and date are updated by broadca ted information.
TATION PRE ET
DAB and FM presets
Your radio can tore up to 10 of your favourite tation a pre et on both the DAB and FM
band for quick recall.
To store any presets
•Tune to the tation you want to tore a a pre et.
•Pre and hold the Preset button.
'Preset Store' will be displayed.
•Turn the tation/ elect control to choo e the pre et number you want to tore.
For each preset number the preset station currently stored will be displayed or '(Empty)' if
none is stored.
•Pre the tation/ elect control to confirm if you want to tore the tation in the
di played pre et number.
To recall any preset
•Pre the Preset button briefly.
'Preset Recall' will be displayed.
•Turn the tation/ elect control to find the pre et number you want to play.
•Pre the tation/ elect control to play the pre et.
The radio will re-tune and the preset number will be displayed.
LEEP FUNCTION
LEEP TIMER
You can et the Sleep timer to play mu ic for a et period while you are falling a leep.
To set the sleep timer
•Play your choice of mu ic.
•Pre the sleep button repeatedly to tep through the leep time option of Sleep Off,
15 minute , 30 minute , 45 minute , 60 minute , 90 minute .
•Pre the tation/ elect control to confirm the leep time.
The Sleep time will be displayed.

Music will continue to play for the time you selected, then the unit will set to Standby.
ENG-11

ETTING THE ALARM
ETTING THE ALARM
NOTE: The alarm can only be u ed when powered from the main AC adapter, not when
battery powered.
You can et two completely eparate alarm time (ALARM 1 and ALARM 2) and activate
either or both of them to wake you with a buzzer or radio. You can al o pre- et the tation
pre et and volume etting that the alarm will wake you with.
Checking and changing alarm settings
NOTE: -You mu t complete all etting before leaving the menu or your change won't be
aved.
etting the Alarms
•Switch on the radio (Alarm etting cannot be changed when et to Standby).
•Pre the Alarm button once to et Alarm 1 or twice to et Alarm 2.
'Alarm 1 Setup' or 'Alarm 2 setup' will appear on the display.
•Pre the tation/ elect button to continue with etting the alarm.
'Alarm 7 Wizard' or 'Alarm 2 Wizard' will appear on the display to confirm alarm setting.
The alarm is now set in the sequence shown in the next column. Alarm 1 is shown in this
example.
NOTE: Pre the Alarm button at any time to exit alarm etting, leaving the etting
unchanged.

En
ALARM SETTING SEQUENCE
Alarm 1 Time
Set the alarm hours, then minutes
Alarm 1 Duration
Set the duration of the alarm
Alarm 1 wake-up mode (Source)
Choose from AB,FM, Buzzer
Alarm 1 pre et*
Choose a preset for radio alarm modes
ENG-13

Alarm 1 Repeat Set the alarm
aily, Once, Weekends or Weekdays
Alarm 1 Date
Option appears if Repeat is set 'Once
Alarm 1 Volume
Set the volume for Alarm 1
Alarm 1 On/Off
Choose to set Alarm 10n or off
Alarm Saved
The alarm settings have been saved
To make a change to a setting
•Turn the tation/ elect control to croll through the option available for a etting (or
time when clock etting).
•When you have fini hed changing a etting, pre the tation/ elect control to
confirm the etting and move on to the next etting in the equence.
•Repeat the previou two tep to change each etting a required.
*N0TE: -When changing the Alarm radio pre et etting, choo e the 'la t li tened' option to
wake to the la t tation you played before etting the radio to Standby.
aving alarm settings
Your alarm etting are automatically aved when you complete the la t etting and pre
the tation/ elect control.
The display will confirm with the words 'Alarm saved'.

WITCHING THE ALARM ON OR OFF
The alarm indicator on the di play how when the alarm are activated.
En
Alarm 1 et
Alarm 2 et
To witch the alarm on or off once et:
•Set the radio to Standby.
•Pre the Alarm button.
The current alarm status is displayed.
•Turn the tation/ elect control to change the alarm tatu .
•Pre the tation/ elect control to confirm.
WAKING TO THE ALARM
•Check that the alarm indicator are di played a required. If not, et the Alarm( ) On
a de cribed in the previou ection.
•Set the radio to Standby (or et the SLEEP function).
The radio will switch off and the time and date will be displayed with the Alarm Symbol(s).
WHEN THE ALARM WAKE YOU
ENG-15

When the alarm ound you can choo e to et nooze, which will re et the alarm for a
further 5 minute , or to witch it off.
To set snooze
•To et nooze, pre the nooze/ leep button when the alarm ound .
The alarm will stop and the snooze time will count down on the display. After 5 minutes the
alarm will sound again.
To switch off the alarm
•To witch off the alarm, pre the Alarm button.
The unit will set to Standby.
ALARM REPEAT
The alarm( ) will repeat according to the Alarm Repeat etting you made when etting the
alarm.
•Daily - The alarm will ound every day.
•Weekday -The alarm will ound on weekday , but not at weekend .
•Weekend -The alarm will ound on weekend , but noton weekday .
•Once - If thi etting wa cho en, the alarm will ound only on the day you elected.

ALL RIGHTS RESERVED, COPYRIGHT DENVER ELECTRONICS A/S
Electric and electronic equipment contain material , component and ub tance that
can be hazardou to your health and the environment, if the wa te material (di carded
electric and electronic equipment) i not handled correctly.
Electric and electronic equipment i marked with the cro ed out tra h can ymbol, een
below. Thi ymbol ignifie that electric and electronic equipment hould not be di po ed
of with other hou ehold wa te, but hould be di po ed of eparately.
All citie have e tabli hed collection point , where electric and electronic equipment can
either be ubmitted free of charge at recycling tation and other collection ite , or be
collected from the hou ehold . Additional information i available at the technical
department of your city.
Imported by:
DENVER ELECTRONICS A/S
Omega 5A, Soeften
DK-8382 Hinnerup
Denmark
www.facebook.com/denverelectronic
ENG-17
Table of contents
Other Denver Electronics Radio manuals

Denver Electronics
Denver Electronics TR-44 User manual

Denver Electronics
Denver Electronics TR-61 User manual

Denver Electronics
Denver Electronics TR-51 User manual

Denver Electronics
Denver Electronics DAB-56C User manual

Denver Electronics
Denver Electronics TR-64 User manual

Denver Electronics
Denver Electronics TR-41C User manual

Denver Electronics
Denver Electronics DAB-56C User manual

Denver Electronics
Denver Electronics TR-41C MK2 User manual