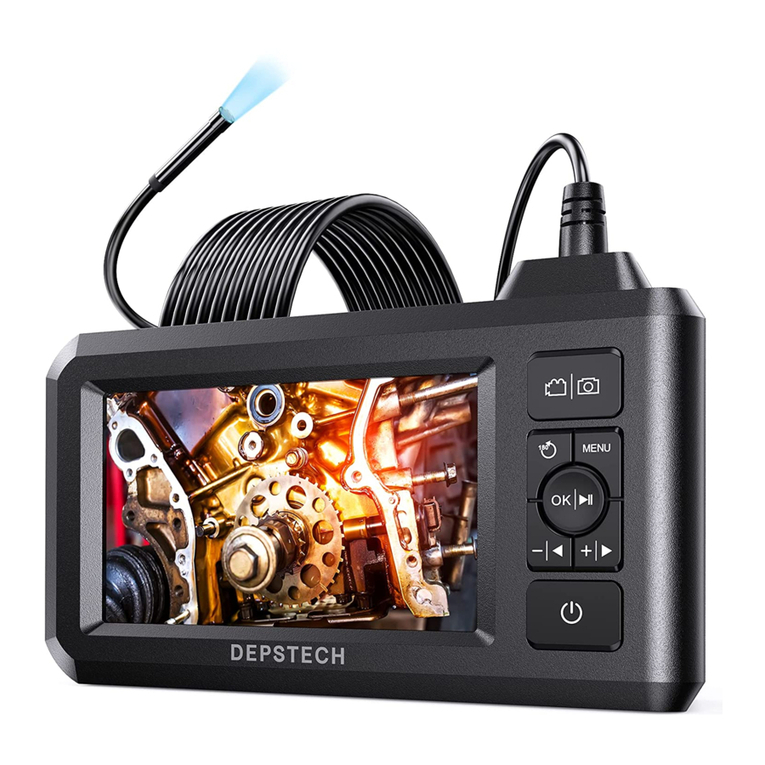
Depstech DS300 User manual

Multi-Language User Manual
Industrial Endoscope
DS300
封面

DE
EN
01 - 08
IT
09 - 16
FR
17 - 24
ES
25 - 32
JP
33 - 40
41 - 48
Catalog
封面背面

Product Features
01
• DEPSTECH is a booming technology company, specialized in creating
various endoscopes and committed to make you feel more secure.
• DS300 is a high-performance industrial endoscope, equipped with 4.3 inch
high-definition display, has the camera and video functions and saves into
TF memory card (Micro-SD card). Such camera uses high-performance
CMOS chip that supports the record-high frame rate to get clear images
with Bluart 2.0 technology, widely used in industrial maintenance, appliance
maintenance, mechanical maintenance and design and other fields.
• This product is a camera of industrial endoscope, not applicable to medical
or physical examination!
• In order to lengthen the battery life, it is recommended that you should
charge the device once every 3 months whether it is used.
• Do not try to replace internal battery by yourself, because unprofessional
operation may lead to risks of personal injury due to battery overheating, etc.
EN
Special Warning and Notice
Safety and Protection
• Probe of camera is an electronic device of high precision, so please do not
hit the probe of camera or pull the cables, which may lead to failure of the
device.
• With IP67 waterproof layer, the probe shall be used with extra care and
protected from scratches!
• Camera probe is made from materials that are not high temperature
resistant, so make sure the internal temperature of any internal combustion
engine or other equipment whose internal temperature is higher has been
cooled when they are examined, otherwise the device will be directly
damaged!
• In case of device damaged, please do not dismantle it by yourself, but
contact the seller or the supplier for more professional maintenance
services.
• Children may not use this device independently without the guidance of
adults.
Operating and Storage Environments
• The device should be operated at an ambient temperature of 32~113℉
(0~45℃).
• The device should be stored in a dry, clean, oil-free and waterless place
without any chemical liquid.

Product Introduction
3
4
5
6
2
1• Hold this button for 2s to power on/off the endoscope
• Single press to take a photo
• Hold this button for 2s to start or end video record
• Click to dim the LED lights of the camera
• Move the cursor up(In the menu)
• Click to rotate the real-time image 180°
• Hold this button for 2s to switch main/side camera
(Only applicable to dual-lens products)
• Click to brighten the LED lights of the camera
• Move the cursor down(In the menu)
• Hold this button for 2s to enter/exited the album
• Click to confirm choices(In the menu)
7• Click to enter the menu
02
6
1
3
7
5
4
2

Charging Status LED indicator
TF Card Slot
10
11
• Short click the reset button with the reset pin to shut
down the device
Reset Button
8
9
• Support up to 32G TF card
• Please format it for the first time of usage
Micro-USB Charging Port
• For charging (Micro-USB cable connected to the adapter)
• For data transmission (Micro-USB cable connected to PC client)
03
UI Introduction
• Red LED indicator flash: Charging status
• Red LED indicator stay on: Charging finished
Photo Shoot / Video Record
Main Lens
TF Card Status
Side Lens
Screen Rotation 180°
98
11 10

1. Click the MENU button to enter menu interface, select
Language by pressing the / arrow button and
then press the button, enter the language setting
interface.
2. Click / button to select the language you need
to switch, and then press button to switch the
language successfully.
3. Click the MENU button to return the Main Interface.
1. Take photos by pressing button.
2. Long press to start or end video recording.
Default language of the device is English; If other language
is required, please follow the steps below:
04
Language Setting
Photo/Video

1. When viewing photos/videos, press MENU to enter the
photo/video detail page.
2. Press / to choose to delete the current file or
all files.
1. Long press in preview mode to enter the photo
album.
2. Press / to view photos, Click to play
videos.
3. Long press to exit the photo album.
05
View photo/video
Delete photos/videos

When the product is turned on the default open the main lens,
long press the button 2s can switch the lens (Main Lens -
Side Lens - Split Screen - Main Lens)
1. On the preview interface, press the MENU button to enter
the menu;
2. Press / to select “Format” options;
3. Press to enter the option interface, Select “OK”;
4. Wait for successful formatting.
Lens Switching
TF Card Formatting
06
(Only applicable to dual-lens products)
OK Cancel

1. Please connect the product to your computer.
2. Press the MENU button to enter the menu.
3. Select “Data transmission”.
4. Press the button to start copying to computer.
Copy photo and video files to computer
07
Guide for accessories installation
Installation method:
Turn counterclockwise-remove
protect cap
Turn clockwise-tighten
accessories
Charging Instructions
1. Use a TF card reader to copy data directly.
1. Connect the device to the DC 5V adapter for charging;
2. The red indicator light flashes when the device is charging, and is
always on when fully charged.
If the device is not connected with computer, click "Data transmission"
on the setup interface, then USB icon shows up on the display; Please
press the MENU button to exit.
It is normal for "No Signal" to appear on the screen when you press
the MENU button to exit data transmission.
2. Use a Micro USB cable to connect to computer for copying
Setting path.
Card Reader
TF
Card

Model
Screen Spec
Camera Diameter
Camera View
Video Spec
Charging Time
DS300
FHD
4.3” LCD Screen
5-10cm
(1.97-3.93in)
70°
1080 p / 25 fps
3-4H
Specifications
08
DS300 Dual
Camera-5m
DS300 Dual
Camera-15m
5.5mm
(0.22in)
7.9mm
(0.31in)
Main Lens: 3-10cm(1.18-3.93in)
Side Lens: 2-6cm(0.79-2.36in)
Best Focal Range
Photo Resolution
1920*1080
Battery Life
2.5-3H
Charging Voltage
and current
DC 5V/2A
Packing List
Endoscope
(32G TF card inserted)
1. Reset pin, Hook, Magnet, Protective Cap
2. Side-View Mirror(only available on
single-lens camera)
User Manual
Micro-USB
Accessories

DE
Produktbeschreibung
09
• DEPSTECH ist ein florierendes Technologieunternehmen, das sich auf
die Entwicklung einer Vielzahl von Endoskopen konzentriert, die Ihr
Leben sicherer machen.
• DS300 ist ein leistungsstarkes industrielles Endoskop mit einem
4,3-Zoll-High-Definition-Display. Unterstützt Foto- und Videofunktionen
und speichert auf einer TF-Speicherkarte (Micro-SD-Karte). Die Kamera
verwendet einen Hochleistungs-CMOS-Chip, der die höchste
Aufnahmebildrate unterstützt, und verwendet die Bluart 2.0-Technologie,
um klare Bilder zu erhalten. Es ist weit verbreitet in der industriellen
Wartung, der Wartung von Haushaltsgeräten, der Konstruktion
mechanischer Wartungsarbeiten und anderen Bereichen.
• Dieses Produkt ist eine industrielle Endoskopkamera, die nicht für
medizinische oder menschliche Untersuchungen geeignet ist!
• Um die Batterielebensdauer zu verlängern, empfehlen wir Ihnen, Ihr Gerät
alle 3 Monate aufzuladen, unabhängig davon, ob es verwendet wird oder
nicht!
• Versuchen Sie nicht, den eingebauten Akku selbst auszutauschen. Bei
unsachgemäßer Handhabung besteht die Gefahr von Personenschäden,
wie z. B. Überhitzung des Akkus.
Besondere Warnungen und Vorsichtsmaßnahmen
Sicherheit und Schutz
• Die Kamerasonde ist ein hochpräzises elektronisches Gerät. Klopfen Sie
nicht auf die Kamerasonde und ziehen Sie nicht am Kabel. Diese Aktion
kann zu Fehlfunktionen des Geräts führen!
• Die Sonde nimmt eine wasserdichte IP67-Schicht an, bitte seien Sie
vorsichtig, wenn Sie sie verwenden, um Kratzer zu vermeiden!
• Das Material der Kamerasonde ist nicht beständig gegen hohe
Temperaturen. Stellen Sie daher bei der Überprüfung von Verbrennungsmo-
toren oder Geräten mit hoher Innentemperatur sicher, dass die
Innentemperatur abgekühlt ist, da das Gerät sonst direkt beschädigt wird!
• Wenn das Gerät beschädigt ist, zerlegen Sie es nicht selbst. Um
professionellere Dienstleistungen zu erhalten, wenden Sie sich für
Wartungsdienste an den Verkäufer oder Lieferanten.
• Kinder dürfen dieses Gerät nicht alleine verwenden, es sollte unter
Anleitung von Erwachsenen verwendet werden.
Nutzungsumgebung und Speicherumgebung
• Bei Verwendung des Geräts sollte die Umgebungstemperatur 0 bis 45°C
(32 bis 113°F) betragen.
• Bei der Lagerung des Geräts sollte die Umgebung an einem trockenen,
sauberen, öl-, wasser- und chemikalienfreien Ort sein.

Produkteinführung
• Halten Sie die Taste für 2 Sekunden gedrückt, um das
Endoskop einzuschalten/auszuschalten.
• Einmal drücken, um ein Foto aufzunehmen.
• Halten Sie diese Taste 2 Sekunden lang gedrückt, um die
Videoaufnahme zu starten oder zu beenden.
• Klicken Sie diese Taste, um den LED-Lampen der Kamera
zu dimmen.
• Den Cursor nach oben zu bewegen.
• Klicken, um das Echtzeit-Bild um 180° umzudrehen
• Halten Sie den Button gedrückt, um zwischen Hauptkamera/-
Seitenkamera umzuschalten. (Nur bei der Dual-Kamera-Version
wird der Dual-Kamera-Modus unterstützt, bei dem das
Echtzeitbild der Haupt/Seitenkamera gleichzeitig auf denselben
Bildschirm projiziert werden kann)
• Klicken Sie diese Taste, um die LED-Lampen der Kamera
aufzuhellen.
• Den Cursor nach unten zu bewegen.
• Klicken Sie diese Taste, um die Auswahl im Menü zu bestätigen.
• Halten Sie den Taste, gedrückt, um das Album zu öffnen/schließen.
• Klicken Sie diese Taste, um ins Menü zu gelangen.
10
3
4
5
6
2
1
7
6
1
3
7
5
4
2

LED-Anzeige für Ladestatus
TF-Karte Steckplatz
10
11
• Klicken Sie kurz auf die Reset-Taste mit dem Reset-Stift,
um das Gerät herunterzufahren
Reset-Taste
8
9
• Unterstützt bis zu 32G TF-Karte.
• Bitte formatieren Sie sie bei der ersten Verwendung.
Ladeanschluss Micro-USB
• Aufladen (Verbinden Sie das Netzteil mit dem Micro-USB-Kabel)
• Datenübertragung (Micro-USB-Datenkabel an PC angeschlossen)
11
Einführung in die UI
Fotoshooting / Video
Haupt-Kamera
Status der TF-Karte
Seiten-Kamera
Bilddrehung 180°
• Rote LED-Anzeige blinkt: Ladestatus
• Rote LED-Anzeige bleibt an: Ladevorgang beendet
98
11 10

1. Klicken Sie auf die MENU, um die Menüoberfläche aufzurufen,
drücken Sie die / Taste, um Language auszuwählen,
und drücken Sie dann die Taste, um die Sprachauswahl
zu öffnen.
2. Klicken Sie auf die Taste / , um die Sprache
auszuwählen, die Sie umschalten möchten, und drücken Sie dann
die Taste , um die Sprache erfolgreich umzuschalten.
3. Klicken Sie auf die Taste MENU, um zum Hauptbildschirm
zurückzukehren.
1. Einmaliges Drücken der zum Aufnehmen eines Fotos.
2. Langes Drücken zum Starten oder Beenden der Videoaufnahme.
Die Standardsprache des Geräts ist Englisch. Um andere
Sprachen einzustellen, führen Sie bitte die folgenden Schritte
aus, um sie einzustellen:
12
Spracheinstellung
Fotoshooting/Video

1. Wenn Sie Fotos/Videos ansehen, drücken Sie auf MENU,
um die Seite mit den Foto-/Videodetails aufzurufen.
2. Drücken Sie die / Taste, um zu wählen, ob Sie
die aktuelle Datei oder alle Dateien löschen möchten.
1. Drücken Sie im Vorschaumodus die Taste und
halten Sie sie gedrückt, um das Album aufzurufen.
2. Drücken Sie / , um das Foto/Video anzusehen,
drücken Sie , um das Video allein abzuspielen.
3. Halten Sie die Taste gedrückt, um das Album zu
verlassen.
13
Fotos/Videos ansehen
Fotos/Videos löschen

Beim Einschalten des Geräts ist das Hauptobjektiv
standardmäßig geöffnet, drücken Sie lange die Taste 2S,
um das Objektiv zu wechseln(Hauptobjektiv - Seitenobjektiv -
Display mit Dualobjektiv - Hauptobjektiv)
1. Auf der Vorschauoberfläche drücken Sie die Taste MENU, um das
Menü aufzurufen.
2. Drücken Sie / , um die Option "Format" zu wählen.
3. Drücken Sie , um die Optionsschnittstelle zu öffnen, wählen
Sie "Konfirmation".
4. Warten Sie auf die erfolgreiche Formatierung.
Objektivwechsel
Formatierung der TF-Karte
14
(Nur bei der Dual-Kamera-Version wird der Dual-Kamera-Modus unterstützt)
Konfirmation Stornieren

1. Schließen Sie das Gerät an Ihren Computer an.
2. Drücken Sie die Taste MENU, um das Menü aufzurufen.
3. Auswählen "Datenübertragung".
4. Drücken Sie die Taste, um den Kopiervorgang auf den Computer
zu starten.
Datenübertragung
Ladeanleitung
15
1. Verwenden Sie einen TF-Kartenleser, um Daten direkt zu kopieren.
1. Schließen Sie das Gerät zum Aufladen an einen DC 5V-Adapter an
2. Die rote Kontrollleuchte blinkt, wenn das Gerät aufgeladen wird, und
leuchtet immer, wenn es vollständig aufgeladen ist.
Montage des Zubehörs
Installationsmethode:
Gegen den Uhrzeigersinn
herausdrehen
Zum Anziehen im
Uhrzeigersinn drehen
Wenn das Gerät nicht mit dem Computer verbunden ist, klicken Sie auf
"Datenübertragung" auf dem Einstellungsbildschirm, das USB-Logo
erscheint auf dem Display, bitte drücken Sie die Taste MENU, um den
Vorgang zu beenden.
Es ist normal, dass "No Signal" auf dem Bildschirm erscheint, wenn Sie
die Taste MENU drücken, um die Datenübertragung zu beenden.
2. Verwenden Sie ein Micro USB-Kabel zum Anschluss an einen
Computer zum Kopieren.
Card Reader
TF
Card

5-10cm
(1.97-3.93in)
5.5mm
(0.22in)
7.9mm
(0.31in)
Typ
Display Spezifikation
Kamera-Diameter
Kamerawinkel
Video Spezifikation
Ladezeit
DS300
FHD
4,3" LCD-Bildschirm
70°
1080 p / 25 fps
3-4H
Spezifikationen
16
DS300 Dual
Camera-5m
DS300 Dual
Camera-15m
Haupt-Kamera: 3-10cm(1.18-3.93in)
Seiten-Kamera: 2-6cm(0.79-2.36in)
Optimaler
Brennweitenbereich
Fotoauflösung 1920*1080
Akkulaufzeit 2.5-3H
Ladespannung
und Stromstärke DC 5V/2A
Packliste
Endoskop
(Mit 32G TF-Karte)
Reset-Pin, Haken, Magnet, Schutzkappe,
Spiegel(Nur die Kamera von Einzelobjektiven
mit einem Seitenspiegel)
Benutzerhandbuch
Ladekabel Micro-USB Zubehör

IT
Descrizione del Prodotto
17
• DEPSTECH è una fiorente azienda tecnologica nella creazione di una vasta
gamma di endoscopi, dedicati a rendere la tua vita più sicura.
• DS300 è un endoscopio industriale ad elevate prestazioni con un display ad
alta definizione da 4,3 pollici. Che supporta le funzioni di foto e video e sono
salvati nella scheda di memoria TF (scheda Micro-SD). La telecamera
utilizza un chip CMOS ad elevata prestazioni che supporta la frequenza dei
fotogrammi di registrazione più elevato, utilizza la tecnologia Bluart 2.0 per
ottenere immagini nitide ed è ampiamente utilizzato nella manutenzione
industriale, nella manutenzione degli elettrodomestici, nella progettazione
della manutenzione meccanica e in altri settori.
• Questo prodotto è una telecamera di endoscopio industriale, non si applica
ai medici o esami umani!
• Per una maggiore durata della batteria, usata o meno, ti consigliamo di
caricare il tuo dispositivo ogni 3 mesi!
• Non tentare di sostituire la batteria integrata da soli, perché se fare un
funzionamento non professionale, può causare il rischio di lesioni personali
come il surriscaldamento della batteria.
Avvertenze Speciali e Note
Sicurezza e Protezione
• La sonda della telecamera è l'attrezzatura elettronico di elevata precisione,
si prega di non colpire la sonda della telecamera o tirare i cavi, perché si
potrebbe causare il guasto del dispositivo!
• La sonda utilizza lo strato impermeabile IP67, si prega di prestare
particolare attenzione durante l'uso per evitare di graffiarsi!
• Il materiale della sonda della telecamera non può resistere alle alte
temperature, quindi quando controllare qualsiasi motori a combustione
interna o un'attrezzatura con una temperatura interna elevata, assicurarsi
che la sua temperatura interna si sia raffreddata, altrimenti potrebbe
danneggiare direttamente l'attrezzatura!
• Per fornire servizi più professionali, se l'attrezzatura è danneggiata, si prega
di non smontarla, è necessario contattare il venditore o il fornitore per i
servizi di manutenzione.
• Non rendere i bambini usare questa attrezzatura da soli, deve usarla sotto
la guida di un adulto.
Ambiente di Utilizzo e Conservazione
• Quando si utilizza l'attrezzatura, la temperatura ambiente deve essere di
0~45°C (32~113°F)
• Quando conservare l'attrezzatura, deve metterla in un luogo asciutto, pulito,
privo di oli, acqua e sostanze chimiche.

Introduzione alla Prodotto
3
4
5
6
2
1
• Fai clic per attenuare le luci LED della telecamera
• Spostare il cursore verso l‘alto
• Fai clic per ruotare l‘immagine in tempo reale di 180°
• Tieni premuto questo pulsante per cambiare telecamera
principale/laterale (Solo per la versione a doppia
fotocamera)
• Fai clic per aumentare la luminosità delle luci LED della
telecamera
• Spostare il cursore verso il basso
• Tieni premuto questo pulsante per accedere/hiudere l‘album
• Fai clic per confermare le scelte nel menù
7• Fai clic per accedere al menù per ulteriori impostazioni
• Premi una volta il pulsante per scattare una foto
• Tenere premuto questo pulsante per 2 secondi per iniziare
o terminare la registrazione video
18
• Si prega di tenere premuto questo pulsante per 2 secondi
per accendere/spegnere l‘endoscopio.
6
1
3
7
5
4
2
Other manuals for DS300
3
Table of contents
Languages:
Other Depstech Industrial Equipment manuals
Popular Industrial Equipment manuals by other brands
SCHUNK
SCHUNK ROTA THW plus Series Assembly and operating manual
STAMPLINE
STAMPLINE S-200 Maintenance and user guide
Grizzly
Grizzly T26472Z owner's manual

Carlisle
Carlisle BINKS E420 operating manual
fann
fann EkoTreat Max WiFi installation instructions
Grifo
Grifo SM Manual of installation, use and maintenance
