manuals.online logo
Brands
  1. Home
  2. •
  3. Brands
  4. •
  5. Desa
  6. •
  7. Air Conditioner
  8. •
  9. Desa AC 10 R User manual

Desa AC 10 R User manual

Other manuals for AC 10 R

1

This manual suits for next models

2

Other Desa Air Conditioner manuals

Desa AC 15 M EHP User manual

Desa

Desa AC 15 M EHP User manual

Desa AC 10 R User manual

Desa

Desa AC 10 R User manual

Desa SPV 12 EH User manual

Desa

Desa SPV 12 EH User manual

Desa AC 14 EHP User manual

Desa

Desa AC 14 EHP User manual

Desa DS-12CH User manual

Desa

Desa DS-12CH User manual

Desa AC 12 EHP User manual

Desa

Desa AC 12 EHP User manual

Desa SPV 12 EH User manual

Desa

Desa SPV 12 EH User manual

Desa AC 9410 EH User manual

Desa

Desa AC 9410 EH User manual

Desa AC 90 E User manual

Desa

Desa AC 90 E User manual

Desa AC 12 EHP User manual

Desa

Desa AC 12 EHP User manual

Popular Air Conditioner manuals by other brands

Fujitsu ASYG 09 LLCA installation manual

Fujitsu

Fujitsu ASYG 09 LLCA installation manual

York HVHC 07-12DS Installation & owner's manual

York

York HVHC 07-12DS Installation & owner's manual

Carrier Fan Coil 42B Installation, operation and maintenance manual

Carrier

Carrier Fan Coil 42B Installation, operation and maintenance manual

intensity IDUFCI60KC-3 installation manual

intensity

intensity IDUFCI60KC-3 installation manual

Frigidaire FAC064K7A2 Factory parts catalog

Frigidaire

Frigidaire FAC064K7A2 Factory parts catalog

Sanyo KS2432 instruction manual

Sanyo

Sanyo KS2432 instruction manual

LG MultiV Series installation manual

LG

LG MultiV Series installation manual

CLIMAVENETA a-CHD U-2T 606+2209 OPERATING AND INSTALLATION Manual

CLIMAVENETA

CLIMAVENETA a-CHD U-2T 606+2209 OPERATING AND INSTALLATION Manual

Midea EWK06CW5 user manual

Midea

Midea EWK06CW5 user manual

Pioneer FAB Series installation manual

Pioneer

Pioneer FAB Series installation manual

SPT WA-1511S user manual

SPT

SPT WA-1511S user manual

Mitsubishi Electric Mr.Slim MSZ-A24NA operating instructions

Mitsubishi Electric

Mitsubishi Electric Mr.Slim MSZ-A24NA operating instructions

Mitsubishi Electric PUHZ-RP50VHA4 Service manual

Mitsubishi Electric

Mitsubishi Electric PUHZ-RP50VHA4 Service manual

Panasonic CS-S18HKQ Service manual

Panasonic

Panasonic CS-S18HKQ Service manual

Panasonic CS-E15NKE3 operating instructions

Panasonic

Panasonic CS-E15NKE3 operating instructions

Gree GWH18TC-K3DNA1B/I Service manual

Gree

Gree GWH18TC-K3DNA1B/I Service manual

Friedrich ZoneAire Compact P08SA owner's manual

Friedrich

Friedrich ZoneAire Compact P08SA owner's manual

Daikin R32 Split Series installation manual

Daikin

Daikin R32 Split Series installation manual

manuals.online logo
manuals.online logoBrands
  • About & Mission
  • Contact us
  • Privacy Policy
  • Terms and Conditions

Copyright 2025 Manuals.Online. All Rights Reserved.

Please read and retain this manual for future reference
PORTABLE AIR CONDITIONER
AC 10 R / AC 12 R / AC 12 EHP
INSTRUCTION MANUAL
Downloaded from AC-Manual.com Manuals
All manuals and user guides at all-guides.com
all-guides.com
SPECIFICATION
Model AC 12 EHP AC 10 R AC 12 R
Cooling capacity * 3500 W 2930 W 3500 W
Heating capacity * 3210 W - -
Power/Ampere consumption for cooling * 1230W / 5.5A 1040 W / 4.7A 1230 W / 5.5A
Power/Ampere consumption for heating * 1140W / 5.0A - -
Air volume 400 m3/h
Humidity removal capacity* 1.8 l/h 1.2 l/h 1.4 l/h
Recommended room size 70 m3 55 m3 70 m3
Power supply 220-240V, ~50Hz
Compressor rotary
Refrigerant R410a
Fan speed 3
Timer 24 h
Working temperature Cooling: 18 ÷ 32oC
Heating: 5 ÷ 27oC
Sleep function yes
Active carbon filter yes
Exhaust pipe Dia: 127 x 1500 mm
Net Weight 32 kg 30 kg 32 kg
Dimension 482 x 380 x 750 mm
1
REMARK:
1. The data marked with '*' may vary for technical reasons: for greater precision, please refer
to the rating label placed at the back of the unit.
2. Measuring condition for above is:
o o o o
Cooling DB 27 C, WB 19 C, Heating DB 20 C, WB 12 C
Downloaded from AC-Manual.com Manuals
All manuals and user guides at all-guides.com
2
BEFORE USE
GENERAL SAFETY
Electrical safety
FOR MAXIMUM EFFICENCY
!Only use in the upright Position on A flat
level surface and At least 50cm FROM ANY
OBJECTS (Fig 1 & 4).
!Do not PLACe objects on the unit or
RESTRICT AIR INLET / outlet (fig. 2).
!Closely supervise any children AND PETS
when UNIT is in use.
!For indoor use only.
!Switch off and unplug when not in use.
!Do not use in humid or wet environments
(Fig 3)
!Do not pull the UNIT along by the cord.
!IF THE SUPPLY CORD IS DAMAGED, IT
MUST BE REPLACED BY AN
ELECTRICIAN OR SIMILARLY QUALIFIED
PERSON, TO AVOID HAZARD.
!Do not exceed the recommended room size
!Close doors and windows
!Keep curtains of blinds closed during the
sunniest part of the day
!Keep filters clean
!Once room has reached the desired
conditions, reduce temperature and
ventilation settings
Fig. 1.
Fig. 2.
Fig. 3.
Fig. 4.
Downloaded from AC-Manual.com Manuals
All manuals and user guides at all-guides.com
3
PARTS
1. Control Panel
2. Air outlet
3. Carrying handle
4. Caster
5. Filter frame for Evaporator Air Inlet
6. Filter frame for Condenser Air Inlet
7. Cord hanger
8. Water stopper for water tray (Dehumidifying
water)
9. Adaptor for Exhaust pipe (exhaust pipe to be
fixed here)
10. Water stopper
11. Inward adaptor - for insertion over hose and
into back of the air conditioner.
12. Outward adaptor - for insertion over hose and
into foam strip (or into hole in the
wall/window).
13. Exhaust hose
14. Round cap for filling the hole in wall/window.
15. Drain tube for continuous drainage
16. Remote control (for electronic type only)
17. Foam strip - for filling the open window space
and with hole for connection to exhaust hose.
18. Active carbon filter
Front Back
Accessories
Downloaded from AC-Manual.com Manuals
All manuals and user guides at all-guides.com
INSTALLATION
4
Installation of the exhaust pipe
The unit is a portable air conditioner that may be moved from room to room.
1. Using the foam strips
Foam strips
!Offer foam strips to the window gap and cut to size if necessary.
!Feed exhaust hose through the foam strip and insert strip into window gaps as shown and
slide window across so that foam is held securely. This technique may also be used for
sash windows.
Note: Take care to maintain protection against intruders
2. Using the adaptor
Wall or Window
Outward adaptor
!Cut a 136mm diameter hole in the wall or window.
!Feed exhaust hose through the window or wall and attach the threaded adaptor from the
outside as shown.
!When not in use, plug the hole with the cover provided.
Fig. 8.
Fig. 9.
Fig. 10.
Downloaded from AC-Manual.com Manuals
All manuals and user guides at all-guides.com
5
Mounting of the exhaust pipe
!Use only the hose provided and clip
exhaust hose and unit adaptor to the back
of the air conditioner
!Avoid kinks and bends in the exhaust hose
as this will cause expelled moist air to build
up causing the unit to overheat and shut
down. Fig 11 & 12 show correct position
!The hose may be extended from 300mm to
1500mm but for maximum efficiency use
the shortest length possible.
WARNING!
The length of the exhaust pipe is specially
designed according to the specification of this
product. Do not replace or prolong it with your
own private hose as this could cause the unit
to mal-function.
Fig. 11.
Fig. 12.
Fig. 13.
Fig. 14.
Downloaded from AC-Manual.com Manuals
All manuals and user guides at all-guides.com
all-guides.com
6
Installation of the carbon filter
1. Remove the filter frame from the unit.
2. Remove the active carbon filter from
its plastic bag.
3. Insert the active carbon filter into the
filter frame.
4. Re-fit the filter frame inside the unit.
1
4
23
OPERATION
for electronic type
Control panel
123456789
1. Button for UV or Ionizer function (this
is only for the model with UV or
Ionizer function)
2. Sleep function button
3. Timer
4. 'Temperature down' button
5. LCD display
6. 'Temperature up' button
7. Speed (ventilation)button
8. Mode (function) option button 9. ON/OFF
(power) button
Fig. 15 Fig. 16
Downloaded from AC-Manual.com Manuals
All manuals and user guides at all-guides.com
5. : Fan indicator. Under Fan mode,
the symbol would be turning
around.
6. : Heating Function indicator (either
Heating Pump or PTC heater).
Under Heating mode, the heating
symbol would be ON and the
symbol would be turning around,
too. The fan speed could be
adjusted as you need.
7. : TIMER Indicator, ranging from 1 to
24 hours.
8. : UV Function indicator – it is not
available in this model
9. : Ionizer Function indicator – it is not
available in this model
10. : Sleeping Function indicator.
11. : Temperature Indicator.
7
LCD Display:
1
2
3456
7
8
9
10
11
12
1. : Fan Speed indicator. Total 3
speed LOW-MED-HIGH (one
block means one speed).
2. : Auto Mode indicator - Auto
Cooling, Auto Fan, and Auto
Heating function.
3. : Cooling Function indicator.
Total 3 speed LOW-MED-HIGH
(one block line is one speed).
When cooling function is
running, the block line would
Flash.
4. : Dehumidifying Function or
Water Full indicator. Under
Dehumidifying function, the
symbol of water tank and 3
drops in the middle would
Flash.. When running Water
Full function, the symbol of
water tank and the 2 small
drops would Flash.
Fig. 18.
Downloaded from AC-Manual.com Manuals
All manuals and user guides at all-guides.com
8
Turning ON/OFF
1. Press ON/OFF button, the unit will start automatically. If the ambient temperature is
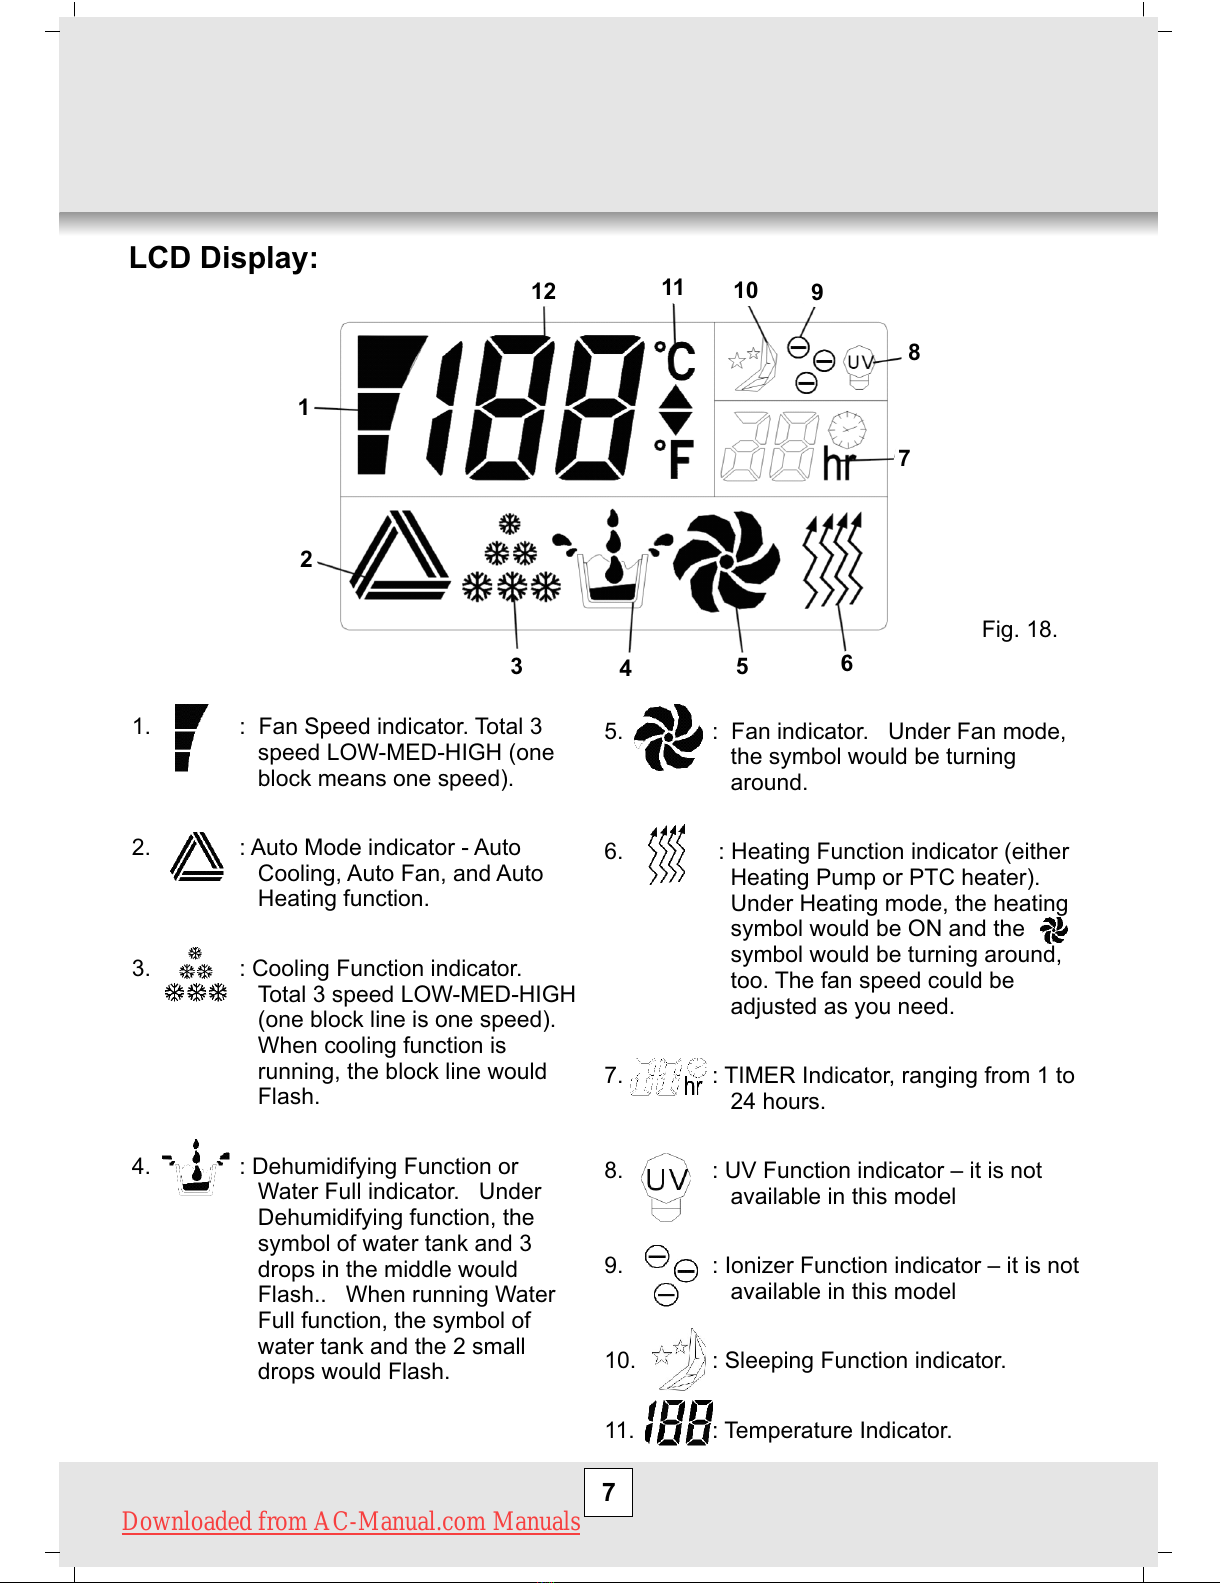
2. In the LCD monitor, sign of the functions in progress come on at the same time.
3. To turn the unit off, press ON/OFF button again.
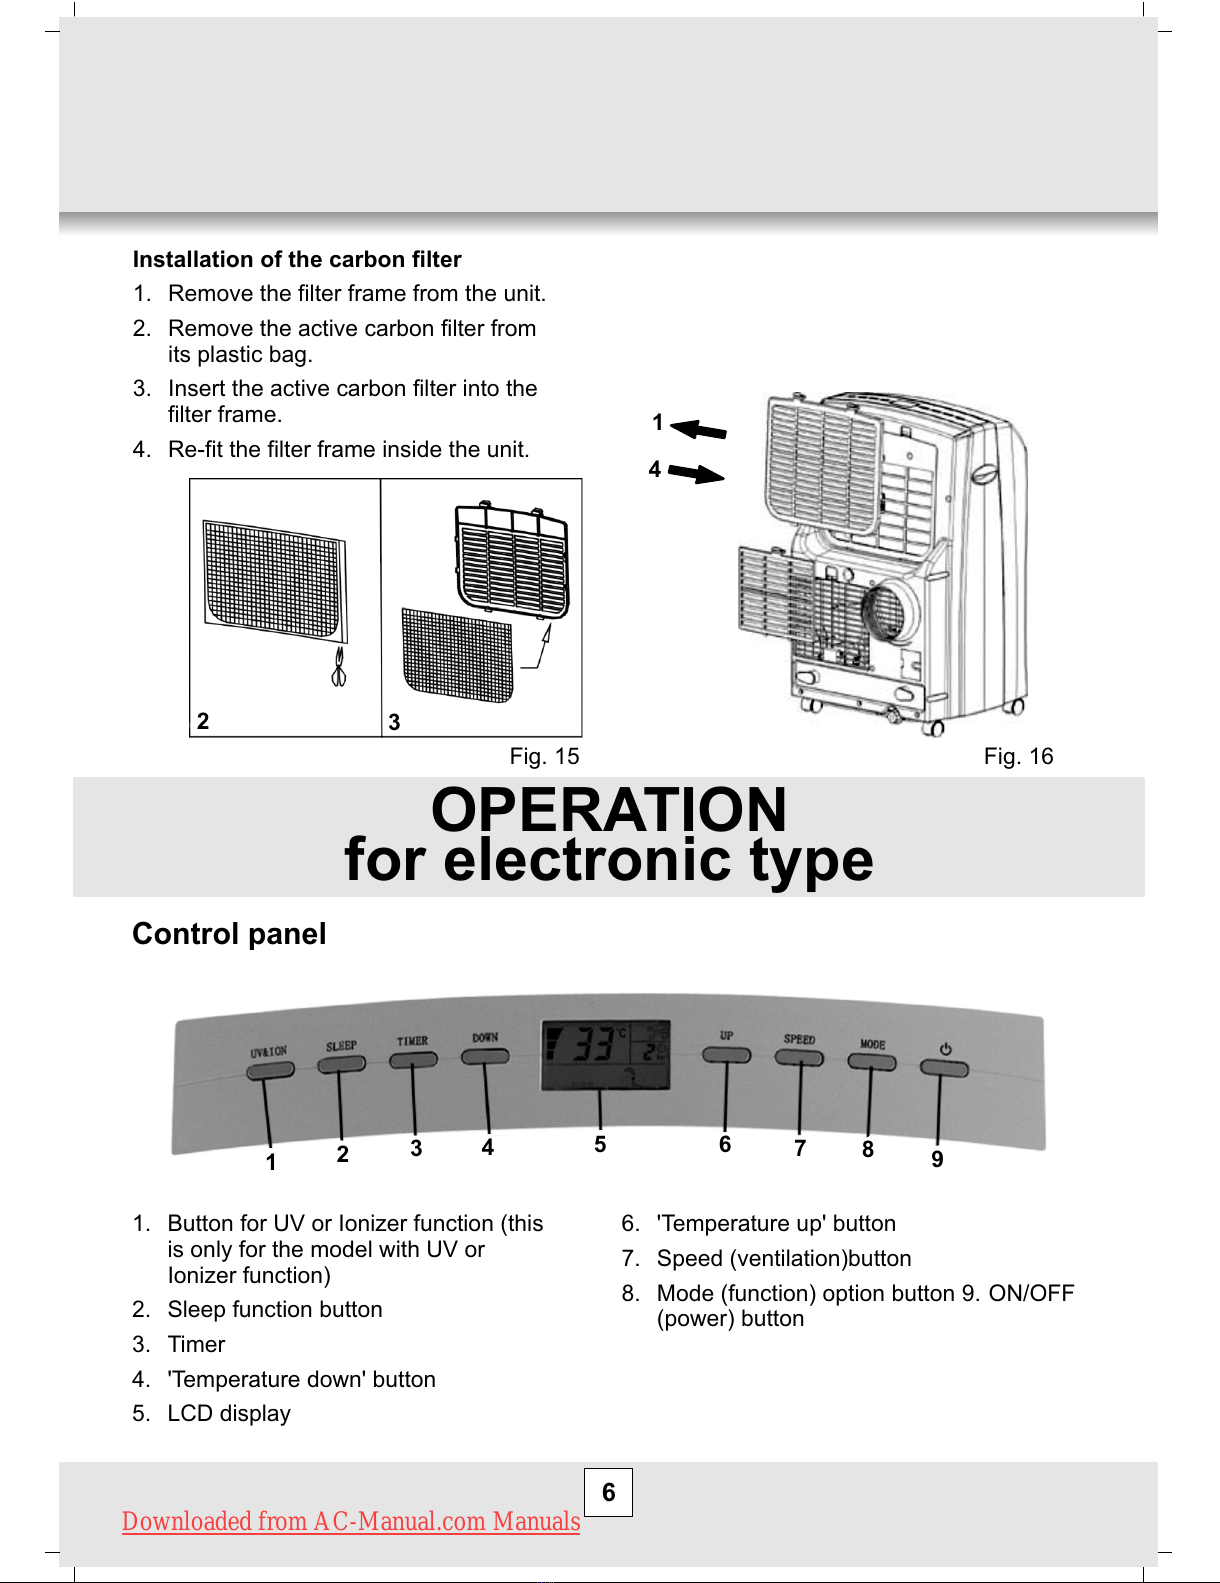
Setting mode/function
Press MODE button to select required working mode: automatic, cooling, fan,
dehumidification or heating, (Heating is only available for heating & cooling models.)
Sign of your selected mode comes on.
Setting temperature
1. Press 'Temperature up' or 'Temperature down' button to regulate the temperature you
desired.
2. The display window will show the temperature you set as you press 'Temperature up' or
'Temperature down' button. Otherwise, it will always show the ambient temperature.
o o
3. The pre-setting temperature of this machine is: 24 C for cooling, 20 C for heating.
Setting ventilation speed
1. Press SPEED button to choose the ventilation speed you need, high, medium or low. The
sign of high, low or medium ventilation will light on at the same time.
2. If the unit is in AUTO mode, it will choose the ventilation speed automatically according to
the ambient temperature.
Setting timer
1. Press TIMER button to set the operating hours you desired (1 to 24 hours, the sign of
timer will light on). When the set time has been reached, the machine will turn off
automatically. The LCD will show the hour(s) you set as you press TIMER button. If the
timer button is not pressed, the unit will work continuously.
2. By pressing the timer but without turning on the other functions, you can PRE-SET the
time for the machine to work. For example, if you press the timer to '2', the unit will work
automatically after 2 hours.
o
!> 23 C, the unit will work in cooling model.
o o
!> 20 C but < 23 C, the unit will work in ventilation model.
!below 20oC, the unit will work in heating function (This is for cooling & heating models
only.),
Downloaded from AC-Manual.com Manuals
All manuals and user guides at all-guides.com
9
Sleep function
o
1. In cooling mode, by pressing the SLEEP button, the set temperature will increase 1 C at
o
the 1st hour, another 1 C at the second hour, then keeps at that temperature.
o
2. In heat mode, by pressing the SLEEP button, the set temperature will descend 1 C at the
o
1st hour, another 1 C at the second hour, then keeps at that temperature.
3. In sleep mode, the ventilation will keep at low speed. Re-press the SLEEP button, the
setting temperature and ventilation speed will return to the pre-selected one.
4. The unit will shut down automatically after the SLEEP function running for 12 hours.
5. Please note, the sleep function is not available while the machine is working in ventilation,
dehumidification or auto mode. Only available in Cooling or Heating mode.
6. When the machine is in Sleeping function, the Fan Speed would turn to be LOW speed.
Dehumidification function
In dehumidification mode, the temperature cannot be adjusted, the ventilation will fix at low
speed.
Heating function (This is optional, only for cool & heat model.)
The air conditioner has heating function (heat pump).
When using this function, the ambient warm air is recycled and use to heat the area where it
is required. Under this system, the machine can run at HIGH/MED./LOW speed.
Self-diagnosis
This machine is equipped with self-diagnosis function. If something is wrong in the machine,
the LCD will show the word “E1” or “E2”. As this time, please call your service center.
** E1: the ambient temperature sensor head (with white socket) is short-cut.
** E2: the temperature sensor head of evaporator copper tube (with blue socket) is short-cut.
To check the sensor socket of PCB inside the electronic box, to see if any loosen.
Fig. 19.
All the above functions can also be
performed with the supplied remote
control.
This remote control requires 2 pcs
AAA batteries to operate
Downloaded from AC-Manual.com Manuals
All manuals and user guides at all-guides.com