DESi Utopic R User manual
USER MANUAL
Wireless Motorized Cylinder

!
GENERAL INFORMATIONS and WARNINGS
- Before using your motorized cylinder, Locking way and Number of turns should be adjusted
properly. Otherwise, the device would not work in a correct way.
- For emergancy conditions, we recommend you to put the keys to an accessible place (like car,
bag etc.)
- If there is any problem with door or locking mechanism, first of all, those problems need to be
solved. Door's mechanical parts and locking mechanism should be working properly.
- If there is a problem with the device, first look to the troubleshooting part of this manual. If you
cannot solve the problem, contact with your dealer.
- All the system need to be protected from water, direct sunlight and shocks.
- Auto-rotating parts of device may cause injuries during installation. BE CAREFUL!
2

3
Controlling Options and Compatible Accessories
Wireless Fingerprint Readers
Wireless Keypad
Wireless Auto-Locking Module
Wireless Home Automation Interface
Remote Controllers
Remote Access Module
1.2. BOX CONTENT
(May vary according to model number)
1x Wireless Motorized Cylinder (with keys)
1x Charging Cable (USB)
1x Installation screw and Hex key
User Manual
1. FEATURES OF THE DEVICE
Structure
ABS Plastic
Cylinder Length
(outside) 31 mm x 35 mm (inside)
Inside part can extensile up to 47 mm
(Different cylinder lengths are available)
Batteries and Battery Life
Rechargable Lithium Ion batteries.
4 months or 2.000 operations (locking or unlocking) for 3
turn locks
Communication Capability
Bluetooth Low Energy
ISM RF 434 Mhz
4
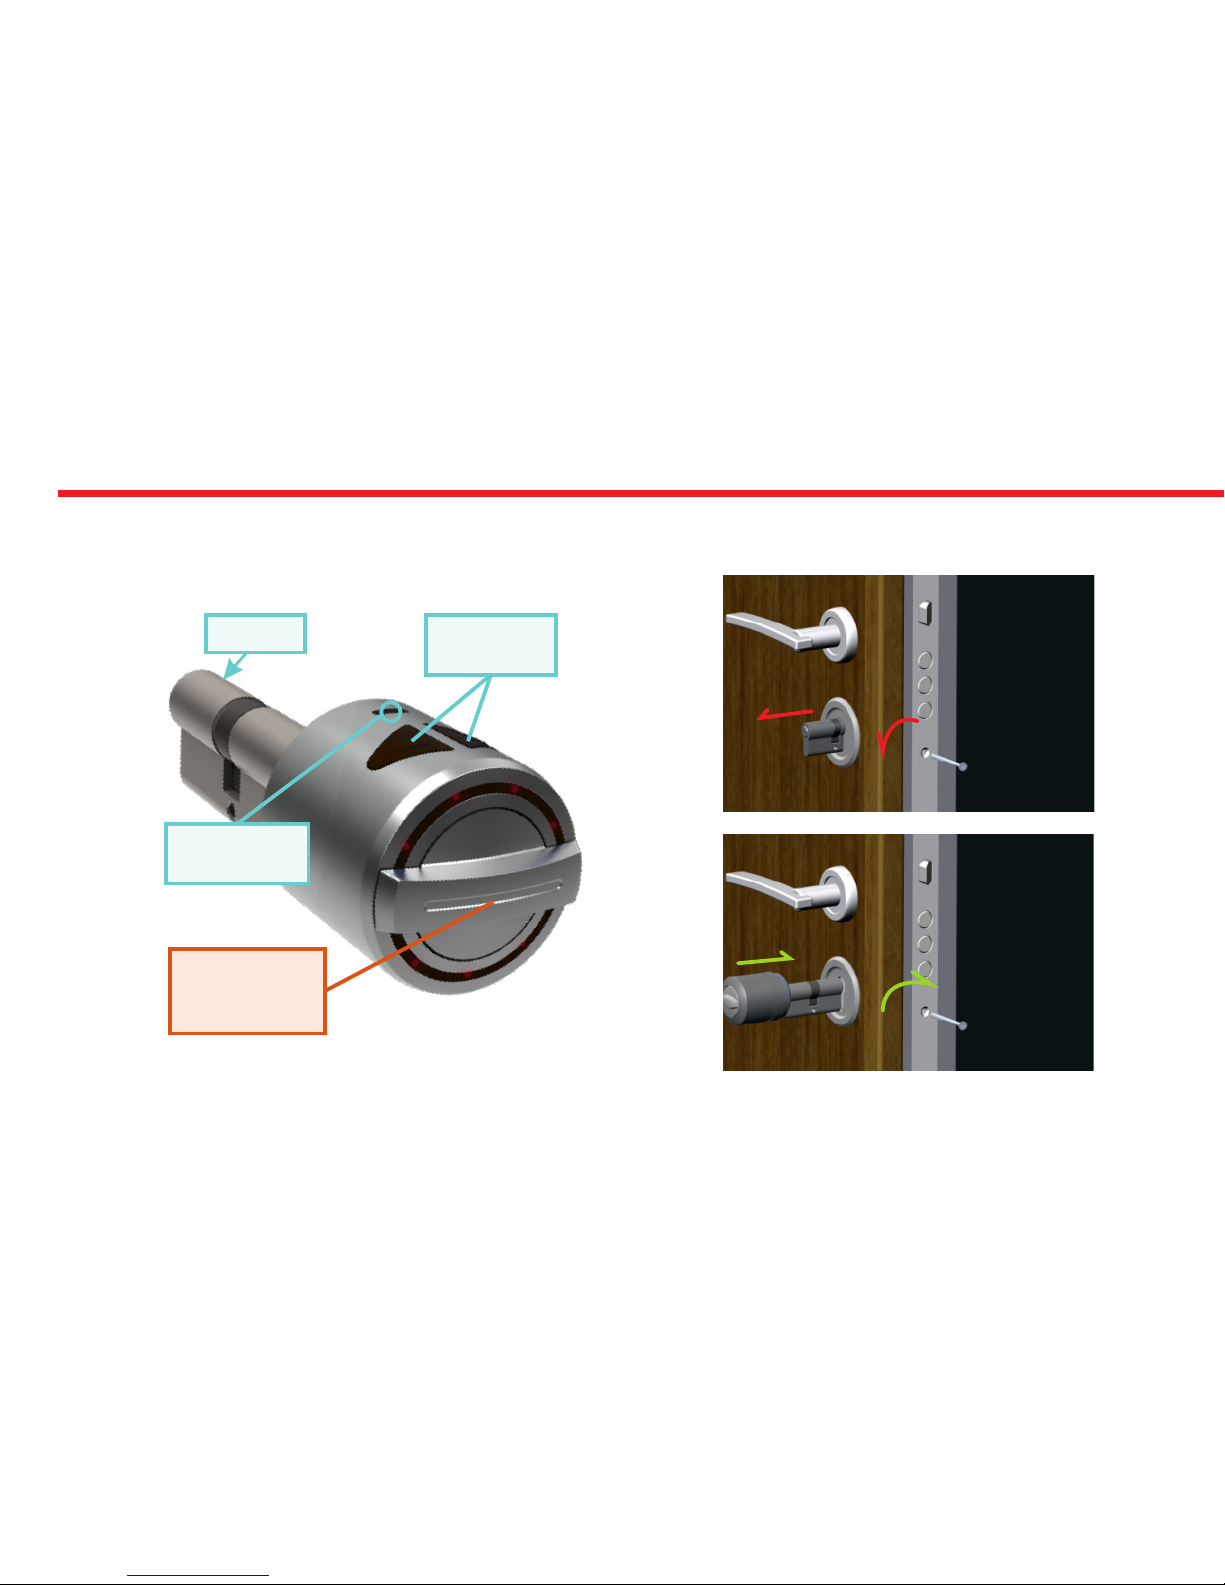
2. PARTS OF DEVICE and INSTALLATION
Control
Buttons
Cylinder
Handle for
Manual
Operation
microUSB
Charging Port
1.STEP
Remove
existing
cylinder.
2. STEP
Install
motorized
cylinder and
tighten
the screw

5
In some security doors, even if you remove cylinder screw, you cannot remove cylinder due to cramped installation of
cylinder defender. Follow the instructions below, for that kind of situations:
- Untighten screws of cylinder defender (don’t remove the screws)
- Remove cylinder screw and take out the old cylinder.
- Disassemble the motozied part from the cylinder.
- Install the cylinder part to the door and tighten the cylinder screw.
- Tighten the screws of cylinder defender.
- Assemble the motorized part with cylinder.
DETACHING / ATTACHING MOTOR AND
CYLINDER
Loosen the set screw
with hex key out of the
box. Pull the motor part out.
To attach two parts, push the motor
properly in to cylinder and tighten
the set screw. Set Screw
The first controller enrolled to motorized cylinder is accepted as master
controller. The rest of controller will be user controllers.
3. MASTER CONTROLLER AND USER CONTROLLERS
Both, master and user controllers can be used to lock/unlock the motorized cylinder but only the master controller can
change settings of motorized cylinder.
If your device’s master controller is “Wireless Fingerprint Reader V1” jump to page 6.
If your device’s master controller is “Wireless Fingerprint Reader V2” jump to page 26.
If your device’s master controller is “Smart Phone” jump to page 46.
Display
Touch Button #1
Set Screw
Touch Button #2
Wake Up Button
Sensor
WIRELESS FINGERPRINT
READER (V1)
6
In this section, you can find details about installation and
usage of Wireless Fingerprint Reader Version 1.
If motorized cylinder bundled with fingerprint reader,
it would be the master controller of your motorized cylinder.
Before you use your motorized cylinder, you should adjust it
properly according to the lock which motorized
cylinder will work together. First, you should adjust
“direction of locking (4.3.5)” and than
“number of rotation (4.3.4)”.
If you want to change the master controller of motorized
cylinder, check “HOW TO RESET MOTORIZED CYLINDER”
topic on last page.
7
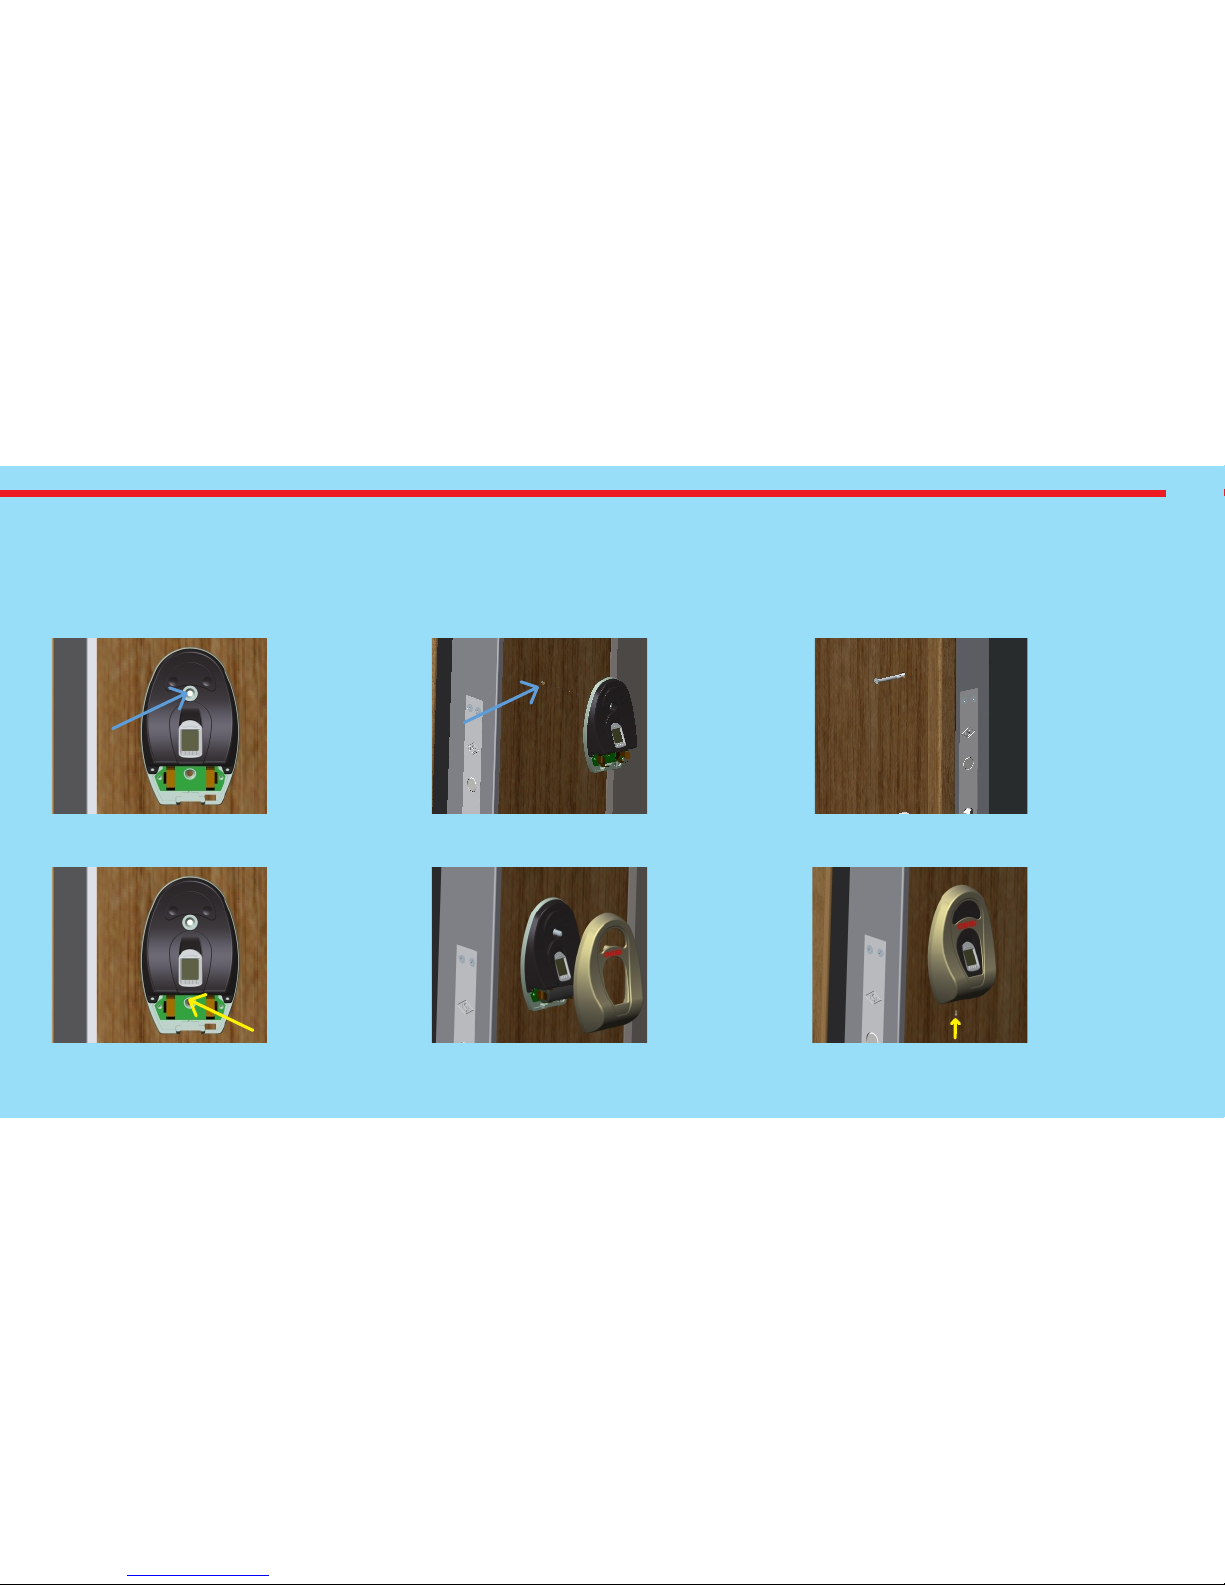
4.1. INSTALLATION OF WIRELESS FINGERPRINT READER V1
First of all, unscrew the set screw at the bottom of reader with a 19 mm (3/4") hex key and seperate metal part and plastic
part. After that, remove the battery, if it is already placed. Use one of the methods below:
4.1.1. First Method (from Inside)
1st Step1st Step1st Step 3rd Step3rd Step3rd Step
4th Step4th Step4th Step
2nd Step2nd Step2nd Step
5th Step5th Step5th Step 6th Step6th Step6th Step
Place reader
to the door
and make a
sign with a
pen through
hole.
Drill a hole
(side to side)
from signed
point with 5
mm bit.
Put the long
screw with
washer to hole
from inside.
Outcoming
part need to
be at most 12
mms.
Place reader
as in 1st step.
Tighten the
short screw
by using
pointed hole.
Install
battery and
fix the metal
cover with
long screw
installed at
3rd step.
Tighten the
set screw.
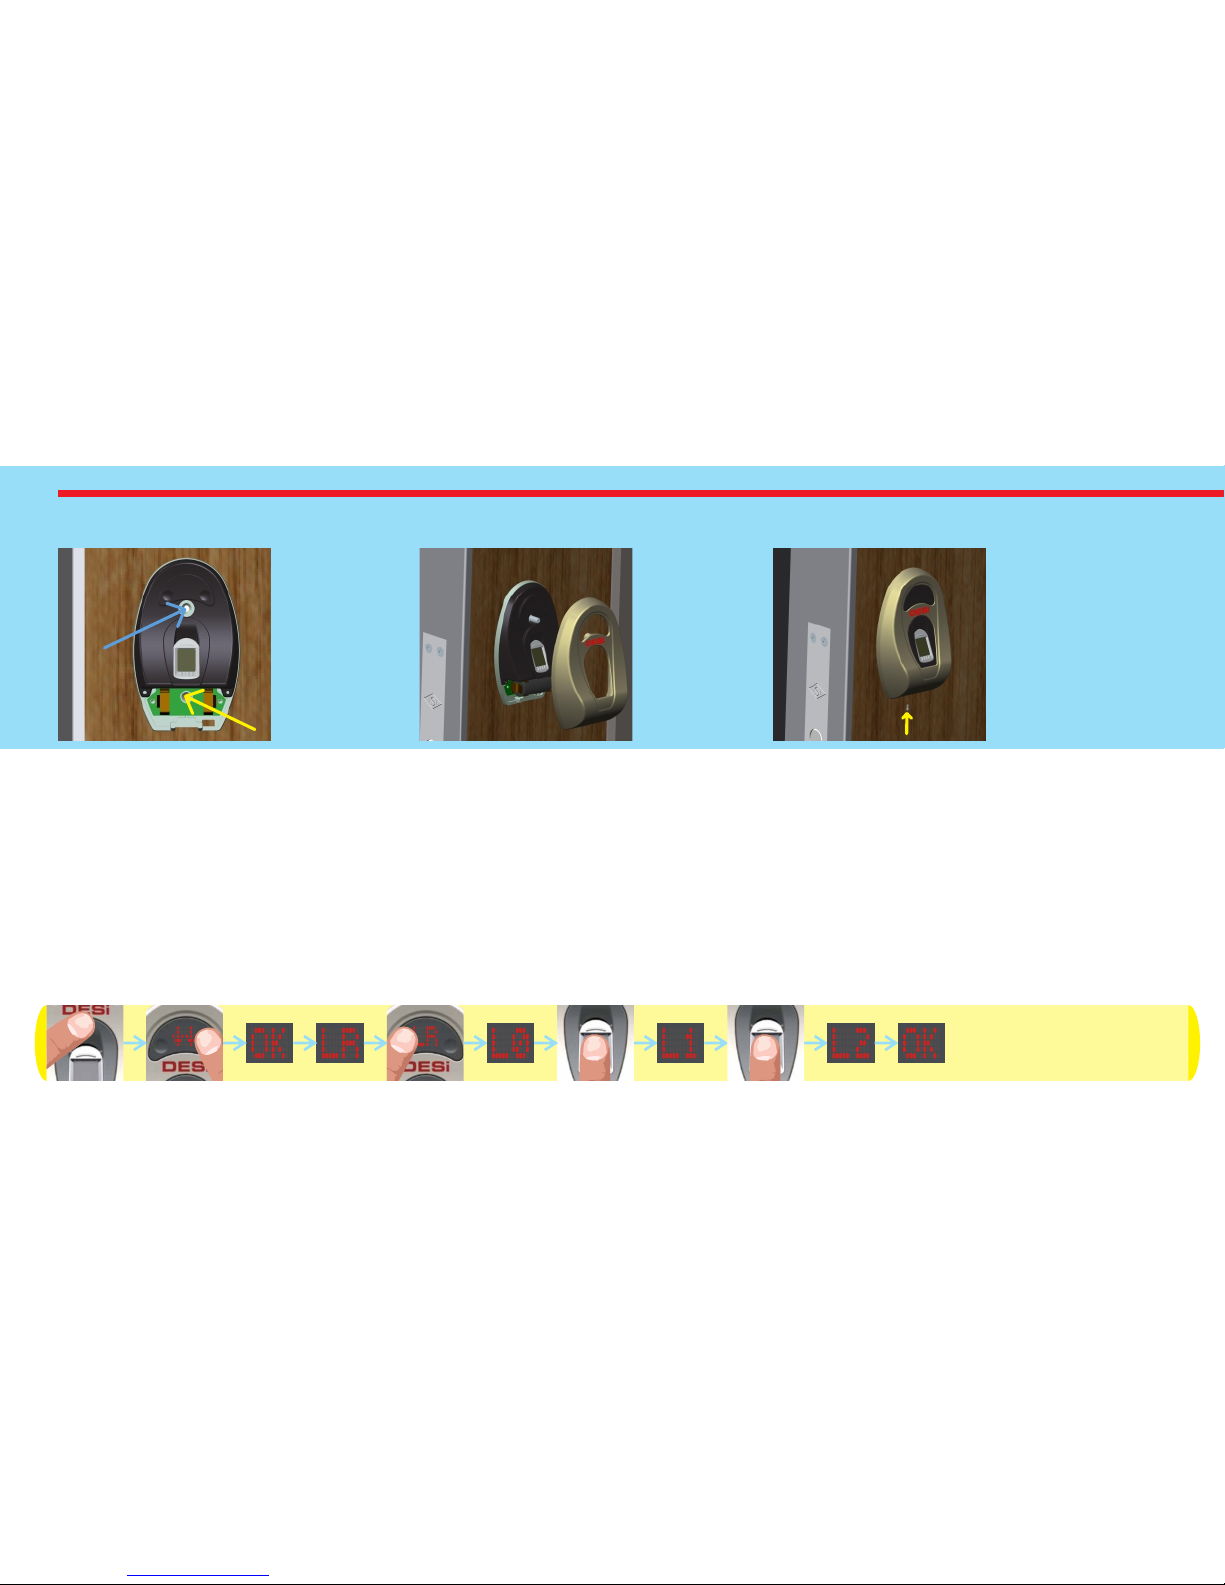
8
4.1.2. Second Method (from Outside)
4.2. ENROLLING FIRST (MASTER) FINGERPRINT
Fingerprint reader comes without any fingerprint in its memory. The first 3 fingerprints are accepted as master
fingerprints and administrative activities like enrolling or deleting fingerprint can be done by master fingerprints only.
Master fingerprints need to be chosen carefully. on’t enroll a child’s finger or a finger which is deformed D ny (or can be
d ) a eformed easily as master finger. To enroll first fingerprint:
- Touch to “wake up” and than “2". First “OK” and than “LR” will be displayed.
- Touch to “1". “L0" code will be displayed.
- Put the finger to the reader. “L1" code will be displayed.
- Put the same finger again. First “L2" and than “OK” code will be displayed.
Install
battery and
place the
metal cover.
1st Step1st Step1st Step 2nd Step2nd Step2nd Step 3rd Step3rd Step3rd Step
Place reader
to the door
and tighten it
with short
screws from
two holes.
Tighten
the set
screw.

9
4.3. SETTINGS / ADMINISTRATION MENU
You can change settings of your motorized cylinder and perform administrative activities via this menu. Before using your
smart cylinder, “number of turns” and “locking way” settings should be adjusted properly. Otherwise, it would damage the
device’s mechanical structure.
The menu items and order is as follows:
LR
DL
CL
TC
MW
UC
BU
RF
Display
Enrolling new fingerprints
Deleting enrolled fingerprints one by one
Deleting all fingerprints (Reseting fingerprint reader)
Adjusting motorized cylinder according to lock’s number of rotation to lock/unlock
Adjusting direction of locking according to door’s opening way
Showing total number of enrolled fingerprints in the device’s memory
Enabling or disabling buzzer sound (Warning tones are always active)
Enabling or disabling automatic locking mode which locks cylinder 1 minute after it is unlocked
Function
2
2
2
2
2
2
2
2
1
1
1
1
1
1
1
1
MA Enabling or disabling delayed locking which locks 5 s. after locking button on the cylinder is pressed.
1
2
ML
MD
MC
HT
Shifting the motorized cylinder to enrolling mode to learn new controllers
Deleting all controllers enrolled to cylinder except master controller.
Reporting number of controllers enrolled to motorized cylinder via buzzer sound
Adjusting latch retraction period.
2
2
2
1
1
1
1
2
* Not available in some versions of fingerprint reader.
10
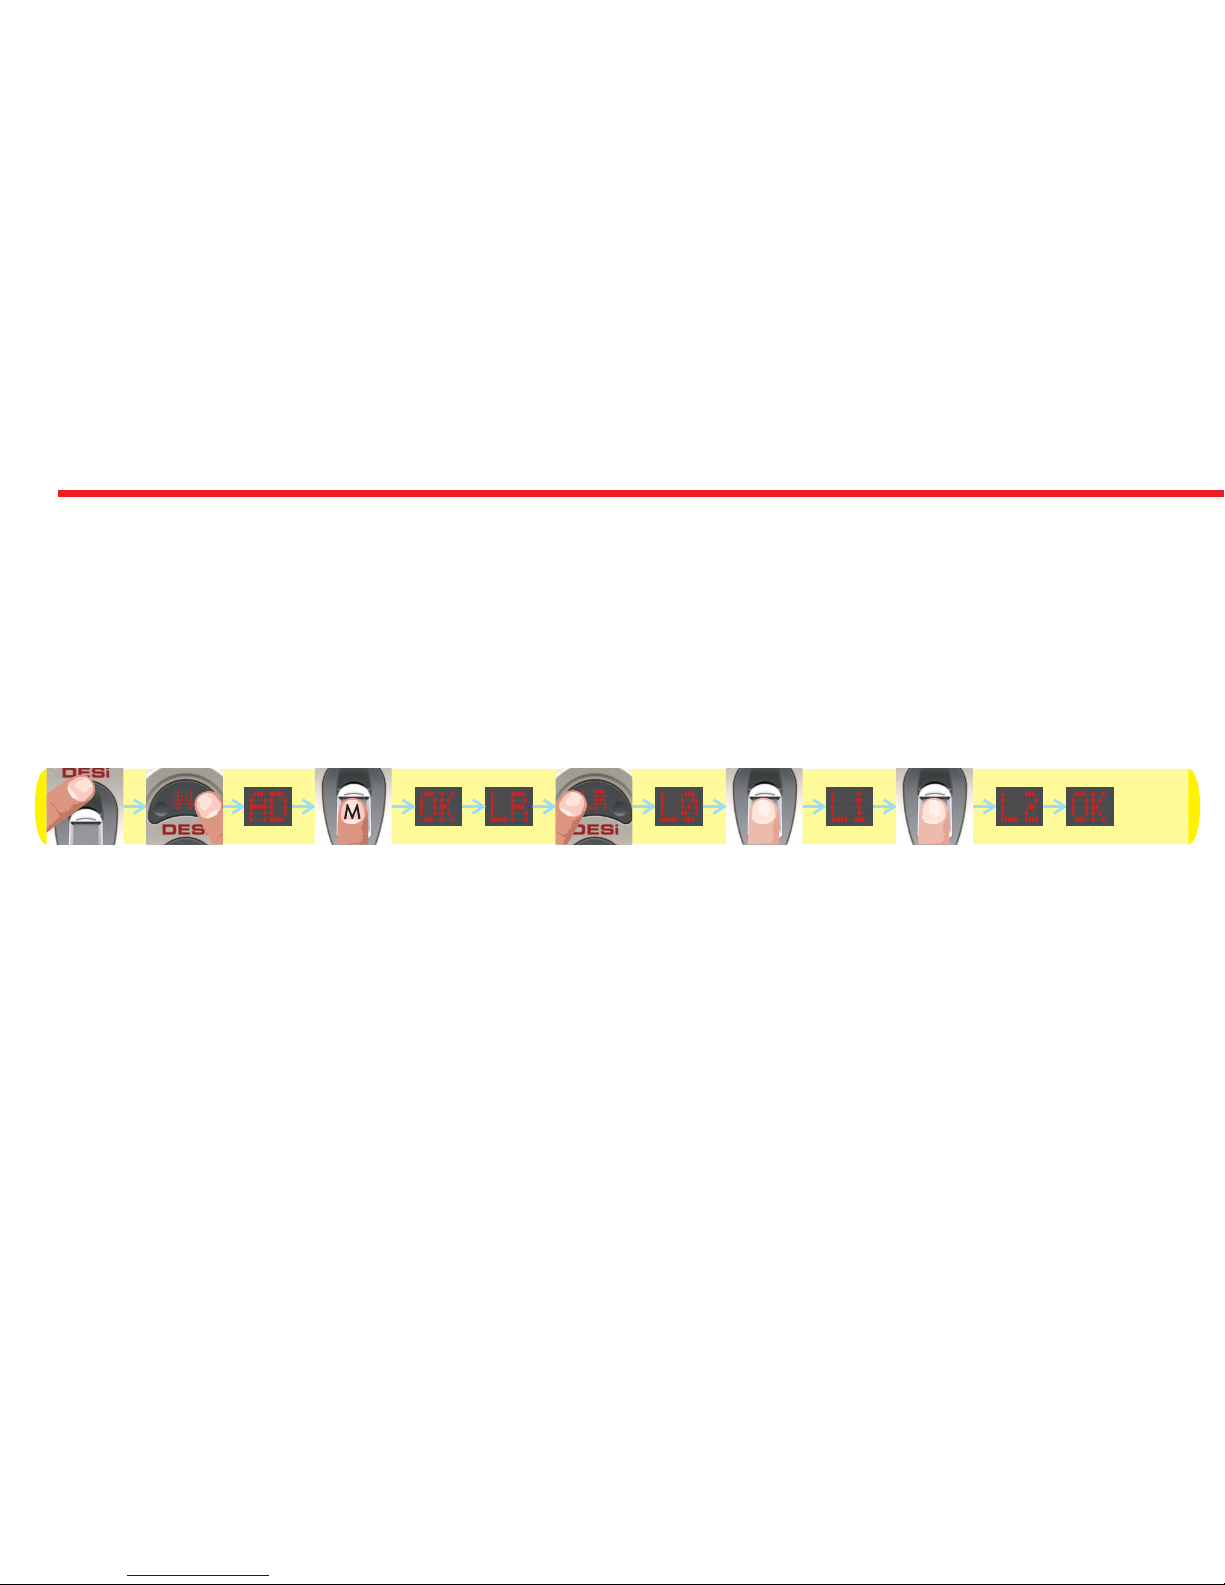
4.3.1. ENROLLING A NEW FINGERPRINT (LR)
If you want to enroll a new fingerprint to the reader, follow the steps below:
- Touch “WAKE UP”. Two arrows will appear on display. Than touch “2”. “AD” will be shown.
- Put one of the master fingers to the reader. First “OK” and than “LR” will be shown.
- Touch to “1” when “LR” is on display. “L0” will be shown.
- Put the new finger you want to enroll to the sensor. “L1” will be shown.
- Put the same finger again. First “L2” and than “OK” will be shown.
In this way, the new finperprint will be enrolled to the device. Schematic representation of operation is as follows:
NOTE 1: System assigns an id to fingers and this id is shown when finger is read.
NOTE 2: During enrollment, device reads the finger 2 times. If 2 reads don’t match, “EE” code will be displayed and reader
turns back to “L0" step. In this case, enrolling need to be repeated. Try to put your finger to the sensor in a similar way
during both read steps of enrollment

11
4.3.2.DELETING ENROLLED FINGERPRINTS ONE-BY-ONE (DL)
If you want to delete an enrolled fingerprint which you know the id number, follow the steps below:
- Touch “WAKE UP”. Two arrows will appear on display. Than touch “2”. “AD” will be shown.
- Put one of the master fingers to the reader. First “OK” and than “LR” will be shown.
- Touch to “2" till “DL” appears and touch to “1" when “DL” is on display. ”01" will be shown.
- Touch to “1" till you see the fingerprint id you want to delete and touch to “2" when related id is on display.
- “OK” will be shown.
In this way, the related finperprint will be deleted. Schematic representation of deleting a fingerprint (e.g. id is “07") is as
follows:
NOTE: System assigns an id to fingers and this id is shown when finger is read. By mistake, if you pass the id of fingerprint
you want to delete, wait a few seconds till display goes off and restart the procedure.

12
4.3.3. DELETING ALL FINGERPRINTS / RESET FINGERPRINT READER (CL)
If you want to delete all enrolled fingerprint readers (including masters) , follow the steps below:
- Touch “WAKE UP”. Two arrows will appear on display. Than touch “2”. “AD” will be shown.
- Put one of the master fingers to the reader. First “OK” and than “LR” will be shown.
- Touch to “2" till “CL” appears and touch to “1" when “CL” is on display. ”01" will be shown.
- Touch to “1" till you see “17" and touch to “2".
- “OK” will be shown.
In this way, all the finperprints (including masters) will be deleted. Schematic representation of operation is as follows:
NOTE: If you pass “17" by mistake, don’t touch any button and wait a few seconds till display goes off. After that restart the
procedure.

13
4.3.4. ADJUSTING MOTORIZED CYLINDER ACCORDING TO LOCK’S NUMBER OF ROTATION TO LOCK/UNLOCK (TC)
To adjust your motorized cylinder according to lock’s number of rotation, follows the steps below:
- First of all, close the door.
- Touch “WAKE UP”. Two arrows will appear on display. Than touch “2”. “AD” will be shown.
- Put one of the master fingers to the reader. First “OK” and than “LR” will be shown.
- Touch to “2" till “TC” appears and touch to “1" when “TC” is on display. ”AT" will be shown.
- Touch to “2". “OK” will be displayed and cylinder will automatically lock and unlock the door.
In this way, motorized cylinder will learn how many rotations is needed to lock / unlock the door. Schematic representation
of operation is as follows:

14
4.3.5. ADJUSTING DIRECTION OF LOCKING ACCORDING TO DOOR’S OPENING WAY (MW)
To adjust your motorized cylinder’s locking way according to the door, follows the steps below:
- Touch “WAKE UP”. Two arrows will appear on display. Than touch “2”. “AD” will be shown.
- Put one of the master fingers to the reader. First “OK” and than “LR” will be shown.
- Touch to “2" till “MW” appears and touch to “1" when “MW” is on display. ”MR” or “ML” will be shown.
- Touch to “1" to toggle between;
“MR” - right door,
“ML” - left door.
- When desired way is displayed, touch to “2". “OK” will be displayed.
In this way, motorized cylinder’s direction of locking will be set. Schematic representation of changing direction of locking
from right to left is as follows:
NOTE: To transfer settings to motorized cylinder, you need to lock or unlock motorized cylinder via master controller.

15
4.3.6. REPORTING TOTAL NUMBER OF ENROLLED FINGERS (UC)
To adjust your motorized cylinder’s locking way according to the door, follows the steps below:
- Touch “WAKE UP”. Two arrows will appear on display. Than touch “2”. “AD” will be shown.
- Put one of the master fingers to the reader. First “OK” and than “LR” will be shown.
- Touch to “2" till “UC” appears and touch to “1" when “UC” is on display.
In this way, number of enrolled fingerprints will be displayed. Schematic representation of this operation (which shows 8
fingerprints enrolled to reader) is as follows:
16
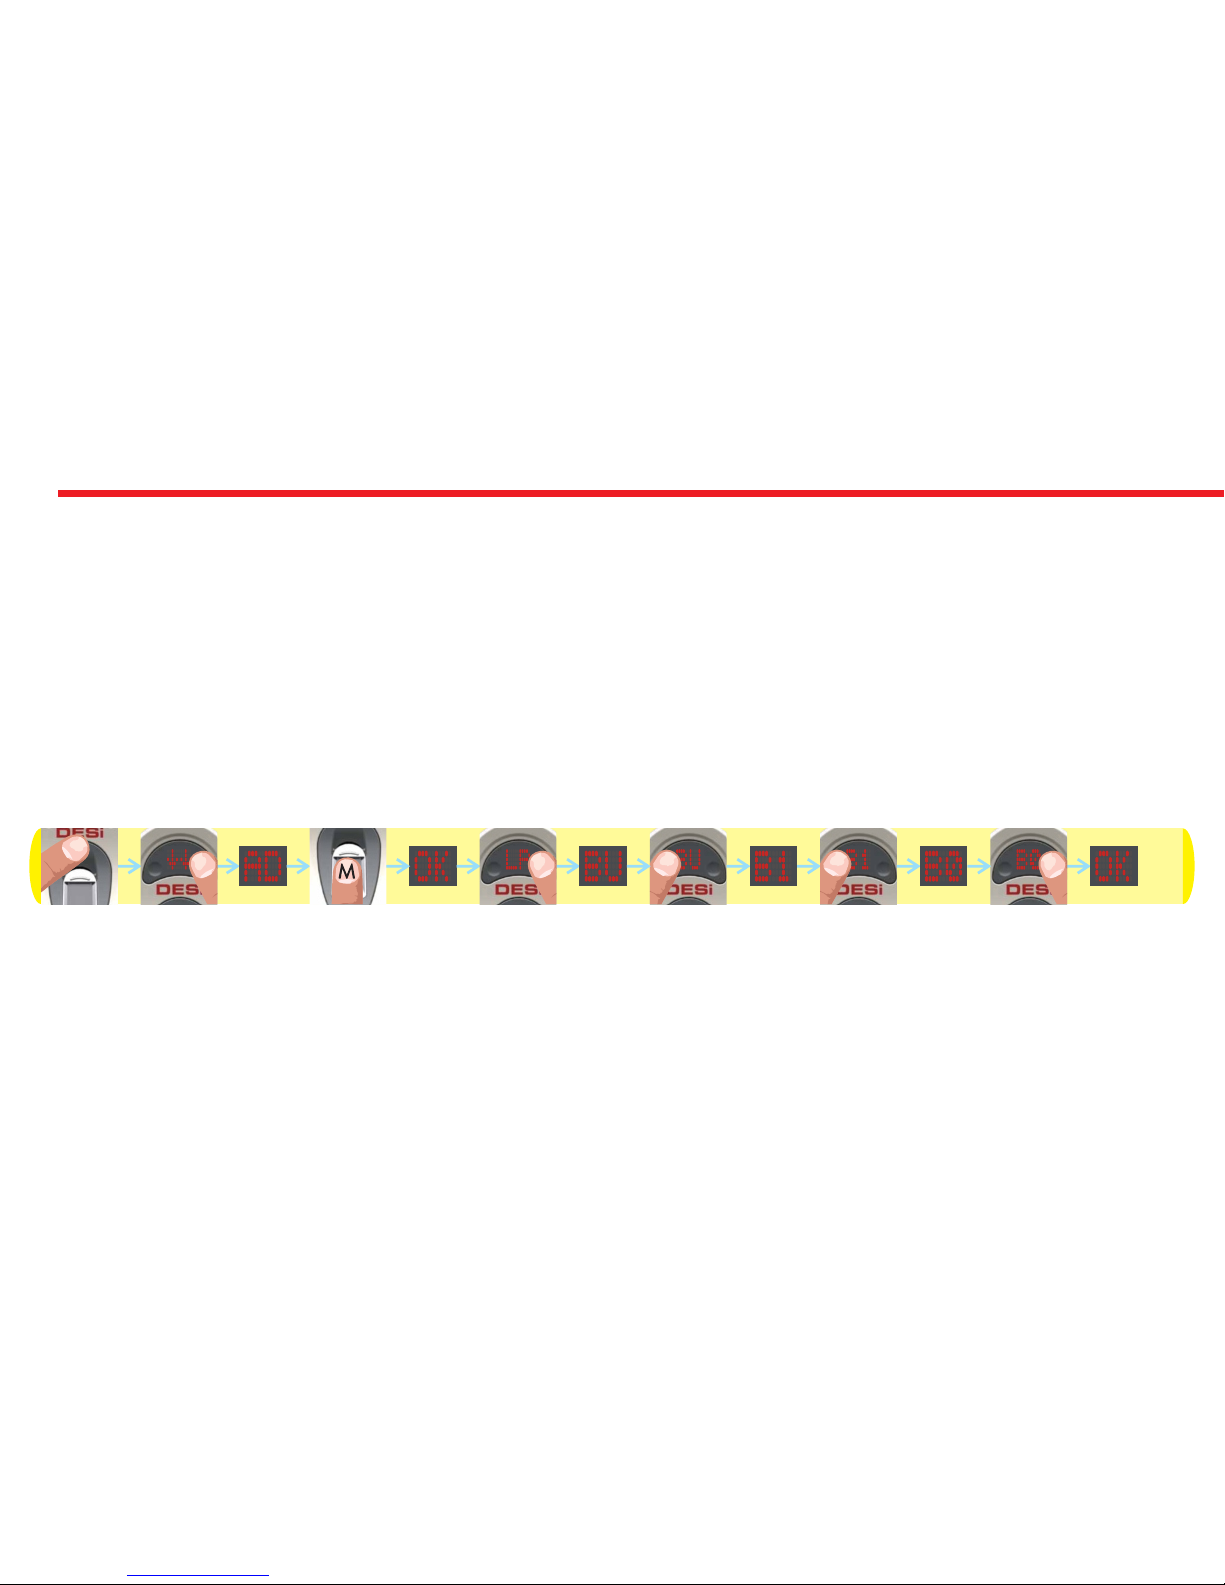
4.3.7. ENABLING OR DISABLING BUZZER SOUND (BU)
You can disabled (or enable) activation sounds by following steps below:
- Touch “WAKE UP”. Two arrows will appear on display. Than touch “2”. “AD” will be shown.
- Put one of the master fingers to the reader. First “OK” and than “LR” will be shown.
- Touch to “2" till “BU” appears and touch to “1" when “BU” is displayed. ”B0" or “B1" will be shown.
- Touch to “1" to toggle between;
“B0” - buzzer is disabled
“B1” - buzzer is enabled.
- When desired choice is displayed, touch to “2". “OK” will be displayed.
In this way, desired buzzer choice will be set. Schematic representation of disabling buzzer sound is as follows:
NOTE: To transfer settings to motorized cylinder, you need to lock or unlock motorized cylinder via master controller.

17
4.3.8. AUTO-LOCKING FEATURE (RF)
Your device has an automatic locking feature which locks itself 1 minute after it is unlocked. If you enable this feature, you
will be sure that your door is always locked.
You can enable or disable this feature by following steps below:
- Touch “WAKE UP”. Two arrows will appear on display. Than touch “2”. “AD” will be shown.
- Put one of the master fingers to the reader. First “OK” and than “LR” will be shown.
- Touch to “2" till “RF” appears and touch to “1" when “RF” is displayed. ”R0" or “R1" will be shown.
- Touch to “1" to toggle between;
“R0” - auto-locking is disabled
“R1” - auto-locking is enabled.
- When desired choice is displayed, touch to “2". “OK” will be displayed.
In this way, desired auto-locking choice will be set. Schematic representation of enabling auto-locking is as follows:
NOTE: To transfer settings to motorized cylinder, you need to lock or unlock motorized cylinder via master controller.

18
4.3.9. DELAYED LOCKING FEATURE (MA)
Your motorized cyclinder has a delayed locking feature which locks itself 5 second after you press the locking button on
the motorized cylinder. If this feature is enabled, when you are going out, if you touch locking button on motorized
cylinder and close the door in 5 seconds, it will lock the door automatically. You can enable or disable this feature by
following steps below:
- Touch “WAKE UP”. Two arrows will appear on display. Than touch “2”. “AD” will be shown.
- Put one of the master fingers to the reader. First “OK” and than “LR” will be shown.
- Touch to “2" till “MA” appears and touch to “1" when “MA” is displayed. ”M0" or “M1" will be shown.
- Touch to “1" to toggle between;
“M0” - delayed locking is disabled,
“M1” - delayed locking is enabled.
- When desired choice is displayed, touch to “2". “OK” will be displayed.
In this way, desired delayed locking choice will be set. Schematic representation of enabling delayed locking is as follows:
NOTE: To transfer settings to motorized cylinder, you need to lock or unlock motorized cylinder via master controller.

19
4.3.10. SHIFTING MOTORIZED CYLINDER TO ENROLLING NEW CONTROLLER MODE (ML)
Your motorized cylinder may learn up to 40 different controllers. To shift your motorized cylinder to enrolling new
controller mode, follows the steps below:
- Touch “WAKE UP”. Two arrows will appear on display. Than touch “2”. “AD” will be shown.
- Put one of the master fingers to the reader. First “OK” and than “LR” will be shown.
- Touch to “2" till “ML” appears and touch to “1" when “ML” is on display.
- “OK” will be displayed.
In this way, motorized cylinder will shift to enrolling new controller mode with a long warning tone. After that tone, you
need to send locking or unlocking signal via the new controller that you want to enroll to the motorized cylinder. If
enrolling will be succesful, you will hear two short warning tones from motorized cylinder.
Schematic representation of operation is as follows:

20
4.3.11. DELETING ALL ENROLLED CONTROLLERS OF MOTORIZED CYLINDER EXCEPT MASTER CONTROLLER (MD)
To delete all enrolled controllers of your motorized cylinder, follows the steps below:
- Touch “WAKE UP”. Two arrows will appear on display. Than touch “2”. “AD” will be shown.
- Put one of the master fingers to the reader. First “OK” and than “LR” will be shown.
- Touch to “2" till “MD” appears and touch to “1" when “MD” is on display. ”01" will be shown.
- Touch to “1" till you see “17" and touch to “2".
- “OK” will be shown.
In this way, motorized cylinder will delete all enrolled controllers of motorized cylinder with a long warning tone.
Schematic representation of operation is as follows:
NOTE: This operation doesn’t delete master controller from motorized cylinder’s memory. If you want to delete master
controller as well, please check “HOW TO RESET MOTORIZED CYLINDER” topic on page .....
Other manuals for Utopic R
1
Table of contents
Other DESi Door Lock manuals


Popular Door Lock manuals by other brands


Signature Hardware
Signature Hardware PIRAN 953389-DU-LH manual

Kaba Mas
Kaba Mas High Security Pedestrian Exit Device with Electric Locking... installation guide

Häfele
Häfele ER5000 installation guide

National Cabinet Lock
National Cabinet Lock C8175 Dimensional drawing

LockState
LockState RemoteLock openEDGE RG Hardware installation

ZKTeco
ZKTeco HBL100 installation guide


