Designability WizzyBug User manual

Wizzybug
Instructions for Use
DOC-025 Wizzybug Instructions for Use en-GB 4.0 November 2020

Do not use Wizzybug until these Instructions for Use have
been read and understood.
This document may be viewed in a zoomed format or with text-
to-speech enabled by downloading a digital version from
designability.org.uk/meet-wizzybug/resource-for-families.
DISTRIBUTOR CONTACT INFORMATION
(IF APPLICABLE)
Name, address, telephone, email and website:

Designability Charity Ltd.
Wolfson Centre, Department D1
Royal United Hospital
Bath BA1 3NG
United Kingdom
Tel: +44 (0)1225 824103 Fax: +44 (0)1225 824111
Website: www.designability.org.uk
Charity Number: 256335
If you need to contact Designability
please tell us your serial number.
Your Wizzybug serial number is . . . . . . . . . . . . . . . . . . . . . . . . . . . . . . . .
Battery type Lithium Iron Phosphate (LiFePO4)
Nickel Metal Hydride (NiMH)
Sealed Lead Acid (SLA)
If you have any questions about Wizzybug, or about these
instructions, contact Designability or your Wizzybug provider.
The Wizzybug is a class I medical device conforming to the
requirements of EU regulation 2017/745 and UK regulation
2002/618. Designability and the Wizzybug is registered with
relevant competent authorities (MHRA in the UK). Designability is
ISO 9001 certified, ensuring quality at all stages of the product
development and production process.

4
Contents
Important Information........................................................................................... 5
Overview of Wizzybug ........................................................................................... 8
Wizzybug Features.................................................................................................10
Accessories.................................................................................................................12
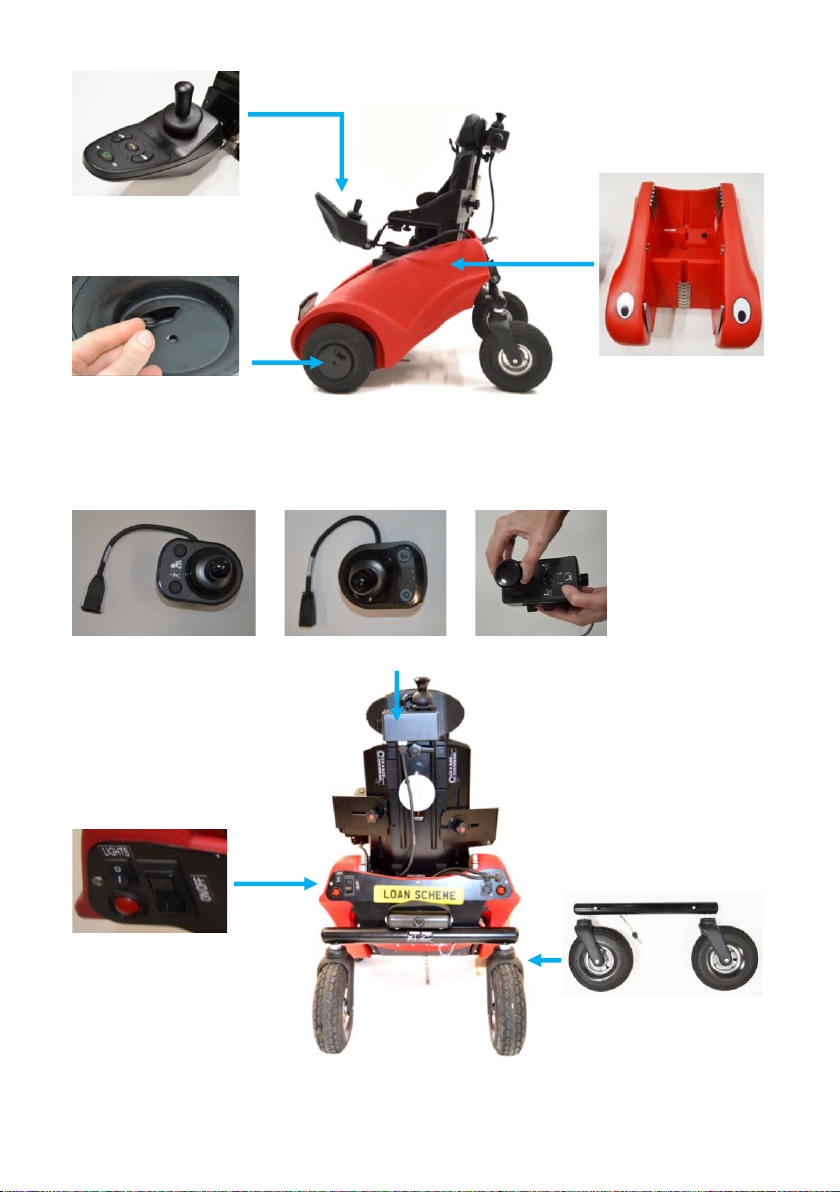
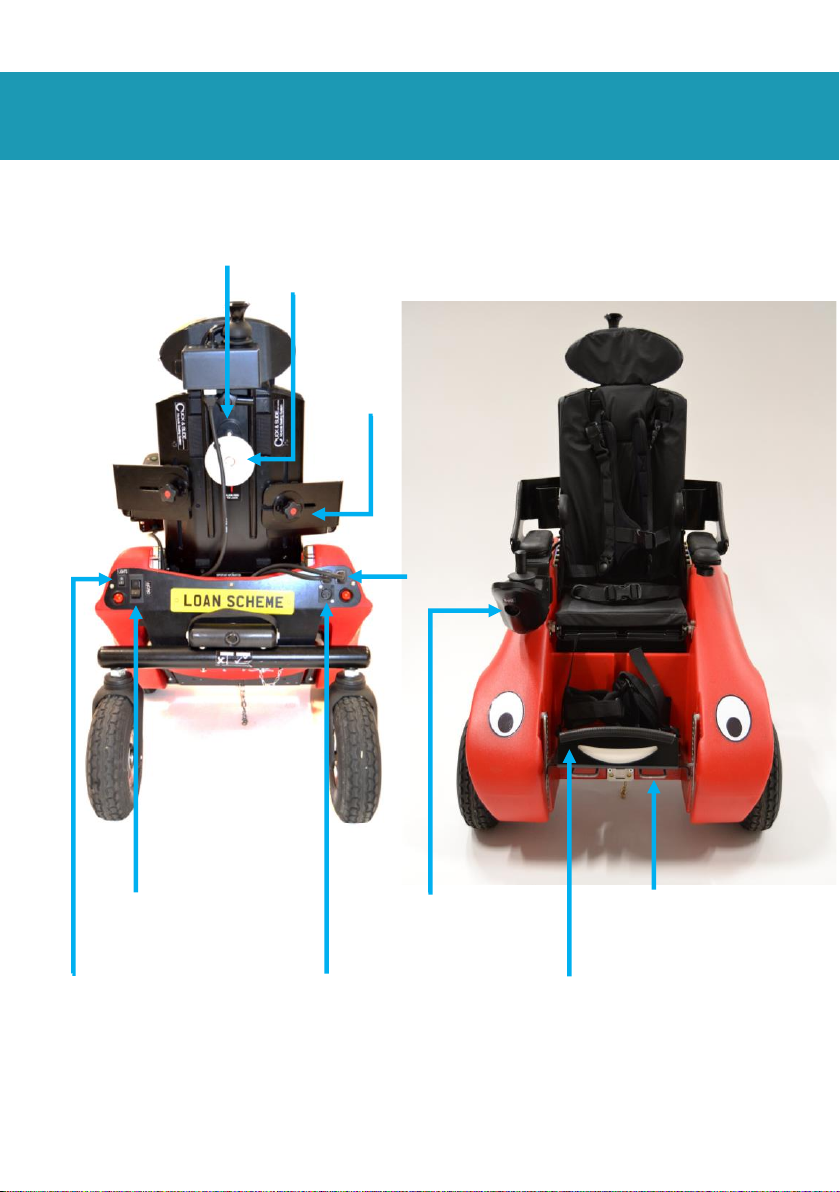
Getting to Know Wizzybug ................................................................................13
How to Put Wizzybug Together......................................................................18
Armrests and Thoracic Supports ....................................................................24
How to Take Wizzybug Apart...........................................................................25
Wheels ..........................................................................................................................28
Seating System .........................................................................................................30
Control System.........................................................................................................37
Positioning of the Joystick .................................................................................42
Using the Horn .........................................................................................................44
Locking the Joystick ..............................................................................................45
Metal Tray...................................................................................................................46
Optional Control Inputs.......................................................................................47
LiNX Plus Advanced Settings............................................................................48
Battery Indicator .....................................................................................................49
Battery and Charging............................................................................................50
Maintenance of the Battery ..............................................................................54
Moving and Handling ...........................................................................................55
Transportation..........................................................................................................56
Maintenance and Servicing...............................................................................58
Warranty (Sales Customers Only) ..................................................................59
Disposal........................................................................................................................60
Glossary of Symbols Found on Labelling...................................................61
Troubleshooting ......................................................................................................62
Specification..............................................................................................................64
Table of Figures .......................................................................................................66
Contacting Designability ....................................................................................68
Wizzybug Passport.................................................................................................68

5
Important Information
INTENDED PURPOSE AND INTENDED USERS
Wizzybug is an electrically powered wheelchair for indoor and
outdoor use. It is intended for physically disabled children, with
adult supervision.
Wizzybug is intended to be provided only under the supervision
of a qualified clinician.
Wizzybug is intended for pre-school children of minimum age of
14 months and a maximum weight of 20 kg.
Wizzybug is intended for disabled children living with conditions
including cerebral palsy, spinal muscular atrophy, spina bifida or
muscular dystrophy, as well as children with amputations or any
other conditions affecting their ability to walk functionally in
daily living.
MODELS AND IDENTIFICATION
The models of Wizzybug covered by this document and their
Unique Device Identification (UDI-DI) numbers are:
Wizzybug DX UDI 5060838350000
Wizzybug Shark UDI 5060838350017
Wizzybug LiNX UDI 5060838350024 Includes LiNX Plus accessory
To check your Wizzybug model, find the product label on the
backrest or body (see page 8) and look for the UDI symbol.

6
SAFETY INFORMATION
Please read these instructions carefully before using Wizzybug,
and take extra care where you see the warning symbol .
You must supervise your child when they are in or near
Wizzybug, just as you would supervise a toddler who has
no physically limiting conditions. For example, you must
take control of Wizzybug on pavements near roads, near
steps or near open water.
Do not use Wizzybug if:
•Any parts appear damaged or out of shape.
•There is an unusual sound coming from Wizzybug.
•You believe that the use of Wizzybug could be dangerous
to your child or to someone else.
Do not make changes to Wizzybug without permission from
Designability, because this could be dangerous.
If you feel Wizzybug is unsafe, do not use it. Contact Designability
or your Wizzybug provider using the contact details at the front
of these instructions.
If a serious incident happens with a Wizzybug, it should be
reported to Designability. If you live outside the UK, you can ask
for help with this from your Wizzybug provider.
When your child no longer needs to use Wizzybug, it must not be
passed to another child to use unless it has been returned to the
manufacturer or provider first to check that it is safe and working.

7
SUITABILITY (CONTRAINDICATIONS)
Wizzybug is not appropriate if your child:
•Needs healthcare equipment to be used on or with
Wizzybug, unless this has been through Designability’s risk
assessment procedure. This includes commercial
headrests, dynamic head supports, oxygen cylinders and
ventilators.
•Cannot keep their head upright for long enough for them
to use Wizzybug to move themselves independently, or if
Wizzybug's head support does not give enough head
support for your child.
•Needs head controls to use Wizzybug.
•Has very complex seating needs that Wizzybug's seating
system cannot meet.
•Is not ready to learn cause and effect, because of a
cognitive impairment.
•Has a visual impairment severe enough that they cannot
use Wizzybug safely.
•Needs to use switches mounted at points other than the
tray.
•Is not included in the Intended Users described on page 5,
unless there is exceptional clinical need and a qualified
clinical person feels Wizzybug is appropriate for your
child.

8
Overview of Wizzybug
Your Wizzybug is made of the following parts:
Battery (located under the seat) and charger:
Fig. 1 Overview of Wizzybug Parts
Headrest (0.5kg)
Footrest (0.8kg)
Seating System
(7.4kg incl. headrest,
controller, harnesses
and cushions)
LiFePO4 Battery (2.8kg) and Charger
NiMH Battery (6kg) and Charger
SLA Battery (6kg)
Prolite E Charger (left) and Numax
Charger (right)
Older versions
of either battery
may come in a
black carry bag.

9
Fig. 2 Overview of Wizzybug Parts (Side View)
Fig. 3 Overview of Wizzybug Parts (Rear View)
Controller with Joystick
(see page 37 for
different joystick types)
Wheel Release
Mechanism
Body (16.4kg)
LiNX Carer Control
(0.5kg)
DX Carer Control
Shark Carer Control
Rear Control Panel
located at back of
Body
Rear Wheel Assembly
(3.5kg)

10
Wizzybug Features
Fig. 4 Overview of Features
Seat Release Knob
White Dial
Armrest
Controller
Sockets
Lights On/
Off Switch
Power On/
Off Switch
Charger Socket
(For NiMH Battery)
Charger Socket
(For LiFePO4 or
SLA Battery)
Footrest
Footrest Spring
Mechanism

11
Controller
with Joystick
Armrest Reach
Adjustment
Hand-Screw
Carer Control
Wheel Release (On
Both Front Wheels)

12
Accessories
Wizzybug is supplied in a standard set-up (page 8). The clinician
who supports setting up Wizzybug can choose from a range of
optional accessories, so that it suits your child. These may
include:
•Anklesures Kit
•Chailey Headrest
•Butterfly Harness
•Dynamic Harness
•Abductor Pommel (small or large)
•Thigh Adductor
•Golf Ball Knob
•Black Ball Knob
•T Bar Assembly
•Blue Polyurethane Ball
•Spikey Silicone Ball
•Soft Play Tray
•Extended Footplate
•Metal Tray (page 46)
•Moozi Joystick (page 47)
•Buddy Buttons (red, green, yellow and blue) (page 47)
•DX Switch Components (interface, cable and adaptor)
•LiNX Plus Joystick (with switch interface components)
Only these accessories shall be used with Wizzybug.
Some accessories may be unavailable in some countries.
MyLiNX app is available for Android/iOS, providing access to
basic system and diagnostic information for Wizzybug (LiNX
model only). Refer to the Resources Hub on dynamiccontrols.com
for further information on the MyLiNX app.

13
Getting to Know Wizzybug
USER GUIDANCE
Speed Always choose a suitable speed range for your child’s
ability and their environment (see pages 40 to 41). Wizzybug can
be driven at low speeds indoors or in small spaces, so that your
child can steer around obstacles. It can also be driven at higher
speeds in bigger spaces.
Stopping Your child can stop Wizzybug by letting go of the joystick.
If you need to stop Wizzybug quickly, you can turn off the on/off
switch at the back of Wizzybug (Fig. 5), on the controller (Fig. 6) or
use the carer control to take control of Wizzybug. However, the
quickest way to stop Wizzybug may be to lift your child’s hand
from the joystick (Fig. 7).
Driving on slopes Wizzybug can take much longer to stop on a
slope than on level ground.
Driving on pavements or near steps The carer must take control
of Wizzybug on pavements or near roads, open water, steps or
other obvious hazards.
Always use dropped kerbs to move off pavements or when
crossing the road, so that Wizzybug does not move in a
dangerous or unexpected way. Keep your child away from kerb
edges and roads.
Fig. 5 On/Off Switch
Fig. 6 Power Button
Fig. 7 Hand Release from Joystick

14
Crossing the road The carer should take full control by switching
to carer control or by disengaging the wheel releases (page 28)
and pulling Wizzybug by the headrest.
ENVIRONMENT
You must stay close to your child until they are confident and
able to use Wizzybug, especially if there are hazards nearby such
as furniture, changes in ground levels, or busy areas. A
responsible adult should always be between Wizzybug and any
hazard.
Wizzybug prefers firm level surfaces and gentle slopes. Do not
attempt slopes steeper than 5° (1 in 12). Wizzybug is not suitable
for driving on steep banks, beaches, hilly ground, or very uneven
ground. Your child must not drive Wizzybug up a steep slope,
because it could slip backwards and turn over.
Fig. 8 Steepest Slope
Before use Check Wizzybug’s environment for hazards such as
sharp corners, hot drinks, traps, steps and crushing hazards.
Wizzybug is designed to fit under nursery tables but may also fit
under taller tables and/or other furniture. If there is not enough
space for your child to drive under or between furniture, they
could get crushed or bump their head.
5° Incline (or 1 in 12)

15
Other children You should supervise other children, including
babies and toddlers, near Wizzybug. Make sure Wizzybug does
not drive into other children, or crush their hands or feet. Do not
let any child crawl on or climb onto Wizzybug
Pets Be careful when Wizzybug is near pets.
Driving outdoors Wizzybug is only intended to be used in
daylight. Carers are responsible for judging whether the light
conditions are suitable for their child.
Wet weather Wizzybug can be driven safely in light rain showers,
but should not be used in heavy rain. It should not be driven in
puddles deeper than the thickness of the tyres.
Hot weather On very hot days, be careful not to leave Wizzybug
in hot places (such as car boots or conservatories) for any length
of time.
Surface temperature of Wizzybug Some parts of Wizzybug that
your child can touch may get very hot or very cold because of, for
example, radiators, sunlight or freezing weather conditions.
Storage Wizzybug should be stored indoors in a dry environment
away from radiators and other heat sources.
Anti-static chain This hangs down under
Wizzybug to reduce the build-up of static
electricity (Fig. 9).
If the anti-static chain is missing or does
not touch the ground, please contact
Designability for a replacement.
Fig. 9 Anti-Static Chain

16
IMPORTANT NOTES ON SEATING AND OTHER FEATURES
Never adjust the seating position with your child sitting in
the seat, because you or your child could be injured.
Securing your child in Wizzybug Always use the lap strap and full
harness. Adjust the straps to make sure they fit your child
securely. If you are unsure, contact Designability or your
Wizzybug provider for advice.
Maximum user weight 20kg or 44lb
One child only Wizzybug must only be used by a properly seated
child and should not be used to give rides to other children.
Seating system The seating system is only intended to be used in
Wizzybug and should not be used for any other purpose.
Seating position and mounting of the child’s joystick Ask an
occupational therapist or physiotherapist for advice about the
best seating position and joystick position for your child.
Footrest The footrest can be provided with
anklesures to position your child’s feet
securely. If anklesures have been provided,
your child should use them. If your child
does not need anklesures make sure their
feet stay within the footrest, because they
could be injured if their feet hang over the
front or sides.
When your child is not using Wizzybug, you can remove the
footrest to avoid children injuring themselves on the front of the
footrest if they try to crawl or climb onto Wizzybug.
Fig. 10 Anklesures on
Footrest

17
Transfers Always follow best practice for moving and handling
when you transfer your child in and out of Wizzybug. Your child’s
therapist can recommend what is best for you and your child. If
you use a walk-in transfer, this is easier if the footrest is removed.
Wizzybug should be switched off before you transfer your
child into or out of it.
Adjustment of seating system Check your child’s seating position
regularly, and adjust it if you need to. Wizzybug is not a dedicated
seating system and should only be used in Wizzybug. Wizzybug
should not be used for long periods of time - always check your
child’s comfort and posture in Wizzybug, and check their skin for
pressure sores.
Dynamic head supports Never use a dynamic head support with
Wizzybug.
Fire safety The seat cushions, arm pads, main body and
controllers comply with international standards for resistance to
ignition sources.
Wizzybug life We expect Wizzybug to perform as intended for up
to 5 years (if it is not neglected, misused or abused). Refer to the
warranty information in these instructions (page 59).
Small parts Make sure your child does not pick at the foam
padding parts of the seating system, because they could choke if
they swallow small pieces of foam.

18
How to Put Wizzybug Together
When you are putting Wizzybug together, do not trap your
fingers between the different parts.
Wizzybug has the following parts:
•Body
•Rear Wheel Assembly
•Battery
•Tray (optional, page 46)
REAR WHEEL ASSEMBLY
To attach the rear wheel assembly to the body:
1. Lift up the back of the body using the fabric
handle.
2. Position the rear wheel
assembly with the label facing
away from Wizzybug’s body and
lower the prongs into the two
holes in the rear wheel assembly
beam.
3. Push the spring clip (attached by a
short chain) around the end of the
prong as shown. This attaches the
rear wheel assembly beam to the body.
4. Turn the spring clip sideways under the rear
wheel assembly beam for protection.
Fig. 11 Attaching the Rear Wheel Assembly
•Footrest
•Seating System
•Carer Control

19
BATTERY
Fitting the Battery (SLA or NiMH)
1. Place the battery into the box
under the seat, with the cable
coming out from the opposite
side to the socket (see Fig. 12).
2. Position the connector so that it
can easily be pushed into the
socket. Push in the connector
then turn the collar clockwise to
secure it.
3. Make sure the battery cable is tucked in, so that it cannot
damaged and does not stop the seat being adjusted.
Fitting the Battery (LiFePO4)
The battery fits into the box under
the seat, under the black cover.
1. Open the cover by pinching the
black tab and white button at
the front of the cover.
2. Place the battery into the box
as shown (it will only fit one
way round).
3. Position the connector with the silver slider down and to the
left, and push it into the socket. Turn the connector clockwise
until it clicks.
4. Close the cover fully, keeping your fingers clear
of the hinge.
Cable
Socket
Fig. 12 Fitting the SLA/NiMH Battery
Fig. 13 Fitting the LiFePO4 Battery

20
FOOTREST
The footrest can be attached before or after the child is seated.
The footrest can be level or can be tilted to match the tilt-in-
space angle of the seat position. Ideally your child’s feet should
sit flat on the footplate.
The height and angle of the footrest can be adjusted using the
colour codes at the back and sides of the footrest. To make the
footrest level, choose your child’s footrest height colour at the
back of the footrest, look for the two side slots of the same
colour, and choose the lowest of those two slots.
To tilt the footrest upwards or downwards, choose higher or
lower slots at the sides of the footrest.
To attach the footrest:
1. Squeeze together the bars under the footrest.
2. Push the footrest into the chosen central slot.
3. Line up the footrest with the chosen side slots,
then let go to fix the footrest into the side
slots.
Make sure the footrest is fixed in the correct
position for your child before using Wizzybug
Fig. 14 Attaching the Footrest to Wizzybug
(From top to bottom) Footrest bars, height of the footrest -
showing the back-plate with the coloured slots, footrest tilt
adjustment using the side slots.
Other manuals for WizzyBug
1
Table of contents
Popular Medical Equipment manuals by other brands

Orliman
Orliman MANUTEC MF-50 Instructions for use

Vatech
Vatech Smart Plus PHT-35LHS Technical manual

Image Diagnostics
Image Diagnostics ilex32 4K Installation and operation manual

Levabo
Levabo all on manual

Gaymar
Gaymar Thermacare TC3146 operating manual

Veridian Healthcare
Veridian Healthcare 11-50DP instruction manual