Detech SSP-5100 G User manual

SSP-5100 G

SSP-5100G
RESETRESET DEPTH TUNER
DETECT
DELAY
ON/OFF
DISC
LIGHT
AUTO
VOLUME
SSP-5100G
VERSION 1.0
CONGRATULATIONS FOR PURCHASING YOUR SUPER SENSITIVE
PENETRATOR-5100G PULSE INDUCTION METAL DETECTOR.
Take the coil out of the leather bag. The coil is folded into sheaf, this is its
transport position. Put the sheaf on the ground, and arrange its elements to form a
square. You’ll find that your coil is different from the classic square coils of the PI
detectors - it has a middle sector. A magnetometer is built-in there, making possible
the unique discrimination of your detector. Now join all the tubing elements, as shown
on Figure 1. After the assembly position the coil on operational height (Figure 2) over
the ground surface, far from big metal objects. Attention: Take care for metal parts on
your shoes and wear.
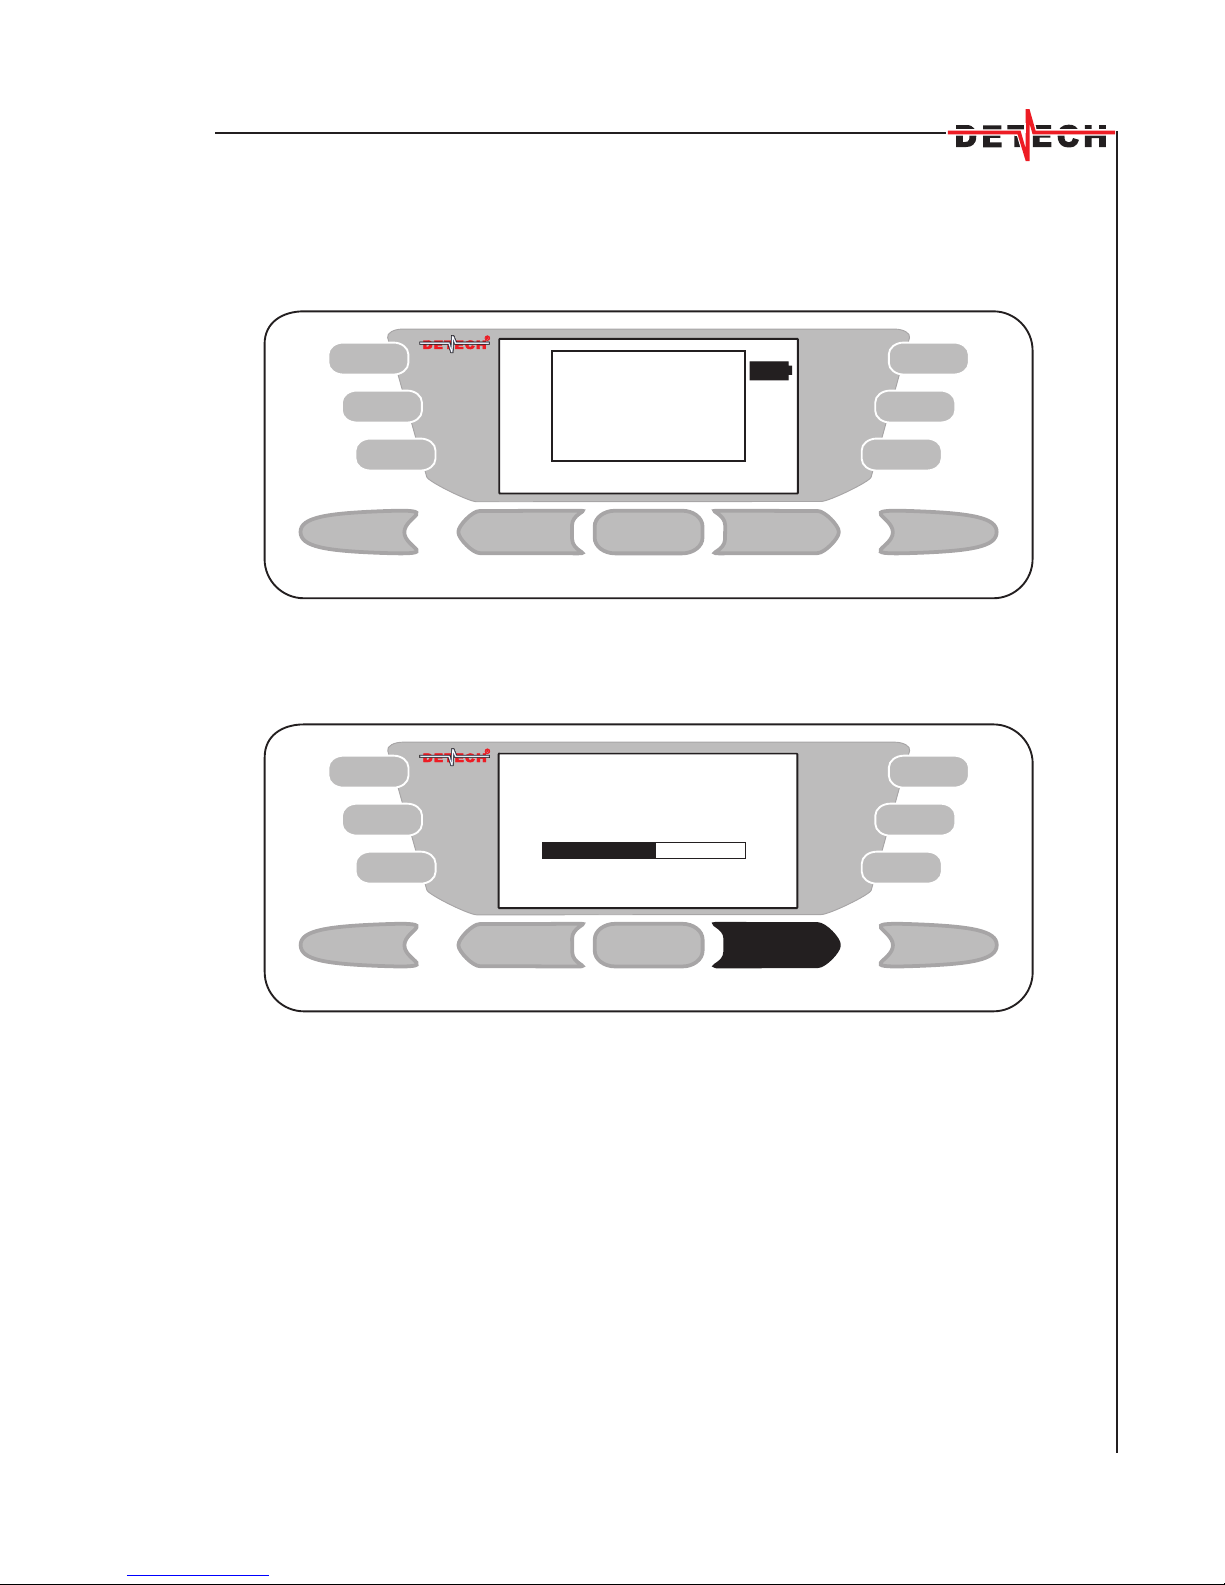
For few seconds you’ll see on the
display the logo of the manufacturer, the
model of the detector and its software.
Connect the antennae cable to the control box using the coupling on the rear
panel. Then turn the detector on pressing the ON/OFF button.
1
Figure 1 Figure 2
PULSE INDUCTION
ASSEMBLY OF THE COIL AND TURNING THE DETECTOR ON
SSP-5100G
RESETRESET DEPTH TUNER
DETECT
DELAY
ON/OFF
DISC
LIGHT
AUTO
VOLUME
MIN
0N
A
5
03 99.9%
42,6
SSP-5100G
RESETRESET DEPTH TUNER
DETECT
DELAY
ON/OFF
DISC
LIGHT
AUTO
VOLUME
MIN
AUTO TUNING
MAX
wait
61.6
2
Then the operational screen appears. It shows the battery condition and the current
levels of the settings. The symbol A shows that your detector is in AUTOMATIC MODE
of operation. This mode will be described in details below.
Press the TUNER button. On the display will appear” AUTO TUNNING/wait”.The
detector starts to tune automatically to the ground conditions. For some seconds the
AUTO-
TUNNING will stop at a level corresponding to the current ground conditions. Few
seconds later the detector will turn to the OPERATIVE screen itself. You will hear 1-3
ticks per second coming from the loudspeaker of the detector. Your detector is now
ready for searching.
ATTENTION: If you are close to metal object the cursor will continue to move from max
to min positions unable to stop at a certain value. Then on the screen will appear the
text PLEASE, MOVE THE COIL. Remove the coil to an other position and press the
TUNER button again.
Because of the presence of too many metal objects in the buildings we do not
recommend testing the detector inside the buildings.
Everything we spoke about until now is done in the AUTOMATIC MODE.
Every time you turn on your detector, it will enter its AUTOMATIC MODE of operation.
The Automatic mode of operation is one of the most important options of your detector.
In this mode the processor looks for the changes in the ground mineralization during the
coil’s movement over the ground and adjusts the detector to these changes. The ticking
rate in this mode of operation is preset and could not be controlled by the operator.
AUTOMATIC OPERATION MODE

AA
INSTRUCTION MANUAL
3
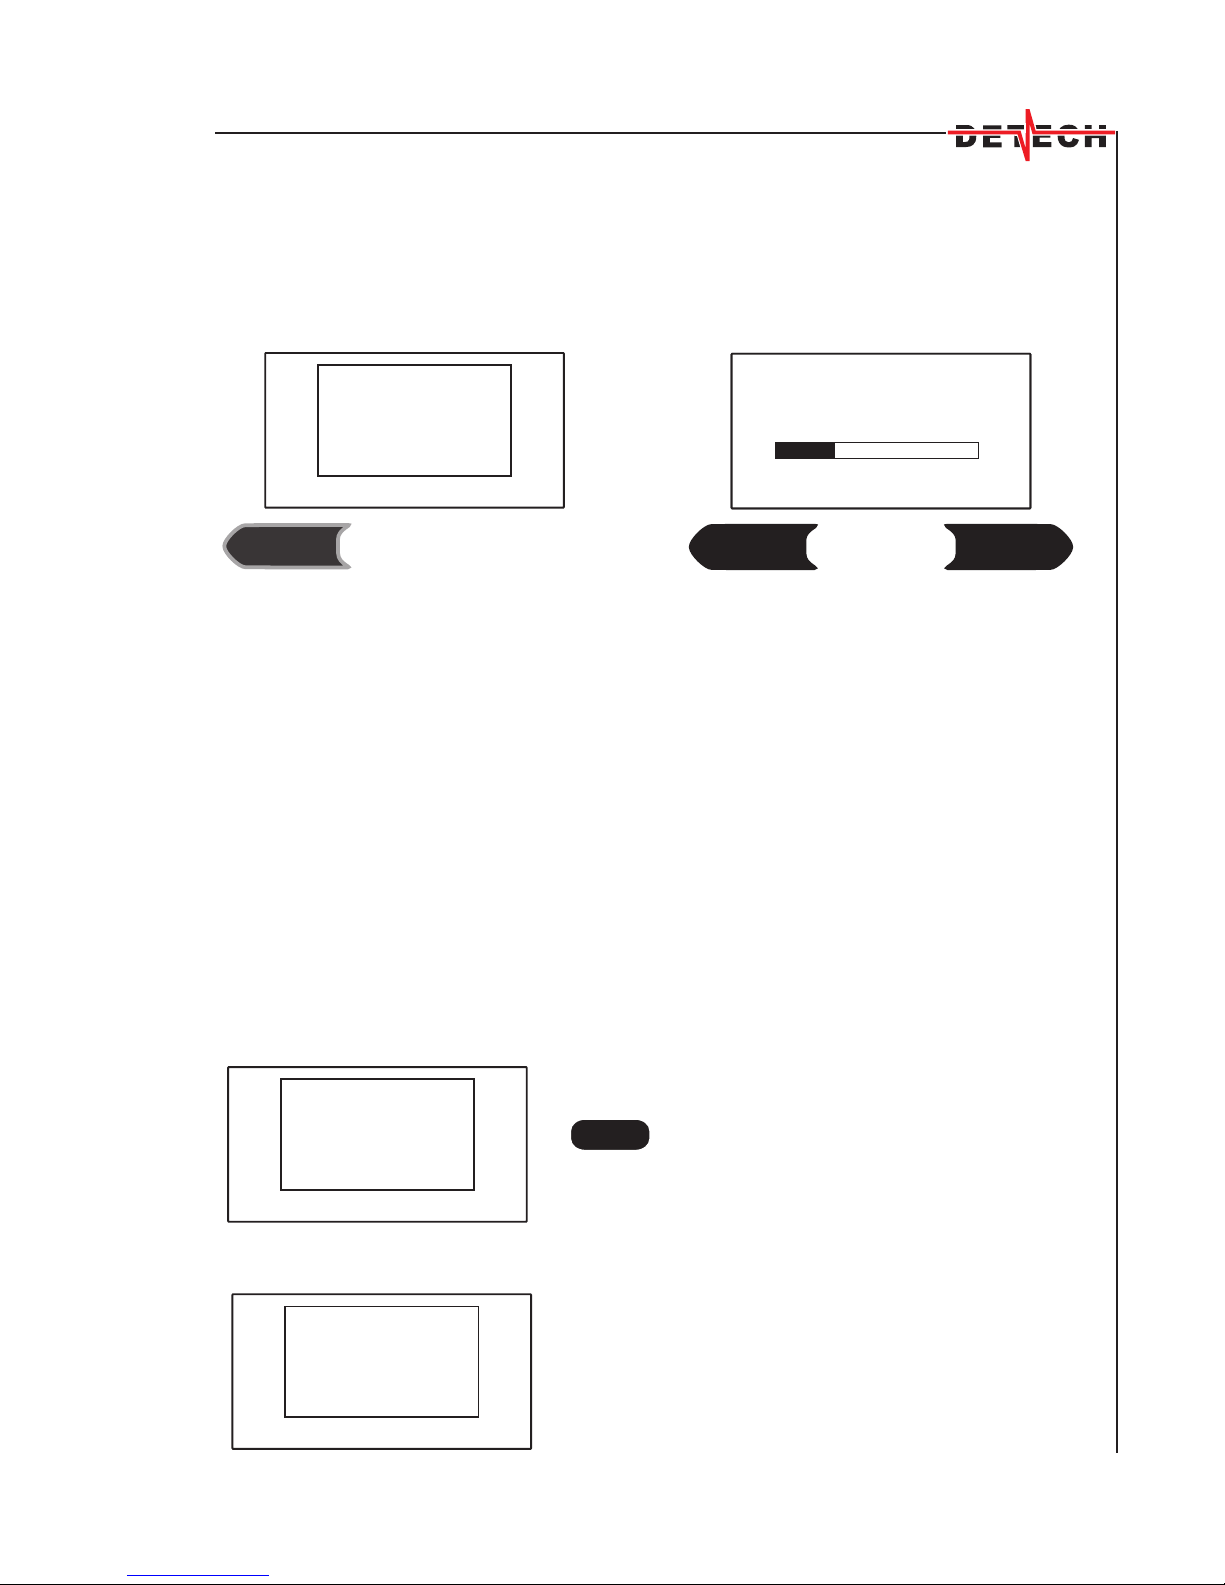
Due to the very high intensity of the signal while operating the detector with the 1mX1m
coil or the bigger sized coils, you would not be able to get an idea about the location of
the target and you would have difficulties with its pin-pointing. At the moment you start
hearing a signal from the target press immediately the RESET button, but in no way
while the signal from the target has reached its maximum strength. In this way you’ll be
able to pin-point the target much better. After the resetting, passing over the target you’ll
hear signal with much less intensity (see the right display above) and the pin-pointing will
be much more accurate. We recommend this only to the experienced operators, as there
is a risk to reject a target if resetting the detector in inappropriate moment.
The bigger size of the target, and the closer distance to it, the higher is the intensity of
the signal. When the signal’s intensity is maximal, the graphics will raise to the highest
part of the operative screen, and a value of 100 will be given in the middle of the screen.
If the signal is with a lower intensity (this could happen while resetting, as explained
above) the graphics will reach a lower level, and the value on the screen will be, as in
the described example, 48.
Note: If you are moving the coil correctly, at a constant operational height, not passing
over metal object, and you are not under the influence of strong electromagnetic
disturbances, the graphics will be a smooth straight line “crawling” in the lower end of the
screen, and the intensity of the signal will be 0.
NOTE: While in Automatic Mode the SSP-5100 is a typical motion system - the search
coil should be moved slowly over the ground surface, but never stop over a metal target.
Try to keep constant operational height of the coil. If anyway you change the
operational height of the search coil, nearing it sharply to the ground surface, the
processor will need 7-8 seconds to restore the optimum ticking rate. If you don’t want to
wait for this, you could use whichever of the two RESET buttons for a fast AUTO
retuning.
NOTE: If you RESET while the coil is passing over a metal target the detector will tune
to the target and it will be cancelled, or will produce only a very faint signal.
Some professionals use this feature to decrease the signal’s intensity and receive a
better target pin-pointing. If you have a big shallow target the signal’s line would be like
that on the screen shown left down.
100 48

SSP-5100G
RESETRESET DEPTH TUNER
DETECT
DELAY
ON/OFF
DISC
LIGHT
AUTO
VOLUME
M
SSP-5100G
RESETRESET DEPTH TUNER
DETECT
DELAY
ON/OFF
DISC
LIGHT
AUTO
VOLUME
M
MIN
AUTO TUNNING
MAX
wait
4
MANUAL MODE OF OPERATION
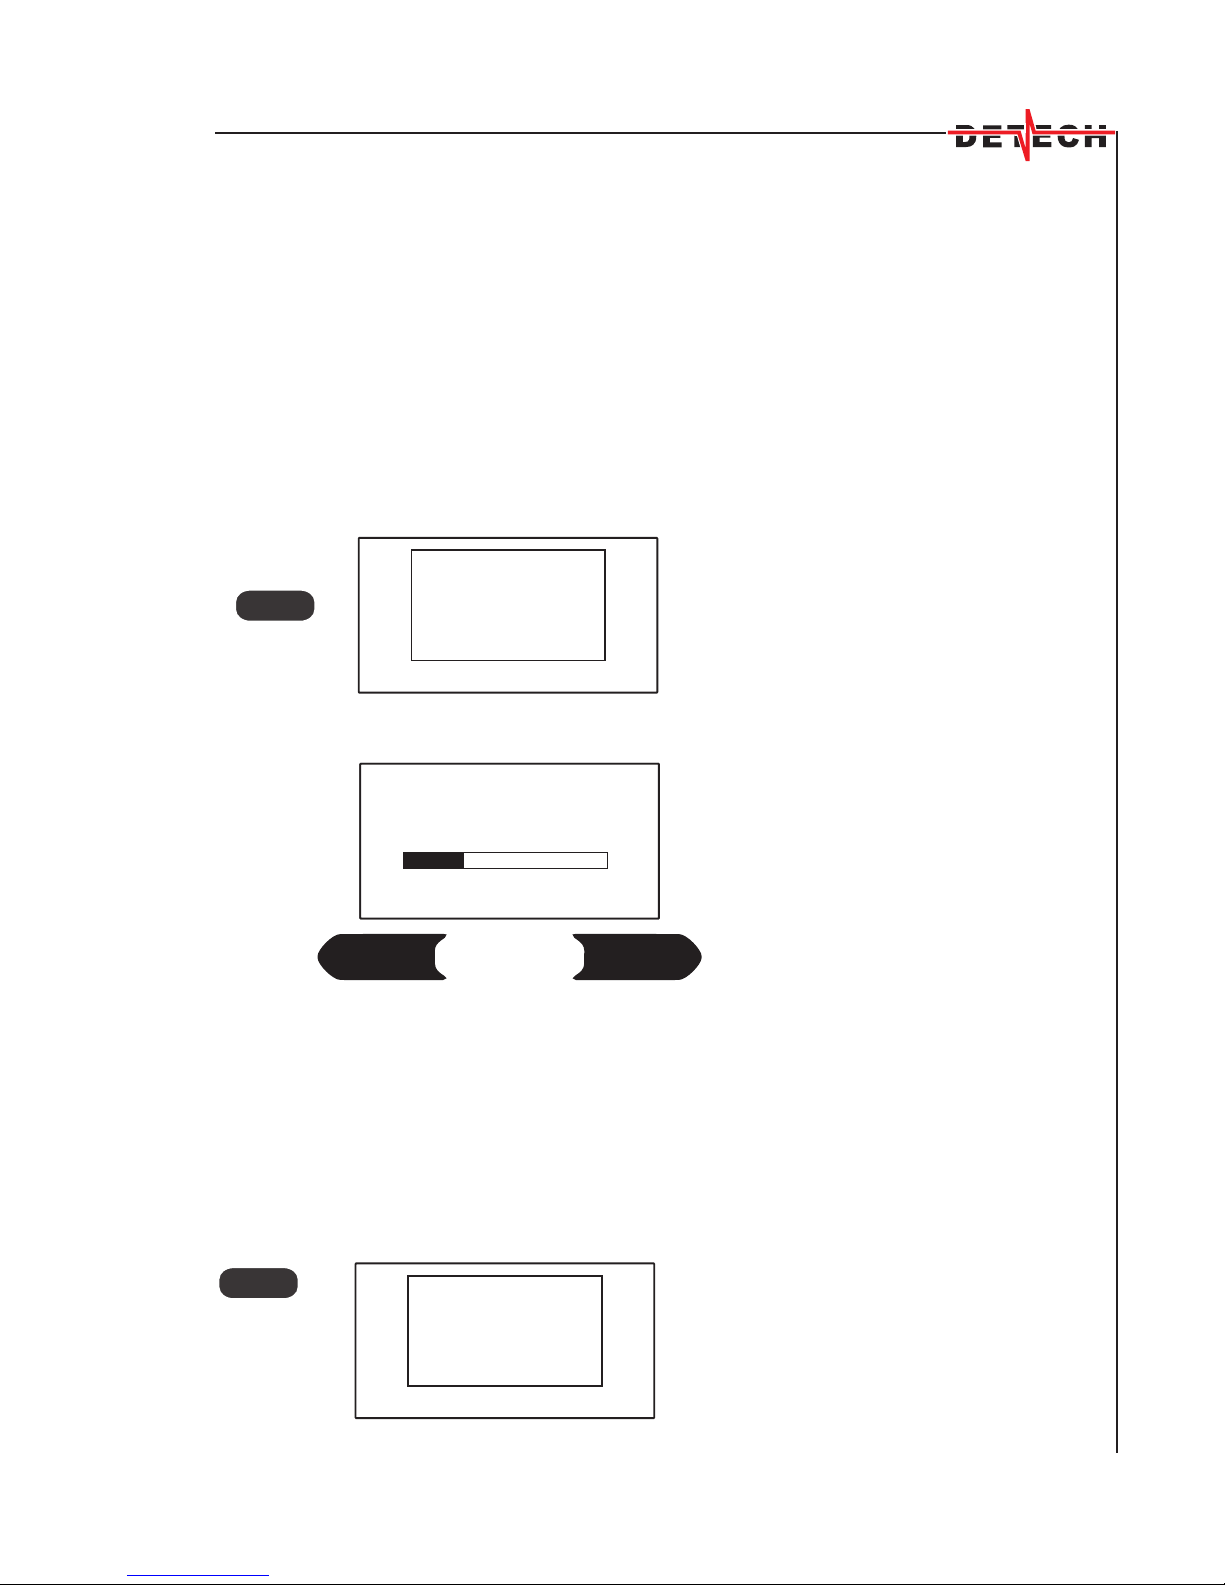
The Automatic Mode is very easy and operative mode. But the MANUAL MODE of
operation will give you much more sensitivity and stability of operation. While in
Automatic Mode press the AUTO button. On the Operative Screen the symbol A for
Automatic Mode will change to the symbol M - Manual Mode of operation.
Then you should press the TUNER button, so that you could tune the detector in the
Manual Mode. Lets remind you again that the coil should be on operational height over
the ground’s surface - 3-6 inches.
On the screen will appear the inscription for Automatic Tuning of the detector. For
some seconds the detector will finish the process of AUTO TUNING. The ticking rate is
1-3 ticks per second - it is chosen by the manufacturer as universal, and appropriate
for the most conditions of searching.

61.2%
5
SSP-5100G
RESETRESET DEPTH TUNER
DETECT
DELAY
ON/OFF
DISC
LIGHT
AUTO
VOLUME
MIN
ADJUST TUNER
MAX
manual
61.2
MANUAL MODE OF OPERATION
If you like the preset level of the ticking rate and find it appropriate for your needs, press
the DETECT button to enter the operational screen and start searching.
If you want to change the ticking rate you could make it by pressing DEPTH or TUNER
buttons. Note that the DEPTH and TUNER buttons have an ARROW like form and
function. You could increase or decrease the ticking rate by pressing the right arrow
(TUNER) button or left arrow (DEPTH) button.
For a higher sensitivity increase the ticking rate. But have in mind that the increasing of
the ticking rate too much won’t give you any more sensitivity, it could even worsen the
quality of detector’s operation.
There are cases when the detector becomes unstable, due to high mineralization or
electromagnetic interferences nearby. In such cases you could decrease the ticking rate,
pressing the left arrow (DEPTH) button. This will increase the stability of operation, but will
decrease significantly the sensitivity of the detector.
No matter whether you have increased or decreased the ticking rate you’ll have to press
the DETECT button. Immediately upon this the processor will save the setting of the
ticking rate you have chosen and will keep it, no matter the changes in the ground
conditions or the changes of the operational height of the detector’s coil.
Have in mind, that if you sharply change the operational height of the coil, the ticking rate
will change sharply, and the processor will need about ten seconds to return to the ticking
rate you have chosen. If you do not want to wait for this, press one of the RESET buttons.
NOTE: If you are over a metal target while pressing a RESET button this could eliminate
the target!
You could check at every time the level of tuning,
looking at the right bottom end of the display - the
current level of tuning is inscribed in %. May be it is
good to know that when you are on the field and you
tune the detector and the processor choose a lower
value in percentage, this will mean that the soil’s
mineralization is higher. If you tune the detector in the
town, the lower percentage value will mean that you
are near to metal objects. In this case you’ll have to find a clear from metal objects place.
Immediately after that on the display appears an inscription for manual tunning.
DISC
0N
0N
Fe
DEPTH
DISC
LIGHT
1
6
DESCRIPTION OF THE CONTROLS
DEPTH
DISCRIMINATION
The DEPTH button is the control directly affecting the sensitivity of the detector and its
depth of detection. The value of depth is always inscribed in the bottom left end of the
operative screen - the values are from 1 to 8. To make a change in the depth of your
detector, simply press the DEPTH button. For about 5 seconds on the display will
appear the ADJUST DEPTH screen.
DEPTH TUNER
MIN
ADJUST DEPTH
MAX
12345678
Using the ARROW buttons DEPTH and TUNER you could change your DEPTH setting.
If you operate the detector in ideal ground conditions you could use higher settings of
DEPTH for maximum depth penetration. But it is not necessary, as your detector is
really a powerful penetrator. We recommend using lower settings of DEPTH - you’ll
have the same great depth of detection with a much more stable operation..
Your detector has an unique, real discrimination of the ferrous (magnetic) objects
through built-in the search coil magnetometer. The Discrimination mode of operation
allows avoiding the unnecessary digging of the unwanted shallow ferrous targets. The
detector is set in a way to discriminate only in the surface, arable layer of the ground. As
it happens often the hoards of coins to be buried together with ferrous instruments,
weapons or other ferrous objects. If the detector discriminated in its entire detection
range, it would reject also the valuable hoards while eliminating the ferrous targets. If
you have an information that the treasure you are looking for is in a ferrous vessel, or
buried together with other ferrous objects you it is advisable to turn off the
discrimination. Turning ON/OFF the discrimination is made when the detector is in the
operative screen by pressing the DISC
button. Of course, you should know
that the discrimination is possible only
with a discriminating coil - such are
the coils with built-in magnetometer.
With discrimination turned ON
and operating in AUTO mode when
passing the coil over a ferrous target the
sound will start to increase, and then will sharply fall into silence, the graphics will
fall sharply and turn black and in the right bottom of
the screen will appear the symbol Fe. When you
operate in Manual mode the graphics will turn black
the symbol Fe will appear, but there won’t be any
audio discrimination.
DEPTH TUNER
MIN
ADJUST VOLUME
MAX
12345678
DELAY MIN
VOLUME 8
7
DESCRIPTION OF THE CONTROLS
VOLUME
DELAY
The discrimination is based on the magnetic qualities of the ferrous objects. The
tempered steels would produce a more explicit response from your detector. These are
objects like knives, scalpels, scissors, swords. At the other hand, such ferrous objects
should be dug, as they are relics. They have been valuables for their ancient users. And
people used to bury their money together with their valuable instruments and weapons.
That is why your detector is set to discriminate the unwanted ferrous objects only in the
arable surface layer of the ground.
Through the VOLUME control you could choose different levels of sound’s volume.
When the coil is brought by two
operators we recommend the level
of the sound to be at maximum - 8.
When the operator is alone, for
example operation with the round
coils, and if he wishes to work with
headphones then he could be forced
to decrease the sound’s volume - this
could be made by pressing the
VOLUME button (in front of this
button on the operative screen is
inscribed the current level of sound’s
volume). On the display will appear
ADJUST VOLUME, and using the
arrow buttons DEPTH and TUNER
you could decrease/increase the
sound’s level. After you have chosen
the new level, press the DETECT
button to return the operative screen
If you don’t make this for 5 seconds,
the detector will turn to the operative
screen itself.
When operated by two men in a windy weather, or when the noise of your steps on
dried grasses and leaves is too high, it is possible to not hear the ticking rate or the
signals from the deeper targets. In such cases we recommend operation with maximum
(8) level of sound’s volume.
The DELAY is control having strong
effect on the detector’s sensitivity and
on the overcoming of the grounds
effects. The detector has two values of
the DELAY - MIN and MAX. The value
of the DELAY is inscribed always on the
left upper end of the screen. To change
the current setting you should press the
DELAY button.

42,6
SSP-5000G
TUNER
DELAY IS
CHANGED
PLEASE ADJUST
TUNER AGAIN
8
DESCRIPTION OF THE CONTROLS
LIGHT
With the MIN setting of the DELAY the detector is equally sensitive to all metal target
and detects them at maximum depth. With the MAX setting of the DELAY the detector
rejects some thin foils, modern alloys, i.e. low
conductivity objects. This setting is appropriate
for operation in heavily mineralized grounds.
Mind that with the MAX setting of the DELAY the
detector loses a little bid of its sensitivity.
With every change of the DELAY settings on the
display will appear the text DELAY IS
CHANGED, and for proper operation the
detector will have to be tuned again - please,
press the TUNER button.
If you want to use the light of the display press the LIGHT button. With LIGHT on in the
upper right end of the display there will be a symbol of a small lamp. Have in mind that
with LIGHT ON the detector will faster discharge its batteries.
SSP-5000G
9
BATTERIES
Your detector is provided with built-in rechargeable battery pack - NiMH batteries, 1800
mAh. These batteries have no “memory” - they could be recharged at any time, with no
request to be fully discharged.
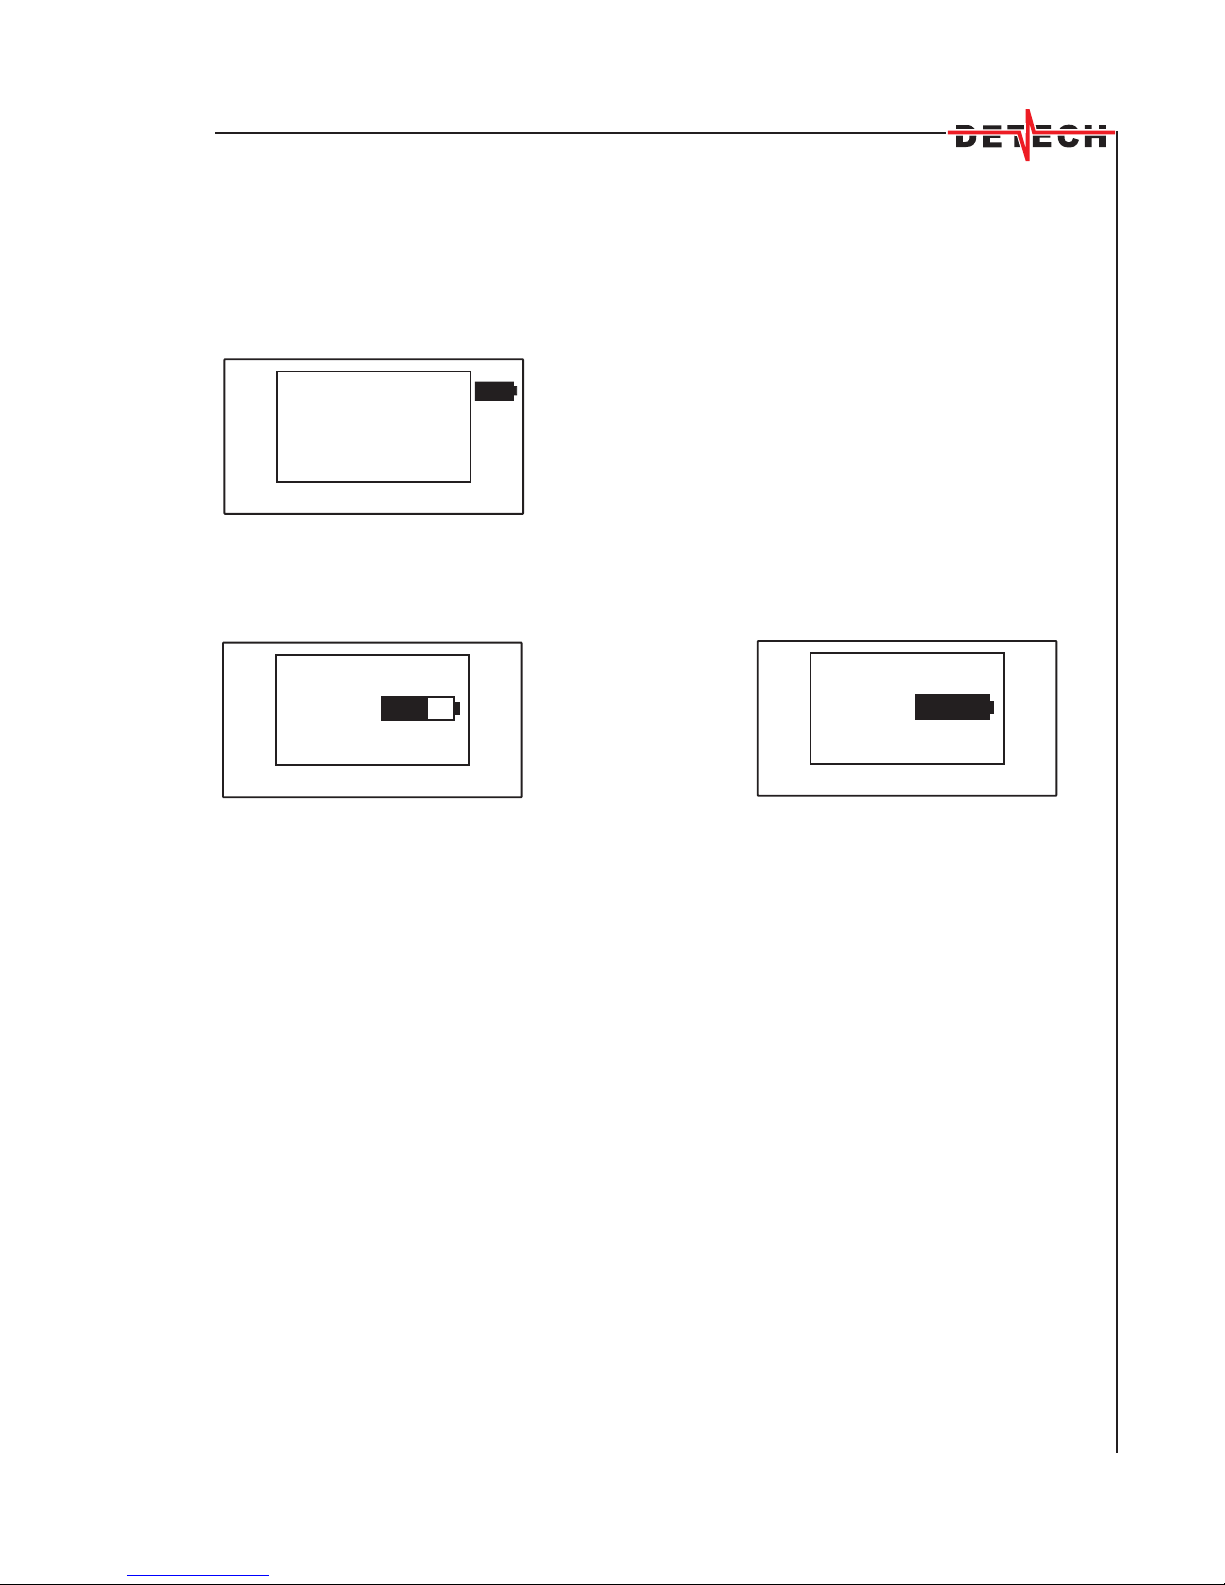
NOTE: The NiMH battery pack supplied with your detector is charged, so it is not
necessary to charge it before the first use of
your detector. The batteries will reach their full
capacity after numeral charge/discharge cycles.
The battery condition is constantly shown by a
a battery symbol in the upper right end of the
display.
To recharge your detector, please, plug the mains
charger plug into the COIL/CHARGER coupling
on the rear panel. Then plug the mains charger
into the wall socket. The detector starts charging. But to be able to see the process,
press ON/OFF button. If the battery is not charged, on the screen will appear a text
BATTERY
CHARGING BATTERY HAS
BEEN CHARGED
CHARGING BATTERY and a symbol of a recharging battery. When the battery is fully
charged the text BATTERY HAS BEEN CHARGED will appear and the battery symbol
will show a fully charged battery.
On the rear panel there is also a coupling for external power supply. When you switch
on an external power supply its voltage should not be more than 12V, and please, keep
to the polarity given on the rear panel.
NOTE: No matter whether you use external, or the internal power supply, if the voltage
of the batteries decrease below the appropriate level the detector will warn you with an
inscription on the display THE BATTERY IS LOW. PLEASE CHARGE IT.
To extend your battery’ life use headphones.

7
10
USEFUL ADVICES
SOME EXAMPLES FOR DISPLAY INDICATIONS
Looking at the Operative screen you’ll see a
continuously rolling line at the bottom of the screen.
When you are not moving and there are no sources of
electromagnetic interferences nearby the line will be
smooth, nearer to straight line. The same straight line
you’ll see if you operate the detector keeping constant
operational height of the searchcoil and you do not
pass over a metal object.
Note that the intensity of the signal is 0.
When you operate the detector in areas with
electromagnetic interferences the rolling line at the
bottom of the screen will be broken and curly one. The
ticks from the loudspeaker would not be constant, they
would change their frequency chaotically.
The intensity of the signal will vary from 1 to 7-8.
0
Big, shallow non-ferrous target
Big, shallow ferrous target
Big, strongly magnetized ferrous target
Big, deeply buried non-ferrous target
Fe
Fe

11
USEFUL ADVICES
Big, deep low magnetic ferrous target
Big, deeply buried strongly magnetized ferrous target
Small, shallow non-ferrous target
Small, shallow low magnetic ferrous target
Small, shallow, strongly magnetized ferrous target
With the graphics above we have shown only some more typical cases. In the practice,
the graphical variants are much more. With your practice you’ll learn to identify most of
the targets without digging them out first.
Fe
Fe
Fe
Fe

12
SSP-5100 DISCRIMINATOR Technical Specifications
Continuous power consumption: min 110 mA
Maximum power consumption: 180mA
Working Frequency: 100 Hz
Sound Range: 0.2Hz - 2.0KHz
Battery: Rechargeable 1800mA / 12V
Charger Input: 110V AC, 60Hz
Charger Output: 17V DC
Battery Charging Time (empty): max. 10 hours
Depth Control for Maximized Detection Depth
Headphone Input: 1/4" Mono Jack
Optimum Temperature Range: 0-50 Degrees C
Control Box Weight (incl. battery): 24.69oz. (700 g)
Table of contents
Other Detech Metal Detector manuals


