Devicor Mammotome elite User manual

Biopsy System Instructions
Please read all information carefully.
Failure to properly follow the instructions may lead to serious surgical consequences.
IMPORTANT: This package insert is designed to provide instructions for use of the Mammotome elite Holster and Probe. It is
not a reference to surgical techniques.
Mammotome elite is the only single-insertion, tetherless device with TruVac vacuum technology.
www.mammotome.com/ifu eIFU number:
001212

1
Indications for Use
The Mammotome elite Biopsy System is indicated to obtain tissue samples from the
breast or axillary lymph nodes for diagnostic analysis of breast abnormalities.
•The Mammotome elite Biopsy System is intended to provide breast tissue for
histologic examination with partial or complete removal of the imaged
abnormality.
•The Mammotome elite Biopsy System is intended to provide breast tissue for
histologic examination with partial removal of a palpable abnormality.
The extent of a histologic abnormality cannot always be readily determined from the
palpation or imaged appearance. Therefore, the extent of removal of the palpated or
imaged evidence of an abnormality does not predict the extent of removal of a histologic
abnormality, e.g., malignancy. When the sampled abnormality is not histologically
benign, it is essential that the tissue margins be examined for completeness of removal
using standard surgical procedures.
In instances when a patient presents with a palpable abnormality that has been
classified as benign through clinical and/or radiological criteria (e.g., fibroadenoma,
fibrocystic lesion), the Mammotome elite Biopsy System may also be used to partially
remove such palpable lesions. Whenever breast tissue is removed, histological
evaluation of the tissue is the standard of care. When the sampled abnormality is not
histologically benign, it is essential that the tissue margins be examined for
completeness of removal using standard surgical procedures.
This instrument is for diagnostic use only and is not indicated for therapeutic use.
Contraindications
None known.
Device Descriptions
Devicor’s Mammotome elite Biopsy System is composed of a Holster and a Probe. The
System may also include the use of the optional accessory (the Introducer Stylet) to
initiate the track within the breast tissue to the biopsy site (refer to Introducer Stylet IFU
for details). The Mammotome elite system may be used with ultrasound imaging
guidance to excise and collect diagnostic samples with a single insertion of the Probe.
The components of the system are designed to operate safely when used together for
diagnostic sampling of tissue during a biopsy procedure.
The Holster, reusable and supplied non-sterile, is a self-contained, handheld, electro-
mechanical vacuum-assisted biopsy device that consists of a rechargeable lithium-
polymer battery and includes a charging base with an AC power cord and adapters
(See Figure 1).

2
The Probe, single use and supplied sterile, includes an outer trocar shaft with distal
aperture and a translating inner hollow cutter (See Figure 2). The Probe also includes
an Integrated Coaxial Cannula, and a proximal Specimen Collection Cup with an
enclosed Tissue Sample Basket and cap (See Illustration 2). The Integrated Coaxial
Cannula can be detached from the Probe and used with the optional Introducer Stylet
accessory prior to a biopsy procedure to penetrate the breast tissue. The body of the
Probe contains one Alignment Tab and two Locking Tabs to secure the Probe into the
Holster.
The Holster creates vacuum inside the device to assist in pulling tissue into the Probe
aperture while the sharpened inner cutter rotates at high speeds and advances across
the aperture to acquire targeted tissue. The tissue sample is transported by vacuum to
the Specimen Collection Cup. The Integrated Coaxial Cannula may also be detached
from the Probe after the biopsy and remain in the breast to retain a track to the biopsy
site when placing a biopsy site identifier. The Holster is designed with 3 biopsy button
options to accommodate multiple hand positions (See Figure 3).
IMPORTANT: The biopsy site identifiers may be used in conjunction with the
Mammotome elite Biopsy System to radiographically mark the location of the biopsy
procedure. DO NOT USE A MARKER NOT APPROVED FOR USE IN THE
Mammotome elite BIOPSY SYSTEM.
Figure 1

3
Figure 2
Figure 3
Warnings
•This instrument should only be used by physicians trained in percutaneous
needle techniques for tissue collection.
•As with any biopsy instrument, there may be a potential for infection.
•Physicians should use sound judgement for use of this device with patients
where increased risk or complications may be associated with core removal or
biopsy.
•Patients receiving anticoagulant therapy or who may have bleeding disorders
may be at increased risk.

4
•Do not use this instrument in conjunction with Magnetic Resonance Imaging
(MRI).
•Products manufactured or distributed by companies not authorized by Devicor
Medical Products, Inc. may not be compatible with the Mammotome elite
System. Use of such products may lead to unanticipated results, EMC issues
and possible injury to the user or patient.
•Instruments or devices which come into contact with bodily fluids may require
special disposal handling to prevent biological contamination.
•The Probe is packaged and sterilized for single use only. Do not reuse,
reprocess or resterilize. Reuse, reprocessing, or resterilization may compromise
the structural integrity of the device and/or lead to device failure that in turn may
result in patient injury, illness or death. Also, reprocessing or resterilization of
single use devices may create a risk of contamination and/or cause patient
infection or cross-infection, including, but not limited to, the transmission of
infectious disease(s) from one patient to another. Contamination of the device
may lead to injury, illness, or death of the patient.
Precautions
•Minimally invasive procedures should be performed only by persons having
adequate training and familiarity with minimally invasive techniques. Consult
medical literature relative to techniques, complications, and hazards prior to
performance of any minimally invasive procedure.
•Minimally invasive instruments may vary in diameter from manufacturer to
manufacturer. When minimally invasive instruments and accessories from
different manufacturers are employed together in a procedure, verify compatibility
prior to initiation of the procedure.
•Do not autoclave device.
•Do not submerse device.
•Do not spray the Holster with any fluids.
•Special care should be taken to avoid bending or twisting the Probe. If Probe is
bent, do not use. Dispose of the Probe in an appropriate container.
•The Probe is not designed for percutaneous skin puncture.
•The Holster must only be used with Mammotome elite Biopsy Probes.
•Dispose of all opened disposable instruments whether used or unused.
•If the patient-contacting components of the sterile Probe (i.e., the needle
aperture, trocar shaft, or integrated coaxial cannula) should come in contact with
a non-sterile surface, the Probe shall be disposed of in an appropriate container.

5
Adverse Reactions
•Potential complications are limited to the region surrounding the biopsy site and
include hematoma, hemorrhage, infection, pain and tissue adherence to the
biopsy probe while removing it from the breast. As per routine biopsy procedures,
it may be necessary to cut tissue adhering to the biopsy probe while removing it
from the breast.
•Patients receiving anticoagulant therapy or who may have bleeding disorders
may be at increased risk.
•Use of products manufactured or distributed by companies not authorized by
Devicor Medical Products, Inc. may not be compatible with the Mammotome elite
System and may lead to unanticipated results, EMC issues and possible injury to
the user or patient.
•The Probe is packaged and sterilized for single use only. Reuse, reprocessing, or
resterilization may compromise the structural integrity of the device and/or lead to
device failure or contamination that in turn may result in patient injury, illness or
death.
Illustration 1: Device Assembly Illustration and Nomenclature

6
Illustration 2: Probe Illustration and Nomenclature
Equipment Required
•Appropriate imaging modality and accessories
•Mammotome elite Biopsy Holster
•Mammotome elite Biopsy Probe
•Surgical gloves and drapes
•Local anesthetic
•Scalpel
•Other equipment as necessary
DIRECTIONS FOR USE
Route of Administration/Method of Application
Caution: Federal (USA) law restricts this device to sale by or on the order of a
physician.
This instrument should only be used by physicians trained in percutaneous needle
techniques for tissue collection.
IMPORTANT: Inspect all packaging before use. If product packaging is compromised or
product is dropped when removing packaging, use the following protocol:

7
•Holster: Follow Cleaning the Holster and Disinfecting the Holster procedures.
•Probe: Dispose as it is no longer a sterile instrument.
Verify compatibility of all minimally invasive instruments and accessories prior to using
the instrument (Refer to Warnings and Precautions Sections).
First Time Use
Holster ships without a full battery charge. The Holster must be completely charged
prior to first time use. Clean and disinfect the Holster, according to Cleaning the Holster
and Disinfecting the Holster. To charge the battery, place the Holster in the Charging
Base. The Holster will indicate proper placement by an audio indicator. Once the
Holster has been fully charged, as indicated by a solid green light on the Battery
Indicator, it may be removed from the Charging Base for use. An audio indicator will
sound when the Holster is removed from the Charging Base. The battery will require
approximately 200 minutes to fully charge.
IMPORTANT: The Holster MUST BE FULLY CHARGED before the initial use.
Loading the Probe
1. Using sterile technique, remove the Probe from the package. To avoid damage,
do not drop the device into the sterile field. If the patient-contacting parts (trocar
shaft, aperture, and integrated coaxial cannula) of the Probe come in contact with
a non-sterile surface, the Probe must be disposed of in an appropriate container
•The Probe is packaged with a protective sleeve over the trocar shaft. It is
recommended that the protective sleeve remain on the trocar shaft until
the Probe is ready to be introduced into the percutaneous site. Take care
to avoid injury when removing the sleeve.
2. Grasp the Probe body and align the Alignment Tab with the Holster notch. Begin
pushing the Probe base into the Holster cavity while lining up the Holster’s
Alignment Tab with the Holster notch in the Probe body (See Illustration 3, Step
1).
3. Push the Probe body firmly into the Holster until a click is heard indicating the
Locking Tabs have engaged the Holster (See Illustration 3, Step 2).
8
Illustration 3:
CAUTION: To avoid pinching fingers while loading the Probe into the Holster, grasp the
Holster on the sides above the logo and near the Probe Locking Tabs.
4. When the probe is inserted, the Holster will automatically turn on and begin an
initialization sequence. During initialization, the motor is audible and the active
Biopsy Indicator Light is illuminated solid orange. At the end of a successful
initialization, the Holster beeps 1 time and the active Biopsy Indicator Light
illuminates green indicating the system is ready for sampling.
•If the system is not ready for sampling, the Holster will beep 3 times and
the Fault Indicator Light will illuminate amber. See Troubleshooting for the
corrective action.
CAUTION: Moving parts. Ensure nothing is blocking the needle aperture at this time.
•If the Holster is left undisturbed for 10 minutes after loading a Probe, the Holster
will enter a sleep mode to conserve battery charge. During sleep mode, the
Biopsy and Battery Indicator Lights will turn off and the buttons will be inactive.
Once the Holster is moved, the device will wake from sleep mode.
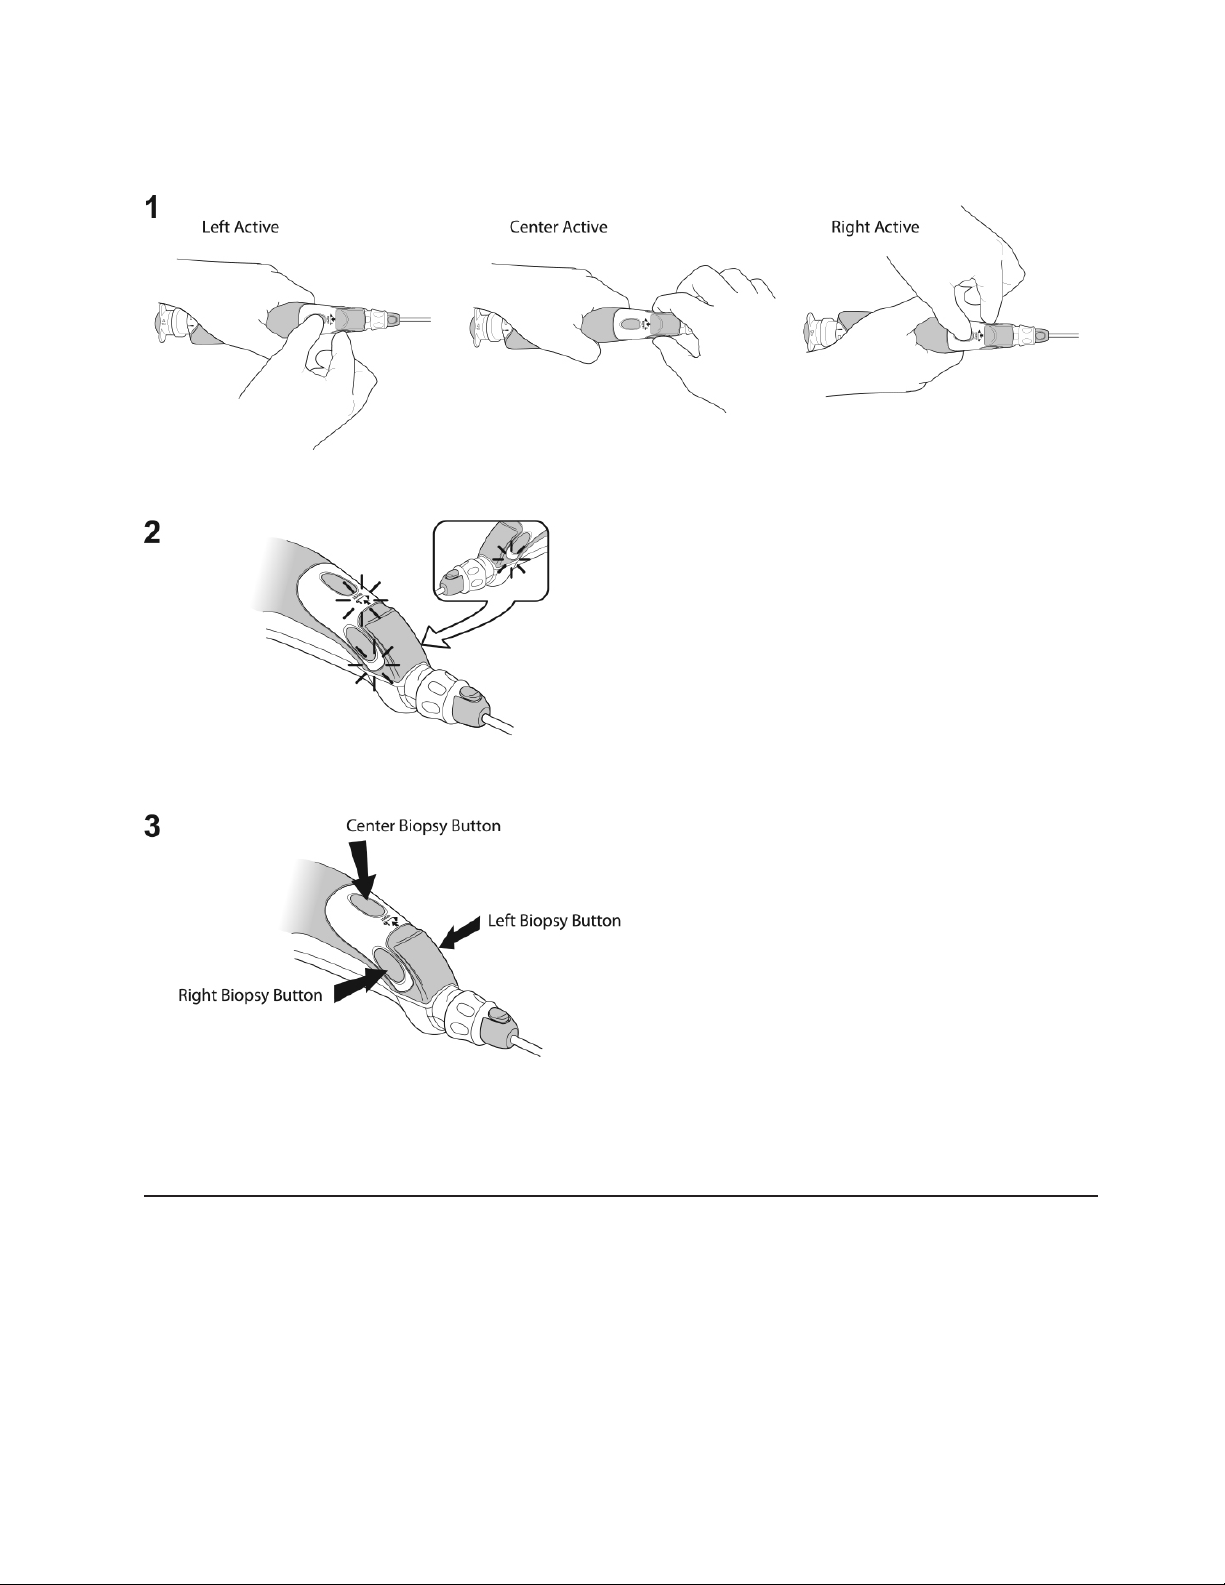
Biopsy Button Selection
The Center Biopsy Button is pre-selected when shipped. Only one Biopsy Button
remains active when the device is on. The active Biopsy Button is identified by a solid
green Biopsy Indicator Light. To change the desired active Biopsy Button, ensure the
Probe is attached then press and hold the two inactive Biopsy Buttons simultaneously
for 3 seconds (See Illustration 4, Step 1). There will be an audible indicator and all 3
Biopsy Indicator Lights will be flashing green (See Illustration 4, Step 2). User may then
press and release the desired active Biopsy Button (See Illustration 4, Step 3). The
active Biopsy Button selection is stored in the device for future use.
9
Illustration 4:
The Essential Performance of the Mammotome elite Holster is the activation of the
sampling cycle only when the active sample button is pressed.
Procedures for Tissue Sampling
Prepare the percutaneous site in accordance with standard surgical technique prior to
insertion of the Probe.
5. Incise the selected area adequately to accommodate the trocar shaft.

10
6. Remove the protective sleeve from the Probe.
•The Integrated Coaxial Cannula may be removed if further ease of
insertion is desired. If it is removed, discard appropriately. It is
recommended that the Integrated Coaxial Cannula not be reattached to
the Probe to minimize the risk of injury.
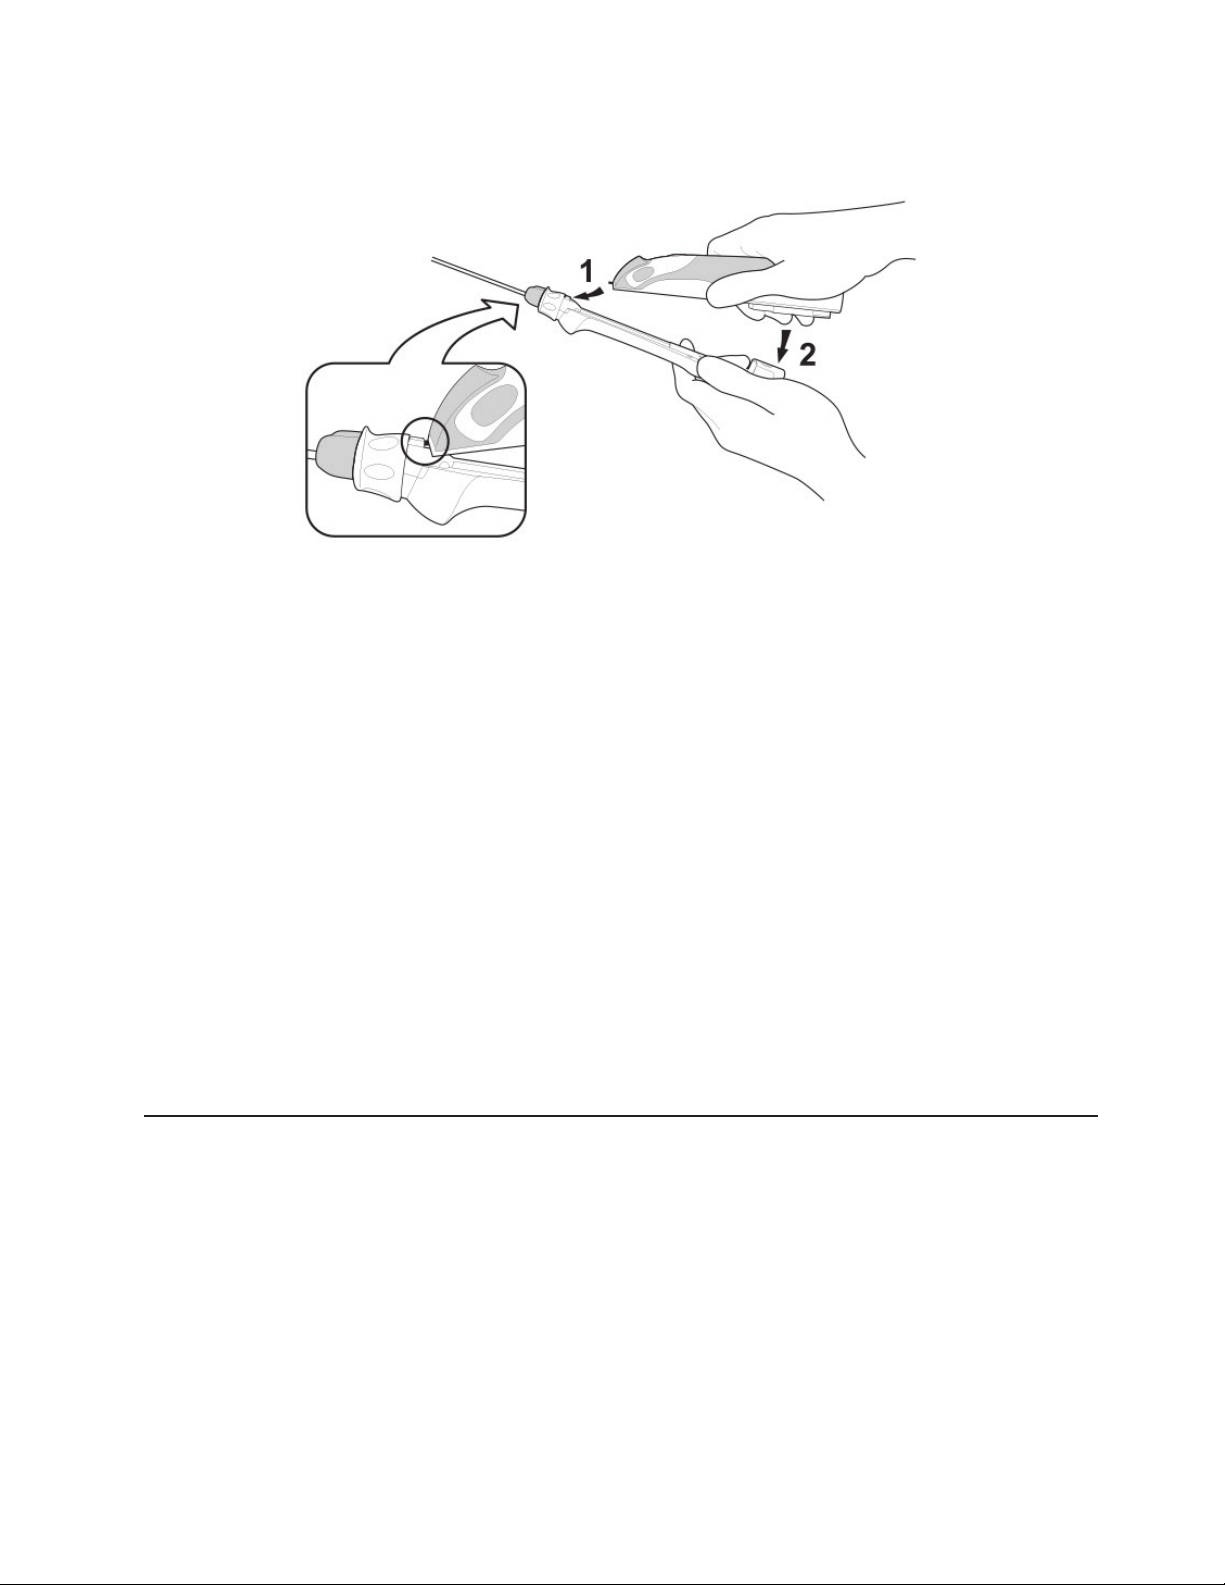
7. If necessary, use the Needle Rotation Knob to adjust the position of the Needle
Aperture before introducing the Probe into the incision. To rotate, pull the Needle
Rotation Knob out (See Illustration 5, Step 1). Rotate to desired clock position
(See Illustration 5, Step 2) and release (See Illustration 5, Step 3). The Aperture
Locator indicates the position of the aperture.
Illustration 5:
8. Introduce the Probe through the incision and position the Probe tip in the target
area with the tip past the lesion. Imaging guidance should be used as
appropriate.
•Keep fingers clear of active Biopsy Button until target site has been
reached.
9. Push the active Biopsy Button on the Holster to acquire a tissue sample. The
biopsy cycle proceeds automatically. A vacuum is created, the inner cutter
cannula of the Probe is retracted, tissue is drawn into the Needle Aperture and
the hollow cutter rotates and translates forward, cutting tissue. When the cutter
reaches the distal end of the Needle Aperture, it will stop moving and use the
vacuum to transport the sample to the Specimen Collection Cup. The Biopsy
Indicator Light continuously illuminates orange and the motor will be audible
during the sampling and tissue collection process. At the end of the biopsy cycle,
the vacuum will turn off and the Biopsy Indicator Light will illuminate solid green.
•Do not remove the Specimen Collection Cup during tissue acquisition.
•The biopsy cycle may be interrupted to avoid unnecessary injury or
visualize the location of the aperture via imaging (sonogram).
11
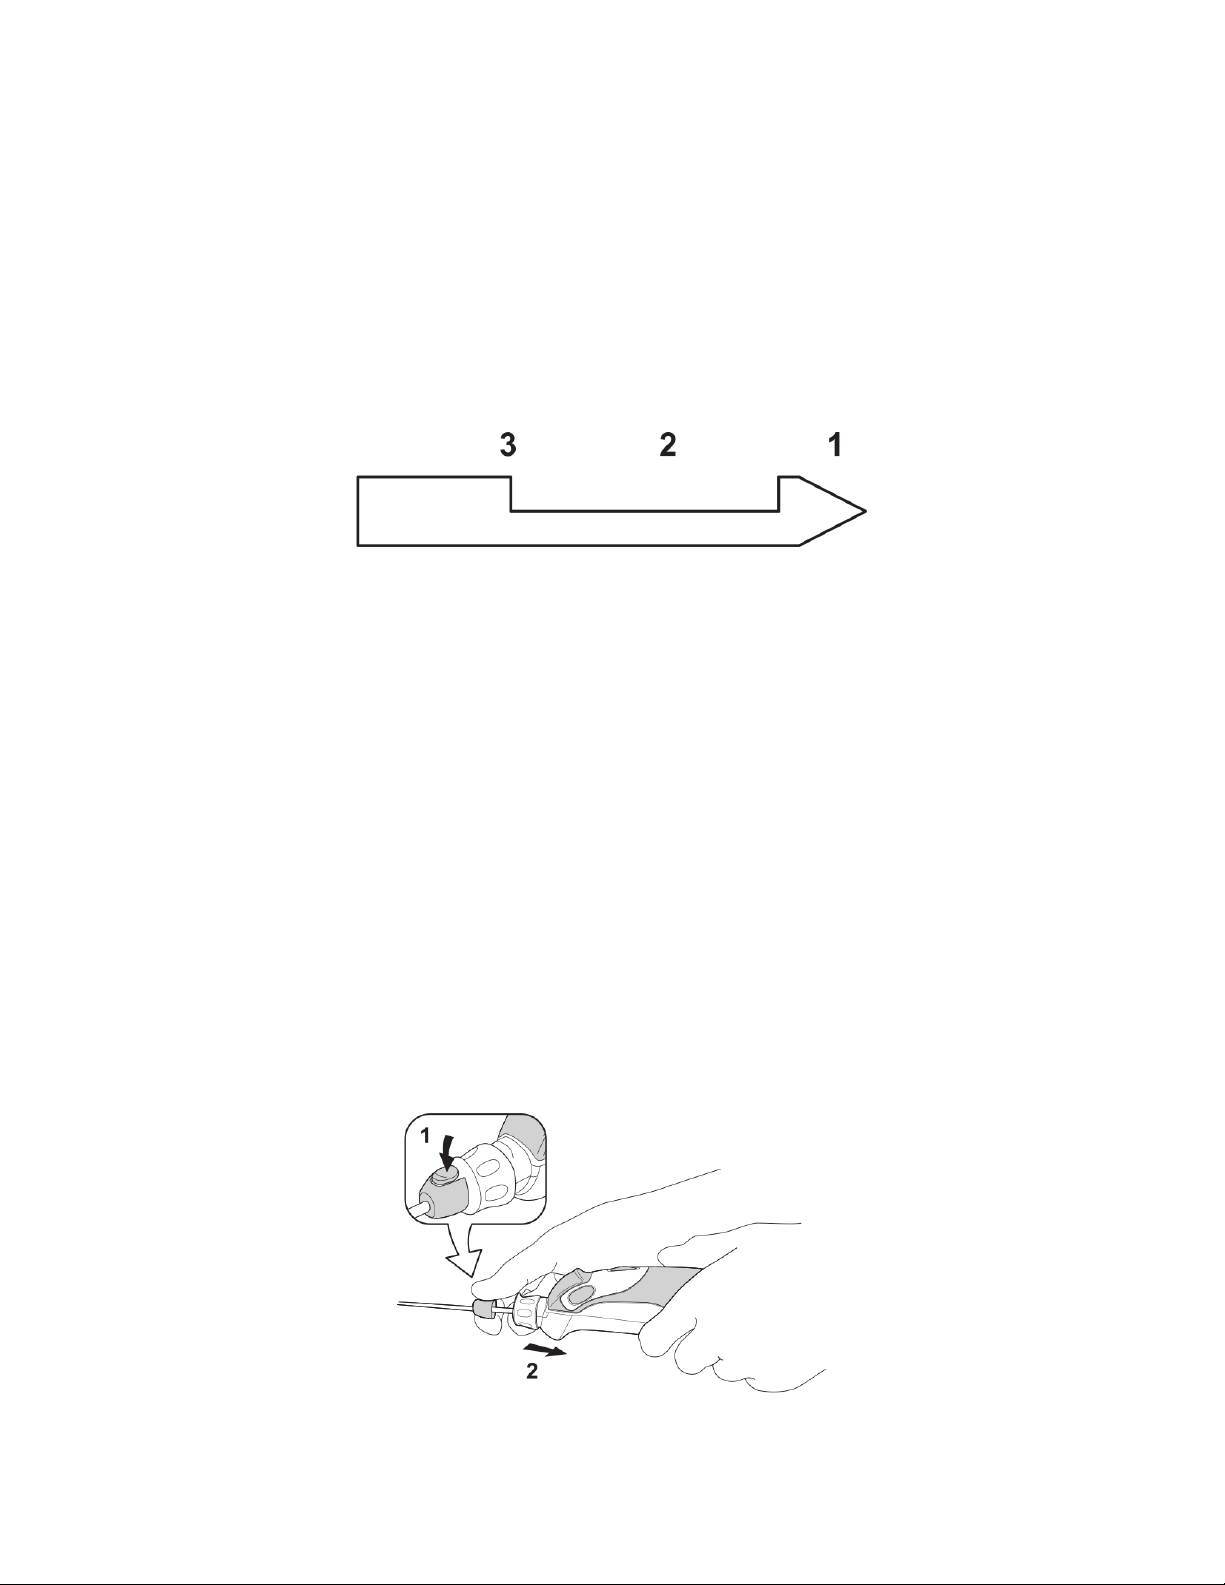
•Push the active Biopsy Button only once to initiate the biopsy cycle. To
interrupt the biopsy cycle, push the Biopsy Button again when the cutter is
retracting from position 1 to 3 (See Illustration 6) or when the cutter is
advancing from position 3 to 2. When the biopsy cycle is interrupted, the
cutter will retract to position 3. The Biopsy Indicator LED flashes orange.
To complete the biopsy cycle, push the Biopsy Button.
Illustration 6:
CAUTION: Moving parts. Ensure nothing is blocking the needle aperture at this time.
10.Rotate the aperture, via rotation of the Holster and Probe, for the next sample
acquisition and repeat step 6 as necessary to obtain additional samples.
•To avoid bending the needle, do not apply excessive pressure when
positioning within the breast or axilla.
•Verify collection of desired specimen using post biopsy imaging of the
patient as necessary.
11.If proceeding WITHOUT using a biopsy site identifier, once the final tissue
sample is obtained, remove the device and care for the incision site as
appropriate. Advance to Step 10.
12.If proceeding WITH using a biopsy site identifier, once the final tissue sample is
obtained, disconnect the Integrated Coaxial Cannula and remove the Probe,
leaving the cannula in place, by pressing the Coaxial Release Button (See
Illustration 7) to facilitate marker placement in the biopsy cavity.
Illustration 7:
12
a. Using standard surgical technique, insert a compatible marker through the
Coaxial Cannula, using ultrasound image-guidance to confirm that the
desired depth is reached.
b. When the desired depth is reached - as confirmed by ultrasound image-
guidance - deploy the marker.
c. Use imaging to verify marker has reached desired location.
d. Remove and dispose of the Coaxial Cannula and care for the incision site
as appropriate.
13.To assure a cleared needle after the needle has been removed from the breast
or axilla, press the Biopsy Button to activate a test cycle.
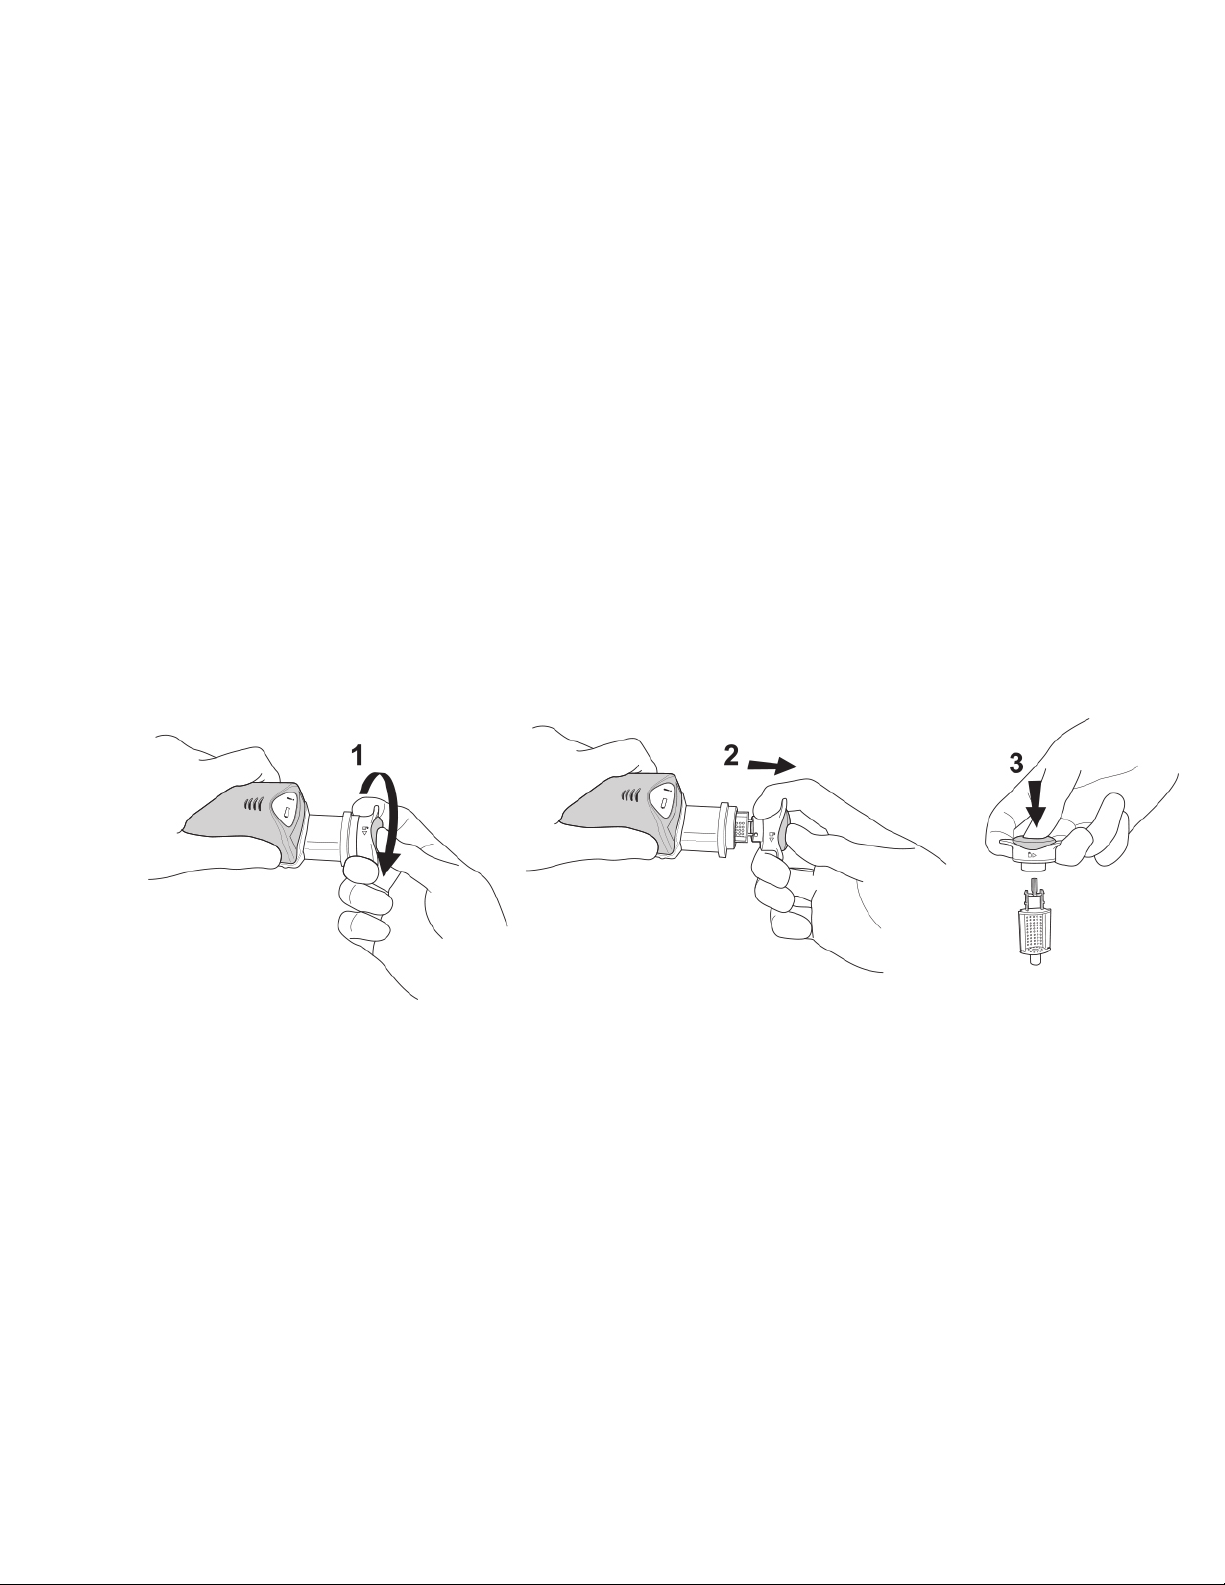
14.Rotate the Specimen Collection Cap counter clockwise a quarter turn (See
Illustration 8 Step 1). Remove the Cap and Tissue Basket together (See
Illustration 8, Step 2). Press the Tissue Basket Release Button to remove the
Tissue Basket from the Specimen Collection Cap for ease of sample pathology
(See Illustration 8, Step 3).
Illustration 8:
15.Sterile forceps may be used to aid in removing the samples from the Tissue
Basket, if needed.
16.Replace Specimen Collection Cap to dispose of Probe. To replace, rotate
Specimen Collection Cap a quarter turn counter clockwise, insert into Specimen
Collection Cup (See Illustration 9, Step 1) and rotate clockwise a quarter turn
(See Illustration 9, Step 2). The lock symbol should be at the 12 o’clock position.
If applicable, insert new Tissue Basket and Specimen Collection Cap to continue
sampling (See Illustration 9).

13
Illustration 9:
CAUTION: Probe is meant for SINGLE-USE ONLY. Dispose of Probe immediately after
use.
NOTE: Single patient use probes are considered medical waste and should be disposed
of appropriately (e.g. incineration).
Removing Probe from Holster
While pressing down on the Probe’s Locking Tab, pull the Probe out of the Holster
cavity (See Illustration 10). Dispose of Probe in the appropriate container.
Illustration 10:
CAUTION: Probe is meant for SINGLE-USE ONLY. Dispose of Probe immediately after
use.
CAUTION: Do not recap Probe tip.
The cleaning agents and disinfectants specified for use in these instructions have
been validated for use with the Mammotome elite biopsy system. The use of
cleaning agents or disinfectants other than those specified in these instructions
should be assessed for equivalency before using. Technical data sheets are
typically available through the cleaning/disinfection agent manufacturer’s web
pages to assist in this assessment. Any cleaning or disinfection process,

14
including tools and solutions, may influence the wear of a device or equipment.
There are no limitations for time of storage of any disinfected device prior to use.
Additionally, no support systems are required.
Cleaning the Holster
Less than 45 minutes after each use, manually clean the Holster thoroughly utilizing a
pH neutral enzymatic detergent. Proceed with manual cleaning utilizing an enzymatic
detergent as follows:
1. Prepare a pH neutral detergent or pH neutral enzymatic detergent according to
the detergent manufacturer’s directions.
2. Use a soft, clean cloth lightly moistened with the cleaning solution to manually
clean all surfaces that are exposed when the probe is attached to the Holster. In
addition, use a standard soft bristle toothbrush to clean areas containing
crevices. The gears and electronics on the underside of the Holster should not be
wiped with detergent.
3. To rinse, wipe thoroughly using a soft, clean cloth lightly moistened with
lukewarm (27°C – 44°C) tap water.
4. To rinse the crevices, wipe thoroughly using a clean soft bristle, standard
toothbrush moistened with lukewarm (27˚C- 44˚C) tap water.
5. Dry with a clean, soft cloth. Do not expose to heat greater than 50°C
6. Inspect the device for visible contamination. If contamination is present, repeat
steps 1-5 until no visible contamination is present.
CAUTION: Do not attempt to sterilize the Holster or Charger Base through autoclave,
ethylene oxide, radiation, or plasma sterilization procedures; do not process through an
automated washer-disinfect or ultrasound bath; do not spray the Holster with fluids or
submerge in fluids; do not use liquids on the Charger Base; this may damage the
instrument. Do not allow the detergent to come in contact with the electronic
components on the underside of the Holster as this may damage the Holster. If the
Holster is cleaned improperly, the warranty may be void. Do not transport the device in
a container prior to cleaning.
Disinfecting the Holster
An intermediate level disinfection process must follow the cleaning procedure. The
following chemical disinfectants are approved for use with the Holster:
•50% Bleach (Sodium Hypochlorite) Solution (1 part bleach to 1 part purified or
deionized water)

15
Disinfectants should be prepared and used according to the manufacturer’s
recommendations for use, concentration and contact time. The use of other
disinfectants, other than those specified in these instructions, should be assessed for
equivalency before using. Technical data sheets are typically available through the
manufacturer’s web pages to assist in this assessment. Any disinfection process,
including tools and solutions, may influence the wear on a device or equipment.
1. Soak a clean cloth and a soft bristle toothbrush in the disinfectant solution.
Squeeze the cloth thoroughly to remove all excess solution. Tap toothbrush to
remove excess solution.
2. Thoroughly wipe down all surfaces of the Holster that are exposed when probe is
attached to the Holster ensuring that a slightly wet surface is maintained for 5
minutes. The gears and electronics on the underside of the Holster should not be
wiped with detergent.
3. Thoroughly scrub crevice areas with the soft bristle, standard toothbrush
ensuring that a slightly wet surface is maintained for 5 minutes.
4. Sterile gauze or a clean, soft cloth moistened with purified water should be used
to remove the disinfectant from the device. Repeat 4 additional times to
thoroughly remove residue.
5. A clean soft bristle, standard toothbrush moistened with purified water should be
used to remove the disinfectant from the crevices of the device. Repeat 6
additional times to thoroughly remove residue.
6. Wipe the Holster with 70% Isopropyl Alcohol (IPA) applied to gauze. Ensure the
gauze is inserted into the crevice of the device.
7. Allow the Holster to air dry.
Within the applied decontamination process, ensure that detergent and disinfectant
residuals are sufficiently removed. Purified or deionized water should be used during
final rinsing processes, where applicable (multiple rinses may be required). Refer to the
manufacturer’s recommendations for the removal of disinfectant residuals.
CAUTION: Do not attempt to sterilize the Holster or Charger Base through autoclave,
ethylene oxide, radiation, or plasma sterilization procedures; do not spray the Holster
with fluids or submerge in fluids; do not use liquids on the Charger Base; this may
damage the instrument. Do not allow the disinfectant to come in contact with the
electronic components on the underside of the Holster as this may damage the Holster.
If the Holster is disinfected improperly, the warranty may be void. Do not transport the
device in a container prior to disinfection.
Disinfected products should be stored in dry, clean environment, protected from
contamination, direct sunlight, pest and extreme temperatures and humidity.
The Mammotome elite holster has an expected life of 500 reprocessing cycles.

16
Charging the Holster
Completely charge the Holster prior to first time use. The Holster utilizes a rechargeable
lithium-polymer battery. The battery will require approximately 200 minutes to fully
charge. The battery must be adequately charged prior to using the Holster for the first
time and prior to beginning each procedure. While in the Charging Base, the Battery
Indicator Light will illuminate solid green when the battery is fully charged. If the battery
is not fully charged, the Battery Indicator Light will flash green or yellow to indicate
reduced battery level.
To charge the Holster:
1. Ensure the appropriate adapter plug is connected to the AC power adapter.
2. Connect the small silver plug from the AC power adapter cord to the charging
base.
3. Place the charging base on the flat surface that is easily accessible.
4. Plug the AC power adapter into a wall outlet.
5. After cleaning and disinfecting, place the Holster into the charging base. When
properly placed on the Charging Base, the Holster will emit a two-tone beep to
indicate correct placement into the base. If the yellow light illuminates, the battery
will require approximately 200 minutes to fully charge.
6. The Battery Indicator Light will flash yellow or green to indicate active charging
and level of charge while on the charging base. The Holster is adequately
charged when the Battery Indicator Light illuminates solid green. The Holster will
emit a two-tone beep when removed from the Charging Base.
•Use only with supplied AC power adapters, cords and other accessories provided
in the package at the time of purchase. The AC adapter from wall outlet shall be
safely removed and serve as isolation means. Do not place the charging base
and AC adapter in a location where it is difficult to remove if needed to
disconnect from wall outlet.
•After every use or when not in use, the Holster should remain in the Charging
Base to maintain a fully charged battery. A safety circuit prevents overloading the
battery.
•Any time Holster is motionless for 10 minutes with or without a Probe attached,
the Battery Indicator Light will turn off. When the Holster is moved, the Battery
Indicator Light will illuminate to indicate the current state of charge.
•Any time Holster is motionless for 1 hour with or without a Probe attached, the
Holster will go into a deep sleep. Place the Holster into the Charging Base
without the probe and remove it to turn the Holster back on.

17
•During a biopsy procedure, the Battery Indicator Light will illuminate solid green.
If the Battery Indicator Light flashes green, the Holster has sufficient charge to
complete one procedure. If the Battery Indicator Light illuminates a continuous
yellow, the Holster will not function and must be placed on the Charging Base
immediately.
Battery Indicator Quick Reference Guide
Battery Indicator Status
Holster Inside Charger
Holster Outside Charger
Solid Green Battery fully charged Adequate charge available
Flashing Green Battery is charging Sufficient charge to complete one
procedure
Flashing Yellow Battery is charging. Holster must
remain on charging base.
N/A
Solid Yellow N/A Insufficient charge. Return Holster
to charging base.
IMPORTANT: If the Battery Indicator Light turns off after a continuous yellow light, the
Holster cannot be recharged. Contact the MAMMOTOME Customer Support Center or
a representative.
NOTE: To minimize unnecessary power usage during extended periods of non-use, the
Holster charger can be unplugged.
NOTE: Do not stack charging base on top of any other devices.
Troubleshooting
1. The Fault Indicator Light is solid amber:
The Holster performs periodic system checks while the device operates. If a fault
is detected, the Fault Indicator Light will illuminate solid amber. If this occurs,
ensure the Probe is outside of the patient, remove the Probe from the Holster
and replace with a new Probe. If the Fault Indicator Light does not turn off,
contact the MAMMOTOME Customer Support Center or a representative.
2. The Battery and Biopsy Indicator Lights do not illuminate after loading a
Probe into the Holster:
Check the Battery Indicator to ensure sufficient charge. Ensure the Alignment
and Locking Tabs are securely in place. Ensure it is the initial use of the Probe. If
these conditions are satisfied and lights still do not illuminate, replace the Probe
with a new Probe. If the indicator lights do not turn on after properly inserting a
new Probe, contact the MAMMOTOME Customer Support Center or a
representative.

18
3. The Holster is not charging when placed into the Charging Base:
Check that the AC power cord is securely inserted into the Charging Base and a
wall outlet. Check that there are no obstructions over the charging connections
on the Charging Base or Holster and then insert the Holster into the Charging
Base. Ensure the audible tone sounds from the Holster and the Battery Indicator
Light flashes. If there is no audible tone or flashing light, replace the Charging
Base and AC power cord by contacting the MAMMOTOME Customer Support
Center or a representative.
Holster Specifications
Electrical Conformity
This medical equipment has passed all required testing for electric
shock, fire and mechanical hazards in accordance with UL 60601-1,
IEC/EN 60601-1, CAN/CSA C22.2 No 60601-1
Fluid Ingress Not protected against the ingress of fluids
Flammability Equipment not suitable for use in the presence of flammable
anesthetic
Dimensions Length: 18.9 cm
Width: 5.0 cm
Height: 3.8 cm
Battery Location Batteries are located in the proximal end of the Holster
AC Power Cord and Adapters Use only with supplied AC power accessories:
•Model : FRM015-S09-1 p/n TRM15-S10-I-351359
•Input Voltage: 100-240VAC
•Input Current: 0.7A-0.4A
•Input Frequency: 50-60Hz
•Output Voltage:10 Volts DC
•Output Current: 1.5 A
•Max Watts: 15W

19
System Specifications
Classification Class II, internally powered Type BF equipment
Applied Part Probes (MEP10, MEP13)
Environmental Conditions Transportation and Storage:
•-20°C to +50°C (-4°F to 122°F)
•10% to 95% Relative Humidity, Non-Condensing
•500 to 1060 hPa Atmosphere Pressure
Operation:
•+5°C to +40°C (41°F to 104°F)
•30% to 75% Relative Humidity, Non-Condensing
•810 to 1060 hPa Atmosphere Pressure
Mode of Operation Non-Continuous: 40 cycles ON, 30 minutes OFF
Holster Package Specifications
Package Materials B-Flute Corrugate Carton
EPE Foam
Environmental Conditions Fully Loaded carton with product: 3lb 1.5oz:
•EPE Foam: 5.7oz
•B-Flute Corrugate Carton with Label: 10.4oz
•Paper IFU + Set Up Sheet: 4.0oz
•Charger: 14.1oz
•Holster: 8.6oz
•Adapter + Box: 7.6oz
Electromagnetic Compatibility (EMC), Guidance, and Manufacturer
Declarations
The Mammotome elite Biopsy System requires special precautions regarding
electromagnetic compatibility (EMC) and must be installed and used in accordance with
the EMC information provided in this installation guide. The Mammotome elite Biopsy
System is intended for use in the electromagnetic environment specified below. The
customer or user of the Mammotome elite Biopsy System should assure that is used in
such an environment.
Table of contents
Other Devicor Medical Equipment manuals

Popular Medical Equipment manuals by other brands


Getinge
Getinge Arjohuntleigh Nimbus 3 Professional Instructions for use

Mettler Electronics
Mettler Electronics Sonicator 730 Maintenance manual

Pressalit Care
Pressalit Care R1100 Mounting instruction

Denas MS
Denas MS DENAS-T operating manual

bort medical
bort medical ActiveColor quick guide

AccuVein
AccuVein AV400 user manual


