DeVilbiss Air Power Company ATK100 User manual
Model ATK100
OPERATOR’S MANUAL
SAFETY ● ASSEMBLY ● OPERATION ● MAINTENANCE ● ESPAÑOL
D26409 Rev. 0 4/28/02
Read Operator’s Manual. Do not operate equipment until you have read this
Operator’s Manual for Safety, Assembly, Operation, and Maintenance
Instructions.

2- ENG
D26409
• Air powered equipment and power tools are capable of
propelling materials such as fasteners, metal chips, saw
dust, and other debris at high speed, which could result
in serious eye injury.
• Tool attachments can become loose or break and fly
apart propelling particles at the operator and others in
the work area.
• Abrasive tools such as sanders and grinders, rotating
tools such as drills, and impact tools such as nailers,
staplers, wrenches, hammers, and reciprocating saws
are capable of generating sparks which could result in
ignition of flammable materials.
• Never operate tools near flammable substances such
as gasoline, naptha, cleaning solvents, etc.
• Work in a clean, well ventilated area free of combustible
materials.
• Never use oxygen, carbon dioxide or other bottled
gases as a power source for air tools.
HAZARD
WHAT COULD HAPPEN HOW TO PREVENT IT
RISK OF FIRE OR EXPLOSION
• Exceeding the maximum pressure rating of tools or
accessories could cause an explosion resulting in seri-
ous injury.
• Use compressed air regulated to a maximum pressure
at or below the rated pressure of any attachments.
• Never connect to an air source that is capable of
exceeding 200 psi.
• Always verify prior to using the tool that the air source
has been adjusted to the rated air pressure range.
Some dust created by power sanding, sawing, grinding, drilling, and other
construction activities contains chemicals known (to the State of California) to cause
cancer, birth defects or other reproductive harm. Some example of these chemicals are:
●●lead from lead-based paints
●●crystalline silica from bricks and cement and other masonry products
●●arsenic and chromium from chemically-treated lumber
Your risk from these exposures varies, depending on how often you do this type of work. To reduce your
exposure to these chemicals: work in a well ventilated area, and work with approved safety equipment,
always wear MSHA/NIOSH approved, properly fitting face mask or respirator when using such tools.
When using air tools, basic safety precautions should always be followed to reduce the risk of personal
injury.
SAFETY GUIDELINES - DEFINITIONS
indicates an imminently hazardous situation which, if not
avoided, will result in death or serious injury.
indicates a potentially hazardous situation which, if not
avoided, could result in death or serious injury.
indicates a potentially hazardous situation which, if not
avoided,may result in minor or moderate injury
used without the safety alert symbol indicates potentially
hazardous situation which, if not avoided, may result in
property damage.
This manual contains
information that is
important for you to know and
understand. This information re-
lates to protecting YOUR SAFE-
TY and PREVENTING
EQUIPMENT PROBLEMS. To
help you recognize this informa-
tion, we use the symbols below.
Please read the manual and pay
attention to these sections.
IMPROPER OPERATION OR MAINTENANCE OF THIS PRODUCT COULD RESULT IN
SERIOUS INJURY AND PROPERTY DAMAGE. READ AND UNDERSTAND ALL WARNINGS AND
OPERATING INSTRUCTIONS BEFORE USING THIS EQUIPMENT.WHEN USING AIR TOOLS, BASIC
SAFETY PRECAUTIONS SHOULD ALWAYS BE FOLLOWED TO REDUCE THE RISK OF PERSONAL
INJURY.
SAVE! IMPORTANT SAFETY INSTRUCTIONS SAVE!
HAZARD
WHAT COULD HAPPEN HOW TO PREVENT IT
RISK OF EYE OR HEAD INJURY
• Always wear ANSI approved Z87.1 safety glasses with
side shields.
• Never leave operating tool unattended. Disconnect air
hose when tool is not in use.
IMPORTANT SAFETY INSTRUCTIONS
• For additional protection use an approved face shield
in addition to safety glasses.
• Make sure that any attachments are securely
assembled.
• Compressed air can be hazardous. The air stream can
cause injury to soft tissue areas such as eyes, ears, etc.
Particles or objects propelled by the stream can cause
injury.

3- ENG D26409
• A wrench or a key that is left attached to a rotating part
of the tool increases the risk of personal injury.
• Tools left unattended, or with the air hose attached can
be activated by unauthorized persons leading to their
injury or injury to others.
• Air tools can propel fasteners or other materials
throughout the work area.
• Air tools can become activated by accident during
maintenance or tool changes.
• Remove air hose when tool is not in use and store tool
in secure location away from reach of children and or
untrained users.
• Use only parts, fasteners, and accessories
recommended by the manufacturer.
• Keep work area clean and free of clutter. Keep children
and others away from work area during operation of
the tool.
• Keep work area well lit.
• Remove air hose to lubricate or add grinding
attachments, sanding discs, drills, etc. to the tool.
• Never carry the tool by the hose.
• Avoid unintentional starting. Don't carry hooked-up tool
with finger on trigger.
• Repair servicing should be done only by an authorized
service representative.
• Using inflator nozzles for duster applications can cause
serious injury. •DO NOT use inflator nozzles for duster applications.
• Remove adjusting keys and wrenches before turning
the tool on.
HAZARD
WHAT COULD HAPPEN HOW TO PREVENT IT
RISK OF INJURY
• Always wear MSHA/NIOSH approved, properly fitting
face mask or respirator when using such tools.
• Long term exposure to noise produced from the opera-
tion of air tools can lead to permanent hearing loss. • Always wear ANSI S3.19 hearing protection.
HAZARD
WHAT COULD HAPPEN HOW TO PREVENT IT
RISK OF LOSS OF HEARING
HAZARD
WHAT COULD HAPPEN HOW TO PREVENT IT
RISK TO BREATHING INHALATION HAZARD
• Always work in a clean, dry, well ventilated area.• Some materials such as adhesives and tar, contain
chemicals whose vapors could cause serious injury
with prolonged exposure.
• Abrasive tools, such as grinders, sanders, and cut-off
tools generate dust and abrasive materials which can
be harmful to human lungs and respiratory system.
• Air tools can cause the workpiece to move upon con-
tact leading to injury.
• Loss of control of the tool can lead to injury to self or
others.
• Use clamps or other devices to prevent movement.
• Never operate tool while under the influence of drugs
or alcohol.
• Don't overreach. Keep proper footing and balance at all
times.
• Keep handles dry, clean, and free from oil and grease.
• Stay alert. Watch what you are doing. Use common
sense. Do not operate tool when you are tired.
• Poor quality, improper, or damaged tools such as
grinding wheels, chisels, sockets, drills, nailers,
staplers, etc., can fly apart during operation, propelling
particles throughout the work area causing serious
injury.
• Always use tool attachments rated for the speed of the
power tool.
• Never use tools which have been dropped, impacted or
damaged by use.
• Use only impact grade sockets on an impact wrench.
• Do not apply excessive force to the tool, let the tool
perform the work.
• Fasteners could ricochet or be propelled causing
serious injury or property damage. • Never point discharge of tool at self or others.
• Do not pull trigger unless tool contact safety device is
against work surface.
• Never attempt to drive fasteners into hard surfaces
such as steel, concrete, or tile.
• Take care to avoid driving a fastener on top of another
fastener.
• Position tool carefully so that fasteners will be delivered
to the proper location.
4- ENG
D26409
• Tools which cut, shear, drill, staple, punch, chisel, etc.
are capable of causing serious injury.
• Tools which contain moving elements, or drive other mov-
ing tools, such as grinding wheels, sockets, sanding discs,
etc. can become entangled in hair, clothing, jewelry and
other loose objects, resulting in severe injury.
• Never wear loose fitting clothes, or apparel which
contains loose straps or ties, etc. which could become
entangled in moving parts of the tool.
• Remove any jewelry, watches, identifications, bracelets,
necklaces, etc. which might become caught by the
tool.
• Keep hands away from moving parts. Tie up or cover
long hair.
• Always wear proper fitting clothing and other safety
equipment when using this tool.
• Keep the working part of the tool away from hands and
body.
HAZARD
WHAT COULD HAPPEN HOW TO PREVENT IT
RISK OF ENTANGLEMENT
HAZARD
WHAT COULD HAPPEN HOW TO PREVENT IT
RISK OF CUT OR BURNS
• Improperly maintained tools and accessories can cause
serious injury.
Use only accessories identified by the manufacturer to
be used with specific tools. • Use of an accessory not intended for use with the
specific tools, increases the risk of injury to persons.
• Maintain the tool with care.
• Keep a cutting tool sharp and clean. A properly
maintained tool, with sharp cutting edges reduces the
risk of binding and is easier to control.
HAZARD
WHAT COULD HAPPEN HOW TO PREVENT IT
RISK OF INJURY (continued)
• Using air tools to attach electrical wiring can result in
electrocution or death. • Never use nailer/staplers to attach electrical wiring
while energized.
• Avoid body contact with grounded surfaces such as
pipes, radiators, ranges, and refrigerators. There is an
increased risk of electric shock if your body is
grounded.
• Fasteners coming in contact with hidden electrical
wiring could cause electrocution or death.
• This tool is not provided with an insulated gripping
surface. Contact with a “live” wire will also make
exposed metal parts of the tool “live” and can result in
electrocution or death.
HAZARD
WHAT COULD HAPPEN HOW TO PREVENT IT
RISK OF ELETRIC SHOCK
• Thoroughly investigate the workpiece for possible
hidden wiring before performing work.
• Check for misalignment of binding or moving parts,
breakage of parts, and any other condition that affects
the tool’s operation. If damaged, have the tool serviced
before using.
• There is a risk of bursting if the tool is damaged.
Before each use:
l
Drain water from air compressor tank and condensation from air lines. See air compressor’s
operators manual.
Disconnect the tool from the air supply before lubricating or
changing sockets.
l
Lubricate tool, see “Maintenance” section
in this manual.
Impact wrench
sockets and
accessories must be used with this tool.
Do not use hand sockets and
accessories.
l
Select the required impact socket. This tool
has a 1/2" square drive, use 1/2” sockets.
Use 1/2” extensions only when needed.
l
Connect tool to air hose of recommended
size. NOTE: The use of a quick connect
set makes connecting easier.
IMPORTANT: The use of air filters and
air line lubricators is
recommended.
To use:
l
Turn air compressor on and allow air tank
to fill.
l
Set the air compressor’s regulator to 90 PSI. This tool operates at a maximum 90 PSI
pressure.
l
Place tool in forward or reverse position at the desired
torque, see chart for approximate torque values.
IMPORTANT: These torque values can vary depending
on the size of the air compressor and the cubic feet of
air (SCFM) the air compressor delivers.
l
Depress the trigger to operate tool.
l
Release trigger to stop tool.
l
Always disconnect air supply when changing sockets.
l
When job is complete, turn the air compressor off and
store as described in the air compressor operator
manual.
5- ENG D26409
ASSEMBLY
OPERATION
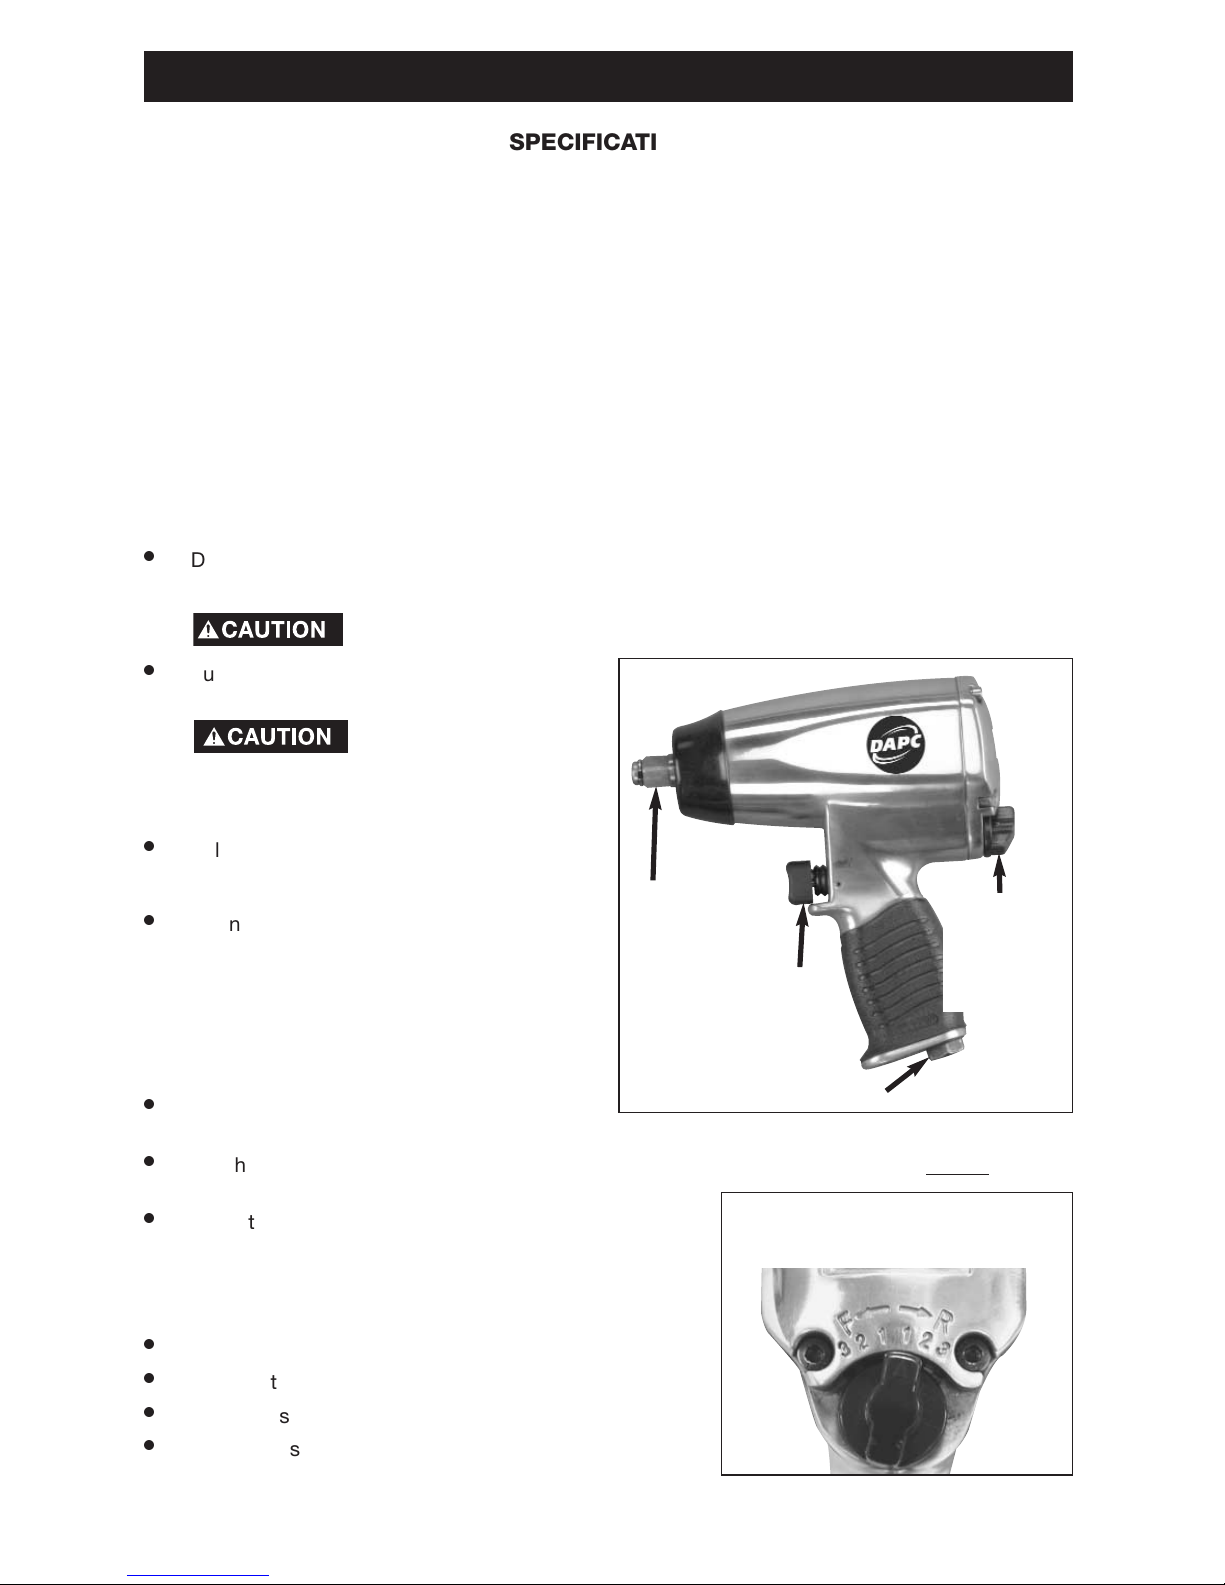
Air Inlet
Trigger
1/2”
Square
Drive
Accessories Required
IMPORTANT: Line pressure or hose inside diameter should be increased to compensate for
unusually long air hoses (over 25 feet). Minimum hose diameter should be 3/8” I.D. and fittings
should have 1/4” NPT thread.
Forward/
Reverse
and Torque
Adjustment
Lever
SPECIFICATIONS
Maximum Torque 260 ft./lbs
Maximum Free Speed @ 90 PSI 7,000 RPM
Maximum Working Pressure 90 PSI
Air Inlet 1/4” NPT
Recommended Hose Size 3/8” I.D.
1/2” Impact Wremch
#1 approximately 110-160 ft./lbs. Torque
#2 approximately 160-210 ft./lbs. Torque
#3 approximately 210-260 ft./lbs. Torque
Forward/
Reverse
and Torque
Adjustment
Lever

6- ENG
D26409
Before each use:
l
Drain water from air compressor tank and condensation from air lines. See air compressor’s
operators manual.
Disconnect the
ratchet wrench from
the air supply before lubricating or
changing sockets.
l
Lubricate tool, see “Maintenance”
section in this manual.
Impact wrench
sockets and
accessories must be used with this
tool. Do not use hand sockets and
accessories.
3/8” Air Ratchet
Maximum Free Speed @ 90 PSI 200 RPM
(Forward/Reverse)
Maximum Working Pressure 90 PSI
Air Inlet 1/4" NPT
Recommended Hose Size 3/8" I.D.
Maximum Torque 50 Ft./Lbs.
SPECIFICATIONS
ASSEMBLY
Accessories Required
IMPORTANT: Line pressure or hose inside diameter should be increased to compensate for
unusually long air hoses (over 25 feet). Minimum hose diameter should be 3/8” I.D. and fittings
should have 1/4” NPT thread.
OPERATION
Air Inlet
Throttle Control Lever
Reverse/Forward Button
MAINTENANCE
Lubrication
Air tools require lubrication throughout the life of the tool. The air motor and bearing uses com-
pressed air to power the tool. Because moisture in compressed air will rust the air motor, you must
lubricate the motor daily. An inline oiler is recommended.
To lubricate the air motor manually:
l
Disconnect the tool from the air supply holding it so the air inlet faces up.
l
Depress the trigger and place one to two drops of air tool oil in the air inlet Depressing the
trigger helps circulate oil in the motor. NOTE: Use SAE #10 weight oil if air tool oil is not
available.
Keep out of the reach of children. If taken internally, do not induce
vomiting, call a doctor immediately or contact your local poison
control center.
l
Connect the tool to an air source, cover the exhaust end with a towel and run for a few
seconds.
Any excess oil in the motor is immediately expelled from the
exhaust port. Always direct exhaust port away from people or
objects.
Failure to lubricate the tool at the air inlet will void your warranty.

7- ENG D26409
l
Select the required impact socket. This tool has a 3/8" square drive, use 3/8” sockets. Use
3/8” extensions only when needed.
Connect tool to air hose of recommended size. NOTE: The use of a quick connect set makes
connecting easier.
IMPORTANT: The use of air filters and air line lubricators is
recommended.
To use:
l
Turn air compressor on and allow air tank to fill.
l
Set the air compressor’s regulator to 90 PSI. This tool operates at a maximum 90 PSI
pressure.
l
Place tool in forward or reverse position.
l
Depress the throttle control lever to operate tool. NOTE: The throttle control lever provides
instant response when depressed.
l
Release throttle control lever to stop tool.
l
Always disconnect air supply when changing sockets.
l
When job is complete, turn the air compressor off and store as described in the air
compressor operator manual.
Tips
l
Drive the fastener until the ratchet stalls and then further tighten by operating the air ratchet in
the same manner as a manually operated ratchet.
MAINTENANCE
Lubrication
Air tools require lubrication throughout the life of the tool. The air motor and bearing uses com-
pressed air to power the tool. Because moisture in compressed air will rust the air motor, you must
lubricate the motor daily. An inline oiler is recommended.
To lubricate the air motor manually:
l
Disconnect the tool from the air supply holding it so the air inlet faces up.
l
Depress throttle control lever and place one to two drops of air tool oil in the air inlet
Depressing the throttle control lever helps circulate oil in the motor. NOTE: Use SAE #10 weight
oil if air tool oil is not available.
Keep out of the reach of children. If taken internally, do not induce
vomiting, call a doctor immediately or contact your local poison
control center.
l
Connect the tool to an air source, cover the exhaust end with a towel and run for a few
seconds.
Any excess oil in the motor is immediately expelled from the
exhaust port. Always direct exhaust port away from people or
objects.
Failure to lubricate the tool at the air inlet will void your warranty.
8- ENG
D26409
Air Hammer
Blows Per Minute 4,500
Maximum Working Pressure 90 PSI
Air Inlet 1/4" NPT
Recommended Hose Size 3/8" I.D.
SPECIFICATIONS
Before each use:
l
Drain water from air compressor tank and condensation from air lines. See air compressor’s
operators manual.
Disconnect the tool from the air supply before lubricating.
l
Lubricate tool, see “Maintenance” section in this manual.
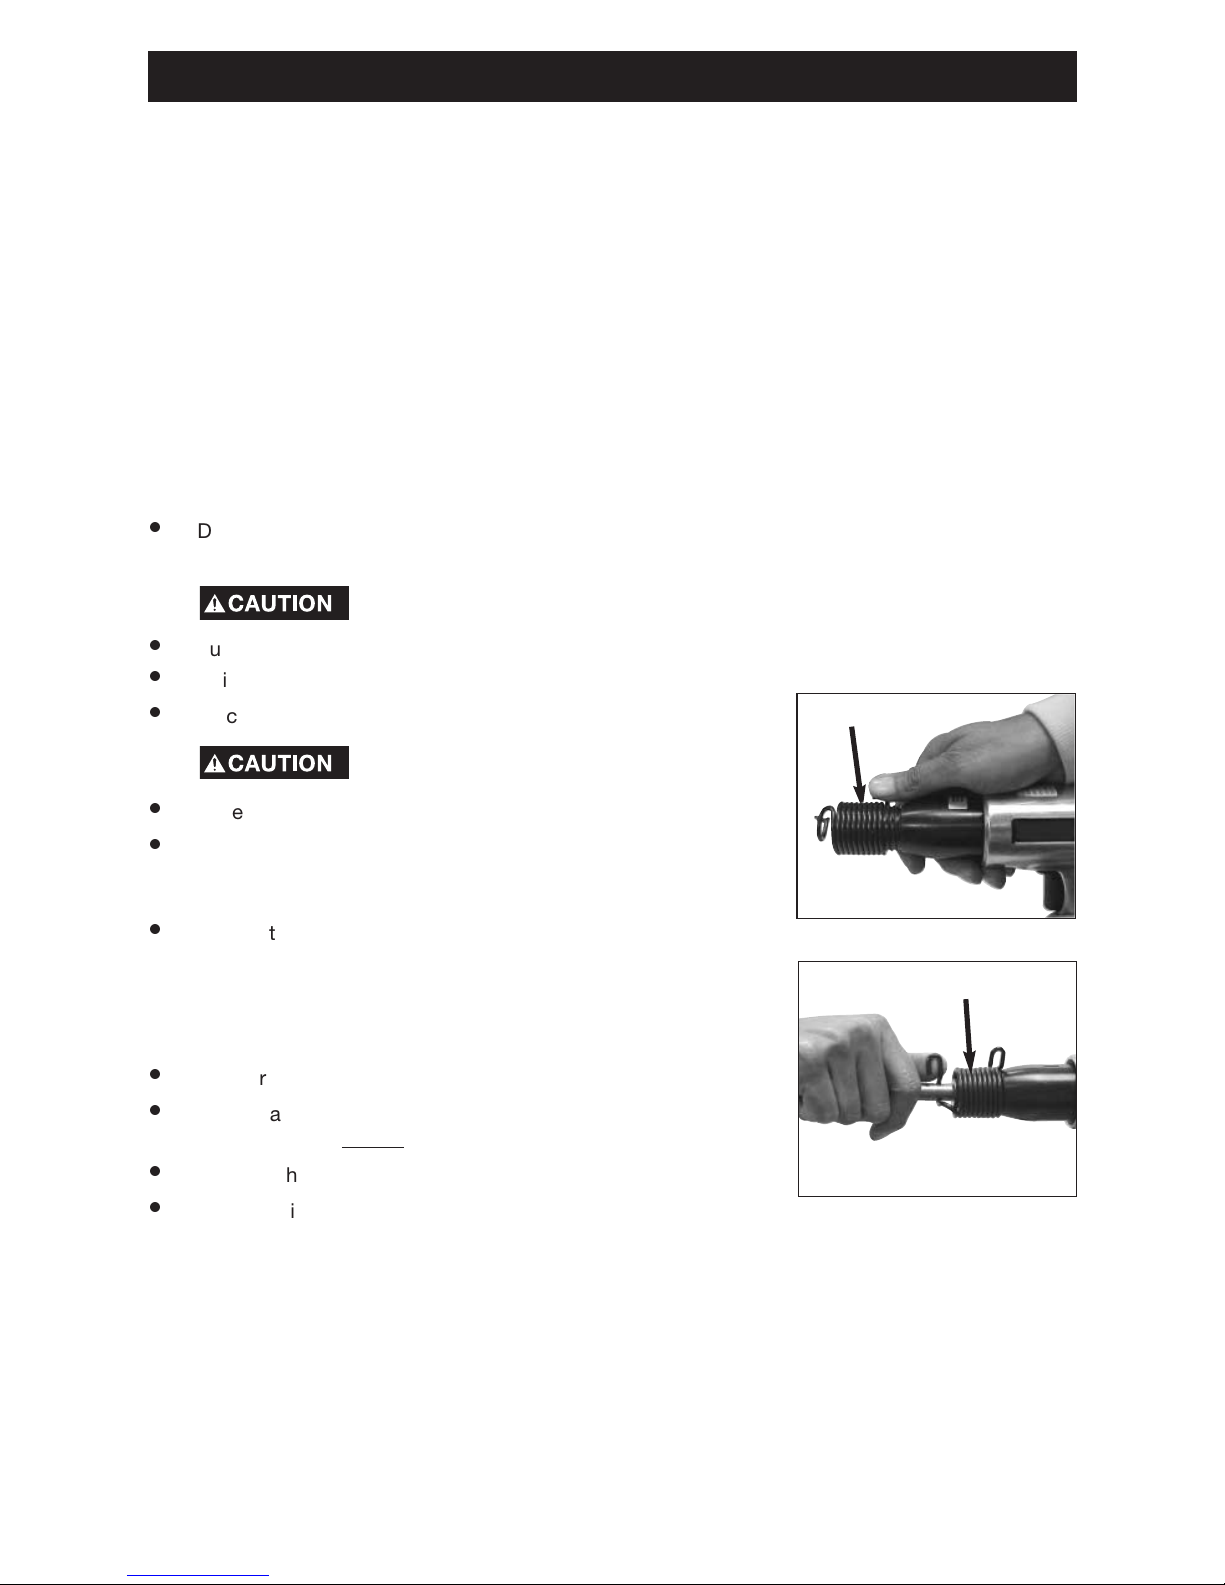
l
Using rear tab, as shown, remove spring retainer.
l
Place chisel into hammer.
Inspect chisel daily for excessive wear or
cracks.
l
Slide spring retainer over chisel.
l
Using front tab, as shown, tightly install spring retainer over
chisel. IMPORTANT: The spring retainer holds chisel in place. It
must be secure before the chisel can operate properly.
l
Connect tool to air hose of recommended size. NOTE: The use
of a quick connect set makes connecting easier.
IMPORTANT: The use of air filters and air line lubricators is
recommended.
To use:
l
Turn air compressor on and allow air tank to fill.
l
Set the air compressor’s regulator to 90 PSI. This tool operates
at a maximum 90 PSI pressure.
l
Depress the trigger to operate tool.
l
Release trigger to stop tool.
ASSEMBLY
OPERATION
Retaining Spring
Retaining Spring
Remove
Install
Accessories Required
IMPORTANT: Line pressure or hose inside diameter should be increased to
compensate for unusually long air hoses (over 25 feet). Minimum hose diameter
should be 3/8” I.D. and fittings should have 1/4” NPT thread.

9- ENG D26409
MAINTENANCE
Lubrication
Air tools require lubrication throughout the life of the tool. The air motor and bearing uses com-
pressed air to power the tool. Because moisture in compressed air will rust the air motor, you must
lubricate the motor daily. An inline oiler is recommended.
To lubricate the air motor manually:
l
Remove chisel.
l
Disconnect the tool from the air supply holding it so the air inlet faces up.
l
Depress the trigger and place one to two drops of air tool oil in the air inlet Depressing the
trigger helps circulate oil in the motor. NOTE: Use SAE #10 weight oil if air tool oil is not
available.
Keep out of the reach of children. If taken internally, do not induce
vomiting, call a doctor immediately or contact your local poison
control center.
l
Connect the tool to an air source, cover the exhaust end with a towel and run for a few
seconds.
Any excess oil in the motor is immediately expelled from the
exhaust port. Always direct exhaust port away from people or
objects.
Failure to lubricate the tool at the air inlet will void your warranty.
Rotary Tool
Maximum Free Speed (No Load) 25,000 RPM
Maximum Working Pressure 90 PSI
Collet Size 1/4", 1/8"
Air Inlet 1/4" NPT
Recommended Hose Size 3/8" I.D.
SPECIFICATIONS
ASSEMBLY
Accessories Required
IMPORTANT: Line pressure or hose inside diameter should be increased to
compensate for unusually long air hoses (over 25 feet). Minimum hose diameter
should be 3/8” I.D. and fittings should have 1/4” NPT thread.

10- ENG
D26409
Before each use:
l
Drain water from air compressor tank and
condensation from air lines. See air
compressor’s operators manual.
Disconnect the tool
from the air supply
before lubricating or changing grinding
abrasive.
l
Lubricate tool, see “Maintenance” section in
this manual.
Use accessories rated
for 25,000 RPM or
more.
l
Select the required grinding stone. NOTE: The tool is equipped with a 1/4” collet and uses grinding
stones with a 1/4” shank size. To use grinding stones with a 1/8” shank size the 1/4” collet must be
replaced with the 1/8” collet supplied.
To change grinding stones:
l
Loosen the collet nut, using wrenches supplied.
l
Insert grinding stone into collet and tighten collet nut.
NOTE: The grinding stone’s shank should be within 1/4”
from collet nut to prevent vibration.
l
Connect tool to air hose of recommended size.
NOTE: The use of a quick connect set makes
connecting easier.
IMPORTANT: The use of air filters and air line lubricators is
recommended.
To use:
l
Turn air compressor on and allow air tank to fill.
l
Set the air compressor’s regulator to 90 PSI. This tool operates
at a maximum 90 PSI pressure.
l
Depress the throttle safety release and throttle control lever to operate tool. NOTE: The spindle
revolves at full speed when throttle control lever is fully depressed. As thumb is raised the self
releasing throttle closes, slowing down the spindle and allowing the operator to choose the best
speed and power for the job. When the throttle lever is completely released it cannot be
depressed again until the safety release is disengaged.
l
Release throttle control lever to stop tool.
l
Always disconnect air supply when changing collets.
l
When job is complete, turn the air compressor off and store as described in the air
compressor operator manual.
OPERATION
Air Inlet
Throttle Control Lever
Collet Nut
Throttle
Safety
Release
Collet Nut
Grinding Stone

11- ENG D26409
MAINTENANCE
Lubrication
Air tools require lubrication throughout the life of the tool. The air motor and bearing use compressed
air to power the tool. Because moisture in compressed air will rust the air motor, you must lubricate
the motor daily. An inline oiler is
recommended.
To lubricate the air motor manually:
l
Disconnect the tool from the air supply holding it so the air inlet faces up.
l
Depress the throttle safety release and throttle control lever and place one to two drops of air
tool oil in the air inlet Depressing the throttle control lever helps circulate oil in the motor.
NOTE: Use SAE #10 weight oil if air tool oil is not available.
Keep out of the reach of children. If taken internally, do not induce
vomiting, call a doctor immediately or contact your local poison
control center.
l
Connect the tool to an air source, cover the exhaust end with a towel and run for a few
seconds.
Any excess oil in the motor is immediately expelled from the
exhaust port. Always direct exhaust port away from people or
objects.
Failure to lubricate the tool at the air inlet will void your warranty.

12- ENG
D26409
LIMITED WARRANTY
DeVilbiss Air Power Company warrants to the original purchaser who uses the product in a consumer
application (personal, residential or household usage) that all products covered under this warranty are free from
defects in material and workmanship for one year from the date of purchase. All products covered by this limited
warranty which are used in commercial applications (i.e., income producing) are warranted to be free of defects in
material and workmanship for 90 days from the date of original purchase. Products covered under this warranty
include air compressors, air tools, service parts, pressure washers, and generators.
DeVilbiss Air Power Company will repair or replace, at DeVilbiss' option, products or components which have
failed within the warranty period. Service will be scheduled according to the normal work flow and business
hours at the service center location, and the availability of replacement parts. All decisions of DeVilbiss Air Power
Company with regard to this limited warranty shall be final.
This warranty gives you specific legal rights, and you may also have other rights which vary from state to state.
RESPONSIBILITY OF ORIGINAL PURCHASER (initial User):
• To process a warranty claim on this product, DO NOT return it to the retailer. The product must be evaluated
by an Authorized Warranty Service Center. For the location of the nearest Authorized Warranty Service Center
call 1-800-888-2468, Ext. 2, 24 hours a day, 7 days a week or visit our web site @ devap.com.
• Retain original cash register sales receipt as proof of purchase for warranty work.
• Use reasonable care in the operation and maintenance of the product as described in the Owners Manual(s).
• Deliver or ship the product to the nearest Authorized Warranty Service Center. Freight costs, if any, must be
paid by the purchaser.
• Air compressors with 60 and 80 gallon tanks will be inspected at the site of installation. Contact the nearest
Authorized Warranty Service Center that provides on-site service calls for service call arrangements.
• If the purchaser does not receive satisfactory results from the Authorized Warranty Service Center, the
purchaser should contact DeVilbiss Air Power Company.
THIS WARRANTY DOES NOT COVER:
• Merchandise sold as reconditioned, used as rental equipment, or floor or display models.
• Merchandise that has become damaged or inoperative because of ordinary wear, misuse*, cold, heat, rain,
excessive humidity, freeze damage, use of improper chemicals, negligence, accident, failure to operate the
product in accordance with the instructions provided in the Owners Manual(s) supplied with the product,
improper maintenance, the use of accessories or attachments not recommended by DeVilbiss Air Power
Company, or unauthorized repair or alterations.
* An air compressor that pumps air more than 50% during a one hour period is considered misuse because
the air compressor is undersized for the required air demand.
• Repair and transportation costs of merchandise determined not to be defective.
• Costs associated with assembly, required oil, adjustments or other installation and start-up costs.
• Expendable parts or accessories supplied with the product which are expected to become inoperative or
unuseable after a reasonable period of use, including but not limited to sanding disks or pads, saw and shear
blades, grinding stones, springs, chisels, nozzles, o-rings, air jets, washers and similar accessories.
• Merchandise sold by DeVilbiss Air Power Company which has been manufactured by and identified as the
product of another company, such as gasoline engines. The product manufacturer's warranty, if any, will apply.
•ANY INCIDENTAL, INDIRECT OR CONSEQUENTIAL LOSS, DAMAGE, OR EXPENSE THAT MAY RESULT
FROM ANY DEFECT, FAILURE OR MALFUNCTION OF THE PRODUCT IS NOT COVERED BY THIS
WARRANTY. Some states do not allow the exclusion or limitation of incidental or consequential damages, so
the above limitation or exclusion may not apply to you.
•IMPLIED WARRANTIES, INCLUDING THOSE OF MERCHANTABILITY OR FITNESS FOR A PARTICULAR
PURPOSE, ARE LIMITED TO ONE YEAR FROM THE DATE OF ORIGINAL PURCHASE. Some states do not
allow limitations on how long an implied warranty lasts, so the above limitations may not apply to you.
213 Industrial Drive • Jackson, TN 38301-9615
Telephone: 1-800-888-2468 , Ext. 2
FAX: 1-800-888-9036
Table of contents
Popular Tools manuals by other brands


Hyundai power products
Hyundai power products HCOMBI336F-A Original instructions

BGS technic
BGS technic 3058 instruction manual

Würth
Würth AKP 18-A-600 operating instructions

Huskie Tools
Huskie Tools REC-Y33M Operation manual

BlueSpot
BlueSpot 07945 user manual

Matco Tools
Matco Tools LOWZC450 instruction manual


