dexbaby safe sleeper bed rail ultra User manual

Figure A
Figure A
READ ALL INSTRUCTIONS BEFORE FIRST USE. Ages 2 Years – 6 Years
CAUTION: ADULT ASSEMBLY REQUIRED.
WARNING: IMPORTANT! KEEP FOR FUTURE REFERENCE!
• SUFFOCATION AND STRANGULATION HAZARD.
• Death or Serious Injury Can Occur.
• Infants who cannot get in and out of an adult bed without help can be
trapped between a mattress and a wall and suffocate. NEVER place infants
in adult beds with or without a bed rail.
BED RAIL USE:
• Bed rail can trap young children against mattress, headboard, or footboard.
• Use only for children who have outgrown a crib. NEVER use in place of crib.
• Use only with children who can get in and out of adult bed without help
(typically 2 years and up).
• ALWAYS keep bed rail pushed firmly against mattress and at least 9 in. from
headboard and footboard.
• NEVER use on toddler bed, bunk bed, waterbed, or bed with inflatable
mattress. Use only on adult bed with mattress and mattress support as
defined by the manufacturer.
• Discontinue use if damaged, broken, or if parts are missing.
COMPONENTS (Figure A):
1. Curved Bar (2)
2. Mesh Cover (1)
3. Hinged Legs (2) with Safety Strap
4. Round Lower Bar (2)
5. Square Stabilizer Bar (2)
6. Anchor Strap and Plate (1)
#BR48X20-01
safe sleeper
™
bed rail ultra
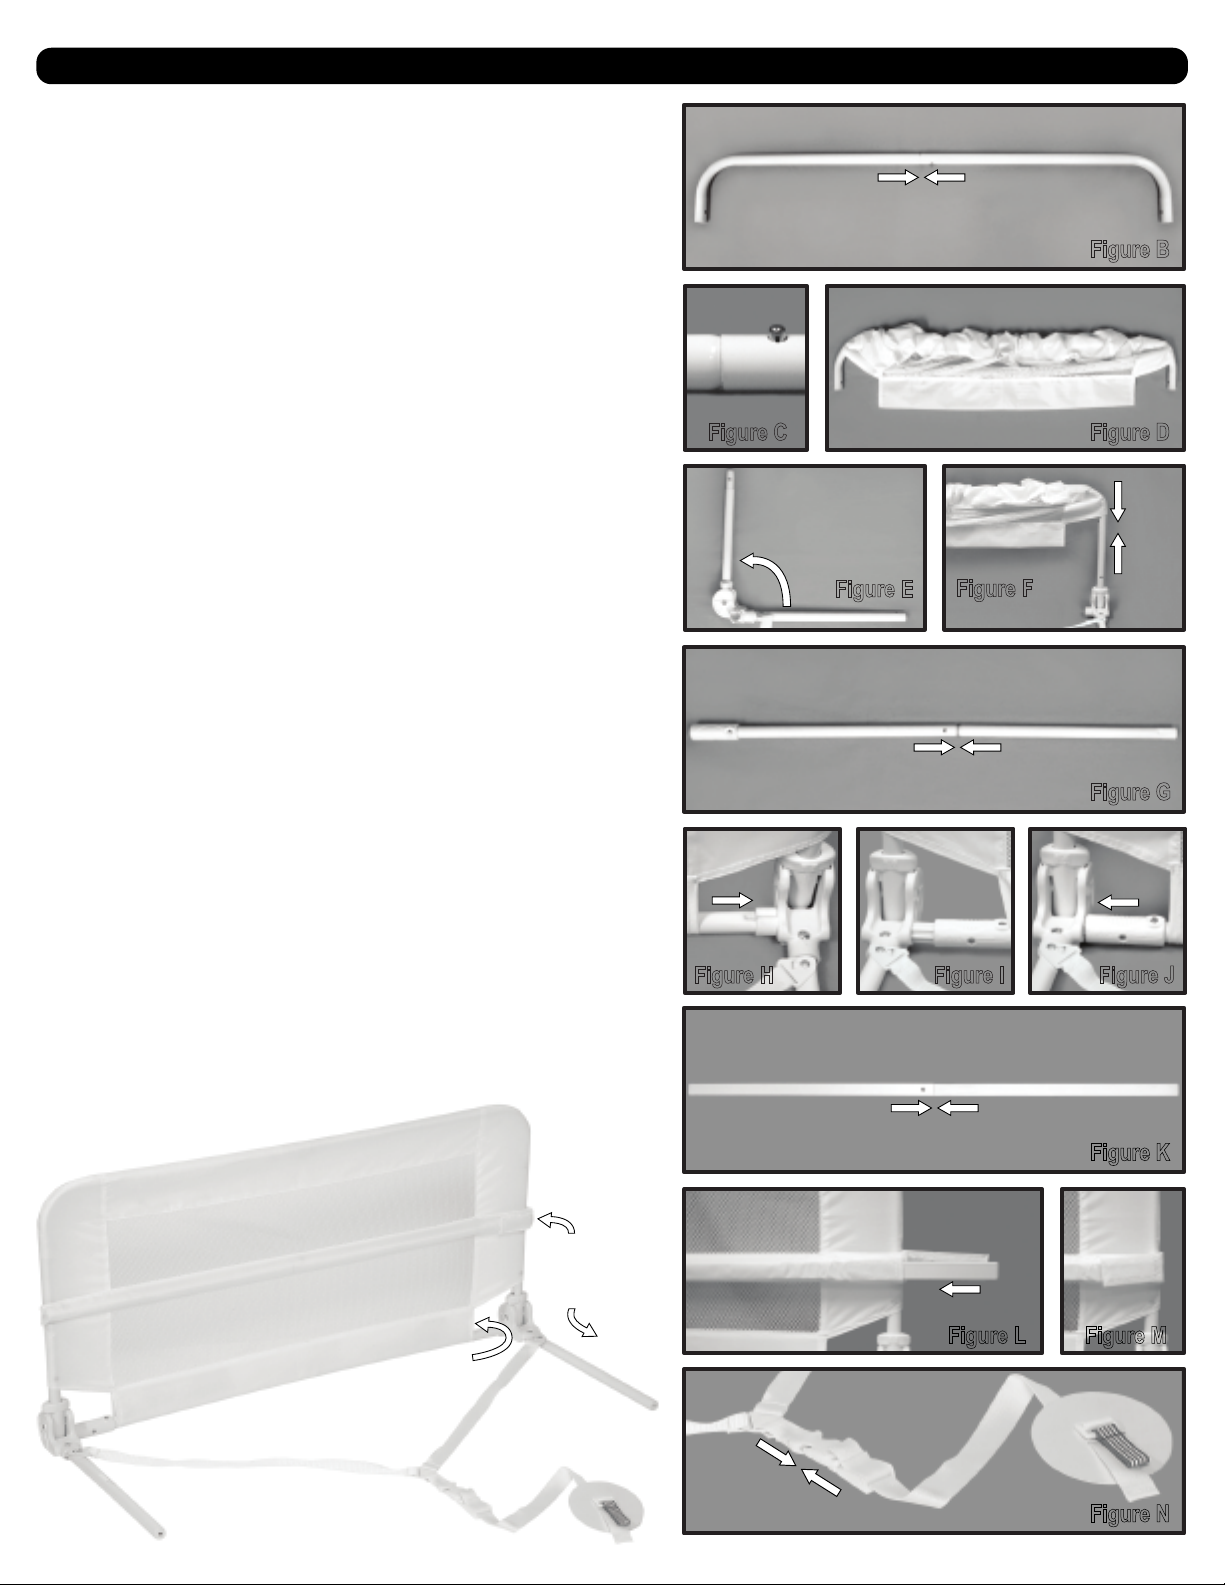
Figure N
Figure N
Figure M
Figure M
Figure L
Figure L
Figure K
Figure K
Figure J
Figure J
Figure I
Figure I
Figure H
Figure H
Figure G
Figure G
Figure F
Figure F
Figure E
Figure E
Figure D
Figure D
LOWER SLEEVE
Figure C
Figure C
Figure B
Figure B
Please rest assured that these instructions are very easy to followand
will help you assemble this rail very quickly and WITHOUT TOOLS!
01. Lay all pieces out on the floor or table. (Figure A)
02. Connect the 2 Curved Bars until they lock into place. (Figure B)
Make sure silver button protrudes from hole in bar when finished. (Figure C)
03. Insert assembled Curved Bar into Mesh Cover, leaving the ends of Curved
Bar exposed. (Figure D)
04. Open Hinged Legs until hinges lock firmly into place. (Figure E)
NOTE: Make sure Safety Straps are not twisted.
05. Connect Hinged Legs to Curved Bar until they lock into place (Figure F),
making sure that the sleeve in the middle of Mesh Cover faces inward toward
the outstretched Hinged Legs. (see assembled photo below)
Make sure silver button protrudes from hole in bar when finished. (Figure C)
06. Slide Mesh Cover down toward each hinge.
07. Connect the 2 Round Lower Bars until they lock into place. (Figure G)
Make sure silver button protrudes from hole in bar when finished. (Figure C)
08. Depress silver button on plastic slide-lock end of the Lower Bar (Figure G)
and slide this section into the “UNLOCK” position.
09. Insert “V” grooved end of assembled Lower Bar (Figure G) into the lower
sleeve of the Mesh Cover (see assembled photo below) matching the “V” end
of the bar with the “V” end at the base of the Hinged Leg. (Figure H)
Press firmly into place.
10. Align the plastic slide-lock end of the Lower Bar to the fitting on remaining
Hinged Leg and slide locking sleeve over the fitting until the spring-loaded
button snaps firmly into place. (Figure I and Figure J)
11. Connect the 2 Square Stabilizer Bars. (Figure K)
Make sure silver button protrudes from hole in bar when finished.
12. Insert assembled Stabilizer Bar (Figure K) into the sleeve in the middle of
Mesh Cover and close velcro flap. (Figures L and M)
13. Connect Anchor Strap and Plate to Safety Strap attached to Hinged Legs.
(Figure N)
ASSEMBLY INSTRUCTIONS
LOWER SLEEVE
SLEEVE IN MIDDLE
OF MESH COVER
MUST FACE INWARD
TOWARD LEGS

Figure Q
Figure Q
Figure P
Figure P
mattress
stabilizer bar
anchor plate
box spring
Figure O
Machine wash cold and hang dry, or surface wash with damp cloth.
CLEANING INSTRUCTIONS
INSTALLATION AND USE INSTRUCTIONS FOR BEDS WITH BOX SPRINGS
01. Extend Anchor Strap and Plate to maximum length.
02. Insert Hinged Legs into place between mattress and box spring.
03. Extend Anchor Strap and Plate so that Anchor Plate is in position for
tightening. (Figure O)
04. Pull red striped tag toward you while pushing the Anchor Plate forward with
opposite hand, pressing Anchor Plate firmly against the mattress and box
spring. (Figure P)
05. Release grip on the red striped tag and pull the lower strap toward you until
Anchor Plate is snug against mattress and box spring. (Figure Q)
IMPORTANT: To insure bed rail is tight as possible against mattress and
box spring, raise the mattress and tighten the strap slightly. Then lower the
mattress and pull the anchor plate back and firmly into place. Repeat this
step as needed and until tight.
06. Tuck remaining length of strap under the mattress, out of the way of children.
07. Lowering rail after installed on bed: This rail is designed with childproof
hinges for added safety. Therefore – to lower your rail - you must raise EACH
(both left and right) spring-loaded hinge at the same time. The hinges each
display an arrow pointing upwards in the direction you must raise the hinge to
disengage it. Once each spring is raised, you may gently lower the rail with
ease. This will allow you to easily change or make the bed. When you raise
the rail back to the upright position, the locks will automatically pop back into
place for safety.
© 2010 DEX Products, Inc., dexbaby™, safe sleeper™, and the footprint logo are trademarks of DEX Products, Inc. safe sleeper™ bed rail is protected by
U.S. patent number 6,990,697 which is strictly monitored and enforced. Patent infringement will be prosecuted to the full extent of the law. Made in China. 0710
DEX Products, Inc.
www.dexbaby.com 800.546.1996 840A Eubanks Drive, Vacaville, CA 95688
This manual suits for next models
1
Table of contents
Popular Medical Equipment manuals by other brands


Getinge
Getinge Arjohuntleigh Nimbus 3 Professional Instructions for use

Mettler Electronics
Mettler Electronics Sonicator 730 Maintenance manual

Pressalit Care
Pressalit Care R1100 Mounting instruction

Denas MS
Denas MS DENAS-T operating manual

bort medical
bort medical ActiveColor quick guide

AccuVein
AccuVein AV400 user manual


