Dexter Power CGA18LD User manual

1
CGA18LD
Cordless angle grinder 115mm
Amoladora angular sin cable 115mm
ADEO Services 135 Rue Sadi Carnot - CS 00001 59790 RONCHIN - France
Made in P.R.C. 2018
EN
ES
IT
FR
PT
EL
USERS MANUAL 4
MANUAL DEL USUARIO 40
MANUALE DI ISTRUZIONI 81
MANUEL D’UTILISATION 21
MANUAL DO UTILIZADOR 62
100
2
189
10
711 5
6
2 3 4
3
A B C
D E F
G1
G4
G2
H
G3

4
EN
GENERAL POWER TOOL SAFETY WARNINGS
Read all safety warnings and all instructions. Failure to follow the warnings and instructions
may result in electric shock, re and/or serious injury.
Save all warnings and instructions for future reference.
The term “power tool” in the warnings refers to your mains-operated (corded) power tool or battery-
operated (cordless) power tool.
1) Work area safety
a) Keep work area clean and well lit. Cluttered or dark areas invite accidents.
liquids, gases or dust. Power tools create sparks which may ignite the dust or fumes.
c) Keep children and bystanders away while operating a power tool. Distractions can cause you
to lose control.
2) Electrical safety
a) Power tool plugs must match the outlet. Never modify the plug in any way. Do not use any
adapter plugs with earthed (grounded) power tools. Unmodied plugs and matching outlets will
reduce risk of electric shock.
b) Avoid body contact with earthed or grounded surfaces, such as pipes, radiators, ranges and
refrigerators. There is an increased risk of electric shock if your body is earthed or grounded.
c) Do not expose power tools to rain or wet conditions. Water entering a power tool will increase
the risk of electric shock.
d) Do not abuse the cord. Never use the cord for carrying, pulling or unplugging the power tool.
Keep cord away from heat, oil, sharp edges or moving parts. Damaged or entangled cords
increase the risk of electric shock.
e) When operating a power tool outdoors, use an extension cord suitable for outdoor use. Use
of a cord suitable for outdoor use reduces the risk of electric shock.
f) If operating a power tool in a damp location is unavoidable, use a residual current device
(RCD) protected supply. Use of an RCD reduces the risk of electric shock.
3) Personal safety
a) Stay alert, watch what you are doing and use common sense when operating a power
medication. A moment of inattention while operating power tools may result in serious personal
injury.
b) Use personal protective equipment. Always wear eye protection. Protective equipment such as
dust mask, non-skid safety shoes, hard hat, or hearing protection used for appropriate conditions will
reduce personal injuries.
c) Prevent unintentional starting. Ensure the switch is in the off-position before connecting to
power source and/or battery pack, picking up or carrying the tool. Carrying power tools with
your nger on the switch or energizing power tools that have the switch on invites accidents.
d) Remove any adjusting key or wrench before turning the power tool on. A wrench or a key left
attached to a rotating part of the power tool may result in personal injury.
e) Do not overreach. Keep proper footing and balance at all times. This enables better control of
the power tool in unexpected situations.
f) Dress properly. Do not wear loose clothing or jewellery. Keep your hair, clothing and gloves
away from moving parts. Loose clothes, jewellery or long hair can be caught in moving parts.
g) If devices are provided for the connection of dust extraction and collection facilities, ensure
these are connected and properly used. Use of dust collection can reduce dust-related hazards.
Original Instructions

5
EN
4) Power tool use and care
a) Do not force the power tool. Use the correct power tool for your application. The correct
power tool will do the job better and safer at the rate for which it was designed.
b) Do not use the power tool if the switch does not turn it on and off. Any power tool that cannot
be controlled with the switch is dangerous and must be repaired.
c) Disconnect the plug from the power source and/or the battery pack from the power tool
before making any adjustments, changing accessories, or storing power tools. Such
preventive safety measures reduce the risk of starting the power tool accidentally.
d) Store idle power tools out of the reach of children and do not allow persons unfamiliar with
the power tool or these instructions to operate the power tool. Power tools are dangerous in
the hands of untrained users.
e) Maintain power tools. Check for misalignment or binding of moving parts, breakage of parts
and any other condition that may affect the power tool’s operation. If damaged, have the
power tool repaired before use. Many accidents are caused by poorly maintained power tools.
f) Keep cutting tools sharp and clean. Properly maintained cutting tools with sharp cutting edges
are less likely to bind and are easier to control.
g) Use the power tool, accessories and tool bits etc. in accordance with these instructions,
taking into account the working conditions and the work to be performed. Use of the power
tool for operations different from those intended could result in a hazardous situation.
5) Battery tool use and care
A charger that is suitable for
one type of battery pack may create a risk of re when used with another battery pack.
Use of any other battery
packs may create a risk of injury and re.
c) When battery pack is not in use, keep it away from other metal objects, like paper clips,
coins, keys, nails, screws or other small metal objects, that can make a connection from one
terminal to another. Shorting the battery terminals together may cause burns or a re.
d) Under abusive conditions, liquid may be ejected from the battery; avoid contact. If contact
Liquid ejected from the battery may cause irritation or burns.
6) Service
parts. This will ensure that the safety of the power tool is maintained.
SAFETY INSTRUCTIONS FOR ALL OPERATIONS
Safety Warnings Common for Grinding:
a) This power tool is intended to function as a grinder. Read all safety warnings, instructions,
Failure to follow all instructions
listed below may result in electric shock, re and/or serious injury.
b) Operations such as sanding, wire brushing, polishing or cutting-off are not recommended
to be performed with this power tool. Operations for which the power tool was not designed may
create a hazard and cause personal injury.
manufacturer. Just because the accessory can be attached to your power tool, it does not assure
safe operation.
d) The rated speed of the accessory must be at least equal to the maximum speed marked on
the power tool. Accessories running faster than their rated speed can break and y apart.
e) The outside diameter and the thickness of your accessory must be within the capacity
rating
of your power tool. Incorrectly sized accessories cannot be adequately guarded or
controlled.

6
EN
f) Threaded mounting of accessories must match the grinder spindle thread. For accessories
mounted by anges, the arbour hole of the accessory must t the locating diameter of the ange.
Accessories that do not match the mounting hardware of the power tool will run out of balance,
vibrate excessively and may cause loss of control.
g) Do not use a damaged accessory. Before each use inspect the accessory such as abrasive
wheels for chips and cracks, backing pad for cracks, tear or excess wear, wire brush for
loose or cracked wires. If power tool or accessory is dropped, inspect for damage or install
an undamaged accessory. After inspecting and installing an accessory, position yourself and
bystanders away from the plane of the rotating accessory and run the power tool at maximum no-
load speed for one minute. Damaged accessories will normally break apart during this test time.
h) Wear personal protective equipment. Depending on application, use face shield, safety
goggles or safety glasses. As appropriate, wear dust mask, hearing protectors, gloves and
workshop apron capable of stopping small abrasive or workpiece fragments. The eye protection
must be capable of stopping ying debris generated by various operations . The dust mask or
respirator must be capable of ltrating particles generated by your operation. Prolonged exposure to
high intensity noise may cause hearing loss.
i) Keep bystanders a safe distance away from work area. Anyone entering the work area must
wear personal protective equipment. Fragments of workpiece or of a broken accessory may y
away and cause injury beyond immediate area of operation.
j) Hold the power tool by insulated gripping surfaces only, when performing an operation
where the cutting tool may contact hidden wiring. Contact with a “live” wire will also make
exposed metal parts of the power tool “live” and could give the operator an electric shock.
k) Position the cord clear of the spinning accessory. If you lose control, the cord may be cut or
snagged and your hand or arm may be pulled into the spinning accessory.
l) Never lay the power tool down until the accessory has come to a complete stop. The spinning
accessory may grab the surface and pull the power tool out of your control.
m) Do not run the power tool while carrying it at your side. Accidental contact with the spinning
accessory could snag your clothing, pulling the accessory into your body.
n) Regularly clean the power tool’s air vents. The motor’s fan will draw the dust inside the housing
and excessive accumulation of powdered metal may cause electrical hazards.
Sparks could ignite these materials.
p) Do not use accessories that require liquid coolants. Using water or other liquid coolants may
result in electrocution or shock.
Further safety instructions for all operations
Kickback and Related Warnings
Kickback is a sudden reaction to a pinched or snagged rotating wheel, backing pad, brush or any other
accessory. Pinching or snagging causes rapid stalling of the rotating accessory which in turn causes the
uncontrolled power tool to be forced in the direction opposite of the accessory’s rotation at the point of
the binding.
For example, if an abrasive wheel is snagged or pinched by the workpiece, the edge of the wheel that
is entering into the pinch point can dig into the surface of the material causing the wheel to climb out or
kick out. The wheel may either jump toward or away from the operator, depending on direction of the
wheel’s movement at the point of pinching. Abrasive wheels may also break under these conditions.
Kickback is the result of power tool misuse and/or incorrect operating procedures or conditions and can
be avoided by taking proper precautions as given below.
kickback forces. Always use auxiliary handle, if provided, for maximum control over kickback or
torque reaction during start-up. The operator can control torque reactions or kickback forces, if
proper precautions are taken.
b) Never place your hand near the rotating accessory. Accessory may kickback over your hand.
c) Do not position your body in the area where power tool will move if kickback occurs.

7
EN
Kickback will propel the tool in direction opposite to the wheel’s movement at the point of snagging.
d) Use special care when working corners, sharp edges etc. Avoid bouncing and snagging the
accessory. Corners, sharp edges or bouncing have a tendency to snag the rotating accessory and
cause loss of control or kickback.
e) Do not attach a saw chain woodcarving blade or toothed saw blade. Such blades create
frequent kickback and loss of control.
designed for the selected wheel. Wheels for which the power tool was not designed cannot be
adequately guarded and are unsafe
b) The grinding surface of centre depressed wheels must be mounted below the plane of the
guard lip. An improperly mounted wheel that projects through the plane of the guard lip cannot be
adequately protected.
c) The guard must be securely attached to the power tool and positioned for maximum safety,
so the least amount of wheel is exposed towards the operator. The guard helps to protect the
operator from broken wheel fragments, accidental contact with wheel and sparks that could ignite
clothing.
d) Wheels must be used only for recommended applications. For example: do not grind with
the side of cut-off wheel. Abrasive cut-off wheels are intended for peripheral grinding, side forces
applied to these wheels may cause them to shatter.
wheel. Proper wheel anges support the wheel thus reducing the possibility of wheel breakage.
Flanges for cut-off wheels may be different from grinding wheel anges.
f) Do not use worn down wheels from larger power tools. Wheel intended for larger power tool is
not suitable for the higher speed of a smaller tool and may burst.
SAFETY WARNINGS FOR BATTERY PACK
a) Do not dismantle, open or shred cells or battery pack.
b) Do not short-circuit a battery pack. Do not store battery packs haphazardly in a box or drawer where
they may short-circuit each other or be short-circuited by conductive materials.
c) Donotexposebatterypacktoheatorre.Avoidstorageindirectsunlight.
d) Do not subject battery pack to mechanical shock.
e) In the event of battery leaking, do not allow the liquid to come into contact with the skin or eyes. If
contact has been made, wash the affected area with copious amounts of water and seek medical
advice.
f) Seek medical advice immediately if a cell or battery pack has been swallowed.
g) Keep battery pack clean and dry.
h) Wipe the battery pack terminals with a clean dry cloth if they become dirty.
i) Battery pack needs to be charged before use. Always refer to this instruction and use the correct
charging procedure.
j) Do not maintain battery pack on charge when not in use.
k) After extended periods of storage, it may be necessary to charge and discharge the battery pack
several times to obtain maximum performance.
l) Battery pack gives its best performance when it is operated at normal room temperature (20°C±5°C).
m) When disposing of battery packs, keep battery packs of different electrochemical systems separate
from each other.
n) Rechargeonlywiththechargerspeciedbymanufacturer.Achargerthatissuitableforonetypeof
batterypackmaycreateariskofrewhenusedwithanotherbatterypack.
o) Do not use any battery pack which is not designed for use with the equipment.
p) Keep battery pack out of the reach of children.

8
EN
q) Retain the original product literature for future reference.
r) Remove the battery from the equipment when not in use.
s) Dispose of properly.
GENERAL SAFETY WARNINGS FOR YOUR BATTERY
CHARGER
WARNING: Read all safety warnings and all
instructions. Failure to follow the warnings and instructions
mayresultinelectricshock,reand/orseriousinjury.
Save all warnings and instructions for future reference.
- This appliance can be used by children aged from 8 years and
above and persons with reduced physical, sensory or mental
capabilities or lack of experience and knowledge if they have
been given supervision or instruction concerning use of the
appliance in a safe way and understand the hazards involved.
- Children shall not play with the appliance. Cleaning and user
maintenance shall not be made by children without supervision.
- If the supply cord is damaged, it must be replaced by the
manufacturer,itsserviceagentorsimilarlyqualiedpersonsin
order to avoid a hazard.
ADDITIONAL SAFETY INSTRUCTIONS FOR YOUR
BATTERY CHARGER
1. Before charging, read the instructions.
2. After charging, disconnect the battery charger from the supply
mains. Then remove the chassis connection and then the
battery connection.
3. Do not charge a leaking battery.
4. Do not use chargers for works other than those for which they
are designed.
5. Before charging, ensure your charger is matching the local AC
supply.
6. For indoor use, or do not expose to rain.
7. The charging device must be protected from moisture.
8. Do not use the charging device in the open.
9. Do not short out the contacts of battery or charger.
10.Respect the polarity “+/-“ when charging.
11. Do not open the unit and keep out of the reach of children.

9
EN
12.Do not charge the batteries of other manufactures or ill-suited
models.
13.Ensure that the connection between the battery charger and
battery is correctly positioned and is not obstructed by foreign
bodies.
14.Keep battery charger’s slots are free of foreign objects and
protect against dirt and humidity. Store in a dry and frost-free
place.
15. When charging batteries, ensure that the battery charger is in
awell-ventilatedareaandawayfrominammablematerials.
Batteries can get hot during charging. Do not overcharge
any batteries. Ensure that batteries and chargers are not left
unsupervised during charging.
16. Do not recharge non-rechargeable batteries, as they can
overheat and break.
17. Longer life and better performance can be obtained if the
battery pack is charged when the air temperature is between
18ºC and 24ºC. Do not charge the battery pack in air
temperatures below 0ºC, or above 40ºC. This is important as it
can prevent serious damage to the battery pack.
18.Charge only battery pack of the same model provided by
manufacturer and of models recommended by manufacturer.
10
EN
TECHNICAL DATA
Type CGA18LD (CGA -designation of machinery, representative of Angle Grinder)
NOISE INFORMATION
A weighted sound pressure LpA 77dB(A)
KpA 3dB(A)
A weighted sound power LwA 88dB(A)
KwA 3dB(A)
Wear ear protection when sound pressure is over 80dB(A)
VIBRATION INFORMATION
Vibration total values (triax vector sum) determined according to EN 60745:
Grinder surface grinding Vibration emission value ah,AG = 4.381m/s2
Uncertainty K = 1.5m/s²
WARNING: The vibration emission value during actual use of the power tool can differ from
the declared value depending on the ways in which the tool is used dependant on the following
examples and other variations on how the tool is used:
How the tool is used and the materials being grinded.
The tool being in good condition and well maintained
Using the correct accessory for the tool and ensuring it is sharp and in good condition.
The tightness of the grip on the handles and if any anti vibration accessories are used.
And the tool is being used as intended by its design and these instructions.
Note:
- that the declared vibration total value has been measured in accordance with a standard test method
and may be used for comparing one tool with another;
- that the declared vibration total value may also be used in a preliminary assessment of exposure.
Warning:
- that the vibration emission during actual use of the power tool can differ from the declared total value
depending on the ways in which the tool is used
Voltage
Charger Model
Battery pack model
No. Of battery cells
Battery capacity
Charging time
Rated speed
Disc size
Disc bore
Thickness of recommend grinding wheel
Grinding Disc type
Grinding disc guard type
Spindle thread
Machine weight
18V
ACG18LD
ABP118L2 / ABP118L3
5 / 10
2.0Ah Li-Ion / 3.0Ah Li-Ion
80min / 2h
8800/min
115mm
22.23mm
6mm
Type 27
For grinding disc type 27
M14
1.56kg

11
EN
- avoid vibration risk
suggestion: 1) wear glove during operation
2) limit operating time and shorten trigger time
This tool may cause hand-arm vibration syndrome if its use is not adequately managed.
WARNING: To be accurate, an estimation of exposure level in the actual conditions of use
should also take account of all parts of the operating cycle such as the times when the tool is
switchedoffandwhenitisrunningidlebutnotactuallydoingthejob.Thismaysignicantlyreducethe
exposure level over the total working period.
Helping to minimize your vibration exposure risk.
ALWAYS use accessories in good condition.
Maintain this tool in accordance with these instructions and keep well lubricated (where appropriate).
If the tool is to be used regularly then invest in anti vibration accessories.
Avoid using tools in temperatures of 10oC or less.
Plan your work schedule to spread any high vibration tool use across a number of days.
ACCESSORIES
Battery pack Sold separately
Charger Sold separately
Auxiliary handle 1
Grinding disc 1
Wheel guard for grinding 1
Spanner 1
We recommend that you purchase your accessories from the same store that sold you the tool. Use
good quality accessories marked with a well-known brand name. Choose the type according to the
work you intend to undertake. Refer to the accessory packaging for further details. Store personnel
can assist you and offer advice.
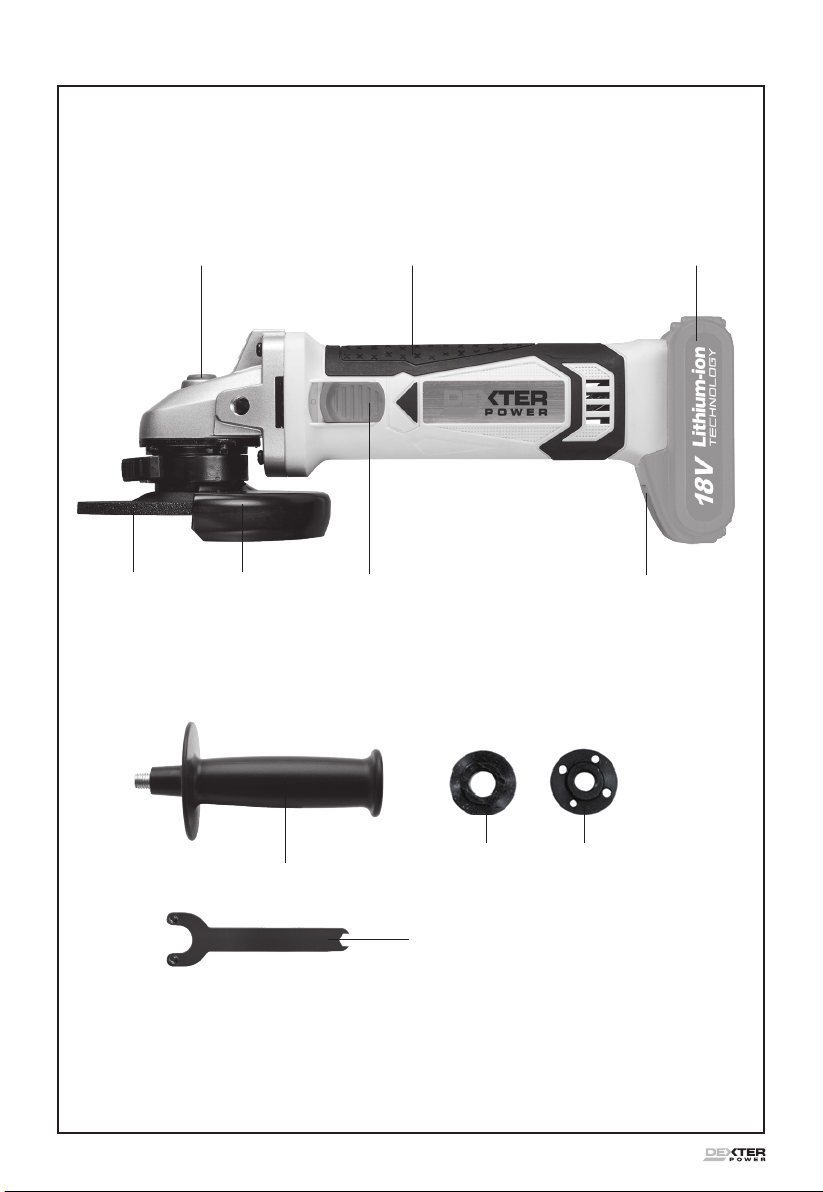
COMPONENT LIST
1. Auxiliary handle
2. Spindle lock button
3. Soft grip handle
4. Battery pack*
5. Battery pack release button*
6. On/Off switch
7. Grinding Disc guard
10. Spanner
11. Grinding Disc
* Not all the accessories illustrated or described are included in standard delivery.

12
EN
To reduce the risk of injury, user must read instruction manual
Warning
Wear ear protection
Wear eye protection
Wear dust mask
Wear protective gloves
Not permitted for face grinding with abrasive cutting off wheels
Do not use broken grinder
Not permitted for wet grinding
Do not expose to rain or water
Do not burn
Do not dispose of tools/batteries, Return exhausted batteries or tools to your local
collection or recycling point.
Always charge the battery pack between temperatures 0°C to 40°C
Battery contains lithium. This battery shall be brought to your shop to be recycled
For indoor use only
Read the operator’s manual.
Double insulation
SYMBOLS

13
EN
Fuse
T 2 A time lag fuse with rated current of 2 A
Positive terminal
Negative terminal
T 2A

14
EN
OPERATING INSTRUCTIONS
NOTE: Before using the tool, read the instruction book carefully.
INTENDED USE
The machine is intended for roughing and brushing metal and stone materials without using water.
BEFORE PUTTING INTO OPERATION
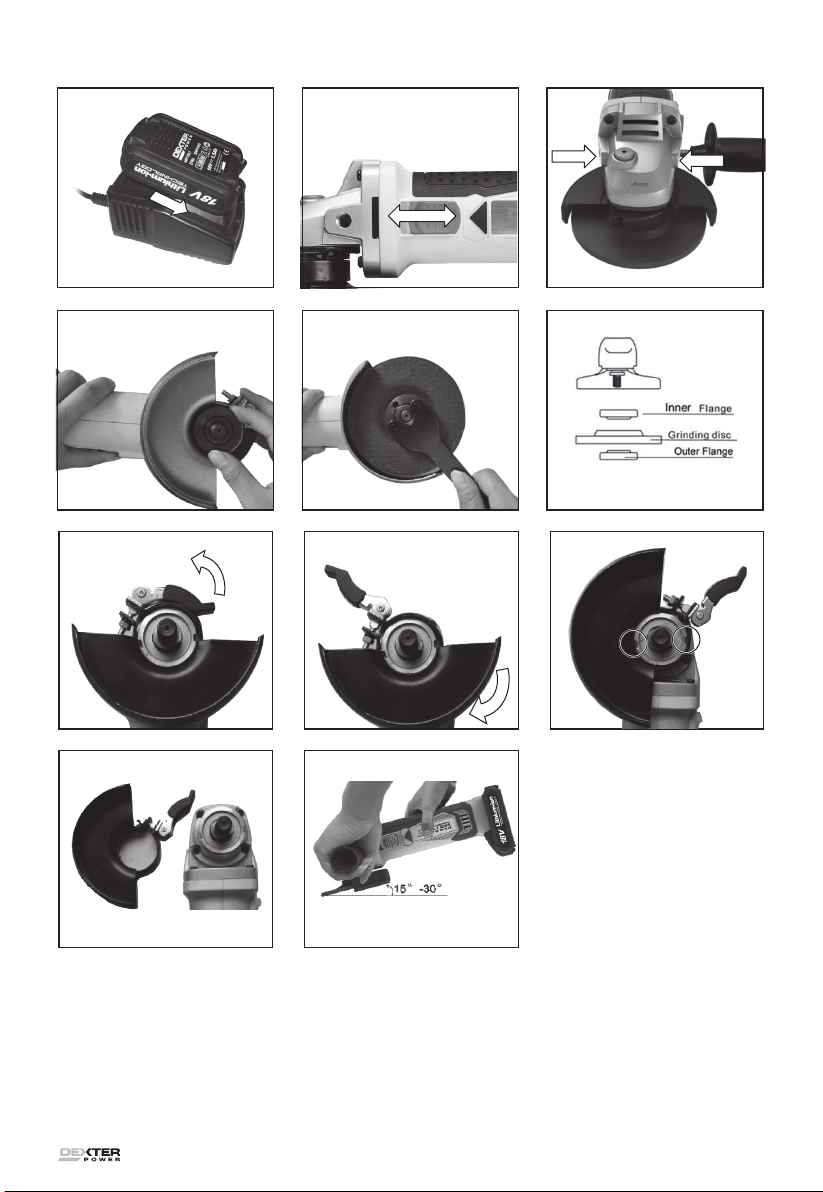
A) CHARGING THE BATTERY
The battery charger ACG18LD is matched to the Li-ion battery ABP118L2/ABP118L3. Do not use
another battery charger.
The Li-ion battery is protected against deep discharging. When the battery is empty, the machine is
switched off by means of a protective circuit: The tool holder no longer rotates.
In a warm environment or after heavy use, the battery pack may become too hot to permit charging.
Allow time for the battery to cool down before recharging.
Whenthebatterypackischargedforthersttimeandafterprolongedstorage,thebatterypackwill
accept a 100% charge after several charge and discharge cycles.
B) TO REMOVE THE BATTERY PACK
DepresstheBatteryPackReleaseButton(5)rmlyrstandthenslidetheBatteryPackoutfrom
your tool.
C) TO INSTALL THE BATTERY PACK
SlidethefullychargedBatteryPackontothetoolwithsufcientforceuntilitclicksintoposition.
D) HOW TO CHARGE YOUR BATTERY PACK (SEE FIG A)
CHARGING PROCEDURE
1) Plug the charger into an appropriate outlet. The light will be green.
2) Slide the battery pack into the charger, the light will turn to red to indicate the charging process
has started.
3) When charging is completed, the light will turn to green. The pack is now fully charged, unplug
the charger and remove the battery pack.
WARNING: When battery charge runs out after continuously use or exposure to direct
sunlight or heat, allow time for the tool to cool down before re-charging to achieve the full
charge.
CHARGING INDICATOR
This recommended charger is designed to detect some problems that can arise with battery
packs. Indicator lights indicate problems (see table below). If this occurs, insert a new battery
pack to determine if the charger is OK. If the new battery charges correctly, then the original pack
is defective and should be returned to a service center or recycling service center. If the new
battery pack displays the same problem as the original Battery Pack, have the charger tested at an
authorized service center.
Light Status
Red on ________ Charging
Redash _ _ _ _ Defective Battery
Green on ________ Fully Charged
Greenash _ _ _ _ Hot/Cold Delay

15
EN
OPERATION
1. SLIDE ON/OFF SWITCH (See Fig. B)
Tostartthepowertool,rstpressthebackofon/offswitch,thenpushtheon/offswitch(6)forward.
To lock the on/off switch (6), press the on/off switch (6) down at the front until it engages.
Toswitchoffthepowertool,brieypressdownthebackoftheon/offswitch(6)andthenreleaseit.
NOTE: The machine is equipped with the function of Accidental Start Protection.
the machine will not run when you put the battery on the machine if switch is engaged “on“ position
to make sure safety to user. The machine will work only after you switching off and switching on
again.
2. HAND GRIP AREAS
Alwaysholdyouranglegrinderrmlywithbothhandswhenoperating.
3. ADJUSTABLE AUXILIARY HANDLE (See Fig. C)
You have the option of two working positions to provide the safest and most comfortable control of
your angle grinder. The handle can be screwed clockwise into either hole on the sides of the gear
case.
NOTE: this handle should be used at all times to maintain complete control of the tool.
4. SPINDLE LOCK BUTTON
The spindle lock button must only be used when changing a disc.
WARNING: Never press it when the disc is rotating!
5. DISC FITTING (See Fig. D, E)
Theinnerange(9)islocatedoverthespindleandcheckthatiftheinnerangeiscorrectlylocated.
Thetwomachinedatsectionsmustfacetheanglegrinderandlocatedintheappropriatedposition
onthespindle.Locatethedisc(11)ontotheinnerange(9)withthelabelfacingtheanglegrinder
andthenplacetheouterange(8)ontothespindle.Pressthespindlelockbutton(2)androtatethe
spindleuntilitlocks,thenrmlytightentheouterange(8)withthesuppliedspanner(10).Checkif
the disc can rotate freely and is securely clamped. Make a no load test run for 20 seconds to check
disc vibration and disc run out. To remove a disc, reverse these instructions.
WARNING: Do not use a disc marked with a lower RPM than that of the max rated speed
shownontheratingplate.Cleantheangesandcheckthenewdisc.
6. FIX OUTER FLANGE CLAMPING (See Fig. F)
Ensuretheraisedpartoftheouterangeisttedfacingthegrindingdisctoprovideimproved
support for the disc hole. Always ensure your disc is securely clamped.
7. ADJUSTMENT AND REMOVING THE GUARD
ADJUSTING THE GUARD
Before any work on the machine itself, detach battery pack.
For work with grinding discs, the wheel guard must be mounted.
WHEEL GUARD FOR GRINDING
Thecodedprojectiononthewheelguardensuresthatonlyaguardthattsthemachinetypecan
be mounted.
Open the clamping lever. Place the wheel guard with coded projection into the coded groove on the
spindle of the machine head and rotate to the required position (The recommended work angel for
the guard is -30° to +30°).
To fasten the wheel guard, close the clamping lever.
The closed side of the wheel guard must always point to the operator.

16
EN
REMOVING THE GUARD (See Fig. G1, G2, G3, G4)
Never remove your guard for any other working conditions. Toremove,rsttakeoffthedisc
andbothanges.Thenopentheclampingleverandrotatetheguardtoaligntheprojectionswith
the gear case cut outs, then remove the guard (the guard has been well adjusted, do not adjust its
nut casually).
Tore-ttheguard,repeatthisprocessinreverse.Keepallpartsinasafeplace.
NOTE: The guard is well adjusted for directly use, do not adjust its nut casually. But after long time
use, user may need to adjust guard’s nut (with clamping lever open and adjust it by tool) to ensure
theguardissecurelyclampedaftertheclampingleverisnallyclosed.(Intheclosedcondition,
strengthof8Nmcan’trotatethewellxedguard).
8. USE THE GRINDER (See Fig. H)
ATTENTION: Do not switch the grinder on while the disc is in contact with the workpiece.
Allow the disc to reach full speed before starting grinding.
WARNING: Never use a cutting disc for grinding. When grinding, only use disc guard for grinding,
do not use other disc and disc guard which is not mentioned in this manual.
CAUTION: Please support the workpiece properly.
Holdyouranglegrinderwithonehandonthemainhandleandotherhandrmlyaroundthe
auxiliary handle.
Always position the guard so that as much of the exposed disc as possible is pointing away from you.
Be prepared for a stream of sparks when the disc touches the metal.
For best tool control, material removal and minimum overloading, keep an angle between the disc
and the workpiece surface at approximately 15oto 30owhen grinding.
Use cautiously when working into corners as contacting with the intersecting surface may cause the
grinder to jump or twist.
NOTE: When side grinding and peripheral grinding, also need to keep the angle between the disc
and the workpiece surface at approximately 15º to 30º.
When grinding is complete, allow the workpiece to cool. Do not touch the hot surface.
9. OVERLOAD
Overloading will cause damage to the motor of your angle grinder. This can happen if your angle
grinder is subjected to heavy use for prolonged periods of time.
Never attempt to exert too much pressure on your angle grinder to speed up your work.
Theabrasivediscsoperatemoreefcientlywhenlightpressureisexerted,thusavoidingadropin
the speed of your angle grinder.
If your angle grinder becomes too hot, run it no load for 2-3 minutes until it has cooled to normal
operation temperature.
10. DISPOSAL OF AN EXHAUSTED BATTERY PACK
To preserve natural resources, please recycle or dispose of the battery pack properly. This battery
pack contains Lithium batteries. Consult your local waste authority for information regarding available
recycling and/or disposal options. Discharge your battery pack by operating your tool, then remove the
battery pack from the tool housing and cover the battery pack connections with heavy duty adhesive tape
to prevent short circuit and energy discharge. Do not attempt to open or remove any of the components.
WORKING HINTS FOR YOUR ANGLE GRINDER
Always start at no load to achieve maximum speed then start working.
Do not force the disc to work faster, reducing the Disc’s moving speed means longer working time.
Always work with a 15
º
to 30
º
angle between disc and work-piece. Larger angles will cut ridges into the work-
pieceandaffectthesurfacenish.Movetheanglegrinderacrossandbackandforthoverthework-piece.

17
EN
Alwaysensurethework-pieceisrmlyheldorclampedtopreventmovement.
MAINTENANCE
1. Keep the grinder ventilation slots clean and free from obstructions. If available, blow compressed
air into the vents to clear any internal dust (safety goggles must be worn when undertaking this
process).
2. Keep the outer case of the grinder clean and free from grease. Do not wash with water or use
solvents or abrasive. Use only mild soap and damp cloth to clean the tool. Never let any liquid get
inside the tool. Never immerse any part of the tool into a liquid.
3. Your angle grinder requires no additional lubrication. There are no user serviceable parts in your
power tool.
4. Always store your power tool and your accessories in a dry place and out of the reach of children.
TROUBLESHOOTING
Although your new angle grinder is really very simple to operate, if you do experience problems,
please check the following:
1.Ifyourgrinderdiscwobblesorvibrates,checkiftheouterangeistightenedorifthediscis
correctlylocatedontheangeplate.
2. Do not use the damaged disc as it may disintegrate. Remove it and replace with a new disc.
Dispose of old disc sensibly.
3. If working on aluminum or a similar soft alloy, the disc will soon become clogged and will not grind
effectively.
4. A small amount of battery pack leakage may occur under extreme temperatures or after heavy
use. Immediately wash any leakage from hands, skin or clothes with soap and water.
5. The power-draw from the battery generates heat. This is increased as the energy draw increases.
You will not damage the battery pack and the generated heated heat is normal. Should you desire to
cool it down, simply allow the tool to cool off prior to continuing work.
6. The battery pack may get warm when charging. This is normal. It is a result from the stepping
down of the chemical reactions inside the batteries during the charging process.
7. The charger will get warm during charging. This is normal. It is a result of the stepping down of
the main supply.
ENVIRONMENTAL PROTECTION
This product has been marked with a symbol relating to removing electric and electronic
waste. This means that this product shall not be discarded with household waste but that it
shall be returned to a collection system which conforms to the European Directive 2012/19/
EU. It will then be recycled or dismantled in order to reduce the impact on the environment. Electric
and electronic equipment can be hazardous for the environment and for human health since they
contain hazardous substances.
DISPOSAL OF AN EXHAUSTED BATTERY PACK
To preserve natural resources, please recycle or dispose of the battery pack properly. This
battery pack contains Li-ion batteries. Consult your local waste authority for information
regarding available recycling and/or disposal options. Discharge your battery pack by
operating your tool, then remove the battery pack from the tool housing and cover the battery pack
connections with heavy-duty adhesive tape to prevent short circuit and energy discharge. Do not
attempt to open or remove any of the components.

18
EN
DECLARATION OF CONFORMITY
We
ADEO Services
135 Rue Sadi Carnot - CS 00001 59790 RONCHIN - France
Declare under our sole responsibility that this CGA18LD Cordless angle grinder 115mmis in
conformity with the following standards or standardized documents.
Declare that the product,
Description: Cordless angle grinder 115mm
Type: CGA18LD (CGA-designation of machinery, representative of angle grinder)
Function peripheral and lateral grinding
Batch No.:
Complies with the following Directives,
Machinery Directive 2006/42/EC
Electromagnetic Compatibility Directive 2014/30/EU
RoHS Directive 2011/65/EU
Standards conform to,
EN 60745-1: 2009+A11:2010
EN 60745-2-3: 2011+A2:2013+A11:2014+A12:2014+A13:2015
EN 55014-1:2017
EN 55014-2:2015
IEC 62321-1: 2013
IEC 62321-2: 2013
IEC 62321-3-1: 2013
IEC 62321-4: 2013
IEC 62321-5: 2013
IEC 62321-6: 2015
IEC 62321-7-1: 2015
IEC 62321-7-2: 2017
ISO17075-1: 2017
Last two number of the year CE marking applied: 18
Gael CONSIGNY
Asian Quality Director Global Sourcing
Authorized representative of Bruno Pottie, Director of Global Sourcing Shared Service Center
ADEO Services 135 Rue Sadi Carnot - CS 00001 59790 RONCHIN - France
Done in Shanghai 01/01/2018

19
EN
WARRANTY
1. Dexter products are designed to highest DIY quality standards. Dexter provides a 24-months
warranty for its products, from the date of purchase. This warranty applies to all material and
manufacturing defects which may arise. No further claims are possible, of whatever nature, direct or
indirect, relating to people and /or materials. Dexter products are not directed to professional use.
2. Intheeventofaproblemordefect,youshouldrstalwaysconsultyourDexterdealer.Inmostcases,
the Dexter dealer will be able to solve the problem or correct the defect.
3. Repairs or the replacement of parts will not extend the original warranty period.
4. Defects which have arisen as a result of improper use or wear are not covered by the warranty.
Amongst other things, this relates to switches, protective circuit switches and motors, in the event of
wear.
5. Your claim upon the warranty can only be processed if:
● Proofofthepurchasedatecanbeprovidedintheformofareceipt.
● Norepairsand/orreplacementshavebeencarriedoutbythirdparties.
● Thetoolhasnotbeensubjectedtoimproperuse(overloadingofthemachineorttingnon-
approved accessories).
● Thereisnodamagecausedbyexternalinuencesorforeignbodiessuchassendorstones.
● Thereisnodamagecausedbynon-observanceofthesafetyinstructionsandtheinstructionsfor
use.
● Thereisnoforcemajeureonourpart.
● Adescriptionofthecomplaintisenclosed.
6. The warranty stipulations apply in combination with our terms of sale and delivery.
7. Fault tools to be returned to Dexter via Dexter dealer will be collected by Dexter as long as the
product is properly packaged. If faulty goods are sent directly to Dexter by the consumer, Dexter will
only be able to process these goods if the consumer pays the shipping costs.
8. Products which are delivered in a poorly packaged condition will not be accepted by Dexter.

20
EN
Other manuals for CGA18LD
1
Table of contents
Languages:
Other Dexter Power Grinder manuals


