Di-Acro 6 User manual

REV. A 11/12
1
DI-ACRO
#6 & #8 POWER BENDER
INSTRUCTION MANUAL

REV. A 11/12
2
TABLE OF CONTENTS
A. INTRODUCTION PG. 3
B. SAFETY INFORMATION PG. 3
C. SPECIFICATIONS PG. 4
D. INSTALLATION PG. 4-5
E. LUBRICATION PG. 5
F. CONTROL DESCRIPTION PG. 5-7
G. SETUP & RUN NO. 6 BENDER PG. 8-9
H. SETUP & RUN NO. 8 BENDER PG.9-10
I. TABLE ASSEMBLY PG. 11-13
J. 4” CYLINDER ASSEMBLY PG. 13
K. BASE ASSEMBLY PG. 14-15
L. NO. 6 TOOLING HEAD ASSEMBLY PG. 16-17
M. HANGER ASSEMBLY PG. 18
N. PRESSURE ROLLER ASSEMBLY PG. 19
O. NO. 8 TOOLING HEAD ASSEMBLY PG. 20-21
P. NOSE HOLDER ASSEMBLY PG. 22
Q. GAUGE GROUP PG. 23
R. FLOOR PLAN PG. 24
S. HYDRAULIC DIAGRAM PG. 25
T. ELECTRICAL DIAGRAM PG. 26
U. WARRANTY PG. 27

REV. A 11/12
3
A. Introduction
This instruction manual serves two purposes:
1. It outlines essential information for installation, operation and maintenance of the No. 6
and No. 8 Power Bender.
2. It gives a complete parts breakdown identified by number, should replacements be
required.
It is recommended that the operator become familiar with the bender’s instructions and operating
details. It is also recommended that the foreman or supervisor familiarize himself with the
operating details of the machine to insure its continued efficient service.
The Di-Acro Power Benders are designed to accommodate two different types of tooling.
The No. 6 Bender is designed to handle tubing to 1.125” diameter (.060 wall-mild steel) and
round bars up to .563” diameter.
The No. 8 Bender will handle round bar up to 1” diameter and tubing up to 1.500” diameter.
B. Safety –Caution
Always read and understand this instruction manual before operating the No. 6 or No. 8
Bender.
Always make certain that other individuals are not in the working area of this machine
before operating.
Always keep fingers, hands, arms, elbows, head, feet or other parts of the body clear of
swinging arm and out of tooling area while machine is in operation.
Always make certain power is off when installing or changing tooling.
Always make certain power is disconnected when servicing machine.
Never allow untrained personnel to operate this machine.

REV. A 11/12
4
C. Specifications
SPECIFICATIONS
No. 6 Tooling Head No. 8 Tooling Head
Capacity (Material) 1-1/4” OD Tube (.060 wall 1-1/2” OD Tube (.060 wall
mild steel mild steel
3/4” IPS 1” IPS
5/8” Rd (solid mild steel) 1” RD (solid mild steel)
1/4”x 2” Flat (easy way) 3/8”x4” (easy way)
1/4” x 1” Flat (hard way) 3/8” x 1” (hard way)
Radius Capacity 9” 24”
Degree of Bend 280 360
Hydraulic Pressure 1000 PSI 1000 PSI
Motor 3 HP 3 HP
Cylinder 4” 4”
Floor Space 18” x 62” 18” X 62”
Shipping Weight 1,150 lbs. 1,150 lbs.
Spindle Torque 3487 ft./lbs. 3487 ft./lbs.
Power Required 208, 230 or volt, 3phase, 60hz
D. Installation
During shipment, the bender may have accumulated a coating of dust or grit. Remove all
Dirt and rust preventative with cleaning solvent.
WARNING: To prevent serious bodily injury fasten machine to floor through 4 holes
(5/8” Dia) provided in the base of machine.
When shipped the gauge is removed for packing purposes. Install one of the two gauge groups
as illustrated below.

REV. A 11/12
5
NOTE: Install gauge group “A” for short or single length bends. Install group “B” for longer
or multiple length bends.
NOTE: It is suggested that all four stop arms be placed at right angles to each other even if
only one or two are needed so that the knurled knob can be easily turned in to position
the stops.
Connect electricity to a thee phase input power supply making certain the transformer and motor
are connected properly for power being supplied (208, 230, or 460).
Check pump rotation. Proper rotation is shown by the directional arrow on shroud located at the
top of the motor. To change pump rotation, interchange two supply lines.
Check pump reservoir and fill to the proper level in the sight gauge if needed. Reservoir is filled
at the factory.
E. Lubrication
Fill pump with anti-wear hydraulic oil such as Mobil DTE-26 or equivalent. A viscosity
between 120 and 250 SUS should be maintained. If this is not available, automotive oil SAE 20-
20W, type SC, SD, SE is an acceptable substitute when there is little or no water contamination.
Detergent dispersant additives in these oils hold water in a tight emulsion and prevent separation
of water, even after long standing periods. A minimum of lubrication is required on the No. 6
and No. 8 benders. A single grease fitting on the rack cam requires lubrication every 500 hours
of operation or every three months. The same schedule applies to the miscellaneous linkages on
the control and gauges. Use NLGI No. 2 grease on the grease fittings, and a No. 30 machine oil
on the linkages.
F. Control Description
1. Initial Power Up
After providing the proper power source to main electrical enclosure, rotate
disconnect switch to the “ON” position. This will provide power to the control
panel.
If needed rotate “E” stop mushroom button clockwise to deactivate.
Press “POWER ON RESET”
Press “START”, “STOP” buttons to control hydraulic pump. NOTE: Stop pump
when not running production. Running for extended periods of time can cause
overheating.
2. HMI Screen Displays
Three screen options are provided to operate the power bender. They are the
“Production” screen, “Manual/Homing” screen, and “Bend Value” screen. See page
7 for screen layout.
The “F4” button is used to toggle between the “Production” screen and
“Manual/Homing screen.

REV. A 11/12
6
The “F1” button (when in the “Production” screen is used to enter the “Bend Value”
screen “F1” (ESC) or <RET> is used to return back to the “Production screen.
3. Manual Operation
Start Hydraulic pump with the “START” button.
Go to the “Manual/Homing” screen; press “F4” if in the “Production” screen.
Toggle “F2” button between “Extend” & “Retract” to control the rotation
direction of the tooling head.
Position and hold fingers in the two hand safety switch to activate rotation.
Rotation will stop when fingers are removed from the safety switch or the
hydraulic cylinder has reached full stroke in either direction.
The “F2” button must be toggled back to rotate the tooling head in the other
direction.
NOTE: The bend value is displayed but cannot be reset. Also, the proximity switch
used for homing in “Auto” mode does not stop rotation in “Manual” mode.
4. Automatic Operation (Step 1-Homing)
Using the manual operation (Step 1) rotate the tooling head to the desired
“Home” position for making a bend.
Once properly positioned, press “F1” when in the ‘Manual/Homing” screen to
Toggle to the “Auto” mode.
Press “F3” to activate the “Homing” sequence. The “Homed” indicator circle
will turn off and the “Homing’ indicator circle will illuminate (turn dark)
Manually position the trip arm, under the left side of the machine, until the yellow
lights on the proximity switch illuminates on the base of the switch if necessary.
NOTE: The “Homing” operation will automatically zero the bend value.
Automatic Operation (Step 2 –Setting the Initial Bend Set Point)
(assuming the Homing sequence is complete and “Auto” mode is selected)
Press “F1” in the “Production” screen to go to the “bend Value” screen
Enter the desired bend angle using the numeric key pad. The set bend angle and
actual bend angle may differ by a few degrees and therefore the set bend angle
may need to be changed. Material spring back will also need to be considered.
Press the <RET> Key to save a bend value and return to the “Production” screen.
Press “F1” to escape from the “Bend Value” screen back to the “Production
screen. The bend value will default back to the previous value.
5. Automatic Operation (Step 3 –Test Bending and Bend Value Adjustment)
Position and hold fingers in the two hand safety switch to activate rotation.
Rotation will stop once the “Bend Value” has been reached.
NOTE: Rotation will stop anytime the two hand safety switch is deactivated (fingers m
removed). Rotation direction will not change until the “Bend Value” has been
reached.
Position and hold fingers in the two hand safety switch to activate rotation back

REV. A 11/12
7
to the Home position. Rotation will not stop once the Home position has been
reached.
If the desired bend angle is not obtained repeat Step 4 (above)
6. Cycle Counter
A cycle counter is available in the “Production” screen. It is activated in the
“Auto” mode when the “Bend Value” is reached.
Press “F3” in the “Production” screen to reset the counter.
CONTROL PANEL

REV. A 11/12
8
G. SET-UP & RUN NO. 6 BENDER
NOTE: This example set-up is of forming in the counter-clockwise direction.
When you first receive your machine and tooling head, make sure you have all the
proper
parts and quantity of parts. Refer to pages 16 and 17 for No. 6 tooling head
components.
1. Turn power on. Make sure that the rack assembly is fully retracted into the cylinder.
Once in position, turn power off.
2. Place rotating arm assembly on machine top as shown on this page.
3. Place slide bar adjacent to the rotating arm.
4. Insert the 3/8” socket head cap screws into the holes on the slide and loosely thread
them into the table top.
5. Insert the three 1/2” diameter dowels into the holes of the slide bar to they are flush at
the top. At this point tighten the 3/8” screws and secure the bar.
6. Turn power on and follow the manual operation instructions to rotate the pinion
assembly in a counter-clockwise direction. Rotate pinion assembly until threaded
holes line up with clearance holes on the rotating arm. Once the holes are aligned,
turn power off, insert and tighten the six 7/16” socket head cap screws.
7. Insert the holding pin and 1/2" radius pin into their proper positions on the rotating
arm.
8. Install the proper bending collar.
9. Attach the proper clamp block to the hanger assembly.
10. Adjust Quik-Lok slide that controls the clamp block.
A.. Bolt to the rotating arm at position where material can be held firmly between
bending collar and clamp block.
B. Add spacer rods as necessary to assure firm pressure between clamp block and
bending collar.

REV. A 11/12
9
11. Adjust Quik-Lok slide that controls follow block (excessive pressure not necessary).
12. Clamp material with clamp block.
13. Clamp material with follow block.
14. Follow Manual Operations Instructions to test bend a part.
NOTE: After desired part has been achieved, material stop indexes can be adjusted and
follow automatic operation instruction to set up for production.
To Set Up For Clockwise Bending
1. Remove Quik-Lok that controls clamp block from rotating arm.
2. Remove Quik-Lok that controls follow block.
3. Remove rotating arm and slide.
4. Remove and flip over screw support on the end of the rotating arm.
5. Turn power on and fully extend cylinder.
6. Turn power off.
7. Repeat steps 8 through 15 in set up for counter-clockwise bending.
H. SET-UP AND RUN NO. 8 BENDER
NOTE: This example is of forming in the counter-clockwise direction.
When you first receive your machine and tooling head make sure you have all the proper
parts
quantity of parts. Refer to pages 20 & 21 for No. 8 tooling head components.

REV. A 11/12
10
1. Turn power on. Make sure that the rack assembly is retracted fully into the cylinder.
Once
in position turn power off.
2. Place mounting plate on machine top as shown on this page.
3. Place nose holder slide on machine so that machine dowel and screws holes are
aligned.
4. Locate 3/8” socket head cap screws and insert through the slide and loosely thread
them
into the table top.
5. Insert the four 1/2” diameter dowels into the holes of the slide bar so they are flush at
the top. Tighten the 3/8” screws and secure the bar.
6. Place the nose holder assembly on slide. Do not bolt down at this time.
7. Insert desired center pin or radius collar.
8. At this time you need to determine the proper location of the locking pin. Place a
sample
piece of the material into the radius collar. Insert the locking pin into the mounting
plate
so that the material will be held in position when turning the locking pin in a counter-
clockwise rotation.
9. The mounting plate should be located so that the locking pin will be adjacent to the
forming side opposite the instrument panel when the cylinder rod is all the way back in
the cylinder. Follow Manual Operation instructions so that the pinion assembly rotates
in a counter clockwise direction. Rotate pinion assembly until threaded hole line up
with holes in the mounting plate. Insert the six 7/16” screws in the mounting plate and
tighten. When it becomes necessary to change position of mounting plate, remove the
six mounting screws in the top of the plate, which mount it to the spur pinion gear.
Position mounting plate in desired position and replace screws.
10. Rotate locking pin in a counter-clockwise direction and lock material against center pin
11. Adjust nose holder assembly.
a. Tighten bolts “B” securely
b. Finger tighten bolts “A”
c. Adjust nose holder support screw “C” until nose comes in contact with material.
d. Tighten bolts “A” securely.
12. Follow Manual Operation Instructions to test bend a part.
NOTE: After desired part has been achieved, and material stop indexes can be
adjusted. Follow automatic operation instructions to set up for production.
To Set Up For Clockwise Bending
1. Change position of pin to position shown on diagram for clockwise bending.
2. Repeat steps 7 thru 12 in set up for counterclockwise bending.

REV. A 11/12
11
I. TABLE ASSEMBLY

REV. A 11/12
12
POWER BENDER
TABLE ASSEMBLY
PARTS LIST
8700000-060
ITEM
PART NUMBER
DESCRIPTION
QTY
1
8150110-505
TABLE
1
2
8156650-300
DANGER SIGN
1
12
899111-000
CYLINDER MOUNT
1
13
20A0508C2104
SCREW-SHCS 5/8-11X2-1/4
4
14
62X0508
LOCKWASHER 5/8
4
15
8150371-170
CYLINDER ASSEMBLY
1
16
120464-000
SHIM
1
19
8150390-108
PINION ASSEMBLY
1
20
8150120-308
LOCATING BUSHING
1
21
8310100-300
CONE
1
22
8310100-400
CUP
1
23
8150470-509
LOCKING RING
1
24
23A0104C0308
SCREW-SSS 1/4-20X3/8
2
25
8000110-608
GEAR CASE COVER
1
26
8310301-100
CAM FOLLOWER
1
27
8150110-808
CAM FOLLOWER SPACER
1
28
8150470-400
NUT
1
29
8690100-200
GREASE FITTING
1
30
21A0308C2000
SCREW-HHCS 3/8-16X2
6
31
8310100-100
CONE
1
32
8310100-200
CUP
1
33
19A0102X2104
PIN-DOWEL 1/2X2-1/4
4
34
8150111-008
TAKE-UP CAP
1
35
20B0516C0708
SCREW-BHSCS 5/16-18X7/8
4
36
8371005-600
OIL SEAL
1
38
8200130-108
TRIP CLAMP
1
39
20A0104C1104
SCREW-SHCS 1/4-20X1-1/4
1
40
8000130-108
TRIP ARM
1
*
23A0104C0304
SOC SET SCREW 1/4-20X1/2
1
73
8150120-805
INDEX KNOB
1
74
8151120-307
PIN
1
75
8200120-307
KNOB
1
76
8151510-206
SPRING
1
77
23A0104C1000
SCREW-SSS 1/4-20X1
2
78
8150130-400
CLAMP
1
79
20A0516C1102
SCREW-SHCS 5/16-18X1-1/2
1
80
8151142-007
STOP ROD SUPPORT
1
84
8300142-007
STOP ROD SUPPORT
2
85
23A0516C0104
SOC SET SCREW 5/16-18X1/4
4
REV. A 11/12
13
POWER BENDER
TABLE ASSEMBLY
PARTS LIST “CONTINUED”
ITEM
PART NUMBER
DESCRIPTION
QTY
86
62X0308
LOCKWASHER 3/8
6
90
62X0516
LOCKWASHER 5/16
4
92
8150110-800
SPACER
2
*
8150740-101
PROX. MOUNT
1
*
8150740-102
ENCODER FLEX PLATE
1
*
8150740-103
ENCODER ADAPTOR
1
*
23A0X10C0104
SCREW-SSS #10-24 X 1/4
2
*
23A0X10C0102
SCREW-SSS #10-24 X 1/2
1
*
20A0X08C0304
SCREW-SHCS #8-32X3/4
6
*
31X0X08C
NUT-JAM #8-32
6
*
61X0X10
WASHER-FLAT #10
10
*
62X0X10
WASHER-LOCK #10
6
* Parts shown above with (*) asterisk in Item column are not shown on assembly drawing
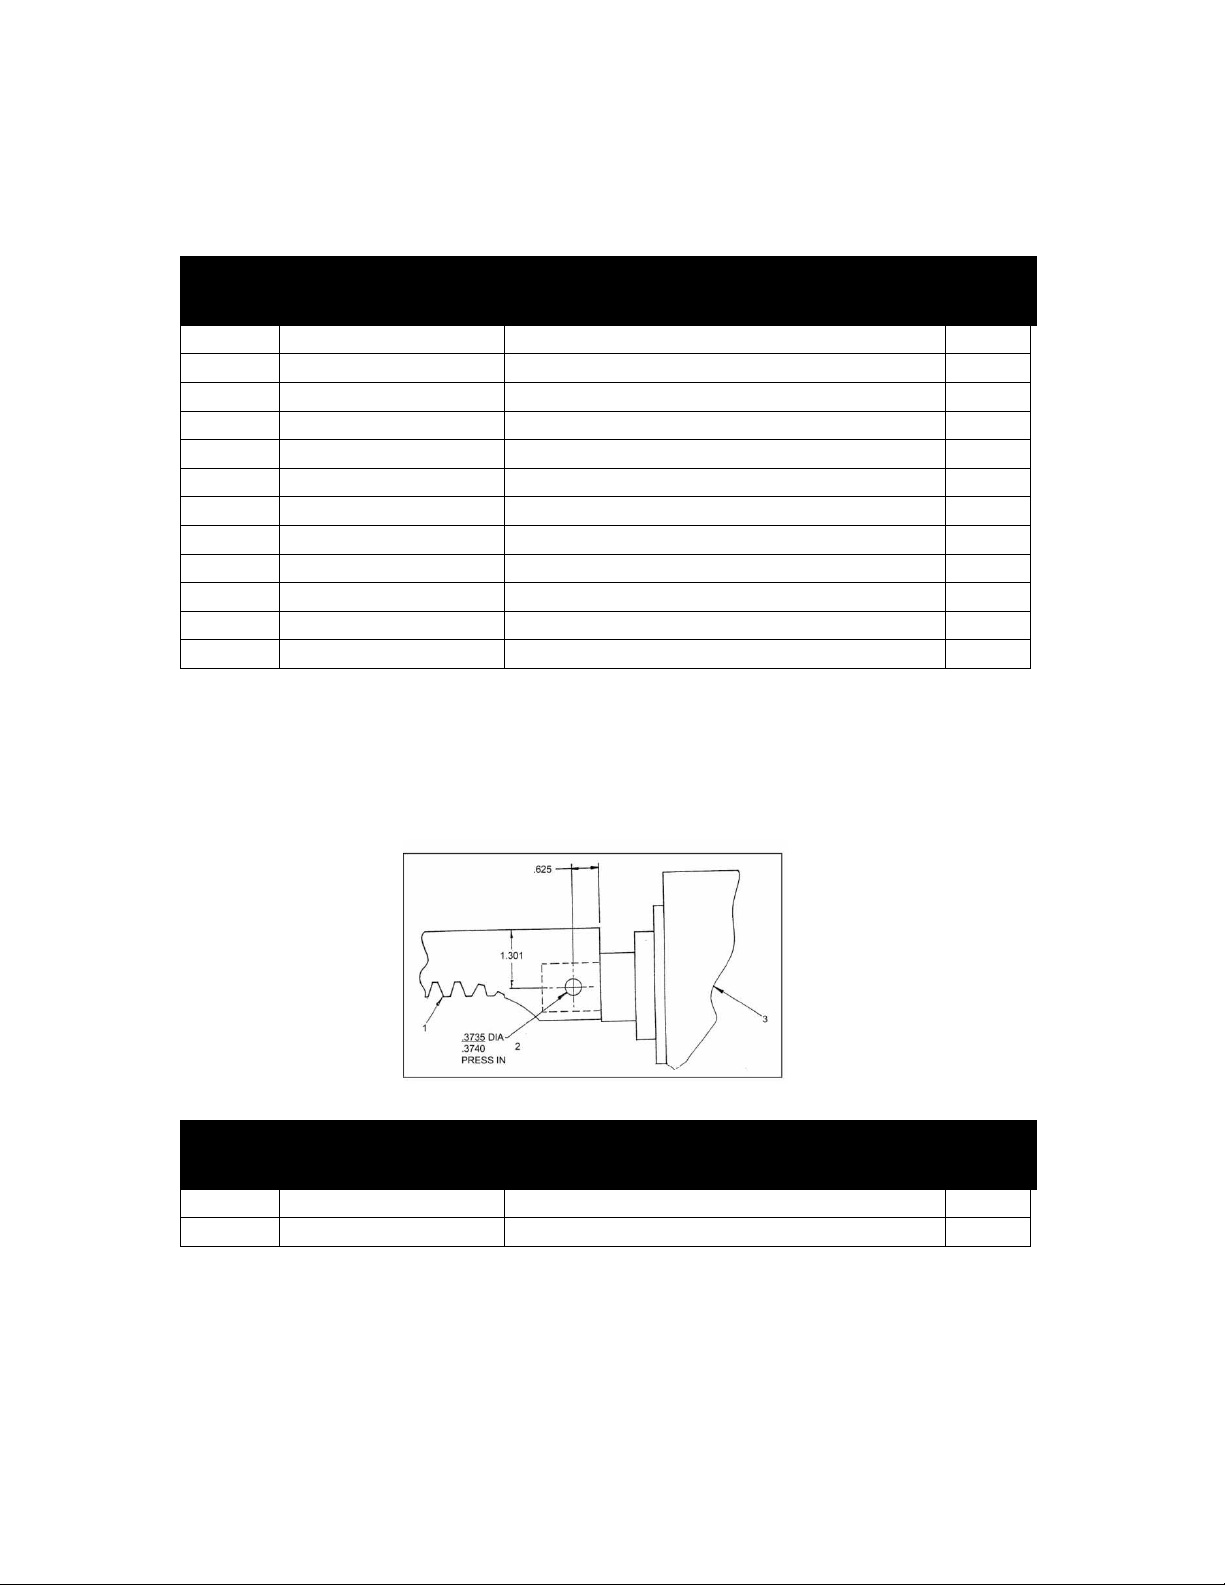
J. 4” CYLINDER ASSEMBLY
As of April 2011, the new style Rack (P/N 8150122-607) was threaded onto the cylinder piston
shaft and locked with a jam nut. Beginning December 2012 a ¼-20” set screw was used to lock
the thread.
Reflects old style Rack
ITEM
PART NUMBER
DESCRIPTION
QTY
1
8150122-607
RACK
1
3
8150372-100
CYLINDER
1
SEAL KITS (NOT SHOWN)
8150730-116 PISTON SEAL KIT
8150730-117 ROD SEAL KIT
NOTE: When replacing old style Rack (P/N 8150121-607), drill 3/8 dia. hole in rack and
align with hole in piston rod. Install 3/8” dowel pin.
REV. A 11/12
14
K. BASE ASSEMBLY

REV. A 11/12
15
POWER BENDER
BASE ASSEMBLY
PARTS LIST
121871-000
ITEM
PART NUMBER
DESCRIPTION
QTY
1
121871-100
BASE-SUB ASSY/PWR BENDER
1
2
121871-200
DOOR ASSEMBLY
1
3
8150720-108
DOOR
1
4
8150720-109
HINGE
1
5
803343-000
LATCH
1
6
20A0104C0304
SCREW-SHCS 1/4-20X3/4
5
7
62X0104
WASHER-LOCK 1/4
5
8
30X0104C
NUT-FULL 1/4-20
5
9
21A0308C0304
SCREW-HHCS 3/8-16X3/4
4
10
62X0308
WASHER-LOCK 3/8
4
11
20A0102C1104
SCREW-SHCS 1/2-13X1-1/4
4
12
62X0102
WASHER-LOCK 1/2
4
13
1000307-000
HYDRAULIC POWER SUPPLY
1
14
8150730-103
HYDRAULIC PUMP
1
15
8150730-104
PRESSURE ADJUSTMENT
1
16
8150730-105
FLOW ADJUSTMENT
1
17
8150730-106
DIRECTIONAL VALVE
1
18
8150730-107
PRESSURE GAUGE
1
19
8150730-108
RETURN FILTER
1
20
8150730-109
RESERVOIR
1
21
8150730-110
DRAIN PLUG
1
22
8150730-111
SIGHT LEVEL/TEMP GAUGE
1
23
8150730-112
FILLER/BREATHER CAP
1
24
8150730-113
MOTOR
1
25
8150730-115
PO CHECK VALVE
1
26
130-0221-P
HYDRAULIC HOSE
8’
27
130-0213-P
90° MALE ELBOW
2
28
130-0214-P
SWIVEL FITTING
4
29
8150730-114
BUSHING
2
30
20A0102C1304
SCREW-SHCS 1/2-13 X1-3/4
4
31
62X0102
WASHER-LOCK 1/2
4
32
61X0102
WASHER-FLAT 1/2
4
33
30X0102C
NUT-FULL 1/2-13
4
34
8150750-101
TAMPER PROOF LOCK
1
35
100-0135-P
NAMEPLATE
1

REV. A 11/12
16
L. NO. 6 TOOLING HEAD ASSEMBLY

REV. A 11/12
17
NO. 6 TOOLING HEAD
ASSEMBLY PARTS LIST
ITEM
PART NUMBER
DESCRIPTION
QTY
1
20A0716C1104
SOC HEAD CAP SCREW 7/16-14X1-1/4
6
2
8156120-302
HOLDING PIN
1
3
8130016-970
RADIUS PIN
1
4
20A0516C0508
SOC HEAD CAP SCREW 5/16-18X5/8
2
5
8156111-371
HANGER ASSEMBLY
1
6
61X0308
FLATWASHER 3/8
4
7
20A0308C2102
SOC HEAD CAP SCREW 3/8-16X2-1/2
4
8
8200111-371
ROTATING ARM ASSEMBLY
1
9
8400111-301
SPACER ROD C –4”
2
10
8300111-301
SPACER ROD B –2”
2
11
8156111-301
SPACER ROD A –1”
2
12
8700111-301
SCREW SUPPORT
2
13
20A0308C1000
SOC HEAD CAP SCREW 3/8-16X1
4
14
8500111-301
KNURL HEAD SCREW
2
15
20A0308C1102
SOC HEAD CAP SCREW 3/8-16X1-1/2
12
16
8910111-300
SLIDE
1
17
19A0102X1304
DOWEL PIN 1/2 X 1-3/4
3
18
8000111-371
ASSEMBLY COMP ROLLER
1

REV. A 11/12
18
M. HANGER ASSEMBLY
HANGER ASSEMBLY
PARTS LIST
ITEM
PART NUMBER
DESCRIPTION
QTY
1
85000111-300
HANDLE ROD
1
2
8120810-700
PLASTIC KNOB
1
3
61X0308
FLATWASHER 3/8
1
4
19A0102X2102
DOWEL PIN 1/2 X 2-1/2
1
5
19A0508X2102
DOWEL PIN 5/8 X 2-1/2
1
6
8156111-302
HANDLE WELDMENT
1
7
8920111-300
NOSE ASSEMBLY
1
7A
23A0104C0308
SCREW-SSS 1/4-20X3/8
1
8
8930111-300
LINK
2
9
8156120-301
LINK PIN
1
10
8400111-300
HANDLE BLOCK
1
10A
23A0104C0104
SCREW-SSS 1/4-20X1/4
2

REV. A 11/12
19
N. PRESSURE ROLLER ASSEMBLY
PRESSURE ROLLER ASSEMBLY
PARTS LIST
ITEM
PART NUMBER
DESCRIPTION
QTY
1
19A0508X2102
DOWEL PIN 5/8 X 2-1/2
1
2
8156111-302
HANGER WELDMENT
1
3
8100111-371
ROLLER ASSEMBLY
1
8600111-301
ROLLER HOLDER
1
8156111-300
ROLLER
2
8200120-301
ROLLER PIN
2
8690100-200
DRIVE FTG
2
3A
23A0104C0308
SCREW-SSS 1/4-20X3/8
1
4
8930111-300
LINK
2
5
8156120-301
LINK PIN
1
6
8400111-300
HANDLE BLOCK
1
6A
23A0104C0104
SCREW-SSS 1/4-20X1/4
2
7
19A0102X2102
DOWEL PIN 1/2 X 2-1/2
1
8
61X0308
FLAT WASHER 3/8
1
9
8120810-700
PLASTIC KNOB
1
10
8500111-300
HANDLE ROD
1

REV. A 11/12
20
O. NO. 8 TOOLING HEAD ASSEMBLY
Other manuals for 6
1
This manual suits for next models
1
Table of contents
Other Di-Acro Construction Equipment manuals


