Diamond Lustre COBRA-H-DLC User manual

1
COBRA-H-DLC 09/2003
COBRA-H-DLC
OPERATOR’S MANUAL
2
INTRODUCTION
This manual will help you get the most from your Cobra-H-DLC. Read these instructions thoroughly
before operating the machine.
This product is intended for commercial use only.
PARTS AND SERVICE
Repairs, when required, should be performed by your authorized Diamond Lustre dealer who maintains
an inventory of original replacement parts and accessories.
Call the Diamond Lustre distributor from whom you purchased your machine when you need parts or
service. Please specify the Model and Serial Number when discussing your machine.
SERIAL NUMBER PLATE
The Serial Number of your machine is shown on the plate that is mounted on the floor of the base
compartment. This serial number and model are needed when ordering replacement parts for the machine.
Use the space below to note the Model and Serial Number of your machine for future reference.
MODEL : COBRA-H-DLC
SERIAL NUMBER : _____________________________________
Be sure to fill out and return your warranty card.
DO NOT OPERATE THE MACHINE UNTIL YOU HAVE READ THIS SECTION.
IMPROPER USE WILL VOID THE WARRANTY.
•Always use a defoamer when foaming occurs to prevent vacuum motor damage.
•Never use water above 130°F (54°C).
•Do not use outdoors or where temperature is below freezing. Protect your machine from any
extremes in temperatures.
•Do not let the pump run dry. Turn the pump off and refill the tank when cleaning solution
gets low.
•Flush the machine with an acid de-scaler regularly (monthly or more often) to prevent a
build-up of minerals or chemicals in the pump and heat systems. Follow the flush with a clear
water rinse to remove any particles and to rinse the acid from the machine.
•Use approved chemicals only. All chemicals should be mixed thoroughly. Liquid chemicals
are recommended to prevent powder buildups. A pH between 6 and 9 is recommended.
The use of high alkaline detergents or strong acids will accelerate the wear of the pump
and seals, and will void the warranty.
•All extension cords must have a rating of at least 12/3 (#12 cord). Extension cords should
be no longer than 50 feet. Replace the plug immediately if the ground prong becomes
damaged or is broken off.
UNCRATING
When the machine is delivered, carefully inspect the shipping carton and the machine for damage. If damage is
evident, save the shipping carton so that it can be inspected. Contact Diamond Lustre Customer Service
immediately for instructions on how to file a freight damage claim.

3
COBRA-H-DLC 09/2003
IMPORTANT SAFETY INSTRUCTIONS
This machine is only suitable for commercial use, for example in hotels, schools, hospitals, factories, shops
and offices other than normal residential housekeeping purposes.
When using any electrical appliance, basic precautions should always be followed, including the following:
NOTE: Read all instructions before using this machine.
WARNING!
To reduce the risk of fire, electric shock, or injury:
•Do not leave the machinge unattended when it is plugged in. Unplug the unit from the outlet when not in
use and before servicing.
•To avoid electric shock, do not expose to rain or snow. Store, and use, indoors.
•Do not allow to be used as a toy. Close attention is necessary when used near children.
•Use only as described in this manual. Use only the manufacturer’s recommended attachments.
•Do not use with damaged cord or plug. If the machine is not working as it should, has been dropped,
damaged, left outdoors or dropped into water, return it to a service center.
•Do not pull by the cord, use the cord as a handle, close a door on the cord, or pull the cord around sharp
edges or corners. Do not run the machine over the cord. Keep the cord away from heated surfaces.
•Do not unplug by pulling on the cord. To unplug, grasp the plug, not the cord.
•Do not handle the plug, the cord or the machine with wet hands.
•Do not put any object into openings. Do not use with any opening blocked; keep free of dust, lint, hair,
and anything that may reduce air flow.
•Keep loose clothing, hair, fingers, and all parts of body away from openings and moving parts.
•Do not pick up anything that is burning or smoking, such as cigarettes, matches, or hot ashes, or any
health endangering dusts.
•Turn off all controls before unplugging.
•Use extra care when cleaning on stairs.
•Do not use to pick up flammable or combustible liquids such as gasoline or use in areas where they may
be present.
•Connect to a properly grounded outlet only. See Grounding Instructions.
•Liquid ejected at the spray nozzle could be dangerous as a result of its temperature, pressure or
chemical content.
4
120VAC GROUNDING INSTRUCTIONS
This machine must be grounded. If it should electrically malfunction, grounding provides a path of least
resistance for electric current to reduce the risk of electric shock. This appliance is equipped with a cord
having an equipment-grounding conductor and grounding plug. The plug must be plugged into an appropriate
outlet that is properly installed and grounded in accordance with all local codes and ordinances.
DANGER!
Improper connection of the equipment-grounding conductor can result in a risk of electric shock. Check with
a qualified electrician or service person if you are in doubt as to whether the outlet is properly grounded. Do
not modify the plug provided with the appliance. If it will not fit the outlet, have a proper outlet installed by a
qualified electrician.
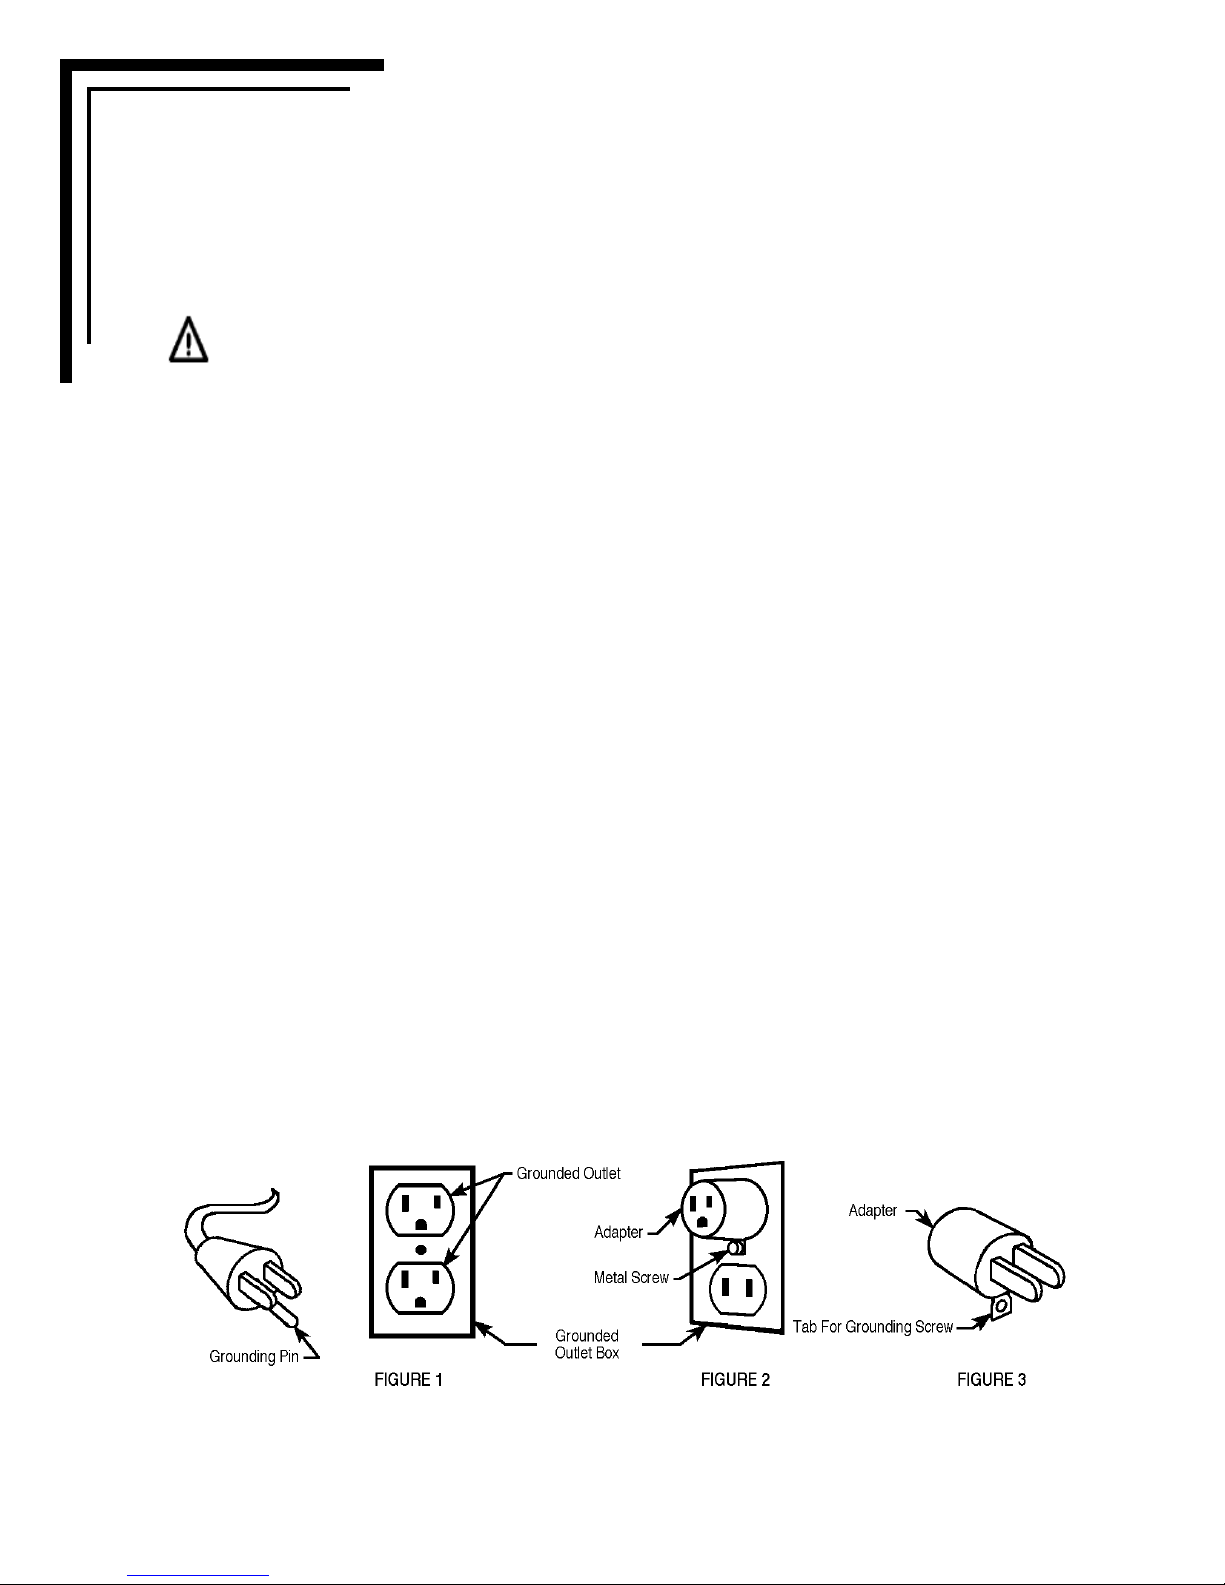
This appliance is for use on a nominal 120-volt circuit, and has a grounding plug that looks like the plug
illustrated in Figure 1 below. A temporary adapter illustrated in Figures 2 and 3 may be used to connect this
plug to a 2-pole receptacle as shown in Figure 2 if a properly grounded outlet is not available. The temporary
adapter should be used only until a properly grounded outlet (Figure 1) can be installed by a qualified
electrician. The green-colored rigid ear, tab, or the like extending from the adapter must be connected to a
permanent ground such as a properly grounded outlet box cover. Whenever the adapter is used, it must be
held in place by a metal screw. Grounding adapters are not approved for use in Canada.
Replace the plug if the grounding pin is damaged or broken.
The Green (or Green/Yellow) wire in the cord is the grounding wire. When replacing a plug, this wire must
be attached to the grounding pin only.
Extension cords connected to this machine should be 12 gauge, three-wire cords with three-prong plugs
and outlets. DO NOT use extension cords more than 50 feet (15 m) long.
PLEASE NOTE: FOR NORTH AMERICA ONLY

5
COBRA-H-DLC 09/2003
MACHINE DESCRIPTIONS
Operator Handle (1) - Operator holds this to move the machine from one location to another.
Solution Tank Lid (2) - Fill Solution Tank here with warm water and chemicals.
Switch Plate (3) - This is where the switches are located that operate the pump, vacuum and heater.
Recovery Tank Lid (4) - The Recovery Tank can be flushed out by running clean water into this opening
with the Drain Gate (7) open. The vacuum float Shut-OFF can also be accessed through this opening for
maintenance.
Vacuum Inlet (5) - This is where the vacuum hose attaches to the machine.
Latch (6) -Open the latches to access the base compartment, which contains the motors and heater.
Drain Gate (7) -Open this gate to drain the recovered solution out of the machine. Be sure to keep this
gate clean.
Castor (8) -The castor swivels for easy maneuvering in tight spots.
Wheel (9) -Large, non-marking wheels for ease of transport.
Power Cords (10) -Two, 25 foot cords, rated 12 gauge, 3 wire. Do not use if either cord is damaged.
The cord with the red sleeve operates the vacuum and the pump. The other cord operates the heat
exchanger.
1
2
3
4
5
6
7
10
9
8
BECOME FAMILAR WITH YOUR NEW EXTRACTOR

6
OPERATION
1Inspect the machine, hoses, and cleaning tools for cleanliness and completeness.
2Fill the Solution Tank with warm water. Using warm water may be a benefit in cleaning effectiveness,
but do not use hot water (above 130°F+/ 54°C) in the tank. Add liquid cleaning solution with a pH
value of between 6 and 9. High pH detergents and/or acid rinses will accelerate the wear of the seals
and will void the warranty.
3Plug in the power cords. Do not connect both cords to the same outlet. If you are certain the cords
are on separate circuits, turn the Heat switch on. CAUTION: using the Heat switch when the cords
are on the same circuit may cause the circuit breaker in the wall to trip. NOTE: the cord with no red
sleeve powers the Heat Exchanger. The cord with the red sleeve powers the vacuums and pump.
4Attach the spray hose to the solution quick disconnect on the front of the machine and attach the
vacuum hose to the hose barb on the recovery tank. Attach the other ends of the hoses to the
cleaning tool.
5Allow the heat exchanger two minutes to reach operating temperature.
6Turn the pump on. Turn the vacuum on. NOTE: the pump has a built in pressure switch; the
pump runs only when you are spraying.
7Begin cleaning using the correct hoses and tool.
8Use defoamer in the recovery tank any time foaming occurs.
9Monitor the water level in the solution tank. Do not let the pump run dry.
10 When the solution tank gets low, turn off the pump, fill the solution tank, empty and clean the
recovery tank.
11 When finished with the job, remove any unused solution from the solution tank, and run a few gallons of
clean water through the system to rinse out any detergent.
BALL FLOAT VACUUM SHUT-OFF
Prior to using the machine, always check that the float filter is clean and the ball can travel freely. When the
recovery tank is full, the ball float will rise and will shut off the vacuum flow to prevent any more water from
entering the tank. Turn off the vacuum, and empty the recovery tank. NOTE: if foam is present or if the ball
float is prevented from rising, the float will not be able to stop the air flow, and the tank may over fill.
CAUTION!
To avoid vacuum motor damage, always make sure the float filter is clean and the ball can travel freely prior to
using the machine. And always use a defoamer when foaming occurs.
7
COBRA-H-DLC 09/2003
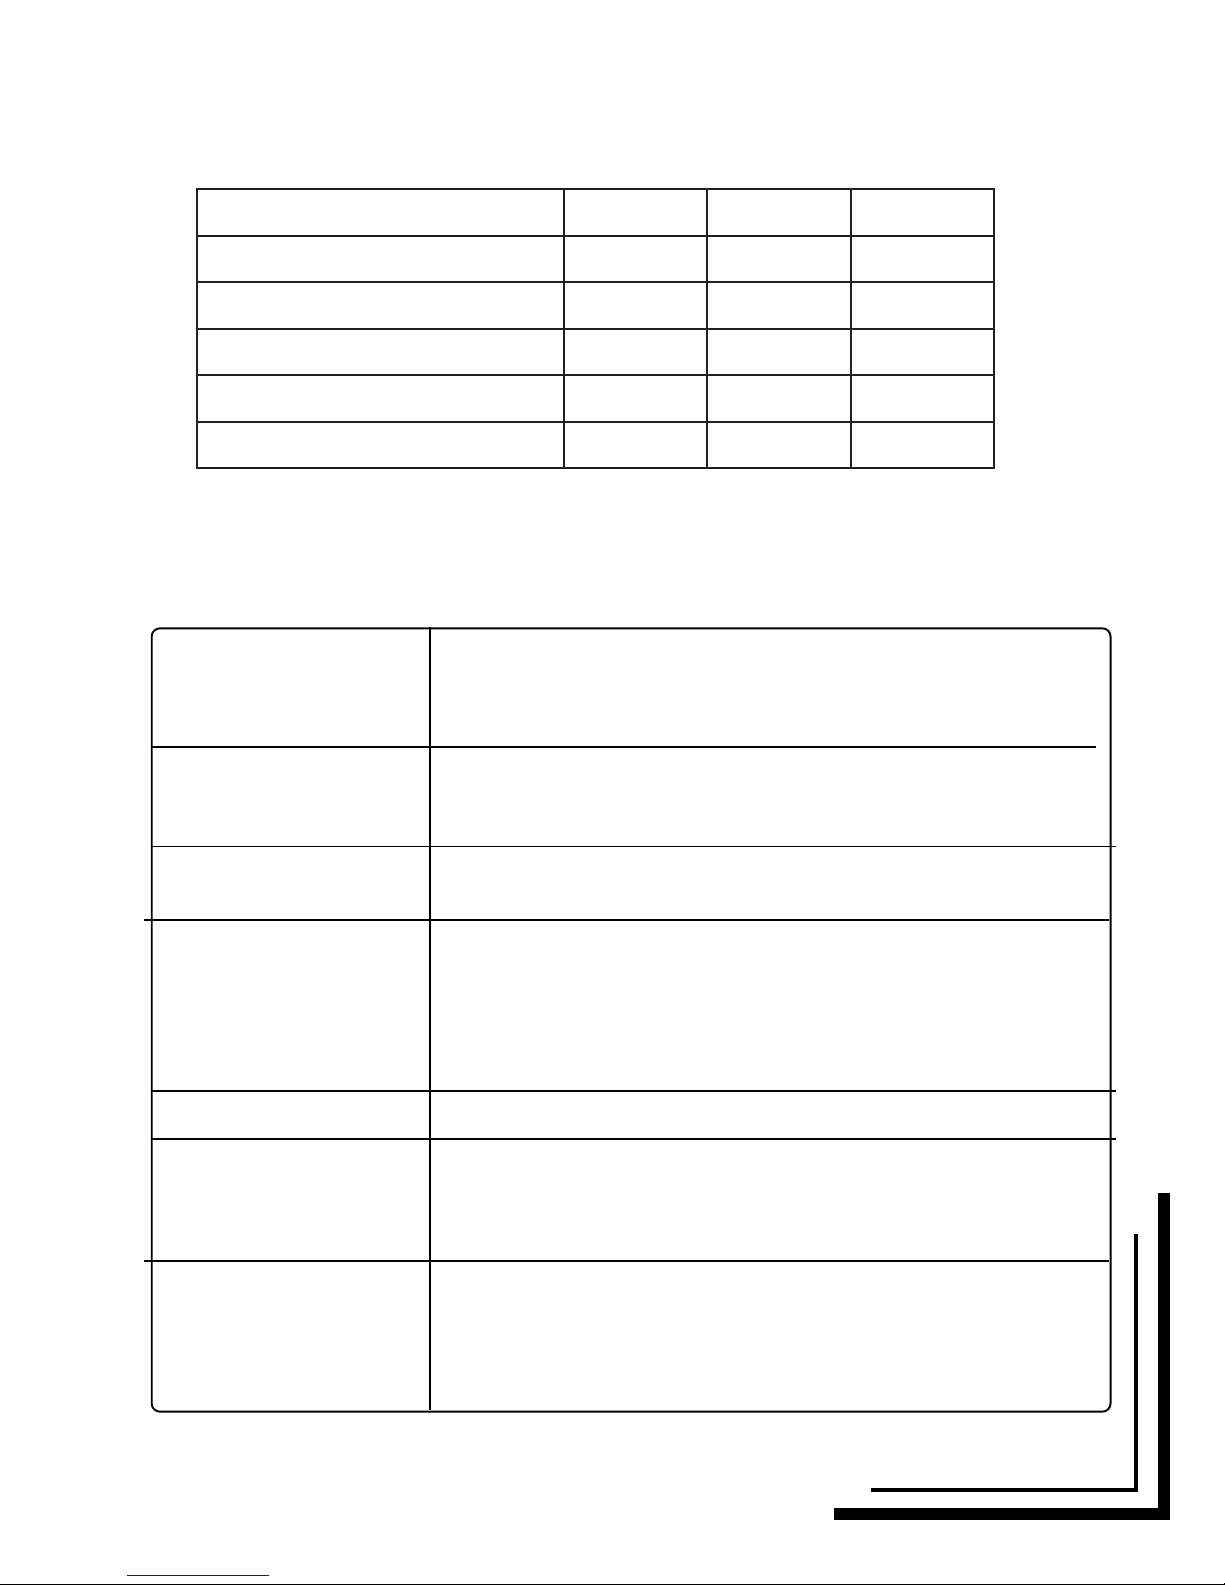
Daily Monthly Yearly
PMUP&SENILHSULF X
RETLIFTAOLFMUUCAVNAELC X
RETLIFNOITULOSNAELC X
SYAWRIATELNIKCEHC X
ENIHCAMELACSED X
SEHSURBROTOMMUUCAVKCEHC X
MAINTENANCE
TROUBLESHOOTING
CHECK THIS
Solution tank is empty
Clogged spray tip
Pump not running
Valve on tool not operating
Solution path is clogged. Pump only runs when spraying occurs
Solution tank may be empty, or nearly empty
No power to pump. Test the switch. Test the pump motor.
Partially clogged solution path (hose, heater, tool)
Worn pressure switch in pump. Adjust pressure sensor in pump head.
Debris plugging cleaning tool or vacuum hose
Drain gate is not completely closed, or seals are damaged
Internal vacuum hose is cracked
Recovery tank lid is not closed, is cracked or gasket is damaged
Recovery tank is warpped or cracked
Debris impeding air movement on vac motor impellors
No power to motor. Test the switch. Test the vacuum motor.
Trying to spray too long. Try spraying for 12 -15 seconds per cycle
Heat exchanger needs to be flushed
Wrong tool being used. Too much water passing through
Longer hose, or larger diameter hose, than standard
Heat switch is off
No power in the wall outlet — check to see if breaker has tripped
No power to heat switch — check power cord for ‘opens’
No power out of heat switch. Check power at Bi-metalic switch
Follow troubleshooting steps to isolate the problem. Call your distributor.
IF PROBLEM OCCURS
NO SPRAY
PUMP
DOESN’T
RUN
PUMP
PULSATES
LOW
SUCTION
NO SUCTION
LOW
HEAT
NO
HEAT
If you are unable to diagnose the problem, contact the company from which you purchased your Cobra-H-DLC
8

9
COBRA-H-DLC 09/2003
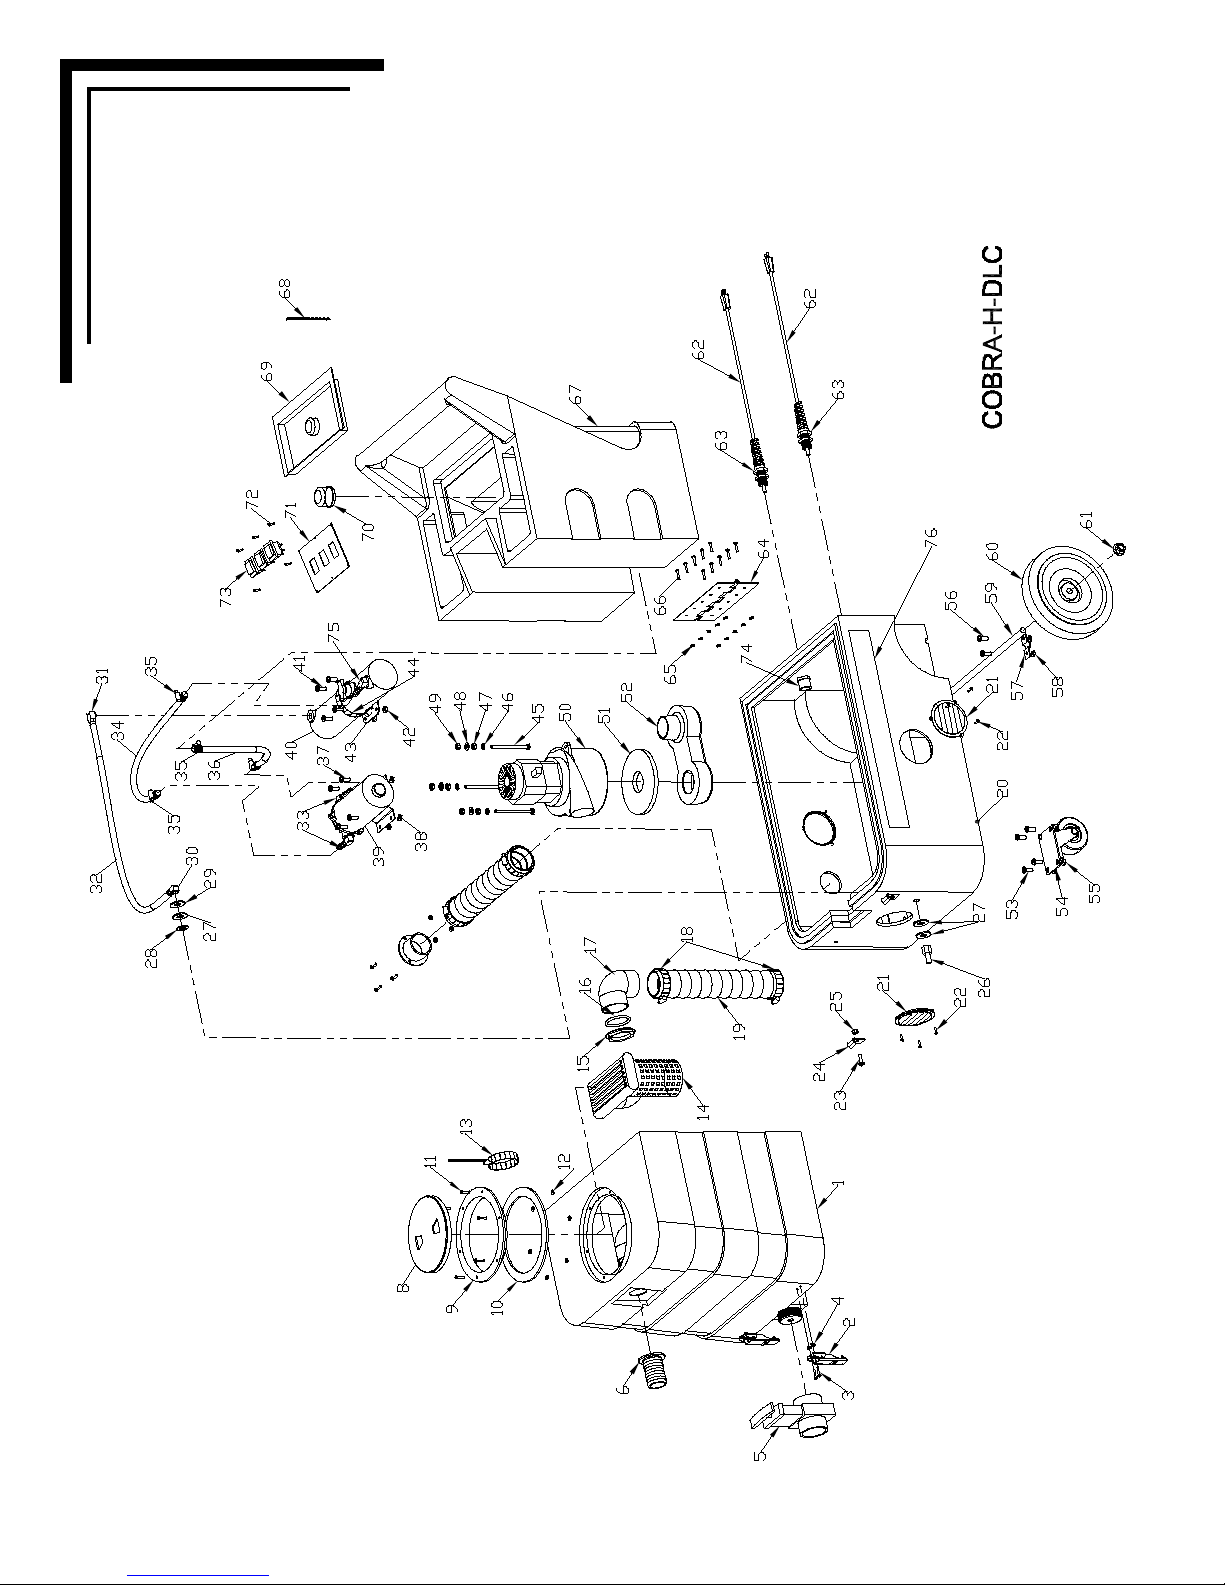
COBRA-H-DLC 120V
PART LIST
#1 VT-5 Recovery Tank
#2 908A Latch
#3 21C Screw, 8-32 X 5/8”
#4 325 Locknut, 8-21
#5 903D Drain Gate, female threads
#6 907 Vacuum Inlet Hose Barb, 1-1/2"
#8 2086 Lid, with ring
#9 N/A Ring, part of lid
#10 1074 Gasket
#11 382C Screw, 8-32 X 1”
#14 FP193 Ball Float, with manifold
#15 185 Nut, aluminum, 1-1/2”
#16 187 O-ring
#17 922 PVC Elbow
#18 156 Hose Clamp
#19 FP171 Hose, 2” X 21”, ribbed
#19A 430 Hose, ribbed, 22” long
#20 BS-6 Base compartment, black
#21 928 Louver, includes 3 screws
#22 FP228 Gasket
#23 21C Bolt, 8032 X 5/8”
#24 909A Latch strike
#26 45 Quick Disconnect, 1/4 n.p.t.
#27 92A Nipple, 1/4 n.p.t.
#28 116 Bushing, fiber
#29 31 Washer, brass
#29A 115 Washer, fiber
#30 91 Elbow, brass, 1/4 n.p.t.
#31 103 Elbow, brass, 1/8 n.p.t.
#32 2012 Hose, 26”
#33 108 Elbow / Hose barb
#34 2012 Hose, pump to heater, 26”
#35 166 Hose Clamp
#36 925 Hose, pump inlet, 3/8” I.D.
#37 138 Bolt, 1/4-20 X 1-1/4”
#38 8 Locknut, 1/4
#39 2007 Pump, 100 psi
#40 FP Heat Exchanger, complete
#41 5 Bolt, 1/4-20 X 3/4”
#42 8 Lock nut, 1/4 -20
#43 455 Bracket, heater mount
#44 76 Hose Clamp
#45 270 Bolt, 1/4-20 X 5”
#46 137 Washer, split lock
#47 136 Nut, finish, 1/4
#48 14 Washer, flat
#49 17 Locknut, 10-32
#50 408B Vacuum motor
ITEM # PART # DESCRIPTION
#51 2013 Gasket, vacuum motor
#52 MA-2 Manifold
#54 2002 Castor, 3”
#57 180 Bracket, axle mount
#59 910 Axle
#60 2003 Wheel, 8”
#61 27A Axle Cap, wheel retaining
#62 495 Power cord, 12/3, 25 ft
#63 184 Cord Retainer
#64 917 Hinge
#65 17 Locknut, 10-32
#66 21 Bolt, 10-32 X 5/8”
#67 HT-5 Holding Tank
#69 901 Lid, solution tank cover
#70 207A Filter, pump inlet
#71 2006B Switch plate
#72 28 Screw, #4 X 3/8”
#73 FP311 Switch, SPDT, with cover
#74 937 Reducer, PVC
#75 208 Hose barb
#76 2001D Label
#77 399A Heat switch
#78 440 Flange, exhaust
#79 22 Bolt, 10-32 X 5/8”
MISCELLANEOUS PARTS / KITS
FP256B Heat repair kit, includes heat/temp. switch
and cutout.
ITEM # PART # DESCRIPTION
10/172003

10
TECHNICAL SPECIFICATIONS:
Vacuum Motor:
Water lift:
Amp Draw:
Tank Construction:
Solution Tank Capacity:
Recovery Tank Capacity:
Application Flow:
Solution Hose Length:
Recovery Hose Length:
Power Cord:
Rear Wheels:
Front Castors:
Heat Exchanger:
Height:
Length:
Width:
Machine weight:
One, 3-Stage
137 Inches
16 amps, each cord
Rotationally molded polyethylene
10 Gal. (38 L)
10 Gal.(38 L)
100 psi
15 Ft. (4.5 m)
15 Ft. (4.5 m)
Two 25 ft. (7.6 m), 12 Gauge, 3-wire
8 In. (20.3 cm)
3 In. (7.6 cm)
2000 Watt
34 In.(86.4 cm)
31 In (78.8 cm)
17.75 In (45 cm)
76 Lb (34 kg)
COBRA-H-DLC
Lancaster, PA •1-800-899-2833 •Fax: 717-464-5159
www.diamondlustre.com
Table of contents
Popular Scrubber manuals by other brands


Numatic
Numatic TTV 678G / 300T Owner's instructions

Tomahawk
Tomahawk TMOP18e Operation manual

Nederman
Nederman WeldFilter EC10 instruction manual

MG
MG 18JN instruction manual

Miele
Miele ProLine CSDA 1010 Operating and installation instructions

Advance acoustic
Advance acoustic Micromatic 13E Instructions for use


