YANGZI YZ-X2 User manual

YZ-X2
Floor Scrubber
operation instructions

YZ-X2
Yangzi.Make cleaning easier

YZ-X2
1
Content
Chapter 1 Description 4
1.1 Content and Purpose........................................................................4
1.2 General Instructions.........................................................................4
1.3 Safety requirements for batteries.....................................................5
1.4 General safety regulations............................................................... 6
Chapter 2 Use of the Machine.................................................................. 6
2.1 Buttons/Panels of the Machine........................................................6
2.2 The operation process of the machine.............................................8
2.3 Precautions for machine operation..............................................10
Chapter 3 Routine Maintenance and Disassembly and Replacement
of Wearing Parts...................................................................................... 11
3.1 Periodic Inspection........................................................................ 11
3.2 Brush disk replacement, installation and adjustment....................12
3.3 Replacement and installation of the absorbent strip..................... 13
3.4 Battery Maintenance......................................................................14
3.5 Maintenance and disassembly of suction motor........................... 15
3.6 Fuse removal..................................................................................16
3.7 Disassembly of the float cage........................................................16
Chapter 4 Analysis Table of Common Problems of Floor Scrubber.17
Chapter 5 Maintenance...........................................................................18

YZ-X2
3
Parts
①Recovery tank cover ②Brush ③Tires ④Universal wheel
⑤Anti-collision wheel ⑥Universal wheel ⑦Armrest ⑧Sewage pipe
⑨Suction handle ⑩Brush plate lift pedal ⑪Suction pipe ⑫Squeegee
⑬Fresh water inlet ⑭Suction motor ⑮Sewage inlet
Performance parameters
Category
Maintenan
ce-free
Liquid-fil
ling
Type Wire-drawing
Type
Cleaning
efficiency
2800 ㎡/h
Brush width
18 inch
Squeegee
width
800 mm
Brush speed
195 rpm
Brush motor
power
550 w
Suction motor
power
550 w
Category
Maintenan
ce-free
Liquid-fil
ling
Type Wire-drawing
Type
Cleaning
efficiency
50 L
Brush width
50 L
Squeegee
width
24V/100Ah
/
Brush speed
2-3 h
/
Brush motor
power
151 kg
150 kg
111 kg
Suction motor
power
1200*800*1050 mm

YZ-X2
4
Chapter 1 Description
1.1 Content and Purpose
The following content points out potentially dangerous
situations, please read these instructions carefully and take
necessary precautions. The essence of this machine operator's
manual is to prevent injuries, and most accidents are caused at
work by not heeding basic safety rules. A careful and careful user is
the best guarantee against accidents, even stronger than some
other precautions. When using the machine, be sure to pay
attention to your surroundings and people nearby, especially
children.
1.2 General Instructions
●Before any maintenance and repair, please turn the start switch to
the off position, and please remove the key from the main power
switch.
●The machine must be used by qualified and authorized personnel.
Children and disabled persons are not allowed to use the machine.
●Keep the battery away from sparks, flames and smoke.
●Do not use it in a place where dangerous, flammable or explosive
gas, liquid or water vapor is present.
●This machine can clean general garbage. It is strictly forbidden to
clean silk ropes, belts, high-temperature sundries, accumulated
water, flammable or toxic and harmful substances, so as to avoid
corrosion and damage to the water-absorbing strip and brush plate,
making them unable to work normally.
● Please keep loose clothing, hair, fingers and other body parts
away from the machine's air vents and any moving parts.
●When the machine stops, remember to turn off the power.

YZ-X2
5
●Do not use the machine where the inclination exceeds the rated
value of the machine.
●Please do not smoke while charging the battery.
●Do not use the machine in a very dirty area. If the road garbage is
thick, please repeat the sweeping work twice or more.
●The machine should be in temperature between -10℃to 40℃.
●When using the machine, the temperature should be between -10
°C and 40°C, and the humidity should be between 30% and 95%.
●Do not use the machine as a means of transportation.
● When the machine is not moving forward, do not let the brush
continue to rotate to avoid damage to the ground.
●In case of fire, please remember to use powder fire extinguisher
instead of water.
●When the machine operation fails, make sure that the failure is not
caused by lack of regular maintenance.
●If some parts need to be replaced, you can buy spare parts from
the original manufacturer or authorized dealer.
● Confirming that the machine is in proper operation and safe
condition, professionals or service center must work in accordance
with the maintenance section of this manual.
●Even if the machine is to be dismantled and scrapped, someone
should be there to pay attention. Because some harmful
substances (such as batteries, waste oil, etc.) have met the
standards, they should be sent to a specific center for processing.
1.3 Safety requirements for batteries
●It must be avoided that the battery is in a low voltage state, and
the battery should be charged as soon as possible when the
voltage is about 21V.
●To avoid leakage of electricity, please keep the battery dry and
clean, especially to remove contaminants such as metal dust.
●It is forbidden to put metal parts (such as tools) on the battery to
prevent the battery from being short-circuited and burnt out.
●The charging room should be well ventilated.
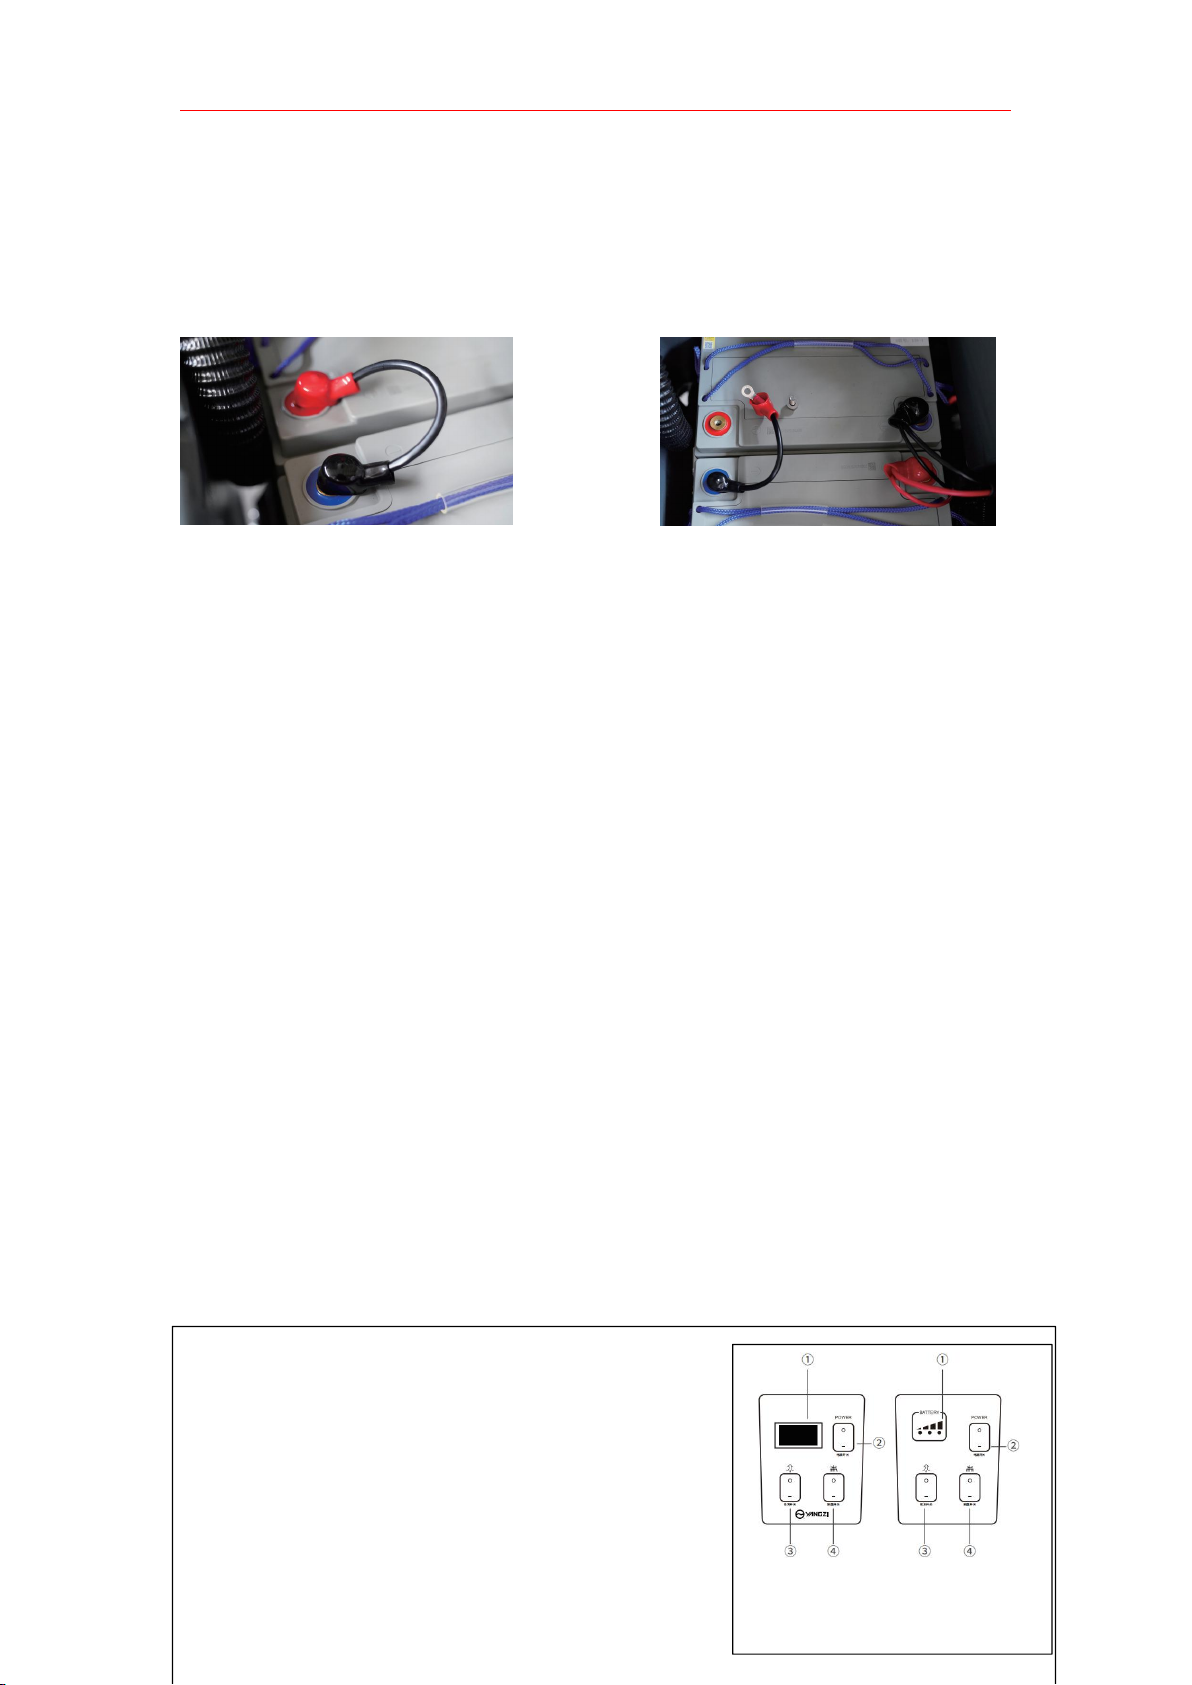
●Do not connect or remove the battery when the key switch is in
the ON position.
●Before removing or installing batteries, first disconnect the
negative (-) battery wire, and then disconnect the positive (+)

YZ-X2
6
battery wire. When rewiring, be sure to pay attention to the polarity
of the battery, as wrong connection will damage electrical
components.
●Avoid direct contact between the positive electrode and the
negative electrode, because it will cause a large current short
circuit, generate high heat and even cause a fire.
1.4 General safety regulations
In addition to the provisions made in this manual, the required
general safety regulations and accident prevention guidelines must
also be observed. Even if you have used a similar sweeper before,
please read the instructions carefully. Reading the instructions
beforehand will save you a lot of time in the future. It is vital that you
become familiar with all accessories and controls and their
functions before you start using them. Read through this manual so
you don't get scrambled when you turn it on.
Chapter 2 Use of the Machine
2.1 Buttons/Panels of the Machine
2.1.1 The core control keys of the machine
●①Power/Voltmeter (the display device can
display the current battery voltage, please
charge when the voltage is lower than 21V).
●②Power switch
●③Suction switch
●④Swipe switch
X2 Maintenance- X2 Drag line
free/Liquid-filling

YZ-X2
7
2.1.2 Charging the battery
2.1.3 Adding water to the water tank
●Open the cover of the water tank before using the machine, pour
clean water into the water tank, pay attention to the water quality,
and prevent the waterway from being blocked.
●When the machine is used to clean the epoxy floor, it is necessary
to replace the ordinary brush plate with the needle plate and add a
cleaning pad for cleaning, which can effectively protect the ground
●The charging socket cable requires at least
a power cable with a diameter of 4mm.
●Note: The charger is placed on a stable
platform, pay attention to moisture-proof,
anti-moisture Water and drop resistant.
●The charging time must be guaranteed for
6-10 hours per charge. Guaranteed electricity
The battery is fully charged during operation.
●During the transportation of the charger,
please do not carry the power cord by hand to avoid
Loose wiring connector.

YZ-X2
8
from wear and tear. For installation, refer to "3.2 Brush plate
replacement and installation" for operation.
2.2 The operation process of the machine
Before start
●Before the normal operation of the machine, make sure that the
squeegee is installed correctly, and the sewage suction pipe is
inserted into the suction port.
Step 1: Unscrew the water-absorbing cross knob,
Pull the handle down and put down the water absorption swaying
tail bracket.
Step 2: Thread the Absorbent Fixing Screw through the Tripod.
Step 3: Install the sewage suction pipe.
The squeegee has been debugged at the factory and can be used
after installation
Power display
●After turning on the main power switch, the voltmeter will display
the battery voltage value. When the voltage is lower than 21V,
please charge it first.

YZ-X2
9
Start the machine
Step 1: Lightly step on the foot lever Step 2: Open the water valve;
and put down the scrubber;
Step 3: Turn on the main power switch, Step 4: Tighten the handlebars and
keep driving at a constant speed.
start the brush switch button and the
water absorption motor switch button;
Stop of the machine
●Close the brush switch button first;
●Close the drain valve;
●Close the switch button of the water suction motor;
●Turn off the main power switch;
● Lightly step on the foot lever to lift the scrubber;
●By pulling the handle, lift the squeegee head.

YZ-X2
10
2.3 Precautions for machine operation
Machine Operation Precautions
●Avoid stopping the machine for a long time in the same place and
let the brush clean; this will leave unnecessary marks on the
ground.
●When cleaning the floor is epoxy floor, it is necessary to add a
cleaning pad to avoid the abrasion of the epoxy floor by the brush.
●The machine is filled with clean water, and attention should be
paid to the clean water, so as not to block the water discharge valve
with impurities.
●After the machine works for a period of time, it is necessary to
discharge the sewage from the sewage tank in time to prevent the
sewage from immersing in the suction motor and causing it to burn.
●To clean the ground with serious oil pollution, please put an
appropriate amount of detergent into the clean water tank to
achieve better cleaning effect, and at the same time drop an
appropriate amount of defoamer into the sewage tank to prevent
the sewage tank foam from immersing in the suction motor and
causing burns.
●After each work is completed, please flush the sewage tank in
time to keep the machine well maintained.
●After the operation in winter, please drain the clean water tank in
time to avoid freezing and affect the reuse.
Sewage tank discharge sewage
●Turn off the main power to ensure that the machine stops;
●Open the cover of the sewage pipe and discharge the water;
●The sewage tank can be properly rinsed with clean water.

YZ-X2
11
Machine storage and maintenance
If the machine will not be used within 30 days, please fully charge
the battery, disconnect the positive and negative output wires of the
battery, and place the machine in a dry and clean place.
Chapter 3 Routine Maintenance and
Disassembly and Replacement of Wearing Parts
3.1 Periodic Inspection
Regular maintenance and inspection
Intervals(h)
4
50
100
200
500
1
Battery level detection
2
Motor carbon brush inspection

YZ-X2
12
3
Whether the main brush is wired,
the silk is entangled
4
Check for debris in the tank
5
Check the buttons and electronics
on the control panel
6
Check the brush for wear
7
Check the filter for impurities
8
Check the sprinkler joint for leaks
3.2 Brush disk replacement, installation and
adjustment
● Park the machine on a flat ground, turn off the main power switch,
and ensure that the machine is in a power-off state;
● Lightly step on the foot lever to keep the brush disc lifted;
●Facing the direction of the brush plate, hold the brush, rotate it to
the right, and the brush plate can be removed; rotate it to the left to
complete the installation.
Note: When installing, make sure the flange is aligned with the
brush plate button holes.
●Replacement of the dial: The dial can
be purchased through our company's
operating platform. Body replacement
is to place the cleaning pad on the
bottom of the dial and make it fit with
the dial solid and neat fit. Please refer

YZ-X2
13
to the previous article for the installation
of the dial on the machine;
●Brush plate adjustment: When the
machine is in the process of cleaning
and driving, when the left deviation
occurs, it needs to be loosen the
direction screw; on the contrary,
when the right deviation occurs, the
direction screw needs to be properly
tightened.
Principle: Dynamic Balance
3.3 Replacement and installation of the
absorbent strip
●Place the machine on a flat ground, turn off the main power switch,
and ensure that the machine is powered off.
●Put down the squeegee through the handle; after rotating the
plastic handle in the opposite direction, take out the squeegee
assembly.
●Unscrew the squeegee assembly nut, remove the bottom plate of
the squeegee assembly, and remove the front and rear rubber
strips of the squeegee.
●Install the squeegee blade.

YZ-X2
14
3.4 Battery Maintenance
The power system of this washing machine is powered by two
12V maintenance-free lead-acid batteries in series, and the system
voltage is 24V.
●When the machine works for a period of time, the battery power
drops, and when the last bar of the power display meter is flashing,
it means that the power is insufficient and needs to be charged in
time;
●When maintaining the battery, please wear protective gloves to
avoid contact with the acid substance of the battery;
● Check whether the battery connecting wire is worn and the
contact parts are loose, and replace it if necessary;
●The terminal of the battery should be kept clean and dry, and
there should be no debris and dust covering it, which is extremely
unfavorable to the battery, and will burn the battery in severe
cases.
Step 1: Align the
holes of the front
rubber strip with the
protrusions of the
plastic assembly of
the squeegee;
Step 2: Fix the plastic
components on the
cast aluminum base
plate of the
squeegee;
Step 3: Align the
holes of the rear
rubber strip with the
plastic components of
the squeegee to the
protrusions;
Step 4: Use both ends
of the bead to snap
together;
Step 5: Tighten the
Nuts.
! ! Notice
◆In order to make the battery have a long service life, it should be charged in time
after the machine is finished, and deep discharge is strictly prohibited.
◆The correct charging method of the lead-acid battery: first insert the battery, then
plug in the mains; when fully charged, first cut off the mains, and then pull out the
battery plug.
◆If the machine is not used for a long time, please fully charge the battery, disconnect
the positive pole of the battery, and store it.

YZ-X2
15
3.5 Maintenance and disassembly of suction
motor
●After the daily use of the machine, please discharge the sewage
from the sewage tank in time to prevent the water level from being
too high, being sucked into the suction motor and burning the
motor.
●During the use of the machine, if there is too much foam, it is
recommended to use a defoamer solution to prevent the foam from
entering the filter screen and into the suction motor, causing the
motor to burn.
●Removal of suction motor: The suction motor is fixed at the
bottom of the clean water tank. Before removing:
1. First empty the machine with clean water, turn off the main
power switch, and keep the machine powered off;
2. Turn the clean water tank back and pull out the suction motor
pair socket;
3. Loosen the fixing nut of the suction motor and take out the
suction motor.
! ! Warn
During the use of the battery, the battery is deeply discharged, the battery capacity will
be reduced, and the lifespan will be shortened.

YZ-X2
16
3.6 Fuse removal
In the daily use of the machine, if the fuse is burned out, or the
fuse needs to be checked due to machine failure, refer to the
following steps to operate:
The first step is to open the water tank, drain the sewage and
clean water, and open the outer cover of the electrical box.
In the second step, use a wrench to unscrew the fuse fastening
screw and remove the fuse.
The third step is to confirm the fuse model and replace the
damaged fuse.
3.7 Disassembly of the float cage
In the daily use of the machine, because the floating ball cage
exists in the sewage tank, and when the sewage is too full, the
floating ball will be sucked at the air outlet by the suction of the
suction motor, and the customer needs regular maintenance. You
can refer to the following steps to operate.
Before dismantling the float cage, drain the sewage and open
the cover of the sewage tank. The floating ball cage is an
embedded rubber structure, and the customer can tilt it to one side
and pull it out with force. Refer to the image below.

YZ-X2
17
Chapter 4 Analysis Table of Common Problems
of Floor Scrubber
Problem
Cause
Solution
Machine is
inoperable
Battery dead
Battery charging
Battery failure
Replace the battery
Battery wiring loose
Tighten the battery wiring
Main fuse blown
Replace the fuse
Brush motor does
not work
The brush head is lifted off the
ground
Lower the brush head
Brush disc motor circuit breaker
tripped
Reset brush circuit breaker
button
Main brush switch failure
Please contact the service
center
Motor carbon brush wear
Please contact the service
center
Fan not working
Suction motor noise is too loud
Please contact the service
center
Suction motor burned out
Replace the suction motor
Carbon brush wear
Please contact the service
center
Little or no water
flow out
Clogged water tank drain valve or
water pipe
Clean or replace the solution
tank drain valve
Drain valve closed
Open the drain valve
Inefficient recycling
of sewage
Recovery tank full
Drain the recovery tank
Absorbent strip wear
Replace the absorbent strip
Suction motor failure
Replace the suction motor
Damaged recovery tank seal
Replace the seal
Shorter working
hours
The voltages of the two batteries
are not equal
Please contact the service
center
Battery charging failure
Repair or replace the charger

YZ-X2
18
Chapter 5 Maintenance
Machine life and operational safety must be ensured by proper
and routine maintenance of the machine. The routine maintenance
requirements are tabulated below. Under suitable working
conditions, the maintenance interval can be changed, which must
be determined by the professional responsible for the maintenance.
To perform maintenance operations, the machine must be stopped
(remove the start switch key), so please read the safety section of
the manual carefully.
Conditions of Use
●Ambient temperature: -10℃~40℃
c●The relative humidity of the air: 5%~70%
●No conductive dust, no explosion hazard environment
● An environment that does not contain gases or vapors that
corrode metals
●Indoor use, ventilated, non-vibration environment, front and rear
space at least 300mm
Maintenance schedule
Maintenance operation
On
handover
Every
10h
Every
50h
Every
100h
Every
200h
Every
500h
Brush Disc Height Adjustment
Check
Whether the brush plate is wired
or entangled
Squeegee Cleaning Complete
Inspection
Tank cover seal inspection
Screw and nut tightening
inspection
Check the wear of the brush disc
Replacement of absorbent strips
Main brush and drive system
motor carbon brush inspection
and replacement
Table of contents
Other YANGZI Scrubber manuals
Popular Scrubber manuals by other brands

Lincoln Electric
Lincoln Electric 3.1 Operator's manual

IPC
IPC 121285 Operator's manual

Nilfisk-Advance
Nilfisk-Advance Advenger BR 855 Use and maintenance

DIVERSITECH
DIVERSITECH FRED JR Operation & maintenance manual

Comet Spa
Comet Spa CRS 90 BT manual

Polivac
Polivac MM1700E OPERATIONS MANUAL & TROUBLE SHOOTING GUIDE