Dibal D-900 Installation guide

Basic Manual
49BD900EN03


Basic Manual D900 Contents
I
CONTENTS
1. CHECKLIST........................................................................................................................... 1
2. MAINTENANCE.................................................................................................................... 1
3. WORKING MODE SELECTION....................................................................................... 2
3.1. SALES SCREENS .................................................................................................................. 2
3.1.1. Receipt / Label............................................................................................................. 3
3.1.2. Self-service.................................................................................................................. 3
4. OPERATING PROCEDURE............................................................................................... 4
4.1. QUICK PLUENTRY............................................................................................................. 4
4.2. QUICK CASHIER ENTRY...................................................................................................... 4
4.3. DIRECT PRICE...................................................................................................................... 4
4.4. NORMAL WEIGHING ............................................................................................................ 4
4.5. OPERATIONS WITHOUT WEIGHING (ADDING,DIVIDING AND MULTIPLICATION).................. 4
4.6. MANUAL ZERO.................................................................................................................... 5
4.7. SET ITEM ............................................................................................................................. 5
4.8. TARE OPERATIONS .............................................................................................................. 5
4.9. OPEN MARKET PRICE AND SPECIAL OFFER PRICE................................................................. 5
4.10. WEIGHT RETURN ............................................................................................................. 5
4.11. QUICK CHANGE PLUPRICE............................................................................................ 5
4.12. RECEIPT MODE ......................................................................................................... 5
4.12.1. Programming a Receipt........................................................................................... 5
4.12.2. Discount on line....................................................................................................... 6
4.12.3. Print receipt: Change and discount calculation..................................................... 6
4.12.4. Receipt revision ....................................................................................................... 6
4.13. LABEL MODE .......................................................................................................... 7
4.13.1. Overall best by date................................................................................................. 7
4.13.2. Batch number........................................................................................................... 7
4.14. SELF-SERVICE MODE....................................................................................................... 7
5. PAPER CHANGE.................................................................................................................. 8
5.1. PAPER CHANGE IN THE RECEIPT PRINTER ............................................................................ 8
5.2. PAPER CHANGE IN THE LABELLING MACHINE...................................................................... 8
5.2.1. Double body model..................................................................................................... 8
5.2.2. Flat model ................................................................................................................... 9
6. ICONS.................................................................................................................................... 10
7. BASIC FAULT FINDING................................................................................................... 10
8. DECLARATION OF CONFORMITY.............................................................................. 11
Refer to user manual for more information


Basic Manual D900 CHECKLIST
1
1. CHECKLIST
Machine
1. - Buyer display
2. - Touch screen
3. - Receipt printer
4. - Tray
5. - Label/receipt printer
Power cable
Quick guide
Manuals in CD
Accessories:
oAdhesive label paper roll or
Receipt paper roll (Depending on the model)
2. MAINTENANCE
The DIBAL Gama D-900 scales with touch screen
come with a programming system based on menus,
i.e. a hierarchical and coded menu structure, which
allows for quick and easy programming.
There are two ways to access the scale’s
programming menu:
1. Keep the MENU key pressed while the scale is
booting.
2. Press the MENU key in the selected operating
procedure screen.
If the scale is operating in a Self-service Mode, see
point 3 Working mode selection.
ITEMS Programming items
CASHIERS Cashier additions, removals and data.
TABLES Sections, Traceability, Recipes, Nutritional data, Barcode, Tares, Payment modes, VAT types,
Currencies.
LISTS Item lists, sales, totals…
TOOLS USB Loading/Unloading, Sending data to slaves, Operations with PC, Other Tools.
DISPLAY Start-up logo, Configuration User Display (Receipt Ops., Label Ops., PLUs, Sections and Cashiers
LABEL Programming Label
RECEIPT >Programming Receipt
SETTINGS Configuration Com. PC, Configuration Keyboard, Reading with scanner, working modes.
FAVOURITES A selection of the most commonly used operating procedures
The scale automatically displays a keyboard in the programming menus requiring data to be entered.
The functions of the programming keys are as follows:
New / Addition
Edit
Delete
Copy
Print
Quit
1
2
3
4
5

WORKING MODE SELECTION Basic Manual D900
2
3. WORKING MODE SELECTION
The scale offers a variety of working modes depending on the required use. When a working mode is
selected, the keyboard (sales screen), the scale’s operating procedure and printing parameters are
automaticallyconfigured. There are two ways to access:
1. To select the working mode, press the MODE key on the assisted sale and pre-packaging keyboards and
then select the selected working mode.
2. Press the MENU key. The scale will access the programming menu, User Menu Settings Working
modes Configuration Working Mode
In the case of self-service scales, to change the working mode, press four times consecutively and
alternatively between the lower left side and the lower right side of the keypad.
3.1. Sales Screens
Depending on the working mode selected, the scale has several sales screens with the key layout and
functions required for each operating procedure. The different working modes all share the metrological
weighing feature, as well as the different icons that display.
Weig
ht
Price
Sum
Tare
PLU/
Informative
message

Basic Manual D900 WORKING MODE SELECTION
3
3.1.1. Receipt / Label
Receipt: With this mode you can make the sale of 1 or several items and print the total accumulated.
Label: The scale prints a label for each recording made, i.e., one per item. You can also work in Pre-
packaging Mode (Automatic weighing).
3.1.2. Self-service
The procedure to follow in this working mode is to place a weight on the tray and press the corresponding direct
key. The selected product’s label is obtained without the cashier’s intervention.
Delete
Receipt
Label
Section
PLUs/
Items
User Menu
Manual zero
Tare
Paper feed
Numeric
keyboard
Cashier
CONFIGURABLE
Function Keys
Receipt/Label
Display Screen
Validate
Receipt
Browsing
screens
PLUs/
Items
OPERATING PROCEDURE Basic Manual D900
4
4. OPERATING PROCEDURE
4.1. Quick PLU Entry
10000 items (PLU) can be programmed.
User Menu Items Press and edit the fields, for
example, Name, PLU/Direct key, WEIGHED/UNITARY…, Price
and VAT type.
4.2. Quick Cashier Entry
Maximum 20 cashiers, User Menu Cashiers Press
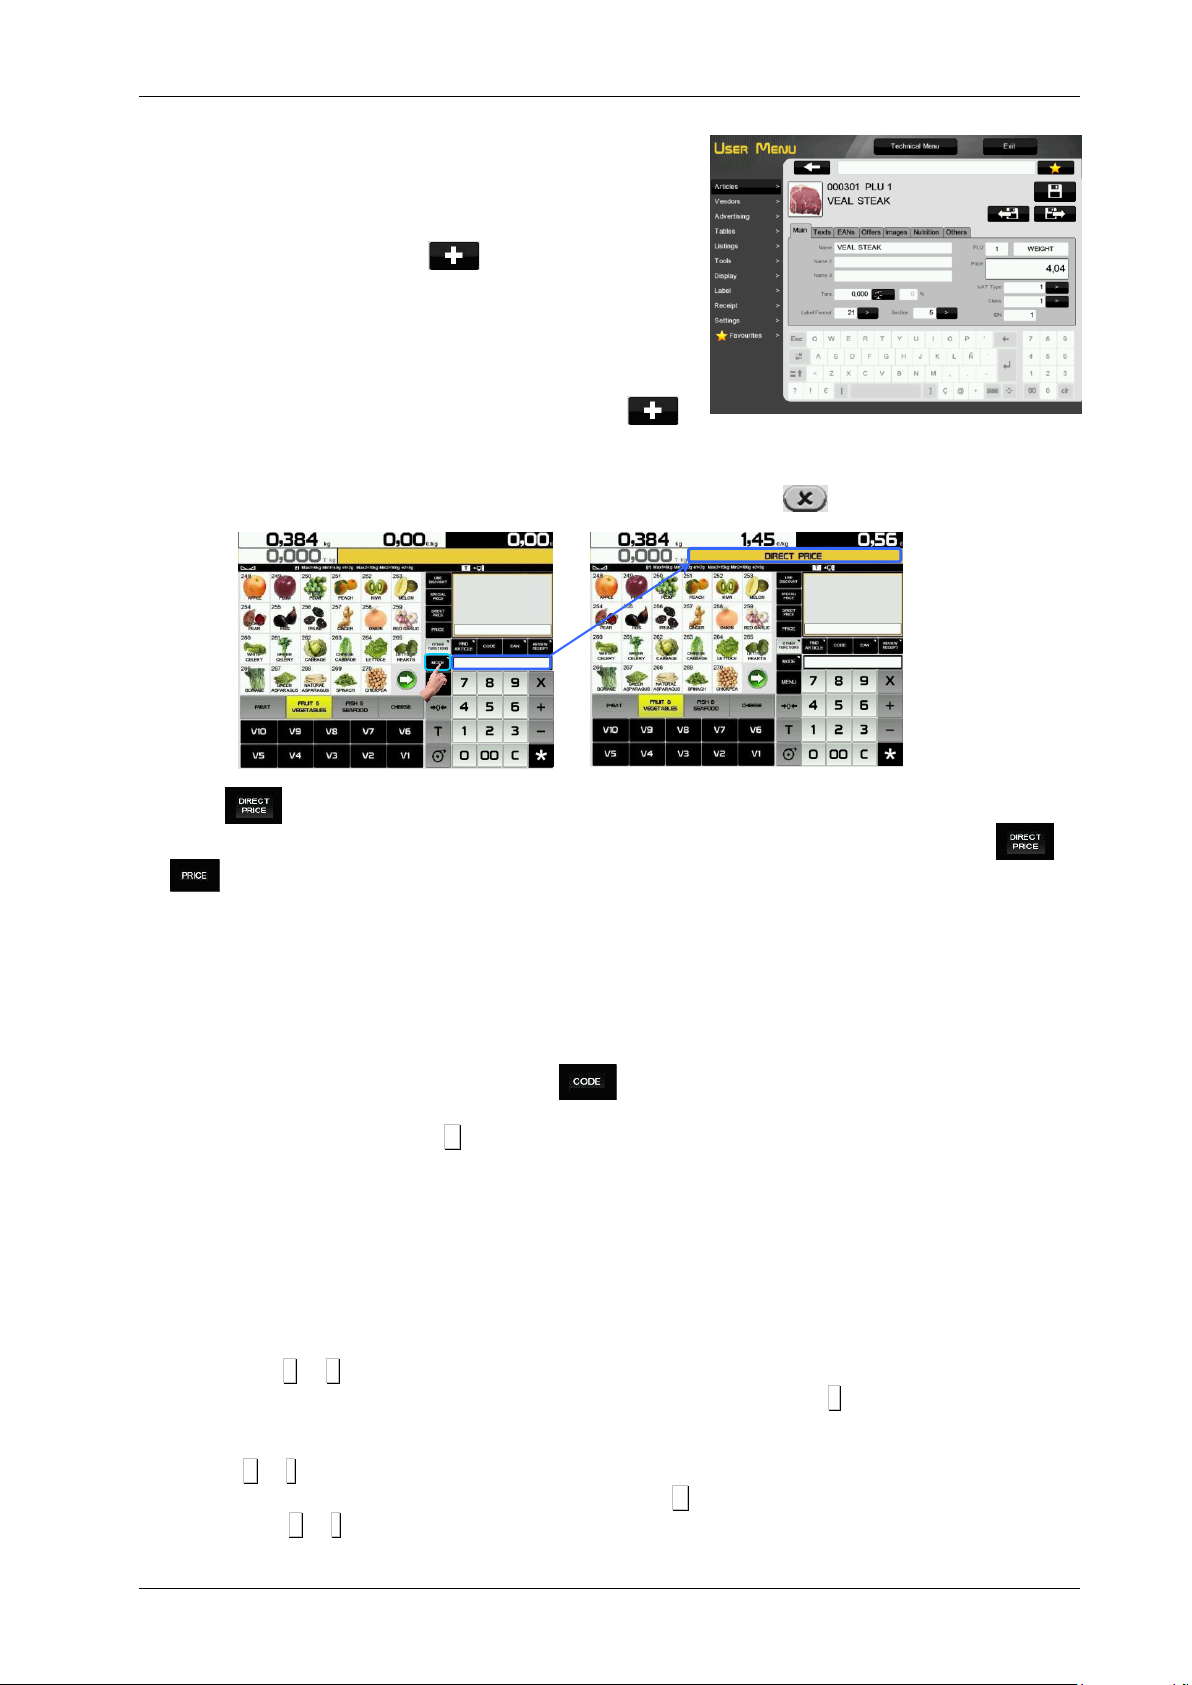
4.3. Direct price
1. User Menu Settings Configuration Keypad Disable Direct price
2. Press and the words DIRECT PRICE show on the display screen.
3. When the weight is placed on the tray, use the numeric keypad to enter the price and press or
.
4. To disable direct price just remove the weight from the tray or press the C key until DIRECT PRICE
disappears from the display.
4.4. Normal weighing
1. Place the product to be weighed on the tray.
2. Enter the price in anyof the following ways:
Using Direct price. See the previous point and press the appropriate cashier.
Entering the item code and pressing the button.
Pressing the corresponding direct key(of the corresponding PLU).
In the event of an error, press C. The price is reset to 0.
3. Record the operation in the corresponding cashier.
4.5. Operations without weighing (adding, dividing and multiplication)
To work with items that are not sold by weight (price/kg) but have a price/unit, such as a bottle of milk.
User MenuSettings Configuration of keyboardMultiplication/Division/Addition.
A. Converting a weighed product into a unitaryproduct.
1. Select the item.
2. Use the numeric keypad to enter the required units.
2
2.
.1
1.
.
Press +or –depending on whether you want to add or subtract (A unit).
2
2.
.2
2.
.
Enter a number of products (of there is more than one unit) and press x.
3. Record the operation in the corresponding cashier.
B. Direct price must be enabled.
1. Press +or -depending on whether you want to add or subtract.
2. Enter the price/unit of the product. In case of error press C. The units are reset to zero.
2
2.
.1
1.
.
Press +or -depending on whether you want to add or subtract.

Basic Manual D900 OPERATING PROCEDURE
5
2
2.
.2
2.
.
Enter the price and press .Record the operation in the corresponding cashier.
If you wish to add or subtract more than one unit before recording, enter the number of products and press x.
3. Record the operation in the corresponding cashier.
4.6. Manual zero
Press to reset the weight to zero.
4.7. Set item
Operations with the same item, configured, User MenuSettings Configuration of keyboard Set Price
.
1. Place the item you are going to work with on the tray.
2. Select the item to be preset.
3. Press the Preset Item key in order to set the price.
4. To disable the fixed price, press the Ckey or select another item.
4.8. Tare operations
Tare associated with each PLU, programmable or manual tare.
The TARE ASSOCIATED WITH EACH PLU is programmed in the tare field when creating or modifying the
PLU’s.
To work with PROGRAMMABLE TARES , place the product to be weighed, select one of the
programmable tares and record the weight.
To do a MANUAL TARE:
1. Place the weight to be tared on the tray.
2. Press the Tare key, .
3. To cancel the tare setting, emptythe tray and press Tare, .
4.9. Open market price and special offer price
FREE THE PRICE
1. The item must have the Alter Price function enabled. User Menu Items Others Tab Alt. Pri.
(Alter Price)
2. Long press on the PLU key. Enter the new price and operate normally with the product.
SPECIAL OFFER PRICE:
1. Make sure that the special offer price is recorded in the PLU you are going to use.
2. Select the item and press Special Offer Price
3. If you wish to sell in Receipt mode , change the working mode.
4.10.Weight return
Returning a product that has already been weighed and the corresponding sum accumulated, User Menu
Settings Configuration of keyboard Weight return , take the following steps:
1. Place the item on the tray again.
2. Select the corresponding PLU.
3. Press the Return key .
4. Press the keyof the corresponding cashier.
4.11.Quick Change PLU Price
The different PLUs available can be viewed on the display. The User MenuSettings Configuration of
keyboard Allow free price option must be enabled. To do so, press the PLU for a few seconds
4.12.Receipt mode
4.12.1.Programming a Receipt
There are fixed formats, 0 and 1, for the receipt as well as programmable formats 2 and 3. The 15
associated header lines can be programmed in all of them.
1. Select the format to edit. User MenuReceiptReceipt Headers Format X (X=0…3).
To design the aspect: For example:

OPERATING PROCEDURE Basic Manual D900
6
Mode: (Normal), Frame: (No), Effect: (No effect), Pos: (Centred) Font: (5), Magnification: (2),
Location: (0)and Text: (Header Line Text).
2. Global Format of receipt. User MenuReceiptPrinter Settings Form. of Receipt 0,…3.
4.12.2.Discount on line
Percentual discount on a given item. Proceed as follows:
1. User MenuReceiptPrinting Receipt Discount on line.
2. If you are working in a working mode other than receipt mode, change to Receipt mode.
3. Carry out the normal weighing operation without recording.
4. Enter the PERCENTAGE of discount you wish to apply. It is shown in the amount on the display and will
be applied in the receipt, in the line corresponding to the item.
5. Press the Discount on line function .
6. Record and continue to operate as normal.
4.12.3.Print receipt: Change and discount calculation
1. Make a recording in a cashier, for example, V4.
2. In order to print the receipt, press the key.
3. Press the keycorresponding to the cashier whose operation you wish to print, for example V4.
4. DISCOUNT ON TOTAL. User MenuSettings ReceiptPrinting Receipt Discount on the Total
YES. The scale will request the discount percentage to be applied in the receipt.
5. CALCULATING THE DISCOUNT CHANGE IN TOTAL. User MenuSettings ReceiptPrinting
Receipt Calculating Change YES, then you can ENTER the amount submitted by the customer.
4.12.4.Receipt revision
Seeing the receipt on the screen or by long pressing on the receipt screen, before the corresponding receipt
is printed:
A. In order to display a receipt on the screen, just look at the upper right section.
1. Press on the cashier and record the operation.
By pressing on the receipt screen or review receipt
screen for a few seconds a new more detailed screen
displays.
1. Seek the operation you wish to revise on the
receipt. If you wish to delete the operation selected
press Eliminate Operation,
2. If you wish to delete a complete receipt press
Eliminate receipt, .
3. If you wish to record the sale, you can do so on the
same screen by pressing Finish Sale, , or
cancel, , in order to go on selling.
7 lines of ticket
6th Line
1st Line
3 lines of ticket
Operation
Quantity
Discount

Basic Manual D900 OPERATING PROCEDURE
7
4.13.Label Mode
1. Carry out the required operation (weighing, etc.).
2. When you press the memory key corresponding to the cashier who has carried out the operation the
label is printed.
3. If you wish to make a given number of COPIES* of the last label issued, enter the number of copies
using the numeric keypad. Then press Copies, . Then press the cashier key where the operation is
stored.
Automatic labelling, User MenuSettings Working ModesAutomatic Weighing With Sel Memo or
Without Sel Memo
“With sel memo”, to select the memory in which the sales will be accumulated.
“Without sel memo”, to accumulate them in V1.
4.13.1.Overall best by date
User MenuSettings Working Modes Best byYES
1. Press Overall Best By .
-Dd/mm/yyyy (day/month/year).
-000 days.
-00:00 specific time.
4.13.2.Batch number
For assigning a global reference to the labels of the items when in labelling mode.
To program the batch number press the batch number key, , and enter the batch number.
4.14.Self-service Mode
L The procedure tofollow in this working mode is to place a weight on the tray and press thecorresponding direct
key. The selected product’s label is obtained without the cashier’s intervention.
Only directkeys are operational in self-service mode.
To print a label:
1. Place the product on the tray.
2. Press the corresponding PLU.
3. The scale will record the operation and print the label.
Number of copies

PAPER CHANGE Basic Manual D900
8
Zona de
soporte
del papel
Slot for
Inserting paper
Roller
Thermal head
Thermal
Head
2
5. PAPER CHANGE
5.1. Paper change in the receipt printer
Take the following steps to change the paper in the printer:
1. Open the new roll.
2. Open the printer cover. Remove any remains of the
previous paper roll.
3. Bend the paper and insert the paper in the slot. Be
careful to insert it in the right slot as otherwise the
machine will not detect the paper.
4. Press until the paper comes out on the other side of
the roller.
5. Cut the paper.
6. Close the cover.
7. Press until the paper emerges.
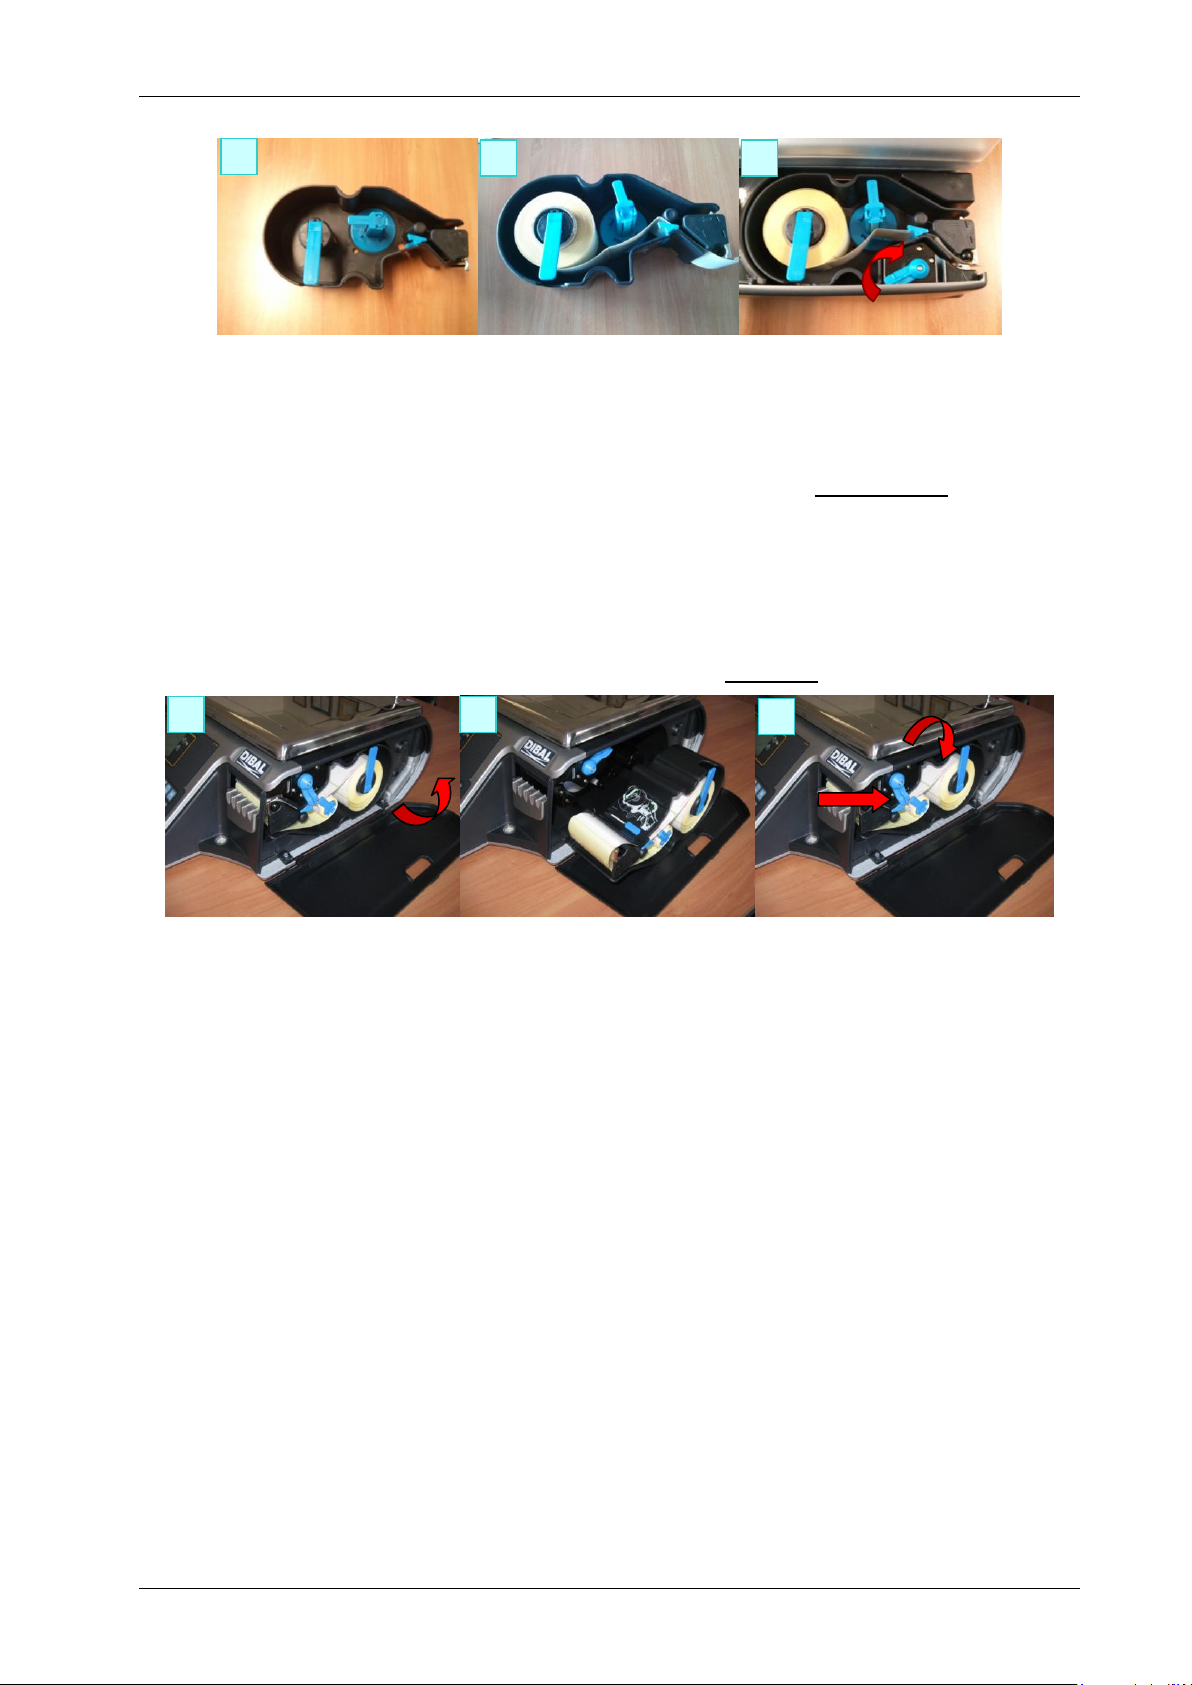
5.2. Paper change in the labelling machine
5.2.1. Double body model
The scale is fitted with a cartridge system to facilitate paper change in the labelling machine.
1. Open the front cover of the machine bypressing the button located on the left side of the machine.
2. Once opened, you will see three blue levers. Turn the lever furthest on the right anti-clockwise to
release the cartridge.
3. Remove the cartridge to make the paper change.
Once you have removed the cartridge, turn the remaining two levers in order to remove the paper holder of
the old roll and remove the excess cardboard.
4. Place the new label roll in the space provided inside the cartridge, and slide the paper through as
indicated in the photo. Be sure to place the paper over the label support and align it properly with the
paper guide.
5. If the width of the label roll is less than 60 mm. place a lid on the cartridge (an optional kit) and tighten the
two levers.
6. Last of all, place the cartridge in the scale and turn the lever on the right clockwise.
3
4
5
6
7
Paper
3
1
2
3
Basic Manual D900 PAPER CHANGE
9
5.2.2. Flat model
The scale is fitted with a cartridge system to facilitate paper change in the labelling machine.
1. Open the side cover in the machine.
2. Once opened, you will see three blue levers. Turn the lever highest up anti-clockwise to release the
cartridge.
3. Remove the cartridge to make the paper change.
Once you have removed the cartridge, turn the remaining two levers in order to remove the paper holder of
the old roll and remove the excess cardboard.
4. Proceed to change the roll as shown in the previous section (Images 4 and 5).
5. Last of all, place the cartridge in the scale and turn the top lever clockwise.
4
5
6
2
3
5

ICONS Basic Manual D900
10
6. ICONS
7. BASIC FAULT FINDING
SIGN
POSSIBLES CAUSES
SOLUTION
The unit is not active
Scale not plugged into the mains or
badly connected
Review the cable connections to the
mains
Zero error
Started up with a weight on the scale’s
tray
Switch off, remove all weights from the
trayand switch on again
The required
weighing mode does
not work
Working mode wrongly configured
Check the working mode
Communications do
not work
Bad cable connection or wrongly
configured communications
Check the communication cable and/or
the communications configuration.
The receipt is not
printed
Wrongly configured working mode
Printer cartridge in wrong position
Configure the working mode properly
Check the printer cartridge
User menu
Manual zero
Tare
Paper feed
Delete
Confirm Sale
Quit
New/Addition
Delete
Copy
Print
Edit
Visible
Delete 1 by 1
Delete 20
Training
Save
Disabled/No
Enabled/Yes
Favourites
Back
Next /Previous Page
Stable
Zero
Minimum
Interval
Receipt
Label
PC connection
WITHOUT PC
Connection

Basic Manual D900 DECLARATION OF CONFORMITY
11
8. DECLARATION OF CONFORMITY
Scan the QR code or click on the link below to view the declaration of conformity.
http://www.dibal.com/DeclaracionesConformidad/
The information contained in this manual can be changed bythe manufacturer without prior notice.
Ref.: 49BD900EN03 REV 03 18/01/16

Other manuals for D-900
1
Table of contents
Other Dibal Scale manuals


Popular Scale manuals by other brands

RCBS
RCBS CHARGEMASTER LITE Product instructions

Rongta Technology
Rongta Technology RLS1000 Software user manual

JS-AZ
JS-AZ PRIS SCALE Operation manual

Withings
Withings Body Installation and operating instructions

SR Instruments
SR Instruments SR Scales SRV947KG Operating and service manual

Gram
Gram AHV Series Operation manual


