DiCiTi AURA 4 Technical manual

RU
1
Passport / Operation instruction
Паспорт / Қолдану бойынша
нұсқаулығы
Паспорт/ Инструкция по эксплуатации
Built-in partition fan (Axial fan)
Белағаштық каналдық тұрмыстық
электр желдеткіштері
Электровентиляторы осевые
канальные бытовые
RU
EN
KZ
RU
EN
KZ To identify the equipment intended to be used in
countries having a warm damp equable climate
Cимвол использования вентилятора в
тропическом климате
Тропикалық климатта желдеткішті пайдалану
символы
AR
AR

AR
2

AR
3

AR
4
AR
5

AR
6

AR
7
AR
8

AR
9
EN
10
Attention!
Before using the appliance please read the contents of this instruction.
Attention!
Children of 8 years old and upward intend this appliance for use
and persons with reduced physical, sensory or mental capabilities,
or lack of knowledge, unless a person responsible for their safety
has given them supervision or instruction concerning the use of the
appliance. Children should be supervised to ensure that they do not
play with the appliance. Cleaning and service of the device shouldn’t
to be made by children without supervision.
Safety requirements
Base on type of protection from electric shock the fans relate to the devices of
class ll (220-240 V ~50/60 Hz). When connecting the fans to the AC mains with a
frequency of 60 Hz, the technical characteristics may change. Check them with
the manufacturer. The climate category «moderately cold» Type «4» (УХЛ4). The
level of protection against solid objects and water: IP24
Attention!
Specialists, who have a special allowance for such types of work, shall
do connection of the fans to power supply. The temperature of fan
exploitation cannot exceed the indicated range (from +1C to +40C).
Avoid the installation of the fan to one ventilation main line with smoke-
deflecting pipe from devices, having fuel burners. In case of maintenance
diagnostics, turn o the automatic breaker (S1 in OFF position) and call
an electrician.
Attention!
All actions for connection, set up, maintenance and repair of the
product have to be carried out only at mains voltage removed (S1 in
OFF position).
One-phase main, to which the fan is connected, must correspond to the norms in
force. Stationary electric wiring must be equipped with an automatic circuit breaker
(S1 in the scheme). The connection is carried out through the switch (S2 in the
diagram) that is built into the stationary wiring. The gap between switch contacts
at all poles must be not less than 3 mm. In the option «-02» the switch (S3 on the
scheme) is built in the fan. Before installation, it is necessary to make sure that there
is no visible damage of impeller, case, grill, and the flow passage of the case has no
any extraneous things, which may damage impeller blades.
Сorrect use
Axial duct domestic electric fan, axial duct domestic removable electric fan is
designed to remove odors and excess moisture from toilets, bathrooms and other
small rooms, required ventilation.
Attention!
For the purposes of maintenance or complete replacement of the
equipment, all fans must have detachable fixing.
Legend Name
СAxial duct domestic removable electric fans with back flow valve.
-02 Axial duct domestic removable electric fans with the pull-chain switch of
turning on/o of the power supply or timer
-03 Electric axial duct household two-speed fans
TURBO Domestic axial duct fan equipped with high capacity motor.
ET Axial duct domestic removable electric fans with electronic timer.
HT Axial duct domestic removable electric fans with humidity sensor.
ETF Axial duct domestic removable electric fans with phototimer.

EN
11
MAIN TECHNICAL CHARACTERISTICS
Additional options can be combined or absent.
SYMBOL LEGEND OF OPTIONS
Legend Name
СAxial duct domestic removable electric fans with back flow valve.
-02 Axial duct domestic removable electric fans with the pull-chain switch of
turning on/o of the power supply or timer
-03 Electric axial duct household two-speed fans
TURBO Domestic axial duct fan equipped with high capacity motor.
ET Axial duct domestic removable electric fans with electronic timer.
HT Axial duct domestic removable electric fans with humidity sensor.
ETF Axial duct domestic removable electric fans with phototimer.
Legend Name
MT Domestic axial duct fans with motion sensor
MR Electric axial duct domestic removable multioptional fans with 2 modes and
built in Fusion Logic 1.0.controller.
MRH Electric axial channel household attachable multioption dual-mode fan with
built-in Fusion Logic 1.1 controller.
EC Domestic axial duct fans with electric switch engine
Name of
color
Domestic axial duct fan designed in Ivory, Champagne, Gray metal, White
carbon, Black carbon, Dark gray metal, Chrome, Gold, Matt black, Obsidian
colours
Example
SLIM 5 C MR -02
, RIO, BREEZE
, MT, EC, TURBO
-03,
Characteristics
Flange
diameter
(mm)
Speed Eciency
(m3/h)
Power
consumption
(W)
Noise level
(dBA)
Net weight
(kg), doesn’t
exceed
AURA 4 100 —90 8,4 25 0,45
AURA 5 125 —180 10 30 0,65
AURA6 149,5
L1 220 18 28
1,0
L2 320 20 33
BREEZE 4 98 —90 9 25 0,50
BREEZE 5 123 —165 13 30 0,67
BREEZE 4 TURBO 98 —110 16 36 0,50
BREEZE 5 TURBO 123 —205 20 39 0,67
Characteristics
Flange
diameter
(mm)
Speed Eciency
(m3/h)
Power
consumption
(W)
Noise level
(dBA)
Net weight
(kg), doesn’t
exceed
BREEZE 4 EC 98 —75 0,05 25 0,57
BREEZE 5 EC 123 —135 0,07 27 0,72
PARUS 4 100 —100 16 35 0,50
PARUS 5 125 —165 20 36 0,60
PRO 4 100 —115 14 32 0,51
PRO 5 125 —195 18 34 0,55
PRO 6 160 —320 22 36 0,87
RIO 4 98 —100 14 32 0,47
RIO 5 123 —180 16 33 0,62
EN
12
Characteristics
Flange
diameter
(mm)
Speed Eciency
(m3/h)
Power
consumption
(W)
Noise level
(dBA)
Net weight
(kg), doesn’t
exceed
SILENT 4 100 —90 8,4 25 0,45
SILENT 5 125 —180 10 30 0,65
SILENT 6 149,5
L1 220 18 28
1,0
L2 320 20 33
SILENT 4 TURBO 100 —120 19 36 0,45
SILENT 5 TURBO 125 —225 20 38 0,65
Characteristics
Flange
diameter
(mm)
Speed Eciency
(m3/h)
Power
consumption
(W)
Noise level
(dBA)
Net weight
(kg), doesn’t
exceed
SLIM 4 100 —90 7,8 25 0,50
SLIM 5 125 —140 10 30 0,60
SLIM 6 150 —250 10 33 0,72
STANDARD 4 100 —100 16 35 0,67
STANDARD 5 125 —185 20 36 0,72
• L1 – Low Speed
• L2 – High Speed
The fans are designed for connection to AC mains
voltage 220-240 V, frequency 50/60 Hz.
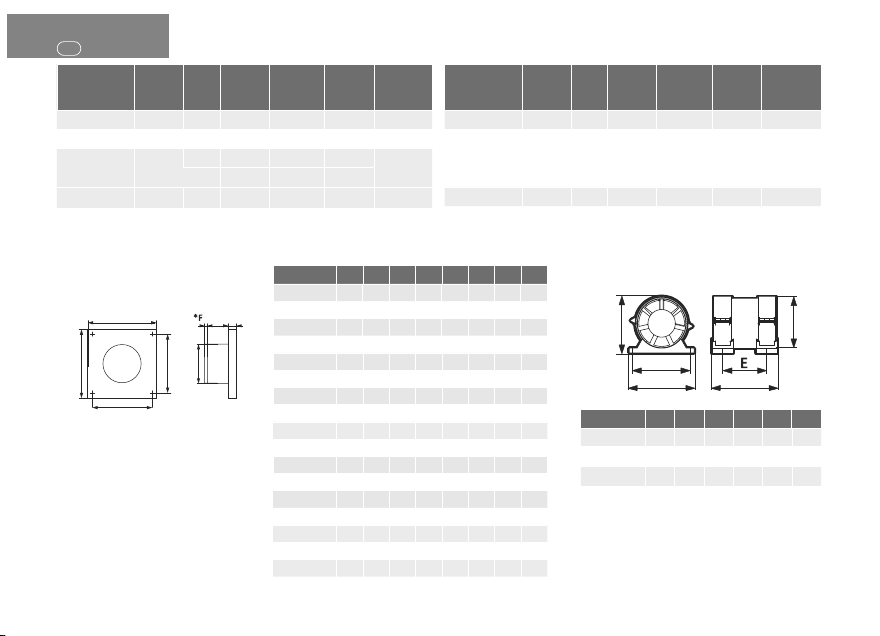
AURA / BREEZE / PARUS /
SILENT SLIM / RIO / STANDARD
PRO
B
A
F
D
C
Model d A B X Y E F* С
AURA 4 100 155 155 135 135 70 7 24
AURA 5 125 175 175 155 155 78 8,5 24
AURA 6 149,5 205 205 183,5 183,5 108 —28
BREEZE 4 98 175 220 135 135 74 6 44
BREEZE 5 123 190 237 160 160 79 6 52
PARUS 4 100 175 220 140 175 48 8 37
PARUS 5 125 219 275 175 220 54 10 42
RIO 4 98 170 170 135 135 74 6 38
RIO 5 123 200 200 160 160 79 6 38
SILENT 4 100 155 155 135 135 70 7 31
SILENT 5 125 175 175 155 155 78 8,5 32
SILENT 6 149,5 205 205 183,5 183,5 108 —37
SLIM 4 100 160 160 140 140 76 7 9
SLIM 5 125 180 180 160 160 82 8,5 9
SLIM 6 150 205 205 187 187 86 10 9
STANDARD 4 100 180 250 160 230 58,5 7 24
STANDARD 5 125 180 250 160 230 58,5 8,5 24
*- This size is present only in fans with “back flow
valve” option
Model A B C D E F
PRO 4 122 138 119 103,6 94 139
PRO 5 147 163 144 128,6 101 146
PRO 6 182 198 179 163,6 104 154
EC
Ød
X
A
Y
B
EN
13
Model A B C D E F
PRO 4 122 138 119 103,6 94 139
PRO 5 147 163 144 128,6 101 146
PRO 6 182 198 179 163,6 104 154
INSTALLATION AND SET UP PROCEDURES
DICITI fans are mounted both with airvents and independently.
DiCiTi fans are intended for wall and ceiling mounting. Models of DiCiTi fans with an ”02”
option are applied to wall mounting.
Mounting of DiCiTi fans is carried out as with ventilating air ducts and independently on
a plain vertical or horizontal surface, for models with an “02” option on a plain vertical
surface of sucient rigidness for installation of a product by means of screws. Tolerance
range of a mounting surface in vertical and horizontal directions is ± 0,5 mm.
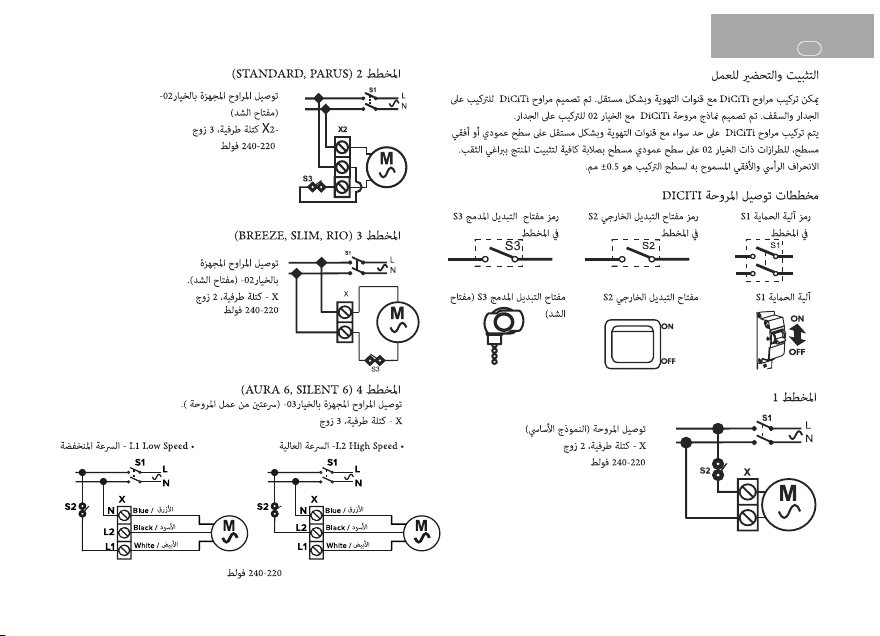
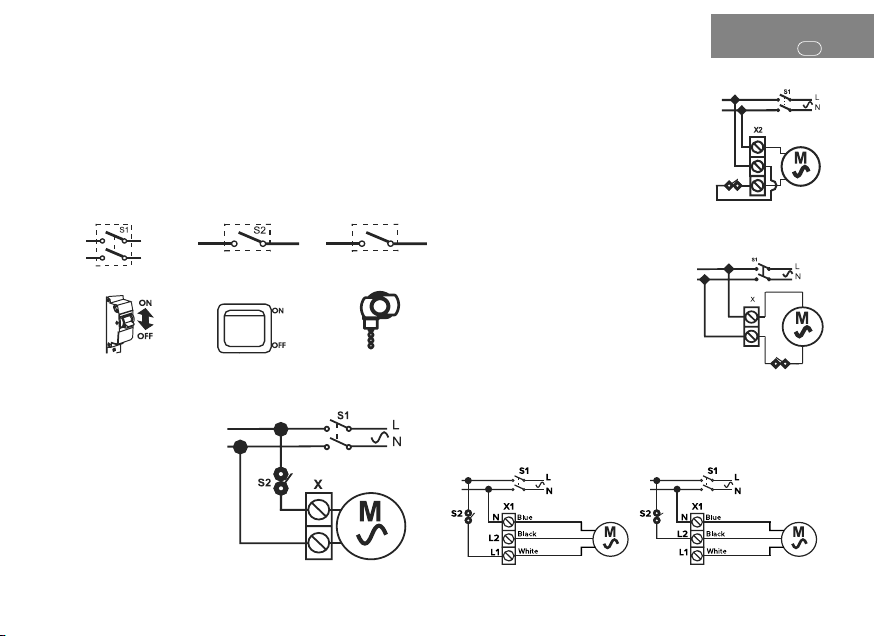
SCHEMATIC DIAGRAMS OF ERA FAN`S CONNECTION
Scheme 1
of fan connectuion (base model)
X- terminal block, 2 pairs
Scheme 2 (for STANDARD, PARUS models)
of fan connection, equipped with - 02 option (pull-chain switch).
X2- terminal block, 3 pairs
Scheme 3 (for BREEZE, SLIM, RIO models)
of fan connection, equipped with - 02 option (pull-chain switch)
X- terminal block, 2 pairs
Scheme 4 (for AURA 6, SILENT 6 models)
of fan connection, equipped with - 03 option (two-speed)
X- terminal block, 3 pairs
S3
Legend of circuit breaker S1
on the scheme
Сircuit breaker S1 External switch S2 Built-in switch S3 (pull chain
switch)
Legend of external switch
S2 on the scheme
Legend of built-in switch S3
on the scheme
S3
220-240V
220-240V
S3
220-240В (12 V*) 220-240V
• L1 – Low Speed • L2 – High Speed
EN
14
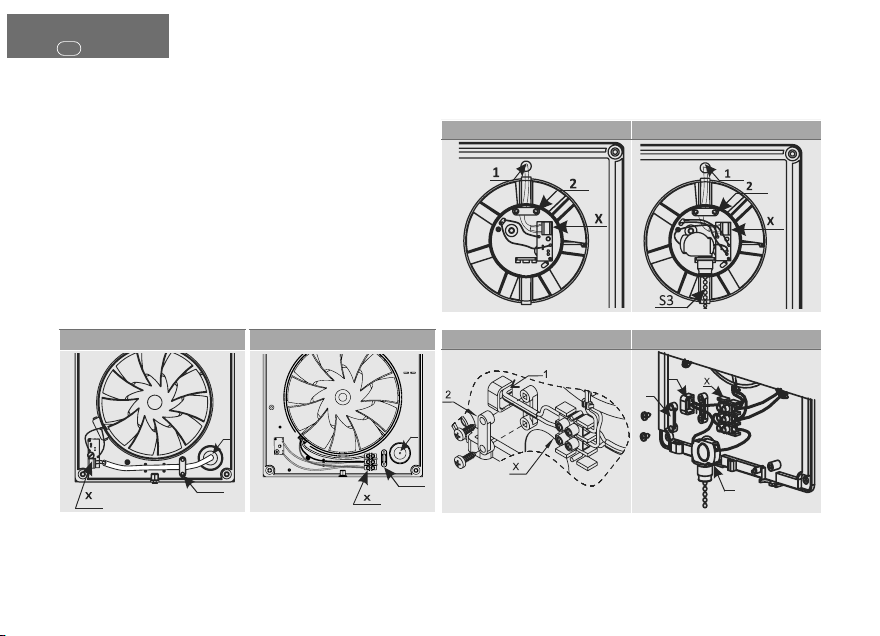
WIRING DIAGRAM CONNECTION OF DICITI FANS TO THE NETWORK
Connection of fan to the network shown in pic. 1-11.
Pic.3 SLIM Pic.4 SLIM -02
Pic.
5 STANDARD
Pic.
6 STANDARD-02
S3
1
2
2
Pic.1 AURA
/ SILENT
2
1
Pic.2 AURA 6
/ SILENT 6
AURA / SILENT (pic. 1-2); SLIM (pic. 3-4); STANDARD (pic. 5-6)
• remove the decorative front panel
• hold the power wire through the cable hole 1 in the case
• strip the insulation on 5-7 mm from the wire end
• insert wires into terminal box X and press them by tap screw (for connection of
AURA 6/ SILENT 6 see fig. 2 and electric scheme 4)
• fix the wires by means of cable clamp 2
• combine clamps of the decorative panel with grooves in the case
• fix the panel with screw
L1
L2
N
2
1
EN
15
Pic.3 SLIM Pic.4 SLIM -02
Pic.
5 STANDARD
Pic.
6 STANDARD-02
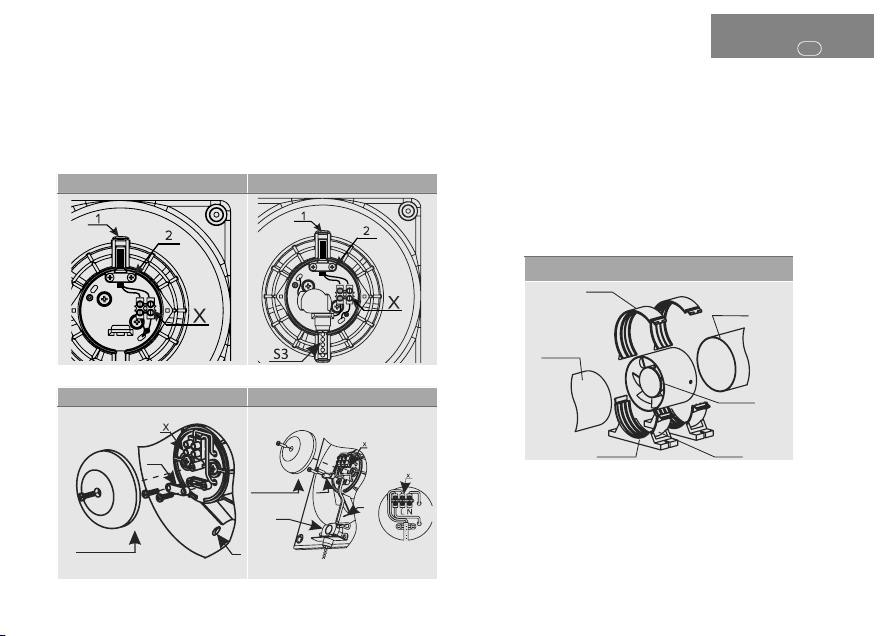
BREEZE / PARUS / RIO (Pic. 7-10)
•remove the decorative front panel and terminal block cover
• hold the power wire through the cable hole 1 in the case
• strip the insulation on 5-7 mm from the wire end
• insert wires into terminal box X and press them by tap screw
• fix the wires by means of cable clamp 2
•install the cover of terminal block and front panel by easy pressure
Pic.7 BREEZE / RIO Pic.8 BREEZE-02 / RIO-02
Pic.9 PARUS / PRO
Pic.
10 PARUS -02
1
2
cover
of terminal block
2
1
S3
cover
of terminal
block
PRO (Pic. 9, 11)
• remove the terminal block cover;
• hold the power wire through the cable hole 1 in the case
• strip the insulation on 5-7 mm from the wire end insert wires into terminal box X and
press them by tap screw;
• fix the wires by means of cable clamp 2;
•install the cover of terminal block.
•Install brackets of holders;
•Install first couple of covers in brackets ;
•Install the fan ;
•Butt airvents from two sides to the fan case
•Fix the fan case with airvents by means of another couple of covers.
Pic.11 PRO
fun
duct
connection
duct
connection
cover
cover
bracket

EN
16
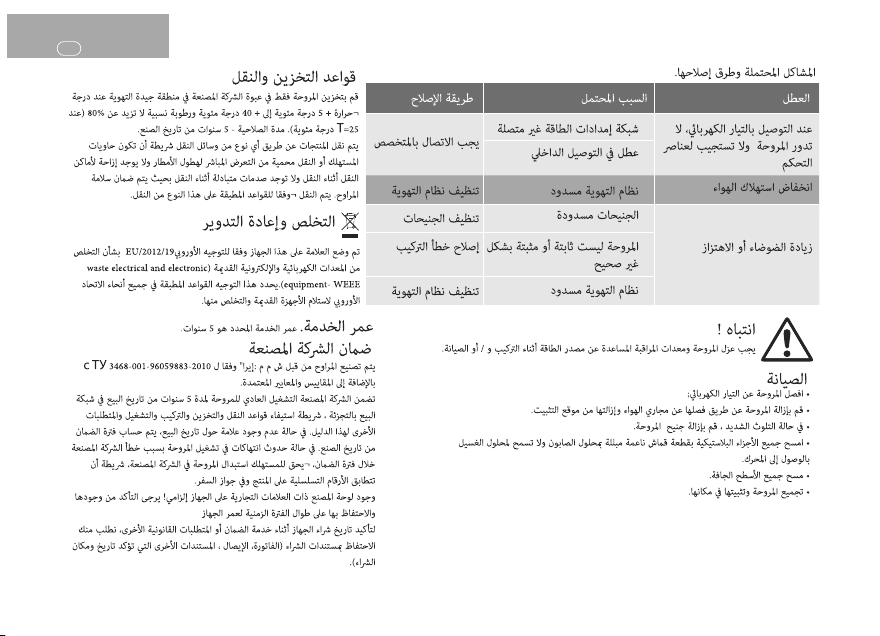
Malfunction Probable cause Remedy
When connected to the power grid, the fan does not rotate, does not respond
to controls.
The mains supply is not connected. It is necessary to consult a specialist.
Internal connection fault.
Low air flow. The ventilation system is clogged. Clean the ventilation system.
Increased noise or vibration.
The impeller is blocked. Clean the impeller.
The fan is not fixed or incorrectly mounted. Correct the installation error.
The ventilation system is clogged. Clean the ventilation system.
Possible problems and solutions
ATTENTION!
The fan and the service controlling equipment has to be isolated from power supply during the installation time and service.

EN
17
Malfunction Probable cause Remedy
When connected to the power grid, the fan does not rotate, does not respond
to controls.
The mains supply is not connected. It is necessary to consult a specialist.
Internal connection fault.
Low air flow. The ventilation system is clogged. Clean the ventilation system.
Increased noise or vibration.
The impeller is blocked. Clean the impeller.
The fan is not fixed or incorrectly mounted. Correct the installation error.
The ventilation system is clogged. Clean the ventilation system.
ATTENTION!
The fan and the service controlling equipment has to be isolated from power supply during the installation time and service.
Maintenance
• disconnect the fan from the mains;
• remove the fan by disconnecting it from the duct and removed from the installation
place.
• in case of heavy soiling, remove the fan impeller;
• wipe all plastic components with a soft cloth soaked in soapy water, it is not allowed
transfer of washing solution to the motor;
• wipe all surfaces dry;
• assemble a fan and set it in place.
Storage and transportation
Keep the fan only in the packaging of the manufacturer in a ventilated room at a
temperature of +5 ° C to +40 ° C and relative humidity of 80% (at T = 25 ° C). Keeping
time - 5 years from date of manufacture. Products transported by any transport provided
consumer protection or transport container from the direct eects of rainfall, lack of
bias transport places during transport, the lack of mutual physical impact during
transportation and preservation of fans. Transportation is carried out in force with the
rules for this transport.
Utilization
This appliance has a label in accordance with European Directive 2012/19/EU on
waste electrical and electronic appliances (waste electrical and electronic equipment
- WEEE). This order acts on rules on the territory throughout the EU and recycling of
old appliances.
Service lifetime Established service period - 5 years
Warranty
Fans are made by LLC «ERA» in accordance with applicable regulations and standards.
Manufacturer guarantees the normal operation of the fan for 5 years from the date
of sale in retail outlets subject to the rules of transportation, storage, installation,
operation and other requirements of this instruction. In case of absence of the date of
sale, the warranty period will be computed from the date of manufacture.
In case of finding failures in the work of the fan on the fault of manufacturer during the
warranty period the consumer has the right to replace the fan in the factory that is the
same serial numbers on the product and in the passport. An availability of branded
factory nameplate on the device is required! Please make sure it is available and store
it on the device during its lifetime.
To confirm the date of purchase for warranty service or presentation of other legal
requirements urge you need to retain proof of purchase (cheque, receipt, and other
documents confirming the date and place of purchase).
The good meets the requirements:
TR CU 004/2011 – «About safety of low voltage equipment»;
TR CU 020/2011 – «Electromagnetic compatibility of technical devices;
EAEU 037/2016 – «On the Restriction of the Use of Hazardous Substances in Electrical
Products and Radio Electronics»
Declaration of Conformity for domestic axial duct electric fans
EAEU N RU Д-RU.HB11.B.03811/20. Validity period from 05.02.2020 till 04.02.2025.
EAEU N RU Д-RU.HB35.B.02657/20. Validity period from 16.06.2020 till 15.06.2025.
Evidence about certificate:
Certificate of Conformity No RU C-RU.AД07.B.00466/19. Validity period from 25.10.2019
to 24.10.2024. Series RU № 0148998. Issued by the Product Certification Authority of
VELES Certification Centre LLC. Address: Bolshaya Podyacheskaya st. 37, letter A, room
5H, c. Saint-Petersburg, Russian Federation, 195009.
Certificate of Conformity No RU C-RU.КА01.B.01103/20. Validity period from25.06.2020
to 24.06.2025. Series RU № 0250784. Issued by the Product Certification Authority
of Atribut Certification Centre LLC. Address: oce 412, 3/8, Ostapovsky proezd Street,
Moscow, 109316, Russia
The decryption of serial numbers.
The serial number is located on the label with the characteristics of fan and consists of
10 characters. The serial number is read from left to right, as follows:
Delivery set
• The assembled fan
• Passport/operation instruction
• Box packaging
• Dowel with screws – 4 PCs. (for fixing the fan) (except for PRO)
• Screws – 2 PCs (for mounting brackets) (except for PRO)
• Bracket – 1 PC. (except for PRO)
Manufacturer / Replacement will be made at the following address:
«ERA» LLC, 390047, Novoselkovskaya street,17,Ryazan city, Russia
tel. (4912) 24-16-00,e-mail: sale@era.trade, www.era.trade
Thank you for choosing us!

KZ
18
МАҚСАТТАЛҒАН ҚОЛДАНУЫ
Тұрмыстық белағаштық каналдық электр желдеткіші (ВОК), тұрмыстық
белағаштық каналдық электр қапталған желдеткіші (ВОКН) туалет және
ванна бөлмелерінен, сонымен қатар желдетуді талап ететін басқа шағын
бөлмелерден жағымсыз иістерді кетіру үшін қолдануға арналған.
ЕСКЕРТПЕ!
Бұл электр бұйым физикалық, психикалық немесе ақыл-ой
қабілеттері төмен болған тұлғалар арқылы (осылардың арасында
балалар ) немесе осы бұйыммен жұмыс істеу бойынша тәжірибесі
немесе білімдері жоқ болса, олар бұйыммен
бақылаусыз болса немесе осы тұлғаларды қауіпсіздігі үшін жауапты
адамдар арқылы осы бұйыммен жұмыс істеуіне үйретілмесе,
қолдану үшін мақсатталмаған. Электр бұйыммен ойнауларын
болдырмау үшін балаларды бақылап жүруіңіз керек.
Қауіпсіздік бойынша талаптар
Электр тоғы арқылы зақымданудан қорғау түрі бойынша электр желдеткіштер
ГОСТ (МЕМСТ) 30345.0-95 бойынша ІІ санаттық құралдарына
(220-240V ~
50/60Hz)
жатады ГОСТ (МЕМСТ) 150150-69 бойынша УХЛ4.
Желдеткіштерді жиілігі 60 Hz ауыспалы ток желісіне қосқан кезде техникалық
сипаттамалары өзгеруі мүмкін. Оларды өндірушіден нақтылап алыңыз.
Электр бұйым қабына қатты түрлі заттары мен судың кіруінен қорғау бойынша
деңгейі ГОСТ (МЕМСТ) 14254-96 (МЭК 529-89): IP24
ЕСКЕРТПЕ!
Желдеткіштердің іске қосылуы осы жұмыстарды өткізу үшін
арнайы рұқсаты бар электрик мамандары арқылы өткізіледі.
Желдеткіштерді белгіленіп көрсетілген температура аумағынан
(+1°C тан +40°C дейін) тыс болған жағдайларда қолдануға
болмайды.
Желдеткішті отын жанарғысы бар құралдардан түтін шығаратын
түтігімен жабдықталған желдету магистраліне бірге орнатылуы
рұқсат етілмейді. Ақаулықтар табылған жағдайда автоматты өшіріп
(S1 бөлшегін OFF позициясына қойып), электрик маманын шақырыңыз
ЕСКЕРТПЕ!
Құралды қолдану алдынан міндетті түрде осы нұсқаулықты оқып,
оның мазмұнымен танысып алыңыз.
ЕСКЕРТПЕ!
Бұйымды іске қосу, реттеу, күту және жөндеу бойынша
өткізілетін барлық әрекеттері тек қана электр жүйесінің
ажыратылған жағдайында өткізілуі тиіс (S1 бөлшегі OFF
позициясында).
Желдеткіш қосу үшін қолданылатын бір фазалық электр жүйесі қолдануда
болған нормаларына сай болуы керек. Стационарлық электр өткізгіш сымы
электр жүйені қорғау автоматы арқылы жабдықталған болуы тиіс (схемада
S1 қылып көрсетілген). Іске қосылуы стационарлық сымы ішіне құрастырып
орнатылған айырғыш арқылы өткізілуі керек (схемада S2 қылып көрсетілген).
Айырғыш контакттары арасындағы саңылау барлық полюстарында 3 мм
көлемінен аз болмауы қажет. «-02» опциясында айырғыш (схемада S3 қылып
көрсетілген) желдеткіш ішіне құрастырылып шығарылған. Құрастырып орнату
алдынан қалақты дөңгелегі, тұрқы, шілтерде көзбен көріне алатын бұзылып
зақымдануының болмауын тексеруіңіз және тұрқының ағызып шығаратын
бөлшегінде желдеткіштің қалақтарын бұзып зақымдай алатын бөтен заттардың
жоқ болуын тексеріп алуыңыз керек.
НЕГІЗГІ ТЕХНИКАЛЫҚ МӘЛІМЕТТЕРІ
Сипаттамалары
Ернемек
диаметрi
(мм)
Жыл-
дамдық
Өнімділігі
(м3/час)
Тұтынатын
қуаты (Вт)
Шуыл
деңгейі
(дБА)
Нетто
салмағы
(кг), артық
емес
AURA 4 100 —90 8,4 25 0,45
AURA 5 125 —180 10 30 0,65
AURA6 149,5
L1 220 18 28
1,0
L2 320 20 33
BREEZE 4 98 —90 9 25 0,50
BREEZE 5 123 —165 13 30 0,67
BREEZE 4 TURBO 98 —110 16 36 0,50
BREEZE 5 TURBO 123 —205 20 39 0,67

KZ
19
ОПЦИЯЛАРДЫҢ ШАРТТЫ БЕЛГІЛЕРІ
НЕГІЗГІ ТЕХНИКАЛЫҚ МӘЛІМЕТТЕРІ
Белгіленуі Аталуы
СКері клапаны бар тұрмыстық белағаштық каналдық қапталған электр
желдеткіштер
-02
Желдеткіш немесе таймерді қуат көзіне қосу / қуат көзінен өшіру үшін тартулы баулы
өшіргішімен жабдықталған тұрмыстық белағаштық каналдық қапталған электр
желдеткіштер
-03 Тұрмыстық екіжылдамдықты арналы өстік электржелдеткіштері
TURBO Өнімділігі жоғары қозғалтқышы бар тұрмыстық осьтік арналық электр
желдеткіштері.
ET Электрондық таймері бар тұрмыстық белағаштық каналдық қапталған
электр желдеткіштер
HT Ылғалдылық тетігімен жабдықталған тұрмыстық белағаштық каналдық
қапталған электр желдеткіштер
ETF Фототаймері бар тұрмыстық белағаштық каналдық қапталған электр
желдеткіштер
MT Қозғалыс датчигі бар тұрмыстық арналы өстік электр желдеткіштері.
Белгіленуі Аталуы
MR
Ішіне құрастырылған Fusion Logic 1.0. контроллері бар тұрмыстық
белағаштық каналдық қапталған мультиопциялық екі режимдік электр
желдеткіштер
MRH
Ішіне құрастырылған Fusion Logic 1.1. контроллері бар тұрмыстық
белағаштық каналдық қапталған мультиопциялық екі режимдік электр
желдеткіштер
EC Электрмен комутацияланатын түрмыстық арналы өстік элеткр
желдеткіштері.
Name of
color
Сәндік орындалудағы Ivory, Champagne, Gray metal, White carbon,
Black carbon, Dark gray metal, Chrome, Gold, Matt black, Obsidian түсті
тұрмыстық арналы өстік электр желдеткіштері.
Белгілеу үлгісі
SLIM 5 C MR -02
, RIO, BREEZE
, MT, EC, TURBO
-03,
Сипаттамалары
Ернемек
диаметрi
(мм)
Жыл-
дамдық
Өнімділігі
(м3/час)
Тұтынатын
қуаты (Вт)
Шуыл
деңгейі
(дБА)
Нетто
салмағы
(кг), артық
емес
AURA 4 100 —90 8,4 25 0,45
AURA 5 125 —180 10 30 0,65
AURA6 149,5
L1 220 18 28
1,0
L2 320 20 33
BREEZE 4 98 —90 9 25 0,50
BREEZE 5 123 —165 13 30 0,67
BREEZE 4 TURBO 98 —110 16 36 0,50
BREEZE 5 TURBO 123 —205 20 39 0,67
Сипаттамалары
Ернемек
диаметрi
(мм)
Жыл-
дамдық
Өнімділігі
(м3/час)
Тұтынатын
қуаты (Вт)
Шуыл
деңгейі
(дБА)
Нетто
салмағы
(кг), артық
емес
BREEZE 4 EC 98 —75 0,05 25 0,57
BREEZE 5 EC 123 —135 0,07 27 0,72
PARUS 4 100 —100 16 35 0,50
PARUS 5 125 —165 20 36 0,60
PRO 4 100 —115 14 32 0,51
PRO 5 125 —195 18 34 0,55
PRO 6 160 —320 22 36 0,87
RIO 4 98 —100 14 32 0,47
RIO 5 123 —180 16 33 0,62
Қосымша опциялардың бір бірімен құрамдастырылған болуы немес жоқ
болуы мүмкін.

KZ
20
Сипаттамалары
Ернемек
диаметрi
(мм)
Жыл-
дамдық
Өнімділігі
(м3/час)
Тұтынатын
қуаты (Вт)
Шуыл
деңгейі
(дБА)
Нетто
салмағы
(кг), артық
емес
SILENT 4 100 —90 8,4 25 0,45
SILENT 5 125 —180 10 30 0,65
SILENT 6 149,5
L1 220 18 28
1,0
L2 320 20 33
SILENT 4 TURBO 100 —120 19 36 0,45
SILENT 5 TURBO 125 —225 20 38 0,65
Сипаттамалары
Ернемек
диаметрi
(мм)
Жыл-
дамдық
Өнімділігі
(м3/час)
Тұтынатын
қуаты (Вт)
Шуыл
деңгейі
(дБА)
Нетто
салмағы
(кг), артық
емес
SLIM 4 100 —90 7,8 25 0,50
SLIM 5 125 —140 10 30 0,60
SLIM 6 150 —250 10 33 0,72
STANDARD 4 100 —100 16 35 0,67
STANDARD 5 125 —185 20 36 0,72
• L1 – Low Speed (төмен жылдамдық )
• L2 – High Speed (жоғары жылдамдығы)
Желдеткіштер кернеуі 220-240 В, жиілігі 50/60 Гц болған ауыстырмалы электр тоқ
жүйесіне қосу үшін мақсатталған.
AURA / BREEZE / PARUS /
SILENT SLIM / RIO / STANDARD
PRO
B
A
F
D
C
Үлгі d A B X Y E F* С
AURA 4 100 155 155 135 135 70 7 24
AURA 5 125 175 175 155 155 78 8,5 24
AURA 6 149,5 205 205 183,5 183,5 108 —28
BREEZE 4 98 175 220 135 135 74 6 44
BREEZE 5 123 190 237 160 160 79 6 52
PARUS 4 100 175 220 140 175 48 8 37
PARUS 5 125 219 275 175 220 54 10 42
RIO 4 98 170 170 135 135 74 6 38
RIO 5 123 200 200 160 160 79 6 38
SILENT 4 100 155 155 135 135 70 7 31
SILENT 5 125 175 175 155 155 78 8,5 32
SILENT 6 149,5 205 205 183,5 183,5 108 —37
SLIM 4 100 160 160 140 140 76 7 9
SLIM 5 125 180 180 160 160 82 8,5 9
SLIM 6 150 205 205 187 187 86 10 9
STANDARD 4 100 180 250 160 230 58,5 7 24
STANDARD 5 125 180 250 160 230 58,5 8,5 24
*- Бұл көлемдер тек қана кері клапан опциясы бар
болған желдеткіштерде бар болады
Үлгі A B C D E F
PRO 4 122 138 119 103,6 94 139
PRO 5 147 163 144 128,6 101 146
PRO 6 182 198 179 163,6 104 154
EC
Ød
X
A
Y
B
ҚҰРАСТЫРЫП ОРНАТУ МЕН ІСКЕ ҚОСУ ҮШІН
ДАЙЫНДАУ
DICITI желдеткіштері желдету ауа өткізгіштерімен және дербес түрде орнатылып
қойыла алынады. DiCiTi желдеткіштері қабырға және төбелерге орнату үшін
мақсатталған. 02 опциясы бар DiCiTi желдеткіштері қабырға үстінен ілініп орнатылып
қолданылады.
DiCiTi желдеткіштердің орнатылуы желдету ауа өткізгіштерімен және дербес түрде,
тегіс тік және көлденең үстілері үстінен, ал 02 опциясы бар желдеткіштердің
орнатылуы тегіс тік және бұйымды бұрама шегелер арқылы орнату үшін жеткілікті
қаттылығы бар үстілер үстінен өткізіледі. Орнатылатын монтаждық үстілердің тік
және көлденең бағыттары бойынша ұйғарынды ауытқу аумағы: ± 0,5 мм.
DICITI желдеткіштері желдету ауа өткізгіштерімен және дербес түрде орнатылып
қойыла алынады.
S3
S1 қорғау автоматтың
схемадағы белгіленуі
S1 қорғау автоматы S2 сыртқы өшіргіші
Ішіне құрастырылған S3
айырғыш (тартпалы айырғышы)
S2 сыртқы өшіргіштің
схемадағы белгіленуі
S3 құрастырылған айы-
рғыштың белгіленуі
ЖЕЛДЕТКІШТЕРІН ҚОСУ БОЙЫНША НЕГІЗГІ
СХЕМАЛАРЫ
1ші схема
Желдеткіштерді іске қосу (базалық нұсқа)
X-клемма тақтасы, 2 жұп
Other manuals for AURA 4
1
This manual suits for next models
25
Table of contents
Languages:
Other DiCiTi Fan manuals


Popular Fan manuals by other brands

Vornado
Vornado 100 series owner's guide

MILUX
MILUX MCF- E135 Operating and installation instructions

Suntec Wellness
Suntec Wellness CoolBreeze 12000 TV Operation manual

Somogyi Elektronic
Somogyi Elektronic home PVRO 40 instruction manual

Olimpia splendid
Olimpia splendid Caldo Whisper Instructions for installation, use and maintenance

Halton
Halton Max Ultra Circular Installation, commissioning and maintenance guide


