Dicota BluePoint User manual

english
User’s Guide
Ultra-Slimline Bluetooth®presenter with laser pointer & mouse function
…………
2
deutsch
Bedienungsanleitung
Ultraflacher Bluetooth®Laserpointer mit Maus-Funktion
…………………………………
12
français
Guide d’utilisation
Pointeur laser Bluetooth®ultra plat avec fonction souris
…………………………………
22
español
Manual de instrucciones
Puntero laser Bluetooth®ultraplano con función de ratón
………………………………
32
italiano
Istruzioni per l’uso
Puntatore laser Bluetooth®ultrapiatto con funzione mouse
……………………………
42
čzesky
Manuál
Ultra tenké Bluetooth® laserové ukazovátko s funkcemi myši
…………………………
52
русский
Инструкция
Ультратонкая лазерная указка Bluetooth® с функциями мыши
…………………
62
magyar
Használati útmutató
Ultravékony Bluetooth® lézeres mutató egér funkcióval
…………………………………
72
polski
Przewodnik użytkownika
Ultra-płaski laserowy wskaźnik Bluetooth® z funkcją myszki
…………………………
82
slovensky
Návod na obsluhu
Ultratenké Bluetooth® laserové ukazovadlo s funkciami myši
…………………………
92
中文
用户指南
带鼠标功能及激光指示器的超薄蓝牙无线演示控制器 ………………………
102
BluePoint

2
english
Index
1. Introduction ………………………………………………………………………………………………… 2
2. Features ……………………………………………………………………………………………………… 3
3. Package contents ……………………………………………………………………………………… 3
4. System requirements ………………………………………………………………………………… 3
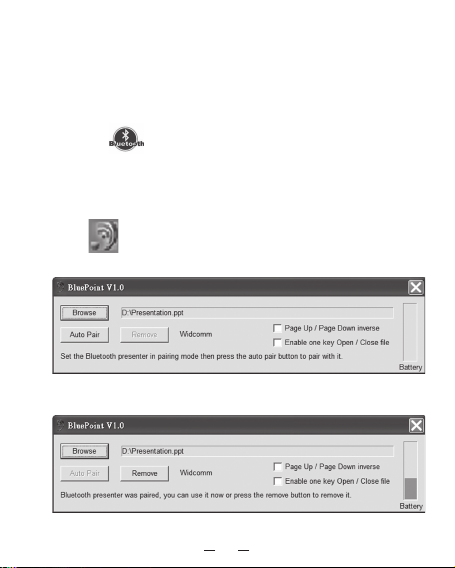
5. Bluetooth®mode feature ………………………………………………………………………… 4
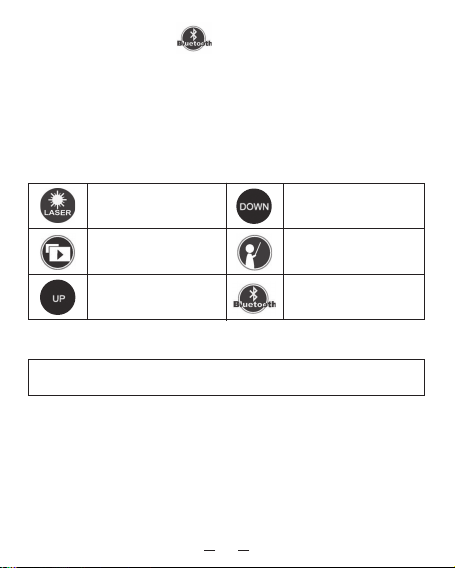
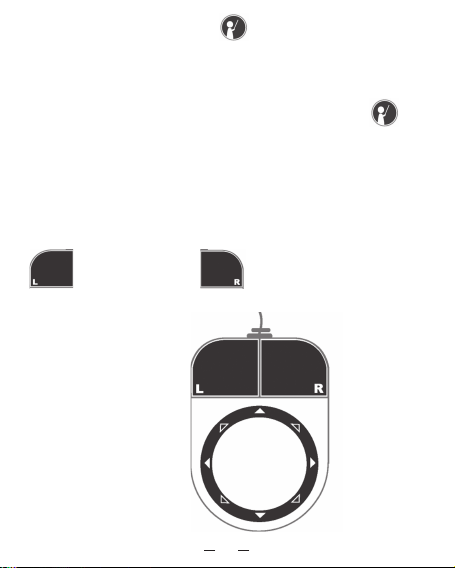
6. Key definition ……………………………………………………………………………………………… 4
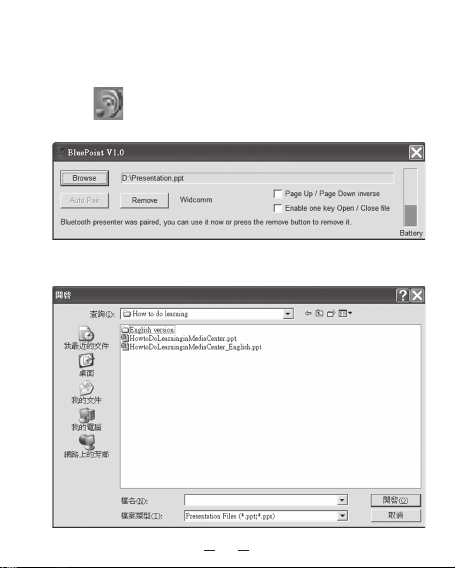
7. Installation and operation ………………………………………………………………………… 4
8. Specifications……………………………………………………………………………………………… 8
9. Troubleshooting ………………………………………………………………………………………… 9
10. Appendix – Installing Bluetooth®dongle …………………………………………… 10
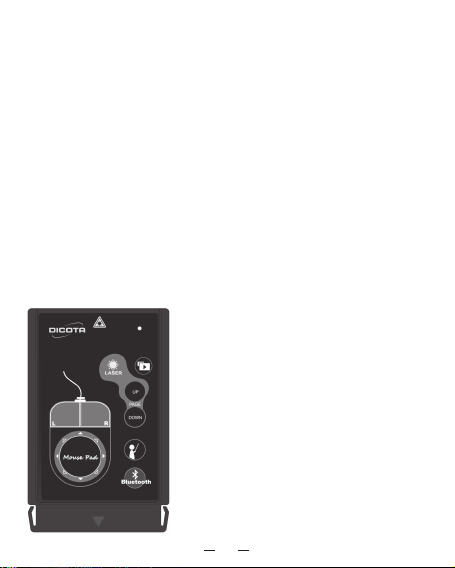
Introduction
With the new Bluetooth®laser pointer from DICOTA every presentation is
an event! If in meetings or during speeches, with the ease of use and sim-
plicity of BluePoint success is guaranteed.
With a simple push of a button the Bluetooth®function is instantly ac-
tivated and BluePoint is ready for operation.
The range amounts to 10 meters. The laser
pointer is activated with a single push of
a button, as well. Crucial elements can be
pinpointed and highlighted.
The integrated mouse pad on BluePoints’
surface makes for a completely new expe-
rience with a fully new kind of naviga-
tion. The cursor can simply be led in all
directions. The mouse buttons integrated
into the mouse pad can be used analog to
the left and right buttons of a normal mouse,
allowing for the combination of mouse
function and laser pointer.
DICOTA Bluetooth®Presenter: BluePoint

3
BluePoint also features a PowerPoint hot button, with which presentations
can be started without delay.
In case BluePoint is not in use, the laser pointer can easily be stowed in
the PCMCIA slot of the Notebook thanks to its unusual, ultra-flat design.
The attractive design, the simple handling via Plug & Play and the sensible
functions make BluePoint an essential companion for every presentation.
Features:
1. Innovative design of omni-directional BluePoint for performing
a perfect presentation.
2. Bluetooth®version 2.0 class II technology, up to 10 meter operation
range.
3. New mouse navigating experience by integrated mouse pad.
4. Built-in laser pointer can catch audience attention during presentation.
5. Ultra compact design for storing in your notebook’s PCMCIA slot
securely.
6. Presentation hotkey allows you to start the prepared PowerPoint file
conveniently.
Package contents:
• Bluetooth®Presenter BluePoint
• CD-ROM driver
• Coin Type Lithium battery CR2032 x 1
System requirements:
• Built in Bluetooth®wireless technology (PC) or external dongle with
Bluetooth®wireless technology
• Bluetooth®profile need to support HID minimum
• Microsoft®Windows®XP SP2, Vista
• 64 MB RAM recommended
• CD-ROM drive or DVD-ROM drive

4
Laser Point
Enter Power Point
slide show
Page up
Page down
Open prepared
Power Point file
Device pairing
Key definition:
Installation and operation:
When BluePoint isn’t in use, please take off the battery for
saving power.
1. Installation of battery
Open the back cover of Presenter and insert a Coin Type CR2032
Lithium battery with the diagram outside the battery chamber.
2. Installing CD-ROM
Place the value software CD into your CD-ROM drive or DVD-ROM
drive and execute Setup.exe file on CD. The installation will be started
after you double-click it. Please follow the instruction to finalize the
installation.
Mode feature:
• Press connection button 3 sec to go into pairing mode
• From pairing mode to sleep mode: 3 mins
• From active mode to idle mode: 0.5 sec
• From idle mode to sleep mode: 10 mins
• LED fast flash in pairing mode or when the button is kept pressing
(except laser button)
• LED flash 1 time per tick in idle mode
• LED stop flash in sleep mode

3. Power on the function of Bluetooth®wireless technology
Power on the function of Bluetooth®wireless technology if your Notebook
builds in a receiver with Bluetooth®wireless technology, or insert your
dongle with Bluetooth®wireless technology and power on the Bluetooth®
wireless technology function.
4. Use application to do Bluetooth®auto-pair with presenter
The application will execute automatically after installation.
1) Click the button on the remote control for 3-5 seconds.
The Blue LED indicator will fast flash when BluePoint paring with
your computer. Make sure you are in pairing mode. From pairing
mode to sleeping mode is only 3 minutes.
2) Open application by double click the “BluePoint” icon on system
tray.
3) Click the “Auto Pair” button to do Bluetooth®auto-pair.
4) You also can remove the Bluetooth®pairing by clicking “Remove”
button after doing Bluetooth®auto-pair, if necessary.
5

5. How to call a prepared file
*If you give presentations often, the following steps would be very
useful for you.
1) Open application by double click the “BluePoint” icon on system
tray.
2) Click the “Browse” button and select the file that you prepared.
3) Then press Open button for program location setting.
(The path & file name is an example, for your reference only.)
6

7
4) Next time when you press the key on the presenter, the file
you set in the path will be opened directly.
6. Other options and battery status
1) Enable “Page Up / Page Down inverse” function to inverse Page Up
and Page Down buttons.
2) Enable “Enable one key Open/Close file” function then the key
not only can open the file you set, but also close the file.
3) The battery status is shown on application and “BluePoint” will show
a warning when the battery is low.
Note: (Mouse function using guide)
The mouse function operation is different with a “touch pad”. You may
see it as a “8-directional buttons” on the mouse pad. With them, you can
move the cursor easily.
similar to mouse Left-Key similar to mouse Right-Key
8-directional buttons on
mouse pad as the following
figure:

8
Item Description
Standard Bluetooth®wireless technology specification
version 2.0 compatible
Frequency Band 2.4 GHz~2.4835 GHz unlicensed ISM Band
Output Power 0.25 mW~2.5 mW (Bluetooth®Power Class II)
Range up to 10 meters (free space)
Battery CR 2032
Operating voltage 3.2 V~2.8 V
Dimension 86 x 53.8 x 4.9 mm
Weight <25 g (including battery)
Certification Approval CE, FCC, BQB
Specifications:
Warning!
• Do not allow minors to use the laser point unsupervised.
Laser point is not a toy.
• Avoid direct eye exposure.
• Never shine the laser point at anyone. The laser point is designed
to illustrate inanimate objects.
• Do not point the laser point at any mirror-like surfaces.
A reflected beam can act like a direct beam on the eye.

9
BluePoint
doesn’t work.
Trouble shooting:
• No battery on the presenter,
battery died, or un-correct
battery installation.
• Fail in the pairing process.
• The computer cannot find
the device.
• Un-correct BLUEPOINT
installation.
Question Analysis Solution
• Check battery and its install-
ation.
• Run the function of Bluetooth®
wireless technology on your
PC/Notebook. If your PC/
Notebook doesn’t bundle with
any receiver with Bluetooth®
wireless technology, please
plug on a dongle with Blue-
tooth®wireless technology.
• Searching and pairing the
device by following manual
“Installation and Operation”.
• Uninstall and re-install by
following manual “Installation
and Operation”.
• BluePoint application doesn’t
activate.
• It doesn’t work after press
buttons due to the computer
software is not working.
• Your computer can’t match
with the Bluetooth device.
• Activate bundled application
by following “Installation and
Operation”.
BluePoint
irregular
reaction
• The driver of Bluetooth®
dongle is provided by IVT.
• You can still use BluePoint
normally even if UI doesn’t
show correctly.
The “Auto
Pair” button of
BluePoint UI is
always enabled
after pairing.

10
Notice:
Before use it, please activate the software by BluePoint Presenter first. If
not use for a long time, please take out the battery from battery chamber.
Status:
Changing the battery doesn’t affect the pairing process. If you want to
pair a device with Bluetooth®wireless technology, you have to push
the button with Bluetooth®wireless technology and follow the step 2.
Appendix – Installing Bluetooth®Dongle:
Bluetooth®dongle is an optional device if your PC doesn’t build in
Bluetooth. It is easy for you to install it. If the dongle has its own driver,
please install it first. Then plug it into the USB port in your computer. If
the dongle has no extra driver, it will be detected by the operating system
automatically, and use Microsoft standard driver.
Before you use it, please make sure your computer follow those system
requirements as bellow:
1. Make sure the system is at least Windows®XP Service pack 2 or
above.
2. After installing the dongle and software, please restart the computer
to ensure all the functions work correctly.
This device complies with Part 15 of the FCC Rules. Operation is subject
to the following two conditions:
1. This device may not cause harmful interference.
2. This device must accept any interference received, including inter-
ference that may cause undesired operation.

11
Disclaimer:
Information in this document is subject to change without notice. The
manufacturer does not make any representations or warranties (im-
plied or otherwise) regarding the accuracy and completeness of this
document and shall in no event be liable for any loss of profit or any
commercial damage, including but not limited to special, inciden-
tal, consequential, or other damage. No part of this document may
be reproduced or transmitted in any form by any means, electronic or
mechanical, including photocopying, recording or information record-
ing and retrieval systems without the express written permission of the
manufacturer.
N4029
This symbol (crossed out bin wheelie symbol according to
WEEE Directive 2002/96/EC and Battery Directive 2006/66/EC)
indicates separate collection of waste electrical and electronic
equipment as well as batteries in the EU countries. Please do
not throw the equipment respectively the batteries into the
domestic refuse. Please use the return and collection systems
available in your country for the disposal.
Customer service:
If you encounter any problem with your BluePoint, please contact our local
2 years warranty. Please find the complete text in our guarantee on the
internet: www.dicota.com.
All the products and software mentioned above are registered trademarks
of their respective owners. Errors and omissions excepted.

12
deutsch
Inhalt
1. Einführung ………………………………………………………………………………………………… 12
2. Ausstattung ……………………………………………………………………………………………… 13
3. Lieferumfang …………………………………………………………………………………………… 13
4. Systemvoraussetzungen………………………………………………………………………… 13
5. Bluetooth®-Modus…………………………………………………………………………………… 14
6. Tastenerklärung ……………………………………………………………………………………… 14
7. Installation und Verwendung ………………………………………………………………… 14
8. Spezifikationen ………………………………………………………………………………………… 18
9. Problemlösung ………………………………………………………………………………………… 19
10. Ergänzung – Installation des Bluetooth®-Empfängers ……………………… 20
Einführung
Mit dem neuen Präsentationstool BluePoint von DICOTA wird jede Präsen-
tation zu einem Erlebnis! Ob in Meetings oder bei Vorträgen, durch eine
sichere und einfache Bedienung von BluePoint ist der Erfolg garantiert.
Durch einen einfachen Tastendruck wird die Bluetooth®-Funktion sofort
aktiviert und BluePoint ist einsatzbereit. Die
Reichweite beträgt 10 Meter. Der Laser-
pointer wird ebenfalls mit nur einem Tasten-
druck aktiviert. Wichtige Elemente können
zielgenau angezeigt und hervorgehoben
werden.
Das integrierte Maus-Touchpad auf der
BluePoint Oberfläche bietet durch eine völlig
neue Art der Navigation ein echtes Erlebnis.
Die am Touchpad integrierten Maus-Tasten
können analog zu der rechten und linken
Taste einer normalen Maus bedient werden,
was die Kombination der Mausfunktion mit
der eines Laserpointers ermöglicht.
DICOTA Bluetooth®-Laserpointer: BluePoint

13
BluePoint verfügt außerdem über eine PowerPoint Schnellstarttaste,
wodurch sich Präsentationen unverzögert starten lassen.
Falls BluePoint nicht im Einsatz ist, lässt sich der Laserpointer dank seiner
außergewöhnlichen, ultraflachen Form problemlos im PCMCIA-Schacht
des Notebooks verstauen. Somit ist BluePoint immer griffbereit und intel-
ligent untergebracht.
Das attraktive Design, die einfache Handhabung durch Plug & Play und die
sinnvollen Funktionen machen BluePoint zu einem unverzichtbaren Beglei-
ter durch jede Präsentation.
Ausstattung:
1. Innovatives Navigations-Design von BluePoint für eine perfekte
Präsentation.
2. Bluetooth®-Version 2.0 Technologie, Reichweite bis zu 10 Metern.
3. Neue Mausnavigationserfahrung dank des integrierten Mauspads.
4. Eingebauter Laserpointer zur Aufmerksamkeitssteigerung des
Publikums während einer Präsentation.
5. Extrem kompaktes Design zum sicheren Verstauen im PCMCIA-
Schacht Ihres Notebooks.
6. Präsentations-Schnellstarttaste für ein leichtes Starten der
vorbereiteten PowerPoint-Datei mittels einem Tastendruck.
Lieferumfang:
• Bluetooth®-Laserpointer mit Mausfunktion BluePoint
• CD-ROM mit Treiber
• Lithium-Knopfzellenbatterie CR2032 x 1
Systemvoraussetzungen:
• Integrierte Bluetooth®-Funktion (PC) oder externer Empfänger mit
Bluetooth®-Funktion
• Bluetooth®-Profil muss HID-Minimum unterstützen
• Microsoft®Windows®XP SP2 oder Vista
• 64 MB RAM empfohlen
• CD-ROM-Laufwerk oder DVD-ROM-Laufwerk

14
Aktivierung des
Laserpointers
PowerPoint-
Präsentation starten
Seite hoch
Seite runter
Vorbereitete Power-
Point-Datei öffnen
Bluetooth-Verbindung
aktivieren
Tastenerklärung:
Installation und Verwendung:
Entfernen Sie bitte die Batterie, wenn BluePoint nicht verwendet
wird, um Strom zu sparen.
1. Installation der Batterie
Öffnen Sie Abdeckung am hinteren Teil von BluePoint und legen Sie
die Lithium-Knopfzellenbatterie Typ CR2032 mit der Beschriftung nach
außen in das Batteriefach.
2. Installation der CD-ROM
Legen Sie die CD in Ihr CD-ROM- oder DVD-ROM-Laufwerk ein und
führen sie die Datei „setup.exe“ aus, die sich auf der CD befindet. Die
Installation wird nach einem Doppelklick gestartet. Folgen Sie den An-
weisungen auf dem Bildschirm, um die Installation abzuschließen.
Modi:
• Drücken Sie den Verbindungsknopf 3 Sekunden, um in den
Pairing-Modus zu wechseln
• Vom Pairing- zu Sleep-Modus: 3 Minuten
• Vom aktiven zum Standby-Modus: 0,5 Sekunden
• Vom Standby- zu Sleep-Modus: 10 Minuten
• LED leuchtet ständig auf, wenn sich das Gerät im Pairing-Modus befin-
det oder wenn der Knopf anhaltend gedrückt wird (außer Laserknopf)
• LED leuchtet ein Mal alle paar Sekunden im Standby-Modus
• LED hört auf zu leuchten, wenn im Sleep-Modus

3. Die Bluetooth®-Funktion einschalten
Schalten Sie die Bluetooth®-Funktion Ihres Notebooks ein oder schließen
Sie den Buetooth®-Empfänger an Ihrem Laptop an.
4. Verbindung des Notebooks und BluePoint via Bluetooth®
Die Anwendung startet automatisch nach Abschluss der Installation.
1) Drücken Sie den Knopf auf der Fernbedienung für 3 bis 5
Sekunden. Die blaue LED-Anzeige wird schnell aufleuchten wenn
BluePoint sich mit Ihrem Computer verbindet. Stellen Sie vorher
jedoch sicher, dass Sie im Pairing-Modus sind. Vom Pairing-Modus
zum Sleep-Modus dauert es nur 3 Minuten.
2) Öffnen Sie die Anwendung, indem Sie das „BluePoint“-Icon doppel-
klicken.
3) Klicken Sie auf „Auto Pair“, um BluePoint automatisch via Bluetooth®
zu verbinden.
4) Falls nötig können Sie das Bluetooth®-Pairing auch entfernen, in dem
Sie „Entfernen“ klicken, nachdem das automatische Pairing abge-
schlossen ist.
15

5. Wie man eine vorbereitete Datei aufruft
Wenn Sie öfters Präsentationen halten, werden die folgenden Schritte
Ihnen sehr nützlich sein.
1) Öffnen Sie die Anwendung, in dem Sie das „BluePoint“-Icon doppel-
klicken.
2) Klicken Sie auf „Durchsuchen“ und wählen Sie die Datei aus, die Sie
vorbereitet haben.
3) Klicken Sie dann „Öffnen“. (Pfad und Name sind nur Beispiele.)
16

17
4) Das nächste Mal, wenn Sie den Schnellstartknopf von
BluePoint drücken, wird die ausgewählte Datei direkt gestartet.
6. Weitere Optionen und Batteriestatus
1) Schalten Sie die Funktion „Bild auf/Bild ab umdrehen“ ein, um diese
Tasten zu vertauschen.
2) Schalten Sie die Funktion „Datei per Klick öffnen/schließen“ ein,
um die ausgewählte Datei nicht nur zu starten, sondern auch zu
beenden.
3) Der Batteriestatus wird in der Anwendung angezeigt und BluePoint
zeigt eine Warnung, wenn der Batteriestatus niedrig ist.
Hinweis: (Mausverwendung)
Die Maus funktioniert etwas anders mit einem Touchpad, welches Sie
als Mauspad mit 8 verschiedenen Tasten betrachten können, welche
alle Richtungen abdecken. Mit diesen können Sie den Mauszeiger ganz
einfach steuern.
Vergleichbar mit der linken Maustaste Vergleichbar mit der rechten Maustaste
Das Mauspad hat
8 Richtungstasten:

18
Element Beschreibung
Standard Bluetooth®-Technologie
Version 2.0 kompatibel
Frequenzbereich 2,4 GHz~2,4835 GHz nicht lizensiertes ISM-Band
Leistung 0,25 mW~2,5 mW (Bluetooth®Leistungsklasse II)
Reichweite bis zu 10 Meter (freie Fläche)
Batterie CR 2032
Betriebsspannung 3,2 V~2,8 V
Größe 86 x 53,8 x 4,9 mm
Gewicht <25 g (Batterie inklusive)
Zertifikate CE, FCC, BQB
Spezifikationen:
Warnung!
• Erlauben Sie Kindern nicht die Verwendung des Laserpointers ohne
Aufsicht! Der Laserpointer ist kein Spielzeug!
• Vermeiden Sie direkten Kontakt mit den Augen.
• Zeigen Sie mit dem Laser niemals auf Menschen. Der Laserpointer
ist dafür gedacht, leblose Objekte hervorzuheben.
• Zeigen Sie mit dem Laserpointer nicht auf spiegelähnliche Flächen.
Ein reflektierter Strahl kann sich genau so verhalten wie ein direkter
Strahl.

19
BluePoint
funktioniert
nicht.
Problemlösung:
• Keine Batterie im Gerät,
Batterie leer oder nicht korrekt
eingelegt.
• Pairing inkorrekt durchgeführt.
• Der Computer kann das Gerät
nicht finden.
• Inkorrekte BluePoint-Instal-
lation.
Frage Analyse Lösung
• Batterie und die Installation
der Batterie überprüfen.
• Starten sie die Bluetooth®-
Funktion Ihres PCs/Note-
books. Wenn sich Ihr PC/
Notebook mit keinem Empfän-
ger von Bluetooth®-Technolo-
gie verbindet, verwenden Sie
bitte einen Bluetooth®-USB-
Empfänger.
• Suchen und pairen Sie das
Gerät, befolgen Sie dabei die
Anleitung „Installation und
Verwendung“.
• De- und reinstallieren gemäß
der Anleitung „Installation und
Verwendung“.
• BluePoint-Anwendung ist
nicht aktiv.
• Die Software läuft nicht
korrekt.
• Ihr Computer kann sich nicht
mit dem Bluetooth®-Gerät
verbinden.
• Aktivieren Sie die Anwen-
dungen anhand der Anleitung
„Installation und Verwendung“.
BluePoint
reagiert unre-
gelmäßig.
• Der Treiber des Bluetooth®-
Empfängers wird von IVT
bereitgestellt.
• Sie können BluePoint trotzdem
ganz normal verwenden.
Die „Auto
Pair“-Funktion
ist nach dem
Pairing immer
aktiviert.

20
Hinweis:
Aktivieren Sie die Software von BluePoint vor der Verwendung. Wenn Sie
BluePoint längere Zeit nicht verwenden, entfernen Sie die Batterie aus dem
Gehäuse.
Status:
Ein Batteriewechsel hat keine Auswirkungen auf den
Pairing-Prozess.
Ergänzung – Installation des Bluetooth®-Empfängers:
Der Bluetooth®-Empfänger ist ein optionales Gerät, falls Ihr Gerät kein in-
tegriertes Bluetooth®besitzt, und einfach zu installieren. Sofern der Emp-
fänger einen eigenen Treiber hat, sollte dieser zuerst installiert werden.
Danach schließen Sie den Empfänger an den Computer an. Falls kein
eigener Treiber vorhanden ist, wird das Betriebssystem automatisch nach
einem suchen bzw. den Standard-Windowstreiber verwenden.
Vor der Verwendung bitte sicherstellen, dass Ihr Computer die folgenden
Voraussetzungen erfüllt:
1. Stellen Sie sicher, dass das Betriebssystem mindestens Windows®XP
Servicepack 2 oder höher ist.
2. Nach der Installation des Empfängers und der Software, starten Sie
den Rechner neu, um eine korrekte Funktionsweise aller Komponenten
zu gewährleisten.
Table of contents
Languages:
Popular Accessories manuals by other brands

METALTEK
METALTEK PLAYMATE iSMASH owner's manual

Grundfos
Grundfos LiqTec Installation and operating instructions

Grodan
Grodan GS21CL12 user manual

Cooler Master
Cooler Master Power Fort C-2010 user manual

Roger Technology
Roger Technology M90 Series instructions

Dewenwils
Dewenwils HRLS21B instruction manual

GESTRA
GESTRA NRG 26-61 Original Installation & Operating Manual

Pilz
Pilz PSEN ma1.3b-24 VA operating manual

leco
leco Sunroof Waved manual

MINOURA
MINOURA REMOTE SHIFTER KIT instruction manual

Dorner
Dorner 2200 series Installation, maintenance & parts manual

Wildlife Acoustics
Wildlife Acoustics sm3bat user guide