Dictum Health eVER-HOME User manual

1
Dictum Health
Use the instructions of this quick start guide to unpack a new eVER-HOME and prepare it for use.
Caution: Follow this quick start guide exactly to ensure safety and ease of assembly. The instructions of this quick start guide are a summary, so for more detailed
instructions consult the complete IFU (Instructions for Use) accessible on the eVER-HOME.
© 2020 Dictum Health. All rights are reserved. To support the intended use of the product described in this publication, the purchaser of the product is permitted to copy
this publication, for internal distribution only, from the media provided by Dictum Health. No other use, reproduction, or distribution of this publication, or any part of it, is
permitted without written permission from Dictum Health. Dictum Health assumes no responsibility for any injury to anyone, or for any illegal or improper use of the product,
that may result from failure to use this product in accordance with the instructions, cautions, warnings, or statement of intended use.
Dictum Health™ and eVER-HOME™ are trademarks of Dictum Health.
Software in this product is copyright 2020 by Dictum Health or its vendors. All rights are reserved. The software is protected by United States of America copyright laws and
international treaty provisions applicable worldwide. Under such laws, the licensee is entitled to use the copy of the software incorporated with this instrument as intended in the
operation of the product in which it is embedded. The software may not be copied, decompiled, reverse-engineered, disassembled, or otherwise reduced to human perceivable
form. This is not a sale of the software or any copy of the software; all rights, title, and ownership of the software remain with Dictum Health or its vendors.
For information about any Dictum Health product, contact Dictum Health Technical Support: [email protected]
Dictum Health Inc. • 255 3rd Street, Suite 102 • Oakland, CA 94607 • (510) 295-4450 • www.dictumhealth.com
eVER-HOME Quick Start Guide
2 DICTUMH EALTH
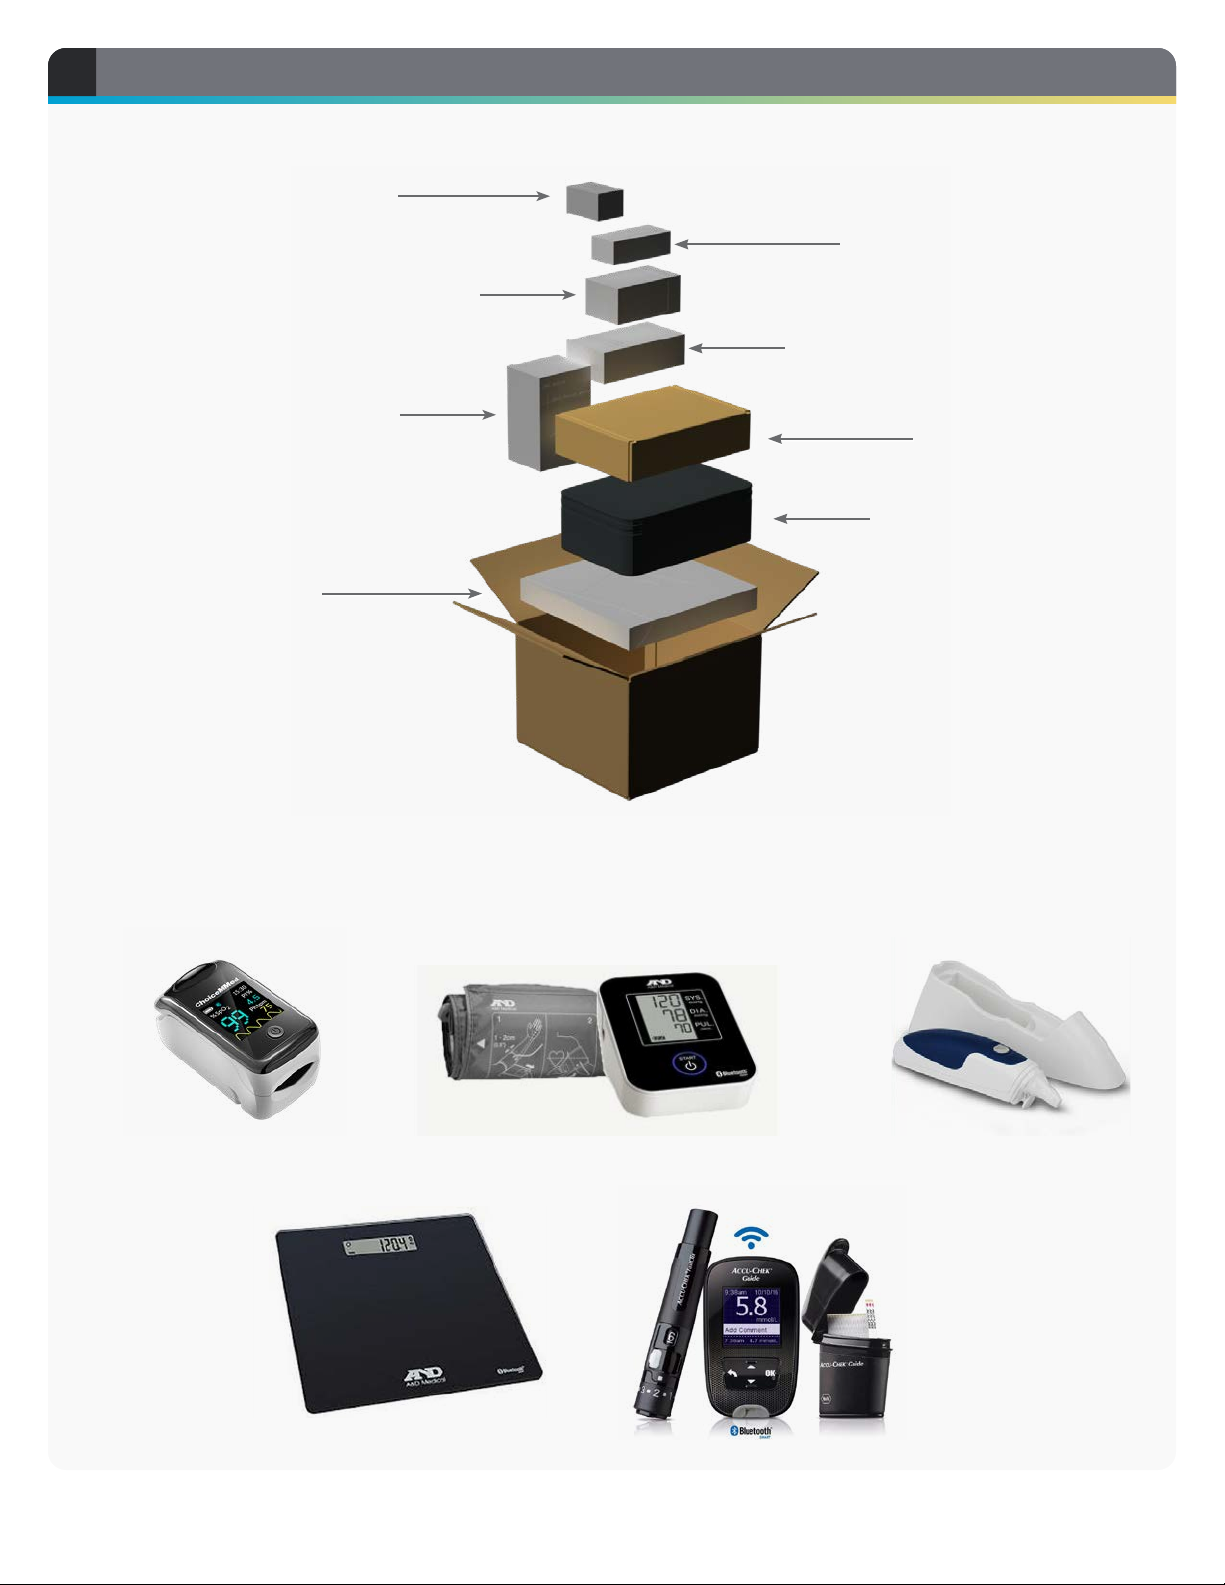
UNPACK THE eVER-HOME AND ACCESSORIES
1
Pulse
Oximeter
Glucometer
(optional)
Blood Pressure
Monitor
Scale
Carrying Case
Thermometer
Probe covers
(optional)
Tablet Box (pg 3)
Pack Box
Accessories (your actual accessory may appear slightly dierent)
UNPACK THE eVER-HOME AND ACCESSORIES
1
Pulse Oximeter Blood Pressure Monitor
GlucometerScale
Thermometer

www.dictumhealth.com 3
UNPACK THE eVER-HOME AND ACCESSORIES 1
Tablet Box
Packing the Carrying Case
The carrying case comes with a number of dividers.
Place the dividers in the slots to create spaces
for the accessories. Place the devices so that the
screens aren’t pressed on by anything sharp or
hard. Place the eVER-HOME in the top pocket.
Here are two examples of possible configurations.
eVER-HOME
AC Adapter
USB Cable
Quick Start
Cover/Stand
Insert dividers
to create spaces

4 DICTUMH EALTH
DEVICE SETUP
2
Power On/O
Back Camera
Camera Flash
Speaker
Speaker
Microphone
USB-C
Power Port
Headphone
Port
Front
Camera
Volume Up/Down
eVER-HOME Features

www.dictumhealth.com 5
DEVICE SETUP, CONTINUED 2
Charge the Device
Use the supplied USB-C cable to charge the device
through a USB port or with the included wall
adapter.
USB-C
Power Port
Power-on the Device
Press and hold the power button until the start
screen appears.
Power on/o
Protective Cover and Stand
The protective cover will help keep the device safe
from accidental damage. Insert the tablet into the
corner tabs 1 to securely hold the device in place.
Flip the cover back and fold under the device to
create a stand 2 .
1
2

6 DICTUMH EALTH
DEVICE SETUP, CONTINUED
2
If the eVER-HOME has
already been setup
Tap the START button 1to start
the eVER-HOME software.
eVER-HOME Settings
Tap the SETTINGS button 2to
open the Settings menu.
Update Software
If an UPDATE button is present,
tap UPDATE 3to update the
software to the most current
version. Follow the prompts from
the device. It will return to this
screen when finished. You must
be connected to Wi-Fi to perform
the update.
Register
If a REGISTER button is present,
contact your doctor’s oce.
1
3
2
4
5
6
7
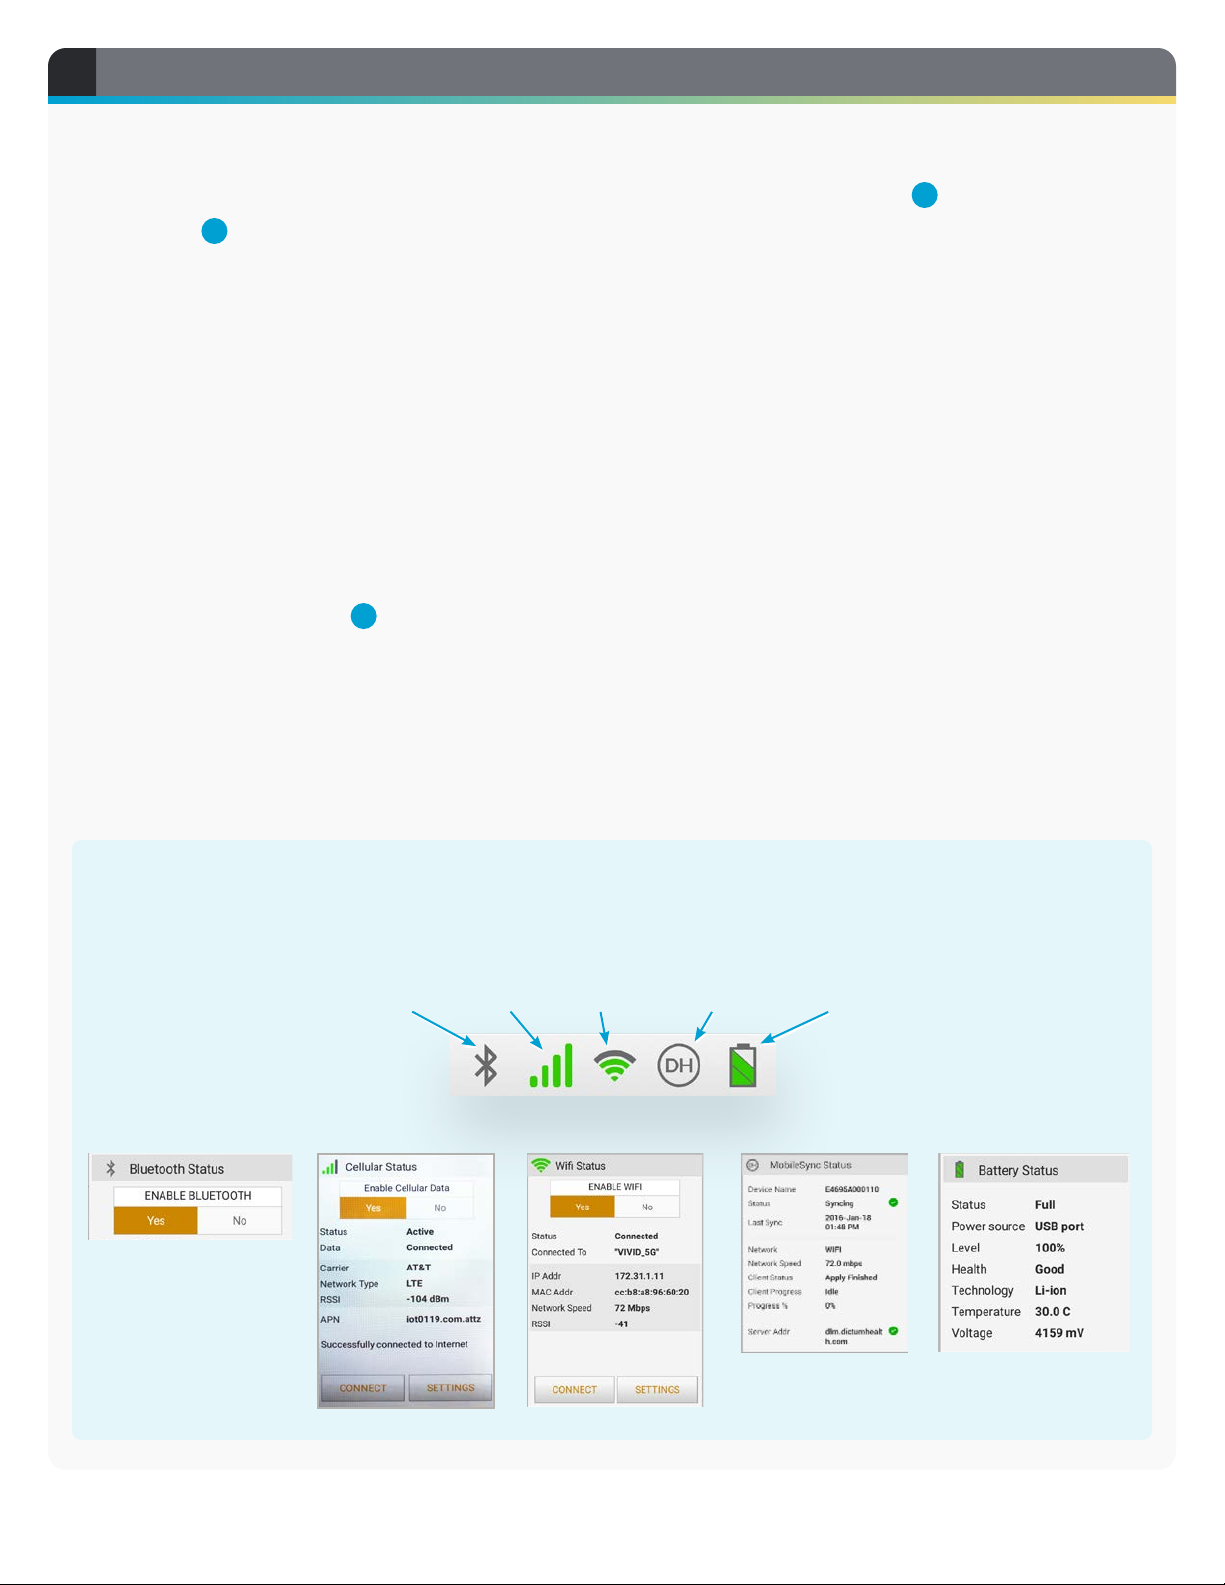
Settings Menu
At any time you can view
the status of Wi-Fi, Cellular,
Bluetooth, DictumHealth server,
and the battery by tapping the
icons in the upper-right corner of
all screens. (See page 9.)
Start Menu
www.dictumhealth.com 7
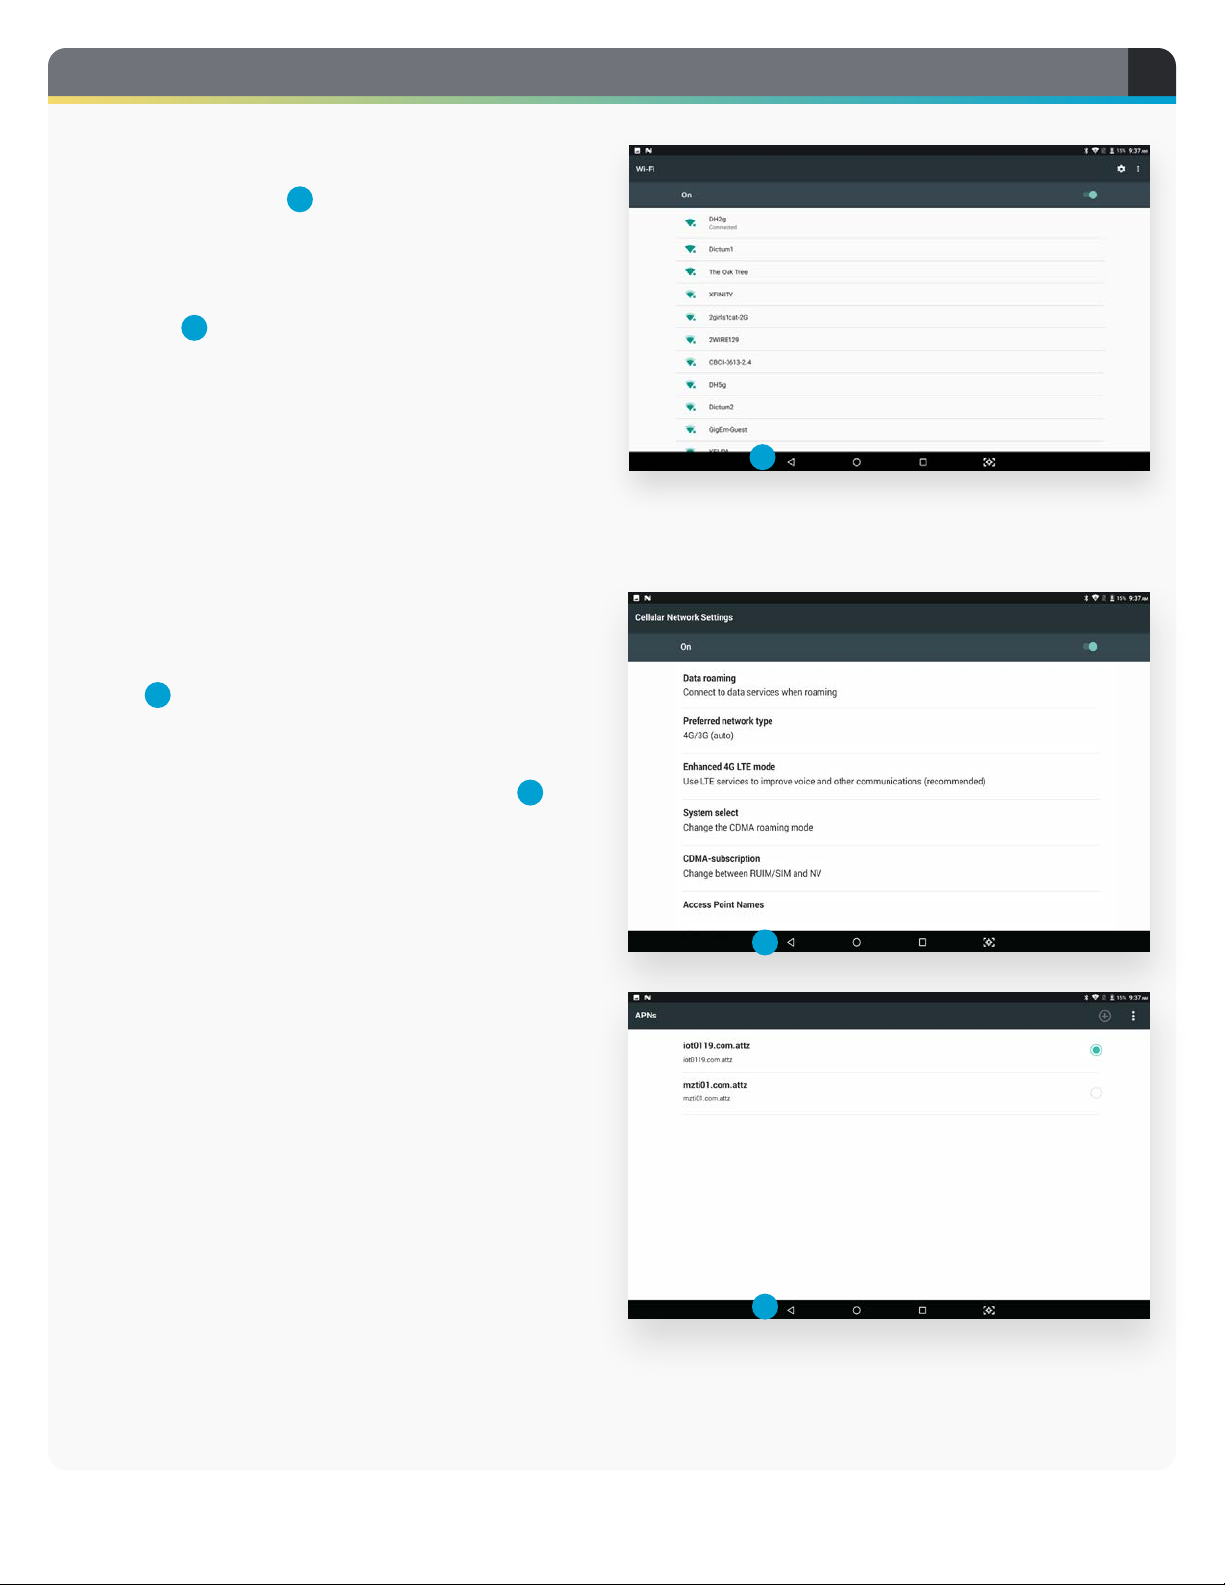
2
DEVICE SETUP, CONTINUED
8
Wi-Fi
Tap the Wi-Fi button 4. A list of available networks
appears. Tap on the name of your network and enter
your password when prompted. To return to the
previous view, tap the triangle icon at the bottom of
the screen 8.
8
8
Cellular
If your tablet is equipped with a cellular SIM card,
the Cellular option will be available. Tap the Cellular
button 5. Tap on “Access Point Names” and make
sure iot0119.com.attz is present and chosen (green
dot at the right). To return to the previous view, tap
the triangle icon at the bottom of the screen 8.
8 DICTUMH EALTH
Occasionally it may be necessary to reset the Bluetooth, Cellular, or Wi-Fi services, which
can be done through these menus by turning the service o (No) and back on again (Yes).
Bluetooth Cellular Wi-Fi Dictum server Battery
Date & Time
To set the tablet’s date and time, tap the DATE &
TIME button 6.
Ensure that “Automatic date & time” is enabled. If
disabled, tap the toggle button at the right to enable
(green).
Ensure that “Automatic time zone” is disabled. If
enabled, tap the toggle button at the right to disable
(gray).
Tap SELECT TIME ZONE. A list of zones will display.
Choose the appropriate one.
To return to the previous view, tap the triangle icon
at the bottom of the screen 8.
Screen Brightness
Tap the BRIGHTNESS slider 7to set the screen to
the desired brightness.
DEVICE SETUP, CONTINUED
2
www.dictumhealth.com 9
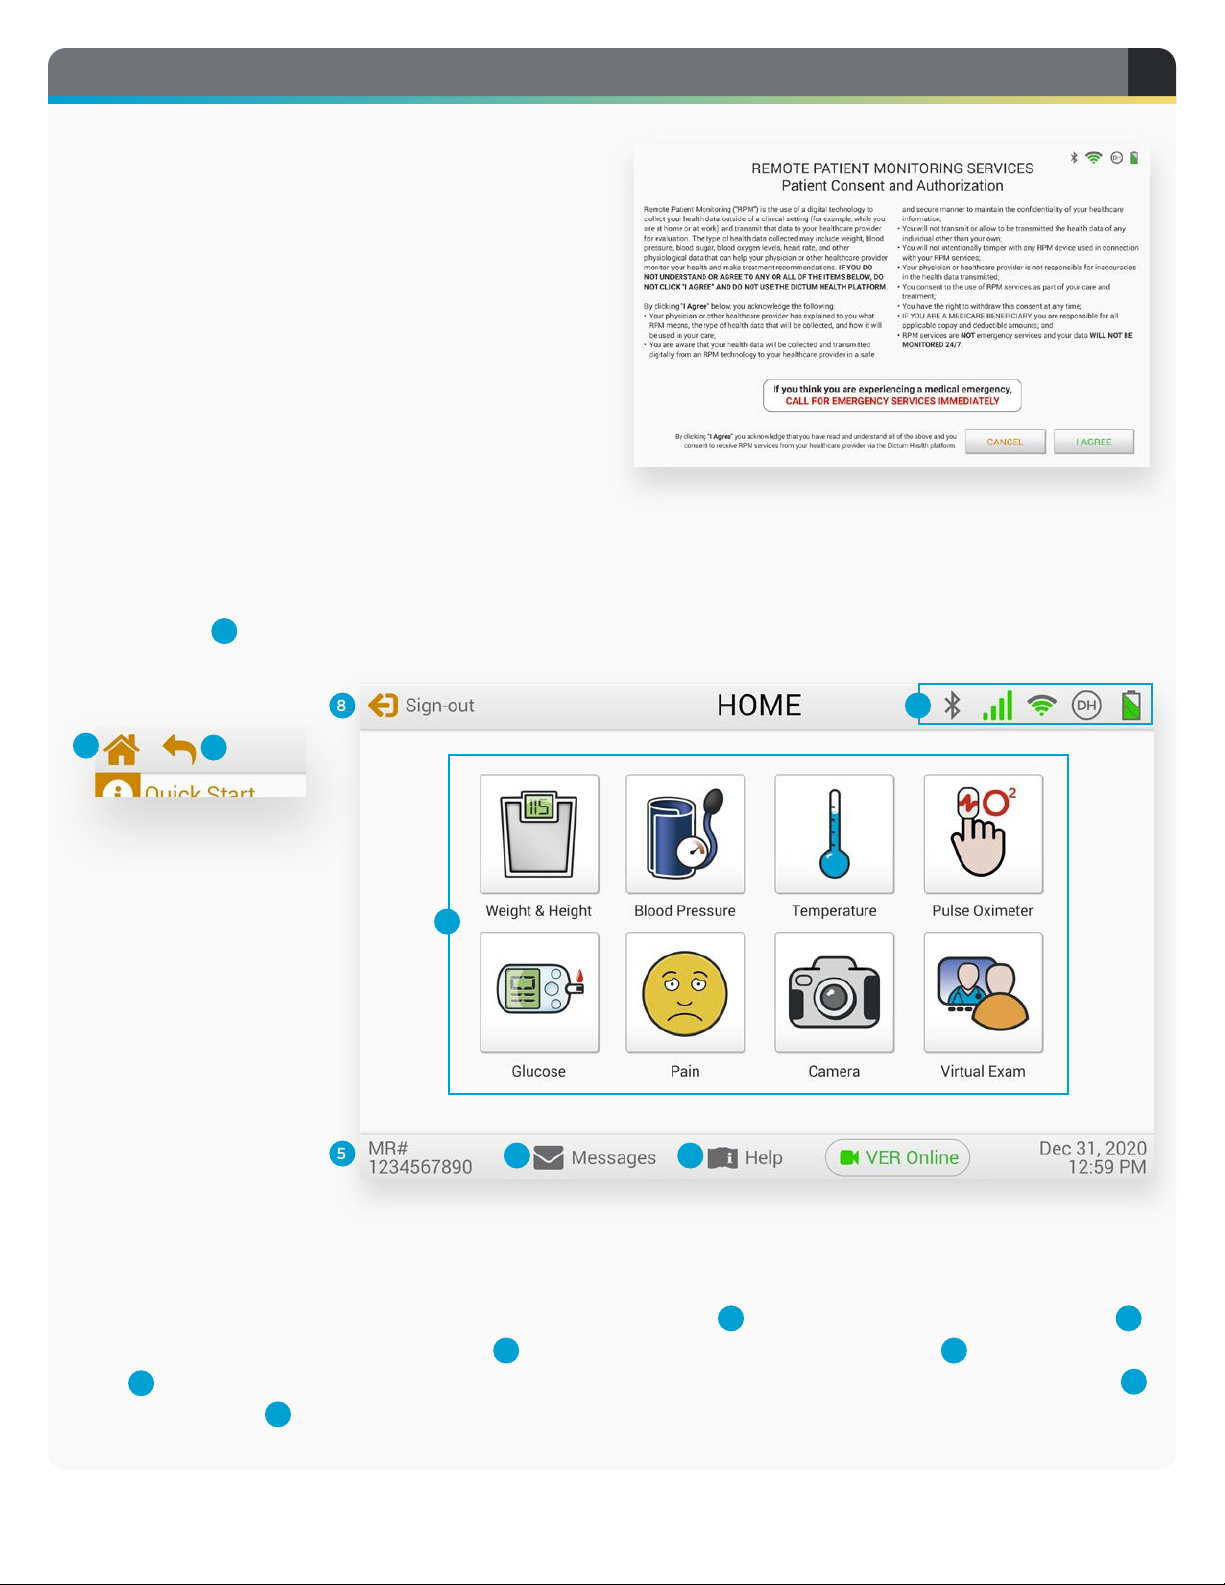
Patient Consent and Authorization
The first time you start the device you will be
asked to confirm your agreement to remote
patient monitoring. If you choose not to accept the
agreement, please contact your doctor’s oce to
arrange for the return of the equipment.
Home Page
HOME is the launching page for the tests you’ve
been assigned. You may or may not see this same
configuration 1.
Header and Footer Bars
The Header and Footer bars contain these options,
available from all screens: including Home 2, Page
Back 3, Bluetooth, Cellular, Wi-Fi, Dictum Server,
and Battery Status 4, your private Medical Record
Number 5, Messages to and from your clinician 6,
and Instructions for Use (Help) 7, except on the
HOME page where Home is changed to Sign-out 8.
5
8
76
1
23
4
3
STARTING THE DEVICE

10 DICTUMHEALTH
Test Screens
Each test has the following elements: a Quick-start
guide of basic instructions 1, a graphic of the test
device 2, the previous test results 3, a quick view of
results trend 4, a button to view historical results 5,
and a manual entry button 6.
Test data is synced to the tablet automatically when
using the Bluetooth devices, but you may occasionally
need to enter data manually 6. Tap the input field 7.
You will be presented with a number pad to enter
your data 8.
7
8
1
2
3
4
5
6
TESTS
4
www.dictumhealth.com 11
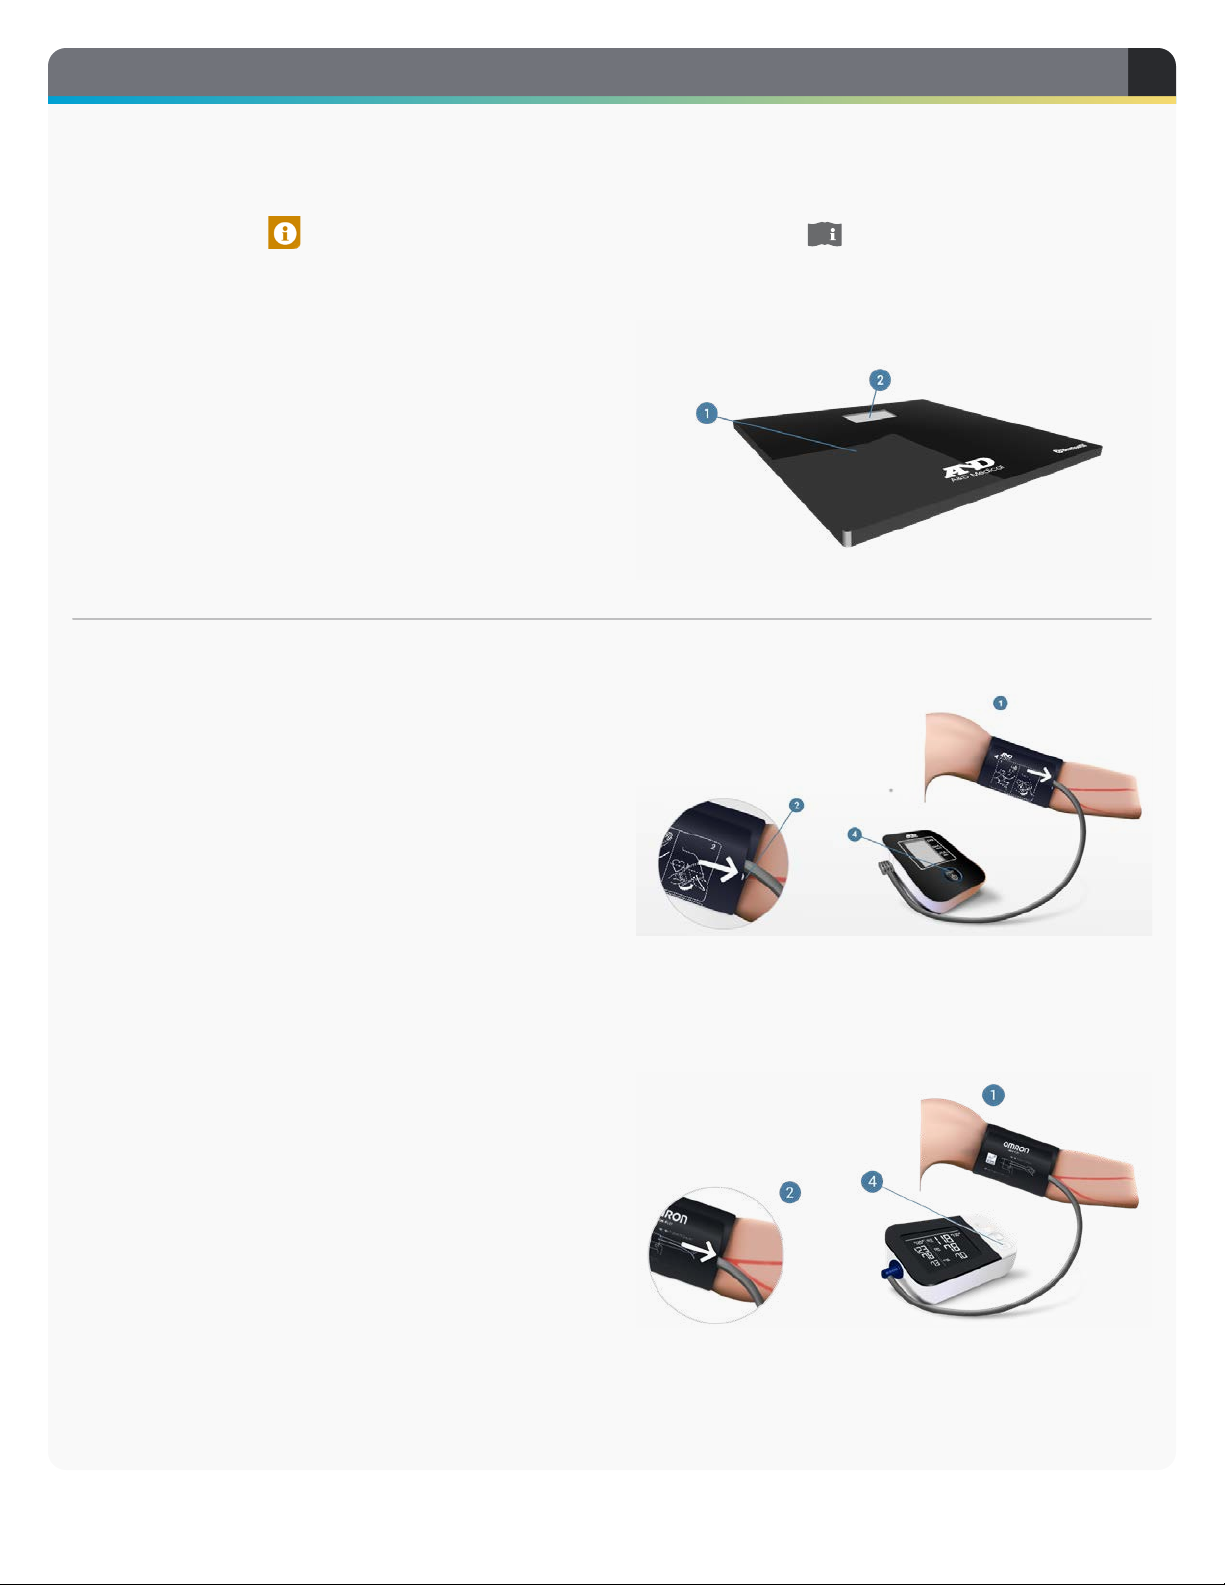
Scale
1. Step on the Scale.
2. Wait for “StEP oFF” to appear in display.
3. Step o scale.
4. Results will automatically sync to tablet.
Quick Start Instructions
Quick-start instructions for testing with the Bluetooth protocol are viewable in each test by tapping the
QUICK START icon . For further Instructions for Use, refer to the HELP section available from the
footer bar of the eVER-HOME. You may have been assigned from one or more of the tests listed here.
Blood Pressure using the
A&D Blood Pressure Monitor
1. Place the cu on your arm as shown. Left arm
preferably.
2. Confirm index points and artery mark align
properly.
3. Sit comfortably, back straight, feet on floor.
Remain still.
4. Press START on the monitor.
5. When the test is complete, the cu will deflate.
6. Results will automatically sync to tablet.
Blood Pressure using the
Omron Blood Pressure Monitor
1. Place the cu on your arm as shown. Left arm
preferably.
2. Confirm index points and artery mark align
properly.
3. Sit comfortably, back straight, feet on floor.
Remain still.
4. Press START on the monitor.
5. When the test is complete, the cu will deflate.
6. Results will automatically sync to tablet.
4
TESTS, CONTINUED
12 DICTUMHE ALTH
Thermometer
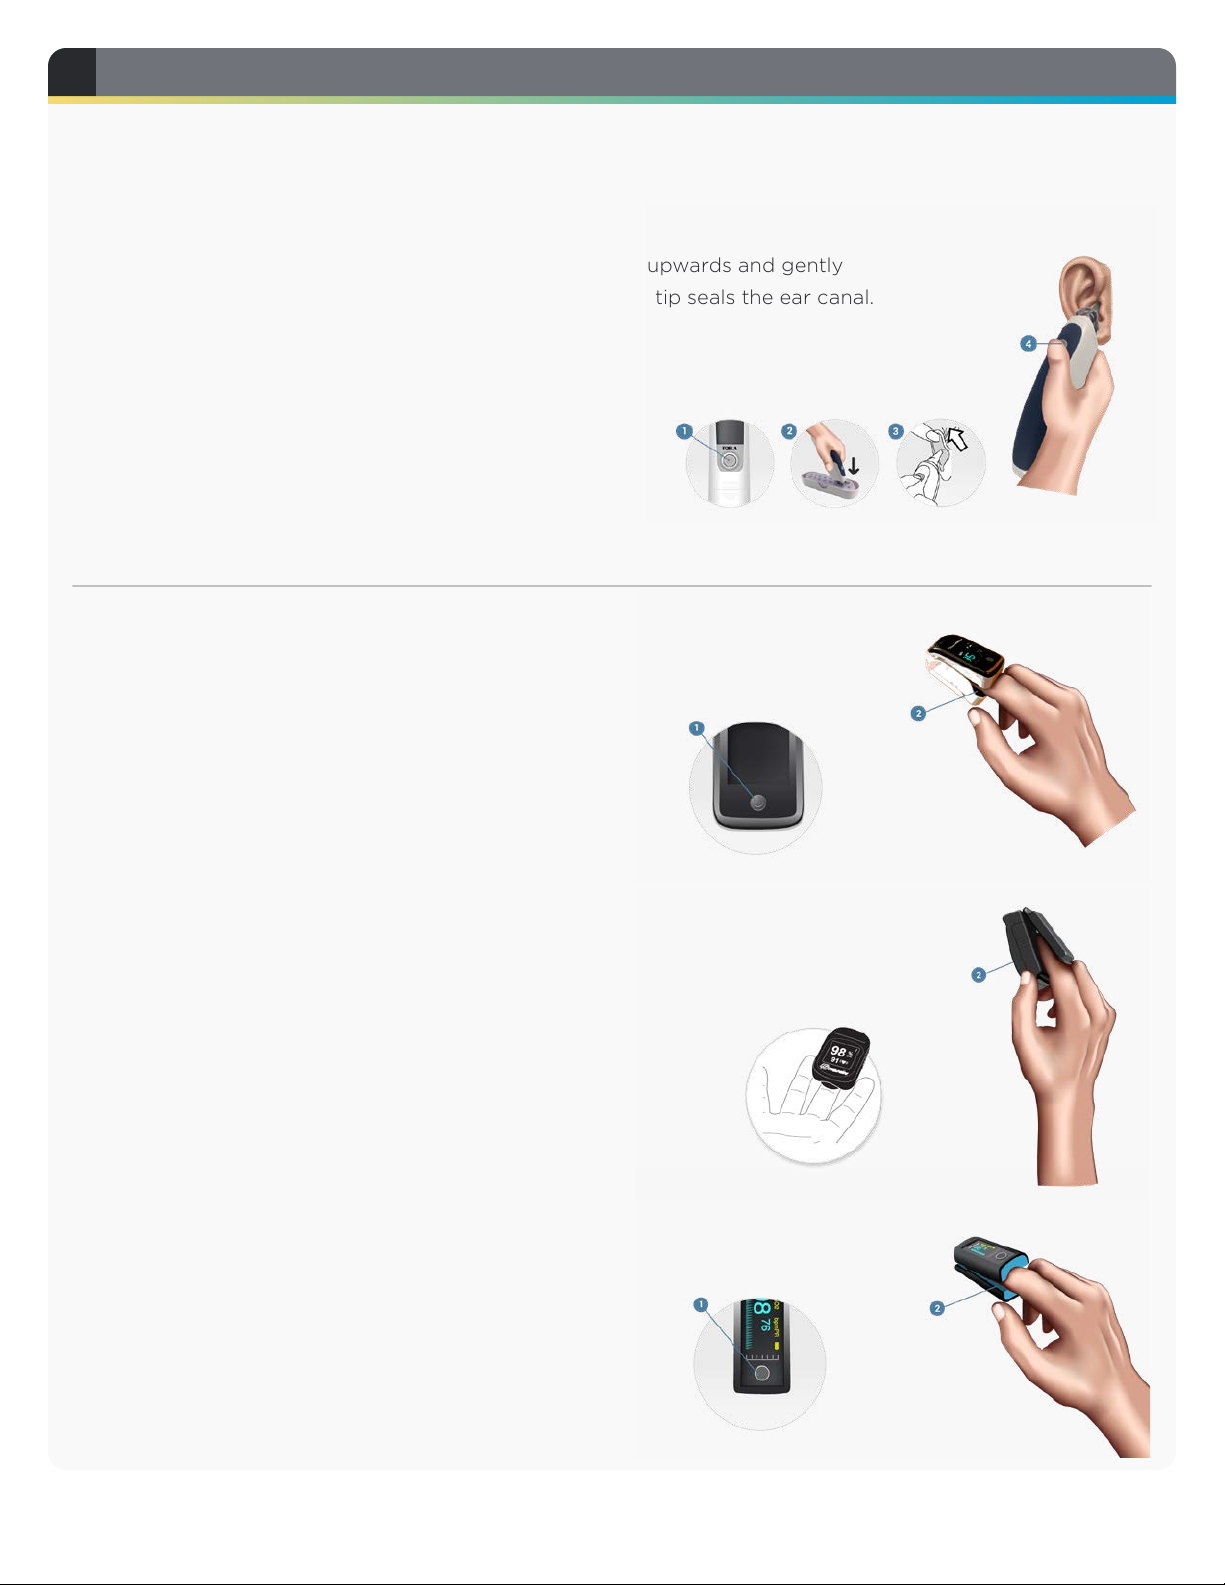
1. Press the circular ON/MEMORY button to power on.
2. Insert a probe cover.
3. Stretch the ear canal by pulling the ear backwards and upwards and gently
inserting the probe into the ear ensuring that the probe tip seals the ear canal.
4. Press the SCAN button.
5. Wait for the beep before removing the probe.
6. Results will automatically sync to the tablet.
7. Turn o the thermometer by pressing ON/MEMORY
button twice. It will automatically turn o if left idle
for 3 minutes.
8. Refer to Help below for further information.
Pulse Oximetry using the
ChoiceMMed Pulse Oximeter
1. Press the POWER button.
2. Place one of your fingers into the rubber opening.
3. The device will start measuring automatically.
4. Keep your hand and body still during measurement.
5. Results will automatically sync to tablet.
Pulse Oximetry using the
Nonin Pulse Oximeter
1. Place one of your fingers into the rubber opening.
2. The device will start measuring automatically.
3. Keep your hand and body still during measurement.
4. Results will automatically sync to tablet.
Pulse Oximetry using the
Wellue Pulse Oximeter
1. Press the POWER button.
2. Place one of your fingers into the rubber opening.
3. The device will start measuring automatically.
4. Keep your hand and body still during measurement.
5. Results will automatically sync to tablet.
4TESTS, CONTINUED

www.dictumhealth.com 13
Glucose — Accu-Chek Guide
1. Insert test strip into the meter.
2. When “Apply Drop” appears, perform fingerstick.
3. Touch the yellow edge of the strip to the blood
drop.
4. The result is displayed, and COMMENT is
highlighted. Click OK to add comment or
BACK ARROW to return to the MAIN MENU.
5. Results will automatically sync to tablet.
Glucose — Accu-Chek Instant
1. Insert test strip into the meter.
2. When flashing drop symbol appears, perform
fingerstick.
3. Touch the yellow edge of the strip to the blood
drop.
4. The result is displayed with an arrow indicating
the target range. The arrow will flash if result is
out of range.
5. Results will automatically sync to tablet.
Pain
Pain is recorded as a scale from 0–10, zero being no
pain and 10 being unbearable pain. Select a number
corresponding to your current pain level.
4
TESTS, CONTINUED

14 DICTUMHE ALTH
UNPACK THE eVER-HOME AND ACCESSORIES
1
.
The device has two built-in cameras — one front-
facing and one back-facing. Choose the camera
for your purpose 1(the cover must be removed
to use the back camera). The size of the image can
be changed 2. Previously captured images are
available in the HISTORY page 3. Tap the button to
capture an image 4. You will be prompted to save
the image with a title and description.
The Virtual Exam Room allows you to have face-to-
face teleconferences with your clinician.
Make sure you’re available for Virtual Exams by toggling
your VER Status from Oine to Online. 1
1
1
2
3
4
VIRTUAL EXAM ROOM (VER)
6
5CAMERA

www.dictumhealth.com 15
UNPACK THE eVER-HOME AND ACCESSORIES 1
1Switch front and back camera
2Capture an image
3Mute the patient’s video
4Mute the patient’s audio
5Privacy mutes audio and video for
both the patient and the clinician
6Audio only option if you are having
trouble with video quality
7Mute clinician’s audio
8Mute clinician’s video
These options give you full control over how you send and receive audio and video:
1 2 3 4
5 6
7 8
When your clinician initiates a call, a window will open
asking if you would like to accept the call. Tap YES 2
to accept the VER request.
You are now connected to your clinician.
2
6
VIRTUAL EXAM ROOM (VER), CONTINUED

General Cleaning Guidelines
Gently wipe the eVER-HOME and accessories as needed with a lint-free microfiber cloth dampened with a
small amount of distilled water. Avoid getting excess moisture onto the devices; the corner of the microfiber
cloth is sucient. You may also use a camera lens cleaning cloth.
Make sure the devices are powered-down before cleaning. Remove the eVER-HOME from the protective
cover.
DO NOT apply too much pressure. DO NOT use household cleaners as they may damage the devices.
DO NOT use compressed air, as it may damage the devices.
Disinfecting Guidelines
Gently wipe the devices using a disinfectant containing hypochlorous acid-based solution containing
50–80ppm (such as Clorox or Lysol disinfectant wipes), or an alcohol-based solution containing more than
70% ethanol or isopropyl alcohol. Do not apply these liquid solutions directly to the eVER-HOME; they
should be carefully applied with a pre-moistened wipe or by dampening the corner of a microfiber cloth with
a small amount of the disinfectant.
Disinfecting equipment
1. Mask and gloves are recommended.
2. Remove all contents from the Carrying Case.
3. Remove the tablet from the Tablet Cover.
4. Tablet: Wipe the tablet on all sides using the guidelines above. Inspect the device front, back, and ports
and buttons for any damage or foreign debris.
5. Blood Pressure Monitor: Wipe the monitor on all sides using the guidelines above. Inspect the device
front, back, and all sides, ports and buttons for any damage or foreign debris. Wipe the cu, hoses, and
connectors using the guidelines above. Inspect the hoses and connectors for any damage or foreign
debris. Inspect the cu Velcro for foreign debris. Make sure the area where the hose connects to the cu
is unbroken.
6. SpO2 Sensor: Wipe the SpO2 sensor on all sides and inside the finger opening using the guidelines above.
Be sure to reach the hinge area inside. Inspect the device front, back, and all sides, joints and crevices for
any damage or foreign debris.
7. Thermometer: If still attached, eject and dispose of the probe cover. Throw away all unused probe covers.
Wipe the thermometer on all sides and around the probe area using the guidelines above. Inspect the
device front, back, and all sides, joints and crevices for any damage or foreign debris.
8. Scale: Wipe the scale on all sides using the guidelines above, paying attention to crevices and cracks.
Inspect the device front, back, and all sides, joints and crevices for any damage or foreign debris.
9. Carrying Case: Remove dividers. Clean all surfaces with a mild cleaning solution, and wipe down
according to the guidelines above.
10.Tablet Cover: With tablet removed, clean all surfaces and around the corner clips with a mild cleaning
solution and wipe down according to the guidelines above.
www.dictumhealth.com
Last Modified: May 23, 2020 10:58 AM • 870-00051-02 Rev. C
Other manuals for eVER-HOME
1
Table of contents


