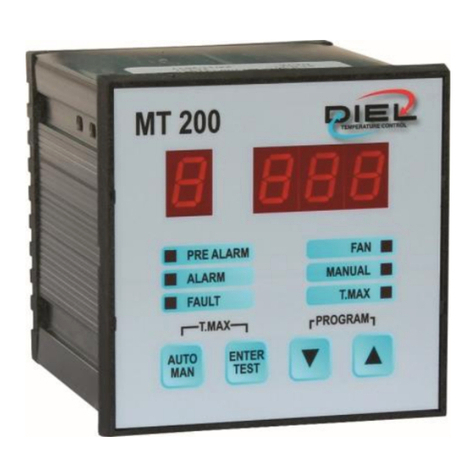
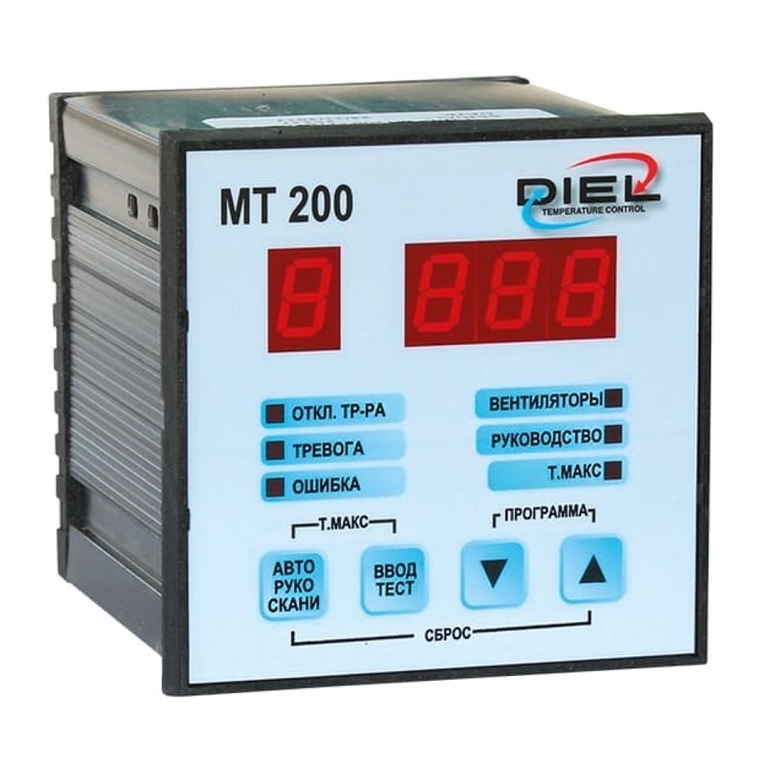
DIEL MT 200 S Quick guide

MT 200 S (MODBUS-RTU)
MT 200 C (MODBUS-RTU - 4/20 mA - 0/20 mA)
MANUALE DI INSTALLAZIONE ED USO
INSTALLATION AND INSTRUCTIONS MANUAL
MANUEL D’INSTRUCTION
BEDIENUNGSANLEITUNG
MANUAL DE USO


ITALIANO
- 3 -
CARATTERISTICHE TECNICHE
Dimensioni
•Contenitore 90X90X115 mm incluse morsettiere.
•Pannello frontale 96x96 mm.
•Peso 0.4 Kg.
Alimentazione
•Alimentazione universale (24÷240) Volt AC/DC ± 10% 50/60 Hz senza rispetto della
polarità, assorbimento 4 VA.
Ingressi
•Quattro ingressi analogici, rilevamento e controllo della temperatura con sensori
PT100 a tre fili nel range da -10 a +200 °C.
Uscite
•Quattro relè 250 VAC 5 A massimi (carico resistivo), 1 contatto pulito di scambio.
•Comunicazione seriale RS485 Half Duplex protocollo MODBUS-RTU (MT 200 S).
•Comunicazione seriale RS485 Half Duplex protocollo MODBUS-RTU -
Comunicazione analogica 0-20 o 4-20 mA (MT 200 C).
Caratteristiche
•Contenitore in NORYL auto estinguente.
•Grado di protezione pannello frontale in policarbonato: IP65 (IP66 a richiesta)
•Grado di protezione pannello posteriore lato morsettiere: IP20
•Display a segmenti luminosi
•Visualizzazione automatica del valore e del numero della sonda relativi al canale più
caldo.
•Segnalazioni di pre-allarme, allarme, guasto sonde, ventilazione, funzionamento
manuale, massimi storici.
•Accesso alla programmazione della centralina direttamente da pannello frontale.
•Possibilità di selezionare indipendentemente ogni singolo canale.
•Soglia di allarme e preallarme impostabile nel range (-9°C ÷ 199°C).
•Precisione ± 1% sul valore di fondo scala ± 1 digit.
•Gestione del ventilatore di raffreddamento su tutte le sonde.

ITALIANO
- 4 -
•Controllo del ventilatore mediante isteresi con due valori di temperatura (H e L).
•Quattro modalità di funzionamento selezionabili.
•Riconoscimento sonde in avaria, massima flessibilità di gestione e semplicità di
programmazione, controllo della validità dei dati introdotti in fase di
programmazione.
•Memorizzazione permanente dei valori programmati e dei dati raggiunti da ciascun
canale (soglie e massimi storici).
•Rigidità dielettrica tra i contatti dei relè e linea di alimentazione 2.5 KVAC per 60".
•Possibilità di utilizzare le sonde per termostatare l'ambiente.
•Risoluzione 1° C.
•Temperatura di lavoro centralina da -40 °C a +60 °C.
•Umidità ambiente ammessa massima 90% non condensante.
•Collegamenti elettrici su morsettiere estraibili polarizzate.
•Possibilità di commutare manualmente i relè mediante il menù di test relè per
simulare o controllare l’affidabilità del contatto.
•Uscita galvanicamente isolata 4-20 mA oppure 0-20mA (MT 200 C).
•Impedenza massima ammessa per uscita in corrente 500 Ohm (MT 200 C)
Scala 4-20 mA (-10°C 4 mA/+200°C 20 mA)
Formula di trasformazione: Iout = (T+10) /210*16 + 4 (corrente in mA temperatura
in °C)
Scala 0-20 mA (-10°C 0 mA/+200°C 20 mA).
Formula di trasformazione: Iout = (T+10) /210*20 (corrente in mA temperatura in
°C).
•Manuale tecnico in cinque lingue (altre lingue a richiesta).
•Costruzione in accordo alle normative .
•Filtro d' ingresso contro i disturbi a normativa .
•Tropicalizzazione (opzionale).
MONTAGGIO
Eseguire nel pannello un foro da 91X91 mm, fissare la centralina con i ganci in
dotazione.
ALIMENTAZIONE

ITALIANO
- 5 -
La centralina può essere alimentata con (24÷240) Volt AC/DC ±10% 50-60 Hz senza
rispetto di polarità.
I morsetti di alimentazione sono indicati con la sigla AL1-AL2 e sono inoltre riportati in
tabella TAB 1 alla fine del manuale.
COLLEGAMENTI ELETTRICI
Eseguire i collegamenti sulle morsettiere estraibili seguendo lo schema riportato in
tabella TAB 1 alla fine del manuale.
Il relè di FAULT risulta normalmente eccitato durante il funzionamento della centralina
(FAULT STATUS A, TAB 1), in caso di guasto alle sonde o di mancanza di
alimentazione il relè si diseccita (FAULT STATUS B, TAB 1).
Il relè di FAN è preposto alla gestione dei ventilatori di raffreddamento del
trasformatore oppure per il condizionamento del locale dove è situato il trasformatore.
I relè ALARM e PRE AL vengono eccitati al superamento di un grado delle rispettive
soglie impostate.
Ogni sonda PT100 standard è dotata di tre fili, uno bianco e due rossi. Collegare il filo
bianco nei morsetti contrassegnati dal simbolo del sensore nella serigrafia, morsetti
(1,4,7,10).
I dodici morsetti di ingresso relativi alle quattro sonde sono così predisposti:
Sonda N. 1 morsetti 1-2-3, sonda N. 2 morsetti 4-5-6.
Sonda N. 3 morsetti 7-8-9, sonda N. 4 morsetti 10,11,12.
Porta seriale RS485 half duplex:
•GND: morsetto 25
•Trasmissione/Ricezione negativo: morsetto 26
•Trasmissione/Ricezione positivo: morsetto 27
Porta analogica 4/20 mA - 0/20 mA (MT 200 C):
•Positivo: morsetto 28
•Negativo: morsetto 29
•Impedenza massima ammessa 500 Ohm (MT 200 C).
Range di temperature (MT 200 C):
•Scala 4/20mA (-10°C 4mA - 200°C 20mA)
•Formula di trasformazione: Iout = (T+10)/210*16 + 4 (corr. in mA temperature in °C)
•Scala 0/20mA (-10°C 0mA - 200°C 20mA)

ITALIANO
- 6 -
•Formula di trasformazione: Iout = (T+10)/210*20 (corrente in mA temperature in °C).
Tutti i cavi di trasporto dei segnali di misura dovrebbero preferibilmente essere:
•separati da quelli di potenza,
•schermati meglio se anche twistati,
•di sezione non inferiore a 0.5 mm².
PROGRAMMAZIONE DELLA CENTRALINA
Premendo a lungo e contemporaneamente i tasti UP e DOWN si entra nel menu di
programmazione.
Sul display compare la lettera "F" che permette di configurare la
centralina nel seguente modo:
•0: tre sonde senza controllo ventilatori.
•1: quattro sonde con controllo dei ventilatori.
•2: quattro sonde senza controllo dei ventilatori.
•3: tre sonde con controllo dei ventilatori.
•4: accesso al menu di programmazione avanzato.
Configurazione di fabbrica: P=140, A=160, L=90, H=100, F=0.
Modificarla con i tasti UP/DOWN e confermare con <ENTER>.
In caso di configurazione F=4 passare direttamente al menu
PROGRAMMAZIONE MENU AVANZATO, diversamente proseguire come segue.
Sul display appare la lettera "P" (preallarme) e la temperatura impostata nella
programmazione precedente.
Con i tasti UP/DOWN si stabilisce la temperatura di preallarme.
Dopo aver impostato la temperatura di preallarme desiderata confermare con
<ENTER>.
Compare di seguito la lettera "A" (Allarme) e la temperatura impostata
precedentemente. Nel caso in cui la nuova temperatura di preallarme
sia superiore a quella di allarme, automaticamente sarà proposta quella di preallarme
più un grado centigrado.
Modificarla con i tasti UP/DOWN e confermare con <ENTER>.
In caso di configurazione F=0 oppure F=2, la programmazione è terminata, in caso di
configurazione F=1 oppure F=3 proseguire come segue.

ITALIANO
- 7 -
Compare la lettera "L" per la scelta della temperatura minima al di sotto della quale il
ventilatore si spegne, modificarla con i tasti UP/DOWN e confermare con <ENTER>.
Compare quindi la lettera "H" per la scelta della temperatura massima al di sopra della
quale il ventilatore si accende, modificarla con i tasti UP/ DOWN e confermare con
<ENTER>.
Appena usciti dalla procedura di programmazione la centralina esegue
automaticamente il test su tutti i settori luminosi (TEST LAMP).
La centralina si predispone in modo automatico visualizzando la massima temperatura
misurata ed il canale relativo.
Per motivi di sicurezza viene in ogni caso controllato il tempo necessario per la
programmazione. Oltre un minuto dall'inizio della fase di programmazione, la stessa
viene interrotta e non salvata, (restano attivi pertanto i parametri precedentemente
impostati) dopo di che si ritorna in modalità di visualizzazione automatica.
La modalità di visualizzazione può essere commutata da manuale ad automatica
premendo l'apposito tasto AUTO/MANUAL.
Nel funzionamento automatico sul display appare la temperatura più elevata
riscontrata ed il corrispondente numero di canale.
In questa modalità è possibile la lettura di tutti i parametri della centralina.
Mediante i tasti UP/DOWN si visualizza in ordine: i valori correnti delle
quattro sonde, la configurazione della centralina (parametro F), la soglia di
preallarme "P", la soglia di allarme lettera "A", le soglie di ventilazione "L" e "H" se
gestite. Dopo circa due secondi dall'ultima visualizzazione, la centralina ritorna nello
stato normale di funzionamento.
Nel funzionamento manuale, a differenza di quello automatico si può visualizzare per
un tempo indeterminato uno qualsiasi dei 4 canali od un qualsiasi parametro di
programmazione. Durante il funzionamento manuale é comunque garantito il
monitoraggio degli altri canali e l'eventuale segnalazione di preallarme, allarme o
guasto che si siano verificati.
Per uscire dal menù di test relè premere il tasto AUTO/MANUAL
Per motivi di sicurezza, trascorso un minuto di inattività da parte dell’operatore la
centralina torna in modalità di visualizzazione automatica. Per la visualizzazione dei
massimi valori raggiunti dalla macchina occorre premere contemporaneamente i tasti
AUTO/MANUAL e ENTER/TEST LAMP.

ITALIANO
- 8 -
La modalità di visualizzazione delle temperature massime é segnalata dall'accensione
del led T.MAX posto sul pannello frontale.
Si tenga presente che i valori massimi vengono azzerati ogni qualvolta si entra in fase
di programmazione.
Nel modo di funzionamento con ventilatore (F=1, F=3) lo stato del relè é segnalato dal
led FAN posto sul pannello frontale.
PROGRAMMAZIONE MENU AVANZATO
Impostando il parametro F=4 è possibile programmare soglie indipendenti
P, A, L, H per ogni canale.
Appare la scritta CH(n) con n (1-4), tramite i tasti UP e DOWN è necessario decidere
se rendere il canale attivo oppure no, in caso affermativo, viene chiesto di introdurre le
soglie P e A.
Appare di seguito la scritta FAn, tramite i tasti UP e DOWN è necessario decidere se
si desidera controllare la ventilazione su quel canale oppure no, se affermativo, viene
inoltre chiesto di introdurre le soglie L e H di ventilazione, in caso di esclusione verrà
proposta la configurazione del canale successivo.
La procedura si ripete per tutti i canali disponibili.
Proseguendo viene richiesto il parametro S (da 1 a 4), tramite i tasti UP e DOWN si
sceglie la velocità di comunicazione del protocollo MODBUS-RTU: S=1 9600 bps, S=2
19200 bps (default), S=3 31250 bps, S=4 38400 bps.
Appare di seguito la scritta A, tramite i tasti UP e DOWN si sceglie l’indirizzo del nodo
MODBUS-RTU (1-255).
Gli altri parametri non modificabili di comunicazione sono: parità=N, bit di dati=8, bit di
stop=1 (N,8,1).
(MT 200 C)
Successivamente appare la lettera “d” per la scelta dell’uscita del canale 4/20 mA -
0/20 mA e può assumere i seguenti valori:
•d=1 uscita fissa temperatura canale 1
•d=2 uscita fissa temperatura canale 2
•d=3 uscita fissa temperatura canale 3
•d=4 uscita fissa temperatura canale 4
•d=5 uscita canale più caldo (fra quelli attivi) default della centralina

ITALIANO
- 9 -
•d=6 uscita in modalità scansione tra i canali attivi
Successivamente appare la lettera “S” per definire il tipo di standard da
adottare
•S1 modalità 4/20 mA (default della centralina)
•S2 modalità 0/20 mA
Di seguito la lettera “t” che definisce il tempo di scansione in secondi
valido solo nella modalità d=6
•Valori impostabili nel range (1-3600 secondi)
•Default della centralina t=60 s
TEST DEI RELE’
Premendo il tasto ENTER/TEST viene effettuato il test del display, tenendolo premuto
a lungo si entra nel menù di test relè. Utilizzando i tasti UP e DOWN si possono far
commutare i relè. Per passare ai successivi relè premere ENTER/TEST, per uscire dal
menù premere AUTO/MANUAL.
DIAGNOSTICA SONDE TERMOMETRICHE
Gli stati di anomalia delle sonde sono segnalati nel seguente modo:
• Sonda interrotta: commutazione del relè di FAULT, display lampeggiante,
visualizzazione delle lettere "ICF" con relativo numero di canale e accensione diodo
led.
• Sonda in corto circuito: commutazione del relè di FAULT, display lampeggiante,
visualizzazione delle lettere "SCF" con relativo numero di canale e accensione del
diodo led.
In caso di guasto di una qualsiasi delle sonde attive l'uscita 4/20mA o 0/20mA viene
portata a zero qualsiasi sia la configurazione scelta.
MODALITA' DEGLI INTERVENTI
Quando una delle sonde termometriche supera di 1 grado centigrado il valore
prefissato dai limiti, dopo circa 1 secondo avviene la commutazione del relè e del
diodo led corrispondente.

ITALIANO
- 10 -
Appena i valori di temperatura scendono di un grado centigrado sotto i valori impostati
i relè ed i led ricommutano.
NORME DI GARANZIA
La centralina è coperta da garanzia per un periodo di 3 anni dalla data di collaudo
posta sia sull’etichetta che sul manuale allegato. La garanzia è ritenuta valida quando
è stato accertato che le cause del guasto sono imputabili a difetti di fabbricazione o ad
errata taratura delle sonde.
Non si risponde invece per guasti dovuti ad errato cablaggio delle sonde o errata
tensione di alimentazione (es. 400 Volt AC).
Non si risponde in ogni caso per danni provocati dal mal funzionamento della
centralina stessa.
Le riparazioni in garanzia, salvo diverso accordo tra le parti sono effettuate presso la
nostra sede di MONTECCHIO MAGGIORE (VI).
ATTENZIONE
Non effettuare prove di rigidità dielettrica o di scariche parziali sulle macchine
elettriche con la centralina inserita, evitare se possibile di collegare direttamente la
centralina al secondario del trasformatore da proteggere, può accadere che, senza
protezione, alla chiusura dell'interruttore a valle del trasformatore, si presentino
sovratensioni che possono danneggiare l'apparecchiatura. Questo è tanto più evidente
se la tensione di alimentazione della centralina, è di 230 V AC e se esistono
condensatori di rifasamento.
CERTIFICATO DI COLLAUDO
La procedura di collaudo viene effettuata nel seguente modo:
•Funzionamento dei pulsanti.
•Prova dei contatti dei relè.
•Controllo meccanico generale.
•Calibrazione e linearizzazione a +30 ºC e +150 °C.
•Funzionamento per 48 h a tensione di alimentazione variabile.
•Prova di isolamento tra alimentazione e contatti relè: 2.5 KVAC per 60".
•Prova lettura/scrittura via MODBUS-RTU.
•Prova funzionamento uscita 4/20 mA - 0/20mA. (MT 200 C).

ENGLISH
- 11 -
TECHNICAL FEATURES
Dimensions
•Box 90x90X115 mm included terminal blocks.
•Front panel 96X96 mm.
•Weight 0,4 Kg.
Power Supply
•Power supply (24÷240) Volt AC/DC ± 10% 50/60 Hz without polarity respect,
absorption 4 VA.
Inputs
•Four analogical inputs, temperature control and mapping with PT100 sensor at
three wires inside range from -10 °C to +200 °C.
Outputs
•Four relays 250V AC, 5A max (resistive load), free switch contact.
•RS485 Half Duplex protocol MODBUS-RTU (MT 200 S).
•RS485 Half Duplex protocol MODBUS-RTU - 4/20 mA - 0/20 mA galvanically
isolated (MT 200 C).
Characteristics
•Self-extinguishable NORYL Box.
•Protection degree front panel in polycarbonate: IP65 (IP66 on request)
•Protection degree of rear panel on terminal board side: IP20
•Display with light segments.
•Visualisation of max temperature and the relevant channel in the automatic mode.
•Alerts of pre-alarm, alarm, probes fault, fanning, manual function, historic highs.
•System programming directly by frontal panel.
•Possibility to select independently each channel.
•Limit of alarm and pre-alarm settable in the range (-9°C ÷ 199°C).
•Precision ± 1% on full scale ± 1 digit.
•Cooling fan control on three or four channels.
•Comparison of temperature for cooling fan between two different levels (L and H).
•Four selectable operating modes.

ENGLISH
- 12 -
•Detection of fault probes, maximum flexibility of managing and semplicity of
programming, checking of validity of the insert data during programming phase.
•Continuos storage of planned and reached values by each channel (limits and
historic highs).
•Dielectric isolation: 2.5 Kv for 60”.
•Software configuration to control the environment temperature.
•Resolution 1° C.
•Working temperature of device from -40°C to 60°C.
•Max allowed dampness in the room 90% not condensing.
•Electrical connections with fast polarised connectors.
•Possibility of manual relays switch through menu test relays to simulate and check
the reliability of contact.
•Galvanically insulated output 4-20mA or 0-20mA (MT200 C)
•Maximum impedance allowed for current output 500 Ohm (MT200 C)
Range 4-20mA (-10°C 4mA / +200°C 20mA)
Transformation formula: lout = (T+10)/210*16 + 4 (current in mA, temperature in °C)
Range 0-20mA (-10°C 0mA / +200°C 20mA)
Transformation formula: lout = (T+10)/210*20 (current in mA, temperature in °C).
•Technical manual in five languages (and more on request).
•Construction in accordance with rules .
•Input filter for power supply in accordance with rules .
•Tropicalization (optional).
ASSEMBLY
Perform a square hole measuring 91x91 mm in the panel board sheet.
Fasten the monitoring system trough the special hooks.
POWER SUPPLY
The device can be supplied with (24÷240) Volt AC/DC ± 10% 50/60 Hz without
respect of polarity.

ENGLISH
- 13 -
ELECTRICAL CONNECTIONS
Perform the connections on the terminal board following the scheme on TAB1 at the
end of this manual.
FAULT relay usually results excited during normal working of device (FAULT STATUS
A, TAB 1), in case of failure of probes or feeding absence, the relay switch off (FAULT
STATUS B, TAB 1).
FAN relay is dedicated to the management of the fans of cooling of the transformer or
for the conditioning of the environment where the transformer is installed.
The ALARM and PRE AL relays switch on when the temperature is higher than one
degree of set level.
Each probe type PT100 is gifted with three wires, one of them is white and the other
two are red.
Connect the white wire to the terminal board which is marked as shown as sensor,
connectors (1-4-7-10)
The twelve terminal boards relevant to the four probes are divided as follows:
Probe N. 1 connectors 1-2-3, probe N. 2 - connectors 4-5-6
Probe N. 3 connectors 7-8-9, probe N. 4 - connectors 10-11-12
Serial communication interface RS485 half duplex:
•GND: connector 25.
•Transmission/Receive negative: connector 26.
•Transmission/Receive positive: connector 27.
Analogic port 4/20 mA - 0/20 mA (MT 200 C):
•Positive: connector 28
•Negative: connector 29.
•Maximum permissible impedance 500 Ohm.
Temperature range (MT 200 C):
•Scale 4/20 mA (-10°C 4 mA - 200°C 20 mA)
•Transformation formula: Iout = (T+10)/210*16 + 4 (current in mA, temperature in °C)
•Scale 0/20 mA (-10°C 0 mA - 200°C 20 mA).
•Transformation formula: Iout = (T+10)/210*20 (current in mA, temperature in °C).
All measured signals cables must preferably be:
•Separated from the power cables
•Screened better even if twisted
•With a section of not less than 0.5 mm2

ENGLISH
- 14 -
PROGRAMMING
Push and hold the buttons "UP" and "DOWN for programming menù.
On the display appears finally the letter "F" which allows to fasten the state of the
monitor system:
•0: three probes without control of the cooling fans.
•1: four probes with control of the cooling fans.
•2: four probes without control of the cooling fans.
•3: three probes with control of the cooling fans.
•4: advanced programming menu.
Default configurations: P=140,A=160,L=90,H=100,F=0.
Modify it pressing buttons UP/DOWN and confirm by <ENTER>.
In case of choice F=4 jump to menu: ADVANCED MENU PROGRAMMING, in other
case continue here.
On the display appears the letter "P" (Pre-alarm) and the set temperature from the last
programming.
The pre-alarm temperature is set through UP/DOWN buttons.
After setting the pre-alarm temperature push <ENTER>.
The letter "A" (Alarm) appears together with the set temperature of the last
programming. If the new pre-alarm temperature is higher than old alarm, the device
propose a new pre-alarm temperature more 1 degree.
Modify it pressing buttons UP/DOWN and confirm by <ENTER>.
In case of choice F=0 or F=2 the programming procedure is finished, in case of
configuration F=1 or F=3, continue as follows.
Now on the display appears the letter "L". for the choice of the lowest temperature
under which the fan switches off.
Modify it pressing buttons UP/DOWN and confirm by <ENTER>.
The letter "H" appears to choose the maximum temperature over which the fan
switches on.
Modify it pressing buttons UP/DOWN and confirm by <ENTER>.
Soon out of programming procedure the device executes a LAMP/TEST.
System is prearranged in automatic way and visualises so the maximum measured
temperature and the relative channel.

ENGLISH
- 15 -
Anyway the necessary time for programming is checked. Over 1 minute from
beginning of the programming phase, the same is interrupted and is not saved so the
previous set limits remain active.
The visualisation mode can be modified from manual to automatic system pressing the
special button AUTO/MANUAL.
During automatic working the higher temperature and the relative number of channels
appear on the display.
In this mode is possible to read all the parameters of the device.
Pushing buttons UP/DOWN is possible to show in order:
Current value of active channels, configuration (parameter F), letter "P" (prealarm),
letter "A" (alarm), fan threshold "L" and "H" if active.
After approx. two seconds from the last showing, the device comes back to the normal
working condition.
In manual mode, unlike the automatic working, it's possible to visualise for an
indeterminate period of time one of the 4 channels or any other programming
parameter.
The monitoring of the other channels and the eventual state of pre-alarm, alarm or
failure which have been created are also guaranteed during manual working.
For security reasons, after a minute of inactivity by the operator, the control unit
returns to automatic display mode.
For the visualisation of the maximum values of the machine push the buttons
"AUTO/MANUAL" and "ENTER/TEST LAMP" at the same time. The visualisation of
the maximum temperatures is signalised through the led T.MAX which is placed on the
front-end panel.
Please note that the maximum values are reset every time you enter in the
programming phase.
The state of fan relay when the system is in mode 1 or 3 is signalised by the led FAN
which is placed on the front end panel.
ADVANCED PROGRAMMING MENU
Setting the parameter F = 4 is possible programming independent thresholds P, A, L,
H for each channel.

ENGLISH
- 16 -
Appears in the word CH(n) with n. (1-4), using UP and DOWN you need to decide
whether to make the channel active or not, and if so, are asked to introduce the
thresholds P and A.
Appears below the written FAn, using the UP and DOWN you need to decide if you
want to control the ventilation on that channel or not, if so, is also asked to introduce
the thresholds L and H of ventilation, in the case of exclusion will be proposed the
configuration of the next channel.
The steps will repeat for all available channels.
Parameter S (1 to 4) will be requested. Use UP and DOWN to select the
communication speed of the Modbus RTU protocol: S=1, 9600 bps; S=2, 19200 bps
(default); S=3, 31250 bps; S=4, 38400 bps. The letter A then appears.
Use UP and DOWN to select the address of MODBUS-RTU (1-255) node.
Other communication parameters not editables are: parity=N, bits data=8, bit stop=1
(N 8,1 )
(MT 200 C)
Then the letter "d" appears for the choice of channel output 4/20 mA –0/20 mA and
can assume the following values:
•d=1 fixed output temperature channel 1
•d=2 fixed output temperature channel 2
•d=3 fixed output temperature channel 3
•d=4 fixed output temperature channel 4
•d=5 hottest channel output (including active ones) the default of the control unit
•d=6 Output in scan mode between active channels
Then the letter "s" appears to define the type of standard to be adopted
•S1 mode 4/20 mA (default of monitor unit)
•S2 mode 0/20 mA
Below is the letter "t" which defines the scan time in seconds valid only in d = 6 mode
•Values selectable in the range (1-3600 seconds)
•default of the control unit t=60 s
TEST RELAYS
Pushing ENTER/TEST,the device performs a display test, pushing and holding the
same buttons, the device enter in test relays mode.

ENGLISH
- 17 -
With the buttons UP and DOWN it is possible to switch a relays state. To test the other
relays, push ENTER/TEST button, to exit push AUTO/MANUAL button.
THERMOMETRICAL PROBES DIAGNOSTIC
The errors on probes during normal working are indicated as follows:
•Deconnected probes: switching off FAULT Relay, flashing light display, the "ICF"
word appear on display with the number of the channel and the fault led light on.
•Short circuit probes: switching FAULT Relay, flashing light display, the "SCF" word
appear on display with the number of the channel and the fault led light on.
In case of fault of the active probes, the output 4/20mA or 0/20mA is switched off at
zero whatever the chosen configuration.
MODALITY OF THE INTERVENTIONS
When one of the thermometric probes detects a temperature over 1 degree centigrade
to the prefixed value, after approx. 1" the relevant relay and led switch.
As soon as the surveyed temperature descents under 1 degree centigrade the relay
and the led changes again.
WARRANTY RULES
The device has a warranty period time of 3 years from test date marked on the label
and at the end of this manual.
The warranty is valid only whether damages are due to manufacturing defects or to a
wrong calibration of probes.
We aren't liable for damages due to a wrong wiring of probes or to a wrong power
supply voltage (for example 400 Volt AC).
At any rate we aren't liable for damages due to the bad working of the equipment.
The reparations in guarantee, except different accord among the parts, will be
effected in our factory in MONTECCHIO MAGGIORE (VI).

ENGLISH
- 18 -
ATTENTION
Don't effect dielectrical test or partial discharge on the electric machine with the device
inserted, avoid if possible to connect the device directly to the secondary of the
transformer to protect, otherwise the transient overvoltage can damage the device.
This is always clearer if the power supply voltage of the device is 230 VAC and in case
of condensers for the remaking.

FRANÇAIS
- 19 -
CARACTERISTIQUES TECHNIQUES
Dimensions
•Boîtier 90x90x115 mm compris bornes.
•Panneau avant 96x96 mm.
•Poids 0.4 Kg.
Alimentation
•Alimentation universelle (24 ÷ 240) Volt AC/DC, ±10%, 50/60 Hz sans respect de
polaritè, absorption 4 VA.
Accès
•Quatre accès analogiques, relevé et contrôle de la température par capteurs PT100
à trois fils dans l'intervalle de -10°C à +200°C.
Sorties
•Quatre relais 250 VAC 5 A maximum (charge résistif) 1 contact troque propre.
•RS485 Half Duplex protocole MODBUS-RTU (MT 200 S).
•RS485 Half Duplex protocole MODBUS-RTU - 4/20 mA - 0/20 mA avec isolation
galvanique (MT 200 C).
Caractéristiques
•Boîtier en NORYL autoéteignant.
•Degré de protection face avant en polycarbonate: IP65 (IP66 sur demande)
•Degré de protection du panneau arrière du côté du bornier: IP20
•Afficheur avec segment lumineux.
•Affichage automatique de la valeur et du numéro de la sonde relative au canal le
plus chaud.
•Signalements de pre-alerte, alerte, défaut sondes, ventilation, mode manuel,
records historiques.
•Accès à la programmation du distributeur directement sur le panneau frontal.
•Possibilité de sélectionner indépendamment chaque canal.
•Niveau de alert et pre-alert reglable dans l'intervalle (-9°C ÷ 199°C).
•Précision ± 1% a pleine échelle ± 1 digit.
•Gestion du ventilateur de refroidissement sur toutes les sondes.

FRANÇAIS
- 20 -
•Contrôle du ventilateur au moyen d'hystérésis à deux valeurs de température (H et
L).
•Quatre modalités de fonctionnement sélectionnables.
•Identification de sondes en défaillance, grande flexibilité de gestion et simplicité de
programmation, contrôle de la validité des données introduites en phase de
programmation.
•Essai de rigidité diélectrique 2.5 KVAC pour 60”.
•Possibilité d'utiliser les sondes pour thermostater l'environnement.
•Résolution 1° C.
•Température de travail distributeur de -40°C à +60° C.
•Humidité ambiante maximum admise 90% sans condensation.
•Connexions électriques sur boites à borne extractibles polarisées.
•Possibilité de commuter manuellement les relais par le menu de test relais pour
reproduire ou vérifier la fiabilité du contact.
•Sortie galvaniquement isolée 4-20 mA ou 0-20 mA (MT 200 C).
•Impédance maximale admissible par sortie de courant 500 Ohm (MT 200 C)
Échelle 4/20mA (-10°C 4mA - 200°C 20mA)
Formule de transformation: Iout = (T+10)/210*16 + 4 (cour. en mA températ. en °C)
Échelle 0/20mA (-10°C 0mA - 200°C 20mA)
Formule de transformation: Iout = (T+10)/210*20 (cour. en mA températ. en °C).
•Manuel technique en cinq langues (autre traductions sur requête).
•Construction selon les réglementations .
•Filtre d'entrée contre les nuisances réglementé .
•Tropicalisation (optional).
MONTAGE
Faire un orifice de 91x91 mm. dans le panneau et fixer le distributeur avec les
crochets de série
ALIMENTATION
L’afficheur peut être alimentè avec (24 ÷ 240) Volt AC/ DC ±10% 50/60 Hz sans
respect de la polarité.
This manual suits for next models
1
Table of contents
Languages:
Other DIEL Control Unit manuals
Popular Control Unit manuals by other brands

Miranda
Miranda NV5100MC Master Control Reference manual

Hydro Instruments
Hydro Instruments PRV-71H Series Operation and maintenance manual

END ARMATUREN
END ARMATUREN TA Series Mounting and operating manual

Flowserve
Flowserve NAF 8886 Series Maintenance and installation instructions

Emerson
Emerson Fisher 8532 instruction manual

Inel
Inel CRS-435XG Operation and installation manual, Safety notes