DigiDesign 96 I/O User manual

Digidesign
2001 Junipero Serra Boulevard
Daly City, CA 94014-3886 USA
tel: 650·731·6300
fax: 650·731·6399
Technical Support (USA)
650·731·6100
650·856·4275
Product Information (USA)
650·731·6102
800·333·2137
International Offices
Visit the Digidesign Web site
for contact information
Web Site
www.digidesign.com
96 I/O
Guide

Copyright
This guide is copyrighted ©2002 by Digidesign, a division of
Avid Technology, Inc. (hereafter “Digidesign”), with all rights
reserved. Under copyright laws, this guide may not be
duplicated in whole or in part without the written consent of
Digidesign.
DIGIDESIGN, AVID and PRO TOOLS are trademarks or
registered trademarks of Digidesign and/or Avid Technology,
Inc. All other trademarks are the property of their respective
owners.
All features and specifications subject to change without
notice.
PN 910609282-00 REV B 09/03
Communications & Safety Regulation Information
Compliance Statement
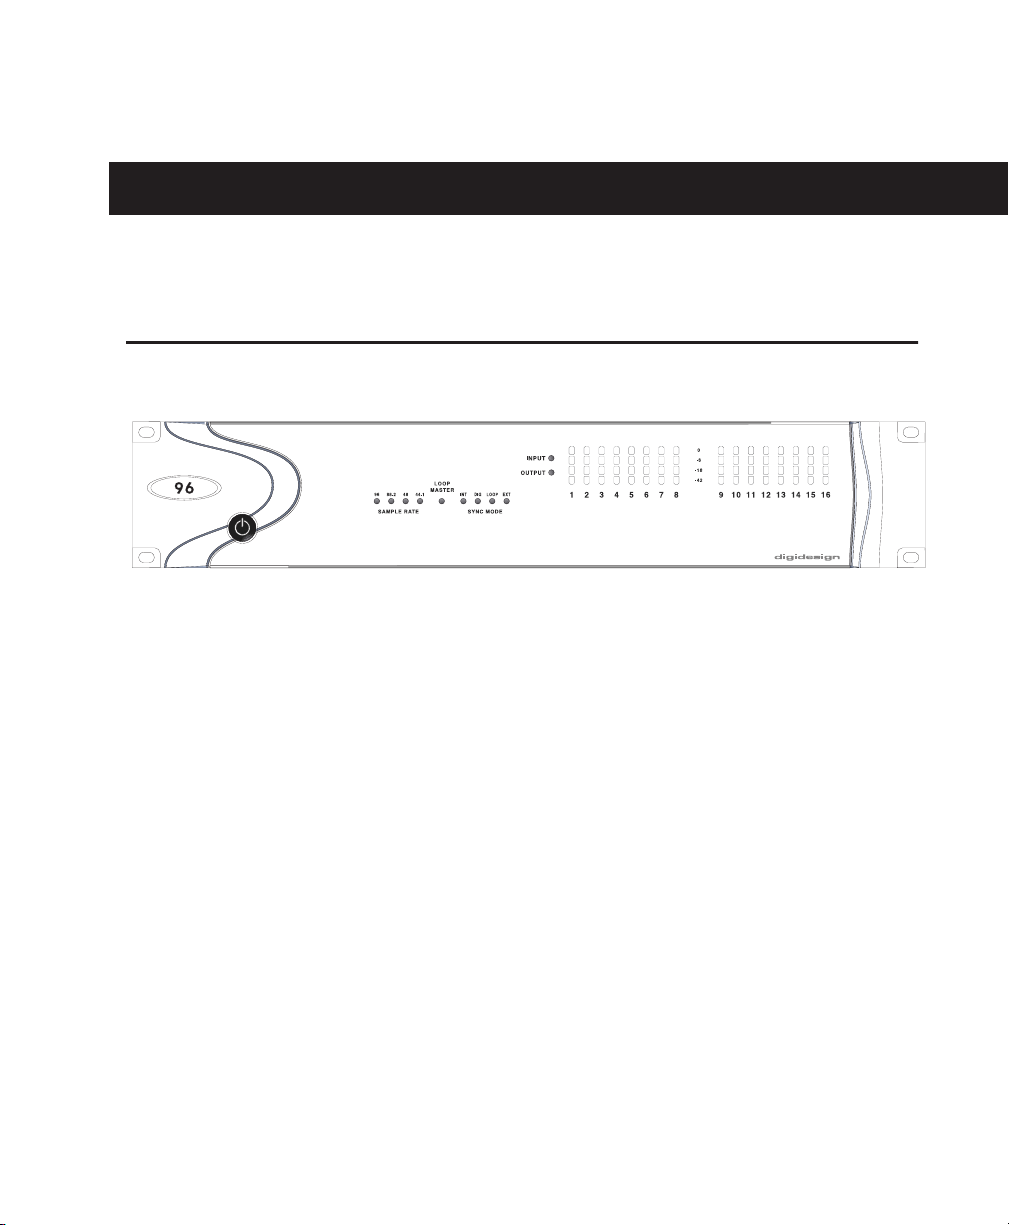
The model 96 I/O complies with the following standards
regulating interference and EMC:
• FCC Part 15 Class A
• EN55103 – 1, environment E4
• EN55103 – 2, environment E4
• AS/NZS 3548 Class A
Radio and Television Interference
This equipment has been tested and found to comply with the
limits for a Class A digital device, pursuant to Part 15 of the
FCC Rules.
Communications Statement
This equipment has been tested to comply with the limits for a
Class A digital device. Changes or modifications to this product
not authorized by Digidesign, Inc., could void the Certification
and negate your authority to operate the product. This product
was tested for CISPR compliance under conditions that
included the use of peripheral devices and shielded cables and
connectors between system components. Digidesign
recommends the use of shielded cables and connectors
between system components to reduce the possibility of
causing interference to radios, television sets, and other
electronic devices.
Safety Statement
This equipment has been tested to comply with USA and
Canadian safety certification in accordance with the
specifications of UL Standards; UL1419 and Canadian CSA
standard; CSA C22.2 No.1-M90. Digidesign Inc., has been
authorized to apply the appropriate UL & CUL mark on its
compliant equipment.
Important Safety Instructions
When using electric or electronic equipment, basic precautions
should always be followed, including the following:
• Read all instructions before using this equipment.
•To avoid the risk of shock, keep this equipment away from
rain water, and other moisture. Do not use this equipment
if it is wet.
• The equipment should only be connected to the correct
rating power supply as indicated on the product.
• Do not attempt to service the equipment. There are no
user-serviceable parts inside. Please refer all servicing to
authorized Digidesign personnel.
•Any attempt to service the equipment will expose you to a
risk of electric shock, and will void the manufacturer’s
warranty.
•The product should be connected only to the correct power
supply as indicated on the product.
Warning!
• HD audio interfaces need room at their sides to maintain
proper air flow and cooling.
•Do not install these units into a rack or other enclosure that
doesn't leave room on either side for the unit fans.
• Do not block the sides of the units (where fans are), or
disconnect the fan.
•If the units are racked up in a case, remove all lids, doors,
or covers before operating the units.
• Failure to do so can result in the units overheating very
quickly, which can permanently damage them.

Contents
iii
contents
Chapter 1. Introduction to the 96 I/O
. . . . . . . . . . . . . . . . . . . . . . . . . . . . . . . . . . . . . . . . . 1
What’s Included
. . . . . . . . . . . . . . . . . . . . . . . . . . . . . . . . . . . . . . . . . . . . . . . . . . . . . . . . . 1
System Requirements
. . . . . . . . . . . . . . . . . . . . . . . . . . . . . . . . . . . . . . . . . . . . . . . . . . . . . 1
About This Guide
. . . . . . . . . . . . . . . . . . . . . . . . . . . . . . . . . . . . . . . . . . . . . . . . . . . . . . . . . 2
About www.digidesign.com
. . . . . . . . . . . . . . . . . . . . . . . . . . . . . . . . . . . . . . . . . . . . . . . . . 2
Chapter 2. 96 I/O Hardware Overview
. . . . . . . . . . . . . . . . . . . . . . . . . . . . . . . . . . . . . . . . . 3
96 I/O Front Panel
. . . . . . . . . . . . . . . . . . . . . . . . . . . . . . . . . . . . . . . . . . . . . . . . . . . . . . . 3
96 I/O Back Panel
. . . . . . . . . . . . . . . . . . . . . . . . . . . . . . . . . . . . . . . . . . . . . . . . . . . . . . . 5
Chapter 3. Installation Overview
. . . . . . . . . . . . . . . . . . . . . . . . . . . . . . . . . . . . . . . . . . . . . . 9
Installing the 96 I/O
. . . . . . . . . . . . . . . . . . . . . . . . . . . . . . . . . . . . . . . . . . . . . . . . . . . . . . 9
Checking Installation
. . . . . . . . . . . . . . . . . . . . . . . . . . . . . . . . . . . . . . . . . . . . . . . . . . . . . 10
Powering Up Your System
. . . . . . . . . . . . . . . . . . . . . . . . . . . . . . . . . . . . . . . . . . . . . . . . . 11
Making Signal Connections to the 96 I/O
. . . . . . . . . . . . . . . . . . . . . . . . . . . . . . . . . . . . . . 11
Example Studio Setup with a Mixing Console
. . . . . . . . . . . . . . . . . . . . . . . . . . . . . . . . . . . . 12
Example Studio Setup without a Mixing Console
. . . . . . . . . . . . . . . . . . . . . . . . . . . . . . . . . 13
Setting Operating Levels
. . . . . . . . . . . . . . . . . . . . . . . . . . . . . . . . . . . . . . . . . . . . . . . . . . 14
Appendix A. Card Removal and Replacement
. . . . . . . . . . . . . . . . . . . . . . . . . . . . . . . . . . 17
Removing an I/O Card
. . . . . . . . . . . . . . . . . . . . . . . . . . . . . . . . . . . . . . . . . . . . . . . . . . . . 17
Hardware Setup Changes
. . . . . . . . . . . . . . . . . . . . . . . . . . . . . . . . . . . . . . . . . . . . . . . . . . 19
Replacing an I/O Card
. . . . . . . . . . . . . . . . . . . . . . . . . . . . . . . . . . . . . . . . . . . . . . . . . . . . 19
Index
. . . . . . . . . . . . . . . . . . . . . . . . . . . . . . . . . . . . . . . . . . . . . . . . . . . . . . . . . . . . . . . . . . . . . 23

96 I/O Guide
iv

Chapter 1: Introduction to the 96 I/O
1
chapter 1
Introduction to the 96 I/O
The Digidesign 96 I/O is a 16-channel digital au-
dio interface, featuring 24-bit analog-to-digital
(A/D) and digital-to-analog (D/A) converters.
The 96 I/O supports sampling rates of up to
96 kHz for superior dynamic range and low
noise floor.
96 I/O Features
• 16 discrete channels of input and output,
with 4-segment LED meters on each channel.
Input and Output channels can include:
• Eight channels of 24-bit D/A and A/D con-
verters for superior analog input and out-
put at sampling rates of 44.1 kHz, 48 kHz,
88.2 kHz, and 96 kHz.
•S/PDIF, AES/EBU, and Optical (ADAT) digi-
tal inputs and outputs.
•Word Clock input and output for synchroniz-
ing 96 I/O with external Word Clock or 256x
(Slave Clock) devices.
• Simultaneous use of up to six 96 I/O units is
supported, for a maximum of 96 channels of
I/O at 48 kHz.
•Legacy port for Digidesign MIX-series audio
interfaces.
•Interface with digital mixing consoles and
other peripherals equipped with ADAT Light-
pipe connections (using the ADAT Optical
standard at up to 24-bit resolution).
What’s Included
•96 I/O with power cable
• This guide
• DigiLink cable (18 inches [0.46m])
• BNC cable (1.5 feet [0.46m])
System Requirements
The Digidesign 96 I/O requires:
•APro Tools|HD-series system on a Digide-
sign-qualified Macintosh or Windows com-
puter.
• Pro Tools software, version 5.3 or higher.
•Amonitoring system (mixer, amplifier,
speakers, or headphones).
Digidesign can only assure compatibility and
provide support for hardware and software it
has tested and approved. For a list of Digidesign-
qualified computers, operating systems, and
third-party devices, refer to the latest compati-
bility information on the Digidesign Web site
(www.digidesign.com/compato).

96 I/O Guide
2
About This Guide
This guide provides a basic overview of the
96 I/O’s features and functionality.
Complete instructions for connecting and con-
figuring your Pro Tools|HD-series system are lo-
cated in the
Getting Started with HD Guide
.
Conventions Used in This Guide
Digidesign guides use the following conven-
tions to indicate menu choices and key com-
mands:
The following symbols are used to highlight im-
portant information:
About www.digidesign.com
The Digidesign Web site (www.digidesign.com)
is your best source for information to help you
get the most out of your Pro Tools system. The
following are just a few of the services and fea-
tures available.
Support
Contact Digidesign Technical Support
or Customer Service; download software up-
dates and the latest online manuals; browse the
Compatibility documents for system require-
ments; search the online Answerbase; join the
worldwide Pro Tools community on the Digide-
sign User Conference.
Training and Education
Become a certified
Pro Tools Operator or Expert; study on your
own using courses available online, or find out
how you can learn in a classroom setting at a
certified Pro Tools Training Center.
Products and Developers
LearnaboutDigidesign
products; download demo software; learn about
our Development Partners and their plug-ins,
applications, and hardware.
News and Events
Get the latest news from
Digidesign; sign up for a Pro Tools demo.
To learn more about these and other resources
available from Digidesign, visit our Web site
(www.digidesign.com).
Convention Action
File > Save
Session
Choose Save Session from the
File menu
Control+N While pressing the Control key,
press the N key
Control-click While pressing the Control key,
click the mouse button
Right-click
(Windows)
Click with the right mouse button
User Tips are helpful hints for getting the
most from your system.
Important Notices include information that
could affect your data or the performance of
your system.
Shortcuts show you useful keyboard or
mouse shortcuts.
Cross References point to related sections in
other Digidesign guides.

Chapter 2: 96 I/O Hardware Overview
3
chapter 2
96 I/O Hardware Overview
96 I/O Front Panel
The 96 I/O has the following front panel
features:
Power Switch and LED Ring
This button turns the 96 I/O on and off.
The LED ring around the power button lights
green when the unit has powered up success-
fully and is connected to an active
Pro Tools|HD-series system. If the LED ring is or-
ange, the unit has power, but the computer it is
connected to is shut down.
Sample Rate LEDs
These LEDs display the current sample rate of
the 96 I/O internal crystal oscillator, which can
be 44.1 kHz, 48 kHz, 88.2 kHz, and 96 kHz. The
sample rate can be set when you create a new
session, or in the Hardware Setup or Playback
Engine dialogs if no session is open.
96 I/O Front Panel

96 I/O Guide
4
Loop Master LED
The LOOP MASTER LED indicates which
Pro Tools|HD-seriesaudio interfaceis themaster
Pro Tools peripheral. Loop Master defaults to
the first HD I/O connected to the HD Core card.
Loop Master will always be lit with a single in-
terface, regardless of the synchronization mode.
Only one HD I/O can be Loop Master at a time.
When you change the clock source to an exter-
nal clock on a particular HD I/O, that I/O will
automatically become the Loop Master and all
other HD I/Os in the chain will be switched to
Loop Slave mode. The Loop Master LED will be
continuously lit on the current Loop Master pe-
ripheral only, and unlit on all other peripherals.
Sync Mode LEDs
The SYNC MODE LEDs indicate different clock
source modes. Synchronization mode LEDs re-
flect the Clock Source choice in Pro Tools.
The SYNC MODE LEDs indicate the current
clock source.
INT (Internal)
This is the 96 I/O standard clock
setting. In this mode, the 96 I/O sample clock is
generated by its internal crystal oscillator, as de-
termined by the session Sample Rate.
DIG (Digital)
This setting indicates that an exter-
nal AES/EBU, Optical (ADAT), or S/PDIF device
is providing system clock.
LOOP (Loop Master)
This LOOP LED indicates
that the 96 I/O is slaving to another HD I/O
through Loop Sync.
EXT (External)
This setting indicates that 96 I/O
is using the EXT CLOCK IN port for system syn-
chronization. External Clock input and output
do not have to be at the Word clock rate.
For more information, see the
Getting Started
Guide
that came with your system.
Input and Output LEDs and Meters
16 sets of four-segment LEDs indicate signal
level for each of the 96 I/O’s 16 channels.
These meters are calibrated at –42 dB, –18 dB,
–6 dB, and 0 dB, respectively.
Two additional LEDs, located to the left of the
meters, indicate whether the meters display in-
put or output levels; the meters indicate output
levels by default, and can be switched from
within the Hardware Setup dialog in Pro Tools.
Note that 0 dB is not to be confused with
clipping; please use the on-screen meters in
Pro Tools to determine whether a signal is
clipping. See the Getting Started with HD
Guide.

Chapter 2: 96 I/O Hardware Overview
5
96 I/O Back Panel
The 96 I/O has the following back panel con-
nectors:
Analog Audio Inputs
The 96 I/O has eight balanced, 1/4-inch TRS
jacks for analog audio input connections. These
inputs feature 24-bit A/D converters.
The TRS inputs are wired as follows:
■
Tip = positive
■
Ring = negative
■
Sleeve = ground
These connectors also support unbalanced con-
nections.
Input operating levels are switchable between
+4 dBu and –10 dBV operation. Unbalanced
connections are supported with the use of stan-
dard 1/4-inch mono phone plugs.
Analog Audio Outputs
The 96 I/O has eight balanced/unbalanced, 1/4-
inch TRS jacks for analog audio output connec-
tions. These outputs feature 24-bit D/A convert-
ers.
All eight output channels are continuously ac-
tive. Output operating levels are switchable be-
tween +4 dBu and –10 dBV operation from
within the Hardware Setup window in
Pro Tools. Unbalanced connections are sup-
ported with the use of standard 1/4-inch mono
phone plugs.
AES/EBU Digital In and Out
These are balanced, three-conductor XLR con-
nectors that accept and output a stereo, 24-bit
AES/EBU digital data stream. These two ports
support up to 96 kHz sample rates.
S/PDIF Digital In and Out
Theseareunbalanced,two-conductor RCA jacks
that accept and output a stereo S/PDIF digital
data stream. S/PDIF supports up to 24-bit audio,
at sample rates up to 96 kHz. To avoid RF inter-
ference during S/PDIF transfers, use 75-ohm co-
axial cable.
96 I/O Back Panel

96 I/O Guide
6
Loop Sync In and Out
Loop Sync is a dedicated clock loop for synchro-
nizing multiple Pro Tools|HD-series interfaces
together. Loop Sync uses a word clock signal
based on sampling rates of either 44.1 kHz or
48 kHz. As sample rates increase in the system,
Loop Sync continues to operate at a base rate of
44.1 kHz or 48 kHz, depending upon the higher
rate.
The Loop Sync In and Out ports are standard
BNC connectors that output a 1x Loop Sync
clock signal. Loop Sync should only be used to
chain multiple Pro Tools|HD-series peripherals
together.
Optical (ADAT) In and Out
The Optical ports accept up to eight channels of
Optical (ADAT) input and output, or two chan-
nels (stereo) optical S/PDIF input and output.
Optical (ADAT) mode supports sample rates up
to 48 kHz. In TOS-Link mode, the 96 I/O sup-
ports two-channel Optical input and output at
sample rates up to 96 kHz.
About Lightpipe-Compatible Devices
Lightpipeis anindustry standard,eight-channel
optical digital audio connection created by Ale-
sis. Lightpipe is found on many devices, includ-
ing Optical (ADAT) decks, modular digital
multitracks (MDMs), sound cards, A/D or D/A
converters, and digital consoles.
EXT. CLOCK In and Out
The External Clock I/O ports are standard BNC
connectors that receive and output a word clock
signal. These ports can be used to synchronize
the 96 I/O to any device that requires (or pro-
vides) word clock.
TheExternalClockInport is configured by your
choice for Clock Source in the Hardware Setup
dialog. The External Clock Out is configured us-
ing the External Clock Out selector in the Hard-
ware Setup dialog.
AC Power
This connector accepts a standard AC power ca-
ble. The 96 I/O is auto power-selecting (100V to
240V) and will automatically work with a stan-
dard modular cable to connect to AC power re-
ceptacles in any country.
Primary Port
The Primary port is where the DigiLink cable
connects from your HD Core or Process card to
the96 I/O.The Primary DigiLinkportsendsand
receives all 32 I/O channels to and from the HD
Core or Process card. As the 96 I/O is a 16-chan-
nel only device, channels 17–32 are passed
through to the Expansion port or the Legacy
port.
Because crucial timing data is passed
through the Loop Sync and Word Clock ports,
you should use high-quality, 75-ohm RG-59
cables for making connections.

Chapter 2: 96 I/O Hardware Overview
7
Expansion Port and Legacy Port
Expansion Port
The Expansion port is where the DigiLink cable
connects an additional HD I/O to your base, or
primary, HD I/O. This port passes channels
17–32 to the secondary, or expansion, I/O.
Legacy Port
This port is used to connect MIX-series Digide-
sign audio interfaces to 96 I/O. You can connect
twoeight-channelinterfaces (suchas the 888|24
or 882|20) or a single sixteen-channel interface
(1622 I/O, 24-bit ADAT Bridge I/O, or the origi-
nal ADAT Bridge I/O) for expanded input and
output options, using their original cables.
When the Legacy port has been activated from
within Pro Tools, your MIX-series I/O will ap-
pear as channels 17–32 in the Pro Tools mixer.
To connect HD or Legacy audio interfaces, refer
to the
Getting Started with HD Guide
.
Legacy and Expansion Peripheral Port
Limitations
BecauseboththeLegacyportandthe Expansion
port use channels 17–32, you can only use one
at a time.
To select the Legacy or Expansion ports, refer to
the
Pro Tools Reference Guide
.
TheLegacyportisnot availableinanysessionin
which the sample rate is set for higher than
48 kHz.
Accessory Port
This port is not supported at this time.

96 I/O Guide
8

Chapter 3: Installation Overview
9
chapter 3
Installation Overview
This chapter provides basic instructions for in-
stalling a 96 I/O, and configuring its operating
levels.
Installing the 96 I/O
All installations require the following AC Power
and DigiLink connections. Expanded systems
also require Loop Sync connections.
Before You Begin
Power Connection
To connect AC power to the 96 I/O:
■
Using the AC power cable included with the
96 I/O, connect the 96 I/O to a standard AC
power receptacle. The 96 I/O is auto power-se-
lecting (100V to 240V), and will work automat-
ically when plugged into an AC power
receptacle in any country.
DigiLink Cable Connections
DigiLink cable connections differ depending on
whetherthe96I/Oisthe only audio interface in
the system, or if it is being added as an expan-
sion I/O to an existing Pr Tools|HD system.
The DigiLink cable provided with the 96 I/O is
18 inches long. You can purchase optional Digi-
Link cables of differing lengths (12 inches, or
25-, 50-, or 100-feet), depending on the needs of
your studio configuration.
To connect the 96 I/O as the only interface in a
new Pro Tools system:
1
Connect one end of the included DigiLink ca-
ble to the Primary port on the 96 I/O.
2
Connect the other end of the DigiLink cable
to the DigiLink port on the HD Core card.
See the Getting Started with HD Guide for
complete system installation and configura-
tion instructions.
If you are adding the 96 I/O to an existing
system, see the Expanded Systems Guide.
Turn off your computer, hardware interfaces,
monitoring system, hard drives, and periph-
erals. Making connections while power is on
can damage your system.
See the Getting Started with HD Guide for
complete system installation instructions.

96 I/O Guide
10
To connect the 96 I/O to an existing Pro Tools|HD-
series system:
1
Connect one end of a DigkLink cable to the
Primary port of the 96 I/O.
2
Connect the other end of the DigiLink cable
to one of the following:
• An available DigiLink port on an HD Pro-
cess card.
– or –
• An available Expansion port on the exist-
ing HD I/O.
Loop Sync Connections with BNC Cable
To connect Loop Sync between two interfaces:
1
Connect the BNC cable from the Loop Sync
Out of the original HD I/O to the Loop Sync in
of the new 96 I/O.
2
Connect the Loop Sync Out from the new
96 I/O to the Loop Sync In of the original
HD I/O.
To connect the 96 I/O into a Loop Sync chain:
■
Connect the new 96 I/O Loop Sync In and
Out ports to properly place the new interface in
the Loop Sync chain. See the
Getting Started with
HD
Guide
for more information.
Checking Installation
This section explains how to quickly check that
your installation was successful.
To check installation using DigiTest:
1 Start up your computer (see “Powering Up
Your System” on page 11).
2 Launch DigiTest.
3 Ensure that any and all HD cards and HD I/Os
are identified properly. If not, see the Getting
Started with HD Guide.
4 When finished, quit DigiTest and restart.
To check or reconfigure I/O:
1 Launch Pro Tools and choose Setup > Hard-
ware Setup.
2 Use the Identify button to verify that your
newly-added 96 I/O has been properly identi-
fied. Select each HD I/O in the Peripherals list,
and click on the Identify radio box in the lower
left corner of the Hardware Setup dialog to illu-
minate all of the LEDs on the front panel. This
will clearly demonstrate which HD I/O you
have selected in the Peripherals list.
3 If you encounter any difficulties, delete the
DigiSetup file (located in the System Folder/Pref-
erences),powerdown the computercompletely,
and turn off all interfaces. Then turn the power
back on all interfaces and boot the computer.
See “Powering Up Your System” on page 11 for
more information.
If you have at least one 192 I/O or
192 Digital I/O in your system configura-
tion, it must be the primary audio interface
and Loop Sync master.
For additional information, see the Ex-
panded Systems Guide.

Chapter 3: Installation Overview 11
Powering Up Your System
In order for Pro Tools to communicate properly
with audio interfaces and other peripherals, it is
important that you start up and shut down your
system in the following order:
Power up your system in this order:
1 Turn on your Pro Tools hard drives.
2 Turn on synchronization or other MIDI pe-
ripherals or interfaces.
3 Turn on your 96 I/O and any other Pro Tools
audio interfaces. On power up, the status LEDs
will flash. Wait at least fifteen seconds for the
96 I/O to initialize, and the status LEDs to stop
blinking and stay lit on any and all audio inter-
faces.Ifproperly connected,thering around the
power switch will be orange while the computer
is powered down.
4 Turn on your computer. When the computer
boots, all power LED rings on HD I/O should
switch to green. This signifies that the HD I/Os
are properly connected to HD cards or other HD
I/Os in your system.
MIX-series audio interfaces will not be available
until they have been made active in the Hard-
ware Setup dialog. See the Getting Started with
HD Guide for info.
Power down your system in this order:
1 Quit Pro Tools.
2 Shut down the computer.
3 Power off your audio interfaces.
4 Turn off any synchronization, MIDI, or other
peripherals or interfaces.
5 Turn off your drives.
Making Signal Connections to
the 96 I/O
Depending on how you plan to use the 96 I/O,
the way you connect it to your studio will vary.
Setting Up Your Studio
The figures on the following pages provide sug-
gestions for connecting studio gear to your sys-
tem.
The first illustrates a studio setup with the
96 I/O connected to a mixing console, with ef-
fects and other gear routed into the console as
well.
The second diagram shows a setup without a
mixer, where effects and monitoring gear are
connected directly to the 96 I/O.

96 I/O Guide12
Example Studio Setup with a
Mixing Console
Example Studio Setup with a Mixing Console
Power Amp
and Speakers
Digital Inputs/Outputs
To DAT Recorder
DAT Recorder
ADAT
optical in/out
to ADAT
Instruments
Connected to Console
Analog
Audio
Outputs
Effects Devices
Digital Effects Device
(set to external sync)
Tape Returns
or Inputs
Analog
Audio
Inputs
Channel
Outputs

Chapter 3: Installation Overview 13
Example Studio Setup
without a Mixing Console
Example Studio Setup without a Mixing Console
Power Amp
and Speakers
Digital Inputs/Outputs
To DAT Recorder
DAT Recorder
ADAT
Optical in/out
to ADAT
Analog
Audio
Outputs
Analog
Audio
ins/outs
Other Effects Devices
Digital Effects Device
(set to external sync)
Mic, Preamp,
Direct Box, Synth, etc.
Analog
Audio
Inputs

96 I/O Guide14
Setting Operating Levels
There are specific windows within the Pro Tools
Hardware Setup dialog in which to make I/O set-
tings specific to your 96 I/O. These include set-
ting input and output operating levels.
Choosing +4 dBu or –10 dBV
Operating Levels
It is important that you determine which line
level is appropriate for your studio. In +4 dBu
operating mode, the 96 I/O is a 24-bit digital
audio device capable of producing audio signals
up to + 18 dBu across +4 dBu input/output. The
default headroom value is 14 dB. This translates
to a maximum output of + 18 dBu.
Check the owner’s manual for your mixer,
power amplifier or effects processor to see if it
canhandlethisload. If the otherdevicesinyour
studio cannot handle this load, consider lower-
ing the headroom value of Pro Tools.
About Input Operating Levels
As with Output levels, check the owner’s man-
ual for your mixer, power amplifier or effects
processor to see if it operates more comfortably
at line level, in which case consider setting the
96 I/O to operate at –10 dBV line levels.
Consider the following when connecting a
mixer:
◆If your mixer cannot handle more than 1.5V
(RMS) inputs at +4 dBu, then you should set the
96 I/O to operate at –10 dBV line level.
◆If your mixer can handle up to 6.15V (RMS)
inputs, or has pads or attenuators on its inputs,
then you can use the +4 dBu setting on the
96 I/O.
◆96 I/O is calibrated for 14 dB headroom at the
+4 dBu setting.
Most manuals contain device input specifica-
tions,includingwhetherornotthereare padsor
attenuators. Consult the manufacturer’s docu-
mentation for your mixer or power amplifier for
further information.
Selecting Analog Input Operating
Levels
If you want to switch the input levels of the
96 I/O from +4 dBu to –10 dBV, you can access
these parameters, on a channel-by-channel ba-
sis, in the Hardware Setup dialog.
To Set Input Operating Levels:
1 Launch Pro Tools.
2 Choose Setups > Hardware Setup in Pro Tools.
Hardware Setup dialog with 96 I/O as the Primary
audio interface
Selecting +4 dBu or –10 dBV levels in the Hardware
Setup Dialog

Chapter 3: Installation Overview 15
3 Click on the Analog In tab to access the radio
buttons with which to select your input operat-
ing levels for each channel.
4 Click OK to leave the Hardware Setup dialog.
See the Getting Started with HD Guide for
complete system configuration instructions.

96 I/O Guide16
Other manuals for 96 I/O
1
Table of contents
Other DigiDesign Accessories manuals

DigiDesign
DigiDesign Mbox User manual

DigiDesign
DigiDesign Mbox User manual

DigiDesign
DigiDesign 192 I User manual

DigiDesign
DigiDesign Mbox 2 Pro User manual

DigiDesign
DigiDesign 888/24 I/O User manual

DigiDesign
DigiDesign 192 I/O User manual

DigiDesign
DigiDesign Mbox User guide

DigiDesign
DigiDesign Mbox 2 User manual

DigiDesign
DigiDesign 96i I/O User manual

DigiDesign
DigiDesign 192 I/O User manual