Digital Sputnik VOYAGER User manual

VOYAGER Manual
December 2019


3
VOYAGER User Manual
Voyager App
To control Voyagers, it is necessary to download the Voyager app available on Google
Play Store, Apple App Store or www.digitalsputnik.com
Opening the latest release of the app will cause all connected Voyagers to update auto-
matically.
This user manual covers features up to v2.2.10 Controller Software and 1.99 Lamp
Firmware. Some functionality on earlier releases may not be available or may differ from
what is presented.
Software updates are released on a semi-regular basis. We recommend updating to the
latest available software version in order to get access to all features.
Voyager App
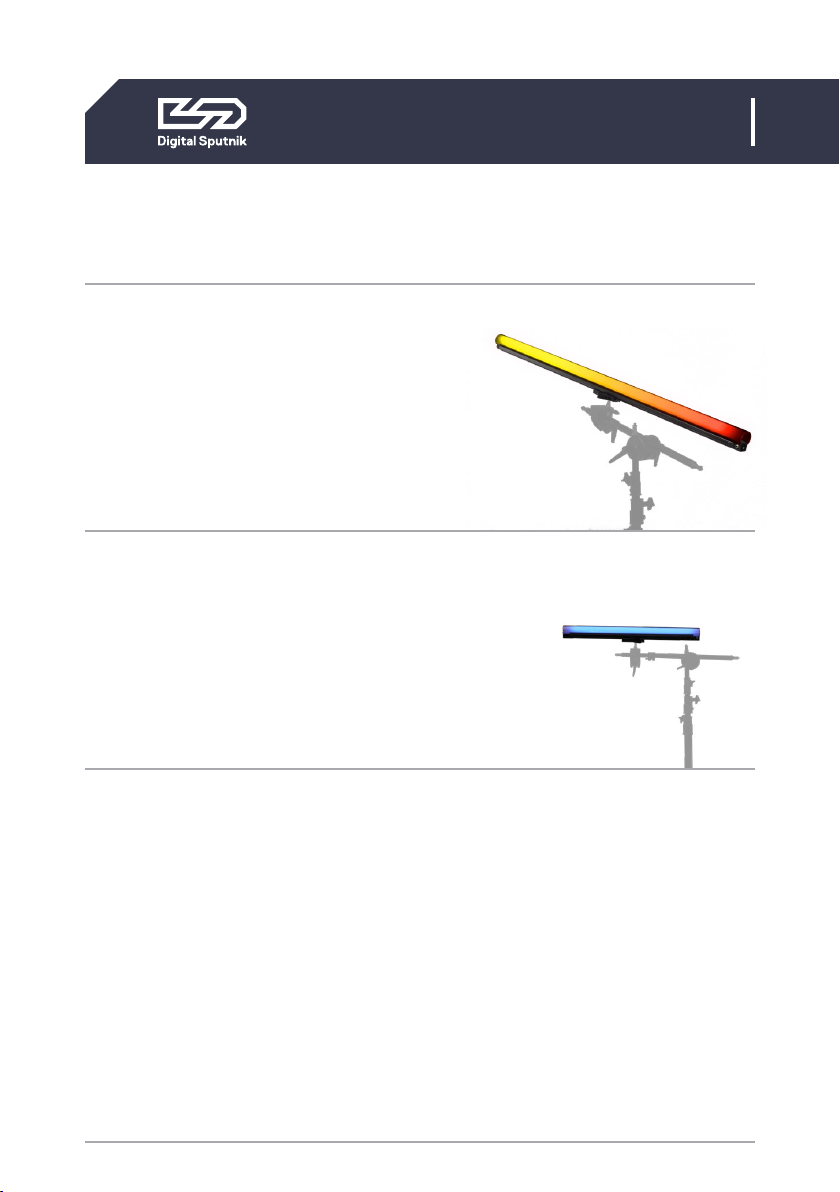
The Voyager Smart Light is a fixture combining light source,
battery, and remote control into one. All that is required is a
smartphone, tablet or computer to act as an interface.
App link to
Google Play Store
App link to
Apple App Store
digital sputnik
webpage
4
VOYAGER User Manual
Technical specs
4 ft.
Dimensions: 1226x62x50mm
(44"x 2.5"x 2")
Resolution: 83 pixels
Weight: 2.2kg (4.86lbs)
Power draw: 40W
Battery: 90Wh
2 ft.
Dimensions: 610x62x50mm
(24"x 2.5"x 2")
Resolution: 42 pixels
Weight: 1.1kg (2.43lbs)
Power draw: 20W
Battery: 45Wh
Input on light: 19VDC 4.74A
Input on charger: 100-240VAC 50/60Hz
Voyagers are fully submersible down to
33ft/10m.*
*Since WiFi can not penetrate water, the unit will
keep the last setting running, but communication
will be disabled.
Technical specs
5
VOYAGER User Manual
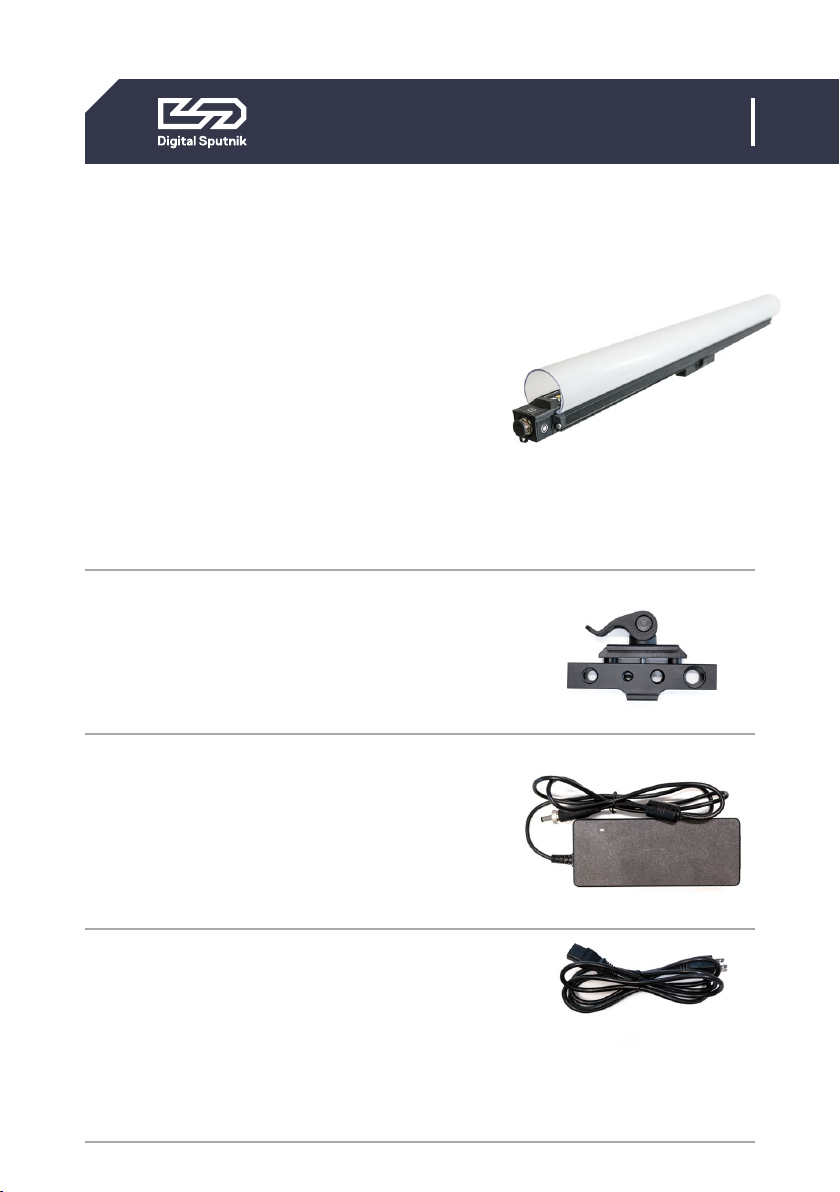
What is in the Box
2’/4’ Voyager Light Tube - The Complete
All in one Light Tube System.
• The Voyager has a clear plastic diffu-
sion sheath that comes off completely
and has a lip inside the rim to hold cut
diffusion.
• The provided diffusion is a Rosco E400
ROLUX filter.
• Quick attach rail system on the back of
the Voyager supports the DS Voyager
Mount.
DS Voyager Mount - Claw type mount that
can attach itself to the back of the Voyager.
You can loosen or tighten the spring loaded
latch by twisting the latches head. Mount
supports 1/4 and 3/8 threading.
19.5V AC/DC Converter - The charging
Brick that will charge the Voyager. It is also
used to bring back Voyager to life after
factory resets. It can charge and provide
power to Voyagers allowing you to use the
fixture and charge it at the same time.
Power Cable - 2m/6ft C13 IEC locking
Power Cable US/EU
What is in the Box:
6
VOYAGER User Manual
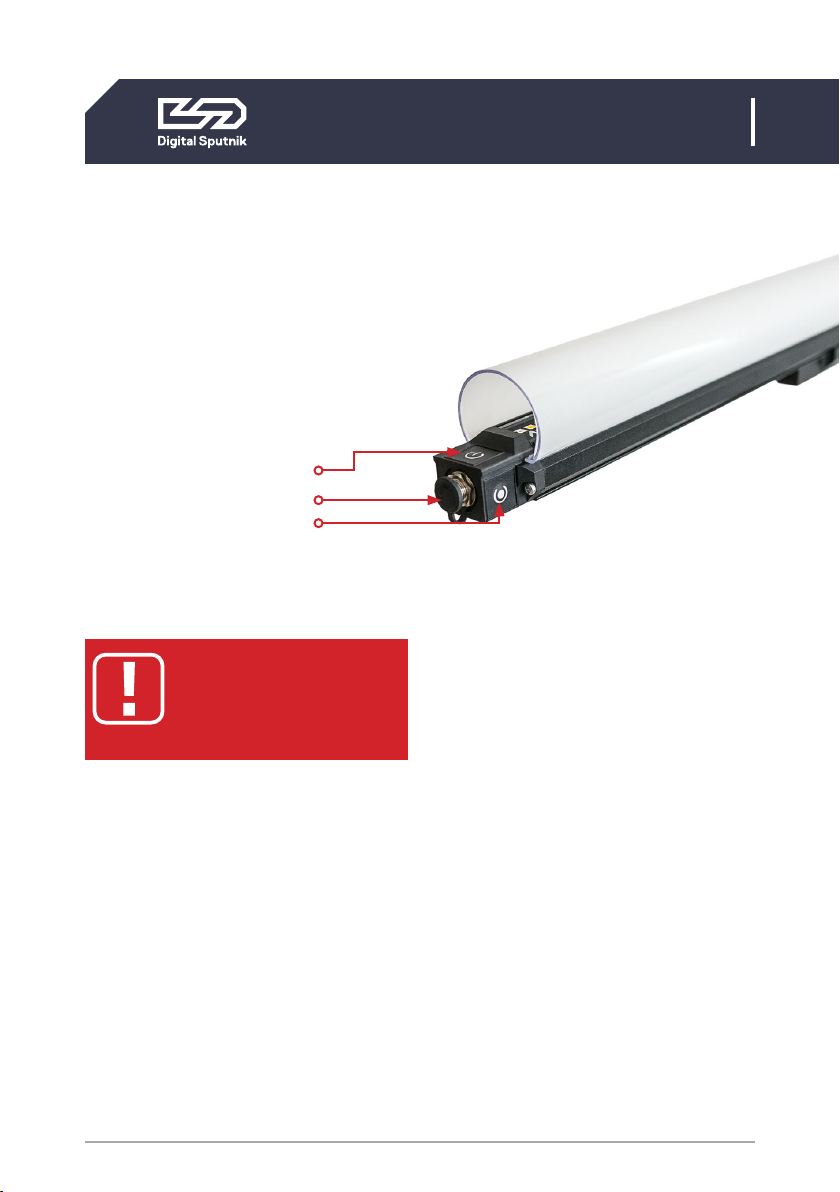
Interface
Front button: Power button
Charging/Data port
Side button: Program button
Interface
* All units are delivered in shelf mode to extend bat-
tery life. If you plan to store your units for longer pe-
riods of time, or to prepare them for air travel, hold
down both Power and WiFi Program buttons while
the Voyager is ON for 10 seconds to fully shut down
and enter the Voyager into Shelf Mode. This is also
the factory reset procedure. The unit must be con-
nected to its adapter to be powered back on.
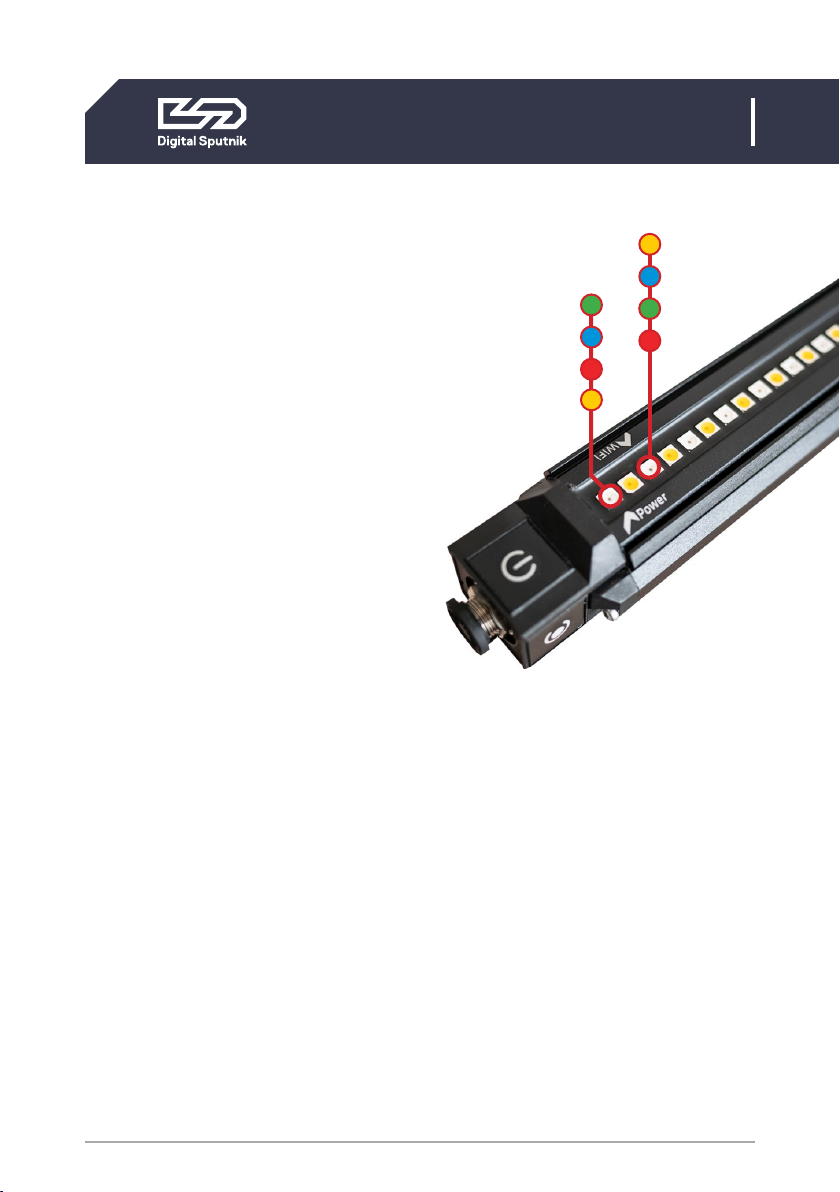
To power the unit ON/OFF, hold the power
button for 3 seconds.
When turning your Voyager ON, The Power
Status LED (1st LED) will turn GREEN for 1 sec-
ond to indicate the Voyager is powering ON.
When booting unit ON for the
first time after unboxing, the
unit must be connected to
the power adapter*.
When turning your Voyager to OFF, The
Power Status LED (1st LED) will turn RED
for 1 second to indicate the Voyager is now
OFF. (OFF is not Complete OFF, but a power
save mode that turns off WiFi and all LEDs.)
It will take about 40 seconds until Voya-
ger is booted and ready for use.
Holding the Power Button for less than
2 seconds will indicate the unit’s Charge,
Power and Wifi status:*
The overall amount of LEDs coming on will
indicate the remaining battery life.
7
VOYAGER User Manual
Interface
1st led: Power Mode
Green: Voyager is ON and fully booted.
Blue: Voyager is booting
(takes about 40 seconds).
Red: Voyager has been switched off.
Yellow: Voyager is charging/StandBy.
No Light: Voyager is complete OFF due
to battery being dead or in
SHELF MODE
3rd led: WiFi Modes (please see the WiFi
Control section below for more detailed
information)
Yellow: Access Point or Master
(default mode). Unit is creating its
own WiFi network, and can be
connected to a remote device.
Blue: Router. The SSID (Network name)
has been given an _M at the end
(i.e. DS0262XXXXXXXX_M). Other
Voyager fixtures set to Client will
connect automatically to this
fixture.
Green: Unit is a Client and is connected
to a network.
Red: Unit is a client and cannot auto
matically find a network to con
nect to or has connection
problems.
*This feature will not work when Voyager is in shelf
mode.
3rd led:
WiFi Mode
1st led:
Power Mode

8
VOYAGER User Manual
WiFi Control
To toggle between WiFi modes, use the
program button (side button). Pressing
the WiFi program button (side button) for
4 seconds or until the 3rd Status LED turn
Magenta will cause the Voyager to toggle
between Master, Client and Router modes.
Modes will always cycle in this order:
MASTER > ROUTER > CLIENT.
When using a single Voyager, make sure
the unit is in AP mode -identifiable by a
Yellow third diode when briefly press-
ing the power button-. Open the avail-
able network list on your remote device
and find your Voyager. The SSID (Network
name) of the Voyager is its serial number
(DS026XXXXXXXXXX). Use the password
dsputnik for connecting.
Then, open the Voyager app, and your lamp
will automatically be added to the Work-
space.
WiFi Control
When using 2 to 9 units ( recommended
maximum is 5 units). Choose any Voyag-
er, and set it to Router mode -identifiable
by a Blue third diode when briefly pressing
the power button-. The WiFi mode of other
unit/units must be set to Client mode. Cli-
ent Voyagers will automatically search for
and connect to a Router Voyager.
When briefly pressing the power button
on client Voyagers, the third diode will be
Green when connection has been estab-
lished or Red if still connecting or if there is
a problem with the connection.
Connect to a Router Voyager. This Voyager
will appear on your device’s available net-
work list with an _M at the end of its SSID
i.e. DS026XXXXXXXXXX_M.
The password will be: dsputnik
Open the Voyager app. Press “Add Lamps”
to add client Voyagers to the scene.
The unit must first be
allowed to fully boot in order
to toggle between WiFi
modes.
Never create more than one
Router Voyager.
Default Voyager password is:
dsputnik

9
VOYAGER User Manual
WiFi Control
When working with more than 9 Voyag-
ers, you will need to connect to them us-
ing an external router. A Voyager in Router
Mode has a max CLIENT capacity of 10 ( 9
Voyagers and 1 Control Device ). For that,
all Voyagers must be connected to the ex-
ternal router network. This can be achieved
using the Voyager App.
In the Setup button > Lamp Settings > *Se-
lect lamp/lamps* to be made into clients >
WiFi Setup > Choose Client Mode.
The left menu box will slide into view, from
here you can choose any visible network
and set the password for the selected net-
work. Press SET to finalize and load the
network settings to the selected Voyager
Tubes.
Then, connect your device to the same
router. Open the Voyager app and press
“Add Lamps” to add Voyagers to the Work-
space.
Voyagers WiFi supports 2.4Ghz and 5Ghz
networks.
**This action does not require to connect each Voy-
ager individually. It is recommended to turn Voyag-
ers into Clients (up to 9) using the previous method.
You can also customize your router’s SSID
to follow the naming convention of a Rout-
er Voyager. If you name your router’s net-
work as DS026XXXXXXXXXX_M, all Voy-
agers set to Client mode will automatically
connect to that network.

10
VOYAGER User Manual
Client status via Bluetooth
It is also possible to verify a Voyagers
WiFi connection when in "Client" mode
via Bluetooth. For this, open your device’s
Bluetooth list and lamps in client mode will
show up:
Lamps SSID (DS026XXXXXXXXXX) ->
Connected SSID (VoyagerRouter)
If there is an issue with the password, it
will show "!WrongPass" at the end of the
connected SSID and if there is no WiFi to
connect to, it will show "SSID".
Client status via Bluetooth

11
VOYAGER User Manual
Charging/StandBy
A Voyager can be charged while being
actively used.
Plugging a powered-off Voyager to a char-
ger will cause it to start charging and enter
standby mode. The StandBy mode is indi-
cated by a yellow first diode when checking
the Voyager’s status. A Voyager in Stand-
By mode will be fully active (including WIFi
module and animation engine), with the
exception of the light output being turned
down. This feature enables instantaneous
bootup from its charging state.
Charging/StandBy
The Voyager’s Built-in battery will last 2
hours and 30 mins on white color and 6
hours on full primary colors all at full inten-
sity.
*To boot from StandBy hold down the power button
for 3 seconds to turn ON.
*Switching Voyager OFF while charging, will put the
unit into StandBy mode.

12
VOYAGER User Manual
WiFi reset
It is recommended to be performed when
encountering errors in communication. To
perform a WiFi restart, press the side but-
ton for +/- 10 seconds. The 3rd diode be-
coming white will indicate the WiFi restart
has been registered.
Only a WiFi reset will restore the default
communication settings:
Wifi mode: Access Point
SSID (Wifi name): Voyagers serial number
(DS0262XXXXXXXXXX)
Password: dsputnik
WiFi reset
Factory Reset/Shelf Mode: If encountering
problems with a Voyager’s responsiveness,
a recommended step is to perform a facto-
ry reset by holding down both buttons for
+/- 10 seconds. It is the same procedure
as for setting a Voyager to shelf mode if
preparing it for storage or travel.
The Voyager must be connected to its pow-
er adapter to boot on after a factory reset.
Factory reset will also alter WiFi settings

13
VOYAGER User Manual
WiFi reset
Voyagers can be animated by streaming
straight onto Voyagers from Spout (Win-
dows) or Syphon (OSX) stream. This means
that every software that supports Spout or
Syphon stream can be used to stream ef-
fect to lamps. Streaming can be selected
from “Set FX” under Spout/Syphon stream.
Keep in mind that streaming is active only
in the video mapping view in the Voyag-
er Controller app. Upon leaving the video
mapping view, the last frame that is sent
to lamps will stay on lamps until another
effect is selected or stream is re-activated.
Using Voyagers with Spout or Syphon streaming
Example: Streaming from After Effects to
Voyagers
Before starting streaming from After Ef-
fects, Spout or Syphon plugins need to be
installed for After Effects.
• Spout (Windows) installation and us-
age guide: https://github.com/benku-
per/Spout-AfterEffects
• Syphon (OSX) installation and usage
guide: http://tobiasebsen.dk/experi-
ments/aesyphon/
After installation to start streaming from
After Effects:
1. Start After Effects
2. Start Voyager Controller, select lamps
you would like to stream onto and
under “Set FX” select Spout/Syhpon
Stream from the effect list.
3. Now everything that is played on After
Effects will be displayed on lamps.
Other manuals for VOYAGER
2
Table of contents
Other Digital Sputnik Lighting Equipment manuals

Digital Sputnik
Digital Sputnik DS 1 User manual

Digital Sputnik
Digital Sputnik DS series User manual

Digital Sputnik
Digital Sputnik DS Series User manual

Digital Sputnik
Digital Sputnik VOYAGER User manual

Digital Sputnik
Digital Sputnik DS6 User manual

Digital Sputnik
Digital Sputnik DS 1 User manual

Digital Sputnik
Digital Sputnik VOYAGER User manual


