DigitalHome Smart DB300 User manual

Quick Start Guide
*
Thanksforpurchasingandusingourproduct.Pleasereadthisquickstartguidebeforeusing,andkeepit
for futurereference.
*
Manualcontentsaresubjecttochangewithoutnoticeinaccordancewithourpolicyofcontinuousproduct
improvement.
(DB300)
- 1-
1.
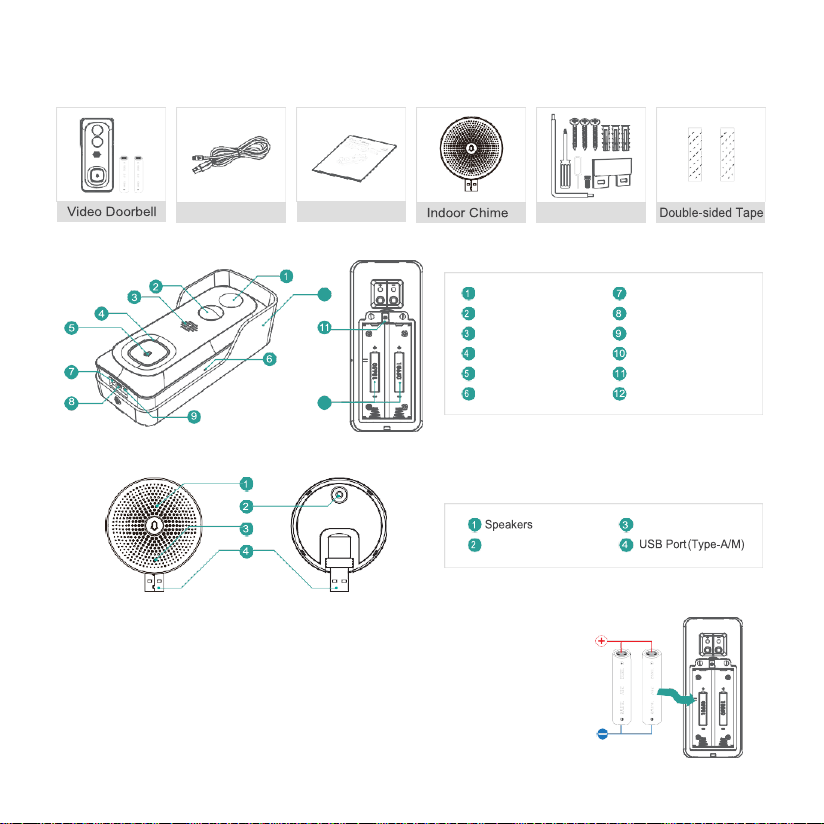
what’s in the box
Please consult below checklist for all the components.
2.
Meet the doorbell
3.
Meet the chime
4.
Battery installation
The batteries are pre-installed in the doorbell. If you have taken out the
batteries,pleasenotetheelectrodeswheninstallingbatteries. Pleaseinsertthe
batteries with positive poles upward!
NOTE:
Improperbatteryinstallationwillcausedamagetothe internalcomponentsandmay
resultinserious injury.
10
12
2MPCamera
PIRMotionSensor
Speakers
IndicatingLED
Doorbell Button
Microphone
ChargingIndicator
Micro USBPort
Reset
Wall-mountbracket
SD CardSlot
BatteryCompartment
USB Cable
User Guide
Screw & Tools
Reset
LEDIndicator
www.digitalhome.ph
- 2-
5.
Battery charging
Thebatteriesinsidethedoorbellarenotfullychargedinaccordancewith
transportation safetyregulations.
PleasechargethebatterieswithaUSBcompatiblewallcharger(notincluded)
andtheprovidedUSBcableforabout8~10hourspriortoWi-Ficonfiguration
andinstallation.
6.
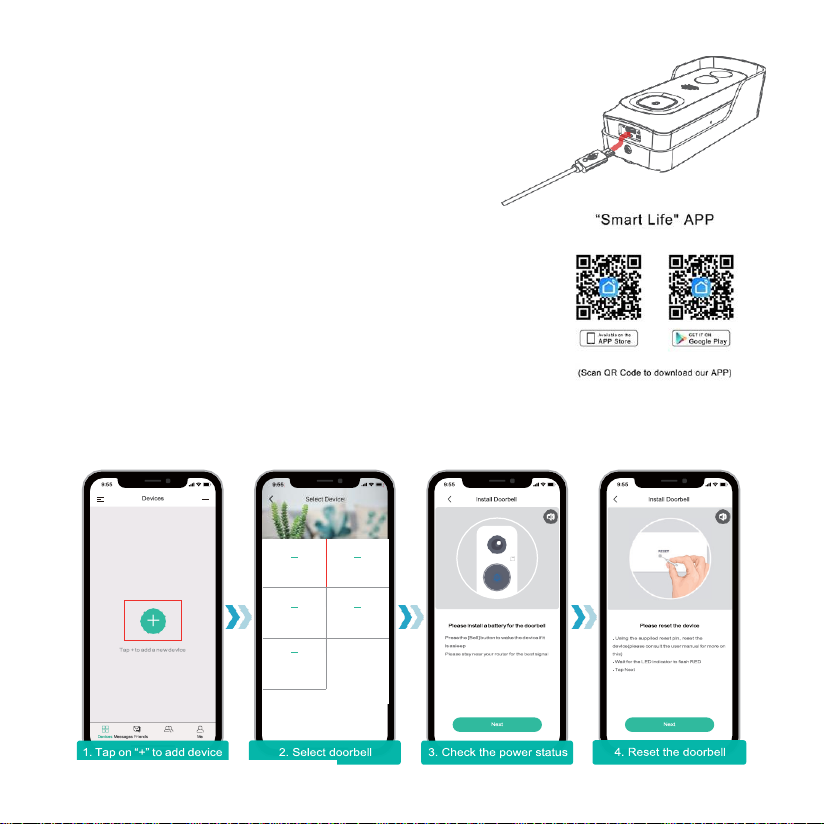
Download the app
Download and install the 'SMARTLIFE' app from Google PlayTM or the
App StoreTM. The App is also available by scanning the QR codes on
the right, using your QR code scanner in your smart phone.
NOTE:
GooglePlay
TM
isatrademarkofGoogleInc.AppStore
TM
isa
servicemark ofApple Inc.
7.
wi-fi set up
Before you start the Wi-Fi configuration, please note below:
1).
The doorbell works with 2.4 GHz WiFi, but notwith 5GHz WiFi.
2).
Avoidusingspecialcharactersorsymbolslike)(@~!#$%^&*...,eitherinyourWi-Finameor password.
3).Perform the configuration near your Wi-Firouter.
LaunchtheSMARTLIFE APPandregisteranaccountwithyourmobilephonenumberofemailID.ThenstarttheWi-
Fi Before you start the Wi-Ficonfiguration, please note below:
Camera
Doorbell
Battery Camera
Floodlight Camera
Network Video
Recorder
www.digitalhome.ph

- 3-
8.
Run a test
Aftersetup,tapontheliveviewwindowintheapp
for a test. Then take your doorbell outside to the
installationspotandrunatestthere.Makesurethe
installationspotiscoveredbystrong2.4GHzWi-Fi
signal.
Note:
Ifthevideoqualityfromthedoorbelloutsideisnotas
goodasitwasindoors,youmayneedtomoveyour
routerclosertoyourinstallationspot,orinvestina
Wi-Fi extender.
12%
www.digitalhome.ph

- 4-
9.
Live view interface
10.
leave a Voice message
Youcanleaveamaximum30-secondvoicemessageontheon-boardmemoryofyourdoorbell,soastoquickly
respondyourvisitorbyataponyourphonewhenyouarenotconvenienttoanswerthedoorbellcall.Thevoice
messagefunction isavailable even without a pre-installed Micro-SDcard.
STEPS:
Setting->Basicfunction->HostLeavesMessage->Recordyourmessage->Hangofftheincomingcallandplaythe voice
message.
1 Quit live viewing
7
Stream bitrate
10 Speak to thescene
13 Notificationhistory
2 Setting menu 3 Battery status
5
HD/SDswitch 6 Wi-Fi signalstatus
11
Record on the phone 12 Body detectionon/off
14 Cloud storage service
SD Card
Device Share
Host Leaves Message
Power Management
www.digitalhome.ph

- 5-
11.
Installation
Select location
Yourdoorbellhas 166-degreeviewangleand120-degree
human detectionrange.
It is suggested to mount your doorbell at least 5 feet (160 cm)
above the ground for the best angle of view and motion
detection performance.
Mount your doorbell
www.digitalhome.ph

- 6-
2. Powered by PC USB Port.
12.
connect the chime
supply power to the chime
Thechimecanbepowered by anUSB compatible phonecharger (DC5V 1A). You can also plug the chime
tothe USB port onyour PC/notebook to supply power.
Pair with doorbell
1.
Tap on “
···
”and enter into
Settings
->
Basic function
, select
Wireless Chime
page.(See to
Picture.6
)
Picture.1
Picture.2 Picture.3 Picture.6
2.
Shortclickontheresetbuttonbehindthechime(Seeto
Picture.4
),andtheLEDindicatorflashesblue,
indicating the device is inpairing mode.
3.
Tap “
ChimePairing
”button in the APP (See to
Picture.6
), and the doorbell will send a wireless pairing
Picture.4
Chime Pairing
One-button untie
Picture.5
1. Powered by DC5V adapter (phone charger).

- 7-
signal to the chime. Pairing succeeds and the indicator on the Chime will be in solid blue. All set!
Congrats! You can push the doorbell button to test the result.

- 8-
Select ringtone
Enter into Settings->Wireless Chime, there are 4 ringtons available (See to Picture.6).
Volume control
You can control the volume level for the chime in the Wireless Chime Pairing page (See to Picture.6).
Unbind
1.
Press and hold reset button on the chime for about 5 seconds till the indicator flashes blue twice, and the
chime will be restored to factory default.
2.
Youcanalsotapon“
One-buttonUntie
”(SeetoPicture.6)intheAPPtoreleasetheconnectionbetween
the doorbells and the wireless chimes.
13.
SHare device
You can share your doorbell with your family members and friends, by a few setting steps in your APP.
STEPS:
Friends -> Search and add your friends into contact list -> Back to
Devices-> enter into Settings -> DeviceShare.
NOTE:
1.
Thereisnolimitation on numbersoffriends sharingonedevice.
2.
Onlytheadminstratorgot accessto the setting menu. Other users can only live view & playback.
Devices Messages Friends Me
SD Card
Device Share

- 9-
3.
Allusers can receivedoorbell calls and alarm notifications.
4.
Many userscan access to thedoorbell simultanously, to live view orplayback.
www.digitalhome.ph

-
10-
USB (Type-A)
Genaral
OS
WDR
Color: 0.01 Lux; B&W: 0.001Lux
1.7mm/F2.0
OS
Support
Cloud storage
Network
14.
Specification
Video doorbell
Video&Audio
Indoor Chime
Image Sensor 1/2.7” CMOS (2.0MP) Power source DC 5V 1A
1920 ×1080 px 0.2W
High power IRLED withICR Max 100dB
166°
Digital WDR
Radio frequency
indoor
Storage Type
Recording
Wifi Frequency
Micro SD Card (Max 128G)
Triggered byPIR motion sensor
2.4 GHz ~ 2.4835 GHz
-30
℃
~ 70
℃
Ø60
× 24
LiveViewSpeed Within 3 ~ 4 Sec
App Name SMARTLIFE
Within 2~4 sec
Working Temp.
& Humidity
-20
℃
~ 50
℃
; <90% (No condensation)
300μA
4~ 6 Months
Standards
IEEE 802.11 b/g/n
Lithium 18650 Battery (3.5V, 3000mAh ) × 2
Firmware Upgrade
Working Time
Standby Time
Working Current
General
APP
250mA

-
11-
235
OTA (on the air)
DC5V1A~2A(MicroUSBPort)
61× 41× 135
2 ~ 3 Months (20 times wake up per day)
www.digitalhome.ph

-
12-
15.
Trouble shooting
Q1: Why I failed to set up Wi-Fi for the doorbell?
A1:
①
.Deviceworkswith2.4GHzWi-Fionly,butnotsupport5GHzWi-Fi.
②
.Wi-Fi networkisnotgood, trytokeepthe
camera near the Wi-Fi router when setting up.
③
.The Wi-Fi password is wrong. Please check if there are special
characters inthe password, or the network is specially encrypted.
Q2: How do I know if I have 2.4G or 5G wifi?
A2: Please check the user manual of your Router or call the network operator for help.
Q3: It has to be on same WiFi to see the camera, or is it over internet from anywhere?
A3: You can view the camera from anywhere, if your camera is well connected to the internet.
Q4: Do any of the recordings get saved to the cloud? Or is it mainly saved in the built-in SD card?
A4: It supports SD card recording as well as cloud storage. You can activate the cloud storage service in App.
Q5: What happens when the SD is full?
A5: When the memory card is full, the camera automatically erase the oldest footage.
Q6: Does it work with Google Home or Alexa?
A6: Sorry, this model does not support Google Home or Alexa.
Q7: Why does it lose connection to wifi?
A7:PleasecheckthenetworkconnectionofyourphoneandtheWi-Firouter.Ifthenetworksignalisnotstrong,you
mayneed to move your router closer to the device, orinvest inan extender.
Q8: Can the motion detection be disabled?
A8:Yes,sure.Recordingistriggeredbydetectedmotions.Youcansetupthesensitivityordisablemotiondetectionin
the settingmenu.
Q9: Do we get charger for the batteries?
A9: Battery charger isnot included. Please charge the batteries with a USB compatible charger(DC5V 1A~2A) for about
8-10hours.
Q10: Can we have 2 or more doorbells at the same residence?
A10: Yes, you can add more than one device at the same residence.
www.digitalhome.ph
Table of contents


