Digno J User manual

DIGNO® J
User Guide


1
DIGNO® J
DIGNO® J User Guide Contents
Introduction
Introduction.........................................................................3
Preparing to Use Handset
Package Contents............................................................... 6
Parts & Functions.............................................................. 6
USIM Card............................................................................ 8
SD Card..............................................................................10
Charging Battery.............................................................. 13
Power On/Off................................................................... 14
Using Touchscreen............................................................ 14
Setting a Google Account................................................15
Waking Handset from Sleep............................................ 17
Basic Operations
Basic Operations...............................................................20
Silent Mode....................................................................... 21
Airplane Mode................................................................... 22
Text Entry.........................................................................22
Updating Software........................................................... 23
Handset Interface
Screen.................................................................................26
Status Bar......................................................................... 28
Using Notifications Window............................................ 29
Using Quick Settings........................................................30
Phone
Placing/Answering Calls...................................................32
Optional Services..............................................................33
Phone Number................................................................... 39
Using Contacts..................................................................39
Messaging
Messaging.......................................................................... 42
Sending S! Mail/SMS.........................................................42
Using Gmail....................................................................... 43
Internet
Using Chrome.................................................................... 46
Camera
Capturing Still Images/Videos......................................... 50
Viewing Still Images/Videos (Photos)............................. 51
Application Basics
Adding/Deleting Applications.......................................... 54
Music
Listening to Music (Play Music)...................................... 60
Managing Data
Exchanging Data by Infrared...........................................62

2
Wi-Fi/Bluetooth®
Connecting by Wi-Fi.........................................................64
Using Bluetooth® Function.............................................. 65
Handset Settings
Handset Settings.............................................................. 68
Network & Internet Settings.......................................... 68
Connected Device Settings.............................................. 69
Display Settings................................................................69
Sound Settings..................................................................70
App & Notification Settings........................................... 70
Battery Settings...............................................................71
Storage Settings...............................................................71
Security & Location Settings..........................................72
Account Settings.............................................................. 73
Accessibility Settings.......................................................74
Google Settings................................................................ 74
System Settings................................................................75
About Phone......................................................................75
Global Services
Making Calls while Abroad.............................................. 78
Warranty/Specifications/Customer Service
Specifications....................................................................82
Materials............................................................................82
Customer Service.............................................................. 83
Safety Precautions
Safety Precautions........................................................... 86
General Notes................................................................... 93
Water/Dust/Shock Resistance......................................... 99

3
Introduction DIGNO® J
Introduction
Introduction
Thank you for purchasing DIGNO® J.
Before You Begin
・DIGNO® J is referred to as "handset" in this guide.
・Read "Safety Precautions" and this guide thoroughly
beforehand for proper usage.
・Accessible services may be limited by contract conditions.
・Unauthorized copying of any part of this guide is
prohibited.
・Guide content subject to change without prior notice.
・Contact SoftBank Customer Support, General Information if
you find inaccuracies.
Guide Usage Notes
・Most operation descriptions are based on default settings.
・Unless noted otherwise, descriptions are for Home Screen.
・Some operation descriptions may be omitted.
・In this guide and on handset, "abroad" means "outside Japan"
with regard to handset/service usage.
・In this guide, microSD™/microSDHC™/microSDXC™ Card is
referred to as "SD Card."
Screenshots & Key Labels
Screenshots and Key labels are provided for reference only.
Actual handset windows, menus, etc. may differ in appearance.

4

Preparing to Use Handset
Package Contents............................................................... 6
Parts & Functions.............................................................. 6
USIM Card............................................................................ 8
SD Card..............................................................................10
Charging Battery.............................................................. 13
Power On/Off................................................................... 14
Using Touchscreen............................................................ 14
Setting a Google Account................................................15
Waking Handset from Sleep............................................ 17

6
Package Contents
Package Contents
・Handset (DIGNO® J)
(Battery is built in)
・クイックスタート (Japanese)
・お願いとご注意 (Japanese)
・Warranty (Japanese)
Parts & Functions
Handset (Front)
Part Description
Front
Camera Use to shoot photos or videos of yourself
Earpiece/
Speaker
Earpiece is also Speaker; hear the other
party's voice and ringtone here
After a call, volume increases gradually to
set level to prevent loud sound close to
ear
Notification/
Charging LED
Lights/flashes while charging, when
powering handset on, etc.
Light/
Proximity
Sensor
Detects surrounding brightness/prevents
Touchscreen misoperation during call
Infrared
Port Transfer by infrared
Display
Touchscreen-type display, operate with
your fingers on Display; surface is
protected with a hybrid shield

7
Preparing to Use Handset DIGNO® J
Handset (Back/Bottom)
Part Description
3.5mm
Headphone
Port
Connect headphones
Camera Capture photos and videos
Mobile
Light Use light when taking photos, etc.
External
Device Port
Connect AC Charger (optional) or Micro
USB cable (sold separately)
Mic Speak here
Card Slot
Cap Insert USIM Card and SD Card
Straphole Attach a strap
Cautions
Handset is airtight to maintain water resistance (IPX7).
Pressing handset forcefully may produce sound around
Earpiece, but this is not a function or performance
abnormality.
Keys
Key Description
Volume Up
Key Increase the volume
Volume
Down Key
Decrease the volume
Long Press to turn Silent mode on/off
Power Key
Turn Display on/off
Long Press for Power off / Reboot /
Screenshot menu; power on when powered
off

8
USIM Card
USIM Card is an IC card containing phone number and other
customer information.
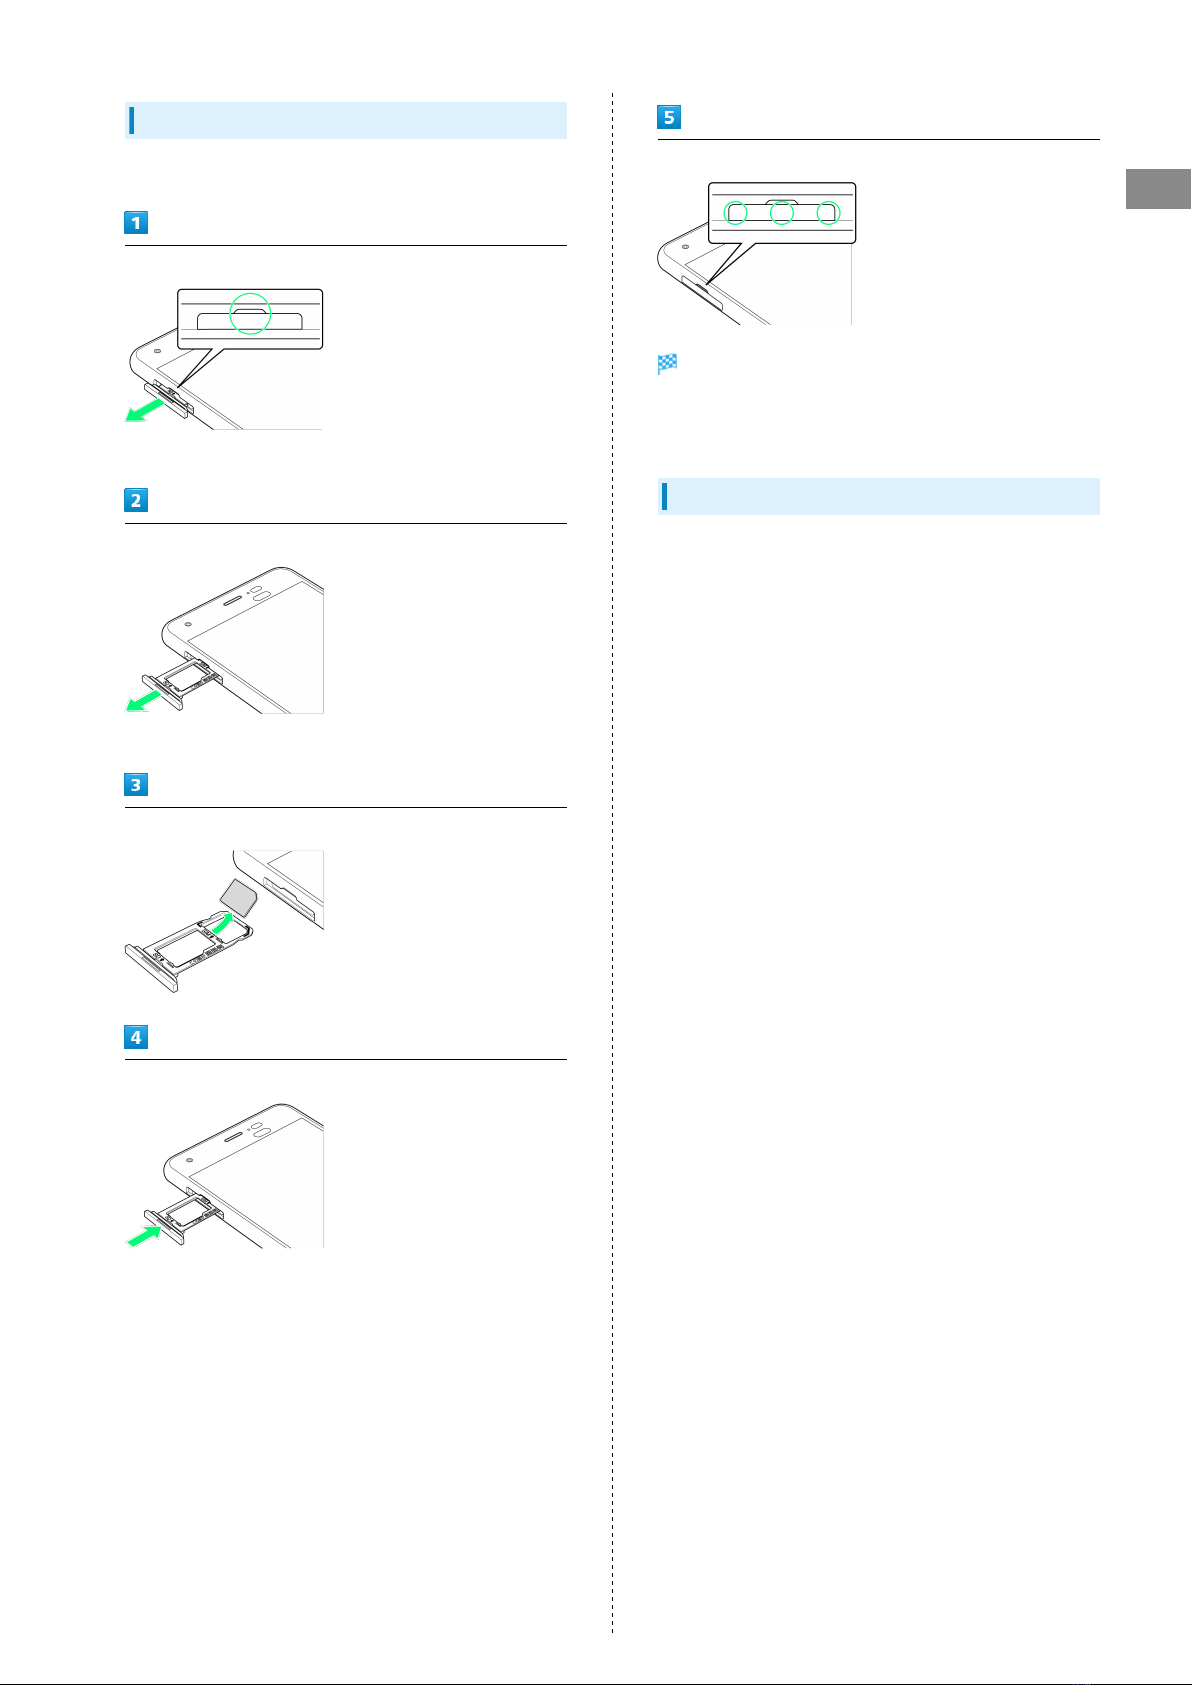
Inserting USIM Card
Always power off beforehand.
Pull out Card Slot Cap
・Use fingernail.
Remove SD/USIM Card Tray
・Pull out slowly without bending in direction shown.
Set USIM Card in SD/USIM Card Tray
・Note orientation of USIM Card. Set Card noting location
of notch and with IC (metal) chip facing down. Wrong
orientation may cause USIM Card to fall or cause handset
malfunction or damage.
・Make sure USIM Card is completely in SD/USIM Card Tray and
not jutting upward.
・Slide in USIM Card in direction shown to avoid damaging tab
on SD/USIM Card Tray.
Insert SD/USIM Card Tray
・Insert slowly without bending in direction shown.
・Note orientation of SD/USIM Card Tray. Wrong orientation
may cause USIM Card or SD Card to fall or cause handset
malfunction or damage.
Install Card Slot Cap
USIM Card is installed.
・Press down firmly where circled ○, and check that Card Slot
Cap is not jutting out.
9
Preparing to Use Handset DIGNO® J
Removing USIM Card
Always power off beforehand.
Pull out Card Slot Cap
・Use fingernail.
Remove SD/USIM Card Tray
・Pull out slowly without bending in direction shown.
Remove USIM Card from SD/USIM Card Tray
Insert SD/USIM Card Tray
・Insert slowly without bending in direction shown.
・Note orientation of SD/USIM Card Tray. Wrong orientation
may cause handset malfunction or damage.
Install Card Slot Cap
USIM Card is removed.
・Press down firmly where circled ○, and check that Card Slot
Cap is not jutting out.
SIM-Unlocking Handset
Handset can be SIM-unlocked. SIM-unlocking handset allows
other-carrier SIM cards to be used with it.
・Some services, functions, etc. may have restrictions when
an other-carrier SIM card is used. SoftBank Corp. does not
guarantee operation whatsoever.
・For details, see SoftBank Website.

10
SD Card
Handset supports SD Cards up to 256 GB. Some SD Cards may
not operate properly.
SD Card Cautions
Data
Information stored on SD Card can become lost or changed
accidently or as a result of damage. It is recommended
that you keep a separate copy of important data. SoftBank
Corp. is not responsible for damages from data that is lost
or changed.
Reading/Writing Data
Never power off handset while it is reading/writing to SD
Card.
Battery Level
A low battery charge may prevent reading/writing to SD
Card.
Handling SD Card
Use/store SD Cards away from the reach of infants. May
cause choking if swallowed.
Inserting SD Card
Always power off beforehand.
Pull out Card Slot Cap
・Use fingernail.
Remove SD/USIM Card Tray
・Pull out slowly without bending in direction shown.
Set SD Card in SD/USIM Card Tray
・Set Card noting orientation of SD Card and with terminals
facing down. Wrong orientation may cause SD Card to fall or
cause handset malfunction or damage.
・Make sure SD Card is completely in SD/USIM Card Tray and
not jutting upward.
・Slide in SD Card in direction shown to avoid damaging tab on
SD/USIM Card Tray.
Insert SD/USIM Card Tray
・Insert slowly without bending in direction shown.
・Note orientation of SD/USIM Card Tray. Wrong orientation
may cause USIM Card or SD Card to fall or cause handset
malfunction or damage.
Install Card Slot Cap
SD Card is installed.
・Press down firmly where circled ○, and check that Card Slot
Cap is not jutting out.

11
Preparing to Use Handset DIGNO® J
Formatting SD Card
When using a new SD Card for the first time, always format it
on handset.
・Formatting erases all data on SD Card. Carefully check any
SD Card that was used on another device before formatting.
・Charge Battery while formatting, or format with adequate
battery charge.
In Home Screen, (Apps)
(Settings)
Storage
SD card
Storage settings
Format
ERASE & FORMAT
DONE
Handset erases all data in SD Card.
・If confirmation appears, follow onscreen instructions.

12
Removing SD Card
Always unmount SD Card and then power off beforehand.
Pull out Card Slot Cap
・Use fingernail.
Remove SD/USIM Card Tray
・Pull out slowly without bending in direction shown.
Remove SD Card from SD/USIM Card Tray
Insert SD/USIM Card Tray
・Insert slowly without bending in direction shown.
・Note orientation of SD/USIM Card Tray. Wrong orientation
may cause handset malfunction or damage.
Install Card Slot Cap
SD Card is removed.
・Press down firmly where circled ○, and check that Card Slot
Cap is not jutting out.
13
Preparing to Use Handset DIGNO® J
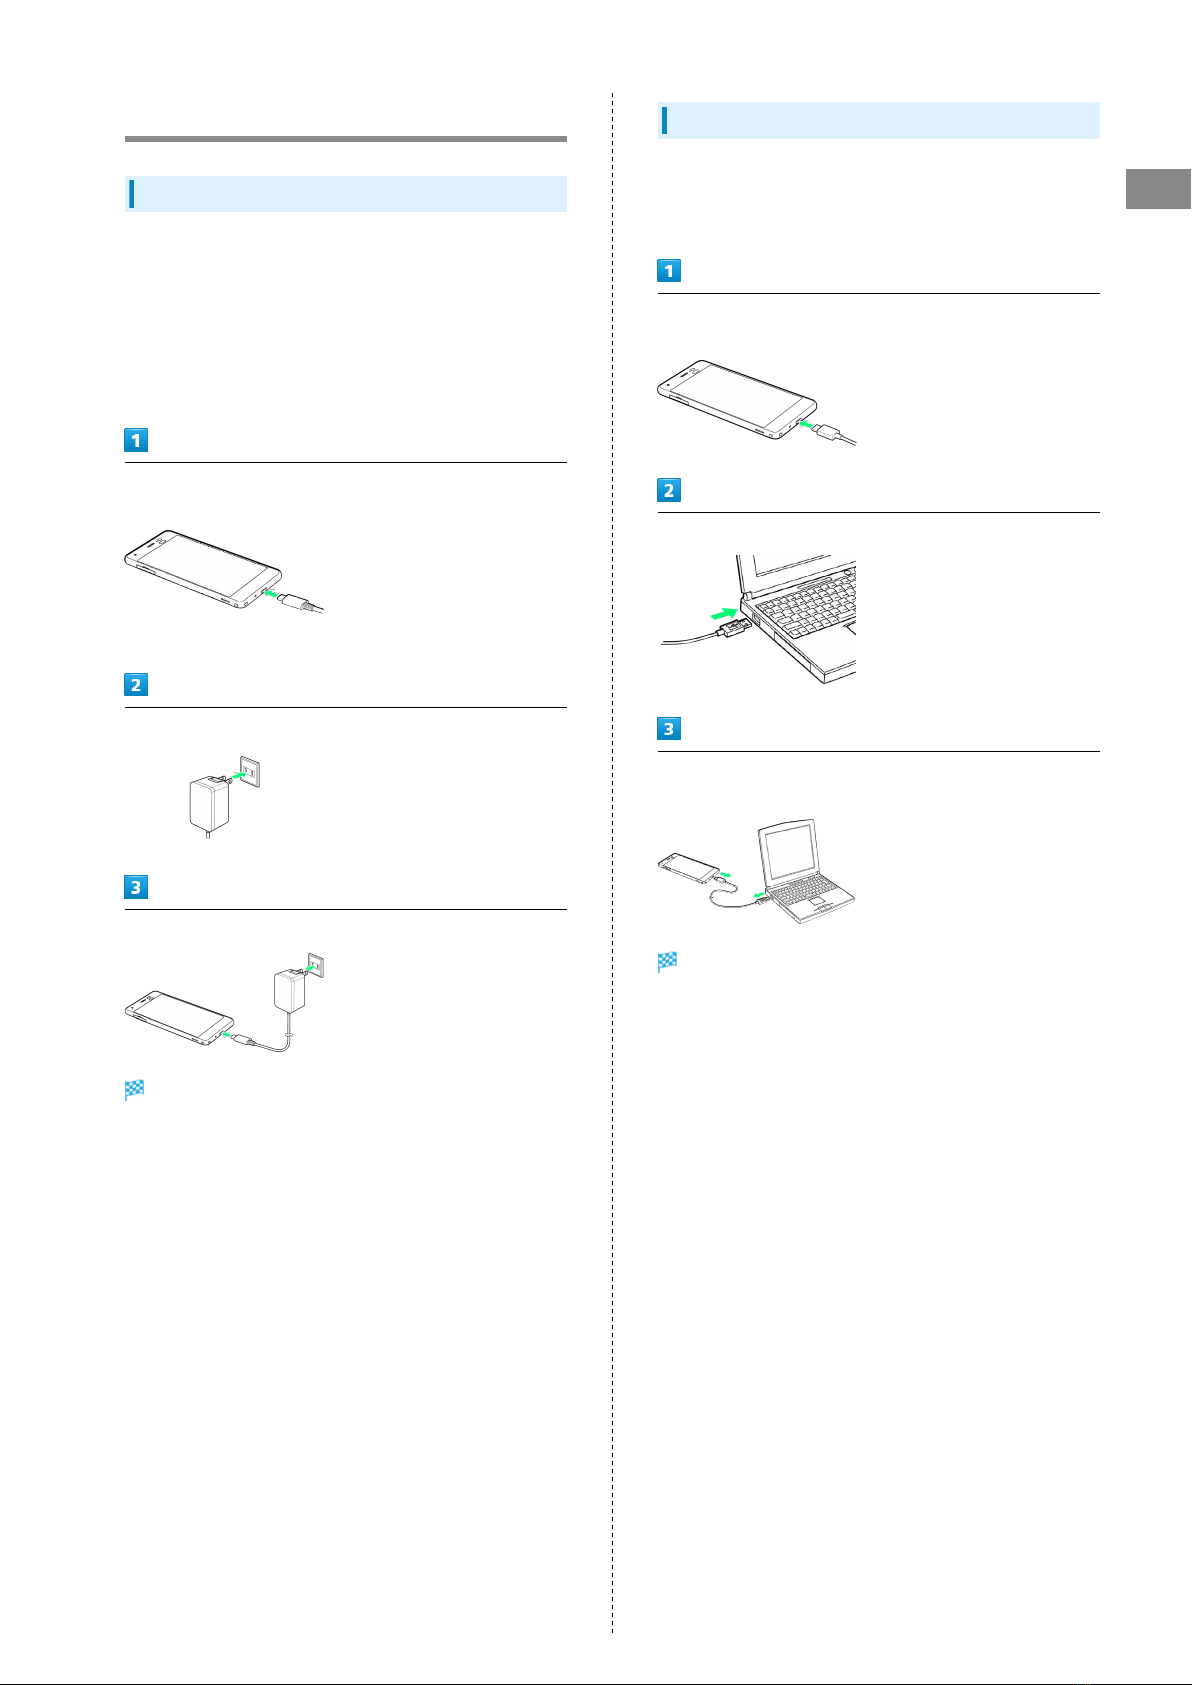
Charging Battery
Charging with AC Charger
AC Charger is an optional item. Be sure to use an AC Charger
specified by SoftBank. See SoftBank Website for information
on AC Charger and other peripherals.
Charging with AC Charger [ZSCAZX]1 is described as an
example.
SoftBank SELECTION USB Type-C rapid charging AC Charger
(SB-AC17-TCQC)
Insert USB Type-C plug of AC Charger into External Device
Port
・Holding plug by connector, insert without bending as shown.
Raise plug on AC Charger and plug into household AC outlet
After charging, remove AC Charger
Charging ends.
・Unplug AC Charger from outlet, and disconnect from
handset.
Charging by PC
Always turn on PC beforehand.
Battery may not charge depending on type of connection to
the PC.
Insert USB Type-C plug on USB Type-C cable for PC into
External Device Port
Insert USB plug of USB Type-C cable into USB port on PC
After charging, remove USB Type-C cable from hand set and
PC
Charging ends.
14
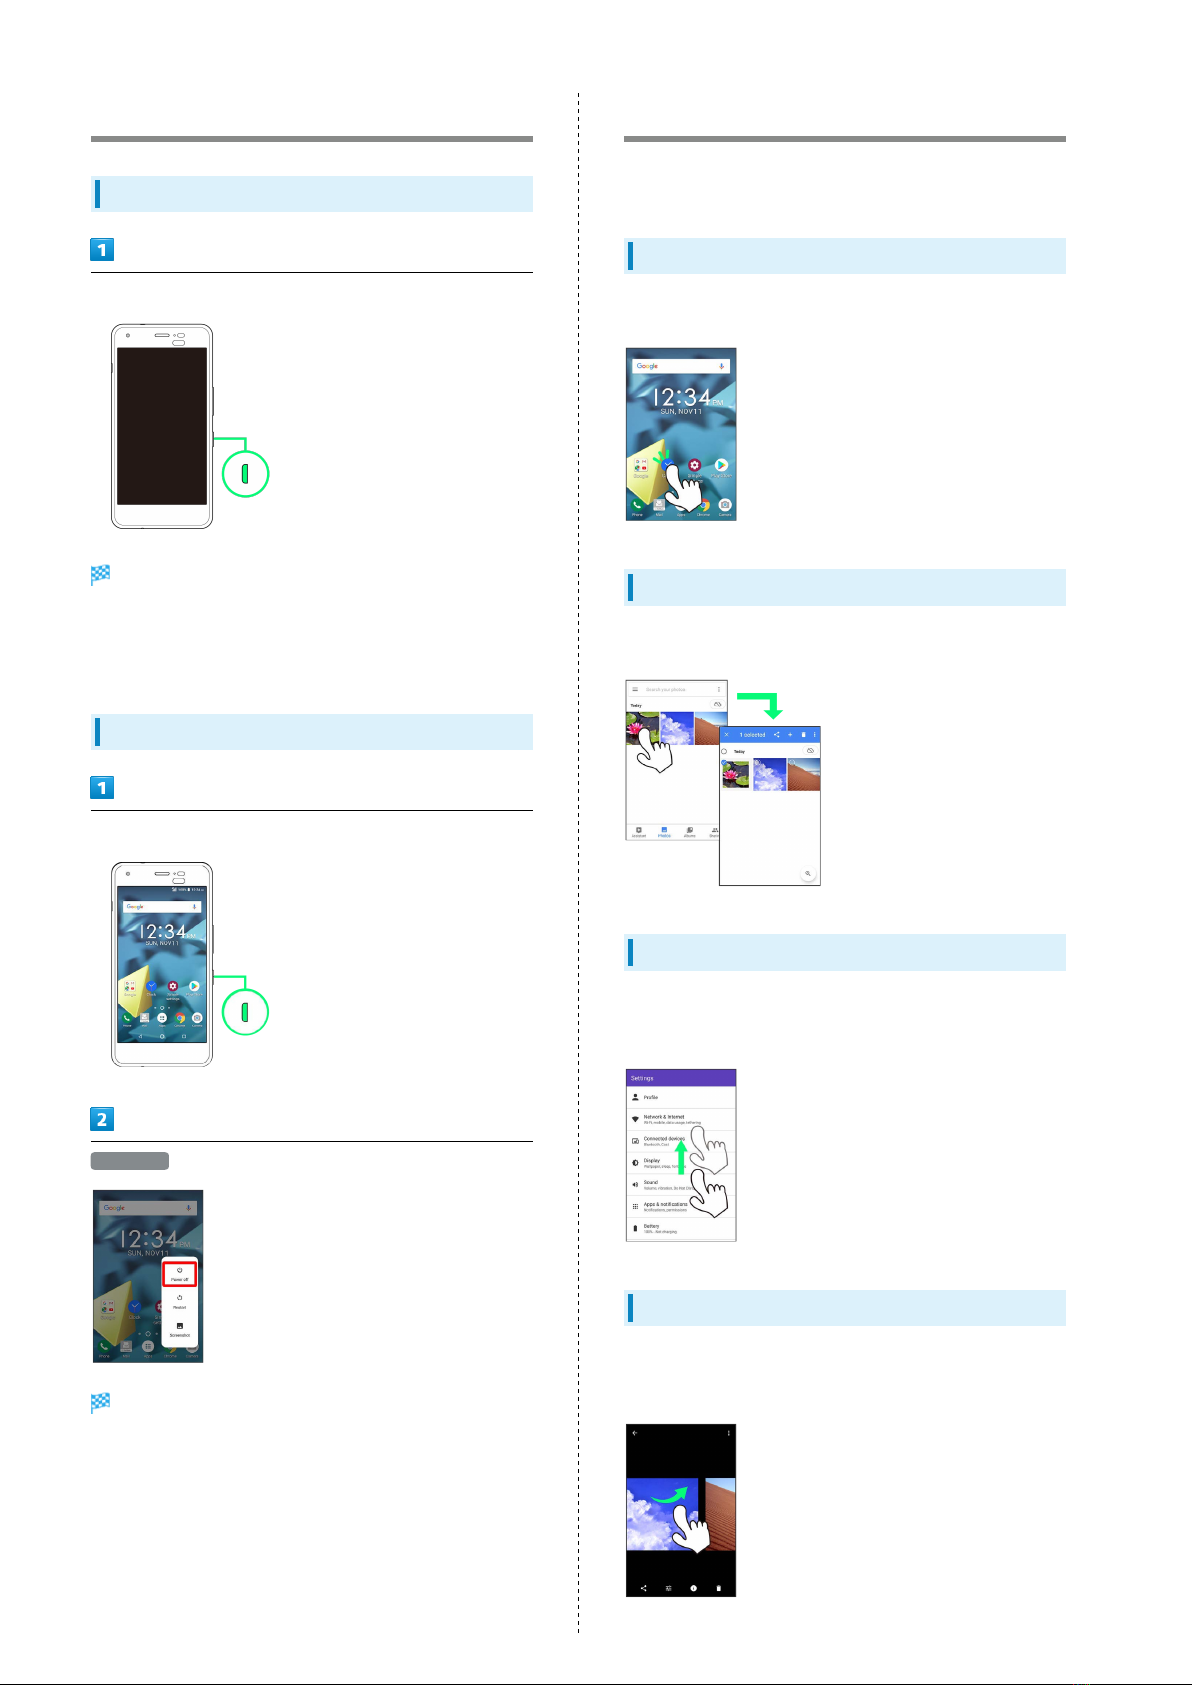
Power On/Off
Power On
Long Press Power Key
Start Screen appears.
・See "Unlocking Start Screen" to unlock Start Screen.
・Startup wizard appears the first time handset is powered
on.
Power Off
Long Press Power Key
Power off
Handset powers off.
Using Touchscreen
Handset uses a touchscreen-type Display. Operate with your
fingers on Display.
Tap
Contact Display lightly and briefly.
Touch & Hold
Contact Display lightly; release finger when screen changes.
Drag
Touch icon or other item lightly, move it where desired, and
release finger.
Swipe/Flick
Contact Display lightly, then brush screen up/down or left/
right.

15
Preparing to Use Handset DIGNO® J
Pinch/Spread
Contact Display lightly, then close/widen fingers.
Setting a Google Account
Use a Google account and get more convenience with Google
services. A Google account is required to use some services or
fully use some applications.
Google Account Cautions
Be careful not to forget your Google account mail address
or password.
Creating a Google Account
In Home Screen, (Apps)
(Settings)
Accounts
Add account

16
Google
Window for logging in to a Google account opens.
Follow onscreen instructions
A Google account is added.
Logging In with a Google Account
If an application is activated that requires a Google account,
a window for adding a Google account opens. Sign in with a
Google account you have so you can use the application.
In Home Screen, (Apps)
(Settings)
Accounts
Add account

17
Preparing to Use Handset DIGNO® J
Google
Window for logging in to a Google account opens.
In window for logging in to a Google account, enter mail
address NEXT
Enter password NEXT
Follow onscreen instructions
You are logged in to your Google account.
Waking Handset from Sleep
Display goes out after a set period of inactivity.
Alternatively, Press Power Key to enter sleep manually. This
saves battery power and prevents accidental Touchscreen
operation.
Sleep
Display goes out after a set period of inactivity to save
power (sleep).
Touchscreen becomes inoperative and prevents accidental
operation.
・Press Power Key while Display is on to enter sleep manually.
If Handset Enters Sleep while Music
Playing
Music continues to play. After pressing Power Key while
Display is off (sleep), operation panel appears in Start
Screen (operation depends on application being used).
Unlocking Start Screen
In Sleep mode, Press Power Key
Start Screen appears.
Drag/Flick screen
Start Screen is unlocked.
・If Pattern / PIN / Password is set for Start Screen, follow
onscreen instructions to unlock.
・Security method for Start Screen can be changed.

18
Table of contents
Other Digno Cell Phone manuals


