Digno U User manual

DIGNO® U
User Guide


1
DIGNO® U
DIGNO® U User Guide Contents
Introduction
Introduction.........................................................................3
Getting Started
Package Contents............................................................... 6
Parts & Functions.............................................................. 6
USIM Card Installation....................................................... 8
Internal Storage & SD Card.............................................10
Charging Battery.............................................................. 13
Power On/Off................................................................... 14
Touchscreen Operations................................................... 15
Basic Operations
Basic Operations...............................................................18
Handset Phone Number.................................................... 20
Silent Mode....................................................................... 20
Airplane Mode................................................................... 21
Text Entry.........................................................................21
Google Account................................................................. 22
Google Play....................................................................... 23
Security Codes.................................................................. 25
USIM PIN............................................................................26
Entering Sleep Mode........................................................ 27
Software Updates.............................................................27
Handset Interface
Home Screen Basics..........................................................30
Status Bar......................................................................... 30
Notifications Window.......................................................32
Phone
Calling................................................................................ 34
Optional Services..............................................................35
Address Book.................................................................... 40
Messaging & Browser
Messaging.......................................................................... 42
Sending S! Mail/SMS.........................................................42
Creating/Sending Gmail....................................................43
Using E-mail...................................................................... 44
Using Chrome.................................................................... 44
Camera
Imaging...............................................................................48
Music & Images
Music Files.........................................................................50
Still Images & Videos.......................................................50
Connectivity
Wi-Fi...................................................................................52
Bluetooth®........................................................................ 53

2
Global Services
Calling Outside Japan...................................................... 56
Settings
About Settings..................................................................60
Profile................................................................................ 61
Wi-Fi Settings...................................................................61
Bluetooth Settings........................................................... 62
Data Usage Settings.........................................................63
More Settings................................................................... 63
Changing Home..................................................................64
Call Settings..................................................................... 64
Sound/Vibration Settings................................................ 65
Display Settings................................................................66
Notification Panel Settings.............................................66
Storage Settings...............................................................67
Eco Mode Settings............................................................67
Battery Settings...............................................................68
Apps Settings....................................................................68
Accounts & Sync Settings............................................... 69
Location Settings............................................................. 69
Start Screen Settings...................................................... 70
Security Settings..............................................................71
Language & Input Settings..............................................71
Backup & Reset.................................................................72
Date & Time Settings...................................................... 72
Accessibility Settings.......................................................73
Printing Settings.............................................................. 73
About Phone......................................................................74
Appendix
Specifications....................................................................76
Materials............................................................................76
Customer Service.............................................................. 77
Safety Precautions
Safety Precautions........................................................... 80
General Notes................................................................... 89
Water/Dust/Shock Resistance......................................... 94

3
Introduction DIGNO® U
Introduction
Introduction
Thank you for purchasing DIGNO® U.
Before You Begin
・DIGNO® U is referred to as "handset" in this guide.
・Read "Safety Precautions" and this guide thoroughly
beforehand for proper usage.
・Accessible services may be limited by contract conditions.
・Unauthorized copying of any part of this guide is
prohibited.
・Guide content subject to change without prior notice.
・Contact SoftBank Customer Support, General Information if
you find inaccuracies.
Guide Usage Notes
・Most operation descriptions are based on default settings.
・Unless noted otherwise, descriptions are for Home Screen.
・Some operation descriptions may be omitted.
・In this guide and on handset, "abroad" means "outside Japan"
with regard to handset/service usage.
・In this guide, microSD™/microSDHC™ Card is referred to as
"SD Card."
Screenshots & Key Labels
Screenshots and Key labels are provided for reference only.
Actual handset windows, menus, etc. may differ in appearance.
Accessing Guide on Handset
Access this Guide on handset via Guide icon in Home Screen
or via Guide indicator on Status Bar. Guide indicator appears
on Status Bar by default. Follow these steps to hide Guide
indicator:
Access Guide Indicator off Back

4

Getting Started
Package Contents............................................................... 6
Parts & Functions.............................................................. 6
USIM Card Installation....................................................... 8
Internal Storage & SD Card.............................................10
Charging Battery.............................................................. 13
Power On/Off................................................................... 14
Touchscreen Operations................................................... 15

6
Package Contents
Package Contents
・Handset (DIGNO® U)
(Battery is built in)
・クイックスタート (Japanese)
・お願いとご注意 (Japanese)
・Warranty (Japanese)
Parts & Functions
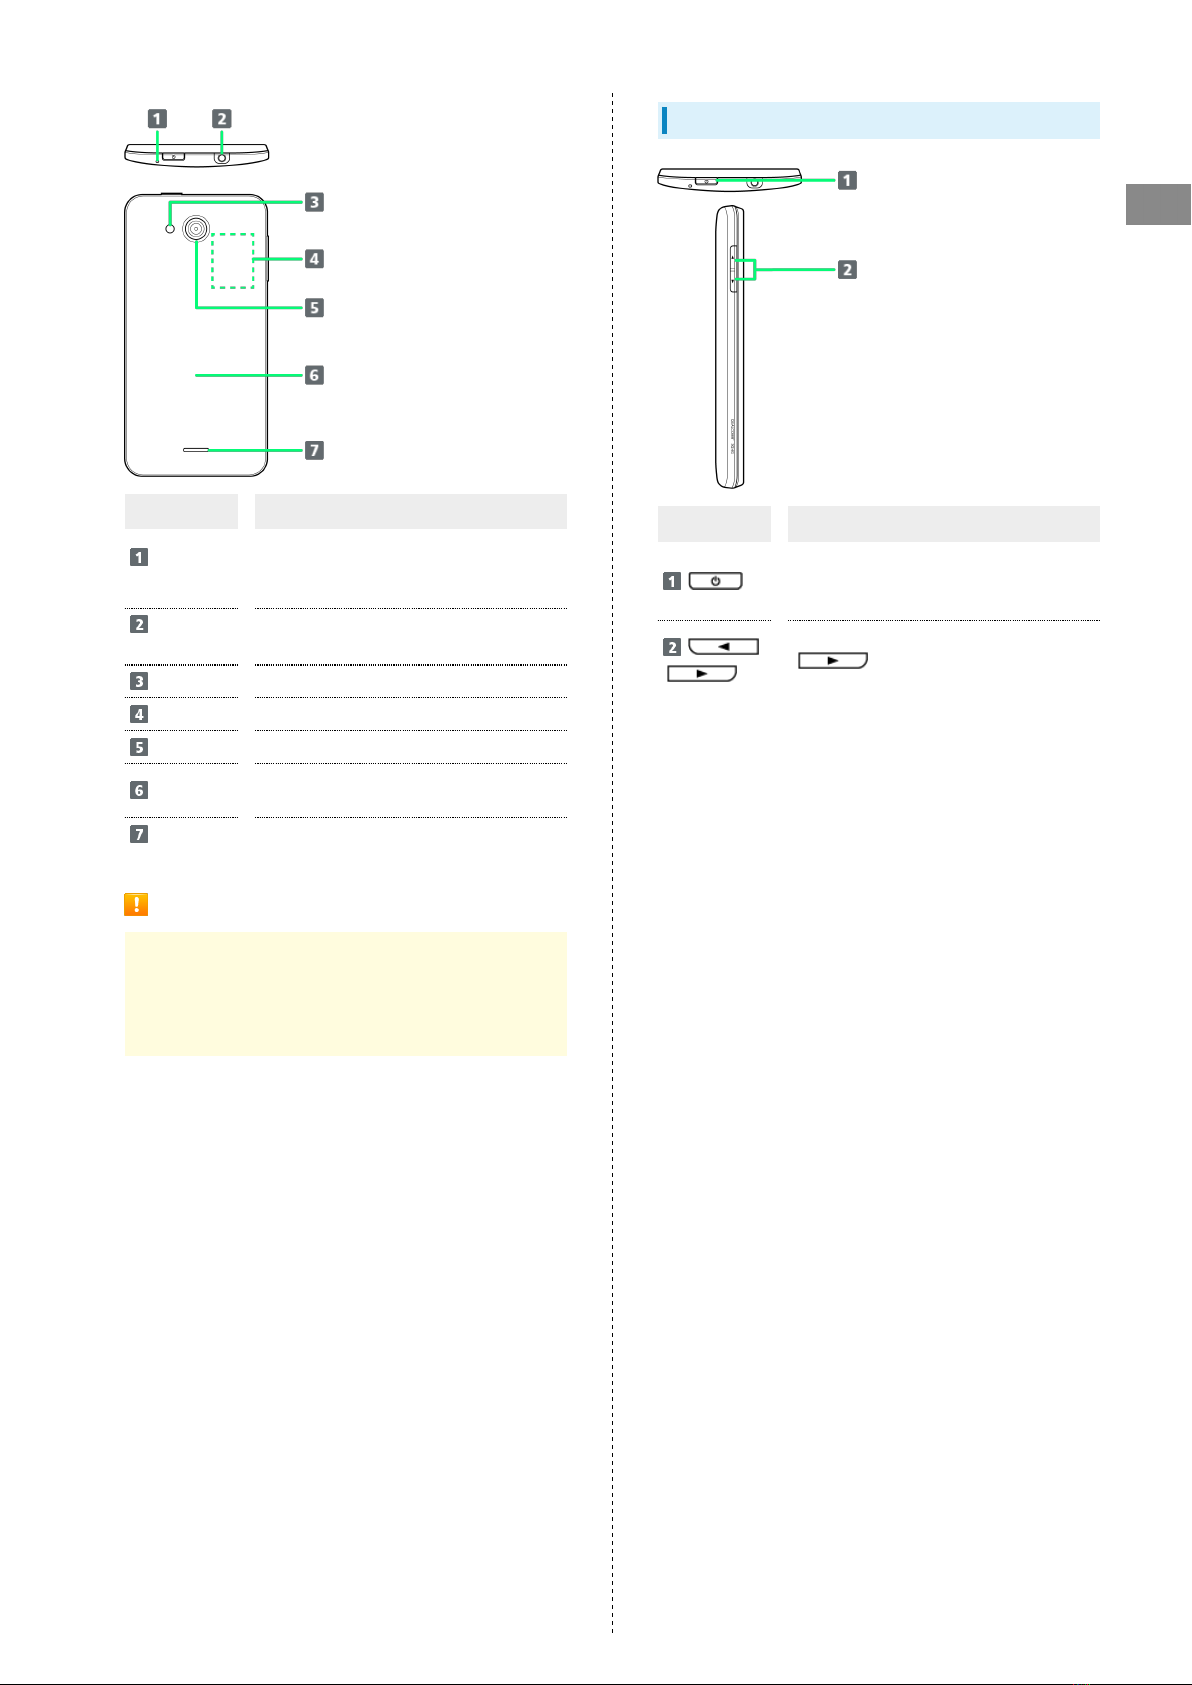
Front/Top/Bottom
Part Description
Front
Camera Capture your own image
Earpiece Hear the other party's voice here
Light/
Proximity
Sensor
Detects surrounding brightness/prevents
Touchscreen misoperation during call
Touchscreen
Display Tap, Swipe/Flick, etc.
External
Device Port
Connect AC Charger (sold separately) or
Micro USB cable (sold separately)
Mic Speak here
7
Getting Started DIGNO® U
Part Description
Noise
Cancel Mic
Detects surrounding noise so other party
can hear you clearer (avoid covering with
fingers, etc. during call)
3.5 mm
Audio Port Connect earphones
Light Use as camera flash/flashlight
Card Slot Insert USIM Card, SD Card
Camera Capture images
Back Cover Open to insert/remove USIM Card or SD
Card
Speaker Ringer and Speakerphone sound from here
Cautions
Handset is airtight to maintain water resistance (IPX7).
Pressing handset forcefully may produce sound around
Earpiece, but this is not a function or performance
abnormality.
Handset Keys
Part Description
Turn Display on/off
Long Press for power on/off and settings
such as reboot and Airplane mode
/Adjust Volume
(Volume Down Key) Long Press
for Silent mode on/off

8
USIM Card Installation
USIM Card IC chip contains customer and authentication
information, including handset number.
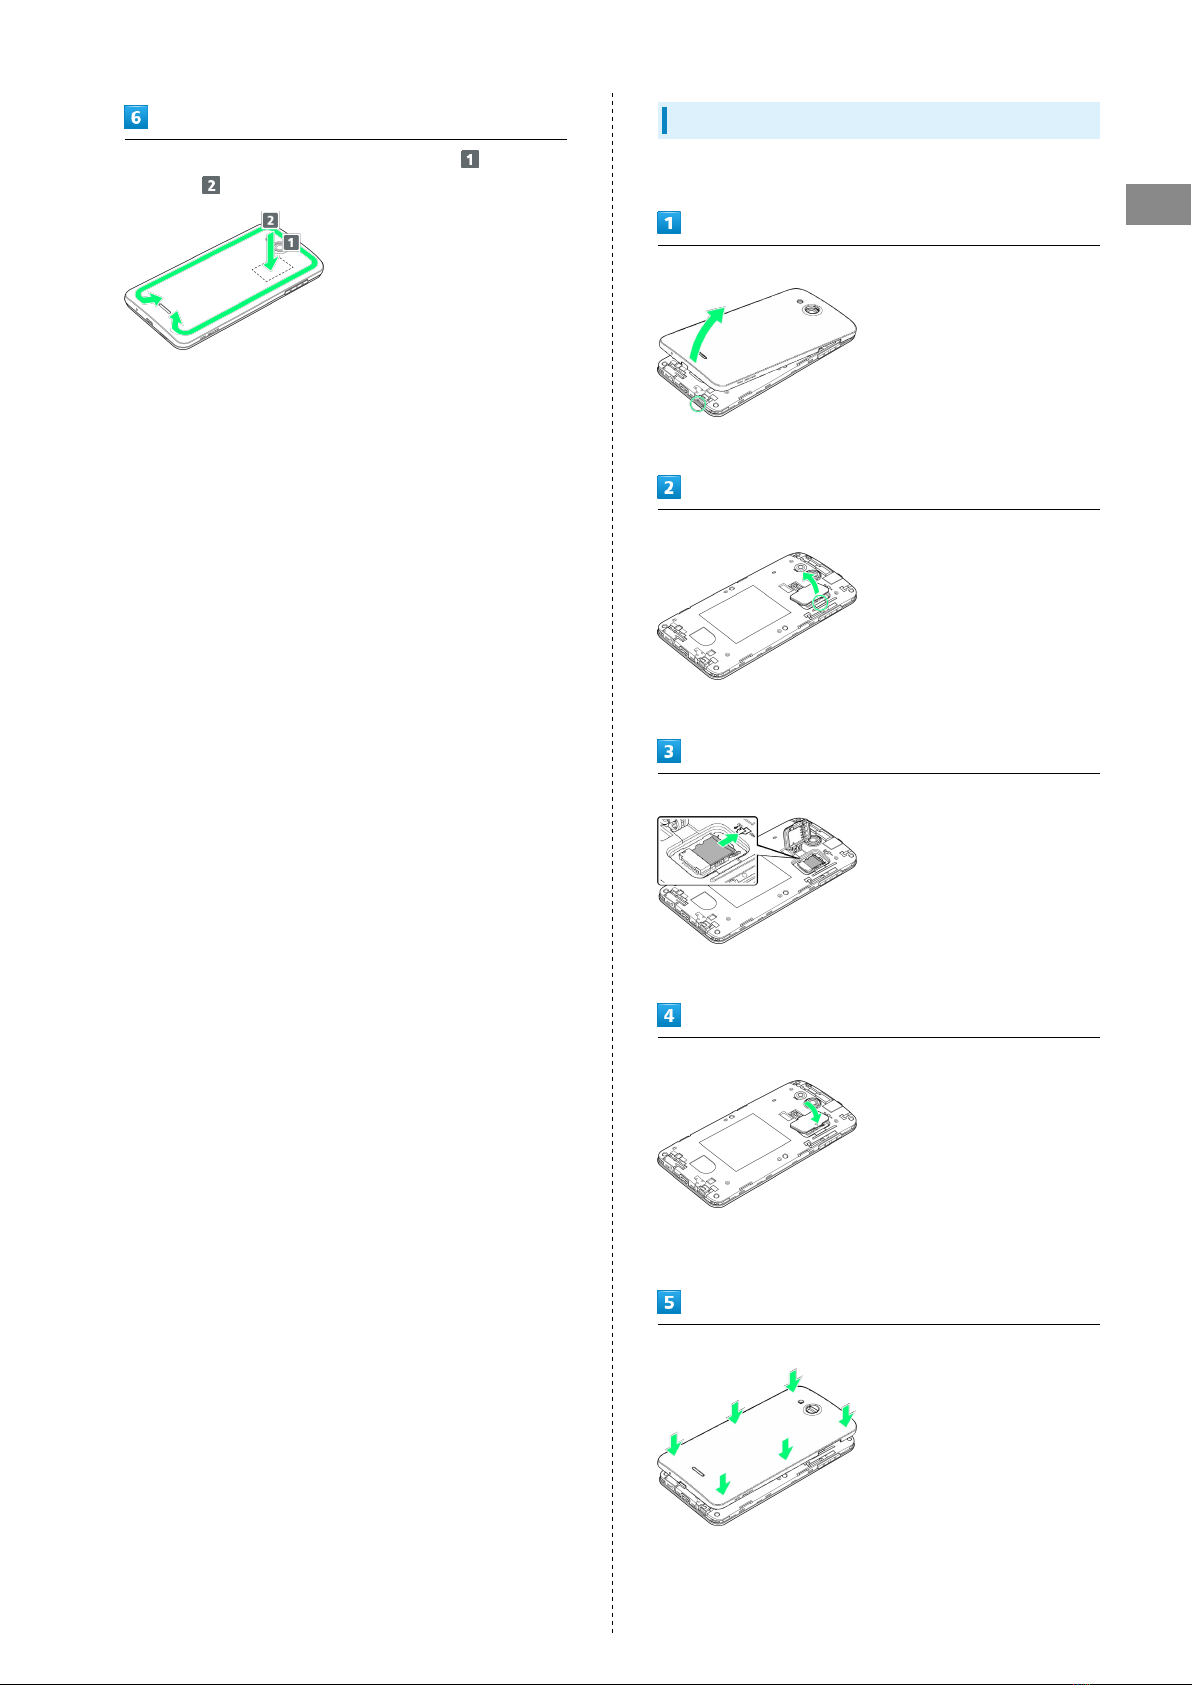
Inserting USIM Card
Always power off beforehand.
Remove Back Cover
・Lift gently in direction shown from notch to remove.
Open Card Slot Cap
・Lift gently in direction shown from notch to open.
While pressing with pad of finger, slide USIM Card Slot Cover
in direction shown until it clicks unlocked
Lift USIM Card Slot Cover in direction shown
Slide USIM Card in direction shown to insert in USIM Card Slot
Cover
・Note location of notch.
Lower USIM Card Slot Cover in direction , and then slide
in direction with pad of finger until it clicks locked
Close Card Slot Cap
・Lower Card Slot Cap in direction shown.
・Close firmly ensuring Card Slot Cap is not raised.
Place Back Cover on handset, and press as shown
Press around edges of Back Cover in direction and press
firmly at to attach completely
・Close firmly making sure there are no gaps to prevent water
intrusion.

9
Getting Started DIGNO® U
Removing USIM Card
Always power off beforehand.
Remove Back Cover
・Lift gently in direction shown from notch to remove.
Open Card Slot Cap
・Lift gently in direction shown from notch to open.
While pressing with pad of finger, slide the USIM Card Slot
Cover in the direction shown until it clicks unlocked
Lift the USIM Card Slot Cover in the direction shown
Slide USIM Card in direction shown to remove
Lower USIM Card Slot Cover in direction , and then slide
in direction with pad of finger until it clicks locked
Close Card Slot Cap
・Lower Card Slot Cap in direction shown.
・Close firmly ensuring Card Slot Cap is not raised.
Place Back Cover on handset, and press as shown
Press around edges of Back Cover in direction and press
firmly at to attach completely
・Close firmly making sure there are no gaps to prevent water
intrusion.
Card Slot Cap
Card Slot Cap is designed to be easy to remove. If it becomes
removed, reattach as follows.
Hook Card Slot Cap as shown Turn Card Slot Cap in
direction shown

10
Internal Storage & SD Card
Handset accepts a microSDHC/microSD Card up to 32 GB. Some
SD Cards may not operate properly.
Internal storage is available for saving data such as captured
still images and videos.
Important SD Card Usage Notes
Back Up Your Files
SoftBank Mobile Corp. is not liable for any damages
resulting from accidental loss/alteration of information.
Keep a copy of contacts, etc. in a separate place.
Low Battery Warning
SD Card may not read/write files correctly if Battery is
low.
Storage
Two storage areas are available with handset, internal storage
and SD Card. They function as follows.
Type Function
Internal
storage
Captured still images/videos, mail
attachments, etc. are saved here. Connect
with a PC to exchange files.
SD Card
Use for transferring files. Save image,
music, and other files to SD Card for use
on handset.
Inserting SD Card
Remove Back Cover
・Lift gently in direction shown from notch to remove.
Open Card Slot Cap
・Lift gently in direction shown from notch to open.
Place SD Card as shown and slide in direction shown to insert
・Insert SD Card all the way gently without bending and with
terminals facing down.
・Insert only SD Cards.
Close Card Slot Cap
・Lower Card Slot Cap in direction shown.
・Close firmly ensuring Card Slot Cap is not raised.
Place Back Cover on handset, and press as shown
11
Getting Started DIGNO® U
Press around edges of Back Cover in direction and press
firmly at to attach completely
・Close firmly making sure there are no gaps to prevent water
intrusion.
Removing SD Card
Always unmount SD Card before removing.
Remove Back Cover
・Lift gently in direction shown from notch to remove.
Open Card Slot Cap
・Lift gently in direction shown from notch to open.
Slide SD Card in direction shown to remove
・Remove gently without bending.
Close Card Slot Cap
・Lower Card Slot Cap in direction shown.
・Close firmly ensuring Card Slot Cap is not raised.
Place Back Cover on handset, and press as shown

12
Press around edges of Back Cover in direction and press
firmly at to attach completely
・Close firmly making sure there are no gaps to prevent water
intrusion.
Formatting SD Card
When using a new SD Card for the first time, always format it
on handset.
・Formatting erases all data on SD Card. Carefully check any
SD Card that was used on another device before formatting.
・Charge Battery while formatting, or format with adequate
battery charge.
In Home Screen, (Apps) (Settings)
Storage
Erase SD card
Erase SD card
Erase everything
Handset erases all data in internal storage.

13
Getting Started DIGNO® U
Card Slot Cap
Card Slot Cap is designed to be easy to remove. If it becomes
removed, reattach as follows.
Hook Card Slot Cap as shown Turn Card Slot Cap in
direction shown
Charging Battery
AC Charger
AC Charger is an optional accessory. Be sure to use KYCAA1,
KYCAC1, ZTDAC1 (Micro USB 1.0A), or ZTDAD1 (Micro USB
1.8A) specified by SoftBank Mobile Corp.
See SoftBank Mobile Website for information on other
accessories.
The following explains how to charge handset using KYCAC1.
・See User Guide for your AC Charger.
Connect AC Charger
・Grasp Micro USB plug and insert as shown.
Plug in AC Charger
Disconnect AC Charger after charging
・Unplug from outlet and disconnect handset.
14
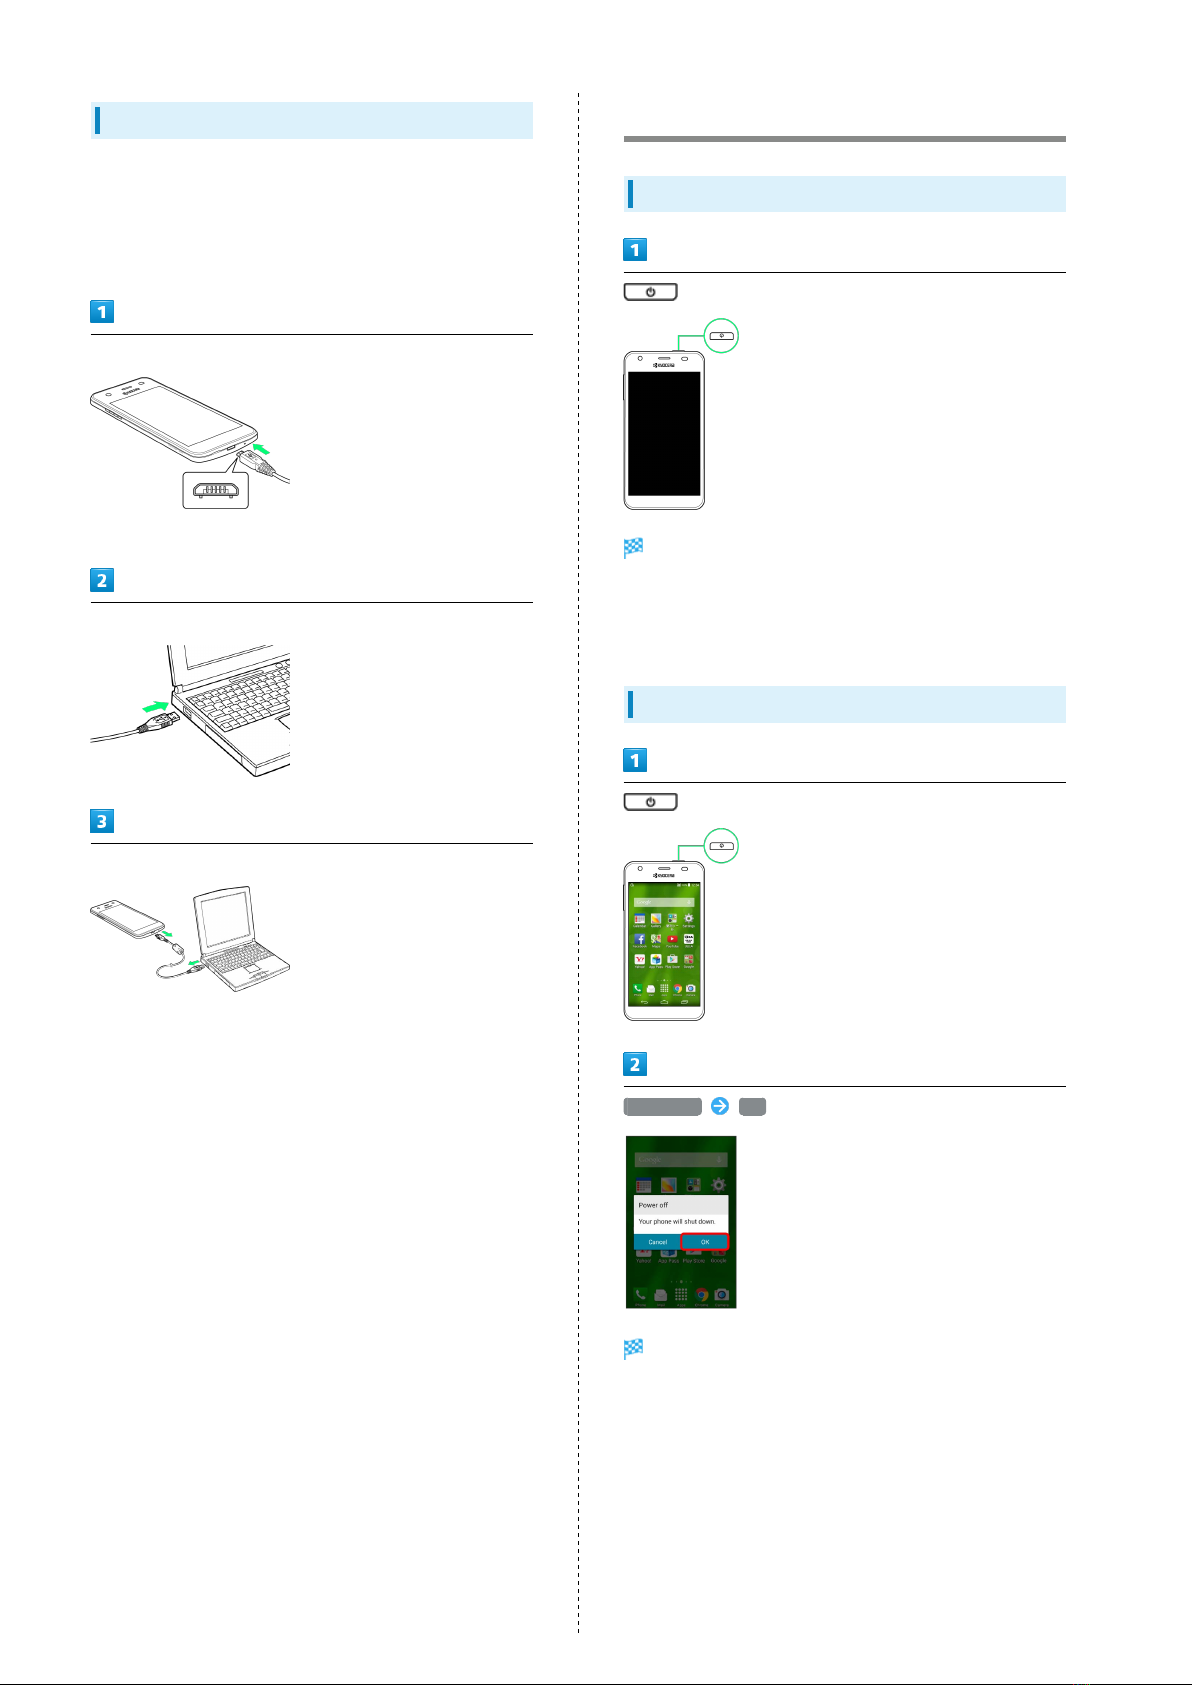
USB Charging
Battery can be charged by Micro USB Cable (sold separately).
・Power on PC first.
・Battery may not charge or charge slowly depending on PC
status/environment.
Connect Micro USB Cable
・Grasp Micro USB plug and insert as shown.
Connect Micro USB Cable to PC USB port
Disconnect Micro USB Cable from handset
Power On/Off
Power On
(Long Press)
Start Screen appears.
・To exit from Sleep mode, see "Exiting Sleep Mode."
・Startup guidance appears the first time handset is powered
on.
Power Off
(Long Press)
Power off OK
Handset shuts down.

15
Getting Started DIGNO® U
Touchscreen Operations
Touch Display to select menu items, open functions, scroll
pages, etc.
Tap
Tap item or key to open or execute corresponding function/
operation.
Touch & Hold
Touch item for 1+ seconds to move icons, open menus, etc.
Drag
Drag item (e.g., Touchscreen unlock slider) to move it.
Swipe/Flick
Swipe/Flick to toggle sheets, pages, etc.
Pinch/Spread
Pinch/Spread to zoom in or out on images, etc.

16

Basic Operations
Basic Operations...............................................................18
Handset Phone Number.................................................... 20
Silent Mode....................................................................... 20
Airplane Mode................................................................... 21
Text Entry.........................................................................21
Google Account................................................................. 22
Google Play....................................................................... 23
Security Codes.................................................................. 25
USIM PIN............................................................................26
Entering Sleep Mode........................................................ 27
Software Updates.............................................................27
18
Basic Operations
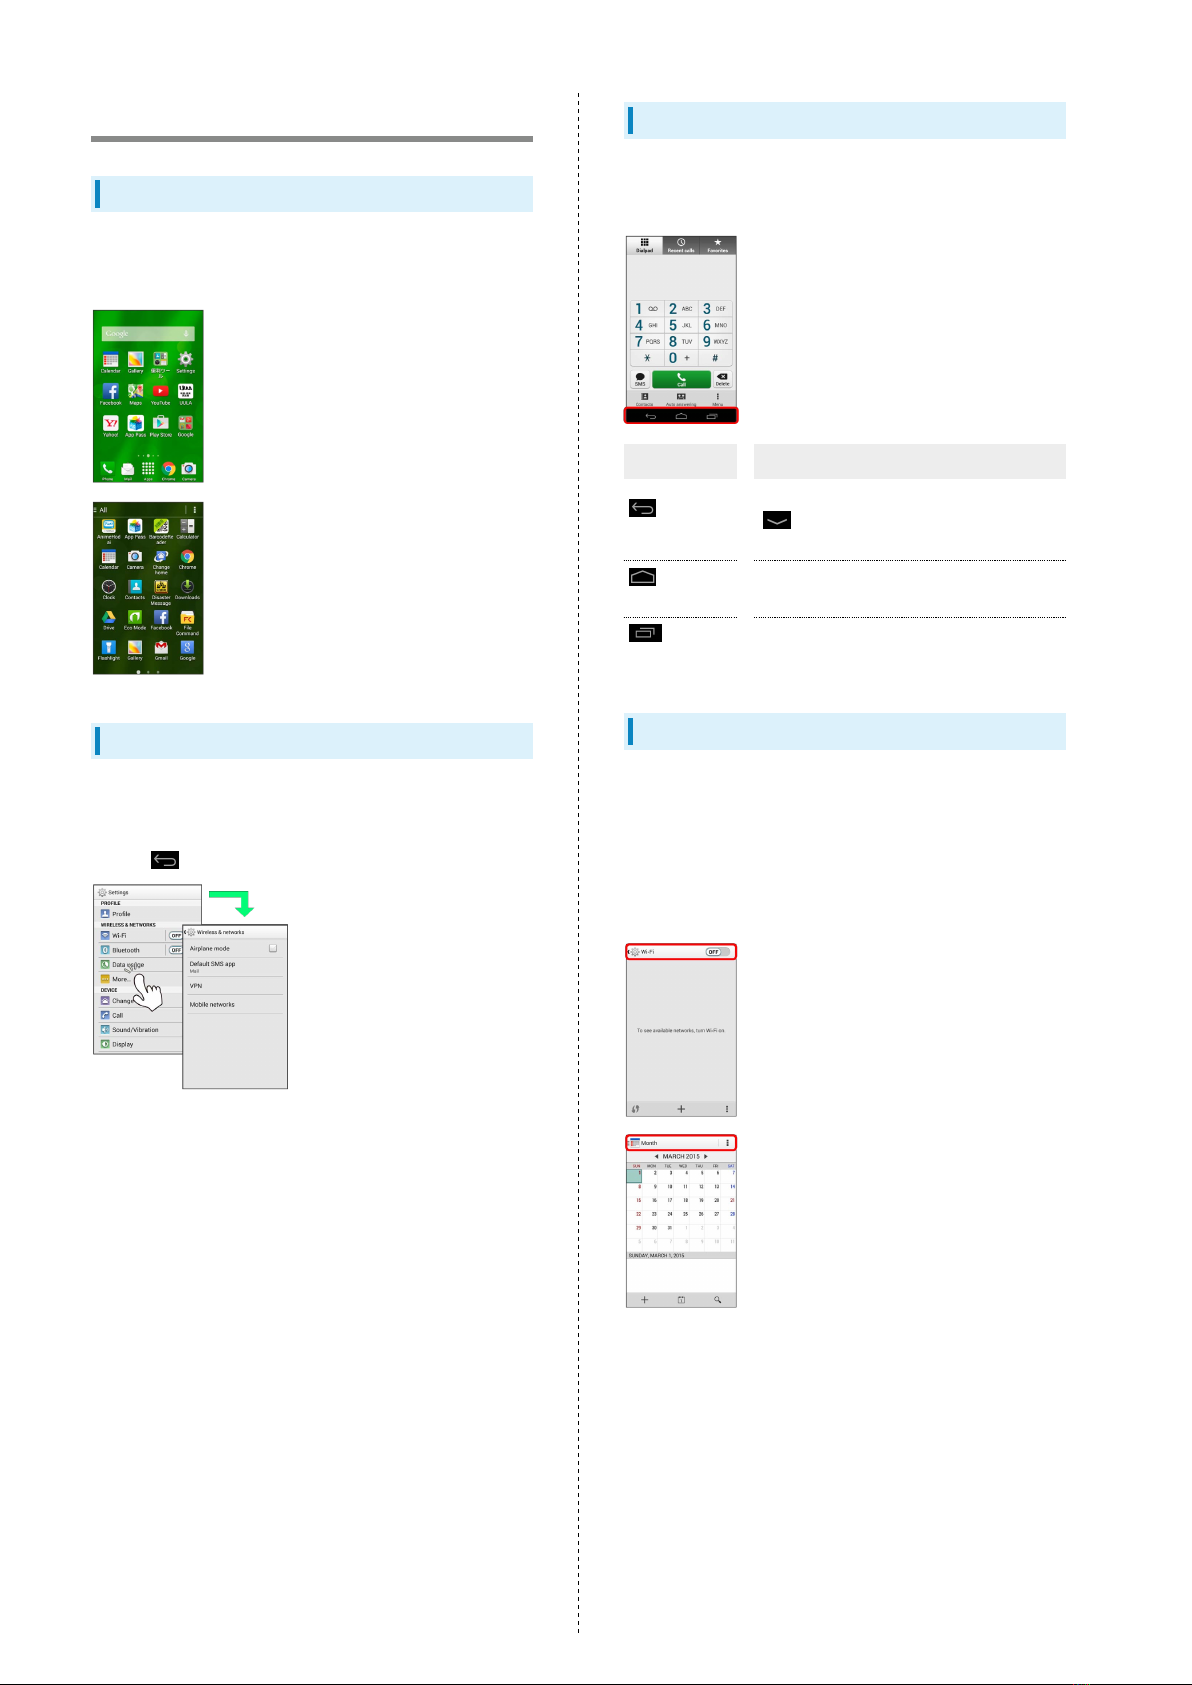
Home Screen & Apps Menu
Most handset operations start in Home Screen (appears at
power on) or in Apps Menu.
Handset Navigation
Tap menu items, icons, onscreen key, etc. to open assigned
items.
・Press to go back or escape.
Navigation Bar
Tap icons on Navigation Bar (Display bottom) for the
following functions/operations.
Icon Description
(Back
key)
Return to previous screen. Appears as
in an onscreen keyboard; Tap to
close keyboard.
(Home
key) Return to Home Screen.
(Recent
Apps key)
Open listing of recently used applications
and activate or delete applications.
Action Bar
Current application/settings window title appears on Action
Bar (Display top). Tap onscreen key or icons at right of Action
Bar to turn function off/on or access available functions.
・Icons for available functions may also appear at the bottom
of Display.
・Touch and Hold icon for function name.
Table of contents
Other Digno Cell Phone manuals


