Diloc SKY9000PLUS User manual

DC Inverter R32
INSTALLATION AND USER MANUAL
NOTA BENE:
Leggere attentamente
questo manuale prima di
installare e/o utilizzare il
prodotto. Conservare il
presente manuale per
futura consultazione.
PLUS
PLUS
PLUS
PLUS
CONTENTS
SAFETY PRECAUTIONS
NAMES OF PARTS
INDOOR UNIT DISPLAY
OPERATING INSTRUCTIONS
INSTALLATION MANUAL
MAINTENANCE
TROUBLESHOOTING
EMERGENCY FUNCTION & AUTO-RESTART FUNCTION
REMOTE CONTROLLER
....................................................................................................2
.................................................................................................................5
.........................................................................................................6
..............................................7
........................................................................................................8
.............................................................................................12
....................................................................................................19
....................................................................................................................32
..........................................................................................................33
INTRODUCTION TO REFRIGERANTS R32/R290
....................................................................................................1
INTRODUCTION TO REFRIGERANTS R32&R290
Introduction to Refrigerants R32 & R290
The refrigerants used for air conditioners are environmentally friendly hydrocarbons R32 and R290.
The two kinds of refrigerants are combustible and odorless. Moreover, they can burn and explode
under certain condition. However, there will be no risk of burning and explosion if you comply with
the following table to install your air conditioner in a room with an appropriate area and use it
correctly.
Compared with ordinary refrigerants, Refrigerants R32 & R290 are environmentally friendly and do
not destroy theozone sphere andthat their valuesof greenhouse effect are alsovery low.
Warnings
Please read themanual before installation,using, maintenance.
Do not usemeans to acceleratethe defrosting processor to clean,other than thoserecommended by
the manufacturer.
It is necessaryto comply withthe provisions ofgas-related national lawsand regulations.
The appliance shall be stored in a room without continuously operating sources (for example: open
flames, an operatingignition gas applianceor an operatingelectric heater.)
Please contact the nearest after-sale service center when maintenance is necessary. At the time of
maintenance, the maintenance personnel must strictly comply with the Operation Manual provided
by the corresponding manufacturer and any non-professional is prohibited to maintain the air
conditioner.
Do not pierceor burn theappliance.
It is necessary to clear away the refrigerant in the system when maintaining or scrapping an air
conditioner.
Warning:Combustible
& Dangerous Read the user manual Read the installation
manual
Read the service
manual
Be aware thatrefrigerants may notcontain an odour.

During the installation of the indoor and
outdoor units the access to the working area
should be forbidden to children.
Unforeseeable accidents could happen.
Make sure that the base of the outdoor unit is
firmly fixed.
Check that air cannot enter the refrigerant
system and check for refrigerant leaks when
moving the air con ditioner.
SAFETY RULES AND RECOMMENDATIONS FOR THE INSTALLER
Carry out a test cycle after installing the air
conditioner and record the operating data.
The ratings of the fuse installed in the built
incontrol unit are T 5A / 250V .
The user must protect the indoor unit with a
fuse of suitable capacity for the maximum input
current or with another overload protection
device.
Ensure that the mains voltage corresponds to
that stamped on the rating plate. Keep the switch
or power plug clean. Insert the power plug
correctly and firmly into the socket, thereby
avoiding the risk of electric shock or fire due to
insufficient contact.
Check that the socket is suitable for the plug ,
otherwise have the socket changed.
Do not install the appliance at a distance of
less than 50 cm from inflammable substances
(alcohol, etc.) Or from pressurised containers
(e.g. spray cans).
If the appliance is used in areas without the
possibility of ventilation, precautions must be
taken to prevent any leaks of refrigerant gas
from remaining in the environment and creating
a danger of fire
The packaging materials are recyclable and
should be disposed of in the separate waste
bins .Take the air conditioner at the end of its
useful life to a special waste collection centre
for disposal.
Only use the air conditioner as instructed in
this booklet. These instructions are not intended
to cover every possible condition and situation .
As with any electrical household appliance ,
common sense and caution are therefore always
recommended for installation, operation and
maintenance.
The appliance must be installed in accordance
with applicable national regulations.
Before accessing the terminals , all the power
circuits must be disconnected from the power
supply.
Read this guide before installing and using the
appliance.
2
The appliance must be fitted with means for
disconnection from the supply mains having a
contact separation in all poles that provide full
disconnection under overvoltage category III
conditions, and these means must be incorporated
in the fixed wiring in accordance with the wiring
rules.
The appliance shall be installed in accordance
with national wiring regulations.
This appliance can be used by children aaged
from 8 years and above and persons with
reduced physical, sensory or mental capabilities
or lack of experience and knowledge if they
have been given supervision or instruction
concerning use of the appliance in a safe way
and understand the hazards involved. Children
shall not play with the appliance. Cleaning and
user maintenance shall not be made by
children without supervision.
The air conditioner must be installed by
professional or qualified persons.
SAFETY RULES AND RECOMMENDATIONS FOR THE USER
Do not try to install the conditioner alone;
always contact specialized technical personnel.
Cleaning and maintenance must be carried out
by specialised technical personnel. In any case
disconnect the appliance from the mains
electricity supply before carrying out any
cleaning or maintenance.
Ensure that the mains voltage corresponds to
that stamped on the rating plate. Keep the switch
or power plug clean. Insert the power plug
correctly and firmly into the socket , thereby
avoiding the risk of electric shock or fire due
to insufficient contact.
Do not pull out the plug to switch off the
appliance when it is in operation, since this
could create a spark and cause a fire, etc.
If the appliance gives off smoke or there is a
smell of burning, immediately cut off the pow
er supply and contact the Service Centre.
Have repairs carried out only by an authorised
Service Centre of the manufacturer . Incorrect
repair could expose the user to the risk of
electric shock, etc.
The prolonged use of the device in such
conditions could cause fire or electrocution.
Never remain directly exposed to the flow of
cold air for a long time. The direct and prolonged
exposition to cold air could be dangerous for your
health .Particular care should be taken in the
rooms where there are children , old or sick
people.
This appliance has been made for air
conditioning domestic environments and must
not be used for any other purpose , such as for
drying clothes, cooling food, etc.
The packaging materials are recyclable and
should be disposed of in the sparate waste
bins . Take the air conditioner at the end of its
useful life to a special waste collection centre
for disposal.
Only use the air conditioner as instructed in
this booklet.These instructions are not int ended
to cover every possible condition and situation.
As with any electrical household appliance,
common sense and caution are therefore always
recommended for installation , operation and
maintenance.
Always use the appliance with the air filter
mounted . The use of the conditioner without
air filter could cause an excessive accumulation
of dust or waste on the inner parts of the device
with possible subsequent failures.
Unhook the automatic switch if you foresee
not to use the device for a long time.
The airflow direction must be properly adjusted.
The user is responsible for having the appliance
installed by a qualified technician , who must
check that it is earthed in accordance with current
legislation and insert a thermomagnetic circuit
breaker.
Ensure that the appliance is disconnected from
the power supply when it will remain inoperative
for a long period and before carrying out any
cleaning or maintenance.
Selecting the most suitable temperature can
prevent damage to the appliance.
The flaps must be directed downwards in
the heating mode and upwards in the cooling
mode.
The batteries in remote controller must be
recycled or disposed of properly.
Disposal of Scrap Batteries --- Please discard
the batteries as sorted municipal waste at the
accessible collection point.
3
SAFETY RULES AND PROHIBITIONS
4
Do not bend , tug or compress the power cord
since this could damage it. Electrical shocks or
fire are probably due to a damaged power cord.
Specialised technical personnel only must replace
a damaged power cord.
Do not use extensions or gang modules.
Do not touch the appliance when barefoot or
parts of the body are wet or damp.
Do not obstruct the air inlet or outlet of the
indoor or the outdoor unit.
The obstruction of these openings causes a
reduction in the operative efficiency of the
conditioner with possible consequent failures
or damages.
In no way alter the characteristics of the
appliance.
Do not install the appliance in environments
where the air could contain gas , oil or sulphur
or near sources of heat.
Do not climb onto or place any heavy or hot
objects on top of the appliance.
Do not leave windows or doors open for long
when the air conditioner is operating.
Do not direct the airflow onto plants or
animals.
Along direct exposition to the flow of cold
air of the conditioner could have negative
effects on plants and animals.
Do not put the conditioner in contact with
water.
The electrical insulation could be damaged
and thus causing electrocution.
Do not climb onto or place any objects on the
outdoor unit
Never insert a stick or similar object into the
appliance. It could cause injury.
This appliance is not intended for use by
persons (including children ) with reduced
physical, sensory or mental capabilities, or
lack of experience and knowledge, unless they
have been given supervision or instruction
concerning use of the appliance by a person
responsible for their safety.
Children should be supervised to ensure
that they do not play with the appliance.
If the supply cord is damaged, it must be
replaced by the manufacturer,its service
agent or similarly qualified persons in
order to avoid a hazard.

5
NAMES OF PARTS
No. Description
1
2
Front panel
Air filter
Optional filter (if installed)
3
Terminal block cover
4
Emergency button
5
6
LED Display
Signal receiver
7
Airflow direction louver
8Deflectors
9
Remote controller
10
Note: the above figures are only intended to be a
simple diagram of the appliance and may not
correspond to the appearance of the units that
have been purchased.
No. Description
13 Air outlet grille
Terminal block cover
14
gas valve
15
liquid valve
16
11
Indoor unit rating label ( )Stick position optional
17
Outdoor unit rating label
12
Ionizer (if installed)generator
13
15
16
17
INDOOR UNIT
OUTDOOR UNIT
12-3
6
4-5
9
11 8
10 7
14
12
INDOOR UNIT
OUTDOOR UNIT
10
OPTION
ECO TURBO
MODEFAN
AUTOCOOL DRY
FAN HEATECO
SLEEPTIMERIFEEL
HEALTHMILDEW
CLEANDISPLAY8 CH
WINDFREE
GENMODE

INDOOR UNIT DISPLAY
6
The shape and position of switches and indicators may be different according to the model, but their
function is the same.
2
No.
Led Function
1
2
3
Temperature display (if present)
/Error code
(1) Lights up during Timer operation when
the air conditioner is operational
(2)Displays the malfunction code when fault
occurs.
SLEEP mode
Lights up during Timer operation.
SLEEP
TIMER
3
1

EMERGENCY FUNCTION & AUTO-RESTART FUNCTION
7
The shape and position of the emergency button
may be different according to the model, but their
function is the same.
Emergency
button
The emergency button is located on E-box cover
of the unit under the front panel.
front panel
Open and lift the front panel up to an angle to reach
the emergency button.
For heating model, press the emergency button at first
time, the unit will operate in COOL mode. Press at
second time within 3 seconds, the unit will operate in
HEAT mode. Press at third time after 5 seconds, the
unit will turn off.
For cooling only model, press the emergency button
at first time, the unit will operate in COOL mode.
Press again, the unit will turn off.
If the remote controller fails to work or maintenance
necessary, proceed as following:
The appliance is preset with an auto-restart function.
In case of a sudden power failure, the module will
memorizes the setting conditions before the power
failure. When the power restores, the unit will restart
automatically with the previous settings preserved
by the memory function.

8
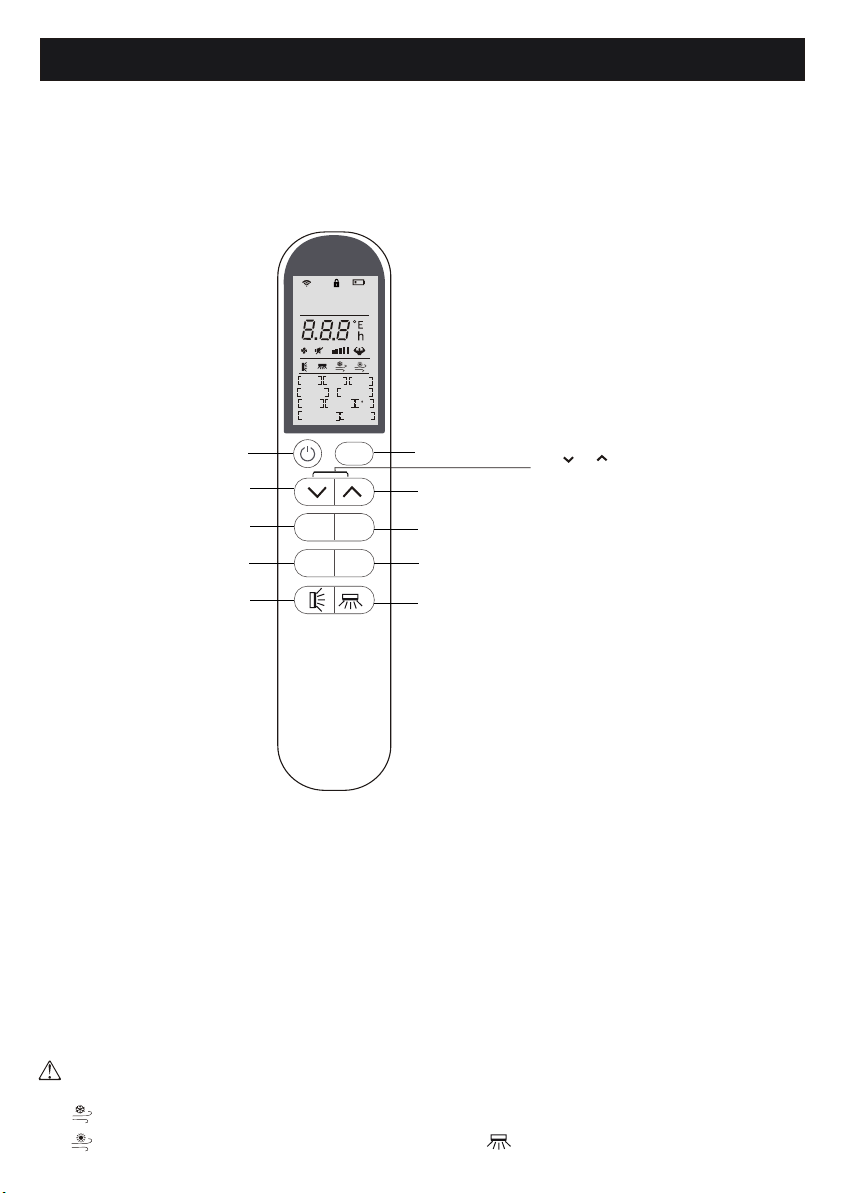
REMOTE CONTROLLER
To select the mode of operation(AUTO COOL DRY FAN HEAT)
To activate / deactivate the ECO function which enables the unit
automatically to sets the operation to achieve energy savings.
Press this button to activate/deactivate the Super function which enables the
unit to reach the preset temperature in the shortest time.
To decrease temperature, time setting or choose the function.
To increase temperature , time setting or choose the function.
To turn on or off the air conditioner .
To select the fan speed of auto/mute/low/mid/mid/high/high/turbo ,
cycle as below
8
10
6
7
9
MODE
ECO
TURBO
1
2
3
4
FAN
5
No.
Button Function
OPTION To activate or deactivate optional function(Check below table).
ON/OFF
Mode OPTIONS
AUTO
COOL
DRY
FAN
HEAT
AUTO
COOL
DRY
FAN
HEAT
TIMER DISPLAY HEALTH I FEEL
TIMER DISPLAY HEALTH SLEEP MILDEW I FEEL
TIMER DISPLAY HEALTH MILDEW I FEEL
TIMER DISPLAY HEALTH I FEEL
TIMER DISPLAY HEALTH SLEEP I FEEL 8 CH
ON
OFF
CLEAN TIMER DISPLAY HEALTH I FEEL
CLEAN TIMER DISPLAY HEALTH SLEEP MILDEW I FEEL
CLEAN TIMER DISPLAY HEALTH MILDEW I FEEL
CLEAN TIMER DISPLAY HEALTH I FEEL
CLEAN TIMER DISPLAY HEALTH SLEEP I FEEL 8 CH
1.If press time interval is over 2 seconds, to activate the swing of vertical
flap(left/right) or deactivate it.
2.If press time interval is in 2 seconds, the swing angle range of vertical flap
will cycle as below.
You will hear a beepwhen you pressthe following buttons or selectthe following optionalfunctions,
though the actualmodel haven't this function, we expressour apologies:
(Optional Function: COMFORTABLE COOLING airflow)
(Optional Function: COMFORTABLE HEATING airflow)
deactivate
Flashing
HEALTH(Optional Function: generate the ionizer)
(button: SWING LEFT/RIGHT)
1.If press time interval is over 2 seconds, to activate the swing of
horizontal deflectors(left/right) or deactivate it.
2.If press time interval is in 2 seconds, the swing angle range of
horizontal deflectors(left/right) will cycle as below.
deactivate
Flashing
REMOTE CONTROLLER
9
OPTION
ECO TURBO
MODE FAN
AUTO COOL DRY
FAN HEAT ECO
SLEEP TIMER I FEEL
HEALTH MILDEW
CLEAN DISPLAY 8 CH
WIND FREE
GEN MODE
7
3
1
9
5
8
4
2
10
6
Hold and together over 3 seconds
to activate of deactivate the Lock function
You will hear a beepwhen you pressthe following buttons or selectthe following optionalfunctions,
though the actualmodel haven't this function, we expressour apologies:
(Optional Function: COMFORTABLE COOLING airflow)
(Optional Function: COMFORTABLE HEATING airflow)
HEALTH(Optional Function: generate the ionizer)
(button: SWING LEFT/RIGHT)
10
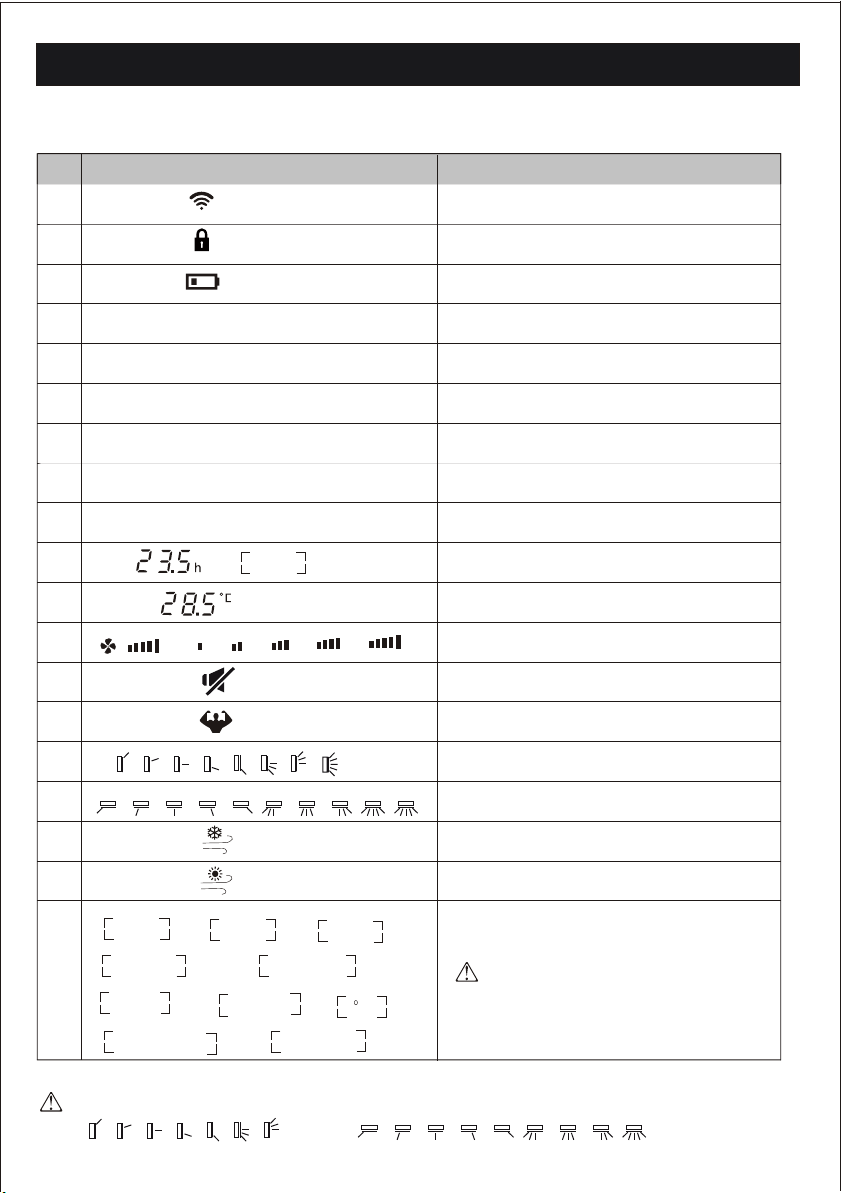
REMOTE CONTROLLER
Remote controller DISPLAY
Meaning of symbols on the liquid crystal display
1
2
3
4
5
6
7
8
9
10
11
12
13
14
Mode Cooling indicator
Mode Dry indicator
Mode Fan indicator
Mode Heating indicator
ECO function indicator
Fan speed indicator: Auto low low mid mid high
15
SUPER indicator
16
17
Mute indicator
18
Flap swing angle indicator
19
Temperature indicator
Meaning
No. Symbols
Deflector swing angle indicator
Comfortable cooling airflow indicator
AUTO
COOL
DRY
FAN
HEAT
ECO
I FEEL
SLEEP
HEALTH
TIMER
DISPLAY
MILDEW
8 CH
CLEAN
WIND FREE
GEN MODE
Flashing
Timer indicator
Single indicator
Lock function indicator
Battery indicator
Mode Auto function indicator
TIMER
Comfortable heating airflow indicator
Optional functions indicator
Notes:
There is no HEALTH/WIND FREE/GEN MODE
functions for current models,
we express our apologies.
flashing
flashing
The following angle can not be selected for current models, we express our apologies.
11
Signal
receptor
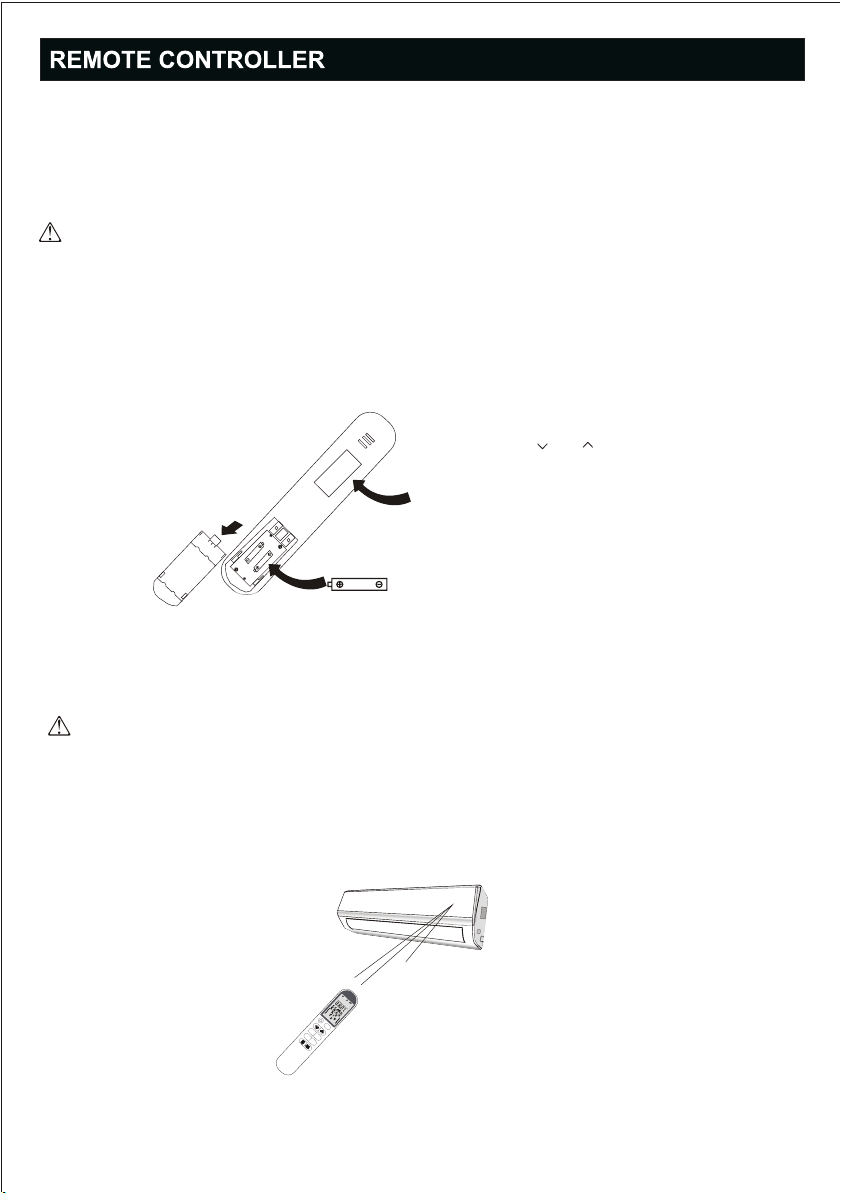
Replacement of Batteries
Remove the battery cover plate from the rear of the remote controller,
by sliding it in the direction of the arrow.
Install the batteries according the direction (+and -)shown on the Remote
Controller.
Reinstall the battery cover by sliding it into place.
Use 2 LRO 3 AAA (1.5V) batteries . Do not use rechargeable
batteries . Replace the old batteries with new ones of the same
type when the display is no longer legible.
Do not dispose batteries as unsorted municipal waste. Collection
of such waste separately for special treatment is necessary.
1. Direct the remote controller toward the Air conditioner.
2. Check that there are no objects between the remote control
and the Signal receptor in the indoor unit.
3. Never leave the remote controller exposed to the rays of the sun.
4. Keep the remote controller at a distance of at least 1m from the
television or other electrical appliances.
OPTION
ECOTURBO
MODEFAN
AUTOCOOLDRY
FAN HEATECO
SLEEPTIMERIFEEL
HEALTH MILDEW
CLEANDISPLAY8 CH
WINDFREE
GENMODE
Note
Child-lock:
Press and
Togetherto active
DisplayON/OFF:
Longpress ECO b-
utton.
Pleaseremove ba-
Tteriesto avoid le-
akagedamage w-
Hennot using for
Along time.
Note
Child-lock:Press and
Togetherto active
Display ON/OFF:
Long press ECObutton
Please remove batteries
Toavoid leakagedamage
when not usingfor a long
time.

OPERATING INSTRUCTIONS
Filter
Heat
Fan
Exchanger
12
The direction of the air outlet is motorized up and down
by flaps, and manually moved right and left by the vertical
deflectors, for some models, the vertical deflectors could be
controlled by motor as well.
The air sucked by the fan enters from the grill and
passes through the filter, then it is cooled/dehumidified
or heated through the heat exchanger.
flaps
flap
movement Deflectors
“SWING”CONTROL OF THE AIR FLOW
The deflectors are positioned manually and placed un-
der the flaps .They allow to direct the air flow rightw-
ard or leftward.
Never position Flaps manually, the delicate mech-
anism might seriously damaged!
Never poke fingers, sticks or other objects in the air
inlet or outlet vents. Such accidental contact with live
pants might cause unforeseeable damage or hurt.
This adjustment must be done while the appliance
is switched off.
1.Press the button to activate the FLAP ,
(1)If press time interval is in 2 seconds,
the swing will cycle as below
(2)If press time interval is over 2 seconds,
it will be deactivate
the air flow is directed alternatively from
up to down .In order to guarantee an even
diffusion of the air in the room.
deactivate
deactivate
Flashing
2.Press the button to activates the motorized deflectors ,
(1)If press time interval is in 2 seconds,
the swing will cycle as below
(2)If press time interval is over 2 seconds,
it will be deactivate
the air flow is directed alternatively from left to right.
(Optional function, depends on the models)
OPTION
ECO TURBO
MODE FAN
flashing
The following angle can not be selected for current models, we express our apologies.
Fan
13
OPTION
ECO TURBO
MODE FAN
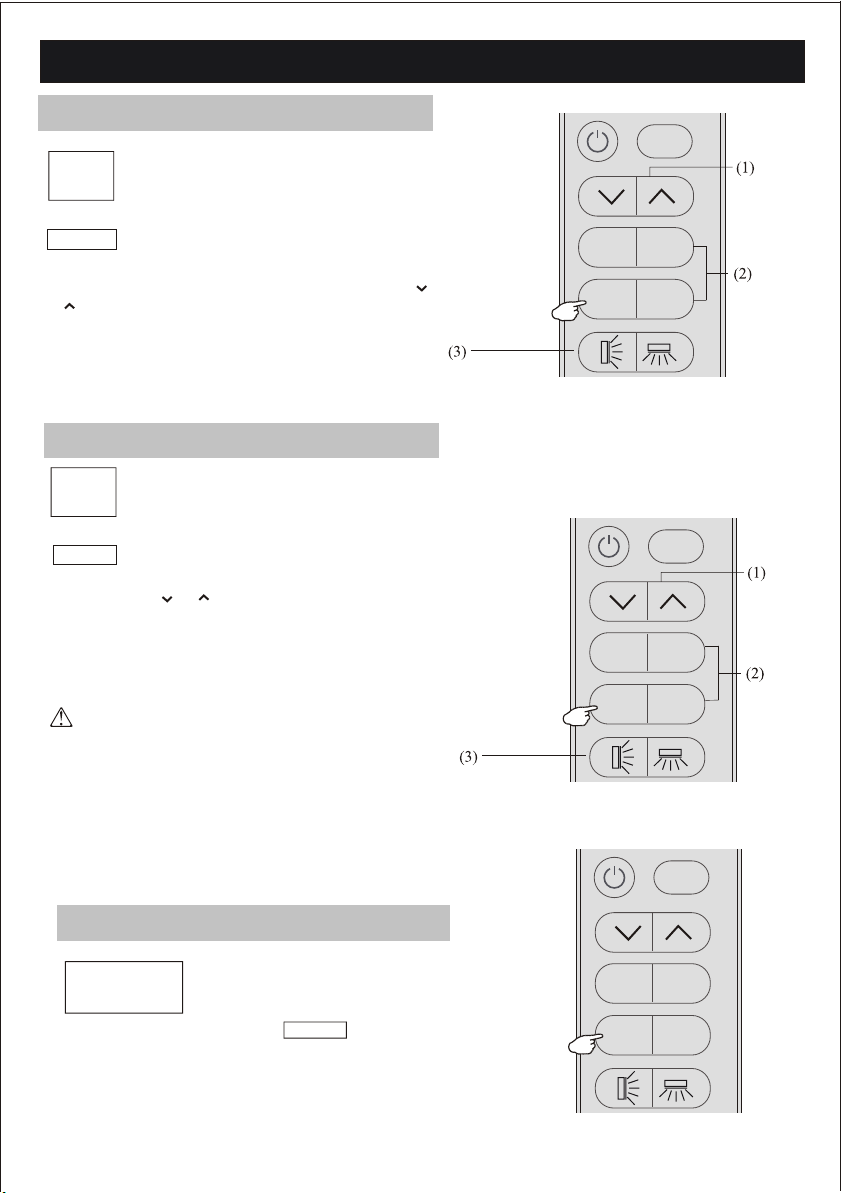
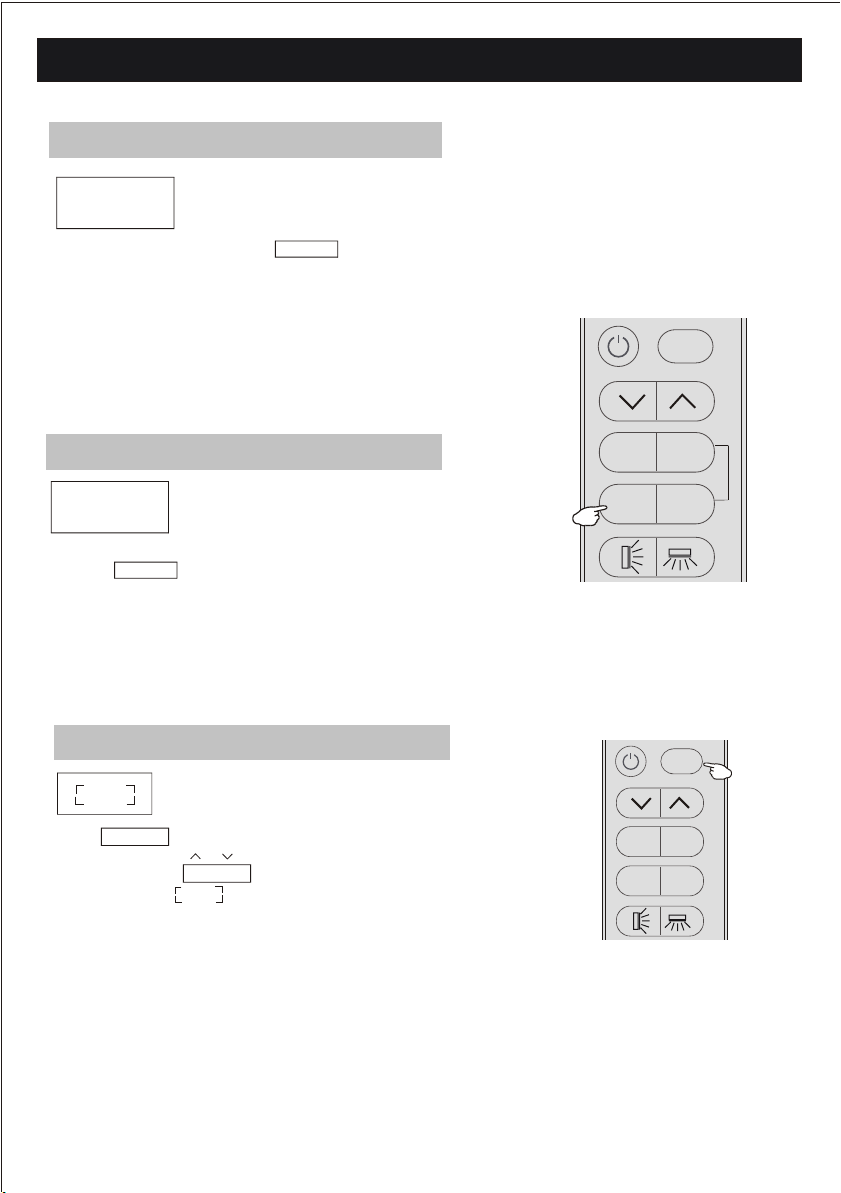
OPERATING INSTRUCTIONS
COOLING MODE
The cooling function allows the air condit-
ioner to cool the room and at the same time
reduces Air humidity.
COOL
To activate the cooling function ( COOL ) , press the
MODE button until the symbol COOL
appears on the display.
HEATING MODE
The cooling function is activated by setting the button
or at a temperature lower than that of the room.
To optimize the function of the Air conditioner, adjust
the temperature (1) , the speed (2) and the direction
of the air flow (3) by pressing the button indicated.
HEAT
The heating function allows the air conditi-
oner to heat the room.
To activate the heating function ( HEAT ) , press the
MODE button until the symbol HEAT
appears on the display.
With the button or set a temperature higher than
that of the room..
To optimize the function of the Air conditioner adjust
the temperature ( 1 ), the speed ( 2 ) and the direction
of the air flow ( 3 ) by pressing the button indicated
In HEATING operation, the appliance can automatically
activate a defrost cycle, which is essential to clean the
frost on the condenser so as to recover its heat exchange
function.This procedure usually lasts for 2-10 minutes
during defrosting,indoor unit fan stop operation.
After defrosting ,it resumes to HEATING mode
automatically.
OPTION
ECO TURBO
MODE FAN
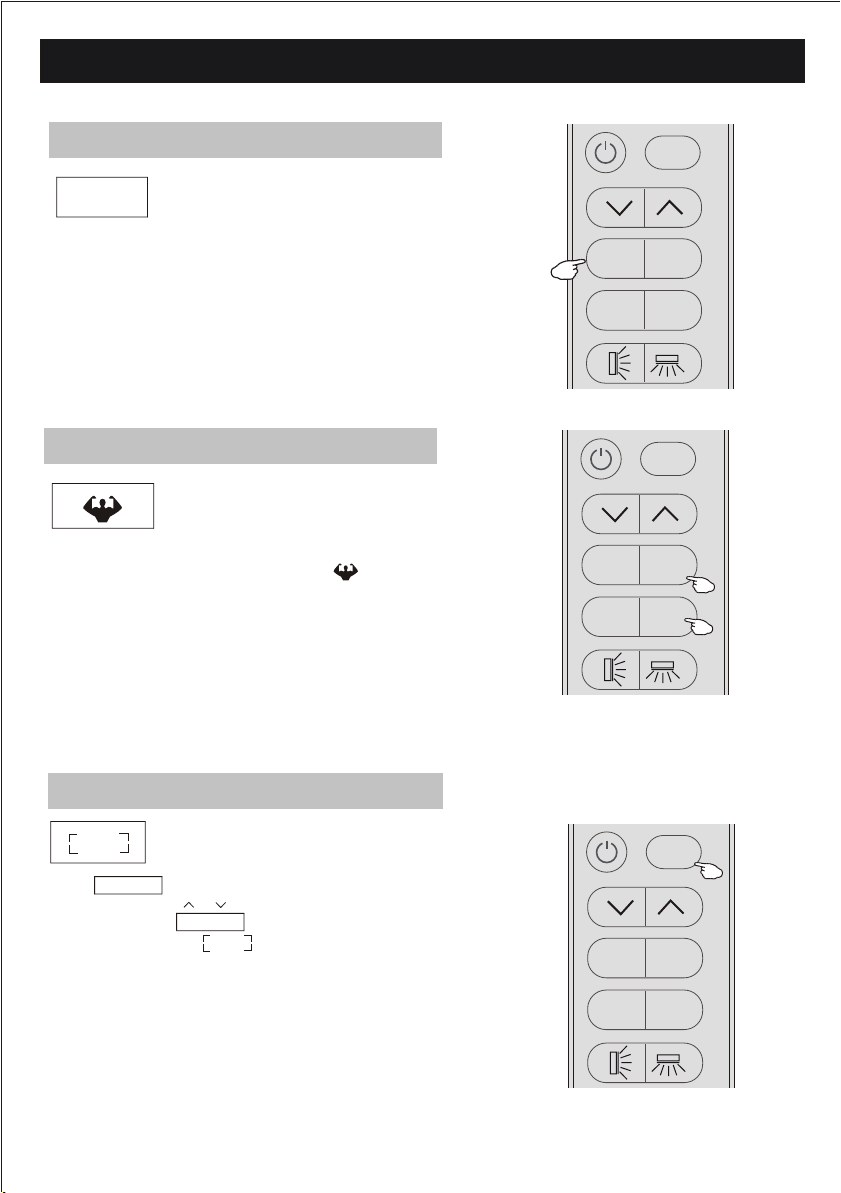
OPERATING INSTRUCTIONS
This function reduces the humid-
ity of the air to make the room
more comfortable.
To set the DRY mode , Press MODE until
DRY appears in the display . An automatic
function of alternating cooling cycles and air
fan is activated.
DRY
DRY MODE
OPTION
ECO TURBO
MODE FAN
14
OPERATING INSTRUCTIONS
AUTO
FAN The air conditioner works in only
ventilation.
To set the FAN mode , Press MODE until
FAN appears on the display.
FAN MODE(Not FAN button)
AUTO MODE
Automatic mode.
To activate the AUTO mode of operation,
press the MODE button on the remote controller until
the symbol appears on the display.
In AUTO mode the run mode will be set automatically
according to the room temperature.
OPTION
ECO TURBO
MODE FAN
AUTO
DISPLAY
DISPLAY function (Indoor display)
Press OPTION at the fist time , select the DISPLAYby
pressing the button or until symbol DISPLAY
is flashing; Press OPTION again to switch off the LED display
on the panel, and appears on the remote controller display.
Do it again to switch on the LED display .
DISPLAY
Switch on/off the LED display on panel
OPTION
ECO TURBO
MODE FAN
OPERATING INSTRUCTIONS
15
SLEEP
ECO function
ECO The air conditioner works
in economic mode
Only in Heating or Cooling model, press ECO button
and symbol ECO will appear on the display, the air
conditioner will work in energy saving process.
OPTION
ECO TURBO
MODE FAN
To cancel this function, pressing the MODE to
switch other mode or pressing the ECO button again.
Turbo function
To activate turbo function,pressing the button TURBO
or pressing the button FAN until symbol appears
on the display.
OPTION
ECO TURBO
MODE FAN
In AUTO/HEAT/COOL/FANmode,
When you selectTURBO feature, it will use
the highest fansetting to blowstrong airflow.
To cancel this function, pressing the FAN to switch
other fan speed or pressing the TURBO button again.
After 10 hours running in sleep mode, the air conditioner
will change to the previous setting mode.
SLEEP function
Press OPTION at the fist time , select the SLEEP by
pressing the button or until symbol SLEEP
is flashing; Press OPTION again to activate the
SLEEP function, and appears on the display.
Do it again to deactivate this function.
SLEEP
OPTION
ECO TURBO
MODE FAN

1. This function help carry away the accumulated
dirt, bacteria, etc from the evaporator.
2. This function will run about 30 minutes, and it will return to the
pre-setting mode .You can press or "Mode" to cancel
this function during the process. You will hear 2 beeps when it's
finished or cancelled.
3. It's normal if there are some noise during this function process,
as plastic materials expand with heat and contract with cold.
4.We suggest operate this function as the following ambient
condition to avoid certain safety protection features.
5. We suggest operate this function per 3 months.
OPERATING INSTRUCTIONS
SELF-CLEAN function
Indoor unit
Outdoor unit
Temp<30
5 <Temp<30
16
MILDEW function
OPTION
ECO TURBO
MODE FAN
MILDEW
Press OPTION at the fist time , select the MILDEW by
pressing the button or until symbol MILDEW
is flashing; Press OPTION again to activate the
MILDEW function, and appears on the display.
Do it again to deactivate this function.
MILDEW
This function enablethe air conditionerstill blow
airflow about 15minutes to drythe indoor innerparts
to avoid mildew, when theair conditioner is off.
Note: MILDEW functiononly available inDRY/COOLING mode
Press OPTION at the fist time , select the CLEAN by pressing the
button or until symbol CLEAN is flashing; Press OPTION again
to activate the CLEAN function, and appears on the display.
Do it again to deactivate this function.
CLEAN
CLEAN
8heating function(Optional)
8H
1.Press OPTION at the fist time , select the 8Hby
pressing the button or until symbol 8H
is flashing; Press OPTION again to activate the
8 heating function, and appears on the display.
Do it again or change the mode to deactivate this function.
2.If the airconditioner is standby, this functionenable the
air conditioner automaticallystart heating whenthe
indoor temperature isequal or lowerthan 8 , it willreturn
standby if thetemperature is equalor higher than18 .
8H
Only can beset in Heatingmode
Switch off the air conditionerby pressing

OPERATING INSTRUCTIONS
17
TIMER OPTION
ECO TURBO
MODE FAN
TIMER function
To set the automatic switch-on /off
of the air conditioner
Note:
All processing should be operated in 5 seconds,
otherwise the processing will be cancelled.
For timer on, before proceeding with the time:
Switch the conditioner off (with the key ).
program the working mode with the button MODE
and the fan speed with the button FAN .
1.Press OPTION at the fist time , select the Timer by
pressing the button or until symbol TIMER
is flashing;
TIMER
AUTO COOL DRY
FAN HEAT ECO
SLEEP TIMER I FEEL
HEALTH MILDEW
CLEAN DISPLAY 8 CH
HEAT
SLEEP TIMER I FEEL
DISPLAY 8 CH
AUTO COOL DRY
HEAT ECO
TIMER
CLEAN DISPLAY
HEAT
TIMER
CLEAN DISPLAY
Timer setting/change/cancel:
2.Press OPTION again, the data symbol like
and TIMER will be flashing;
3.To set the timer or change the timer:
(1)Press the button or to set the expected timer
(Increase or decrease at half-hour intervals)
the symbols hand TIMER both are flashing.
(2) Press OPTION or waiting for 5 seconds without any
operation to confirm the timer , the pre-setting
timer like and symbol will be
on the display.
To cancel the timer(if TIMER is on)
Press OPTION or waiting for 5 seconds without any
operation to cancel the timer .
4.A sample for the Timer-on as Figure1,
Timer-off as Figure2 Figure1,Timer-on
when switch off
Figure2,Timer-off
when switch on
I FEEL function
OPTION
ECO TURBO
MODE FAN
I FEEL
Press OPTION at the fist time , select the I FEEL by
pressing the button or until symbol I FEEL
is flashing; Press OPTION again to activate the
I FEEL function, and appears on the display.
Do it again to deactivate this function.
I FEEL
This function enablethe remote controlto measure
the temperature atits current locationand send this
signal 7 timesin 2 hoursto the airconditioner to
enable the airconditioner to optimizethe temperature
around you andensure maximum comfort.
It will automaticallydeactivate 2 hourslater ,
or indoor temperatureexceed the range0~50 .
18
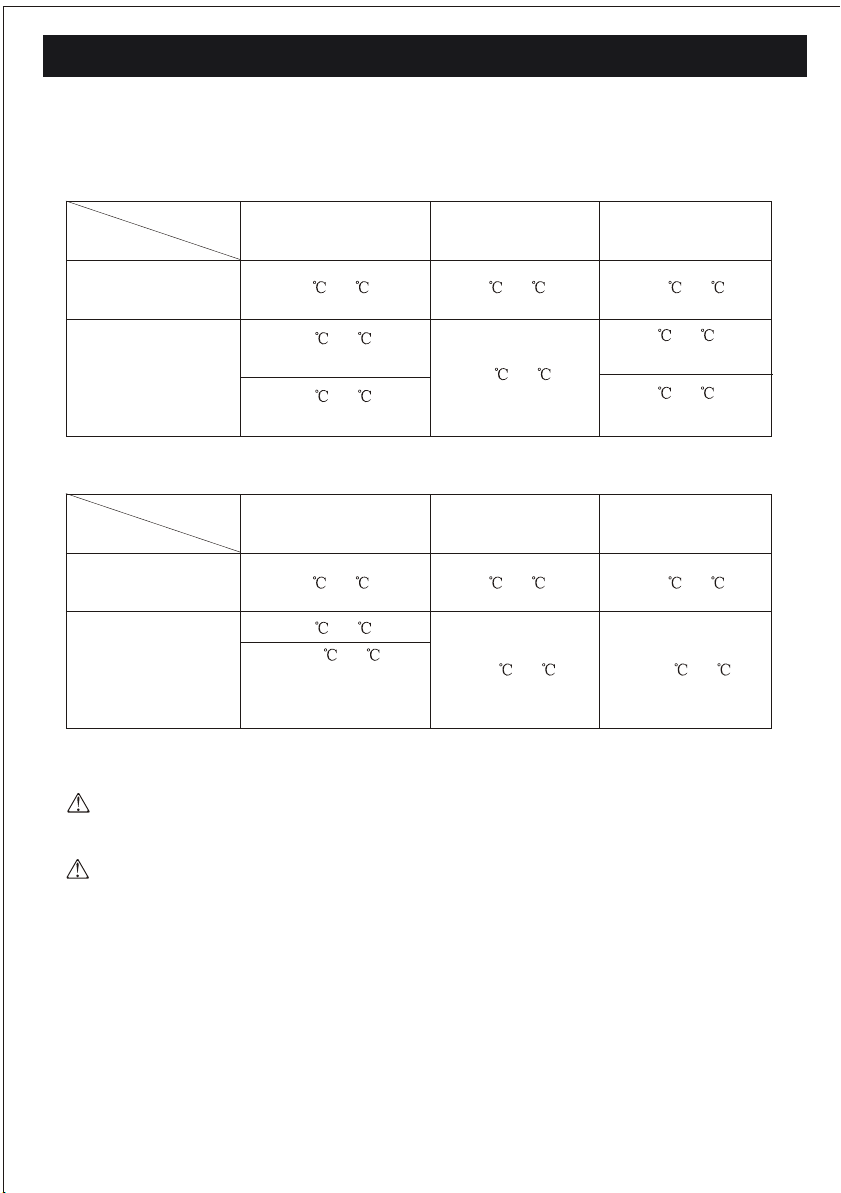
The air conditioner is programmed for comfortable and suitable living conditions as below
if used outside the conditions, certain safety protection features might come into effect.,
OPERATING INSTRUCTIONS
Operating Temperature
Fix air conditioner:
MODE
Temperature
Room temperature
Outdoor
temperature
Cooling operating Heating operating Drying operating
17 ~32 0 ~27 17 ~32
15 ~43
For T1 Climate
15 ~52
For T3 Climate
-7 ~24
Inverter air conditioner:
MODE
Temperature
Room temperature
Outdoor
temperature
Cooling operating Heating operating Drying operating
17 ~32 0 ~30 17 ~32
15 ~53
-15 ~53
For models with low
temperature cooling
system
-15 ~30 15 ~53
The unit does not operate immediately if it is turned on after being turned off or after changing
the mode during operation.This is a normal self-protection action,you need waiting for about 3
minutes.
The capacity and efficiency are according to the test conducted at full-load operation* .
*The highest speed of indoor fan motor and the maximum open angle of the flaps and
deflectors are requested.
15 ~43
For T1 Climate
15 ~52
For T3 Climate
This manual suits for next models
3
Table of contents
Languages:
Other Diloc Inverter manuals


