diLUSSO CSO28SBFS User manual

CSO28SBFS, CSO28ABFS, CSO28OBFS,
CSO28BLFS, CSO28BBFS & CSO28RBFS
V1
Free Standing Combi Steam Oven


CONTENTS
--------------------------------------------------------------------- Page 1
1.0 IMPORTANT INFORMATION
1.1 Important Notes
1.2 Before Installation
----------------------------------------------------------------- Page 2
1.3 Environmental Concerns
------------------------------------------------------------------------ Page 2
2.0 PRODUCT DESCRIPTION
2.1 Technical Specifications
2.2 Electrical Connection Terminal
2.3 Product Description, Dimensions & Accessories
-------------------------------------------------------- Page 3
2.4 Control Panel & Display Screen
2.4.1 Control Panel Instructions
2.4.2 Display Screen Instructions
----------------------------- Page 4
3.0 OPERATING THE FREESTANDING COMBI STEAM OVEN
3.1 Steaming Functions
3.1.1 Before Steam Cooking
3.1.2 Steam Function Overview
------------------------------------------------------------------------- Page 5
3.1.3 Steaming
3.1.4 High Temperature Steaming
3.1.5 Cautions & Warnings on Steaming
3.1.6 Notes on Steaming
3.1.7 Water Shortage Alert
---------------------------------------------- Page 6
3.1.8 Pausing / Cancelling Cooking
---------------------------------------------------------- Page 6
3.2 Grilling and Baking Functions
3.2.1 Grilling and Baking Functions Overview
3.2.1 Grilling and Baking Functions Overview
3.2.2 Grilling
3.2.3 Baking
3.2.4 Steam Assist Baking
3.3 Combination Cooking Function
3.3.2 Combination Steaming & Grilling
-------------------------------------------------------------------------- Page 7
3.4 Program Cooking
3.4.1 Setting the Local Time.
3.4.2 Select and set the cooking function.
------------------------------------------------------- Page 8
3.5 Recommended Steaming Times
--------------------------------------- Page 9
3.6 Recommended Combination Cooking Times
------------------------------------------------------------------- Page 10
4.0 CLEANING & MAINTENANCE
4.1 Cleaning Water Reservoir
4.2 Cleaning the Steam Oven
4.2.1 Shelves & Trays
4.2.2 Glass Door
4.2.3 Door Seal
4.2.4 Oven Chamber
4.2.5 Steam Heating Element ------------------------------------------------------ Page 11
4.2.6 Removing the Oven Door
4.3 Replacing the oven bulb
------------------------------------------------------------------------------------------- Page 12
5.0 WARNINGS
----------------------------------------------------------------------------- Page 12
6.0 TROUBLESHOOTING

1
Dear Customer,
Congratulations on your purchase and thank you for choosing Di Lusso appliances. This appliance
has been designed and manufactured to provide you with years of trouble free service. This
appliance is easy to use, however please read this handbook carefully before installing and operating
it.
1.0 IMPORTANT INFORMATION
1.1 Important Notes;
ŸThis appliance is designed for use by private individuals at home and not for commercial use.
ŸThis appliance is designed to be handy for any adult to use at home. Do not allow children to play
with it. Children less than 8 years of age shall be kept away unless under supervision.
ŸThe appliance surfaces and its accessible parts become hot during use. Care should be taken to
avoid touching heating elements.
ŸThis appliance may be used by children aged from 8 years and above, and by persons with
reduced physical, sensory or mental capabilities or lack of experience and knowledge if they have
been given supervision or instruction concerning use of the appliance in a safe way and
understand the hazards involved.
ŸCleaning shall not be made by children without supervision.
ŸThis product must be connected in accordance with current electrical and plumbing regulations.
ŸThe door should be situated more than 85 mm above floor after installation of the oven.
ŸDanger of fire: do not store items in the steam oven.
ŸBefore maintenance or cleaning of the product, disconnect the appliance from the mains power
and wait for it to cool down first.
ŸDo not use harsh abrasive cleaners or sharp metal scrapers to clean the oven door glass since
they can scratch the surface, which may result in shattering of the glass.
ŸA steam cleaner is not to be used.
ŸFor any repairs, always contact your authorised Customer Service Centre and ask for original
spare parts. Repairs by untrained people may lead to damage and void the warranty.
ŸEnsure that the appliances is switched off before replacing the lamp to avoid the possibility of
electrical shock.
ŸIf the supply cord is damaged, it must be replaced using the cord assembly available from the
manufacturer or services agent.
ŸFlush the built-in reservoir prior to usage of the combi oven for the first time.
ŸFlush the built-in reservoir prior to usage of the combi oven if it has not been used for an extended
period of time.
1.2 Before Installation;
ŸUpon unpacking, check that the appliance is good condition.
ŸEnsure that the electrical plug point for plugging in the appliance, is a switched 3-pin socket with
leakage protection and rated at 220V / 10A / 50Hz.
ŸEnsure that the distance to the plug point is within the length of the cord. Do not use extensions.
ŸEnsure that the bench top or shelf the appliance is to be placed on is level, stable and is able to
support its weight when the food being cooked is placed into it and its reservoir is filled with water.
ŸEnsure that there is adequate space around the appliance for air to circulate.
IMPORTANT! The manufacturer shall not be liable for any direct or indirect damage
caused by faulty installation. The installer must ensure that the product installation and
connection complies with all local and general regulations.

2
1.3 ENVIRONMENTAL CONCERNS
Recycling
Recycle the materials with the symbol .
Put the packaging in applicable containers to recycle it. Help protect the environment and human
health and to recycle waste of electrical and electronic appliances.
Disposal
Do not dispose appliances marked with the symbol , with the household waste. Return the
product to your local recycling facility or contact your municipal office.
2.0 PRODUCT DESCRIPTION
2.1 Technical Specifications
2.2 Electrical Connection Terminal
2.3 Product Description, Dimensions & Accessories
Model Number
CSO28SBFS, CSO28ABFS, CSO28OBFS, CSO28BLFS, CSO28BBFS & CSO28RBFS
Description
Free Standing Combi Steam Oven.
Electrical Ratings
Voltage
220V - 240V
Frequency
50Hz - 60Hz
Maximum Rated Power / Current
2250W/10A
Key Components
Power Ratings
Top Outer Heating Element
1000W
Top Inner Heating Element
1200W
Steam Heating Element
1300W
Bottom Heating Element
1000W
Fan
15W
Light
15W
220-240V~
N
L
IMPORTANT! The power socket must
be earth leakage protected!
IMPORTANT! If the power cable is
damaged, immediately contact a qualified
electrician to have it replaced!
Perforated Stainless Steel Tray
Stainless Steel Tray
Water Measurement Jug
490
415
380
Control Panel &
Display Screen
Water Reservoir Lid
Oven Vent
Oven Door
Door Handle

Time ℃
Time Temp.
Dec. Inc.
Mode Power
START PAUSE
Time ℃
2.4 Control Panel & Display Screen
2.4.1 Control Panel Instructions
2.4.2 Display Screen Instructions
Time Display
Temperature Display
Cooking Duration
Cooking End Time
Local Time
Top Outer Heating Element
Grill
Steaming
Bottom Heating Element
Cooking in progress
Water Reservoir Full
Water Reservoir Running Low
Steaming
High Temperature Steaming
Grilling
Baking
Steam Assisted Baking
℃
FUNCTION
Press the FUNCTION button to choose cooking function.
TIME
Press the TIME button to set the local time, cooking duration, etc.
TEMPERATURE
Press the TEMPERATURE button to set the cooking temperature.
Inrease /
Decrease
Press +/- to adjust the time and temperature.
POWER
When connected to power, the POWER button will light up. Press for 3
sec to turn on the control panel.
PAUSE
Press the PAUSE button once to pause cooking. Press it twice to
stop and cancel the cooking process altogether..
START
Press the START button to start or resume cooking.
3

0.9L
a
1.0L
Mx
0.3L
0.5L
MAXIMUM
Level Mark
Image 5
PUSH to OPEN
Image 4
3.0 OPERATING THE FREESTANDING COMBI STEAM OVEN
IMPORTANT! Before First Use;
Remove and clean all accessories.
Clean the oven cavity and flush the built-in reservoir. Refer to “4.1 Cleaning Water Reservoir” on
Page 8.
3.1 Steaming Functions
3.1.1 Before Steam Cooking
Adding water to reservoir
ŸGently push to open the reservoir lid on the top right hand side of the steam oven.
ŸUse the measurement jug to fill the reservoir with 1L of ambient temperature distilled water. At the
same time the steam oven will also give a beep and the icon “ ”on the display screen will start
flashing indicating the water reservoir is full. The “ ” icon will stop flashing once the water level in
the reservoir reduces.
ŸDo not exceed the “Max,” mark in the water reservoir and be careful not to spill any water over the
appliance when filling.
Ÿ1L of water can last for approximately 1hour of cooking. Its recommended that you add only the
appropriate amount of water for the intended cooking duration.
NOTE! If your water supply is hard or is high in minerals / impurities, use distilled or
filtered water to minimise the build up of scale and water outlet getting clogged.
3.1.2 Steam Function Overview
4
Steaming Functions
Steaming
High Temperature
Steaming
Default Temperature
100°C
110°C
Temperature Range
35°C - 100°C
Fixed at 110°C
Default Cooking Duration
10 mins
10 mins
Cooking Duration Range
5 mins - 2 hours
5 mins - 2 hours

3.1.3 Steaming
ŸAdd water to the water reservoir as per instructions.
ŸPress the power button “ ” to turn on the steam oven.
ŸNext press the function button “ ” once to select the Steaming function “ ” on the display
screen.
ŸThe display screen will indicate the function preset steaming temperature of 100°C and the preset
cooking duration of 10 minutes.
ŸTo change the temperature setting, press the temperature button “ ” once and the temperature
icon “ ” will start to flash on the display. Use the “ ” buttons to adjust.
ŸTo change the cooking duration, press the time button “ ” once and cooking duration icon
“ ” and time icon “ ” will start to flash on the display, then use “ ” to adjust.
ŸTo start cooking press “ ”.
3.1.4 High Temperature Steaming
Use this function to save time when steaming large sized foods such as a whole chicken.
Steam temperature is fixed at 110 C, refer to Steam function instructions (above) to set cooking time.
Cooking duration can be adjusted for this function. The control panel will display the actual cooking
chamber temperature during cooking. Once the cooking chamber temperature rises above 101°C,
into high temperature steam mode, the control panel temperature display will then display “ HI ”.
3.1.5 Cautions & Warnings on Steaming
If the oven is still hot, steam will be released when the oven door is opened. Keep away from the
appliance and wait until the steam has completely dissipated before attempting to remove the cooked
food.
WARNING! When opening the door of a hot oven, do so gradually to allow the steam to
slowly escape and avoid the risk of scalding.
3.1.6 Notes on Steaming
ŸAs a safety precaution, just as steam cooking is about to end, the oven will release some steam
from the cooking chamber through the oven vents located in between the door and control panel.
ŸThe venting process will cause the oven temperature to drop off slightly.
ŸThere may be some water remaining on the steam cooking element after cooking.
ŸThe control panel cooling fan motor will continue to work for few minutes after cooking time has
finished.
3.1.7 Water Shortage Alert
When the water reservoir level gets low, a buzzer will sound and at the same time the “ ” icon on
the display will start flashing. Cooking will also automatically be paused.
ŸPress any button to cancel the buzzer.
ŸAdd water to the water reservoir and then press the “ ” button to resume cooking.
ŸYou may replenish the water reservoir at anytime; even though cooking is in progress.
℃
Time ℃
5

3.1.8 Pausing / Cancelling Cooking
Should you wish to pause cooking to check the food, press the “ ” button. To resume the cooking
process press “ ”.
To terminate the cooking process altogether, press the “ ” button.
3.2 Grilling and Baking Functions
3.2.1 Grilling and Baking Functions Overview
3.2.2 Grilling
ŸPress the power button “ ” to turn on the steam oven.
ŸNext press the function button “ ” three times to select the Grilling function “ ” on the display
screen.
ŸThe display screen will indicate the function preset grilling temperature of 200°C and preset
cooking duration of 30 minutes.
ŸTo change the grilling temperature, press the temperature button “ ” once and the temperature
icon “ ” will start to flash on the display. Use the “ ” buttons to adjust.
ŸTo change the cooking duration, press the time button “ ” once and the cooking duration icon
“ ” and time icon “ ” will start to flash on the display. Use the “ ” buttons to adjust.
ŸTo start cooking press “ ”.
3.2.3 Baking
Use this functions for baking cakes, cookies and other pastries. Refer to Grilling instructions to set
temperature and cooking duration.
3.2.4 Steam Assisted Baking
In this function the oven releases a small amount of steam during cooking into the cooking chamber.
Use this function when roasting or baking to prevent food from becoming too dry. Use either lower
temperatures with longer cooking duration or higher temperature with shorter cooking duration to
achieve the desired balance of moist & tender inside and a crispy outer layer.
Water must be added to the reservoir to use this program. Refer to Grilling instructions to set
temperature and cooking duration. The oven sounds a beep when set temperature is reached and
the timer will begin to count down.
3.3 Combination Cooking Function
3.3.2 Combination Steaming & Grilling
In this function, the oven will carry out steaming first before switching to grilling. Use this function for
a roast that will be crispy outside but moist and tender on the inside.
ŸAdd water to the water reservoir as per instructions.
Grilling and Baking
Functions
Grilling
Baking
Steam Assisted
Baking
Default Temperature
200°C
Temperature Range
70°C - 235°C
Default Cooking Duration
30 mins
Cooking Duration Range
12 mins - 2 hours
℃
6
ŸPress the power button “ ” to turn on the steam oven.
ŸNext press the program button “ ” six times to select the Combination function “ ” on the
display screen. The corresponding smaller icons “ ” & “ ” at the bottom of the display screen
will also be flashing.
ŸThe display screen will indicate the function preset steaming temperature of 100°C and the preset
steaming duration of 10 minutes.
ŸTo change the steaming temperature, press the temperature button “ ” once and both the
temperature icon “ ” and the steaming icon “ ” will start to flash on the display. Use the
“ ” buttons to adjust. Next to adjust the grilling temperature, press the temperature button
“ ” once more and now the temperature icon “ ” and grilling icon “ ” will start to flash on
the display. Use the “ ” buttons to adjust.
ŸTo change the steaming duration, press the time button “ ” once and the cooking duration icon
“ ”, time icon “ ” and the steaming icon “ ” will all start to flash on the display. Use the
“ ” buttons to adjust. Next to adjust the grilling duration, press the time button “ ” once again
and now the cooking duration “ ” and grilling icon “ ” will all start to flash on the display. Use
the “ ” buttons to adjust the grilling time.
ŸTo start cooking press “ ”.
3.4 Program Cooking
Follow the instructions below to program the combi steam oven to delay the start of cooking.
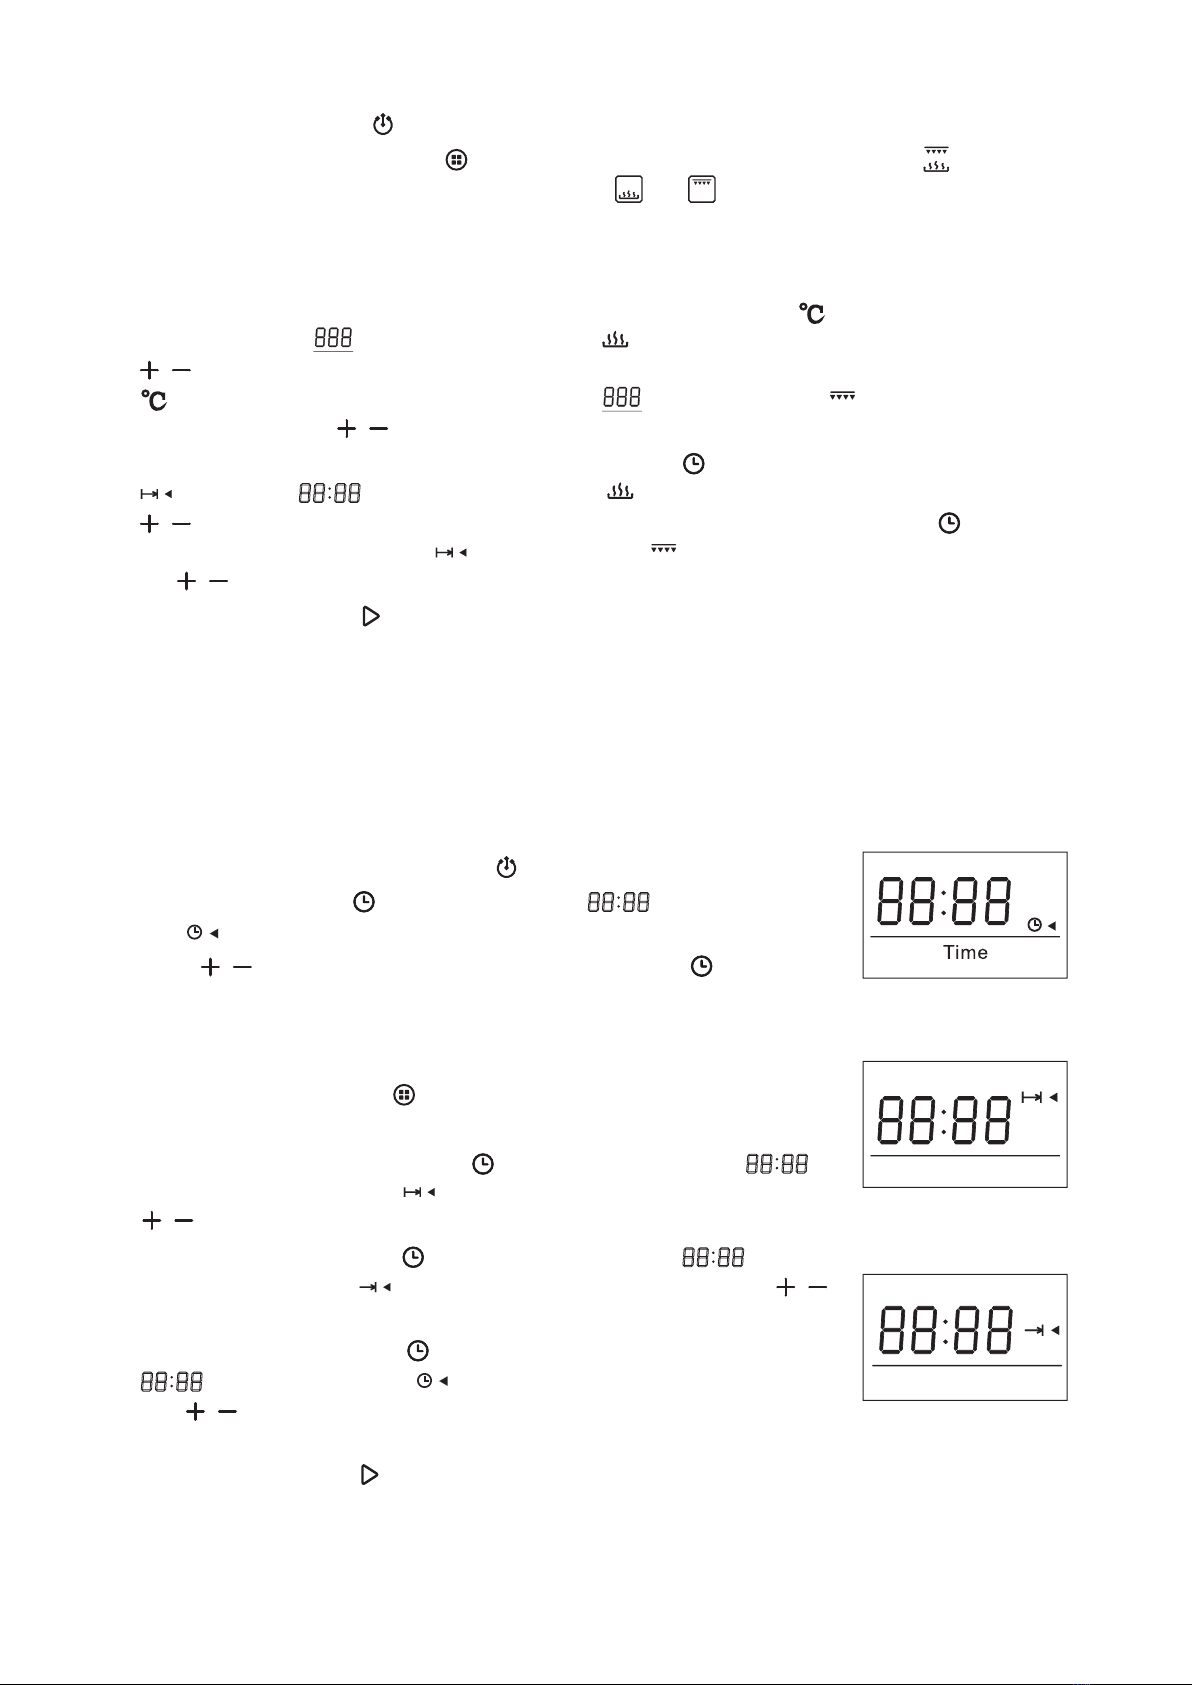
3.4.1 Setting the Local Time.
When the combi steam oven is left in standby mode, it will display the local time. It is recommended
to set the local time if power to the combi steam oven will not be switched off after each use.
ŸTurn on the steam oven by pressing “ ”.
ŸPress the time button “ ” and local time icon “ ” and local time
icon “ ”on the display will start to flash. Refer to Image 1.
ŸPress “ ” to adjust to your local time and then press “ ” to confirm.
3.4.2 Select and set the cooking function.
ŸPlace the food to be cooked into the combi steam oven.
ŸPress the program button “ ” and select the required cooking function.
ŸAdjust the temperature settings if necessary.
ŸThen press the adjust time button “ ” once and the time icon “ ”
and cooking duration icon “ ” on the display will start to flash. Use
“ ” to adjust. Refer to Image 2.
ŸNext press the time button “ ” again and the time icon “ ” and
cooking end time icon “ ” will start flashing on the display. Use “ ”
to adjust to the required time for cooking to stop. Refer to Image 3.
ŸThen press the time button “ ” once more and now the time icon
“ ” and local time icon “ ” will start to flash on the display.
Use “ ” to adjust. Refer to Image 1. (This step is only necessary if
the local time was not set previously).
ŸPress the start button “ ” to set and activate the delay start timer.
The combi steam oven will now display the local time and remains on standby. Cooking will
automatically start for the set cooking duration and stop at the preset end time. ie if set to cook for
duration 20mins and to complete cooking at 3:30, the oven will automatically start at 3:10. "
Time
Image 1
℃
Image 2
Time
Image 3
℃
7
This manual suits for next models
5
Table of contents
Other diLUSSO Oven manuals

diLUSSO
diLUSSO OV908DS User manual

diLUSSO
diLUSSO OV608MS User manual

diLUSSO
diLUSSO CSO45SBI User manual

diLUSSO
diLUSSO OV911TBL User manual

diLUSSO
diLUSSO OV607BBL User manual

diLUSSO
diLUSSO SO60BBBI User manual

diLUSSO
diLUSSO OV608SDS User manual

diLUSSO
diLUSSO SO633WWFS User manual

diLUSSO
diLUSSO OV908DSL User manual

diLUSSO
diLUSSO OV604MS User manual


