diLUSSO OV607BBL User manual

Built-in Oven
OV607BBL
OV607SSL
Installation and Operating Manual

Page 1
Version 1.1 Dec 2016
CONTENTS
Important Notes ------------------------------------------------------------------------------------------------Page 2
Installation Instructions ----------------------------------------------------------------------------------------Page 3
Technical Specification--------------------------------------------------------------------------------------------Page 5
About the Oven-----------------------------------------------------------------------------------------------------Page 5
Oven Timer / Clock ------------------------------------------------------------------------------------------------Page 5
Setting Local Time -------------------------------------------------------------------------------------------------Page 6
Setting the Timer --------------------------------------------------------------------------------------------------Page 6
Program Cooking ---------------------------------------------------------------------------------------------------Page 6
Oven Cooking Function -------------------------------------------------------------------------------------------Page 7
Oven Cooking & Cooking Time ---------------------------------------------------------------------------------Page 9
Cleaning and Maintenance ------------------------------------------------------------------------------------Page 10
Warning ------------------------------------------------------------------------------------------------------------Page 13
Page 2
Version 1.1 Dec 2016
Important Notes
Dear Customer
Thank you for choosing our product. This appliance is easy to use; however please read this handbook carefully
before installing and operating it. Herein, you will find the correct method of installation and tips for best use and
maintenance of the product.
Do not use the oven door handle while moving the appliance, such as to move it out from the packing box.
This appliance is designed to be handy for any adult to use at home. Do not allow children to play with it.
Children need to be supervised when the product is in operation so that they do not go near the oven and
touch the hot surfaces.
Do not touch the heating elements inside the oven.
This product must be connected in accordance with current electrical regulations. A fixed wiring installation
is to be done only by an authorised electrician.
Before maintenance or cleaning of the product, disconnect the appliance from the mains and wait for the
oven to cool down first.
For any repairs, always contact authorised Customer Service Centre and ask for original spare parts. Repairs
by untrained people may lead to damage and void the warranty.
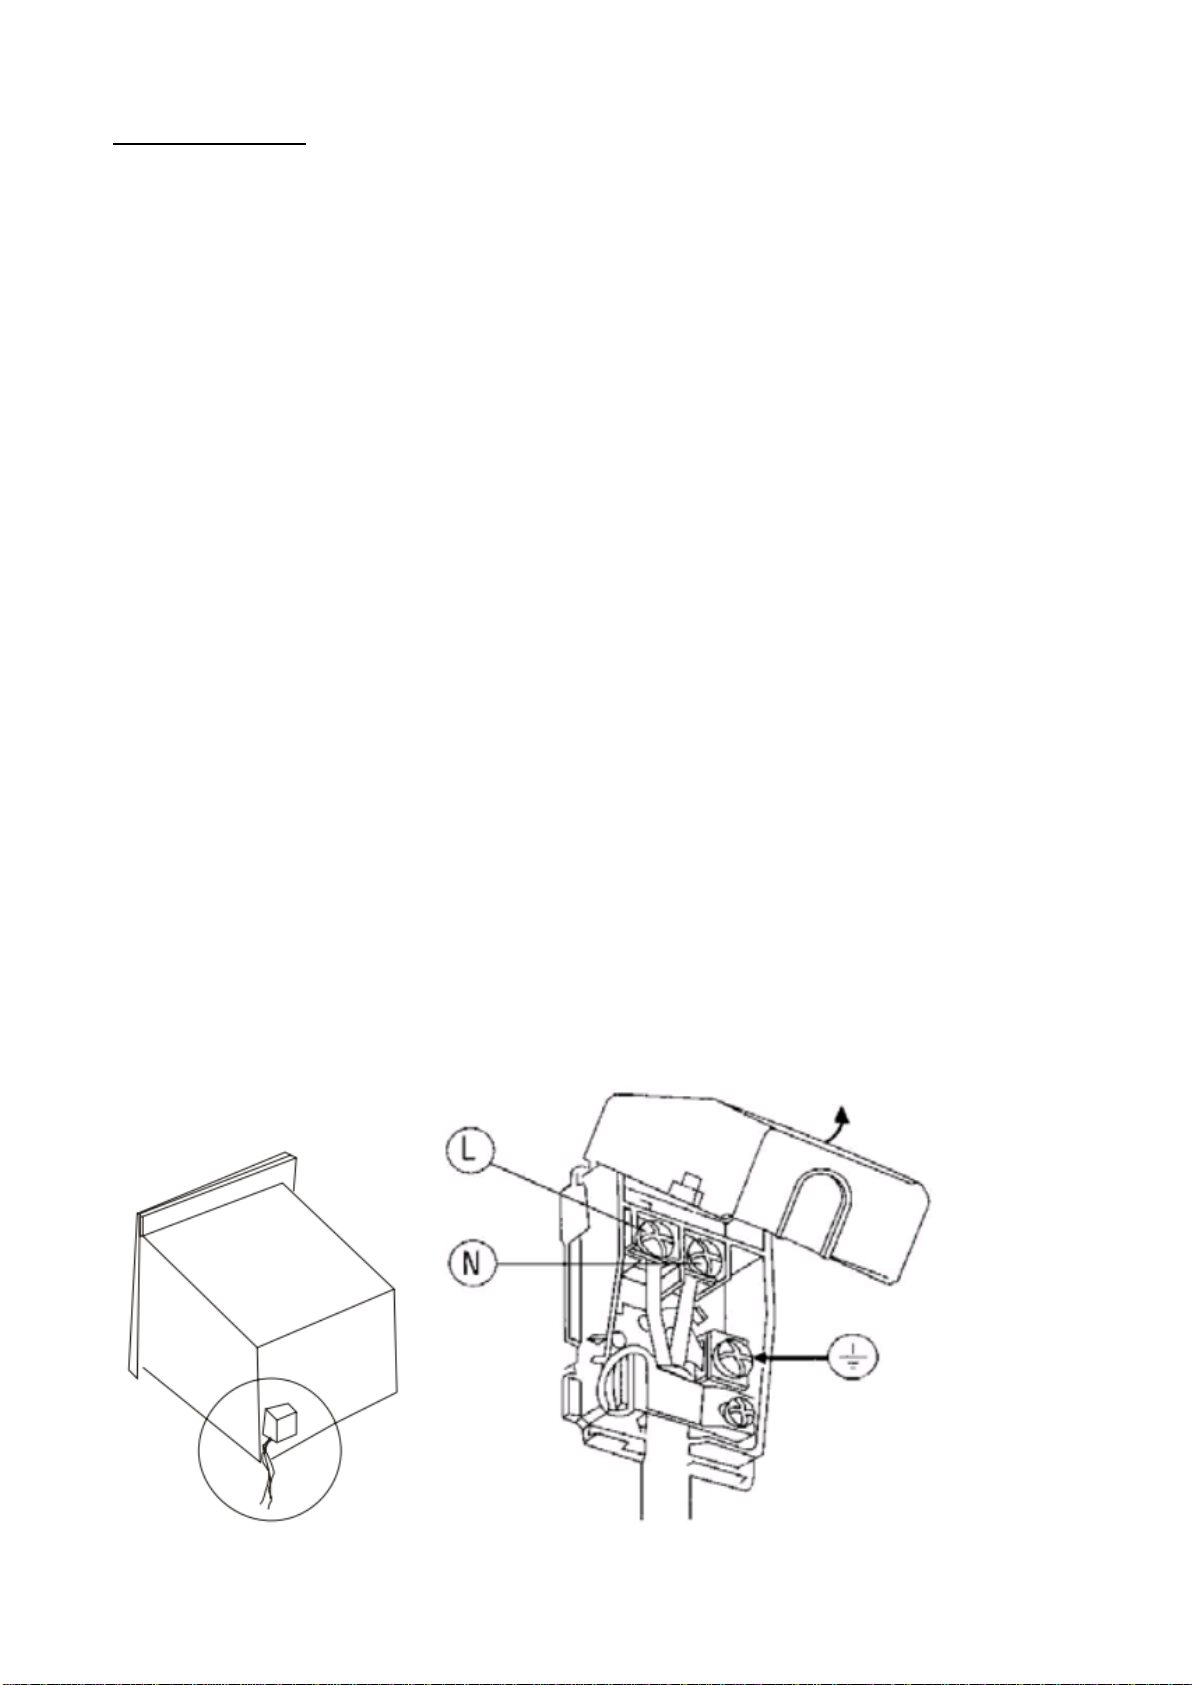
Power Connection:
THE APPLIANCE MUST BE CONNECTED IN ACCORDANCE WITH CURRENT ELECTRICAL RULES AND REGULATIONS.
INSTALLATION IS TO BE DONE ONLY BY AN AUTHORISED ELECTRICIAN.
WARNING: THIS APPLIANCE MUST BE EARTHED
Main connection can also be made by fitting a single phase 15amp switch with a minimum gap between the
contacts of 3mm.
Means for disconnection must be incorporated in the fixed wiring in accordance with the wiring rules.
(Blue)
(Yellow Green)
(Brown)
Page 3
Version 1.1 Dec 2016
Before connecting to the mains, make sure that:
The electric meter, safety valve, feeding line and socket are adequate to withstand the maximum load
required (refer to product data label for maximum load)
The supply system is regularly earthed, according to the regulations in force.
The isolation switch can easily be reached after the oven is installed.
After connection to the mains, check that the supply cable does not overheat.
Never use reductions, shunts, adaptors that can cause overheating or burning.
The supply cable must be positioned so that it does not exceed 50 C above room temperature at any point
of its length.
The manufacture shall not liable for any direct or indirect damage caused by faulty installation. The installer must
ensure that the product installation and connection complies with the local and general regulation in force.
Installation Instruction
Important!
Unplug the oven before performing installation or maintenance
Fit the appliance into its surround (beneath a work-top) by inserting screws into the 4 holes that can be
seen in the frame of the oven when the door is open.

Page 4
Version 1.1 Dec 2016
The sides and the face surface where the oven is to be installed should be milled to allow sufficient air
intake and circulation around the oven, to avoid causing any damage to the furniture.
Ensure the oven in secured firmly in place as described above, and insulate electrical connections in order to
avoid contact with metallic parts. Any protective parts must be secured so that they can only be removed
with the use of tools. The adhesive joining the rolled sections to the cabinet has to withstand temperatures
no lower than 120 C to avoid deformations or instability.
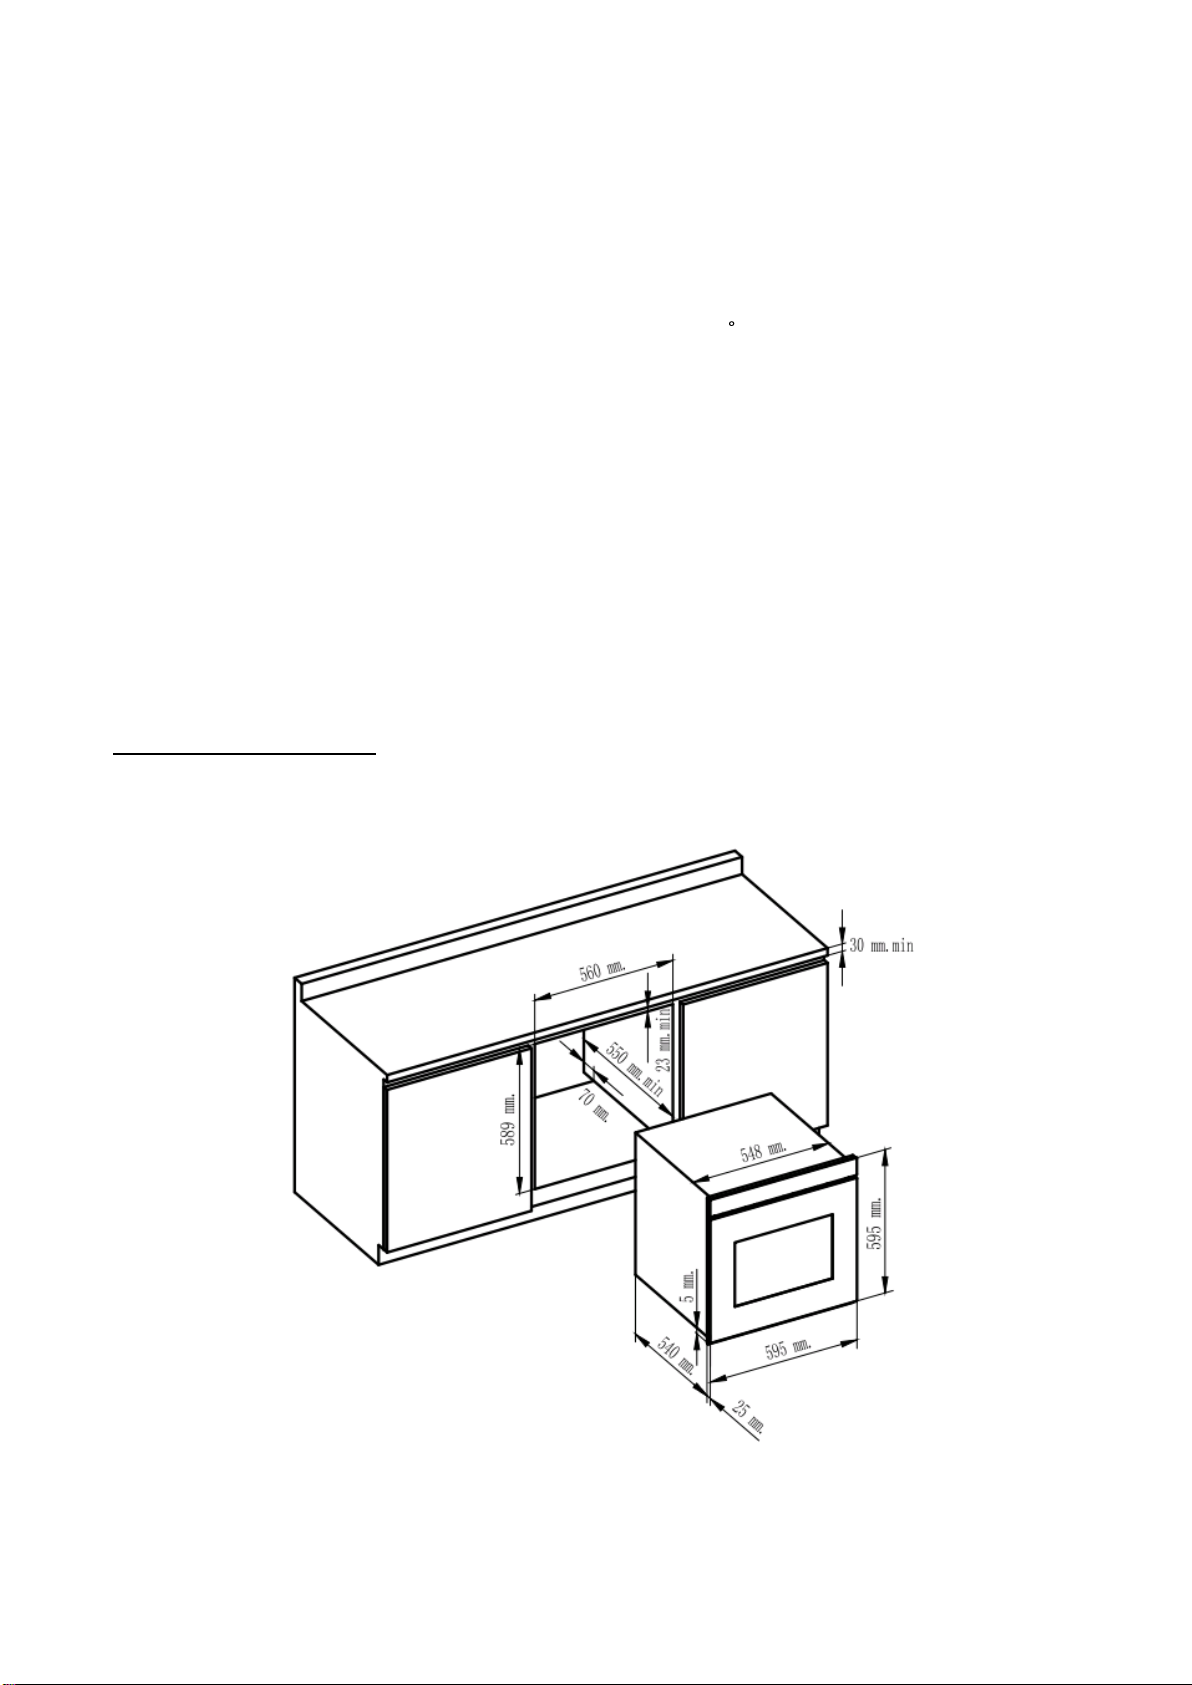
For the most efficient air circulation, the oven should be fitted according to the dimensions shown. The rear
panel of the cabinet must be removed so that air can circulate freely. The panel to which the oven is fitted
should have a gap of at least 70 mm at the rear.
Do not switch on the appliance before it has been fully and correctly installed.
Before using the oven, we suggest to:
Remove the special film covering the oven door glass (if there is any)
Heat the empty oven at max. temperature for 45 minutes. This is to remove any unpleasant smell caused by
working residues.
Carefully clean the internal cavity of the oven with soapy water and rinse it.
IMPORTANT!
When the oven is in operation, hot surfaces might occur at the oven door. Take note of the “Warning! Hot
Surface” sign. Make sure children do not go near the oven when it is in use.
Page 5
Version 1.1 Dec 2016
Technical Specifications
Product : OV607BBL / OV607SSL
Voltage : (220 –240) Vac
Frequency : 50Hz
Maximum Power : 2970 –3540W
Oven Capacity : 70 litres
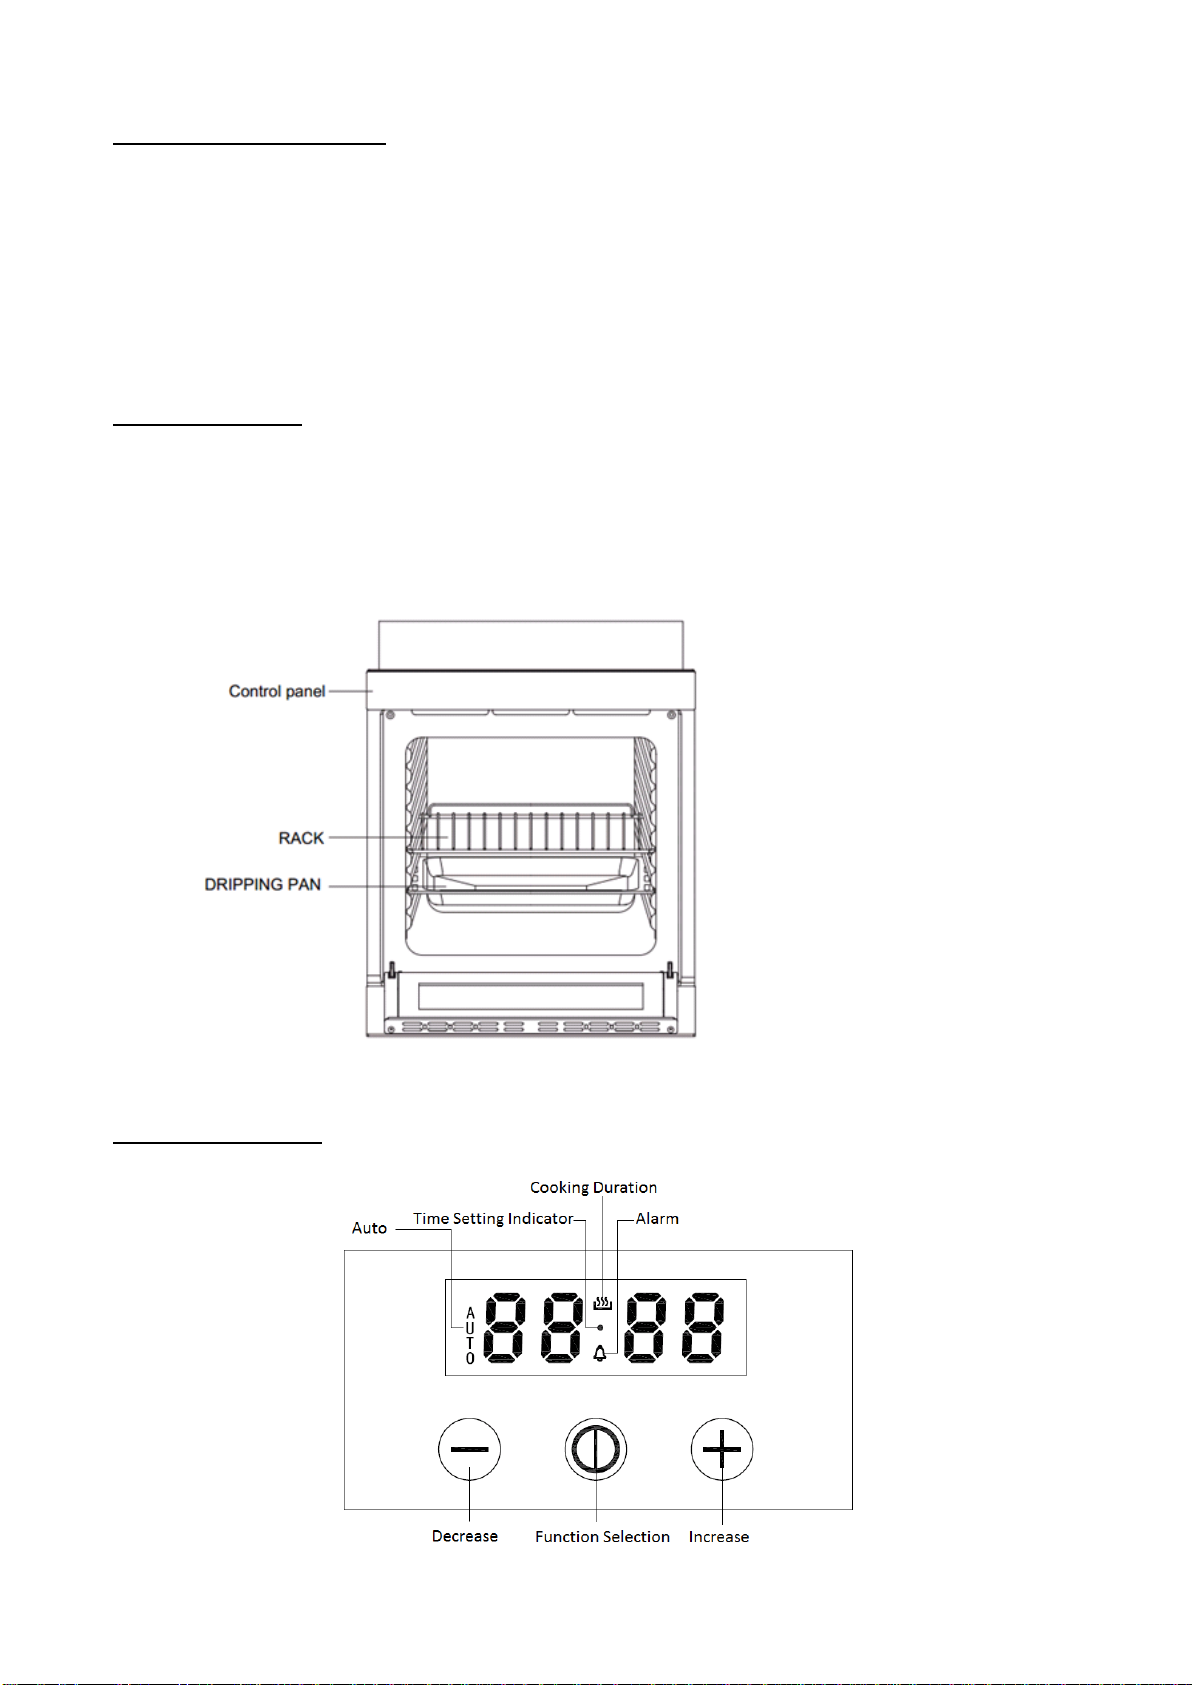
About The Oven
The OV607BBL oven offers extra large capacity of 70L and 7 cooking functions. User can do cooking on 4 shelves
at a time or cook in large quantity which the traditional ovens do not allow.
In order to cool down the external temperature of the oven, a cooling fan blows a stream of air between the
control panel and the oven door.
Oven Timer/Clock

Page 6
Version 1.1 Dec 2016
Setting the Local Time
This may only be set while the oven is in standby mode, and not working. When the oven is first connected to
power, by default “12.00” and “.” will keep flashing.
Use the “+” and “-”button to increase or decrease the value in order to set the local time.
Wait for a few seconds, local time is set. Cooking duration symbol is shown to indicate now the oven is
in manual cooking mode.
Setting the Timer
This function does not interrupt cooking and does not affect the oven; it is simply used to activate the buzzer
when the set amount of time has elapsed.
Press the “Function Selection” button a few times until the “Alarm” symbol begin to flash. Default
timer 0.00 is shown.
Use the “+” and “-”button to increase or decrease the value in order to set the alarm. Setting range is
from “0.01”to “23.59”.
Timer is set when the “Alarm” symbol is no more flashing. Press “Function Selection” button to see the
local time. Timer countdown can be observed in the timer setting mode. Display will show in seconds if
the countdown is less than 1 minute. When this period of time has elapsed, the buzzer will ring for 7
minutes. Press either “+”or “-”button to cancel to buzzer.
Alarm is cancelled if it is set to “0.00”.
Program Cooking
A cooking function must be selected before programming can take place.
Setting Cooking Duration
Press the “Function Selection” button a few times until the “Auto” and “Cooking Duration” symbols
begin to flash.
Use the “+” and “-”button to increase or decrease to set the cooking duration. Cooking duration can be
set to the maximum at “10.00”.
Cooking duration is set when the symbol and local time is displayed.
When the set time has elapsed, the oven will stop cooking and the buzzer rings for 7 minutes. Press
either “+”or “-”button to cancel the buzzer.
Cooking duration is cancelled if it is set to “0.00”.
Setting End Time for Cooking
Cooking duration is set beforehand : Time Delay Function
Press the “Function Selection” button a few times until the “Auto” symbol begins to flash, use the “+”
and “-”button to increase or decrease to set the cooking end time.
The cooking end time must be greater than “local time + cooking duration”. However, it should not
exceed “local time + 23hour 59min”. The oven will start cooking automatically when the local time
reaches “cooking end time – cooking duration”.
When the set time has elapsed, the oven will stop cooking and a buzzer rings. Press either “+”or
“-”button to cancel the buzzer.
Heat Delay is cancelled if the cooking end time is set to “local time + cooking duration”.

Page 7
Version 1.1 Dec 2016
Cooking duration is not set beforehand : End Time for Cooking Function
Press the “Function Selection” button a few times until the “Auto” symbol begins to flash, use the “+”
and “-”button to increase or decrease to set the cooking end time.
The setting range cannot exceed “local time + 23hour 59min”.
End Time for Cooking function is cancelled if it is set to “local time”.
After cooking, oven display will be off if there is no operation for more than 5 minutes. Press any
key to activate the control panel.
Oven Functions
All functions will start working after the temperature is set by using the temperature knob.
Defrost –The fan operates without the heating elements. Can be used to defrost frozen food. The
required time for defrosting depends on the type and quantity of food, and the room temperature.
Always check food packaging for instructions.
Conventional –The traditional way of cooking, using the bottom and top heating elements to provide
heat from above and below. It is ideal for pastries and for slow cooking at a low temperature.
Fan Forced –The circular heating element and the fan comes into operation. Heat is distributed evenly
to all levels. Several dishes can be cooked on different shelves. Fan forced mode is ideal for baking,
cooking large serves of food and cooking different dishes together.
Half Grill –The inner top heating element operates. Provides direct heat to the top surface of the food.
It is suitable for small portions of foods, e.g. toast. Keep oven door closed when in use.
Full Grill –Both outer and inner part of the top heating element operates. It is more suitable for grilling
larger portions of foods than the half grill function, e.g. sausages, steaks, fish. Keep oven door closed
when in use.
Full Grill + Fan –Both inner and outer part of the top heating element operates with fan assistance.
The fan disperses the radiant heat from the elements. Suitable for browning food, whilst keeping it
moist. The door must be closed whilst grilling.
Bottom Heating + Fan –Bottom heating element operates with fan assistance. It is perfect for dishes
with a pastry base and filling, such as custard tarts. It is also suitable for heating precooked foods, or to
sterilize preserving jars.

Page 8
Version 1.1 Dec 2016
Practical hints to save energy
The oven can be switched off several minutes before cooking end; the residual temperature is enough to
complete cooking. Open the oven door only when it is absolutely necessary; to check the cooking phase, look
through the glass door (the inner cavity light is always on).
Pieces of general advice
The oven offers various kind of heating:
1. The conventional heating for the cooking of special roasts
2. The fan forced heating for the cooking of cakes, biscuits and similar.
If the fan heating is chosen, it is recommended to take advantage of it by cooking on more levels to prepare a
complete menu, to save time and energy.
Fan heating
By this function a continuous circulation of warm air is created, suitable for the cooking on multiple levels. The
oven will reach the preset temperature in a very short time.
Conventional heating (the upper and lower heating element operate)
It is especially suitable for the cooking of game and as well as for the cooking of bread and sponge cakes.
It is advisable to place food into the oven after preheating it.
Grill Cooking (the two upper heating elements works)
To cook with the grill, pre-heat the oven for about 5 minutes. During grill operation the heat comes from above;
and its suitable for thin cuts meat and for toasts. The table shows some examples of cooking times and shelf
positions. The cooking times vary according to the type of food, its homogeneity and volume.
Cooking Of Pastry
The air circulation of the oven assures an instantaneous and uniform heat distribution. More trays can be
inserted into the oven together with the pastries, taking care not to use the top level. Together with the pastry,
other foods can be cooked at the same time (fish, meat, etc.), provided they can be cooked at the same
temperature.
GRATINATING (use either the inner upper element or both inner outer upper elements)
“Gnocchi alla romana”, polenta pasticciata, rice, lasagnas, noodles and vegetables dressed with béchamel are
typical preparation for this type of cooking.
Pizza or Focaccia
Use a light aluminium tray with a maximum diameter of 30cm, placing it on top of the rack supplied. If the pizza
has a lot of toppings, it is recommended to add the mozzarella cheese on top of the pizza halfway through the
cooking process.

Page 9
Version 1.1 Dec 2016
Cooking Time
The table shows some examples for the adjustment of the thermostat and of the cooking time.
*The cooking times can vary according to the type of food, its homogeneity and volume.
*For the beef, veal, pork and turkey roasts, with bones or rolled, add about 20 minutes to the times shown in the
table.
*The times indicated in the table refer to the cooking of one dish only; for multiple dishes, the cooking times
should be increased by 5-10 minutes.
Food
Qty.
Kg
Temp.
°C
Pre-heat time in
minutes
Time in
min.
Veal cutlet
1
250
5
8--10
Lam cutlet
1
250
5
12--15
Liver
1
250
5
10--12
Chopped meat
roulades
1
250
5
12--15
Veal heart
1
250
5
12--15
Roast in the net
1
250
5
20--25
Half-chicken
1
250
5
20--25
Fish filet
1
250
5
12--15
Stuffed tomatoes
1
250
5
10--12
Nature of food
Oven Temp.°C
Time Minutes
General
220--250
Relative to Qty
Long-cooking roast
225--250
50--60
Fowl (duck)
210--250
150--180
Poultry
225--250
50--60
Game
200--225
Relative to Qty
Fish
180--200
20--25
Pastries
160--200
60--70

Page 10
Version 1.1 Dec 2016
Cleaning and Maintenance
Caution: Prior to cleaning or maintenance, always disconnect the power supply.
Make sure that steamer cleaner is not used.
Check the oven rubber seal condition on a regular basis. Clean it if necessary. Avoid using abrasive cleaners.
Should it be damaged, contact the nearest after sales service centre.
Never line aluminium foil at the bottom of oven, as this will cause heat accumulation and lead to damage the
oven enamel.
1) CLEANING OF STAINLESS STEEL
In order to have your oven retains its new appearance; regular cleaning and care should be performed to protect
the s/steel finishes.
Never use gritty or abrasive sponges. Stubborn stains can be removed by soaking in hot water, standard stains
can be removed by applying a clean cloth soaked in soapy water before spillage becomes cold or dries up. Acidic
materials like vinegar and citric juices etc can damage the most resistant surfaces. If a spill occurs wipe it
immediately.
Note : Use only damp cloth to clean the stainless steel panel with printed wording. Stainless steel cleaners
and similar products may remove the print.
2) OVEN CLEANING
Oven spillages should be cleaned straight away. Leaving it will cause burning and smoking inside the chamber of
oven the next time oven is used. Leaving spillage’s can cause permanent damage to the enamel thus making it
extremely hard to remove in the future. A non-caustic cleaner is recommended to clean the chamber of the
oven. Do not use abrasive scourers, sponges, cleaning products. Wipe out oven regularly and properly while
oven is still warm with hot soapy water and a soft cloth.
3) TOP HEATING ELEMENT
This element must never be sprayed with any detergents. A damp cloth and a bottlebrush can be used to clean
the roof of the oven and the element itself. Never soak the element and always dry it after cleaning as not doing
so can lead to deterioration. This area should be cleaned regularly as cooking fats spit up and stick to the ceiling
and the element which will burn and smoke, giving out unpleasant odours.
4) LOWER GRILL
Support the front of the grill element while removing the screws retaining the element. Lower the front of the
element carefully to the rest position. When cleaning the oven, pay attention so that not apply any forces to the
grill element. When the cleaning is completed, carefully remove all cleaning chemicals and water from the grill
element. Raise the front of the element into position and secure with the screws.
NEVER USE THE OVEN WITH THE GRILL ELEMENT HANGING DOWN!
5) CLEANING OF OVEN DOOR
Clean the glass door by using damp cloth and dry it. Do not use harsh abrasive cleaners or sharp metal scrapers
to clean the oven glass door as they may scratch the surface and cause glass shattering.
Page 11
Version 1.1 Dec 2016
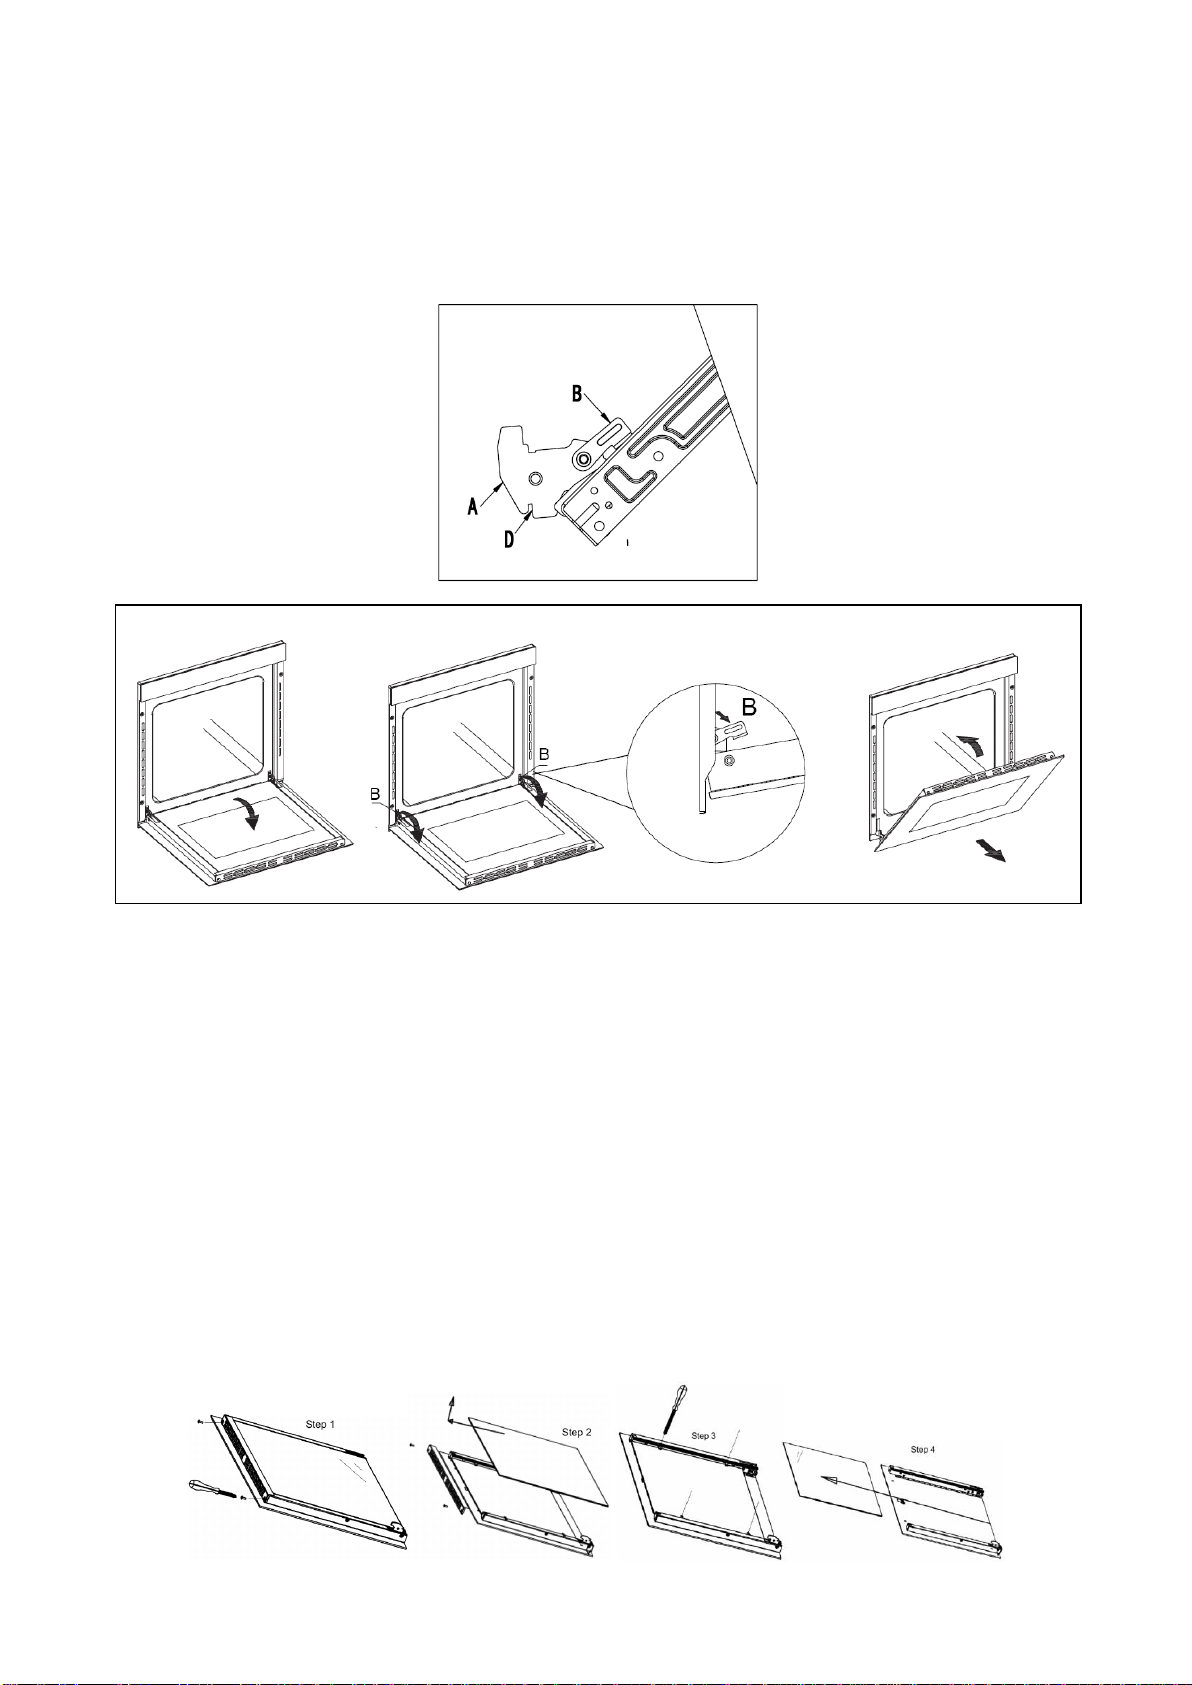
6) REMOVING THE OVEN DOOR
To make it easier to clean the oven chamber, the oven door could be removed.
Open the oven door fully as shown in the figure below. Lift up and turn the small levers B located on the two
hinges. Grip the door on the two outer sides and close it approximately half way. Pull the door towards you lifting
it out of its seat. To replace the door, ensure the seat D is hooked perfectly onto the edge of the oven slot, then
reverse the above mentioned sequence.
7) REMOVING THE DOOR GLASSES
The oven door is a triple glazed door and has vents at the top and the bottom. When oven is in operation, air is
circulated through the door to keep the surface of the door cooler. If condensation happens between the glasses,
the glasses can be disassembled for cleaning purpose.
Remove the door per instruction on point 6, and place the door on a protective surface (e.g. on a table cloth) to
prevent it from getting scratched. The door handle should line up with the edge of the table. Make sure the glass
lies flat to avoid glass to break during cleaning process.
Undo the 2 screws on the upper bracket.
Take the upper bracket out, then the first glass can be removed.
Loosen the 4 clips.
Slide the middle glass panel out carefully. Clean the glass panels and other parts of the door with a soft
damp cloth.
Wipe them dry before reassembling them.
Page 12
Version 1.1 Dec 2016
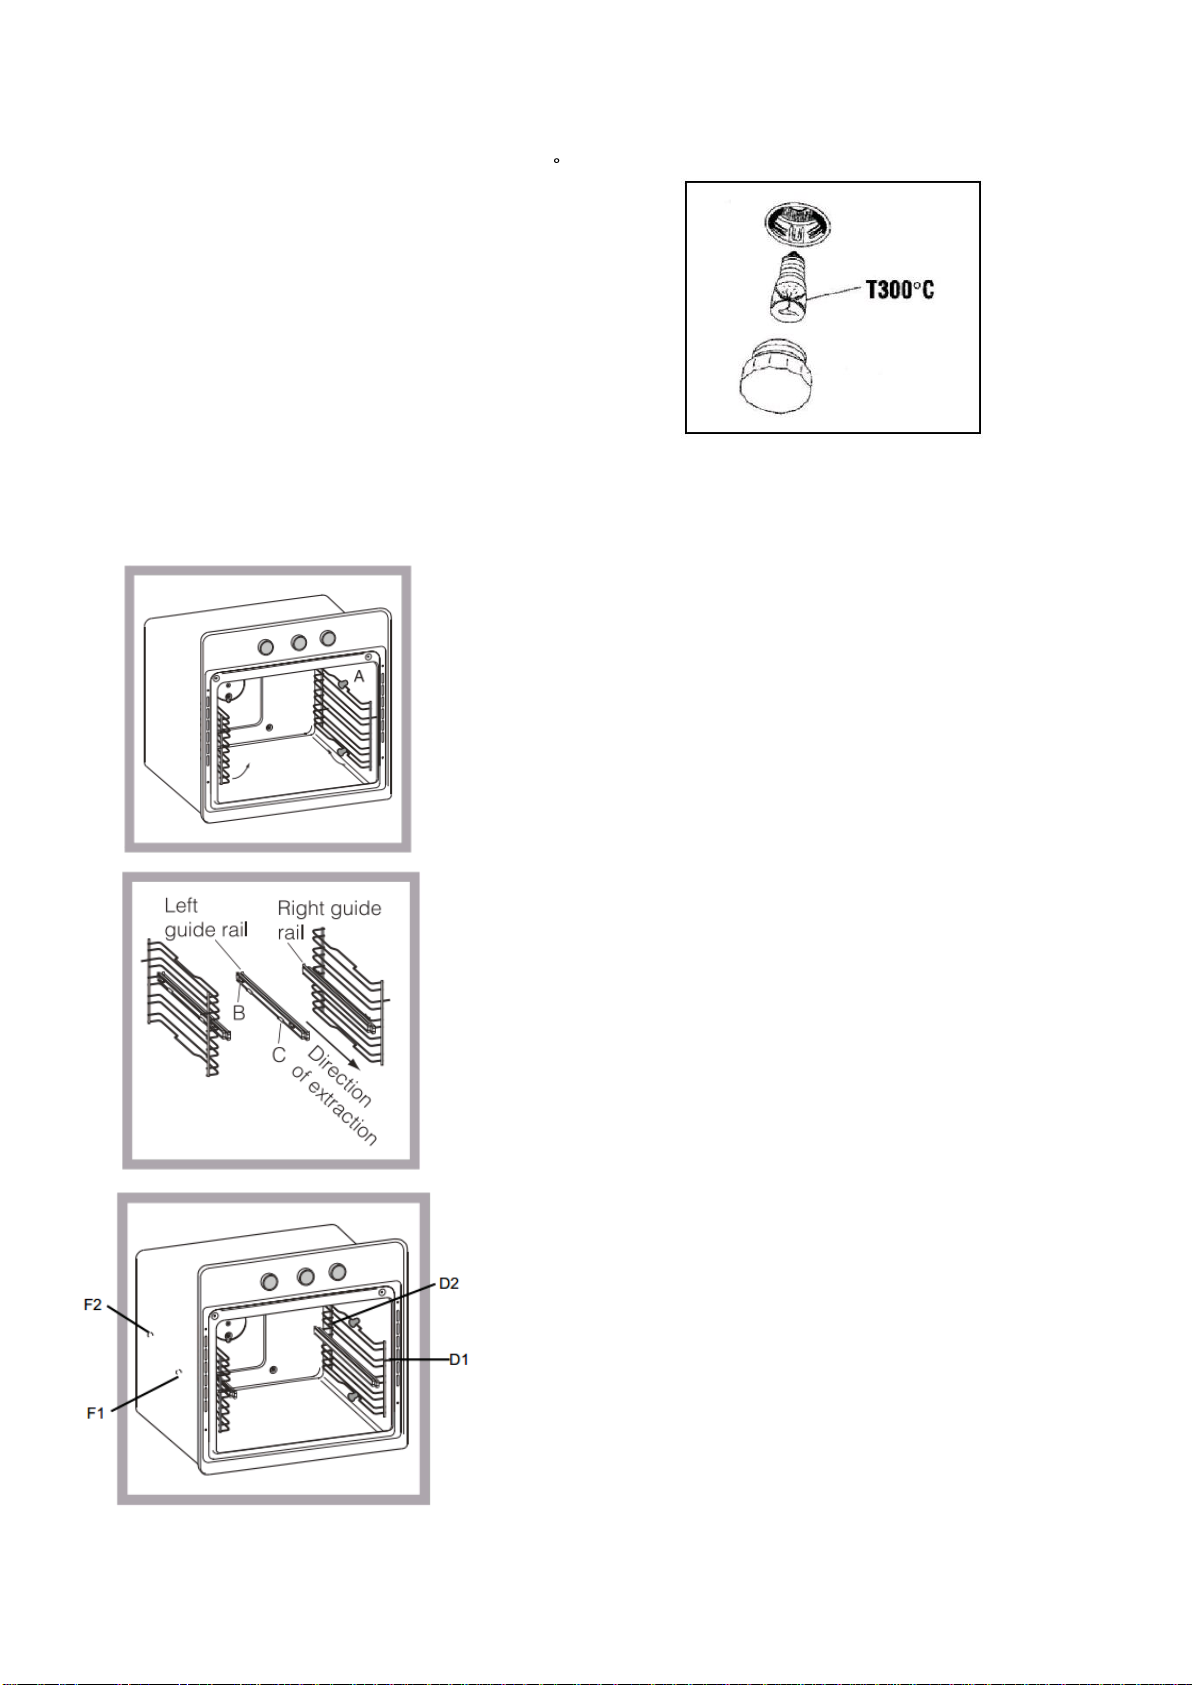
8) REPLACING THE OVEN BULB
Once the oven has been electrically disconnected, unscrew the glass protection cap and the bulb, replacing it
with another one suitable for high temperature 300 C.
It should be fit below points:
Voltage: 220-240Vac Power: 15W E14
Reassemble the glass cap and reconnect the oven.
9) TELESCOPIC RACKS ASSEMBLY
To assemble the telescopic arms :
Remove the two frames, lifting them away from spacers A
Choose which shelf to use with the telescopic arms. Pay
attention to the direction in which the telescopic arms is to be
extracted. Position joint B and the joint C on the frame.
Secure the two frames with the guide rails using the holes
provided on the oven walls. The holes for the left frame are
situated at hole F1, F2, and the right frame at hole D1, D2.
Finally fit the frames on spacers A.

Page 13
Version 1.1 Dec 2016
Warning:
1. Ensure that the appliance is switched off before replacing the lamp to avoid the possibility of electrical
shock.
2. Accessible parts may become hot during use. Young children should be kept away.
3. Do not use harsh abrasive cleaners or sharp metal scrapers to clean the oven door glass since they can
scratch the surface, which may result in shattering of the glass.
4. Steam cleaner is not to be used.
5. Fixed wiring must be protected.
6. The door should be situated more than 85 mm above floor after installation of the oven.
7. Means for disconnection must be incorporated in the fixed wiring in accordance with the wiring rules.
8. When it is in use the appliance becomes hot. Care should be taken to avoid touching heating elements
inside the oven.
9. Surfaces of storage drawer can get hot.
10.The oven must be switched off before removing the guard and that, after cleaning, the guard must be
replaced in accordance to instructions.
11.The control panel is only to be connected to the heating units specified in order to avoid possible
hazards.
12.This product must not be disposed with the domestic waste. It has to be disposed at an authorised bin
for recycling the appliances.
13.This appliance is not intended for use by person (including children) with reduced physical, sensory or
mental capabilities or lack of experience and knowledge, unless they have been given supervision or
instruction regarding the use of the appliance by personnel who is responsible for their safety.
14.Always make sure the knobs are in the “0” position when the appliance is not in use.
Dear Customer,
To protect the surrounding furniture cabinets, after cooking is completed, the cooling fan may stay on until the oven
has cooled down sufficiently. If you have had the oven on for hours at a time, this fan might stay on for up to 60
minutes after you turn off the oven.
This manual suits for next models
1
Table of contents
Other diLUSSO Oven manuals

diLUSSO
diLUSSO OV911TBL User manual

diLUSSO
diLUSSO FS909G5CSD User manual

diLUSSO
diLUSSO SO60BBBI User manual

diLUSSO
diLUSSO OV908DSL User manual

diLUSSO
diLUSSO CSO45SBI User manual

diLUSSO
diLUSSO SO633WWFS User manual

diLUSSO
diLUSSO OV604MS User manual

diLUSSO
diLUSSO OV908DS User manual

diLUSSO
diLUSSO OV608MS User manual

diLUSSO
diLUSSO CSO28SBFS User manual


