Dinkle D-Thermo TMP-004 User manual

Order PN: TMP-004
User Manual

TMP-004
Thermal Transfer Printer
User Manual
Version Change History
Version Change History
V1 Initial version

TMP-004
Thermal Transfer Printer
User Manual
TABLE OF CONTENTS
Safety Instructions 001
1Thermal Transfer Printer 002
1.1 Box Content 002
1.2 Getting To Know Your Printer 003
2Printer Setup 005
2.1 Open The Printer Cover 005
2.2 Open The Printing Mechanism 005
2.3 Loading The Ribbon 006
2.4 Positioning Calibration 008
2.5 Installing the strips 009
2.6 Preparation steps before cutter installation 010
2.7 Installing The Cutter 011
2.8 Optional Installation 014
2.9 Connecting The Printer To The Host Computer 017
3Software Setup 018
3.1 Download software package 018
3.2 Install Driver 018
3.3 Dinkle Label installation 019
4Printer Operation 022
4.1 LED Indicator 022
4.2 Label size calibration and Self Test Page 023
4.3 Error Alerts 024
5Maintenance And Adjustment 025
5.1 Cleaning The Print Head 025
5.2 Adjusting The Print Head Pressure 025
5.3 Adjusting The Print Line 026
5.4 Adjusting The Cutter 026
5.5 Troubleshooting 028
6Software: Dinkle Label Operating 029
6.1 Main page Introdution 029
6.2 General Operating 033
6.3 Setup 038
Appendix 043

001
TMP-004
Thermal Transfer Printer
User Manual
SAFETY INSTRUCTIONS
Please read the following instructions carefully
1. Keep the equipment away from humidity.
2. Before you connect the equipment to the power outlet, please check the voltage of
the power source.
3. Make sure the printer is off before plugging the power connector into the
power jack.
4. It is recommended that you connect the printer to a surge protector to prevent
possible transient overvoltage damage.
5. Be careful not to get liquid on the equipment to avoid electrical shock.
6. For safety and warranty reasons, ONLY qualified service personnel should open
the equipment.
7. Do not repair or adjust energized equipment under any circumstances.

002
TMP-004
Thermal Transfer Printer
Printer Introduction
1 Thermal Transfer Printer
1.1 Box Content
Please check that all of the following items are included with your printer.
Thermal Transfer Printer
Power Cord
AC Adapter
USB Cable
Ribbon
Cutter (Optional Accessory)
Ribbon Hubs ( set of 2 )
Empty Ribbon Core
Label Supply Hub
Label Guide Plates ( set of 2 )
Tray Holder

003
Rear View
1 Thermal Transfer Printer
1.2 Getting To Know Your Printer
Device Overview
Front View
TMP-004
Thermal Transfer Printer
Printer Introduction
USB Port
Power Jack
Top Cover
LED Indicator
Cover Open Buttons
Front Cover
Serial Port ( RS-232 )
Ethernet Port
Fan-Fold Label Inesrt
Feed slot for external label feeding
Power Switch
- ON
- OFF

004
Open The Printing Mechanism
1 Thermal Transfer Printer
1.2 Getting To Know Your Printer
Open The Printer Cover
TMP-004
Thermal Transfer Printer
Printer Introduction
Label Supply Module
- Label Supply Hub
- Label Guide Plates ( Set Of 2 )
Adjustment Screw ( Right )
Screw for adjusting the print head pressure
Adjustment Screw ( Left )
Screw for adjusting the print head pressure
Ribbon Module
- Ribbon Feed Mechanism
- Ribbon Hub
- Empty Ribbon Core
Release Catch ( Right )
Adjustment Screw
Screw for adjusting the print line
Label Guide
Label Sensor
Movable
Release Catch ( Left )
Printing Mechanism
Ribbon Supply Hub
Platen
005
2 Printer Setup
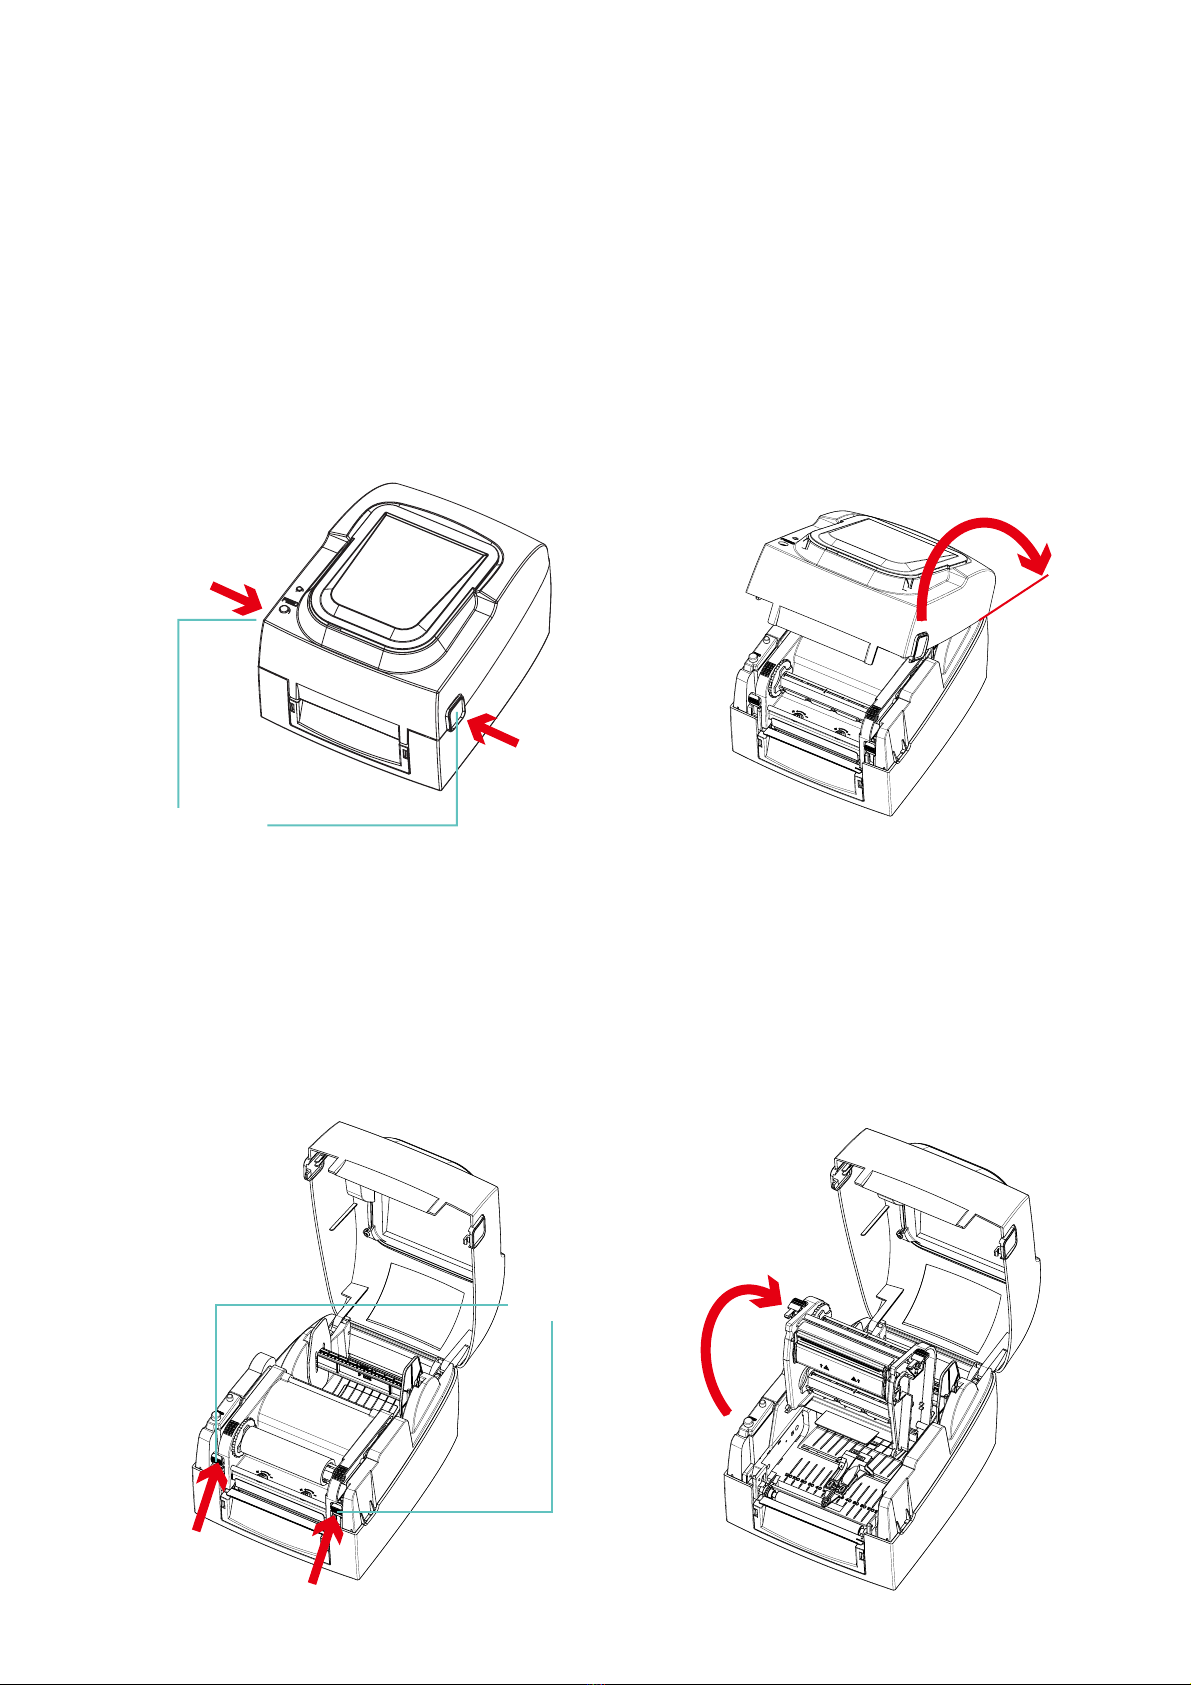
2.1 Open The Printer Cover
Pressing The Cover Open Buttons
Place the printer on a flat surface. Open the printer cover by pressing the release buttons on both sides of the
printer housing and lift the cover.
TMP-004
Thermal Transfer Printer
Installation Guideline
Pressing The Release Catches
Release and lift the printing mechanism.
2.2 Open The Printing Mechanism
Lift the printer cover backward
Pressing the button
Pressing the button
Cover Open Buttons
Release buttons for opening the printer cover.
Release Catches
Pressing
Pressing
Lift the printing mechanism

006
* The left core while ribbon used up is able to be a new Empty Ribbon Core
2 Printer Setup
2.3 Loading The Ribbon
A New Ribbon Module Installation
Place the new ribbon on the hub which forms a ribbon supply hub.
TMP-004
Thermal Transfer Printer
Installation Guideline
Place the empty ribbon core on the hub which forms a ribbon rewind hub.
Stick the ribbon supply hub on the ribbon rewind hub and wind the rewind hub 2~3 circles.
Ribbon Supply Hub
Place on the hub
Ribbon Hub New Ribbon
Ribbon Hub
Ribbon Feed Module
Place on the hub
Empty Ribbon Core
Wind the ribbon around the core

007
2 Printer Setup
2.3 Loading The Ribbon
TMP-004
Thermal Transfer Printer
Installation Guideline
Place the ribbon supply hub at the back of the
printing mechanism.
Close the printing mechanism, making sure
that it clicks into place.
Pass the ribbon supply hub under the print
head.
Insert into the printing
mechanism
Place on the printing
mechanism
Wind to the back
Ribbon Feed Mechanism

008
2 Printer Setup
2.4 Positioning Calibration
TMP-004
Thermal Transfer Printer
Installation Guideline
Sensor Position

009
2 Printer Setup
2.5 Installing the strips
Step 1. Install the tray on the tray holder, and pull out the strip.
(please refer the Tray Holder Assembly Guideline in the kit box to assemble tray holder)
Step 2. Open the printer cover then release and lift the printing mechanism.
Step 3. Pass the labels through the label guides up to the tear-off plate.
Step 4. Adjust the label guides to the label width.
Step 5. Close the printing mechanism. and printer cover
TMP-004
Thermal Transfer Printer
Installation Guideline

010
2 Printer Setup
2.6 Preparation steps before cutter installation
Before installing the cutter, please make some preparations as follows.
STEP 1. Turn Off The Printer :
Remember to switch off the printer before installing any accessaries.
Step 2. Installing spacer
Take the 4 spacers out from the cutter kit box, then tear off the back tape. Trap the 4 positioning posts
underneath the printer by 4 spacers and stick firmly.
TMP-004
Thermal Transfer Printer
Installation Guideline
STEP 3. Open The Printer Cover :
Open the printer cover by pressing the release buttons on both sides of the printer housing.
Please see the Section 2-1 for further information about Open The Printer Cover.
STEP 4. Open The Printing Mechanism :
Press the release catches on both sides of the printing mechanism to open and lift the printing
mechanism.
Please see the Section 2-2 for further information about Open The Printing Mechanism.
011
2 Printer Setup
TMP-004
Thermal Transfer Printer
Installation Guideline
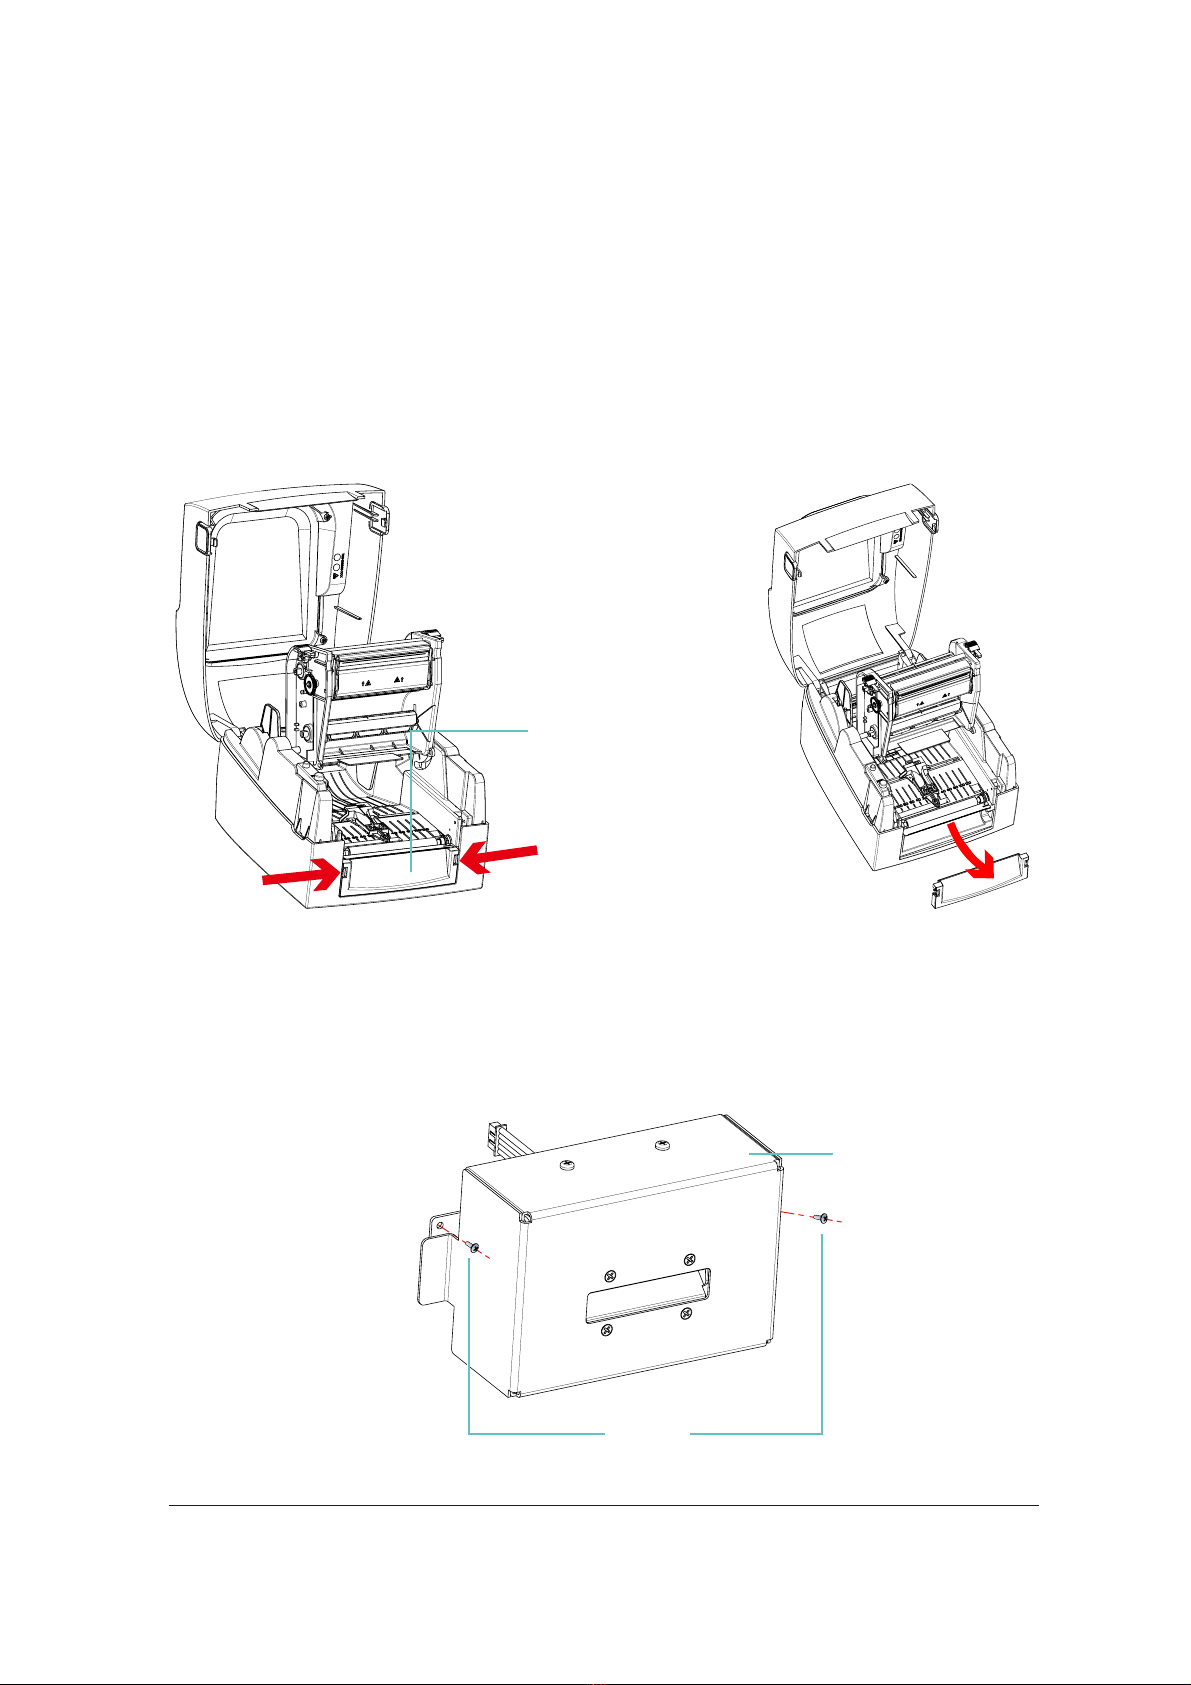
Step 5. Remove The Front Cover :
To remove the front cover, press in the two plastic release tabs.
Remove the front cover as shown in the illustration.
2.7 Installing The Cutter
The Overview Of The Cutter
NOTICE
* Remember to switch off the printer before installing the cutter.
* max. cut width: 50 mm.
2.6 Preparation steps before cutter installation
Release the
front cover
Front Cover
Pressing the two plastic
release tabs
Screws
Cutter Module

012
2 Printer Setup
2.7 Installing The Cutter
Connect the cable of cutter module and the upper jack
TMP-004
Thermal Transfer Printer
Installation Guideline
hold the cutter module, then slide the side brackets into the slots on printer in order
Slide
Connect Cable Of
Cutter Module
Upper Jack
013
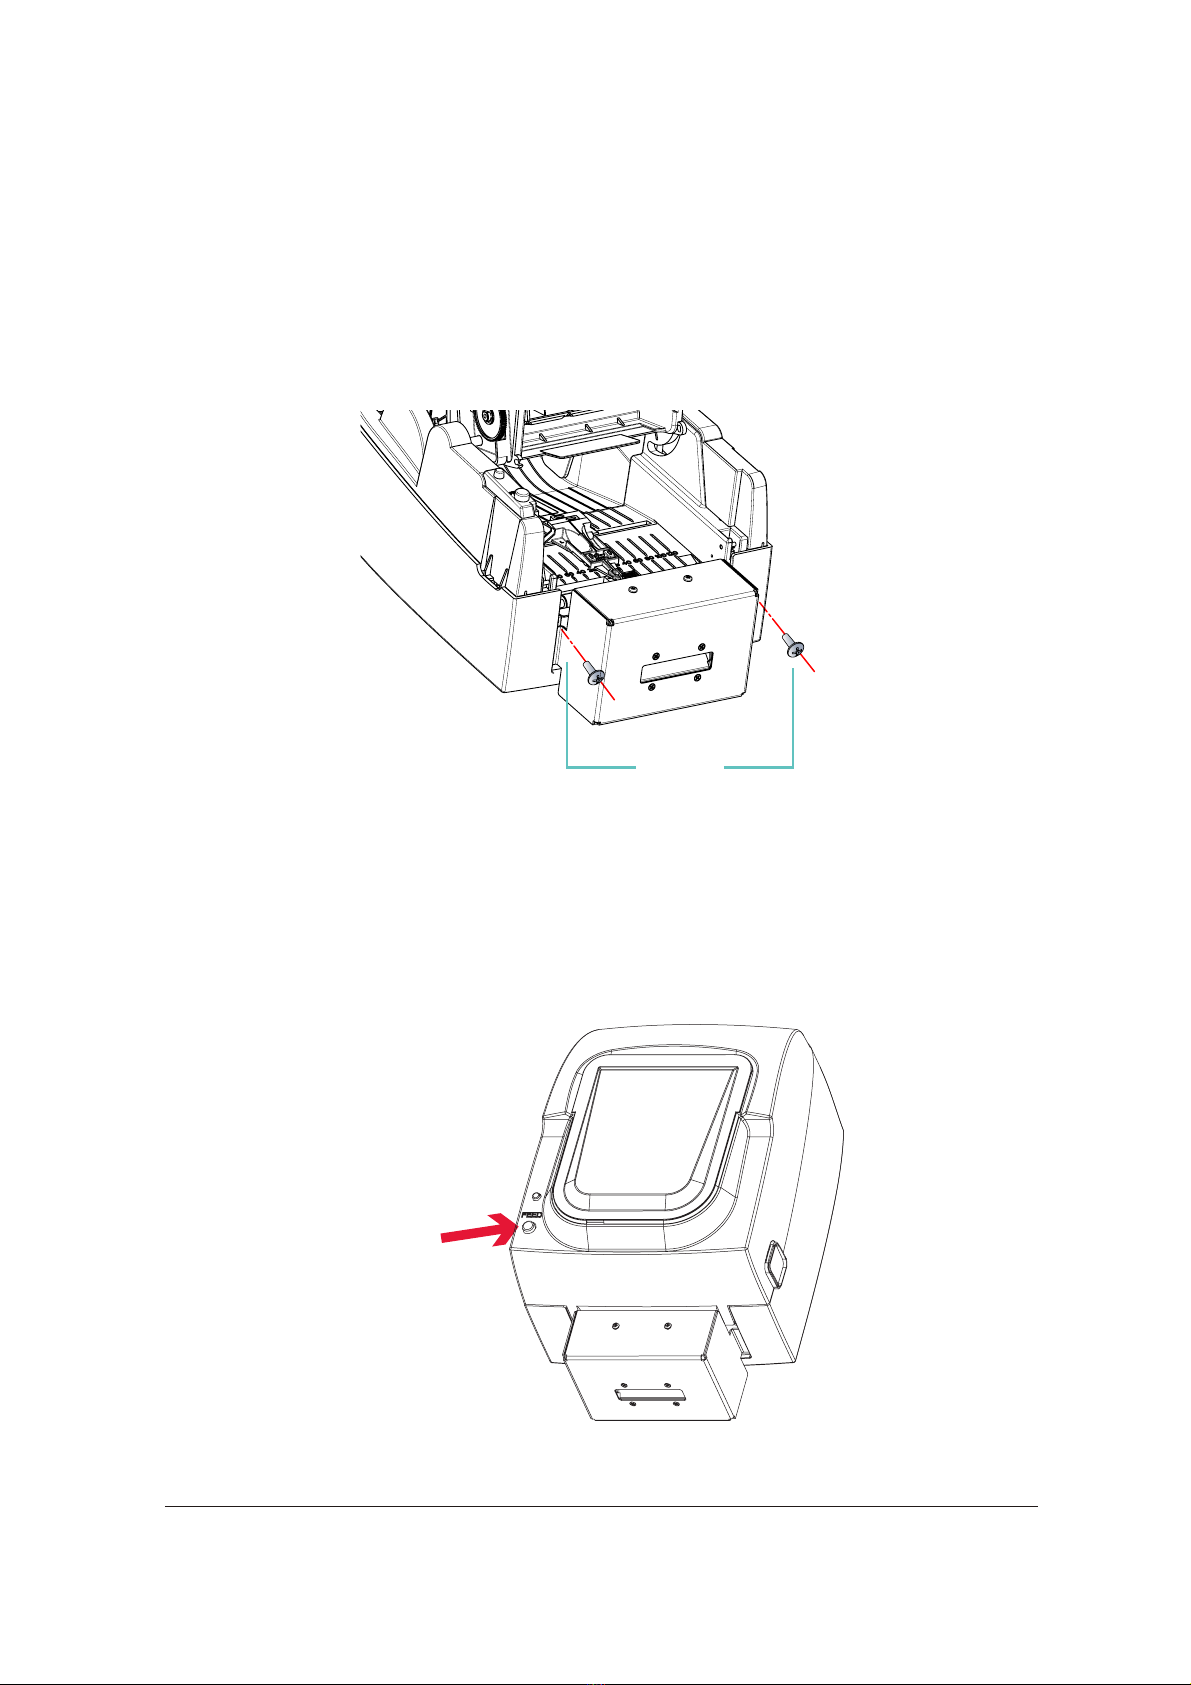
Press FEED button to complete label positioning
fasten the screws on both sides
2 Printer Setup
TMP-004
Thermal Transfer Printer
Installation Guideline
NOTICE
* We advise against using inside wound label stock.
2.7 Installing The Cutter
Press FEED button
Screws

014
Install The Label Roll Module On The Printer
Now load the label stock into the printer.
2 Printer Setup
2.8 Optional Installation
A New Label Roll Module Installation
Place the label stock on the label supply hub, attach the guide plates to the label stock holder.
TMP-004
Thermal Transfer Printer
Installation Guideline
Label Stock
Label Supply Hub
Place on the ribbon hub
Label Guide Plates
Place on the printer

015
2 Printer Setup
2.8 Optional Installation
Release the printing mechanism and lift it.
Pass the labels through the label guides up to the tear-off plate.
Adjust the label guides to the label width.
TMP-004
Thermal Transfer Printer
Installation Guideline
Close the printing mechanism.
Through the label guides
Close
Label Guides

016
2 Printer Setup
2.8 Optional Installation
Installing The Label Supply Hub
1" Cores
Installing the label supply hub for 1" cores.
TMP-004
Thermal Transfer Printer
Installation Guideline
1.5" Cores
Installing the label supply hub for 1.5" cores.
3" Cores
Installing the label supply hub for 3" cores.
NOTICE
* Labels should be at least 30 mm high to ensure correct functioning of the cutter.
017
2 Printer Setup
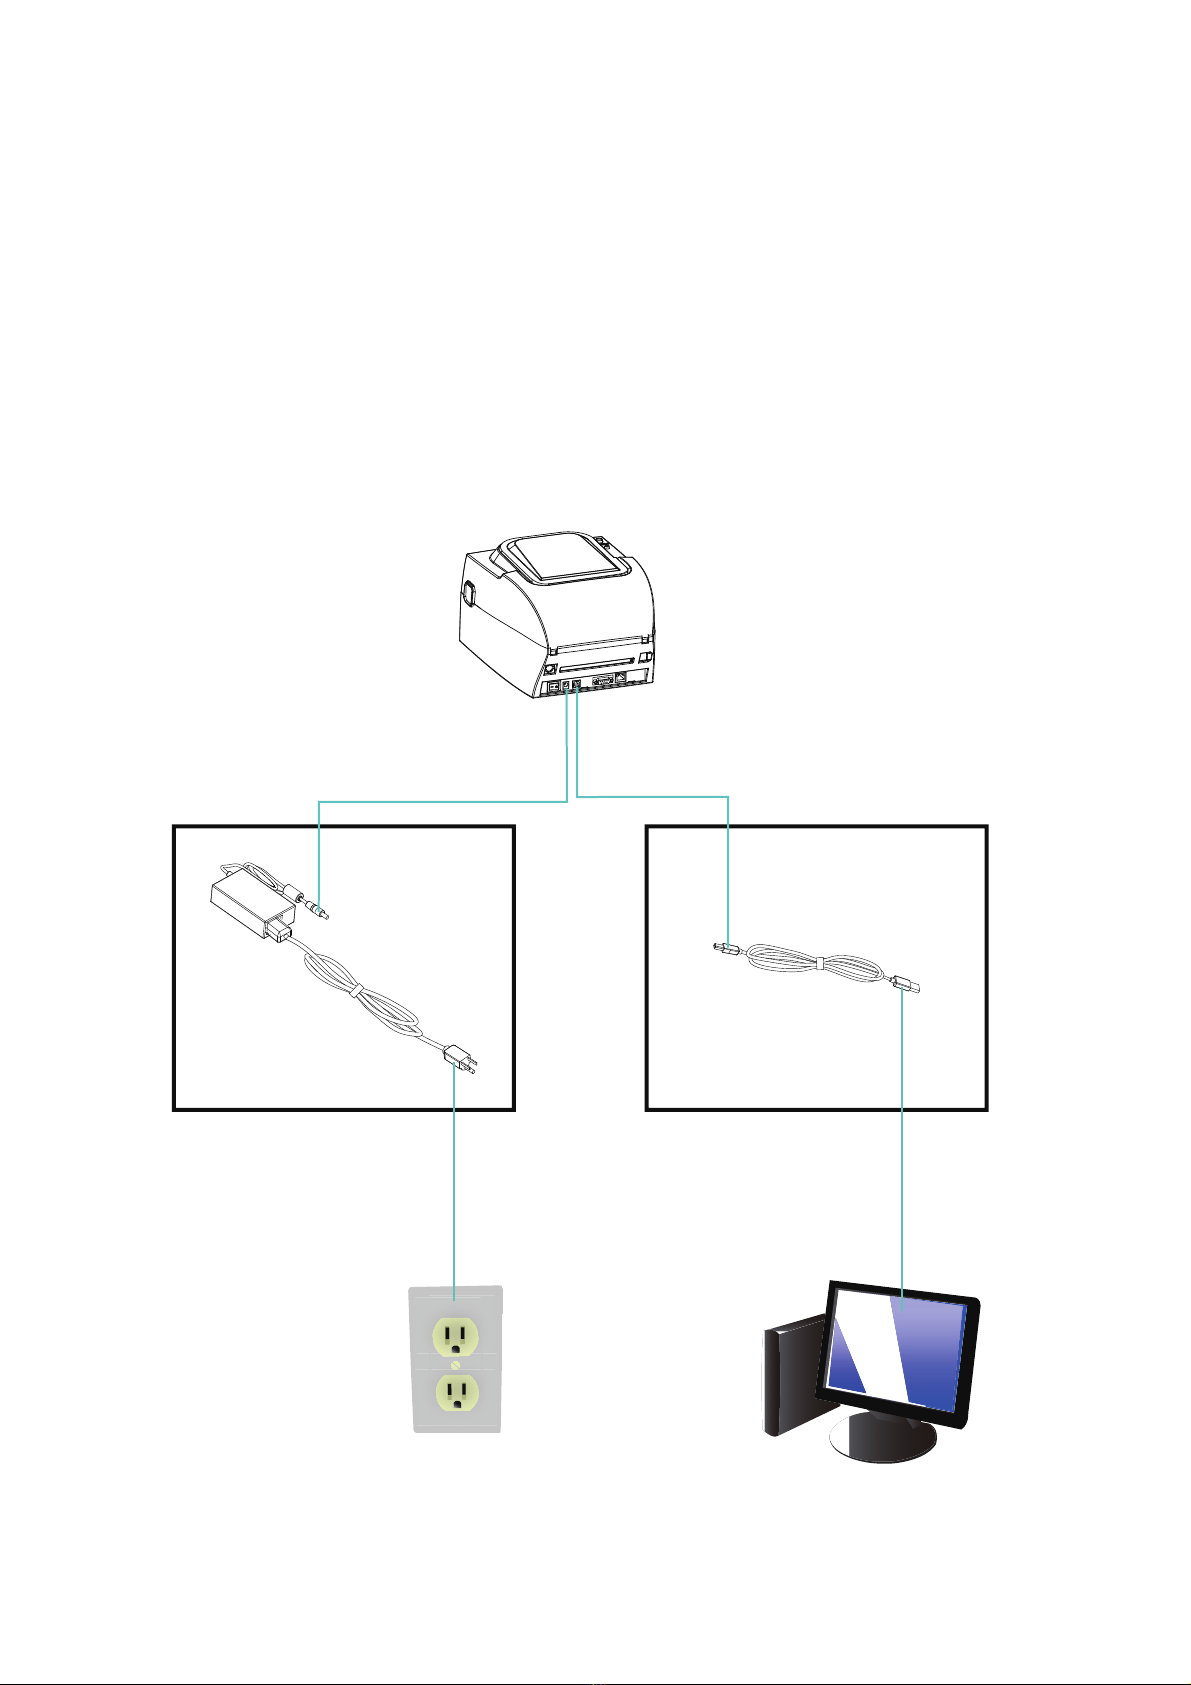
2.9 Connecting The Printer To The Host Computer
• Please make sure that the printer is switched off.
• Connect the power cord to the AC adapter and connect the adapter to the printer.
• Connect the USB / parallel cable to the printer and host computer.
• Switch on the printer. The LED indicator should now lights up.
TMP-004
Thermal Transfer Printer
Installation Guideline
A1
Power Slot
A1
Power Jack
A2
Plug
A2
The Socket Of The Wall
B1
USB Port
B1
USB Port
B2
USB Port
B2
USB Port
Table of contents
Other Dinkle Printer manuals


