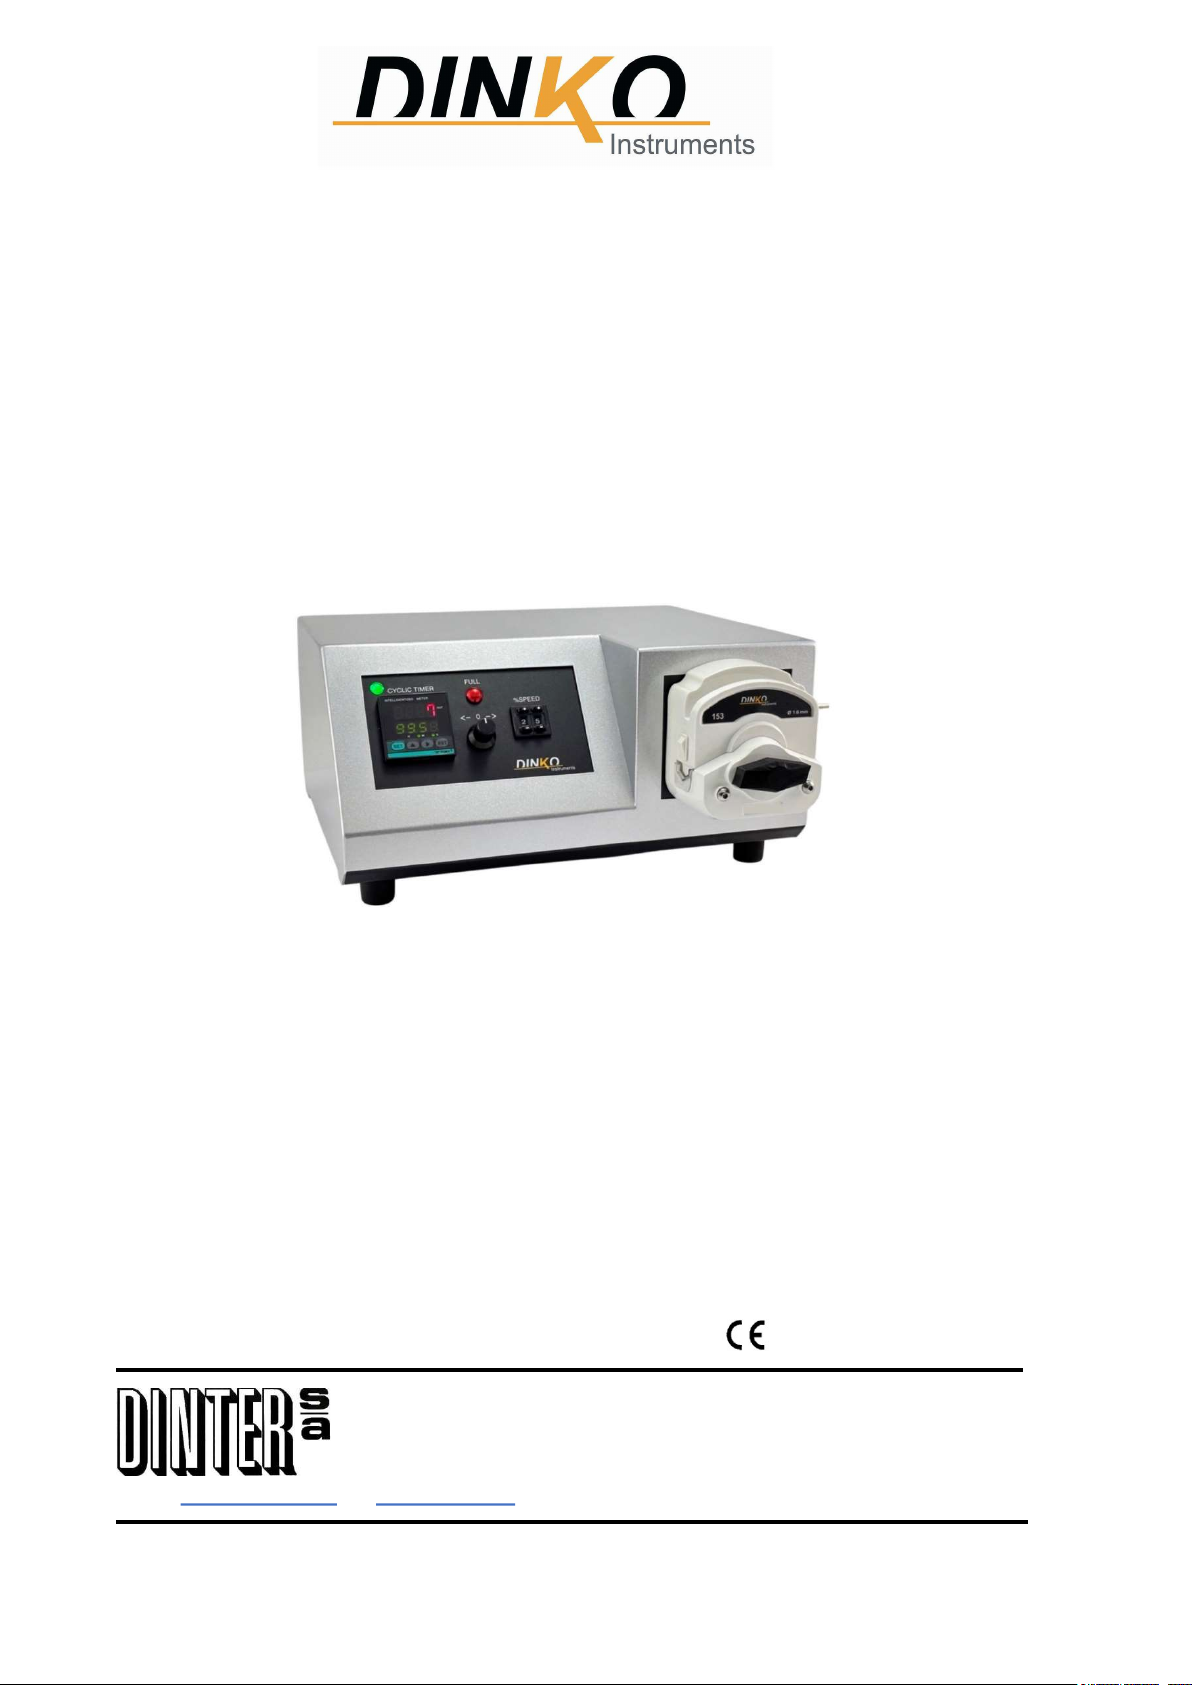
DINKO Instruments 1.9745.00 User manual

1
VARIABLE FLOW PERISTALTIC PUMPS WITH TIMER
Model D-25VT 153-3r
Codes 1.9745.00, 1.9745.11 and 1.9745.50
MANUAL
June 2023
Marked
c/ Encarnació , 123 -125. Tel. +34 93 284 69 62. Fax +34 93 210 43 07
E-mail: dint[email protected] www.dinko.es 08024 - Barcelona

2
INDEX
Page
1- Introduction ········································································································ 3
2- Packing list ········································································································· 3
3- Reception ··········································································································· 3
4- Description ········································································································· 5
5- Specifications ····································································································· 7
6- Start up ·············································································································· 8
7- Digital timer ········································································································ 9
8- Accessories ····································································································· 15
9- Tube change ····································································································· 17
10- Ordering information ························································································· 19
11- Changing fuses ································································································· 19
12- Troubleshooting ································································································ 19
13- Maintenance – Spare parts ················································································· 20
14- Warranty ·········································································································· 21
15- EC Declaration ·································································································· 22
16- Other DINKO devices ························································································· 23

3
1- GENERAL INTRODUCTION
Peristaltic pumps pump all kinds of liquid substances without encountering mechanical elements as occurs in
other pumps. They are easy to use and require minimal maintenance.
The pumped substance is impelled inside an elastic tube thanks to the vacuum generated by a set of rotors that
successively press and release the surface of the tube. The liquid passes directly from its container to another
without any contamination, avoiding backflow when stopping the pump as the tube remains pressed by the roller.
The nature of some corrosive substances or other characteristics that prevent the use of conventional pumps
make peristaltic pumps especially useful for transferring or dispensing such substances.
Flow rates are obtained from 0.02 ml/minute up to 5000 ml/minute.
A large number of different size tubes or hoses made of materials resistant to various substances are available.
2- PACKING LIST Code Quantity
D-25VT pump 1.9745.00 / 1.9745.11/ 1.9745.50 1
Set tubes 1
Power cord 1
Footswitch connector 1
Instruction Manual 1
3- RECEPTION
To ensure correct reception, use of the device, and user safety, we recommend reading this manual in detail
before proceeding to unpack the device and subsequent use, and especially the following points:
3.1- THE MANUAL
This manual must be permanently kept within the equipment user's reach.
3.2- UNPACKING
Carefully unpack the appliance, checking that the contents match the packing list.
Immediately notify any eventuality.
3.3- EXPLOSIVE MIXTURES
Avoid using the device when there is the possibility of generating explosive and flammable gas mixtures.
The ATEX Directive is not covered.
3.4- RESPONSIBILITY
In accordance with the European regulations for use 89/655/CEE, the lack of adequate maintenance and the
alteration or change of any component exempts the manufacturer from any responsibility for the damages that
may occur.
3.5- REPAIRS
Devices to be sent to DINKO technical services must be clean and disinfected.
Otherwise, they will be rejected and returned with postage paid by the owner.

4
3.6- SIGNS AND SYMBOLS
Always pay attention to the danger warning signs and symbols that will appear in this manual or on labels attached
to the body of the Pump such as those shown below.
SIGNS/ SYMBOLS
INTERPRETATION
-
MEANING
Avoid finger contact with moving parts
Danger-Risk-Caution
Before opening
DISCONNECT
the network cable
Before remove cover
PULL OUT plug
Before accessing the interior of the Pump, disconnect the
power cable from the main.
Possible overheating - Do not touch
100-230V AC 50/60Hz AC power supply voltage
110V AC 60Hz AC power supply voltage
12V DC DC power supply voltage
Disposal of waste electrical and electronic equipment by
users within the European Union.
It is not disposable as household waste.
Deliver to the agency for recycling of electronic
equipment.
Contact your local office, the store where you purchased
the equipment, or your household waste disposal
service.
Recycling helps conserve natural resources.
Make sure it is recycled protecting human health and
the environment.

5
4- DESCRIPTION
The D-25Vplus peristaltic pumps in this manual mount the 153-3r head that allows easy access to the tube for
removal when it must be replaced.
On the 153-3r easy-load head, simply pull up and to the left of the lever (1) located on the top of the head to raise
the top and open the head for tube replacement.
When removing the tube, slide the buttons (3) up to move the tube retainers.
The head admits various tube sizes which, combined with the speed regulation, gives a great variety of flows, as
can be seen in the flow chart .
In the description on the front panel, the FULL button, nº 5, obtains the maximum speed of the motor, in the
loading, purging and cleaning operations and the control 2 allows to choose the direction of rotation of the motor
for the inversion of the flow and the unemployment. The cyclical timer nr. 1 has section 7 of this manual with the
instructions for its programming and the speed regulator nr. 3 provides control of the flow with a repeatability of
100%.
In the description on the back there is the connection for the network cable with integrated fuse holder, connection
for the pedal and the timing mode selector no. 12.
Consult the indicative table of dosages and install the appropriate tube.
NEVER CARRY OUT THIS OPERATION WITH THE EQUIPMENT RUNNING.
4.1- HEAD 153-3r :
1
3 3 3
4
2
2 4 4 4
Closed head Open head
1 - Lever to open the head
2 - Tractor axle output guard
3 - Sliding buttons for fixing the peristaltic tube
4 - Complementary head fixing screw holes
The 153-3r head admits another equal head on its same axis of rotation. Remove the protector 2 to face the
complementary head with the axis and insert the two assembly screws in the holes 4.
With 2 heads it is possible to cancel the typical cadence of the peristaltic flow. To do this, when locating the
complementary head, the rotor rollers must be oriented in opposition to the main head rollers.
When the heads are used as independent channels, each one will provide the flow corresponding to the tube
installed in the heads.
If it is intended to double the flow, the two suction and discharge tubes can be installed directly in the feeding and
receiving containers.
The option to use a Y-connection to join the tubes of both heads will allow the cancellation of the peristaltic pulse.
It must be remembered that the final discharge tubes and especially the suction ones must be of a larger diameter
than the head tube. If this is not possible, the total flow will be somewhat less than the theoretical expected.

6
4-2 FRONT PANEL 5
4
Figure a
1
3 2
1- Cyclic timer
2- Numerical speed control
3- Engine crank and stop selector
4- Pilot lamp
5- FULL peak flow push button
4-3 REAR PANEL
7 Figure b
8
9
10 11 12
7- ON/OFF main power switch
8- Fuse box
9- Power socket
10- Timing mode selector
11- Input for voltage-free pedal
12- Fan.

7
5- SPECIFICATIONS
5.1 DIMENSIONS
Pump: 340x280x180. Weight 7Kg
Operation: between 100 and 240V. 50/60 Hz. Amp. 0.5 /1
5.2 FLOW TABLE - Interval guide for each tube.
Code rpm Head 0.5 mm 0.8 mm 1.6 mm 3.2 mm
4.8 mm
6.4 mm
8.0 mm ◄Tube Ø
1.9745.11
110
153-3r
0.17-2.8
0.5-6.7 2.7-28 6.7-100 19-230 27-367 58-500
Flow ml/min
1.9745.00
330 0.5-8.5 1.5-20 8.0-85 20-330 56-700 80-1050 175-1300
1.9745.50
500 0.7-12 2-29 12-120 29-470 80-1000
115-1500 250-2000
The indicated flows are approximate and refer to liquids with a viscosity like water at normal temperature and
without discharge back pressure.

8
6- START UP
INITIAL CONSIDERATION:
For a correct dosing with a Peristaltic Pump with a timer, first of all you have to select the
appropriate tube, both in composition and measurements to carry out the dosing of the
desired volume.
Tests must always be carried out to determine how much volume is dosed per unit of time.
To do this, a series of dosages must be made, and the volume dosed must be checked. If it
is necessary to increase the dosed volume, the dosing time will have to be increased and if
it is necessary to decrease it, it will have to be reduced.
Once this time has been found, we can start working in the mode that best suits us.
6.1- In facilities for processes or assemblies that include a DINKO Pump, there is no must be put into
service before checking that the safety regulations of the European Machinery Directive 2006/42/EC.
6.2- Place the motor rotation direction selector in position “0” (figure a (3)).
Check the position of the IO selector (figure b (10)).
Choose the speed using the percentage numeric indicator buttons. With a 100% reproducibility speed
range available from 0 to 99% speed maximum with an accuracy of 1% (figure a (2)).
6.3- Install the selected tube
During the first few minutes of operation, some of the recently installed tubes suffer an elongation that
alters the distances between the tube and its fixings with the rollers. Readjust the tube in the head to
prevent the rollers from unexpectedly tearing the tube.
Marking the tube with a marker makes it easier to detect a faulty fixing of the tube to its head that will
cause the tube to break by the rollers.
Locate the tubes for loading and unloading the fluid to be pumped.
See instructions in sections 4- Description and 9- Tube Change
6.4 - Set the main switch to the OFF position (figure b (7)).
6.5- Connect the power cable to the rear connector and to the main power. (100-240V 50/60Hz)
(figure b (10)).
6.6- Press the main switch to the ON position (figure b (7)).
Proceed to programming the timer. See description, section 7

9
7- TIMER
When the equipment is connected, the timer starts and waits. To start it, press the ▲ key (6)
1- OUT Open/closed contact indicator-red pilot
2 - Measured time (red)
3 - Scheduled time (green)
4 -Time units (hour-minute-second) H/M/S-pilot green
5 6 7 8
5- SET button.
6- Increment button.
7- Scroll button.
8- Reset or restart button.
The timer allows different working methods, depending on the selected menus.
7.1 Menu selection
By pressing SET for more than 3 seconds, you enter the Menu function. After selecting or modifying the
parameter, press SET and go to the next one. If you spend more than 10 seconds without touching anything, it
jumps to the original screen.
Menu sequence - Factory programming
rAn1
. Select the units of
H/M/S time and the by pressing ▲ select the decimals
maximum time for t.oFF and if they are M/M/S or either M/M
or
M/S
H from 99.99 to 9999
M from 99.99 to 9999
S from 99.99 to 9999
Press SET H/M 99.59
M/S 99.59
rAn2
Idem for t.on
Idem
Press SET
U-d Pressing ▲ selects
Select the way to count the time U- Increasing mode
d - Decreasing mode
Press SET

10
Menu sequence- Factory programming
i nt Pressing ▲ selects
Select response time 1 mS
20ms
Press SET
oUt
. Select the menu you want use. Pressing ▲ selects
Description of the different modes
in the section 7.3 Modes of use n (N Mode ) F (F Mode)
C (C Mode) r (R Mode)
Press SET
stA Pressing ▲ selects
Select start-up: YES - (When the equipment is
manual or automatic connected, press ▲ to start it the first
time (manual)
No -When connected, it starts
up Press SET
automatically
HoLd Pressing ▲ selects
Select that if the current shutdown Yes - Continue
when rebooting, follow the menu
where shutdown cut or start again
no - start over
press SET
Press SET
LoCY LO- Nothing
By pressing ▲ they are selected
ways to lock the menu L-1 -Lock Reset
L-2 -Locks time and menu function
L-3- Lock everything

11
7-2 Selection of operation and stop time.
The timer has two programming times t.oFF and t.on indicating the status of the timer contacts.
t.oFF will always be the first to count and then t.on will count .
N, F modes we can only program the t.oFF , instead in the R mode , we must configure the t.oFF and he t.on .
To enter the time selection menu, press ►. The first digit starting from the left will start to flash, with ▲ we can
modify the value, we will go to the next position with ►, like this until completing the four digits.
When the four digits have been selected, press SET to confirm the selection.
Menu sequence
t.oFF
. Indicates that the contacts are The time parameters of
closed and allow the operation 0.015 – 9999 H
of the equipment were selected in the function
rAn1 from the menu
Press SET
t.on The time parameters of
Indicates that the contacts are 0.01S – 9999 H
open and don’t allow the were selected in the function
operation of the equipment rAn2 from the menu
It is indicated by a red light.
R and C menus only
Press SET

12
7.3 Modes of use
The pump has a timing mode selector on the back with two positions, O and I. (Figure b (10)).
In position O , when the timer starts (by pressing the ▲ key of the timer, it will start counting the programmed
times), the head will work for the time programmed as t.oFF .
In position I , when the timer starts (by pressing the ▲ key of the timer, it will start counting the programmed
times), the head will remain off for the time programmed as t.oFF.
7.3.a - N Mode
This working mode is used for:
- When you want to program a single dosage; When the timer is activated, the equipment will work for the
programmed time and stop.
Programming:
Timing mode selector in position O (Figure b (10)).
Motor rotation direction selector in position “0” (◄ or ►) (Figure a (3)).
Turn off the equipment and turn it on again. With the equipment turned on, press ▲ and check the
programmed t.oFF time ( lower green display ), if it needs to be modified, see 7-2 Selection of
operation and stop time (page 10).
Position the direction of rotation selector in the desired position so that the head rotates clockwise or
anticlockwise.
To start the head, press the RST key, and in the case of having the pedal connected, press the pedal.
The head starts up for the time programmed as t.oFF .
In green we will see the programmed time as t.oFF and in red we will see how the time increases from
0 to t.oFF .
Once the time t.oFF has finished , we will see the same time on the two displays , red and green, it will
stop counting and the head will stop.
To carry out another dosage, press the RST key, and in the case of having the pedal connected, press
the pedal. If the foot pedal is connected, dosing can be started both with the RST key and with the foot
pedal.
RST key
It is the factory programming.

13
- When you want to program a single dosage with a delay; that is, when the timer is activated, it will count
the programmed time with the head stopped and at the end of said time the head will start up, it will
work until the equipment stops.
Programming:
Timing mode selector in position I (figure b (10)).
Motor rotation direction selector in position “0” (◄ or ►) (Figure a (3)).
Turn off the equipment and turn it on again. With the equipment on, press ▲ and check the
programmed t.oFF delay time ( lower green display ), if it needs to be modified, see 7-2 Selection of
operation and stop time (page 10).
To start the head press the RST key, and in the case of having the pedal connected, press the pedal.
Position the direction of rotation selector in the desired position so that the head rotates clockwise or
anticlockwise, when the t.oFF ends .
The head will remain stopped for the time programmed as t.oFF .
In green we will see the programmed time as t.oFF and in red we will see how the time increases from
0 to t.oFF .
Once the time t.oFF has finished , we will see the same time on the two displays , red and green, it will
stop counting and the head will start up.
To carry out another dosage with a delay, press the RST key , and in the case of having the pedal
connected, press the pedal. If the foot pedal is connected, the cycle can be started, both with the RST
key and with the foot pedal.
RST key
7.3.b - F Mode
Same as N Mode, but:
Once the time t.oFF has finished , the green display will see time t.oFF and the red display will continue
counting the time.

14
7.3.c- R mode
Asymmetric cyclical mode, in which an operating time and a stop time are programmed to repeat indefinitely.
This working mode is used for:
- When we want to carry out a repetitive dosing of a specific volume, having a stop time between dosing
and dosing, to be able to place the rubber in another container to do another dosing. (Filling containers
with the same volume)
t.oFF will be the first beat and t.on will be the second beat.
In the timer programming we will select:
oUt r (R mode)
Sta this
Hold no
Selector in position O
The first time will be running and the second stop
Start………Stop……. …Start … …Stop……….Stop … ……
t.oFF t.on
Selector in position I
The first time will be unemployment and the second march
……… . .Stop……….. Start .… …...Stop…..…….. Start
t.oFF t.on
Once the work mode has been selected, turn off the pump and remove the external connector.
When starting the pump, the cycle that we have selected will start.
Note: To use the pump without the timer:
To be able to use the peristaltic pump without taking the timer into account, that is, the head starts when we turn
on the pump and stops when we turn off the pump.
For the equipment to work like this, it is necessary to program the timer as follows:
- By pressing SET for more than 3 seconds, you enter the Menu function. After selecting or modifying the
parameter, press SET and go to the next one. If you spend more than 10 seconds without touching
anything, it jumps to the original screen.
- In the timer menu put in the Sta section YES
- Timing mode selector in position O (figure b (10)).
- Motor rotation direction selector in position “0” (◄ or ►) (Figure a (3)).
- Turn off the equipment and start it up.
- Place the direction of rotation selector in the desired position (◄ or ►) (Figure a (3)).
- The motor will run and the timer will remain on without starting to count.
- To set the timer to count, you would have to press ▲
IT IS THE FACTORY PROGRAMMING

15
8- ACCESSORIES
8.1 Balance for flow and dosage calibration.
Reproducibility 0,1 g. 600g capacity. Code 1.9812.02
To measure the quantity dosed in the Calibration process of peristaltic pumps, it
is very effective to use a precision balance with digital reading.
If the liquid to be pumped has density "1" there will be no difference between grams and milliliters. Otherwise,
calculate the density by weighing a quantity of the liquid with the help of a 25ml test tube, for example,
previously taring the test tube on the scale.
Divide the weight indicated on the digital readout of the scale in grams by the milliliters contained in the test tube
to obtain the density according to the relationship,
D= M / V.
There is always the option to Calibrate the pump directly based on weight instead of volume.
Characteristics:
♦ Single digital reading platter, with highly visible backlit LCD screen.
♦ Simple use of great robustness with ABS casing and hermetic anti-humidity membrane keyboard
♦ Stainless steel pan, 157x128mm ♦ External auto calibration ♦ Units of measure: grams, pounds and
ounces
♦ Continuous tare up to 600 g ♦ Power supply 230V 50/60Hz ♦ Non-slip rubber feet
♦ Working temperature: from +5ºC to +40ºC. Maximum use humidity, 85% RH
8.2 Graduated cylinder, 25 ml. Code 1.9808.20
8.3 Silicone grease, 50g. Lubrication of peristaltic tubes. Code 8.0030.03
8.4 Standing support. Code 1.8003.08
Useful as a support for the tube/dispensing tip. Foot: 150 x 70cm. Bar, height 70cm. Sliding support for dosing
tip.

16
CONNECTORS FOR PERISTALTIC TUBES
8.5 Reducing Splice Connectors / Same Ends, Polypropylene
For tubes 1,6/3,2mm. ID. Code1.0080.15
For tubes 3,2/4,8mm. ID. Code 1.0080.18
For tubes 4,8/6,4mm ID. Code 1.0080.05
For tubes 6,4/8mm ID. Code 1.0080.14
For tubes 8/12,7mm ID. Code 1.0080.20
8.6 Straight connector for fitting/reducer, polypropylene
Straight connector / reducer Ø 4-5-8 to 7-10-12mm. Code 1.0120.31
8.7 Form Y connectors, polypropylene
Y shape connector, 6mm. either. Code 1.0120.26
Y shape connector, 8mm. either. Code 1.0120.48
Y shape connector, 10mm. either. Code 1.0120.32
Y-shaped connector, 12mm. either. Code 1.0120.33
8.8 Connectors-stainless steel 316 tubes- Connection and dosage
Straight connection 40 mm length
Tube for 0,5 and 0,8mm ID tubes, 25 Units. Code 8.0056.14
Tube for 1,6mm ID tubes, 25 Units. Code 8.0056.06
Tube for 3,2mm ID tubes, 25 Units. Code 8.0056.08
Tube for 4,8mm ID tubes, 25 Units. Code 8.0056.10
Tube for 6,4mm ID tubes, 25 Units. Code 8.0056.12
Dosage 130 mm length with a bevel
Dosage tube for 0,5 and 0,8mm ID tubes, 10 Units. Code 8.0056.15
Dosage tube for 1,6mm ID tubes, 10 Units. Code 8.0056.07
Dosage tube for 3,2mm ID tubes, 10 Units. Code 8.0056.09
Dosage tube for 4,8mm ID tubes, 10 Units. Code 8.0056.11
Dosage tube for 6,4mm ID tubes, 10 Units. Code 8.0056.13
Length 38mm
Micro-tube 0,8mm bore, 10 Units Code 1.0077.23
Micro-tube 0,9mm bore, 10 Units Code 1.0077.26
Clamping flange P. Code 1.0120.01
Clamping flange G. Code 1.0120.12
8.9 Anti-floating sunk Head
For peristaltic tubes of 1,6 and 3,2mm ID. Code 1.0303.10
For peristaltic tubes of 4,8mm ID. Code 1.0303.11
For peristaltic tubes of 6,4mm ID. Code 1.0303.12
For peristaltic tubes of 8,0mm ID. Code 1.0303.13
For peristaltic tubes of 9,6mm ID. Code 1.0303.14
For peristaltic tubes of 12,7mm ID. Code 1.0303.15
8.10 Stainless steel tubes for dosing with backflow valve
For tubes of 3,2/4,8mm ID. St.st. tip 4mm bore, WT 1mm. Code 1.0302.10
For tubes of 4,8/6,4mm ID. St.st. tip 6mm bore, WT1mm. Code 1.0302.11
For tubes of 6,4/8mm ID. St.st. tip 8mm bore, WT 1mm. Code 1.0302.12
For tubes of 8/9,6mm ID. St.st. tip 10mm bore, WT 1mm. Code 1.0302.13

17
9- CHANGE OF TUBES
Each pump is supplied with a set of medical/food grade silicone peristaltic tubes according to FDA and USP
standards, autoclavable at 120ºC, with peristaltic use range up to 80ºC and medium duration.
The peristaltic quality of the tubes or rubber consists of their ability to quickly recover their roundness once
the rollers of the peristaltic head of the pump have compressed it to generate the circulation of liquids inside.
In addition, it must offer a minimum mechanical quality to overcome the wear caused by continuous
compression of the rollers without losing its peristaltic capacity.
The pumps use tubes with a calibrated wall thickness of 1.6mm. More thickness will severely damage the motor
shaft and less thickness will prevent peristaltic function and the pump will not pump any liquid.
Thick liquids are best pumped with large tube diameters at low rpm. In the case of external connections, it is
better to use tubes with a larger diameter than the one used in the head. The difference in height between
supply and discharge always influences the performance of the pump and notably in thick liquids.
The pump feed and discharge tubes can be of any wall thickness with an inside diameter as close as possible
to that used in the head or larger, especially on the suction side.
The set of external tubes or connections must be as direct and straight as possible.
There is a range of rubbers that offer different chemical compatibilities with the products to be pumped.
The pump calibration must be updated every time the working conditions of the pump are altered, such as a
change of tube, diameter or type of rubber, distances, new connections, etc.
The standard endowment tubes supplied with the pump are made of medical / food grade silicone according to
FDA and USP standards, sterilizable by autoclave at 120ºC, with a peristaltic range of use up to 80ºC and medium
duration.
Important: Head tubes should be lightly coated with silicone grease to extend life and ease starting at low rpm.
Silicone grease, 50g. Code 8.0030.03
Press OF switch. Extract the tube according to the indications described in the “Description” section.
When the new tube is installed, it should be centered over the rollers to prevent the rotor from pinching it.
Be careful and avoid pinching your fingers. close head
During the first few minutes of operation, some tubes that have just been installed suffer an elongation that alters
the distances between the tube and its fixings with the rollers. Readjust the tube in the head to prevent the rollers
from unexpectedly tearing the tube.
Marking the tube with a marker makes it easier to detect a faulty fixing of the tube to its head that will cause the
tube to break by the rollers.
Because the friction of the tubes with the rollers increases with the diameter of the tubes, the minimum adjustable
speed increases the larger the tube.
It is advisable to use a speed slightly higher than the minimum adjustable speed observed, since the motor may
stop at any moment and cause the regulation circuit to overheat, which could be damaged if it remains in this
situation for a long time.

18
9.1 AVAILABLE TUBES
PHARMA Autoclavable multiple times.
ETO and Gamma sterilizable.
Medical-food grade, class VI USP, 21CFR 177.2600 and FDA.
Not hemolytic.
Excellent resistance to chemicals.
ISO 10993. Low permeability and good resistance to abrasion.
Long duration.
Use temperature, -51ºC to 132ºC .
Beige.
SILICONE Autoclavable.
The most versatile tube. Platinum Cure quality silicone.
Average duration.
Medical/Food Grade. Excellent biocompatibility.
Maximum temperature. 140ºC.
Translucent.
TYGON A-60-G ® Autoclavable
Compatible with Ozone, UV light and disinfectants.
Great resistance to fatigue and abrasion.
Resistant to acids, alkalis, and alcohols.
Use temperature -59ºC to 135ºC.
Black colour.
VITON ® Autoclavable
Suitable for acids and non- acetone solvents.
Maximum temperature 300ºC.
Black colour.
9.2 Codes for 1.6mm wall calibrated tube, 1 meter
▼Tube
I
D mm
►
0.5 0.8 1.6 3.2 4.0 4.8 6.4 8.0
PHARMA - 1.8801.08
1.8801.16 1.8801.32 1.8801.48
1.8801.64
1.8801.82
SILICONE 1.8760.05
1.8760.08
1.8760.16 1.8760.32 1.8760.40
1.8760.48
1.8760.64
1.8760.80
TYGON A-60-G
®
- - 1.8750.16 1.8750.32 - 1.8750.48
1.8750.64
1.8750.80
VITON ® 1.8790.08
1.8790.16 1.8790.32 1.8790.48
1.8790.64
1.8790.80

19
10- ORDERING INFORMATION
Peristaltic pump head 153V-3r. For 1.6mm wall tubes. Model D-25VT.
Code: 1.9745.00 and 1.9745.11
11- CHANGE FUSES
The fuse box is part of the power base located at the rear of the pump. See Figure.
main switch
Fuse box
power base
Pry with a screwdriver between the central part of the fuse holder box and the upper part of the power supply
base to remove the fuse holder box.
The box remains attached without being fully extracted. There are two fuses.
Press the box in to restore its original position.
Remember to replace used fuses.
12- TROUBLESHOOTING
The following table of faults, their causes, and possible solutions, is not intended to cover all possibilities.
However, inconveniences to the user can be avoided which have easily avoidable causes.
PROBLEM
CAUSE
SOLUTION
It doesn't start and it doesn't pilot lights come
on
Lack of food
Blown fuse
Unknown
Check cable and plugs
Change fuse
Request Technical
Service
The head rotor does not turn, but
the pilots shine
Broken tube that prevents it
Faulty engine
Faulty programming
Change tube
Request Technical
Service
Check programming
The rotor turns, the tube is not broken,
but it does not pump
Exhausted, worn tube
Insufficient tube wall
Empty feed tank
Tube Chemical Incompatibility
Change tube
Install suitable pipe
Charge the deposit!
Choose suitable tube
Flow below theoretical
High viscosity
Excessive pump circuit
Internal obstruction in the
tube
Insufficient tube wall
High discharge back pressure
Tube Chemical Incompatibility
Use a larger tube Ø
Chort circuit
Clean
Install suitable tube
Lower back pressure
Choose suitable tube
The head tube moves Small tube diameter
Faulty tube installation
Choosing a suitable tube
Check the fixings

20
13- MAINTENANCE – SPARE PARTS
13.1 LUBRICATION
Before any examination or repair of the appliance, it is necessary to disconnect the mains plug.
Any initiative must be carried out by qualified personnel to avoid greater evils.
Entrust your device to a technical service authorized by DINKO Instruments.
The engine and its block do not require greasing, so they don’t have
maintenance.
The rotor bearings are self-lubricating, but it is advisable to lightly lubricate them
with silicone grease ref. 8.0030.03 or similar from time to time next to the rollers
or the head opening lever and its guides, especially if they have been washed.
See Figure
The head tube must be replaced periodically in a systematic way to avoid the inconvenience of its breaking
during full operation of the pump.
13.2 TUBES
The head tube must be replaced periodically in a systematic way to avoid the inconvenience of its breaking
during full operation of the pump.
13.3 WASHING
At the end of the use of the pump, it is advisable to purge the contents of the tubes to avoid possible
solidifications that could obstruct their interior, especially in tubes with a small internal diameter, and preferably
pump some inert and compatible liquid to complete the washing. Pay attention to avoid possible splashes
13.4 SPARE PARTS
Cyclic timer. Code 1.0045.13
Foot switch - pedal. Code 1.9740.02
Main control circuit. Code 1.0060.06
Pump head 153-3r. Code 1.0078.43
Power supply 100-24. Code 1.8093.21
24 DC motor, 500rpm, brushless. Code 1.0077.37
Control driver for 500rpm motor. Code 1.0077.38
24V DC motor, 330rpm. Code 1.0080.01
24V DC motor, 110rpm. Code 1.0080.13
This manual suits for next models
3
Table of contents
Other DINKO Instruments Laboratory Equipment manuals
Popular Laboratory Equipment manuals by other brands

Microscan
Microscan MINI Hawk Series quick start guide

Endress+Hauser
Endress+Hauser Analytik Jena multi N/C operating manual

Dinter
Dinter DINKO Instruments D-13 instruction manual

Sartorius Stedim Biotech
Sartorius Stedim Biotech Sartocube user manual

Biohit
Biohit Proline instruction manual

IKA
IKA MATRIX DELTA PLUS manual