Dinstar DWG2000B-16G Guide

DWG2000B-16G Quickly Install Manual
_______________________________________________________________________________
_______________________________
DWG2000B-16G Quickly Install Manual
Dinstar Technologies Co., Ltd.
Address: Floor 6, Guoxing Building, Changxing Road, Nanshan District, Shenzhen, China
Postal Code: 518052
Telephone: +86 755 2645 6664
Fax: +86 755 2645 6659
Emails: sales@dinstar.com, suppo[email protected]om
Website: www.dinstar.com www.dinstar.cn

DWG2000B-16G Quickly Install Manual
_______________________________________________________________________________
_______________________________
Table of Contents
1. Hardware installation....................................................................................................................3
1.1 Install SIM Card..................................................................................................................3
1.2 Antenna Installation ............................................................................................................4
1.3 Network Cable Connection of Equipment..........................................................................4
1.4 Power Cable Connection of Equipment..............................................................................4
2. IPconfiguration.............................................................................................................................5
2.1 Config Static IP via IVR .....................................................................................................5
2.2 Config Dynamic IP via IVR................................................................................................5
2.3 Config IP via the default IP.................................................................................................6
3. Application case---SIP register......................................................................................................7
3.1 Network diagram.................................................................................................................7
3.2 Presume...............................................................................................................................7
3.3 How to config......................................................................................................................7
3.3.1 SIP server Configuration..........................................................................................7
3.3.2 SIP user ID config....................................................................................................8
3.3.3 Enable call from SIP Server to GSM .......................................................................8
3.3.4 Enable call from GSM to SIP user 100 .................................................................8
3.3.5 Outgoing Routing.....................................................................................................9
3.3.6 Incoming Routing.....................................................................................................9
3.3.7 System config.........................................................................................................10
4. Application case---SIP Trunk......................................................................................................11
4.1 Network diagram...............................................................................................................11
4.2 Presume.............................................................................................................................11
4.3 How to config....................................................................................................................11
4.3.1 Creak SIP Trunk.....................................................................................................11
4.3.2 Enable call from SIP Server to GSM .....................................................................11
4.3.3 Enable call from GSM to SIP user 100 ...............................................................12
4.3.4 Outgoing Routing...................................................................................................12
4.3.5 Incoming Routing...................................................................................................13
4.3.6 System config.........................................................................................................13
5. Test..............................................................................................................................................13

DWG2000B-16G Quickly Install Manual
_______________________________________________________________________________
_______________________________
1. Hardware installation
1.1 Install SIM Card
When installing SIM card, opening blank panel of SIM slot, procedure shows as below:
1.Pull out the GSM user board
2.Inset the SIM card to the SIM
3.Push in the GSM user board

DWG2000B-16G Quickly Install Manual
_______________________________________________________________________________
_______________________________
1.2 Antenna Installation
Figure 2-2-2 Antenna Installation
1.3 Network Cable Connection of Equipment
Figure 2-2-3 DWG2000B-16Gconnection
1.4 Power Cable Connection of Equipment
Figure 2-2-3 DWG2000B-16Gconnection

DWG2000B-16G Quickly Install Manual
_______________________________________________________________________________
_______________________________
2. IP configuration
2.1 Config Static IPvia IVR
Assuming the IP address of a DWG2000B-16G device is 192.168.1 200, subnet mask is
255.255.255.0, IP of gateway is 192.168.1.1, configured as follows:
1) Please make sure hardware installation have finished
2) Dial the phone number of the SIM card. Dail "*150*1#" after hearing "please dail extension
number ". Hang up after hearing "setting successful"
3) Dial the phone number of the SIM card. Dail "* 152 * 192 * 168 * 1 * 200 #"after hearing
"please dail extension number ". Hang up after hearing "setting successful"
4) Dial the phone number of the SIM card. Dail "*153*255*255*255*0#" after hearing "please
dail extension number ". Hang up after hearing "setting successful"
5) Dial the phone number of the SIM card. Dail "*156*192*168*1*1#" after hearing "please dail
extension number ". Hang up after hearing "setting successful"
6) Dial the phone number of the SIM card. Dail "*111#" after hearing "please dail extension
number ", that will restart the device
7) Dial the phone number of the SIM card. Dail "*158#" after hearing "please dail extension
number ". It will play IVR about the IP of the device
2.2 Config Dynamic IP via IVR
1) Please make sure hardware installation have finished
2) Dial the phone number of the SIM card. Dail "*150*2#" after hearing "please dail extension
number ". That means the DHCP is confirued successfully
3) Restart the device, wait for 30 seconds, and then dial the SIM card telephone number, enter
"* 158 #" to query the IP address
Note: If reporting the IP address is 0.0.0.0, which means that the gateway could not obtain a IP
address successfully. Please check:
1) Make sure the device have been connected to the network
2) Make sure the DHCP Server is working. If there is no DHCP Server, please set the IP of device
to static IP
3) Restart the gateway and try again

DWG2000B-16G Quickly Install Manual
_______________________________________________________________________________
_______________________________
2.3 Config IPvia the default IP
The default IP of the gateway is 192.168.11.1
1) Remember the IP configuration of your PC
2) Change the IP of your PC to "192.168.11.2", Refer to below URL if you do not know how to
change the IP of windows. "http://www.wikihow.com/Change-your-IP-Address-(Windows) "
Type "192.168.11.1" in the address field of browser , then hit "Enter", This will lead to a login
interface which show in the below. Enter username and password and then click “OK” in
configuration interface. The default username and password are “admin/admin”. It is strongly
recommended, change the default password to a new password for system security.
3) Click "Network configuration "-->"local network". Select "Use the fellowing IP address " , Fill
the IP you will assign to this device. Select "Obtain IP Address Automatically" if you want to use a
dynamic IP via DHCP

DWG2000B-16G Quickly Install Manual
_______________________________________________________________________________
_______________________________
3. Application case---SIP register
3.1 Network diagram
3.2 Presume
SIP server : 12.34.56.78/5060
SIP user ID and password: 100/100, 101/101
Dailplan : All calls from GSM to SIP user 100, User 100 can dail a PSTN phone number directly.
3.3 How to config
3.3.1 SIPserver Configuration
Click "System Configuration" ---> "SIP Parameter"
"SIP Proxy " used for setting the IP and port of SIP server, Local SIP port set to 5060, "Is
Register" select "Yes", default register interval is 1800s, you can change it .
DWG2000B-16G Quickly Install Manual
_______________________________________________________________________________
_______________________________
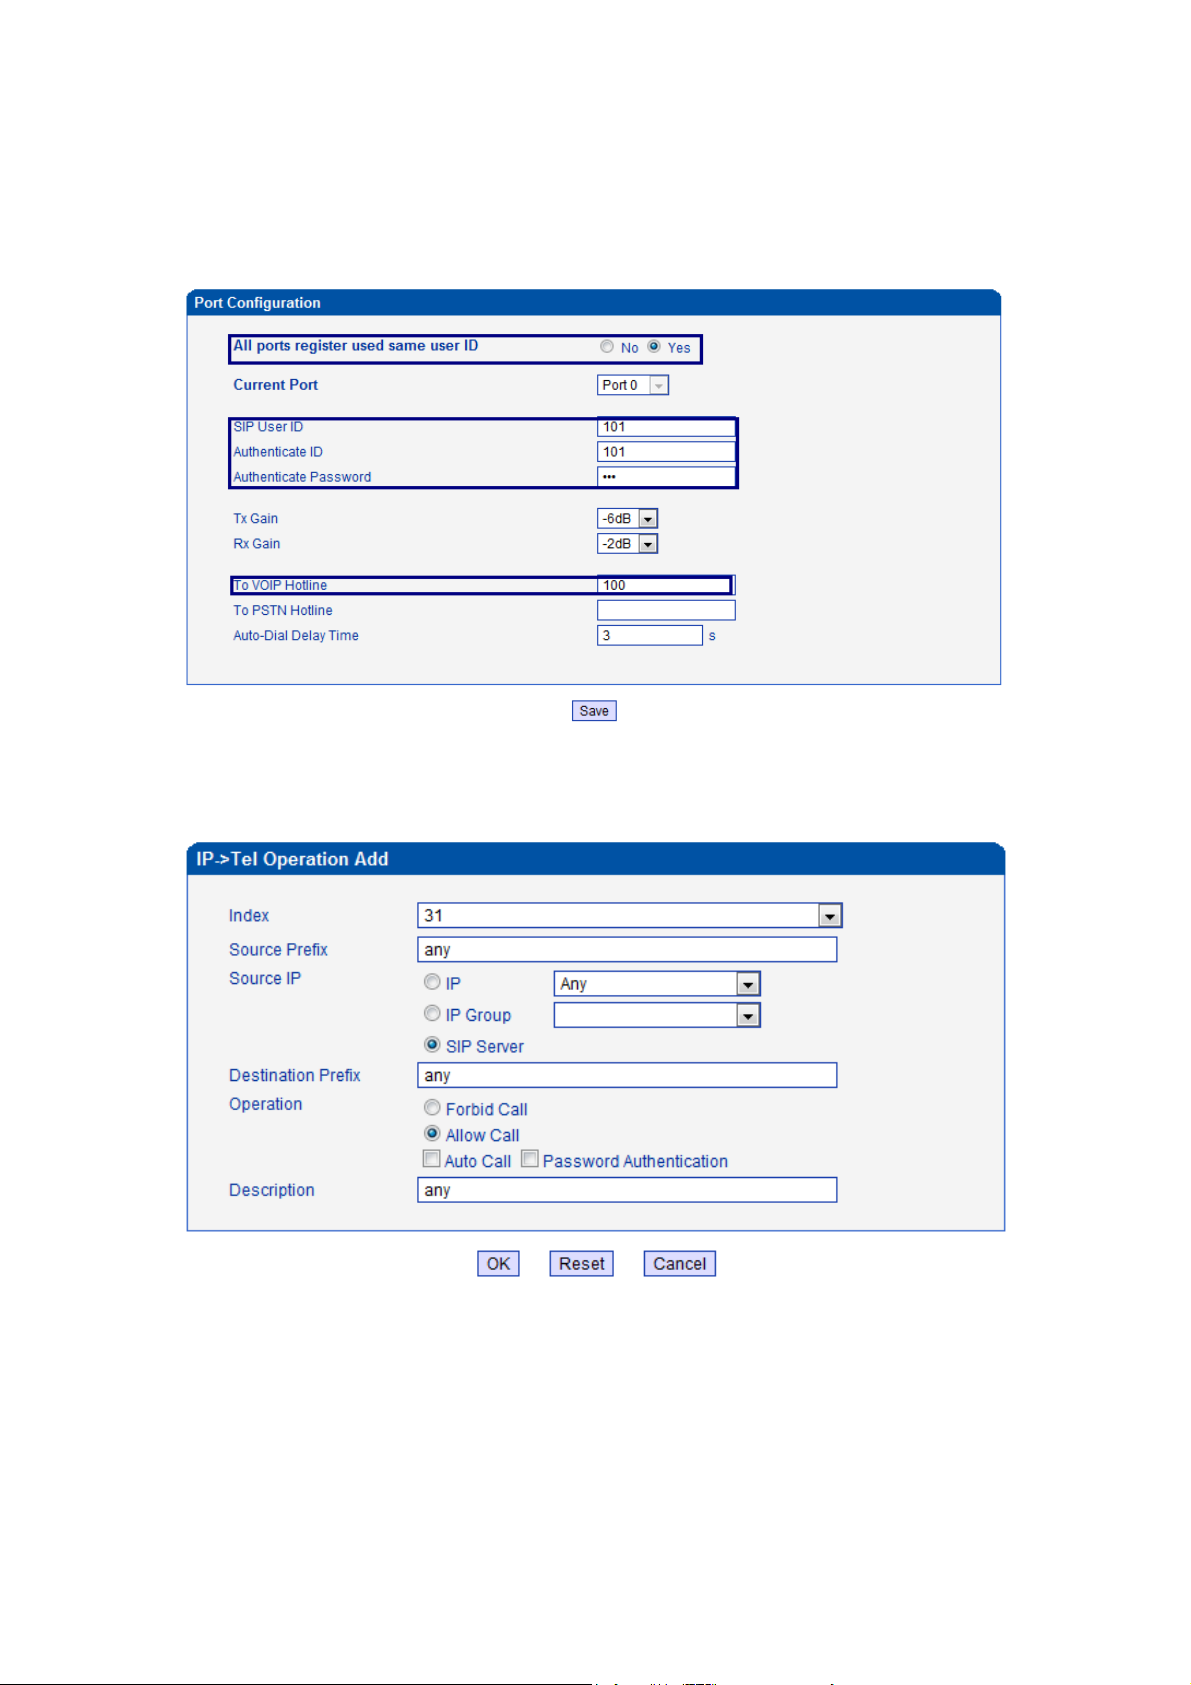
3.3.2 SIPuser ID config
Click "System Configuration" ---> "SIP Parameter"
"All ports register used same user ID" set to "Yes"
"To VOIP Hotline" used to config the dailplan " All calls from GSM to SIP user 100"
3.3.3 Enable call from SIP Server to GSM
Click "Operatio"--->"IP->Tel Operation"
3.3.4 Enable call from GSM to SIPuser 100
Click "Operatio"---> "Tel->IP Operation"
"Auto Call" used to enable auto dail a SIP user when call come from GSM side

DWG2000B-16G Quickly Install Manual
_______________________________________________________________________________
_______________________________
3.3.5 Outgoing Routing
"Routing Configuration"--->"IP->Tel Routing"--->"Modify"
3.3.6 Incoming Routing
"Routing Configuration"--->"Tel->IP Routing"--->"Modify"

DWG2000B-16G Quickly Install Manual
_______________________________________________________________________________
_______________________________
3.3.7 System config
Click "System Configuration" ---> "Service Parameter"

DWG2000B-16G Quickly Install Manual
_______________________________________________________________________________
_______________________________
4. Application case---SIP Trunk
4.1 Network diagram
4.2 Presume
IPPBX IP: 192.168.1.10/5060
SIP user ID and password: 100/100
Dailplan : All calls from GSM to SIP user 100, User 100 can dail a PSTN phone number directly.
4.3 How to config
4.3.1 Creak SIPTrunk
Click "IP Trunk Configuration" --->"IPTrunk"--->"Add"
4.3.2 Enable call from SIP Server to GSM
Click "Operatio"--->"IP->Tel Operation"

DWG2000B-16G Quickly Install Manual
_______________________________________________________________________________
_______________________________
4.3.3 Enable call from GSM to SIPuser 100
Click "Operatio"---> "Tel->IP Operation"
"Auto Call" used to enable auto dail a SIP user when call come from GSM side
4.3.4 Outgoing Routing
"Routing Configuration"--->"IP->Tel Routing"--->"Modify"

DWG2000B-16G Quickly Install Manual
_______________________________________________________________________________
_______________________________
4.3.5 Incoming Routing
"Routing Configuration"--->"Tel->IP Routing"--->"Modify"
4.3.6 System config
Click "System Configuration" ---> "Service Parameter", Please refer to 3.3.7.
5. Test
Resister a SIP user 100. And then make calls to test.
5.1 Mobile phone ------>SIP user 100
1. Use a mobile phone call the SIM card in the GSM gateway.
2. Check if 100 RING
3. Pick up 100, and test the voice quality
4. Hang up mobile phone to check if 100 disconnected immediately
5.2 SIP user 100------>Mobile phone
1. Use SIP user 100 call mobile phone
2. Check if mobile phone RING
3. Pick up mobile phone , and test the voice quality
4. Hang up 100, to check if mobile phone disconnected immediately
Other manuals for DWG2000B-16G
1
Table of contents
Other Dinstar Network Hardware manuals


Popular Network Hardware manuals by other brands


Safety Vision
Safety Vision ROADRECORDER 8000 user guide

Bosch
Bosch VIP X1 Installation and user guide

ICP DAS USA
ICP DAS USA MDCL-705i user manual

NEC
NEC P/N 0893416 user guide

Aviat Networks
Aviat Networks TRuepoint 6500 Installation, operation and maintenance

VSCOM
VSCOM netcom 823RM Quick installation guide


