DiscountRamps TD-600 User manual

Page 1Rev. 061518 DiscountRamps.com •1-888-651-3431
Trailer Dolly
Instructions for Part # TD-600
General Guidelines
Safety Warnings
• It is the user’s responsibility to read and follow all instructions.
• Keep these instructions with the product at all times and review before each use.
• It is the responsibility of this product’s owner to furnish the instructions to any person that borrows
or purchases the product.
• Inspect the product before use to ensure it is assembled properly and all parts are in safe working
order and free of defects.
• Never modify this product in any way.
• All circumstances cannot be addressed in these instructions. Please use common sense and
practice general safety measures when using this product.
• Parts and/or instructions are subject to change without notice.
• Keep hands and feet out from under the trailer tongue while hitching, unhitching, or moving the
trailer. Keep children at a safe distance.
• Always make sure the trailer is supported properly while engaging the trailer dolly.
• Always make sure the trailer tongue is securely connected to the trailer dolly coupler ball before
attempting to move the trailer.
• Take precautions to prevent uncontrolled movement of the trailer once it is connected to the trailer
dolly. Be aware that the slope of a road surface is dicult to judge and the pull of gravity can result
in a dangerously out of control trailer.
• If the trailer dolly is being connected to a trailer which is being stored over a lengthy period of time,
make sure both the trailer and the trailer dolly are chocked properly.
• Keep the trailer dolly clean and free of debris. Inspect before each use and periodically lubricate
moving parts.
Tools Needed
• Two 17mm Wrenches

Page 2Rev. 061518 DiscountRamps.com •1-888-651-3431
Parts
Part Description Quantity
A Base Frame 1
B Leg 1
C Brace 1
D Handle 1
E Tow Bar 1
F Bracket 1
G Axle 1
H Wheel 2
I Cotter Pin 2
Part Description Quantity
J Axle Washer 2
K Tow Ball 1
L M19 Lock Washer 1
M M19 Nut 1
N M10x65 Bolt 1
O M10x50 Bolt 4
P M10 Washer 5
Q M10 Lock Nut 5
B
C
D F
G
H I J K L
M
N O P
Q
E
A
Assembly
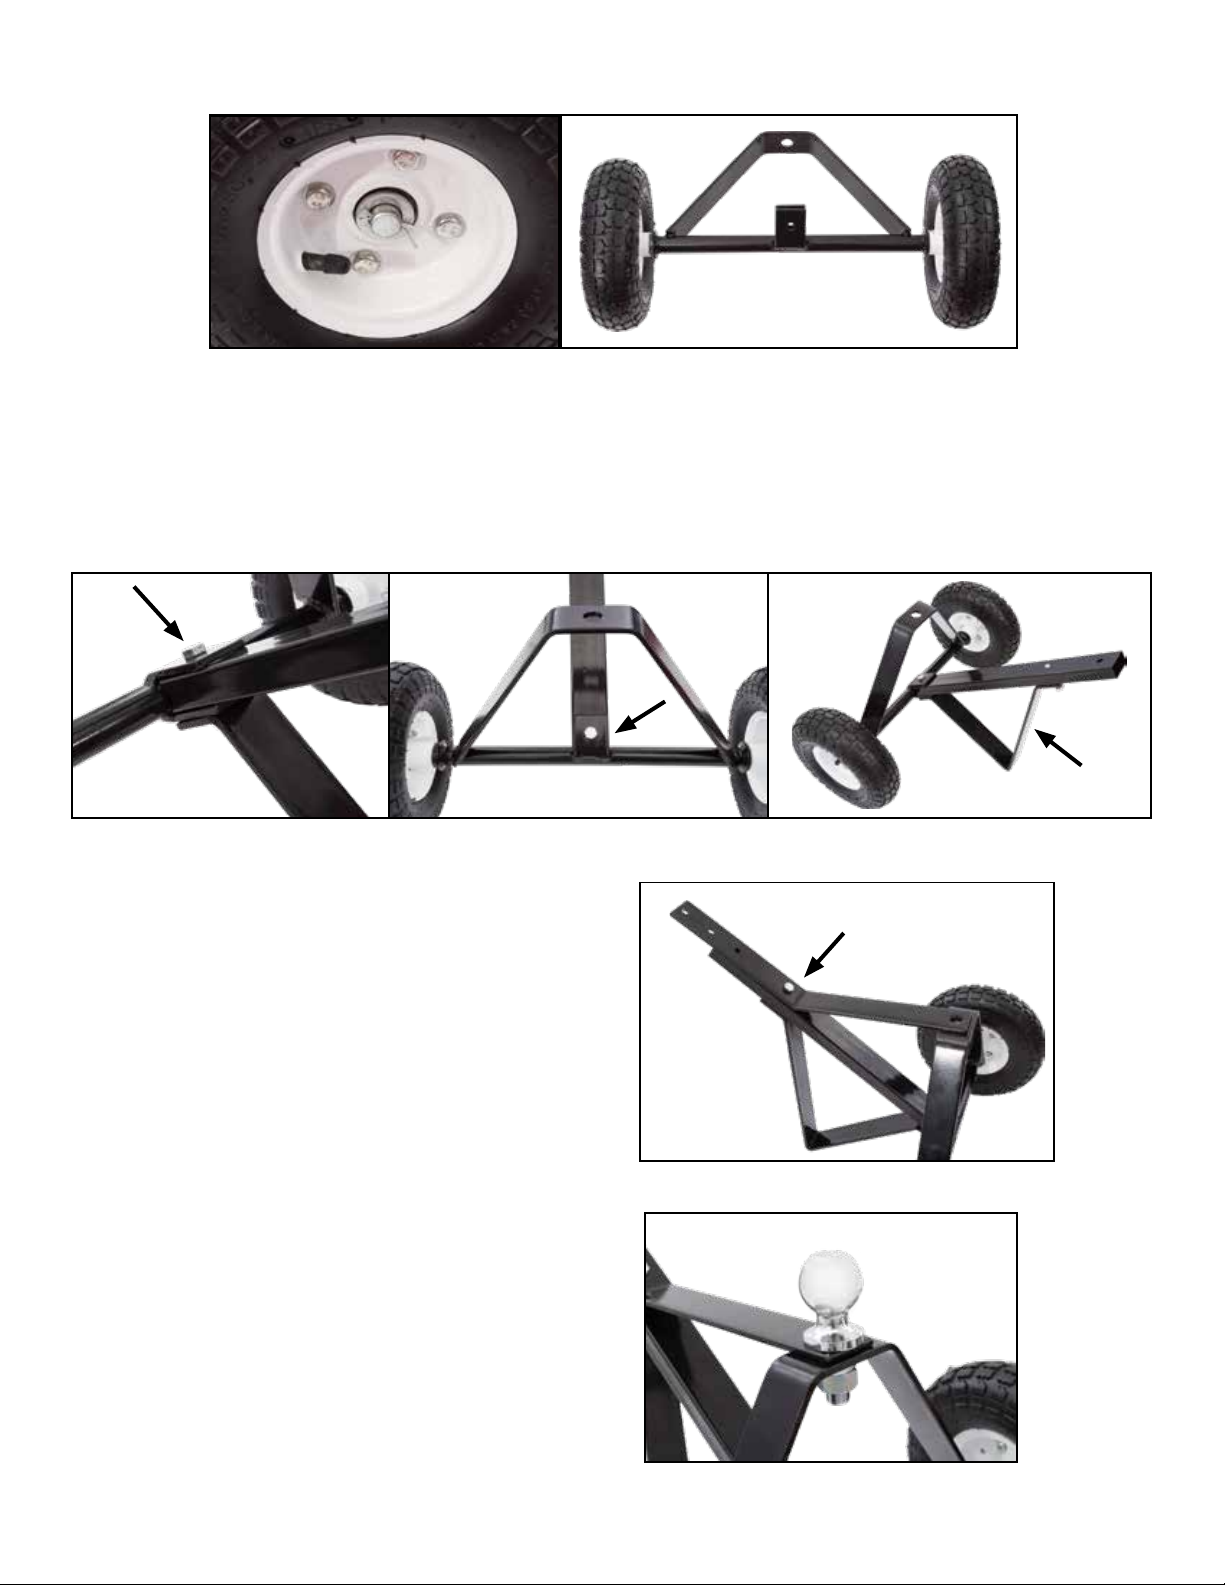
Step 1. Insert the axle (G) into the base frame (A).
(1)
Page 3Rev. 061518 DiscountRamps.com •1-888-651-3431
Step 3. Insert the tow bar (E) into the bracket on the base frame (A), using the end with one hole.
Align the leg (B) with the holes on the tow bar (E), positioning the short end towards the bottom. Se-
cure the three components together using the M10x65 bolt (N), washer (P), and lock nut (Q).
It may be helpful to loosely tighten bolts until the dolly is fully assembled, then securely tighten all bolts.
Step 4. Align the brace (C) with the holes on the
tow bar (E) and base frame (A). Secure the brace
(C) to the tow bar (E) and leg (B) using an M10x50
bolt (O), washer (P), and lock nut (Q).
Step 2. Connect the two wheels (H) to the axle (G) using the axle washers (J) and cotter pins (I).
Step 5. Insert the tow ball (K) into the holes in the
brace (C) and base frame (A), the secure with the
lock washer (L) and nut (M).
(2a)
(3a)
(4)
(5)
(3b) (3c)
(2b)

Page 4Rev. 061518 DiscountRamps.com •1-888-651-3431
Product Warranty and Liability
GENERAL PRODUCT WARRANTY: Products purchased from the Authorized Dealer (original place of purchase) or Merchant (“Deal-
er”) will be free of defects in material and workmanship at the time of receipt, and will meet the specications stated at the place of pur-
chase transaction or online at the Dealer’s website, under normal use and service when correctly installed, operated and maintained.
This product warranty is eective for the period of time stated below, unless otherwise stated in the product instructions or depicted in
the product advertisement. All Authorized Dealer warranties are NON-TRANSFERABLE and cover only the original end purchas-
er. This limited warranty does not cover products purchased through non-authorized dealers. Non-authorized dealer receipts are not
accepted for warranty verication.
***Warranty claims must be made directly to the original place of purchase.***
WARRANTY PERIOD: This warranty remains in force for one year from the date of the product’s accepted delivery. The Authorized
Dealer oers a one year manufacturer’s warranty for most products unless otherwise specied on the product advertisement.
WARRANTY SERVICE: The Authorized Dealer will replace any defective or malfunctioning part at no charge, including payment of the
shipping costs of parts or replacement product to and from the manufacturer. The purchaser is responsible for labor charges. If the
product does not meet specications as depicted in the advertisement, the Authorized Dealer will refund the full purchase price of the
product.
Questions regarding the warranty on a specic product and warranty claims should be directed to the Authorized Dealer with whom the
purchase transaction was made.
WARRANTY LIMITATIONS: The above warranty does not apply to products that are repaired, modied or altered by any party other
than the Authorized Dealer; are subjected to unusual physical stress or conditions (such as overloaded ramps or corrosion), natural
disaster, governmental actions, wars, strikes, labor disputes, riots, theft, vandalism, terrorism or any reason beyond reasonable control;
are damaged due to improper installation, misuse, abuse, accident or negligence in use, storage, transportation or handling, or tamper-
ing; or to products that are considered consumable items or items requiring repair or replacement due to normal wear and tear.
Product should be inspected prior to signing for delivery. Product damage incurred during shipping, unless noted on the Bill of Lading at
the time of delivery, renders this warranty void.
LIMITED LIABILITY: In no event shall THE AUTHORIZED DEALER be liable to the purchaser or any third party for any indirect, inci-
dental, consequential, special, exemplary or punitive damages arising out of the use of the product, including, without limitation, prop-
erty damage, loss of value of the product or any third party products that are used in or with the product, or loss of use of the product or
any third party products that are used in or with the product.
Step 6. Connect the handle (D) to the tow bar (E) using the bracket (F) and remaining M10x50 bolts
(O), washers (P), and lock nuts (Q).
Be sure to tightly secure all bolts using two wrenches.
(6a)
(6b)
Table of contents
Popular Jack manuals by other brands

Pittsburgh
Pittsburgh 62590 Owner's manual & safety instructions

Powerbuilt
Powerbuilt 640405 Operating and maintenance instruction manual

Clarke
Clarke STRONG-ARM CTJ3000G quick start guide

Clarke
Clarke CTJ2500QLG Operating & maintenance instructions

Omega Lift Equipment
Omega Lift Equipment 18122C Operating instructions & parts manual

Pittsburgh
Pittsburgh 58816 Owner's manual & safety instructions


