Discover Video Spider User manual

Discover Video
Spider Encoder
User Guide
Version 1.4.1
1/30/2019
Discover Video LLC
www.discovervideo.com

Spider Encoder
Page 2
Spider Multichannel Encoder Appliance
General Description
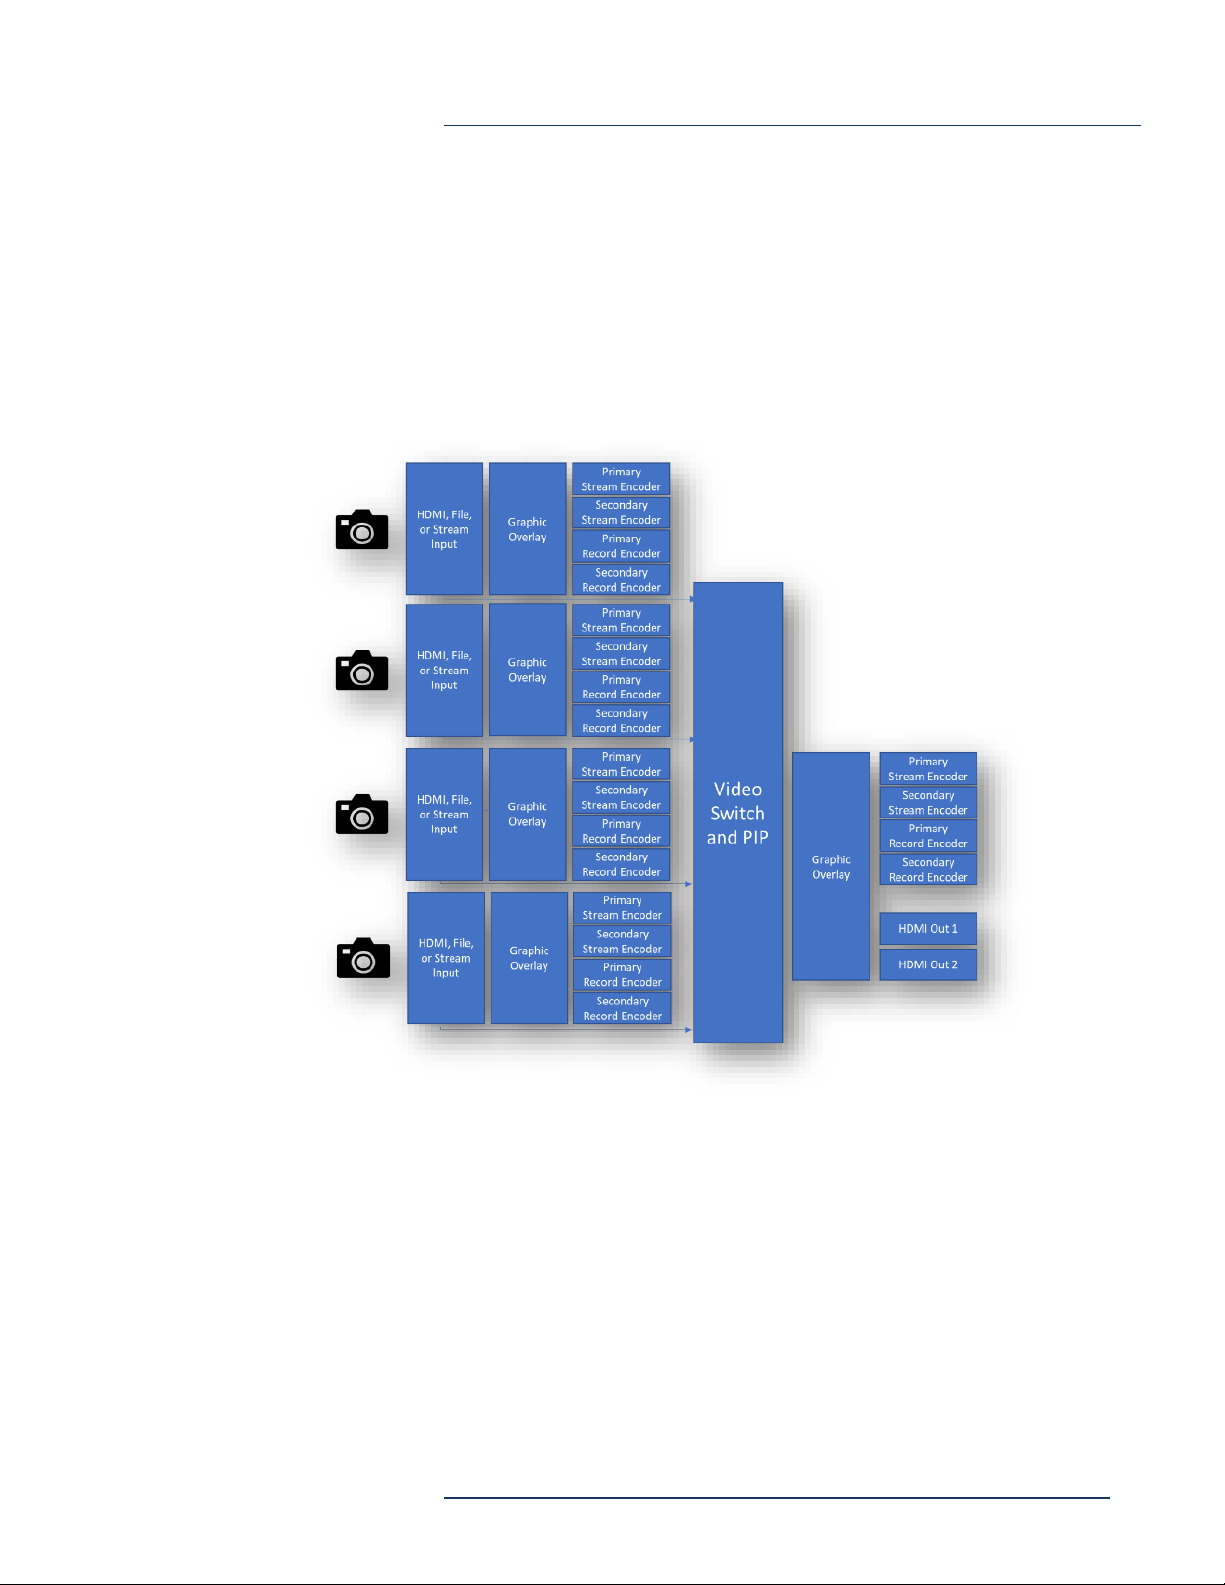
The Discover Video Spider is a 4-channel live video encoder and production switcher
that provides live streaming and recording from a HDMI video input. It is an
economical appliance that is ideal for lecture capture, IPTV, executive broadcasts,
morning announcements, and for enterprise and web streaming.
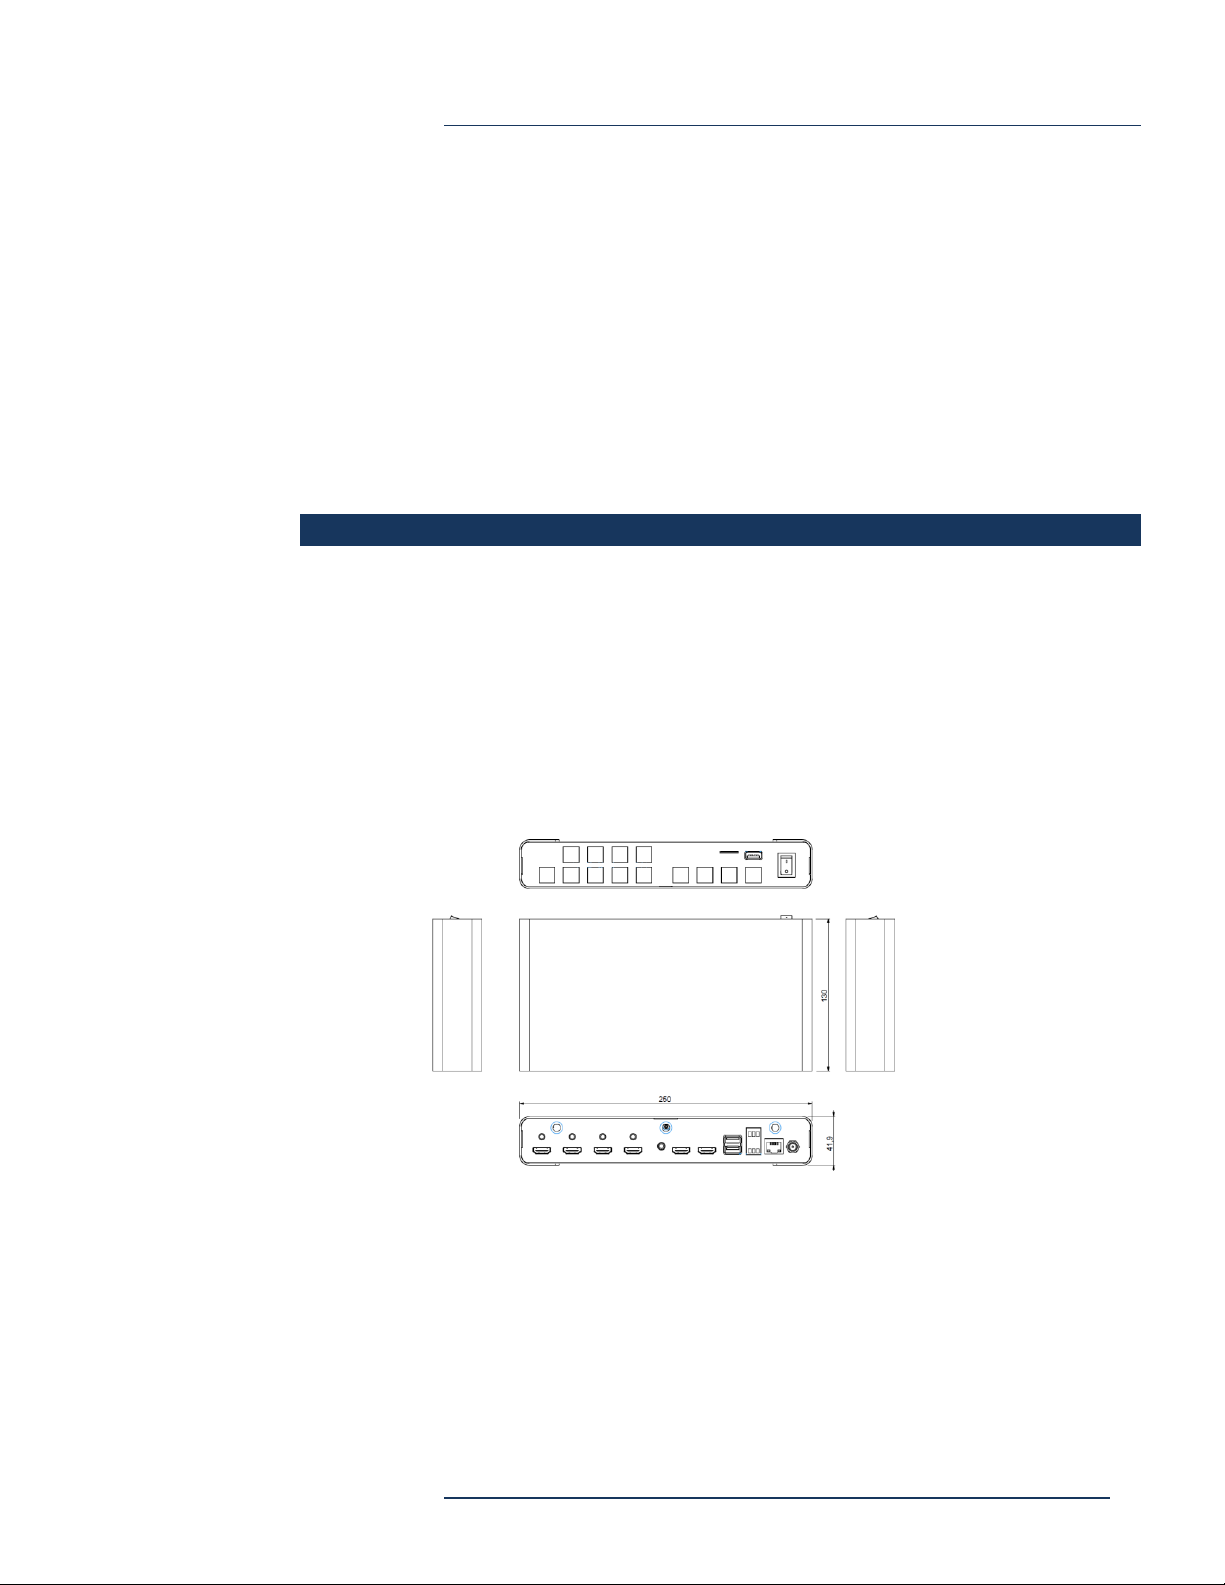
The Spider appliance is compact and is used stand-alone on a desktop or other
surface, and ideal for both fixed and portable use.
Features and Functions
Spider supports four audio/video inputs and two local video outputs (see functional
block diagram).
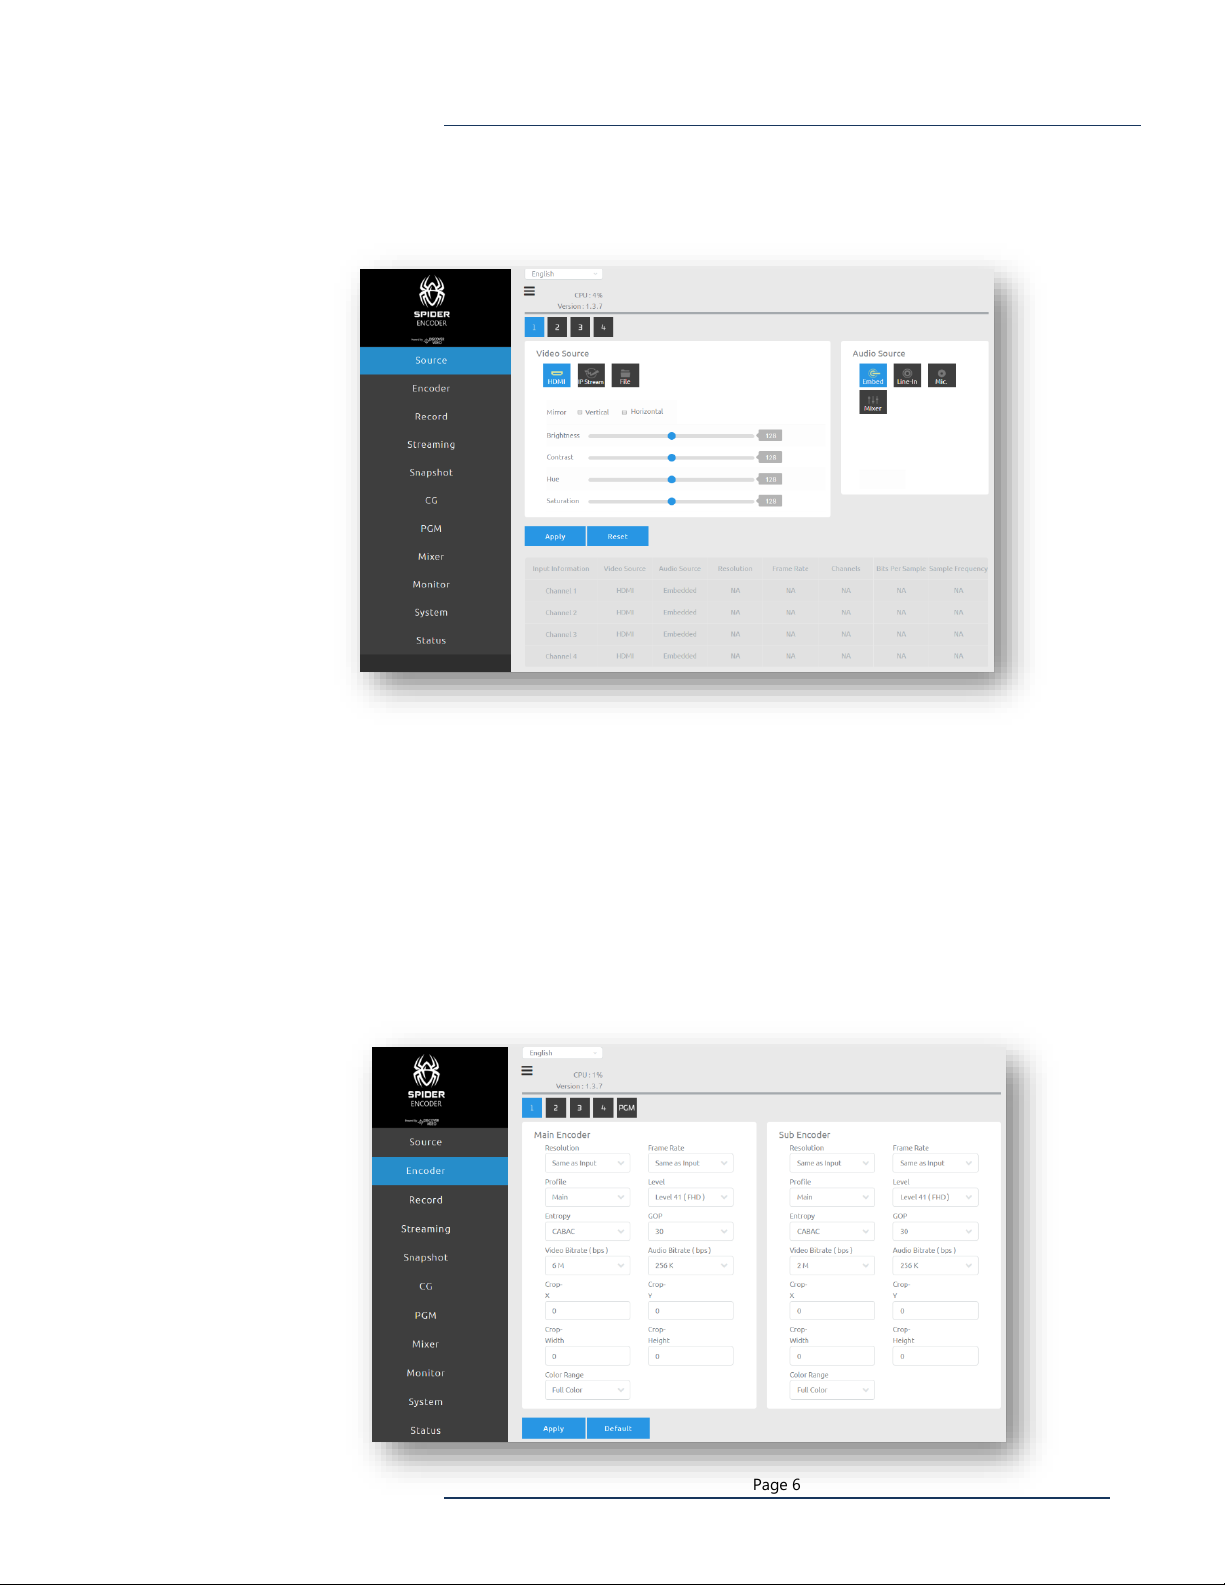
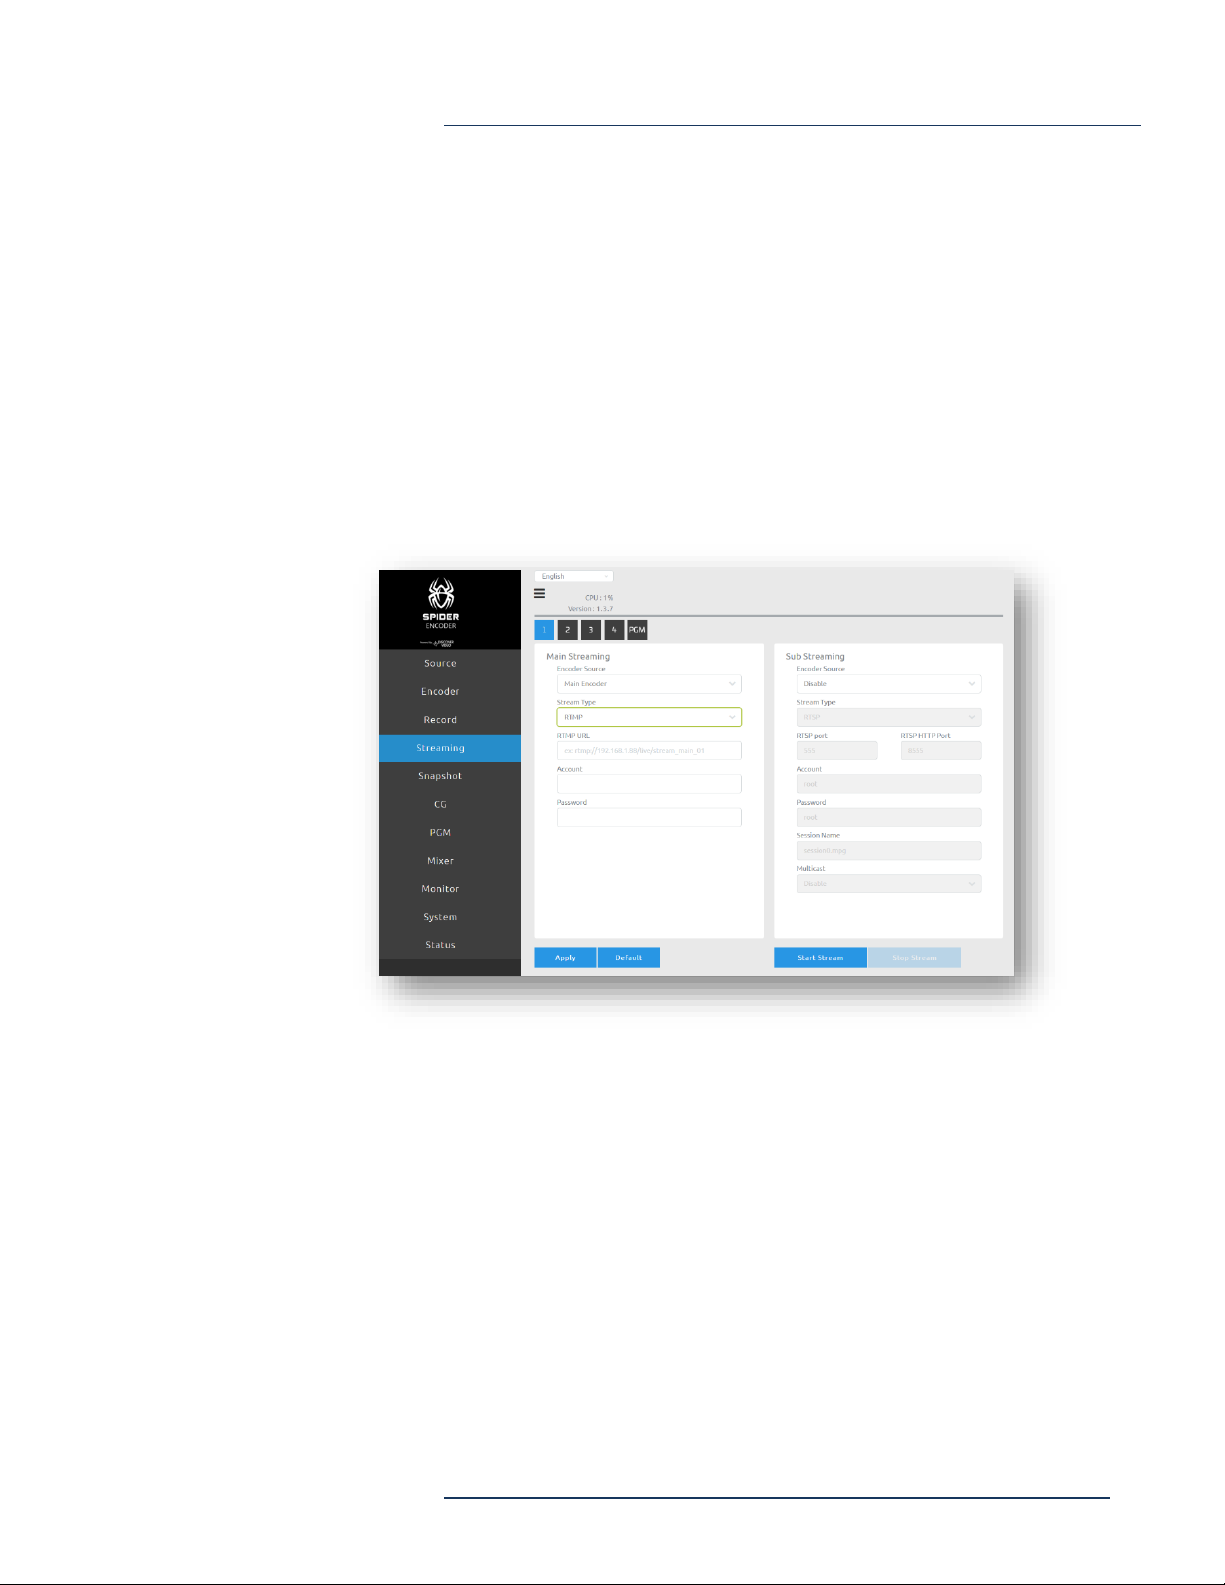
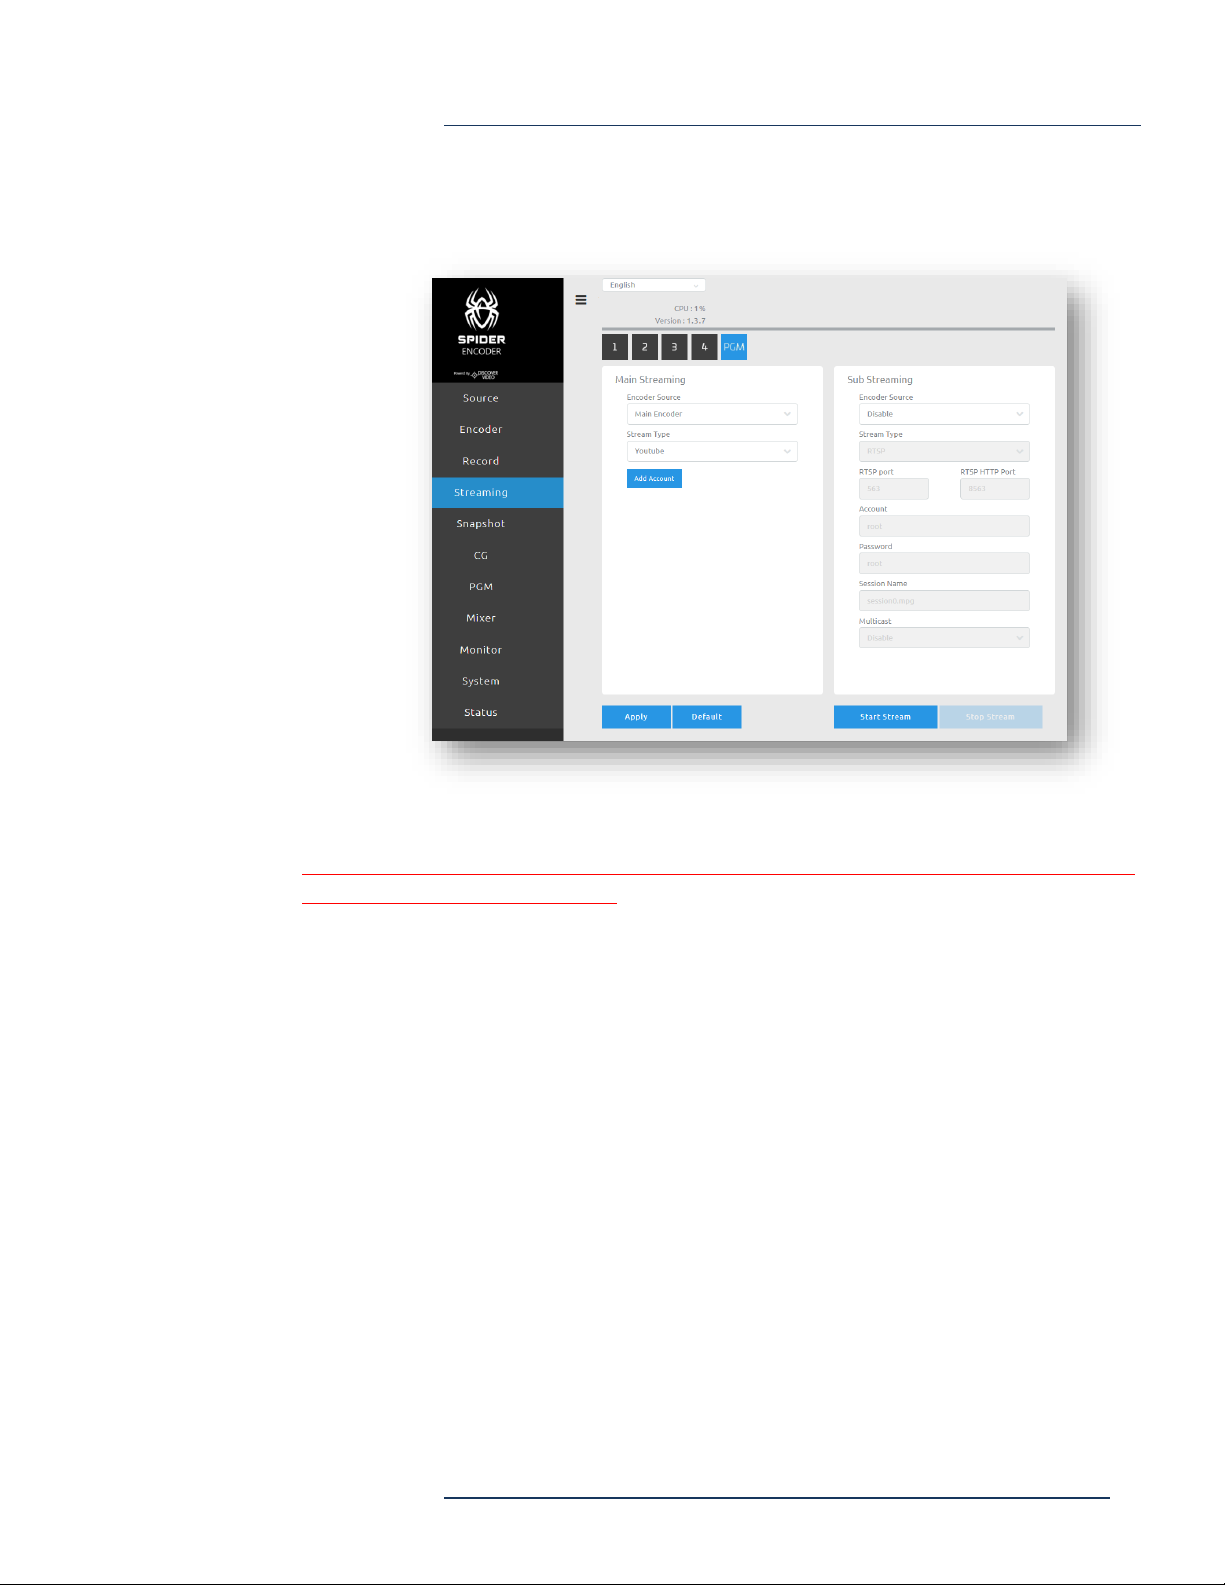
Each video input may be configured as an independent encoder with both primary
and secondary streams.
You may select any of the four video inputs and send it to the Program encoder. The
Program encoder also has both primary and secondary streams. The input to the
Program encoder supports:
•Selected input full screen
•Quad view of all four inputs
•Picture-in-Picture (PIP) view of two selected inputs
•Quad view of all four inputs with selected input as large view
•5-second full screen cycle through each of the four inputs
The Computer Graphic Overlay (CG) function allows you to insert text or images into
any input or Program.
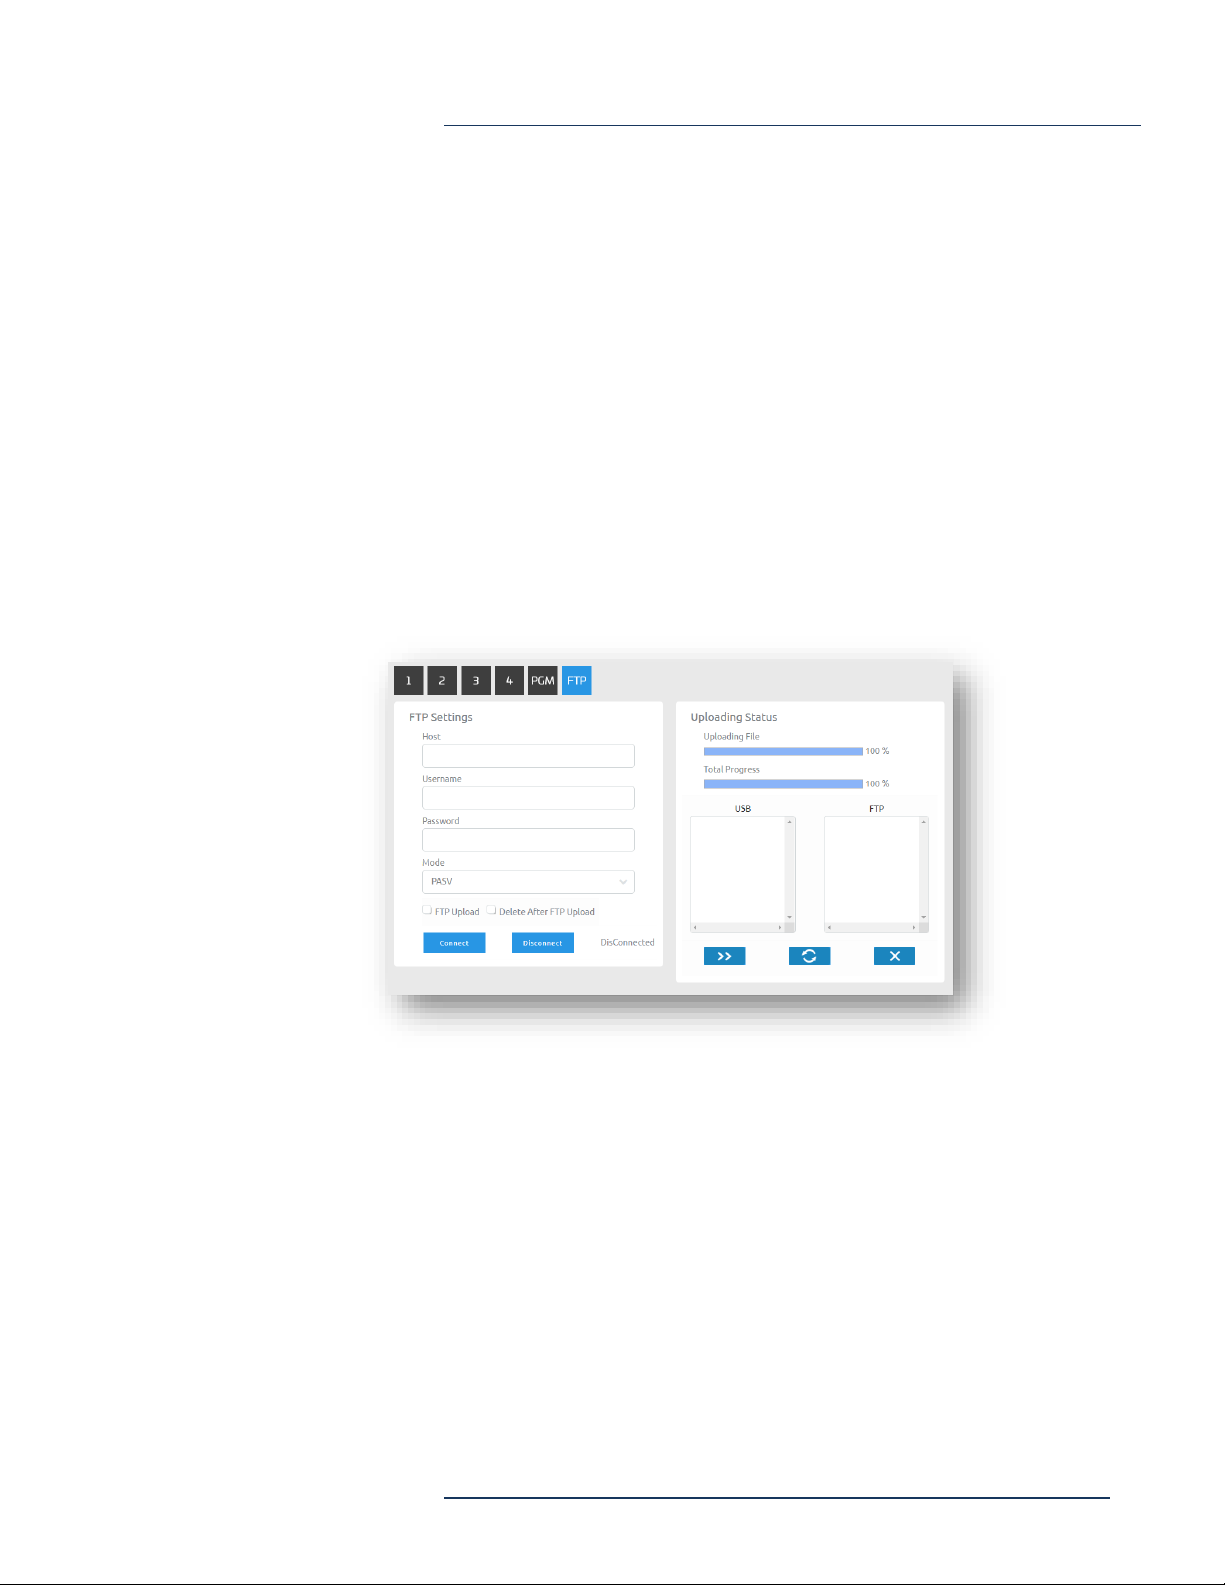
Spider can record any input and/or Program stream in standard .mp4 file format, or in
.avi, .ts, or .mov file format.
Chapter 1:
Introduction

Spider Encoder
Page 3
Spider Multichannel Encoder Appliance
Each stream encoder can produce a video stream using RTMP, RTSP, MPEG-2
Transport Stream, or HLS.
Video input may be HDMI from a non-HDCP source, a .mp4 video file from USB
device, or a live stream from another Spider encoder.
Audio input source may be HDMI or analog.

Spider Encoder
Page 4
Spider Multichannel Encoder Appliance
Installation
The Spider is approx. 10” W x 5” D x 2” H. Connect desired Audio/Video inputs,
10/100/1000 Ethernet, and Power. Power is supplied by an included 12 VDC external
AC power supply and connects to the Spider via a locking DC connector. Optionally,
connect a monitor to HDMI output 1 and/or 2.
Video Inputs are HDMI with embedded audio, or HDMI video with analog audio via
3.5mm “mini jacks”.
RS-458 terminal block connecter is not currently used.
Chapter 2:
Configuration

Spider Encoder
Page 5
Spider Multichannel Encoder Appliance
Find IP Address
Apply power and turn the front panel switch to the on position. Allow a few minutes
for the unit to boot up.
The Spider is configured for DHCP and will obtain an IP address automatically. To
find the IP address used, insert a USB drive into the front panel slot and the Spider will
write “IP_MAC” file. Use notepad or similar to open this file and read the IP address.
You may also use the finder application to discover the IP address over the network,
or you may search your router’s DHCP table to find the IP address used.
Configuration
Enter the IP address in a browser. When prompted, enter default username and
password:
Username: admin
Password: 0000
Language / Firmware
You may select language and view
Firmware version. English and
several Asian languages are
available.

Spider Encoder
Page 6
Spider Multichannel Encoder Appliance
Source
The source page selects the video source for each input. Input source may be HDMI,
IP Stream, or File. For HDMI input, audio selection may be to use the audio
embedded in the HDMI, or to use analog audio via Line-In selection. The status of
each video input is shown.
Encoder
The Encoder page sets the encoder values for each of the five (ten, including sub-
encoders) encoders.

Spider Encoder
Page 7
Spider Multichannel Encoder Appliance
For each of the five encoders:
•Resolution –same as input or scale to new resolution
•Profile –H264 Baseline, Main or High Profile
•Entropy –H264 CABAC or CAVLC
•Video Bitrate –select rate from 256 Kbps to 64 Mbps
•Crop X, Y, Width, Height –select how to crop the input video
•Color Range –Full or Limited
•Frame Rate –same as input or select 1 to 60 fps
•Level –H264 level
•GOP –select Group Of Picture size 1 to 255
•Audio Bit Rate –select audio encoding rate 32 Kbps to 384 Kbps
•Sub Encoder –same as above.
Sub Encoder allows you to send second stream at a
different (lower) bitrate and resolution.
Record
Record page allows user to change the video format that recorded to USB3.0 disk
drive.
•Encoder Source –select Main Encoder, Sub Encoder, or disable
•File Name –Enter desired file name. You may use special characters to
generate unique file names:
•%Y –year

Spider Encoder
Page 8
Spider Multichannel Encoder Appliance
•%M –month
•%D –day
•%h –hour
•%m –minute
•%s –second
•%i –sequential number
•Type –select .mp4, .ts, .avi, or .mov (.mp4 preferred in most cases)
•Duration –select 1 to 120 minutes or unlimited duration
When recording for longer than a specified duration,
multiple files will be created until you stop recording.
Each file will be appended with a -N sequence number
(e.g. file1, file1-1, file1.2, etc.)
FTP
Spider can automatically upload just-recorded video file, or upload selected video
files, from the USB drive.
•Host –the target for the FTP upload
•Username –the FTP username
•Password –the FTP password
•Mode –PASV (Passive) or EPSV (Active)
•FTP Upload –if checked then at the conclusion of any recording, the file will
be added to the upload queue
•Delete After FTP Upload –if checked, then the just-uploaded file will be
deleted from the USB drive after successful upload. This is used to preserve
disk space on the USB drive
•Connect / Disconnect –connects or disconnects from the FTP server

Spider Encoder
Page 9
Spider Multichannel Encoder Appliance
Uploading Status shows the upload percent of the current file and the total
progress of all files scheduled for upload.
The USB box shows files on the USB and the FTP box shows the files found on the
FTP server (root folder only).
To download any file from USB, click on the “USB” word above the USB box. To
download any file from FTP, click on the “FTP” word above the FTP box.
Streaming
For each of the five encoders (input 1 to 4 plus the
PGM output), select
•Encoder Source –Main or Sub encoder, or disable
•Stream Type
•RTMP –push rtmp to server using rtmp URL and optional account/password
•RTSP –Spider RTSP server using configured RTSP and/or RTSP HTTP port,
account, password, and session name (stream name)
•TS –MPEG2 Raw Transport Stream sending UDP to udp://[IP]:[Port]
•HLS –makes HLS available from Spider to a client
•YouTube
•Facebook

Spider Encoder
Page 10
Spider Multichannel Encoder Appliance
For YouTube and Facebook, you may add your account by selecting “Add Account”.
This will cause a popup to appear that connects you to YouTube or Facebook. Be
sure to disable popup blocker!
Follow the instructions for connecting. Copy and past the User Code from the Spider
to the Google or Facebook pages.
Select Start Stream when ready.

Spider Encoder
Page 11
Spider Multichannel Encoder Appliance
Snapshot
Snapshot allows you to take an image in .bmp or .jpg
format and save it to the USB drive. The file name may
contain special characters:
•%Y –year
•%M –month
•%D –day
•%h –hour
•%m –minute
•%s –second
•%i –sequential number
Select FTP upload to add the image to the FTP upload queue, and
select Delete After FTP Upload to delete the image after successful
upload.

Spider Encoder
Page 12
Spider Multichannel Encoder Appliance
Computer Graphics (CG)
Computer Graphics allows you to put text or an image
on each of the four input videos and/or on the PGM
video. The On Screen Display (OSD) location is uses
X-Y coordinates.
Background Color: OSD background color, default 0xff000000 (Transparent)
Foreground Color: OSD foreground color, default 0xff00ff00 (Green)
The color format is 0xAARRGGBB

Spider Encoder
Page 13
Spider Multichannel Encoder Appliance
For picture, you may browse your computer for a .jpg
image and set the X,Y location and width and height.
Select Start CG to show the OSD and Stop CG to end
it.
Program (PGM)
PGM sets the output of the PGM stream or recording.
The function mirrors the front panel buttons.
Select which of the four video inputs is
presented as the PGM
Picture-in-Picture. Select blue video 1 to 4
for the main video, and select orange video
1 to 4 for the inserted video.

Spider Encoder
Page 14
Spider Multichannel Encoder Appliance
Quad Picture-in-Picture. Displays all four
video inputs. Select which one is displayed
in the larger window.
Quad. Display all four videos.
Cycle. Displays each of the four videos for
five seconds and repeats.
PGM Scale –Stretch, Fit, Fill
PGM Background Color –set the background color of
PGM output (if the video does not fill the screen)

Spider Encoder
Page 15
Spider Multichannel Encoder Appliance
Mixer
Mixer sets the audio output for the PGM output.
•Mixer –adjust the audio volume for each of the four inputs
•Follow PGM –the audio is switched with the video
•Channel 1-4 Sound –the audio is always the selected channel

Spider Encoder
Page 16
Spider Multichannel Encoder Appliance
Monitor
Monitor sets the behavior of the two Spider video
output connectors, HDMI1 and HDMI2.
HDMI1 may be set to show the Program output or a
“Multiview”of the inputs. HDMI2 is always the
Program output.
Use HDMI1 to monitor the four inputs and decide
which to select for program. Use HDMI2 to monitor
what is being streamed and/or recorded.

Spider Encoder
Page 17
Spider Multichannel Encoder Appliance
System
•Network DHCP enable/disable –if disable, you can set fixed IP address
•Time Setting –set automatically from NTP server (e.g. set to a-time.nist.gov),
or set manually
•Account and Password –change the account username and password (default
admin / 0000)
•Firmware Upgrade –browse to firmware file and update
•Disk Format –formats attached USB disk
•System Control –Restore All Settings to Default, Reboot the Spider
•Telnet ON/OFF –turns off telnet port (used for DV maintenance)
The Host IP Address shows the current IP address of your Spider. This is
particularly useful when you want to obtain the IP address by using mouse right-
click when using output HDMI1.

Spider Encoder
Page 18
Spider Multichannel Encoder Appliance
Status
Status shows information about each input, recording,
and stream.

Spider Encoder
Page 19
Spider Multichannel Encoder Appliance
Front Panel
•Power –turns power on/off
•Record –starts/stops recording
•Snapshot –creates new snapshot
•Stream –starts/stops live stream
•PGM Buttons (active illuminated)
•Same function as described under PGM section, above
•PiP function layout shown in button green / blue colors
Rear Panel
•HDMI Input 1 to 4
•Analog Audio Input 1 to 4
•HDMI Output 1 and 2
•Analog Audio Output
•USB 2.0 Ports
•Ethernet
•Power
•RS232/RS485 ports currently not used

Spider Encoder
Page 20
Spider Multichannel Encoder Appliance
Operation & Notes
•The maximum combined frame rate should not exceed 300 fps
•The UI shows the CPU percent used. This should be kept as low as possible to
ensure reliable operation
•Do not change encoder rates while streaming. If you change values the Spider
may become confused and you should go to the System page and select
Restore to Default to start your configuration settings again.
IP Finder
Use the Spider IP Finder to locate the Spider encoders on your
network. The finder must be used on the same network as the
encoders. The discovered encoders will show their MAC addresses to
help you identify the device.
You may also obtain the IP address using the HDMI1 output to view
the configuration.
You may also obtain the IP address by inserting USB drive into the
front panel USB slot and reading IP_MAC file that is automatically
written.
Local UI
Connect a monitor to HDMI1, and a keyboard and mouse to the rear
panel USB 2.0 ports.
Right-Click toggles to the local User Interface where you can make
configuration changes without using a browser. The local UI may not
have PGM control (because you have local access to the front panel
buttons).
Table of contents
Other Discover Video Media Converter manuals