Discovery Telecom Biological Microscope User manual

1200x Magnification Microscope
Biological Microscope
Biological Microscope x 2
NOT INCLUDED
!WARNING:
CHOKING HAZARD:
– Small parts.
Not for children under 3 years.
10 +
AGES
INSTRUCTION MANUAL

E-2
Introduction
Congratulations! You’ve chosen one of the highest quality microscopes
available for young explorers. Read the following instructions carefully to
get the greatest benefit from your precision instrument. Then try out the
experiments to begin your investigation of the fascinating world around you.
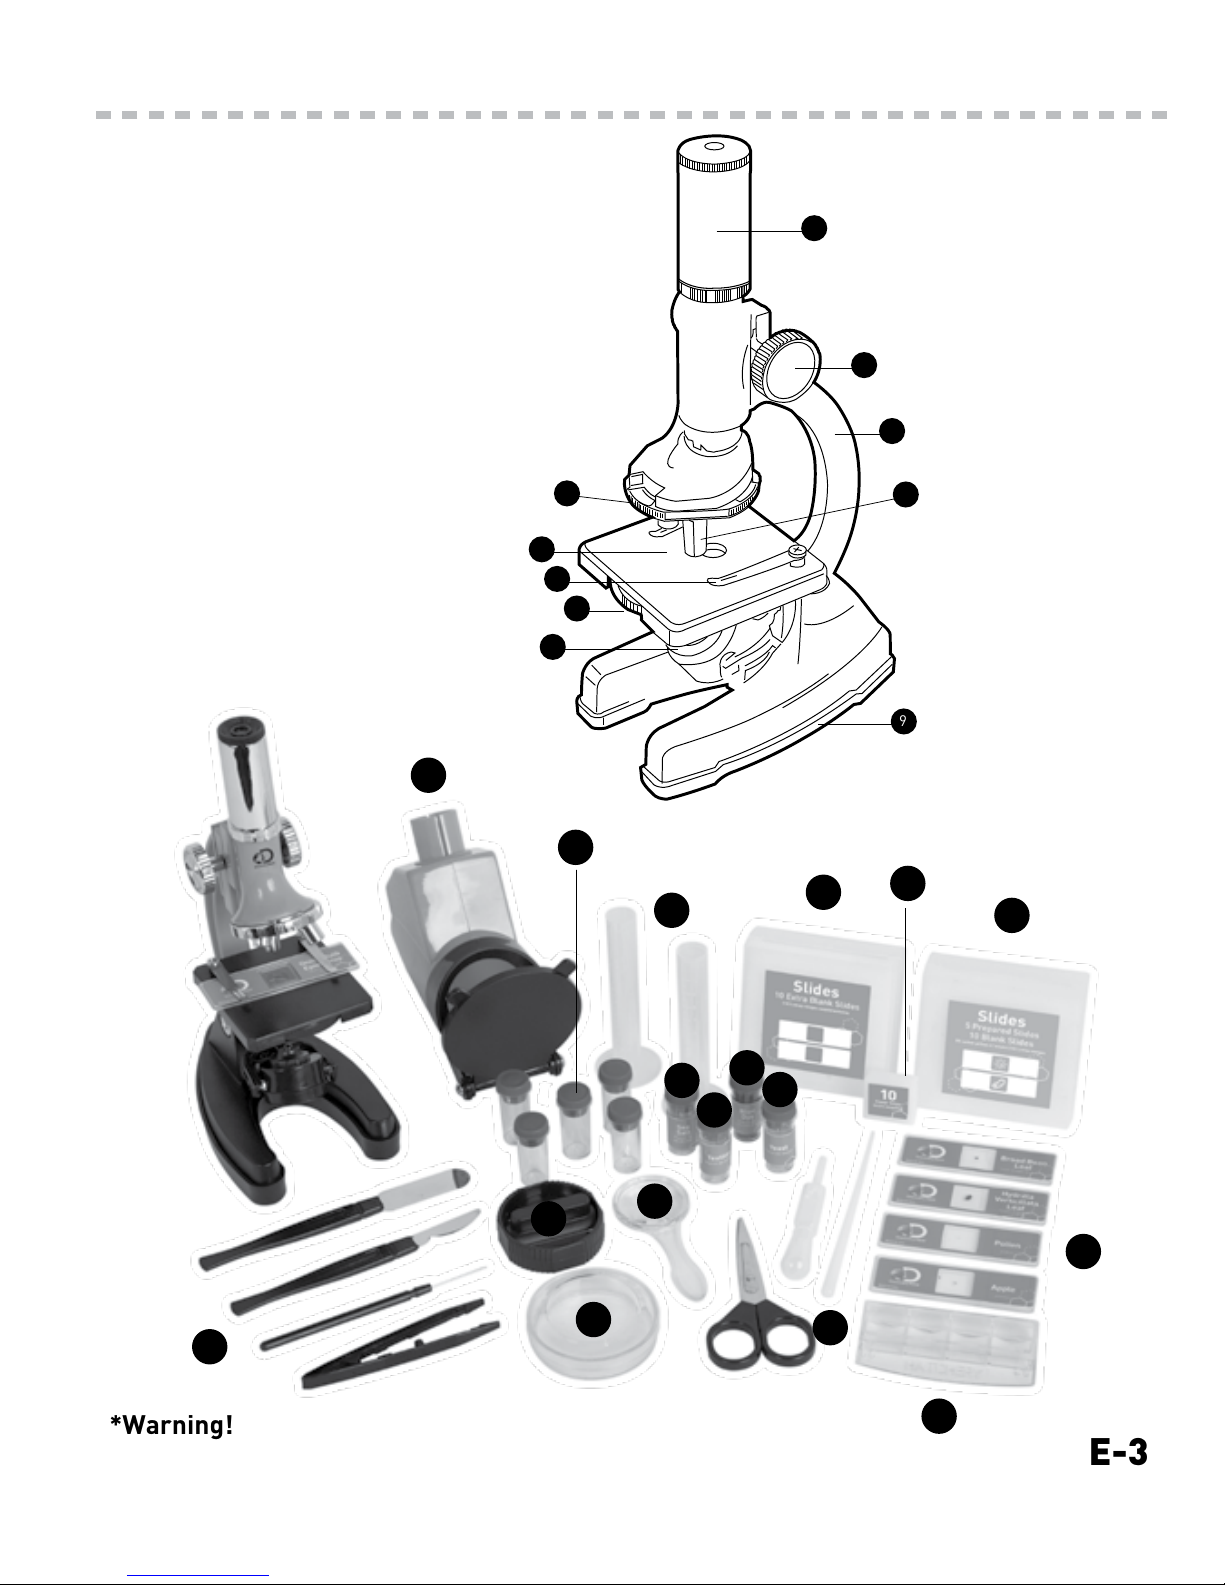
Microscope Parts
1Eyepiece
2Focus Knob
3Stage
4Metal Stage Clips
5Colour Filter Wheel
6Objective
7Objective Turret (15x, 30x, 60x)
8Illumination On/Off Switch and Mirror
9 Rubber Base and Battery Case
10 Microscope Arm
Additional Contents:
11 (5) Prepared Slides and (10) Blank Slides
12 (10) Extra Blank Slides
13 (10) Slide Covers/Labels
14 (5) Collection Vials
15 Petri Dish
16 Macro Viewer
17* Tweezers/Scissors/Needle/Stirring Rod/Scalpel/Pipette
18 Magnifying Glass
19 Graduated Cylinders
20 Specimen Slicer
21 Shrimp Hatchery
22 Textile Fibres Vial
23 Yeast Vial
24 Sea Salt Vial
25 Blue Dye Vial
E-3
1200x
1
10
2
6
9
5
3
4
8
7
*Warning!
Not suitable for children under 3 years of age. Contains functional sharp points.
1200x Microscope
12 11
11
16
18
21
14
19
13
15 17
17
20
22
24 23
25

E-4
How do I use my microscope?
Before you use your microscope, make sure that the
table, desk, or surface that you place it on is stable
and is not subject to vibration. If the microscope
needs to be moved, hold it by the arm and base
while carefully transferring it. Once the microscope
is in a suitable location and the batteries are
installed, check the light source to make sure that it
illuminates. Use a microfibre cleaning cloth to gently
wipe the lenses off. If the stage is dirty with dust
or oil, carefully clean it off. Make sure that you only
raise and lower the stage using the focus adjustment
knob.
How do I operate the illumination?
Locate the mirror/light on the base of the microscope. Flip the mirror/light to the
“on” position (with the light facing up) and the light will illuminate. This microscope is
equipped with an incandescent light that illuminates the specimen from below. The colour
filter wheel is located in the middle of the microscope stage. The filters help you when
you are observing very bright or clear specimens. Using these filters, you can choose
various brightness levels and colours. This helps you better recognize the components of
colourless or transparent objects (e.g. sea salt).
How do I adjust my microscope correctly?
Place the microscope in a suitable location as described above, and sit in a comfortable
viewing position. Always start each observation with the lowest magnification. Adjust
the distance of the microscope stage so that the stage is in the lowest position, farthest
away from the turret head. Turn the objective turret until it clicks into place at the lowest
magnification (Objective 15x / 300x). Note: Before you change the objective setting, always
make sure the microscope stage is farthest away from turret by rotating the focus knob.
Separating the stage and turret by rotating the focus knob will avoid causing damage to
the specimen slide or microscope. When starting an observation, always start with the
15x / 300x objective in the rotating head.
INSTRUCTION MANUAL
E-5
Did you know?
The highest
magnification is not
always the best for
every specimen!
Magnification Guide
Eyepiece Objective Power
300x
600x
1200x
15x
30x
60x
20x
20x
20x
How do I observe the specimen?
Sitting in your location with adequate
illumination chosen from the colour filter wheel,
the following basic rules should be observed:
Start with a simple observation at the lowest
magnification. Position the object or specimen
in the middle of the stage under the stage clips,
centred over the lower light. Focus the image
by rotating the focus knob until a clear image
appears in the eyepiece.
Place the prepared slide directly under
the objective on the microscope stage, and
secure it with the stage clips. The prepared slide should be located directly over the lower
illumination. Look through the eyepiece, and carefully turn the focus knob until the image
appears clear and sharp. Now you can select a higher magnification by rotating to the
30x/600x objective turret. Higher levels of magnification can be achieved by turning the
objective turret to a higher setting (600x or 1200x). Following this procedure creates a
steady increase of magnification without overpowering the view of the object. The following
magnifications should be considered: 300x, 600x, then 1200x. Each time the magnification
changes (due to the objective change), the image sharpness must be readjusted with the
focus knob. When doing this, be careful because if you move the microscope stage too
quickly, the objective and the slide could come into contact and cause damage to the slide or
microscope.
For transparent objects (e.g. sea salt), light is projected by the lower light traveling from
below the stage, through the objective and eyepiece, and finally into your eye. This process
of light transmission is known as microscopy. Many micro-organisms found in water, plant
components, and the smallest animal parts are transparent in nature. Opaque specimens,
on the other hand, will need to be prepared for viewing. Opaque specimens can be made
transparent by a process of treatment and penetration with the correct materials (media),
or by slicing. You can read more about creating specimens in the following Microscope
Experiments booklet.
No recognizable image
No image
No light
Turn on light
Readjust focus
Start with the
lowest power objective (15x)
Centre object on slide under
lowest power objective (15x)
Replace batteries
Check on/off position
Troubleshooting Table
Problem Solution

E-6
CLEANING TIPS
To ensure your microscope has a long service life, clean the lens (objective and eyepiece)
with only a soft, lint-free cloth, like a microfibre cloth. Do not press down too hard while
cleaning, as this might scratch the lens. Ask your parents to help if your microscope is really
dirty.
The cleaning cloth should be moistened with cleaning fluid and the lens wiped clean using
very little pressure. Make sure your microscope is always protected against dust and dirt.
After use, leave it in a warm room to dry off.
WARNINGS AND SAFETY
Read and follow the instructions, safety rules, and first aid information.
This microscope set is intended for children older than age 8. Children should only use
this device under adult supervision. Never leave a child unsupervised with this device.
Accessories in this experimental kit may have sharp edges and tips. Please store the device
and all of its accessories and aids out of the reach of young children when not being used due
to a risk of injury.
This device contains electronic components that are powered by batteries. Batteries should
be kept out of children’s reach. When inserting batteries, please ensure the polarity is
correct. Insert the batteries according to the displayed +/- information.
DANGER OF FIRES AND EXPLOSIONS!
Do not expose the device to high temperatures. Use only battery types recommended. Never
mix old and new batteries. Replace all batteries at the same time. Never mix alkaline,
standard carbon-zinc, and rechargeable nickel-cadmium batteries. Never short circuit the
device or batteries or throw either into a fire. Exposure to high temperatures or misuse of
the device can lead to short circuits, fires, or even explosions. Leaking or damaged batteries
can cause injury if they come into contact with the skin. If you need to handle such batteries,
please wear suitable safety gloves.
CHEMICALS
Any chemicals and liquids used in conjunction with the device should be kept out of reach of
children. Do not drink any of the chemicals contained in this set. Hands should be washed
thoroughly under running water after working with these chemicals. In case of accidental
contact with eyes or mouth, rinse the affected area with water. Seek medical treatment for
ailments arising from contact with the chemical substances, and take the chemicals with you
to the doctor.

E-7
RISK OF MATERIAL DAMAGE
Never take the device apart. Please consult our customer service department and send
the device in for repair if needed.
Do not subject the device to temperatures exceeding 60 °C (140 °F).
TIPS ON CLEANING
Remove batteries from device before cleaning.
MICROSCOPE CARE
Clean the exterior of the device with a dry cloth. To avoid causing damage to electrical
components, do not use cleaning fluids. Clean the lenses (objective and eyepiece) with
only a soft, lint-free cloth, like a microfibre cloth. Do not use excessive pressure—this
may scratch the lens. Protect the device from dust and moisture. Store the device in its
original packaging. Batteries should be removed from the device if it will not be used for
a long period of time.
DISPOSAL
Keep packaging materials, like plastic bags and rubber bands, away from children, as
they pose a risk of suffocation.
Dispose of packaging materials as legally required. Consult the local authority on the
matter if necessary.
DISPOSAL
Dispose of the packaging materials properly,
according to their type, such as paper or card-
board. Contact your local waste disposal service
or environmental authority for information on the
proper disposal.
Please take the current legal regulations into
account when disposing of your device. You can
get more information on the proper disposal from
your local waste-disposal service or environmen-
tal authority.

©2017 Discovery Communications, LLC. Discovery™ and the Discovery™ logo are
trademarks of Discovery Communications, LLC, used under license.
All rights reserved. discoverykids.com
©2017 Explore Scientific, LLC, a Journey North Company.
1010 S. 48th Street, Springdale AR 72762
explorescientificusa.com | exploreone.com | 866.252.3811
All rights reserved. Made in China
CONFORMS TO THE SAFETY REQUIREMENTS OF ASTM F963
CONFORME AUX EXIGENCES DE SÉCURITÉ DE LA NORME ASTM F963
Table of contents
Other Discovery Telecom Microscope manuals

Discovery Telecom
Discovery Telecom 4400150 User manual

Discovery Telecom
Discovery Telecom TDK26 User manual

Discovery Telecom
Discovery Telecom Zoom Power Lab Microscope User manual

Discovery Telecom
Discovery Telecom 4450101 User manual

Discovery Telecom
Discovery Telecom Centi 01 User manual

Discovery Telecom
Discovery Telecom 900x User manual

Discovery Telecom
Discovery Telecom TDK11 User manual


