Ditt Drivhus LINA User manual

Assembly manual / Montageanleitung / Manuel de montage /
Monteringsanvisning / Asennusopas
Greenhouse / Gewächshaus / Serre / Växthus / Kasvihuone
LINA

/ 3
Table of Contents / Inhaltsverzeichnis / Table des
matières / Innehållsförteckning / Sisällysluettelo
- General information / Allgemeine Informationen /
Informations générales / Allmän information / Yleistä
tietoa /4
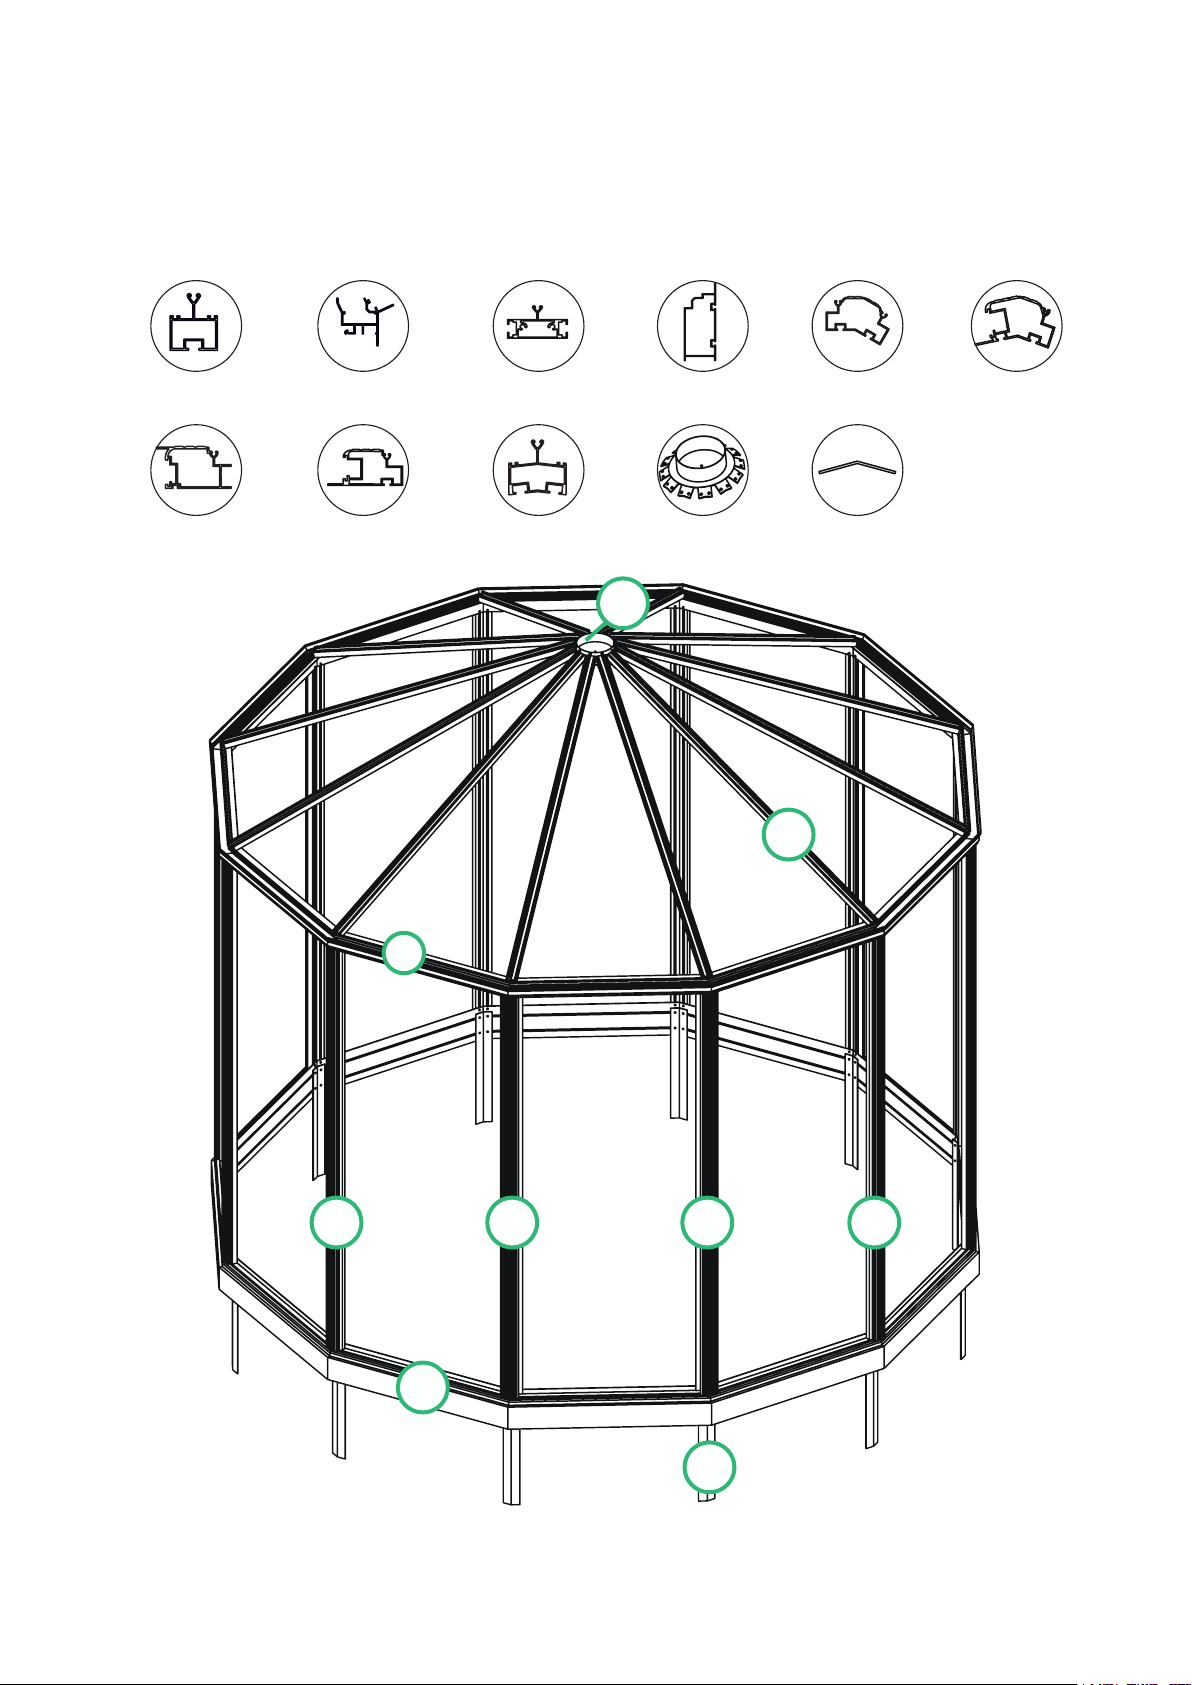
- Profiles / Profile / Profils / Profiler / Profiilit /9
- Order of assembly / Montagereihenfolge / Ordre de
montage / Monteringsordning / Asennusjärjestys:
- Base assembly / Anleitung Fundamentbau / Bas
profil montage / Basprofiler / Base-profiilien /10
- Frame assembly / Montage des rahmens /
Assemblage de la structure / Montering
av ram / Rungon kokoaminen /12
- Door / Türen / Portes / Dörrar / Ovet /19
- Fitting of glass/polycarbonate / Montage der
Glasplatten / Polycarbonatplatten / Montage du
verre ou du polycarbonate / Montering av glas /
polykarbonat / Lasien / polykarbonaattilevyjen
asennus /24
- Windows / Fenster / Fenetres / Fönster / Ikkunat /30
- Rain water downpipes / Regenwasser-Fallrohre /
Tuyaux de descente d'eau de pluie / Rör för
regnvatten / Sadeveden putket /35
- Other elements / Andere Elemente / Autres
éléments / Andra element / Muut elementit /36

/ 4
EN / General information
Dear Customer,
We would like to congratulate you on your new greenhouse purchase! Please read this manual for an easier assembly
and maintenance of your greenhouse. The assembly does not require special technical knowledge. We recommend
that two people assemble the greenhouse. Please follow the instruction steps in the sequence described in the
manual taking into account all additional information provided. Open one package at a time. Do not mix the contents
of different packages. Please store all the packages in a dry place and protect them from exposure to direct sunlight,
wind and rain.
Important
It is recommended that you place your greenhouse in an area that receives the most sunlight and is protected from
the wind. Avoid placing your greenhouse under close to trees. We strongly recommend that you assemble your
greenhouse on a windless and dry day. Avoid leaving the construction unfinished overnight. Always wear gloves,
footwear and goggles when assembling your greenhouse as the edges of the aluminium extrusions, polycarbonate
panels or glass can be very sharp. If using a ladder, please make sure it is placed on an even surface.
Tools and materials
You will need the following to assemble your greenhouse:
- Electric drill - Silicone caulk - 10 & 13 mm wrenches -Tape-measure
- Level - Spade / ground drill - Screwdriver - Ladder
- Concrete - Rope (if greenhouse length exceeds 6 m)
Tips
Anchor the base of your greenhouse by securing its footings in the ground with concrete. Make sure that the base is
100% level and square - the diagonals have to be of equal length! We recommend that you oil the door and window
screws to tighten them easily.
Polycarbonate panels
The external side of polycarbonate panels block ultraviolet rays. This side has a special white film and/or is marked
with a text. Make sure that the external side of the panel faces outside. Peel approximately 5 cm of the white film off
the polycarbonate panel along its perimeter prior to installing the panel into the frame. When you have assembled your
greenhouse, peel off the rest of the protective film. Do not leave polycarbonate panels lying directly on the ground.
Please make sure you place them on the carton packaging.
Accessories
A wide range of accessories for your greenhouse are available from the manufacturer/seller. These will help you to
better care for your plants and keep your greenhouse care and maintenance products neat and organised. To be
updated, follow the news section of the manufacturer's website.
Maintenance and care
Regularly oil the door joints, latches or sliding door tracks. Remove leaves and other dirt from gutters and door tracks.
Once in a while, make sure that doors and windows are properly tightened and in place. Use appropriate disinfectants
to clean your greenhouse in the beginning of the season, prior to its use, and after the vegetation period is over. Clean
the inside and outside of polycarbonate panels with warm water and soft cloth before and after the growing season.
Only mild cleaning products that are safe for aluminium and polycarbonate should be used (e.g., dishwashing liquid,
household soap etc.). If a strong wind is approaching, close the doors and windows firmly. Greenhouse care in winter
period: before the winter season starts, provide additional support to the roof beam from the inside of your
greenhouse; keep the roof clean of snow accumulation, especially of thick, wet or icy; remove it as soon as possible;
protect your greenhouse from snow falling off the surrounding trees and roofs of the nearby buildings.
Warranty
All our greenhouses are produced in compliance with the highest quality standards (CE). The manufacturer gives a 12
year warranty against defects in workmanship and/or construction; a 2 year warranty on painted parts, if any. The
manufacturer guarantees that all glass and polycarbonate pieces are manufactured to the correct dimensions and are
free from material defects. Due to the nature of glass, there is no guarantee that glass will not be broken during
customer handling, installation, or use. The polycarbonate must be installed and maintained according to the
manufacturer specifications. This Warranty does not cover flexible parts of the greenhouse, transportation, any
damages relating to strong wind (>21 m/s), heavy snow or any other extreme environmental conditions, also any
damages caused by improper placement / assembly / use/ care. In case you are not satisfied with the quality of your
greenhouse, please contact the company from which you purchased the product and indicate the type of your
greenhouse and the defect- ed part.
Insurance
We strongly recommend that you contact your insurance company to make sure your greenhouse will be covered on
your policy.
This symbol means that the product is not included and you have to purchase it yourself.

/ 7
SE / Allmän information
Bästa kund,
Grattis till ditt nya växthusköp! Läs först igenom den här manualen för att underlätta monteringen och underhållet av
ditt växthus. Det krävs ingen speciell teknisk kunskap för att montera ihop växthuset. Vi rekommenderar dock att ni
är två personer som genomför monteringen. Följ instruktionerna i den följd de anges i manualen och var uppmärksam
på all ytterligare information som tillhandahålls.
Öppna ett paket i taget. Blanda inte ihop innehåll från olika paket. Se till att alla paket är placerade på en torr yta och
dolda från direkt solljus.
Viktigt
Den bästa placeringen för ditt växthus är en plats som får mycket solljus och samtidigt är skyddad från vinden. Undvik
att placera växthuset under eller nära träd. Vi rekommenderar starkt att du monterar ihop ditt växthus på en torr och
vindstilla dag. Undvik att lämna växthusmonteringen oavslutat över natten. Använd alltid handskar, skor och
skyddsglasögon när du monterar ihop växthuset då aluminiumdelarna och polykarbonatpanelerna kan var mycket
vassa. Om du använder en stege är det viktigt att den placeras på ett jämt underlag.
Verktyg & material
Följande verktyg behövs för att montera ihop växthuset:
- skruvmejsel - borrmaskin - måttband - stege
- två skiftnycklar, 10 och 13 mm - silikontätning - vattenpass - spade och jordborr
- rep (om växthusets längd överstiger 6 m) - cement
Tips
Ett växthus måste förankras i ett fast och jämnt underlag. Fäst växthusets sockel ordentligt i marken. Se till att
sockeln är 100 % jämn och kvadratisk – diagonalerna måste vara lika långa. Vi rekommenderar att du smörjer
skruvarna till dörr och fönster, så att det går lätt att skruva åt dem.
Polykarbonatpaneler
Utsidan av polykarbonatpanelerna blockerar ultravioletta strålar. Den sidan har en speciell vit film och/eller är märkt
med text. Se till att panelernas utsida vänds utåt. Dra bort cirka 5 cm av den vita filmen från polykarbonatpanelernas
ytterkanter innan de sätts i sina skenor. När du har monterat ihop ditt växthus drar du bort resten av skyddsfilmen.
Lämna inte polykarbonatpanelerna liggande på marken. Lägg dem istället på pappförpackningen.
Underhåll och skötsel
Smörj regelbundet dörrfogarna, spärrarna och skjutdörrens spår. Ta bort löv och annat skräp från takrännorna.
Kontrollera då och då att dörrarna och fönstren sitter ordentligt på plats. Använd lämpliga desinfektionsmedel för att
rengöra växthuset i början av säsongen, innan det används samt efter växtperioden. Rengör polykarbonatpanelerna
med varmt vatten och en mjuk trasa. Använd endast milda rengöringsmedel som kan brukas för aluminium och
polykarbonat (t.ex. diskmedel, hushållstvål etc.).
Tillbehör
Ett brett urval av växthustillbehör kan köpas separat från tillverkaren. Tillbehören underlättar för dig att ta hand om
dina växter och håller ordning och reda på dina skötsel- och underhållsprodukter. För att hålla dig uppdaterad, läs om
nyheterna på tillverkarens webbsida (nyhetssektionen).
Växthusskötseln under vintern
Vintern kan innebära snö. Därför rekommenderar vi följande:
• Sätt in extra stöd för takstolarna inne i växthuset, håll taken fria från snö, var speciellt uppmärksam på
blöt, tung snö som måste tas bort så snart som möjligt, skydda ditt växthus från snö som kan falla från
träden runt omkring och från taken på kringliggande byggnader.
• Innan vintern kommer: ta bort cylindrarna som öppnar ventilationsfönsterna automatiskt (om tillämpligt).
• För att skydda växthuset från starka vindar: se till att dörrar och fönster är ordentligt stängda.
Garanti
Växthuset är tillverkat enligt CE 1090-3 kvalitetsstandarder. En 12-årsgaranti täcker ersättning eller reparation av
delar som skadats under tillverkningsprocessen, en 2-årsgaranti gäller för RAL-pulverlackeringen. Tillverkaren
garanterar att alla delar av glas och polykarbonat tillverkas i rätt mått och är fria från materialfel. På grund av glasets
karaktär finns det ingen garanti för att glas inte kommer att brytas under kundhantering, installation eller användning.
Garantin gäller inte skador orsakade av starka vindar (>21 m/s), tung snö eller andra extrema miljöförhållanden eller
skador orsakade av olämplig placering, installation och/eller felaktig användning av växthuset. Om du finner fel eller
brister på ditt växthus, kontakta företaget där du köpte växthuset och ange dess typmodell samt de delar som har fel
eller brister.
Försäkring
Vi rekommenderar starkt att du kontaktar ditt försäkringsbolag för att säkerställa att ditt växthus täcks av din
försäkring.
27
3
27
1716
R3
3 18
R1
SOLIDWORKSEducational Product. For Instructional Use Only.
2 5
25 26
17 18 18 17
16
R3
R1
Profiles / Profile / Profils / Profiler / Profiilit
/ 9
This manual suits for next models
2
Table of contents
Popular Greenhouse Kit manuals by other brands


Vitavia
Vitavia GAIA JUMBO Assembly instructions

Palram
Palram Harmony 6'x4' Assembly instructions

ClearSpan
ClearSpan Storage Master 104598 instruction manual

Sproutwell
Sproutwell GRANGE - 5 Assembly instructions

STC
STC Easy Grow 6x12 Greenhouse Assembly instructions

Growhouse
Growhouse Lean To 6 x 8 Erection and Glazing Instructions


