manuals.online logo
Brands
  1. Home
  2. •
  3. Brands
  4. •
  5. Stocker
  6. •
  7. Greenhouse Kit
  8. •
  9. Stocker 9641/2 User manual

Stocker 9641/2 User manual

Popular Greenhouse Kit manuals by other brands

Dancover TITAN Arch 196 manual

Dancover

Dancover TITAN Arch 196 manual

ACD PRESTIGE MR3 H manual

ACD PRESTIGE

ACD PRESTIGE MR3 H manual

Vitavia VA0040-TRP Assembly instructions

Vitavia

Vitavia VA0040-TRP Assembly instructions

VegTrug Nursery manual

VegTrug

VegTrug Nursery manual

Riverstone Networks Monticello 041315V Assembly instructions

Riverstone Networks

Riverstone Networks Monticello 041315V Assembly instructions

CLIMA POD Spirit V7 Series Assembly instructions

CLIMA POD

CLIMA POD Spirit V7 Series Assembly instructions

Vitavia GAIA JUMBO Assembly instructions

Vitavia

Vitavia GAIA JUMBO Assembly instructions

Palram Harmony 6'x4' Assembly instructions

Palram

Palram Harmony 6'x4' Assembly instructions

ClearSpan Storage Master 104598 instruction manual

ClearSpan

ClearSpan Storage Master 104598 instruction manual

Sproutwell GRANGE - 5 Assembly instructions

Sproutwell

Sproutwell GRANGE - 5 Assembly instructions

STC Easy Grow 6x12 Greenhouse Assembly instructions

STC

STC Easy Grow 6x12 Greenhouse Assembly instructions

Growhouse Lean To 6 x 8 Erection and Glazing Instructions

Growhouse

Growhouse Lean To 6 x 8 Erection and Glazing Instructions

Riverstone Networks Grower's 181010V Assembly instructions

Riverstone Networks

Riverstone Networks Grower's 181010V Assembly instructions

GrowSpan 500 Series manual

GrowSpan

GrowSpan 500 Series manual

Outsunny 845-421V02 manual

Outsunny

Outsunny 845-421V02 manual

ACD Piccolo 03 manual

ACD

ACD Piccolo 03 manual

Riverstone Networks MONT-8 Assembly instructions

Riverstone Networks

Riverstone Networks MONT-8 Assembly instructions

oGrow OGAL-666A manual

oGrow

oGrow OGAL-666A manual

manuals.online logo
manuals.online logoBrands
  • About & Mission
  • Contact us
  • Privacy Policy
  • Terms and Conditions

Copyright 2025 Manuals.Online. All Rights Reserved.

Via Industria 1/7 Industriestraße - I-39011 Lana (BZ)
Tel. +39 0473 563277 - Fax +39 0473 563482
[email protected] - www.stockergarden.com
Art. 9641/2
MANUALE DI ISTRUZIONI
BENUTZERhANDBUch
Ventilazione laterale
Seitenlüftung
ISTRUZIONI DI POSA, DI UTILIZZO E DI MANUTENZIONE
RAccOMANDAZIONI GENERALI
La ringraziamo per aver inoltrato un ordine di una serra STOCKER. La preghiamo di consultare scrupolosamente le presenti istruzioni e di
rispettare le raccomandazioni di posa e di utilizzo indicate. È molto importante leggere integralmente le istruzioni prima di iniziare il montaggio.
Il mancato rispetto delle stesse solleverà il rivenditore da qualsiasi responsabilità.
UN MONTAGGIO DI SCARSA QUALITÀ PUÒ INFLUIRE NOTEVOLMENTE SULLA RESISTENZA DELLA SERRA.
RIcEZIONE DEL MATERIALE
Si raccomanda di verificare il contenuto dei colli con l’ausilio della tabella riassuntiva dei pezzi riportata all’inizio delle istruzioni di montaggio.
ALLGEMEINE EMPFEhLUNGEN
Sie haben einen STOCKER Gewächshaus bestellt ; bitte lesen Sie diese Beschreibung aufmerksam durch und beachten Sie die darin gegebenen
Answeisungen zur Aufstellung, Benutzung, Instandhaltung und Wartung. Lesen Sie vor Montage unbedingt die gesamte Bedienungsanleitung!
Die Nichtbeachtung entbindet den Verkäufer von jeglicher Verantwortung.
EINE MONTAGE VON SCHLECHTER QUALITÄT KANN SICH BETRÄCHTLICH AUF DIE STANDFESTIGKEIT DES GEWÄCHSHAUS
AUSWIRKEN.
MATERIALANNAhME
Wir empfehlen Ihnen, den Inhalt der Pakete anhand der Stückliste, die Sie am Anfang der Montageanleitung finden, zu überprüfen.
2
LISTE DES PIÈCES
PARTS LIST
LIJST VAN ONDERDELEN
STÜCKLIST
ELENCO DEI PEZZI
P131137
P110542
x4
x8
P510151
x5
x3
P620845
P710007 P710193
70mm
x5
x6
x3
P510134
x3
P410028
P710214
x16
x
4
P620255
x1
P710014
P620134
x5
x1
P710013 P620274
x45
P730263
x1
P743241
x2
3
OUTILLAGE NECESSAIRE (Non fourni)
NECESSARY TOOLS (Not supplied)
BENODIGD GEREEDSCHAP (Niet meegeleverd)
BENÖTIGT WERKZEUGE (Nicht geliefert)
ATTREZZI NECESSARI (non forniti)
+
X 2
4
CA
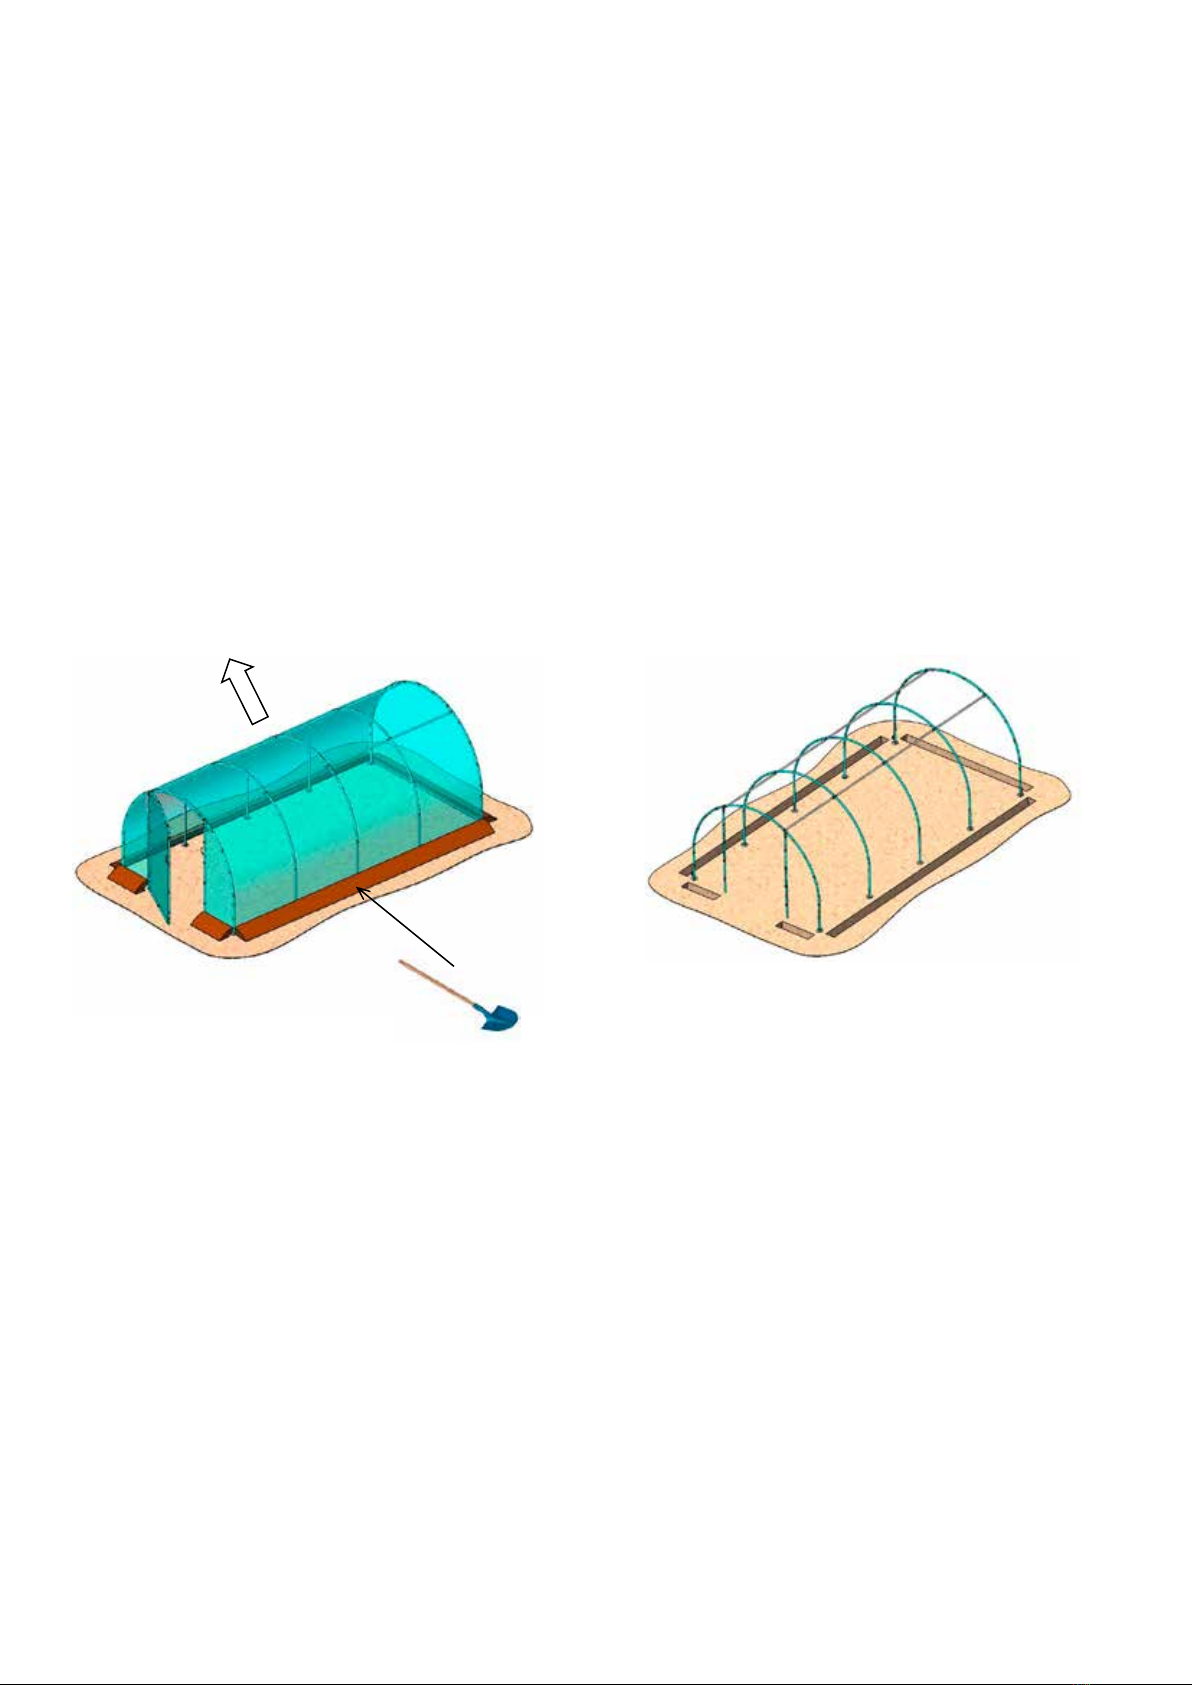
S n°1: Si vous avez déjà monté la serre, il faut
commencer par déterrer le film de couverture,
puis le retirer.
CASE no. 1: If you have already assembled the
hobby tunnel, start by taking the cover sheet out
of the ground and removing it.
VOORBEELD nr. 1: Als u de kas al hebt
opgebouwd, moet u beginnen met het uitgraven
van het folie en het verwijderen.
FALL 1: Wenn Sie das Gewächshaus bereits
komplett aufgebaut haben, müssen Sie zunächst
die Eindeckfolie ausgraben und abnehmen.
CASO n°1: Se la serra è già stata montata, si deve
iniziare sterrando il film di copertura per
rimuoverlo.
CAS n°2: Si la serre est en cours de montage, il
faut mettre en œuvre cette notice avant le
bâchage.
CASE no. 2: If you are assembling the hobby
tunnel, follow these instructions before putting
the cover into place.
VOORBEELD nr. 2: Als de kas nog wordt
opgebouwd, moet u deze instructies uitvoeren,
voordat u de kas afdekt met folie.
FALL 2: Wenn Sie das Gewächshaus noch nicht
komplett aufgebaut haben, führen Sie die in dieser
Anleitung beschriebenen Schritte aus, bevor Sie
die Eindeckfolie aufziehen.
CASO n°2: Se la serra è in fase di montaggio,
attenersi alle presenti istruzioni prima di
procedere alla copertura con il telo.
5
x3
P620845
P620134
P710014
P710013
P710007
Vous pouvez vous aider avec le P620274
You can use P620274
Sie können P620274 verwenden
U kunt P¨620274 gebruiken
È possibile utilizzare il P620274
6
P710013 x6
P131137
x4
7
x2
P620134
P743241
P710014
P131137
P510151
Assemblé
Assembled
Geassembleerd
Montiert
Assemblato
Vue intérieure
Interior view
Binnenaanzicht
Innenansicht
Vista
dall’interno
Vue extérieure
Exterior view
Buitenaanzicht
Außenansicht
Vista
dall'esterno
P710007
8
x3
P710193 x2
P410028
P131137
P510151
Assemblé
Assemblato
P131137
P510151
Assemblé
Assembled
Geassembleerd
Montiert
Assemblato
Vue intérieure
Interior view
Binnenaanzicht
Innenansicht
Vista
dall’interno
Vue extérieure
Exterior view
Buitenaanzicht
Außenansicht
Vista
dall'esterno
9
Si le profil est positionné au dessus de la jonction entre l'arceau et le pied, une vis
autoforeuse est obligatoire pour chaque arceau.
If the section is positioned above the joint between the arch and the foot, a self-drilling screw
is compulsory for each arch.
Als het profiel boven de verbinding tussen de boog en de poot wordt geplaatst, moet er
verplicht gebruik worden gemaakt van een zelfborende schroef voor elke boog.
Wenn das Profil oberhalb der Verbindung zwischen Bogen und Fuß angebracht wird, muss
für jeden Bogen eine selbstbohrende Schraube verwendet werden.
Se il profilo è posizionato al di sopra della giunzione tra l’arco e il piede, è obbligatoria una
vite autoperforante per ogni arco.
Jonction
Joint
Verbinding
Verbindung
Giunzione
P710013
P110542 x8
P730263
P710013 x8
+
+
Profil 131137 + 510151
Profilo 131137 + 510151
Profil 131137 + 510151
Profilo 131137 + 510151
Jonction
Joint
Verbinding
Verbindung
Giunzione