Dittmann TEN 250 User manual
Version 2, 2014-03
TEN 250
1
•
•
•
•
•
•
•
•
•
•
•
0123
Nerve and muscle stimulation effected with the aid of
stimulation current
2 channels with LED display for each channel
Blue display backlighting
7 pre-programmed + 5 adjustable application
programmes for TENS nerve stimulation
11 pre-programmed + 9 adjustable application
programmes for EMS muscle stimulation
10 pre-programmed massage programmes
18 pre-programmed + 6 adjustable special programmes
for 6 different parts of the body
Adjustable intensity (for adjustable application
programmes, also frequency, pulse duration and
application time)
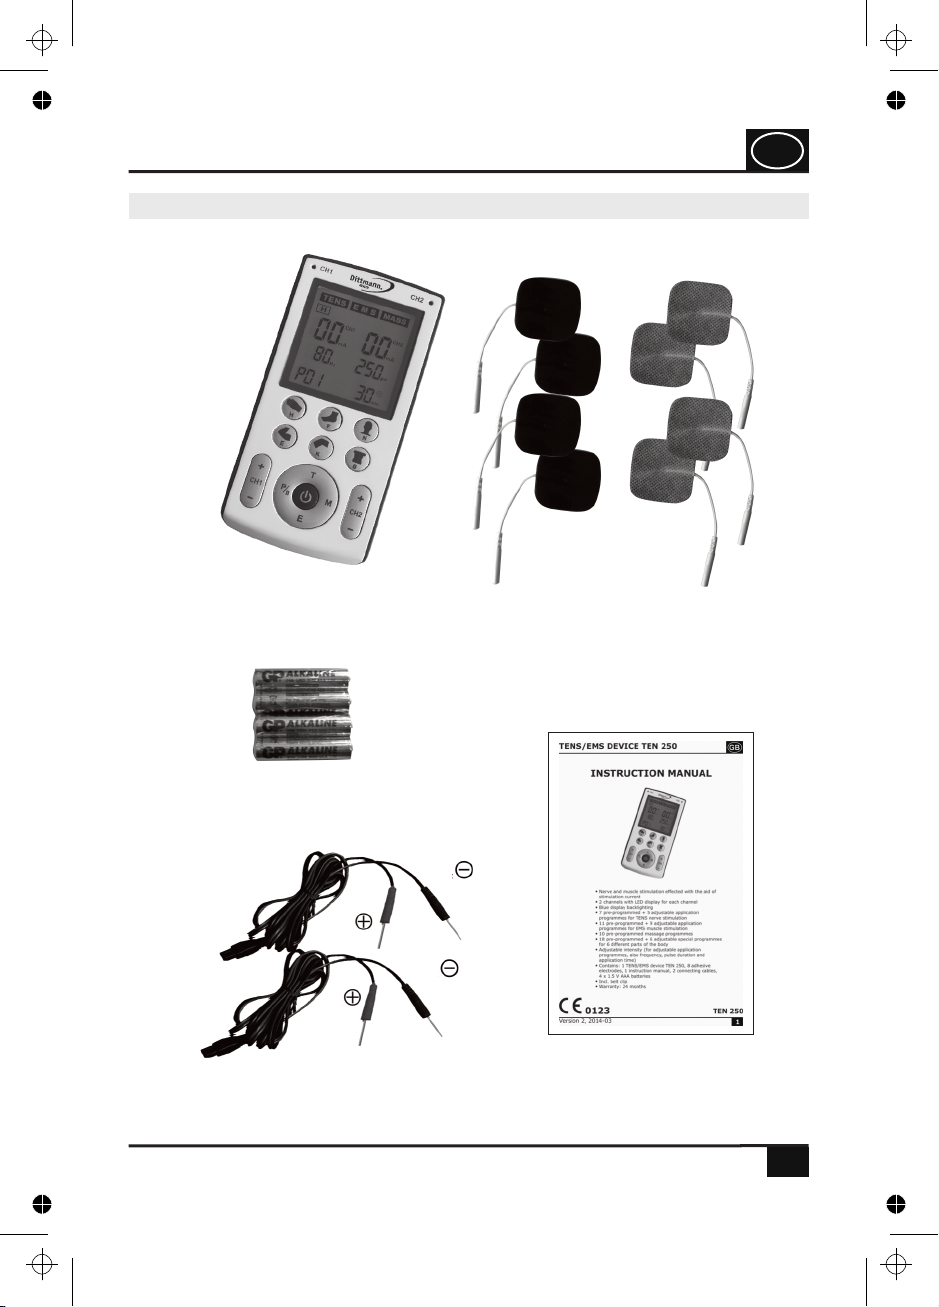
Contains: 1 TENS/EMS device TEN 250, 8 adhesive
electrodes, 1 instruction manual, 2 connecting cables,
4 x 1.5 V AAA batteries
Incl. belt clip
Warranty: 24 months
INSTRUCTION MANUAL
TENS/EMS DEVICE TEN 250 GB
4. PJN157-14_GA-GB_HHD_TEN250_31.03.14
Montag, 31. Mrz 2014 12:10:40
1.0
2.0
2.1
2.2
3.0
3.1
3.3
3.4
3.5
3.6
3.7
3.8
4.0
4.1
4.2
4.3
5.0
6.0
7.0
8.0
9.0
10.0
11.0
12.0
13.0
4
4
4
4
5
5
5
6
6
7
7
8
9
9
10
10
11
12
12
13
14
15
16
19
22
2
TENS application programmes
Application instructions and mode settings
Application instructions
Quick overview for commissioning
Designation and functionality of the TENS/EMS device
LCD display
Battery change and information concerning batteries
Disposal of the TENS/EMS device
Scope of delivery / contents
Cleaning and care of the TENS/EMS device
Storage / maintenance of the TENS/EMS device
Areas where the adhesive electrodes must not be applied
Areas where the adhesive electrodes are applied
Usage of the TENS/EMS device
Usage by children and adolescents
Application for which the TENS/EMS device is not suited
Application for which TENS/EMS device is suited
Usage / environment for which the TENS/EMS device is not suited
Usage / environment for which the TENS/EMS device is suited
General safety instructions
Safety instructions
Information concerning the TENS/EMS therapy
Characteristics of a TENS/EMS device
Basic information
Definition of symbols
No. Topic Page
TABLE OF CONTENTS
GB
4. PJN157-14_GA-GB_HHD_TEN250_31.03.14
Montag, 31. Mrz 2014 12:10:40
14.0
15.0
16.0
17.0
18.0
19.0
20.0
21.0
22.0
23.0
23
24
26
27
28
30
34
35
39
40
3
Dear purchaser,
Congratulations on your purchase of a new TENS/EMS device TEN
250 and thank you for your trust. In order to ensure optimal
functionality and operation of your TENS/EMS device, please read
the instruction manual before using the device for the first time.
This guarantees a long useful life of this product.
Terms of warranty
Technical specification, symbols, pictograms
Information regarding electromagnetic immunity
Malfunctions, troubleshooting
Positioning of the adhesive electrodes for EMS therapy
Positioning of the adhesive electrodes for TENS therapy
Information concerning the positioning of the adhesive electrodes
Special application programmes for six different parts of the body
Massage application programmes
EMS application programmes
No. Topic Page
TABLE OF CONTENTS GB
4. PJN157-14_GA-GB_HHD_TEN250_31.03.14
Montag, 31. Mrz 2014 12:10:40
4
The device is equipped with several application programmes and uses low-frequency
electric currents for therapeutic purposes. The induced electric pulses, their intensity,
frequency and frequency width are controlled by the respective application programme.
By means of the adhesive electrodes applied on the skin, the electric pulses are
transmitted to the nervous system and the muscles. The current flows from the positive
(+) adhesive electrode (with the red plug) to the negative (-) adhesive electrode (with
the black plug). For the purpose of pain treatment, the delivery of pain to the brain is
influenced during the application of a TENS therapy. The user does no longer perceive the
pain at all or perceives the pain to a limited extent only. During the application of an EMS
therapy, the respective muscle receives an electric pulse resulting in a contraction of this
muscle. The intensity of the two channels can be adjusted separately and can be used
independently on two body regions to be treated. The device is equipped with two
channels and four electrodes; thus, you can stimulate two groups of muscles (EMS) or
two pain areas (TENS) at the same time using the respective programmes.
2.2 Information concerning the TENS/EMS therapy
The TENS/EMS device TEN 250 is an electro-stimulation device. To this end, an electric
current is transmitted through the skin.
EMS (electric muscle stimulation) = the muscle tissue is electrically stimulated.
TENS (transcutaneous electric nerve stimulation) = the nerve tract is electrically
stimulated.
2.1 Characteristics of a TENS/EMS device
2.0 Basic information
Warning / danger: The device must not be used by persons with a
pacemaker!
These instructions must be followed under all circumstances!
Warning / danger: If not used correctly, there might be the risk of serious
injury, damage and mortal danger!
Read and follow the instruction manual!
The symbols refer to the following content:
The safety symbols shown in this instruction manual contain information concerning the
correct use of the TENS/EMS device and your safety.
1.0 Definition of symbols
BASIC INFORMATION
GB
4. PJN157-14_GA-GB_HHD_TEN250_31.03.14
Montag, 31. Mrz 2014 12:10:40
5
3.1 General safety instructions
3.1.1
3.1.2
3.1.3
3.1.4
3.1.5
3.1.6
3.1.7
3.1.8
3.1.9
3.2.0
3.2.1
3.2.2
3.2.3
3.2.4
Accessories from other devices must not be used.
3.3.1
3.3.2
3.3.3 As part of a TENS therapy, the device can be used for the treatment of acute
complaints, arthrosis, rheumatic complaints and other chronic pain conditions.
The TENS/EMS device is only intended for external application (skin application)
on humans and for the purposes of electric nerve and muscle stimulation.
Only use the TENS/EMS device for the intended use, i.e. for a low-frequency
therapy (max. electric pulses in a range up to 150 Hz and a max. of 90 mA) on
the human body.
3.3 Usage / environment for which the TENS/EMS device is
suited
While using the TENS/EMS device, do not wear any body jewellery or tattoo
stickers / tattoos in the stimulation area.
Before starting each therapy session, check the device and the adhesive
electrodes for errors. If an error and/or defect occur, the device and the adhesive
electrodes must not be used.
Do not place any heavy or sharp-edged objects on the TENS/EMS device or the
adhesive electrodes.
The connecting cables as well as the adhesive electrodes must not be bent
sharply.
If irregularities occur while using the device, the therapy must be stopped
immediately.
Any misuse and use not in conformity with the application must be avoided.
Please store this instruction manual during the useful life of the product for later
reference and also hand it over if you pass on the TENS/EMS device to third
parties. Please make the instruction manual also available to third parties. The
instruction manual is an integral part of the TENS/EMS device.
Without seeking prior medical advice, do not use the TENS/EMS device on areas
that hurt inexplicably, swollen muscles or after a serious muscle injury. The
therapy using the TENS/EMS device is not a substitution for a medical diagnosis
and treatment.
If you have any doubts concerning the therapy with the TENS device TENS/EMS
device, please seek medical advice in advance.
Do not use the TENS/EMS device while driving and do not perform any other
activities while using the device.
Please remove all metallic objects, such as jewellery, belts, watches and other
utensils from your body, before starting the therapy in such a manner that they
do not come into contact with the TENS/EMS device or the adhesive electrodes.
Is skin alterations, pain, swelling, discomfort or other irregularities occur during
the use of the TENS/EMS device, you must stop the therapy immediately and seek
medical advice.
In case of a defect, the TENS/EMS device must not be repaired, used or modified
(changed) by the users themselves. If used incorrectly, the stimulation current
may cause pain, injuries and burns.
3.0 Safety instructions
SAFETY INSTRUCTIONS GB
4. PJN157-14_GA-GB_HHD_TEN250_31.03.14
Montag, 31. Mrz 2014 12:10:40
3.4.1
3.4.2
3.4.3
3.4.4
3.4.5
3.4.6
3.4.7
3.4.8
3.4.9
3.5.1
3.5.2
3.3.4
3.3.5
6
Therapies using the TENS/EMS device effect a stimulation of the muscular
system. Here, the muscles are stimulated.
Pain relief therapies with the TENS/EMS device are purely of symptomatic nature.
They can effect a pain relief, and, under certain circumstances, a cure. Please
seek medical advice if you have any therapy-related questions.
3.5 Application for which the TENS/EMS device is suited
Medical electrical devices are subject to special precautions regarding EMC
(electromagnetic compatibility). Therefore, please observe the EMC instructions
(page ) on the installation and commissioning of the device provided in this
instruction manual.
35-38
Please note that portable and mobile HF (high-frequency) communication
equipment (e.g. mobile phones) may influence medical electrical devices.
The TENS/EMS device is designed for self-treatment; however, it is not intended
for trade or commercial usage.
Keep a distance of at least 1.5 metres to shortwave or microwave devices and/or
high-frequency (HF) surgical devices when using the TENS/EMS device; otherwise,
there is a risk of skin irritations or burns being caused to the skin under the
electrodes. Do not use the TENS/EMS device on mountains higher than 3,000
metres.
While using the TENS/EMS device, it may interfere with other electric devices or
may be impaired by other electric devices. Therefore, do not use the TENS/EMS
device near other electric devices.
Do not use the TENS/EMS device near highly flammable substances or gases or
near explosives.
Do not use the TENS/EMS device in bed and/or while sleeping.
Do not use the TENS/EMS device while showering, while swimming, in the sauna,
while bathing or in any other environment with high air humidity. Keep away from
any liquids while in use. Otherwise, injuries may occur or health may be
negatively impacted by an increased stimulation r a short circuit. Caution! Mortal
danger!
The TENS/EMS device must not be used at the same time with other medical and
electric devices of any kind.
3.4 Usage / environment for which the TENS/EMS
device is not suited
The sense of intensity may actually depend on the respective daily constitution.
Therefore, the user may adjust the intensity to his/her personal needs using the
intensity control of the TENS/EMS device.
Unless instructed otherwise by your doctor, we recommend an average therapy
duration of 30 minutes up to 3 times a day.
SAFETY INSTRUCTIONS
GB
4. PJN157-14_GA-GB_HHD_TEN250_31.03.14
Montag, 31. Mrz 2014 12:10:40
7
3.6.1
3.6.2
3.6.3
3.6.4
3.6.5
3.6.6
3.6.7
3.7.1
3.7.2
3.7.3 Keep the TENS/EMS device out of the reach of children. Small parts could be
swallowed by children who might then choke. Children could hurt themselves
when using the device.
The TENS/EMS device must be stored out of the reach of children and adolescents
younger than 18 years.
Children must not be treated with this TENS/EMS device.
3.7 Usage by children and adolescents
If a person is not able to perceive the electric stimulation current correctly, a
therapy using this TENS/EMS device must not be performed. Young children are
more sensitive to stimulation current! People of frail health and handicapped
persons might not be able to attract attention to themselves if too high an
intensity of the stimulation current device has been reached.
The following persons should not use the TENS/EMS device: children, invalid
people, allergy sufferers, persons with immunodeficiency, persons with
indefinable pain, diabetes or circulatory insufficiencies, persons with circulatory
disorders of the exterior arteries and tissues or serious cardiovascular diseases. If
in doubt, seek medical advice!
The adhesive electrodes of the TENS/EMS device must not be used on open
wounds, on areas where the skin is sensitive and fresh scars.
Do not use the TENS/EMS device if you could yourself in any way due to a sudden
fright.
With indefinable pain, such as indefinable headaches, a therapy with the
TENS/EMS device is not effective.
Please consult your doctor before using the TENS/EMS device under the following
circumstances: a. acute diseases, b. tumours, c. infectious diseases, d. fever, e.
blood pressure problems, f. skin diseases, g. after an accident, h. nausea or
dizziness, i. onset of illnesses, j. if anomalies occur, k. pain of indefinable cause, l.
diabetes, m. seizures, n. during menstruation, o. if pain is not experienced in
some parts of the body, p. persons with metal and implants in the body.
You must not use the TENS/EMS device under the following circumstances: a.
heart diseases and cardiac arrhythmias (may lead to cardiac arrest), b. directly
on wounds, c. pregnancy, in the uterus area and during labour, d. on the
eyes, e. in patients with pacemakers, f. parts of the body that are poorly
supplied with blood, g. in patients with psychological and/or emotional
problems, h. in patients with diagnosed dementia (deterioration of
mental faculties), i. in patients with a low IQ (intelligence quotient).
3.6 Application for which the TENS/EMS device is
not suited
SAFETY INSTRUCTIONS GB
4. PJN157-14_GA-GB_HHD_TEN250_31.03.14
Montag, 31. Mrz 2014 12:10:40

8
3.8.6
3.8.7
3.8.8
3.8.9
3.9.0
3.9.1
3.8.1
3.8.2
3.8.3
3.8.4
3.8.5
For using the special programmes for different parts of the body, the DITTMANN
textile electrodes and/or the back pain relief belt, knee pain relief cuff or neck cuff
available as accessories are also ideally suited for a convenient application using
the TENS/EMS device TEN 250 (e. g. for the area H, the stimulation glove HFE
322; for the area F, the stimulation sock SFE 323; for the area E, the elbow
electrode EFE 361; for the area K, the knee electrode KFT 362 or the knee pain
relief cuff KMT 285; for the area B, the back pain relief belt RFT 363 or RGT
284 and for the area N, the neck cuff TNM 275).
When using these products together with the TENS/EMS device TEN 250, please
always follow the operating instructions of these additional products and, above
all, the respective safety instructions!
Avoid any contact with the adhesive electrodes during the therapy. Under certain
circumstances, touching the electrodes results in a short circuit involving an
excessive current density. This excessive current density might cause burns and
injuries!
Please remove the protective foil before applying the adhesive electrodes. The
adhesive strength of the electrodes depends on the condition of the skin, storage
and number of therapy sessions. If the adhesive electrodes do no longer stick
completely on the skin surface, they must be replaced by new adhesive
electrodes. The adhesive electrodes must lie completely flat against the skin in
order to avoid locally high current densities which might result in skin burns. After
the application has been completed, stick the adhesive electrodes back on the
protective foil and keep the adhesive electrodes in the polybag in such a manner
that they cannot dry out. Thus, the adhesion is ensured for longer.
Each person reacts differently to an electric nerve stimulation. If the therapy is
not successful, please seek medical advice.
The adhesive electrodes can be connected to and disconnected from the device by
means of a plug connection with an electric cable.
Avoid pulling the cables directly when removing the plug connections from the
adhesive electrodes in order to avoid damage to the cables. . Only handle the
plugs in order to connect or disconnect the adhesive electrodes!
Only connect the cables and the adhesive electrodes if the TENS/EMS device has
been switched off.
Before using the adhesive electrodes, the areas of the skin where the adhesive
electrodes will be put on must be thoroughly cleaned and dried. The areas of the
skin should be greaseless and clean.
Using the TENS/EMS device may result in skin irritations under certain
circumstances. If skin irritations, e.g. redness, blisters or itching, occur, the
TENS/EMS device should no longer be used! Do not use the adhesive electrodes
permanently on the same part of the body, as this can lead to skin irritations.
If you wish to reposition the adhesive electrodes of the TENS/EMS device during
the therapy, make sure that you switch off the device first.
The adhesive electrodes may only be connected to the TENS/EMS device TEN 250.
Please ensure that the device is switched off when putting on or removing the
adhesive electrodes.
3.8 Usage of the TENS/EMS device
SAFETY INSTRUCTIONS
GB
4. PJN157-14_GA-GB_HHD_TEN250_31.03.14
Montag, 31. Mrz 2014 12:10:40
9
4.0.1
4.0.2
4.0.3
4.0.4
4.0.5
4.0.6
4.0.7
4.0.8
4.1.1
4.1.2
4.1.3
4.1.4
4.1.5
The adhesive electrodes must not be applied in such a manner that the current
can directly flow through the brain, e.g. on both temples.
Do not apply the adhesive electrodes on the following parts of the body:
a. on and in the mouth, b. eyelids, c. front neck area, d. larynx,
e. throat area, f. carotid artery, g. heart region, h. genitalia (genital
organs: penis, testicles, ...), i. fingers, j. pacemakers.
Reversed positioning: Never position two poles of the same channel (one
electrode connected to the red positive pole and one electrode connected to the
black negative pole) on different sides of the body axis (i.e. one adhesive
electrode (+) on the right arm and one adhesive electrode (-) on the left arm).
Do not apply the adhesive electrodes directly on the heart region or do not
position the adhesive electrodes directly right next to the heart region in order to
prevent current flowing through the heart region.
The adhesive electrodes must not be applied on parts of the body with skin
inflammations or open and fresh wounds.
4.1 Areas where the adhesive electrodes must not
be used
For the positioning of the electrodes during an EMS therapy, the following
instructions must be observed: If you wish to activate the superficial muscles, you
should apply the adhesive electrodes in parallel to the direction of the muscle
fibres. In order to reach the deep muscle layers, we recommend applying the
adhesive electrodes transversely to the direction of the muscle fibres.
Please ensure that the painful part of the body is enclosed by the positions of the
electrodes during a TENS therapy. For an aching group of muscles, the electrodes
are applied in such a manner that the affected muscles are also enclosed by the
electrodes.
Do not pull the cable if you wish to remove the adhesive electrodes from the skin.
Lift the adhesive electrodes on the edges and remove them carefully.
The recommended distance between the electrodes should not be smaller than
approx. 5 cm and not longer than approx. 25 cm.
The adhesive electrodes must not be resized, e.g. by cutting off parts.
Do not use any adhesive electrodes of an electrode size smaller than 40 x 40 mm
(16 cm²); otherwise, too high a current density can flow and injuries may be
caused.
In order to position the adhesive electrodes correctly, use the information
provided on page 27 as well as the figures on page 28-29 for TENS therapies as
well as on page 30-33 for EMS therapies intended as application examples as
guidance.
Each person reacts differently to an electric nerve stimulation. The positioning of
the electrodes might thus deviate from the standard positions. If the therapies
are not successful, please consult your doctor as to which positioning techniques
are most suitable for you.
4.0 Areas where the adhesive electrodes may be applied
SAFETY INSTRUCTIONS GB
4. PJN157-14_GA-GB_HHD_TEN250_31.03.14
Montag, 31. Mrz 2014 12:10:40

4.2.1
4.2.2
4.2.3
4.2.4
4.3.1
4.3.2
4.3.3
4.3.4
4.3.5
4.3.6
10
Do not immerse the TENS/EMS device in water or other liquids.
A suitable, commercially available disinfectant may be used in order to disinfect
the device. Afterwards, let the TENS/EMS device dry completely.
For hygienic reasons, every user should use his/her own adhesive electrodes.
Clean the surfaces of the TENS/EMS device carefully with a soft, damp cloth.
Ensure that no moisture enters the device. If the device or the electrodes are
very dirty, a mild detergent can be added. The TENS/EMS device must be
switched off during cleaning. To this end, remove the batteries from the device
before cleaning the device. Afterwards, let the TENS/EMS device dry completely.
Do not use any chemical detergents or abrasive cleaners to clean the TENS/EMS
device or the adhesive electrodes.
During cleaning and caring, the TENS/EMS device must be switched off and must
not be connected to the adhesive electrodes.
The TENS/EMS device must not be exposed to direct sunlight. Do not place the
device on hot surfaces.
4.3 Cleaning and care of the TENS/EMS device
If the TENS/EMS device TEN 250 is subject to trade or commercial usage, a safety
inspection must be performed every 2 years in accordance with § 6 MPBetreibV
[German Medical Devices Operator Ordinance]. The safety inspections must be
carried out by a company specialised in medical devices. Further information may
be obtained from our service centre (see page 44).
If the device is not operated for a longer period of time, remove the batteries
from the device.
Do not dismantle or repair the TENS/EMS device; otherwise, technical or physical
accidents may occur. Warning! Mortal danger!
The TENS/EMS device is maintenance-free.
4.2 Storage / maintenance of the TENS/EMS device
SAFETY INSTRUCTIONS
GB
4. PJN157-14_GA-GB_HHD_TEN250_31.03.14
Montag, 31. Mrz 2014 12:10:40
11
1 instruction manual
2 connecting cables
4 x AAA batteries
8 x adhesive electrodes 40x40
mm
1 EMS/TENS device TEN 250
5.0 Scope of delivery / contents
SCOPE OF DELIVERY GB
Black plug
Red plug
Red plug Black plug
4. PJN157-14_GA-GB_HHD_TEN250_31.03.14
Montag, 31. Mrz 2014 12:10:41

6.1
7.1
7.2
Pb, Hg, Cd
7.3
7.4
7.5
7.6
7.7
7.8
7.9
12
Disposal of the batteries: Used batteries must not be disposed of as
household waste! Dispose of the batteries via your specialist dealer
for electronic equipment or your public collection point for recyclable
materials. As a consumer, you are legally obliged to return used
batteries.
These chemical symbols indicate a battery containing harmful sub-
stances: Pb = contains lead, Hg = contains mercury, Cd = contains cadmium.
Batteries may be fatal if swallowed. Therefore, store batteries and products
out of the reach of infants. If a battery was swallowed, seek medical advice
immediately.
If a battery has leaked, avoid any contact with the skin, the eyes and the mucous
membranes. Immediately rinse the affected parts with plenty of clear water and
instantly consult a doctor or seek medical advice.
Batteries must not be charged (except for rechargeable batteries), taken apart,
thrown into fire or short-circuited.
Protect the batteries from excessive heat. Remove the batteries from the device if
they are empty or if you do not use the product for a longer period of time. Thus,
you can avoid any damage which may be caused by leaking batteries.
Always replace all batteries. Do not use any different battery types or brands,
accumulators (rechargeable batteries) or batteries with different capacities.
Cover of the battery housing:
In order to open the cover lock, press on the
shaded arrow-shaped area of the cover and
push it outwards away from belt clip in order to
remove it. Remove the used batteries. Then,
insert four new alkaline batteries (size AAA).
When inserting the batteries, observe the
correct polarity (see marking / embossing in the
battery housing). Afterwards, re-insert the cover
of the battery compartment and push it towards
the belt clip until it has engaged.
Belt clip
Insert 4 batteries (type AAA) observing the correct polarity (+ (positive) and –
(negative) pole).
Battery types: For the TENS/EMS device TEN 250, alkaline batteries of the type
AAA are required. Do not use any rechargeable batteries!
7.0 Battery change and information concerning batteries
If the TENS/EMS device is to be recycled, observe the legal regulations
concerning disposal. Contact your municipality or a waste disposal
company for further information. Dispose of the TENS device in
accordance with the Waste of Electrical and Electronic Equipment
Directive 2002/96/EC (WEEE Directive).
6.0 Disposal of the TENS/EMS device
DISPOSAL / BATTERY CHANGE
GB
4. PJN157-14_GA-GB_HHD_TEN250_31.03.14
Montag, 31. Mrz 2014 12:10:41

1.
2.
.
5.
6.
7.
8.
9.
10.
11.
3.
4
13
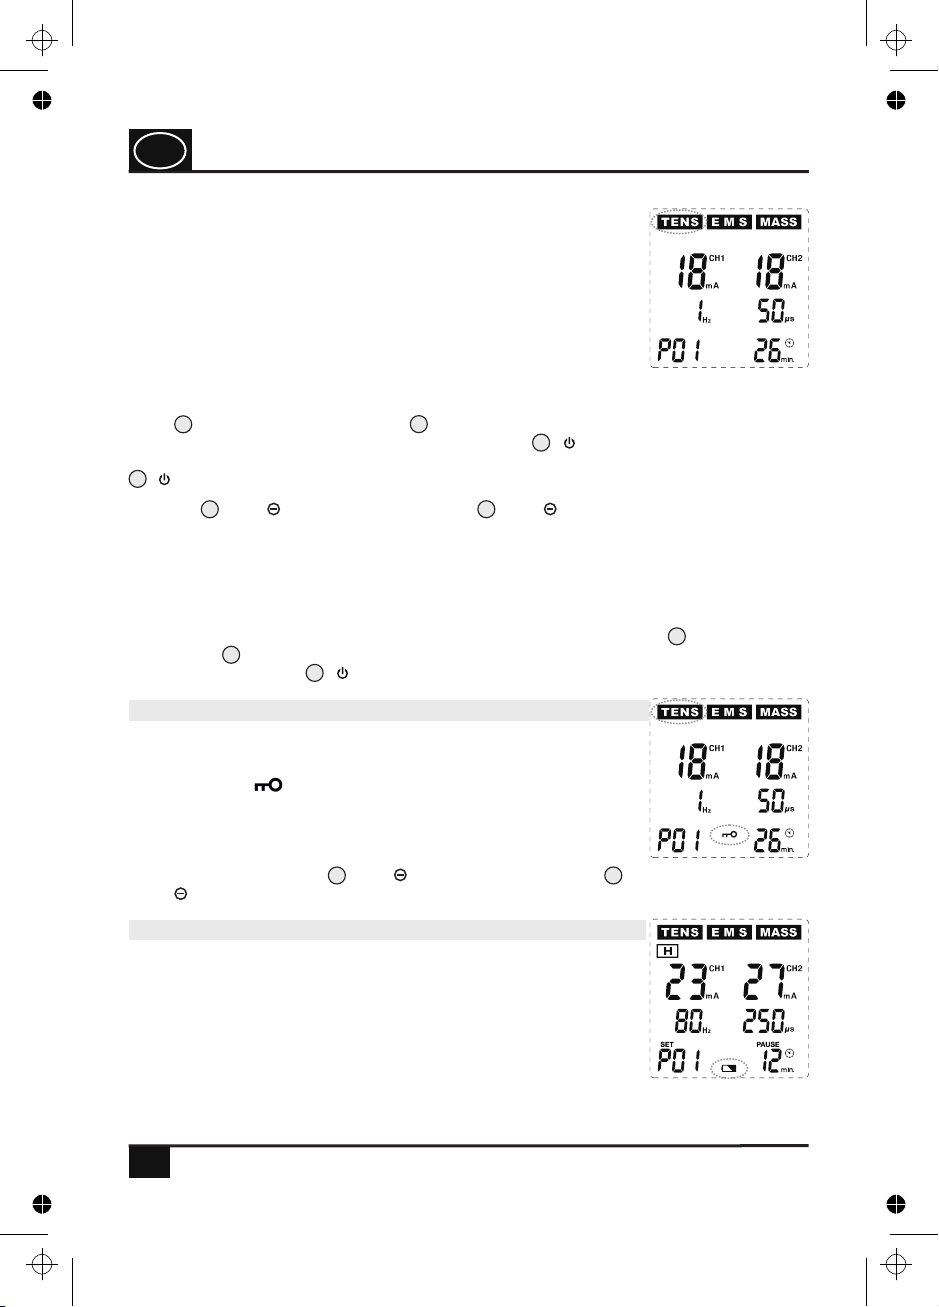
Information about the respective therapy mode: TENS / EMS / MASSAGE
Information about the part of the body to be treated:
H = Hand
F = Foot
N = Neck
E = Elbow joint
K = Knee joint
B = Back
Information about the output intensity in mA (Milliampere) for channel CH1 (left)
and for channel CH2 (right), e. g. 60 mA
Information about the pulse frequency in Hz, e.g. 100 Hz
SET: The device is in the setting mode.
Number of the application programme, e.g. programme P 01
Warning symbol for weak batteries: Change batteries
Information about the keylock
Application time in minutes, e.g. 30 minutes
Symbol “PAUSE” and clock symbol: Flashes if the pause mode has been activated
Information about the pulse duration in µs, e. g. 180 µs
8.0 LCD display
LCD DISPLAY GB
4. PJN157-14_GA-GB_HHD_TEN250_31.03.14
Montag, 31. Mrz 2014 12:10:41

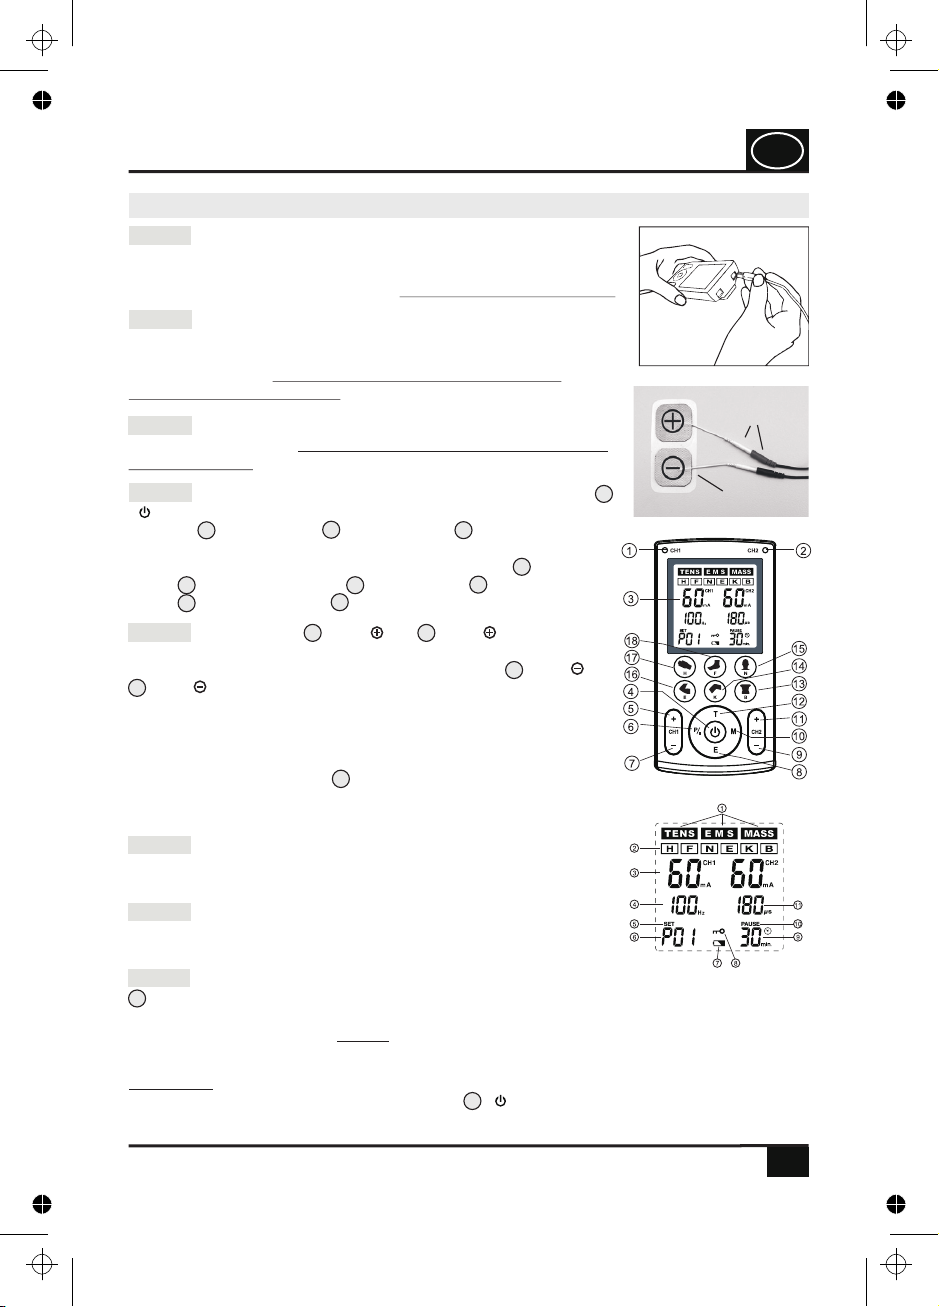
Key (CH2 ) for increasing the output intensity for channel CH2
.
and for
increasing the set values for Hz, µs and min. in the setting mode
Key (CH2 ) for reducing the output intensity for channel CH2 and for reducing
the set values for Hz, µs and min. in the setting mode.
Key (CH1 ) for reducing the output intensity for channel CH1 and for switching
between Hz, .µs and min. in the setting mode
Key (CH1 ) for increasing the output intensity for
channel CH1.
ON/OFF key ( ) for switching on/off the device and
for saving the settings.
1
2
3
4
5
6
7
8
9
10
11
12
15
17
14
13
16
18
14
1
2
Key (F) for selecting 3 pre-programmed programmes and 1 adjustable
programme for the foot.
Key (H) for selecting 3 pre-programmed programmes and 1 adjustable
programme for the hand.
Key (E) for selecting 3 pre-programmed programmes and 1 adjustable
programme for the elbow joint.
Key (N) for selecting 3 pre-programmed programmes and 1 adjustable
programme for the neck.
Key (K) for selecting 3 pre-programmed programmes and 1 adjustable
programme for the knee joint.
Key (B) for selecting 3 pre-programmed programmes and 1 adjustable
programme for the back.
Key (T) for selecting a TENS programme.
Key (M) for selecting a massage programme.
Key (E) for selecting an EMS programme.
Key (P/II): Press this key in the standby mode in
order to select a programme. In order to reach the
setting mode, you must press and hold the key for
several seconds. Press the key during the application
if you wish to pause.
LCD display indicates the current operating status.
The yellow indicator light for channel 2 (CH2)
lights up if the latter is activated.
The yellow indicator light for channel 1 (CH1)
lights up if the latter is activated.
9.0 Designation and functionality of the TENS/EMS device
OVERVIEW OF DEVICE FUNCTIONS
GB
4. PJN157-14_GA-GB_HHD_TEN250_31.03.14
Montag, 31. Mrz 2014 12:10:41
CAUTION: If malfunctions occur while using the device or if you wish to immediately
stop the application, press and hold the key ( ) (Fig. 3). Every time a key is pressed,
an acoustic signal (beep) is generated.
Fig. 4
4
Step 2: Insert one or two connecting cable(s) in the connector
socket(s) of the device (see Fig. 1). Afterwards, connect the
adhesive electrodes to the device by means of the plug connec-
tions (see Fig. 2). The device must be switched off when
establishing the connection!
15
Step 3: Remove the adhesive electrodes from the protective
foil and position them according to the application examples on
the pages 27-33. Warning! Observe the safety instructions!
Fig. 2 protection film
plug
connection
Fig. 1
Fig. 3
4
Step 7: If you wish to reposition the adhesive electrodes, make
sure that you switch off the device first and repeat the steps 3
to 5.
Step 6: The application time can only be adjusted for the U
programmes. For the P programmes, the application time is 30
minutes.
Step 1: Insert 4 batteries (type AAA) observing the polarity
marking of the batteries (see section 7.0 on page 12). When
inserting the batteries in the device, observe the correct polarity
(+(positive) and –(negative) pole). Do not switch on the device!
10.0 Quick overview for commissioning
QUICK OVERVIEW
12 810
13
14 15 16
18
17
4
Step 4: In order to switch on the device, press the start key
( ) (Fig. 3). Set the desired application programme by using
the keys (T) = TENS, (E) = EMS or (M) = MASSAGE.
Furthermore, you can select special programmes for the indica-
ted parts of the body by using the one-touch keys (B) =
back, (K) = knee joint, (N) = neck, (E) = elbow
joint, (H) = hand and (F) = foot.
511
7
9
3
Step 8: In order to switch off the device, press and hold the key
(Fig. 3) Remove the plug of the connecting cable from the device and the adhesive
electrodes. Then, remove the adhesive electrodes from the body and stick them back on
the protective foil (Fig. 2). NOTE: If none of the keys is pressed, the device switches off
automatically after three minutes provided that it is not in the operating state.
Step 5: Press the key (CH1 ) or (CH2 ) in order to
increase the output intensity of channel 1 (CH1) or channel
(CH2) and to start the application. Press the key (CH1 ) or
(CH2 ), in order to reduce the output intensity of channel 1
(CH1) or channel 2 (CH2). On the display of the device, the
selected output intensity as well as the remaining application
duration will be shown. Each application starts from the intensity
level 1 for each channel. You can read the current intensity
setting on the display (see , Fig. 4: Information about the
output intensity (here, e. g. 60 mA) in mA (milliampere) for
channel CH1 (left) und CH2 (right).
GB
4. PJN157-14_GA-GB_HHD_TEN250_31.03.14
Montag, 31. Mrz 2014 12:10:41
11.0 Application instructions
Fig. 5
12
8
10
6
6
6
Fig. 6
Fig. 7
16
11.0 Application instructions11.0 Application instructions11.0 Application instructions11.0 Application instructions
USAGE
11.1 Switching on the device
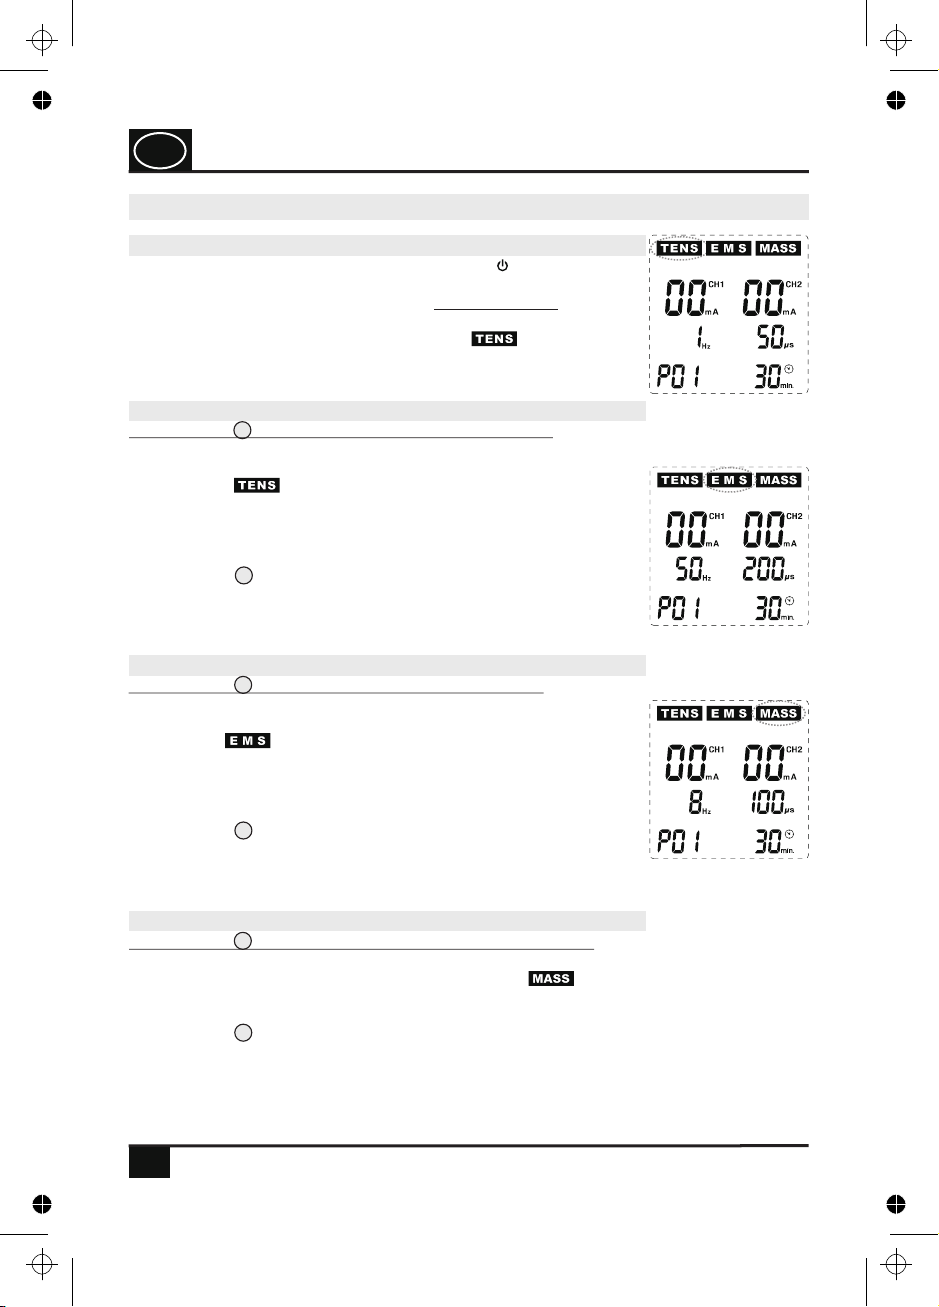
In order to switch on the device, press the key ( ). The blue
display backlighting switches on and the device is now run in the
basic mode. If you switch on the device for the first time, the
display information corresponds to Fig. 5: The device is now run in
the programme 1 (P01) of the TENS mode ( flashes). If you
have already used the device, the programme used last before the
device has been switched off is shown.
11.2 Programme setting TENS mode
Press the key (T) in order to select the TENS mode. The TENS
mode is activated and information, as shown in Fig. 5, appears on
the display: The device is now run in programme 1 (P01) of the
TENS mode ( flashes at the top on the left of the display).
In the TENS mode, there are a total of 12 programmes (7 pre-
programmed programmes P01 - P07 as well as 5 individual
programmes U1 - U5 whose parameters can be set by the users
themselves (see programme tables, page 22). In the TENS mode,
press the key (P/II) repeatedly in order to first call the
programmes P01 - P07 one after the other and then the
programmes U1 - U5. After programme U5, the programme order
starts from the beginning with P01, P02 etc.
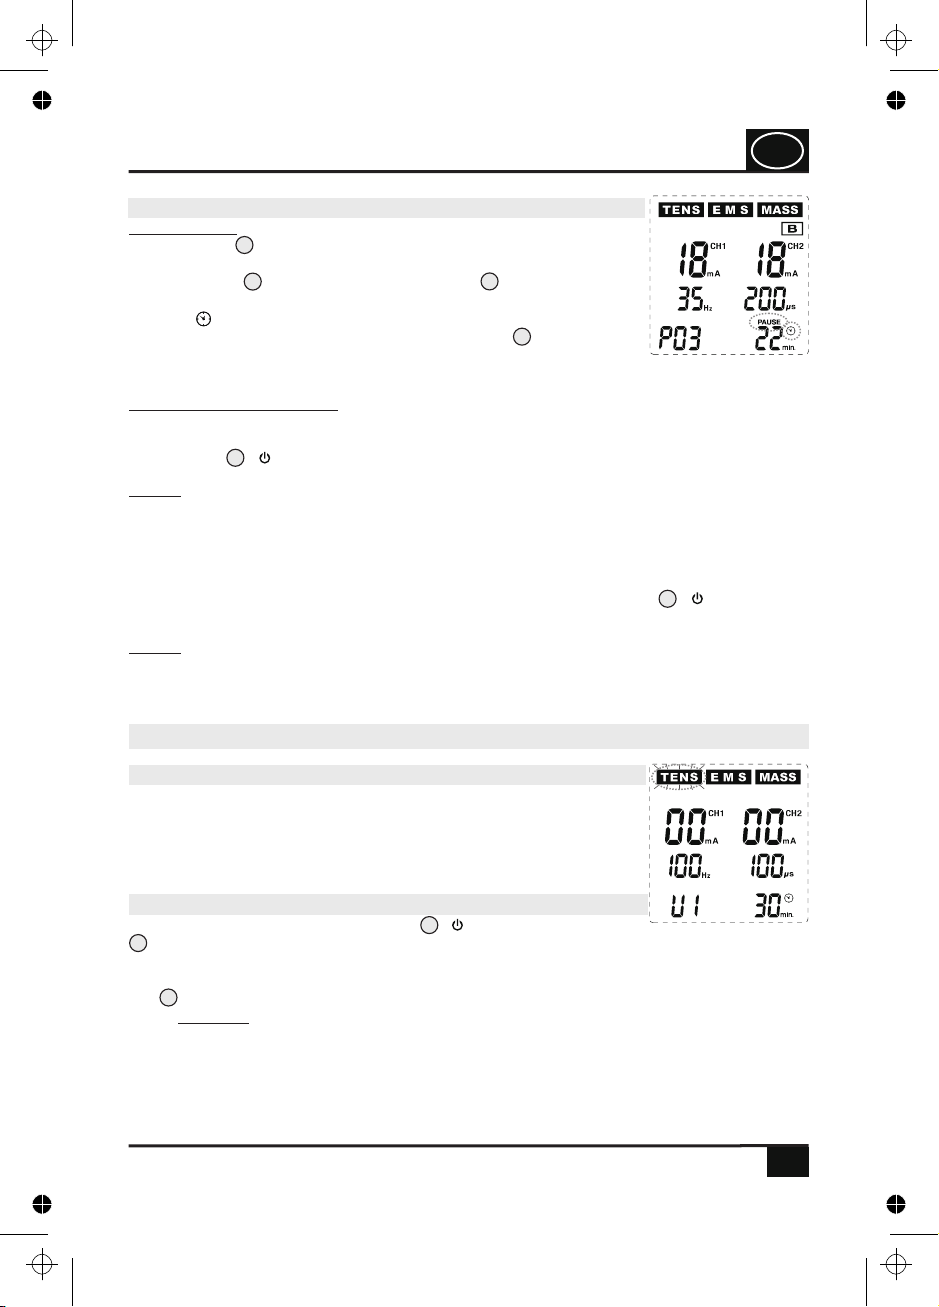
11.3 Programme setting EMS mode
Press the key (E) in order to select the EMS mode. The EMS
mode is activated and information, as shown in Fig. 6, appears on
the display: The device is now run in programme 1 (P01) of the
EMS mode ( flashes at the top in the middle of the display).
In the EMS mode, there are a total of 20 programmes (11 pre-
programmed programmes P01 - P11 as well as 9 individual
programmes U1 - U9 whose parameters can be set by the users
themselves (see programme tables, page 23). In the EMS mode,
press the key (P/II) repeatedly in order to first call the
programmes P01 - P11 one after the other and then the
programmes U1 - U9. After programme U9, the programme order
starts from the beginning with P01, P02 etc.
11.4 Programme setting MASSAGE mode
Press the key (M) in order to select the MASSAGE mode. The MASSAGE mode is
activated and information, as shown in Fig. 7, appears on the display: The device is now
run in programme 1 (P01) of the MASSAGE mode ( flashes at the top on the right
of the display). In the MASSAGE mode, there are 10 programmes P01 - P10 (see
programme table, page 24 - 25) which are all pre-programmed. In the MASSAGE mode,
press the key (P/II) repeatedly in order to first call the programmes P01 - P10.
After programme P10, the programme order starts from the beginning with P01, P02
etc.
GB
4. PJN157-14_GA-GB_HHD_TEN250_31.03.14
Montag, 31. Mrz 2014 12:10:42
11
17
15
17
14
13
16
18
5
11
5
1
2
Fig. 8
Fig. 9
Fig. 10
Fig. 11
Fig. 12
Fig. 13
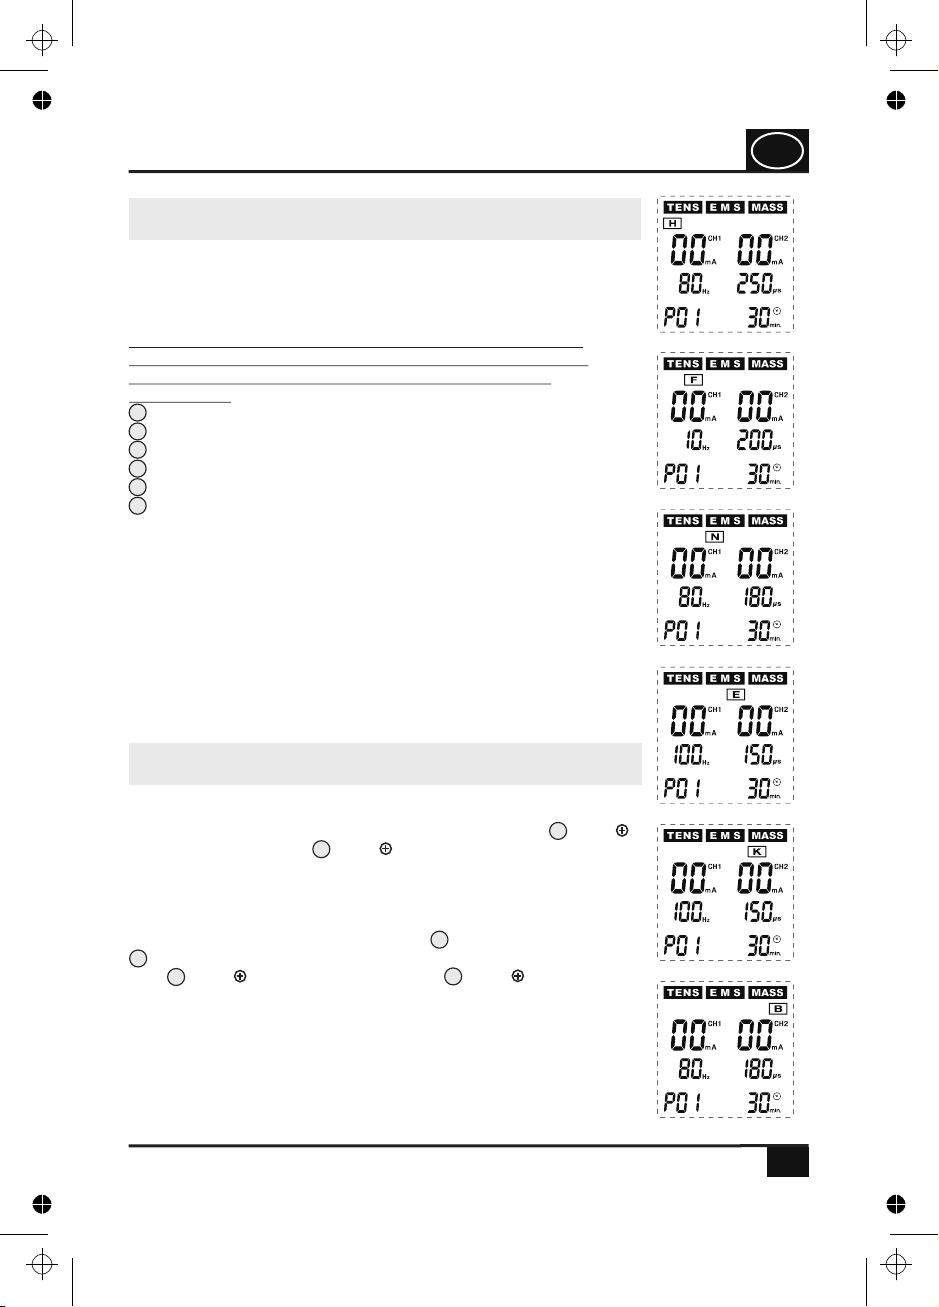
Each of these 6 areas (H) (F) (N) (E) (K) (B) has 3 pre-
programmed therapy programmes as well as one therapy
programme that can be set by the users themselves. By pressing
the respective one-touch key, the therapy programme P01 is
switched on first. By pressing the key again, the next therapy
programme is called. If the four therapy programmes are run
through, the programme order starts from the beginning (P01 >
P02 > P03 > U1 > P01 etc.).
11.5 Programme setting of the special pro-
grammes for six different parts of the body
In addition to the TENS, EMS and massage programmes, the
device is also equipped with 24 special programmes for six
different parts of the body. One-touch keys facilitate the
selection and settings of these special programmes (see also
page 26).
By pressing one of these one-touch keys (H) (F) (N) (E)
(K) (B) for selecting special programmes for different parts
of the body, you can directly select the following special
programmes:
(H): Special programmes for the hand (see Fig. 8)
(F): Special programmes for the foot (see Fig. 9)
(N): Special programmes for the neck (see Fig. 10)
(E): Special programmes for the elbow joint (see. Fig. 11)
(K): Special programmes for the knee joint (see Fig. 12)
(B): Special programmes for the back (see Fig. 13)
After one of these keys has been pressed, information with the
corresponding letter appears on the display (e. g. H if the key (H)
was pressed), as shown in Fig. 8.
USAGE
11.6 Starting the application / setting the
intensity
If you have selected a programme and wish to start with the
application, you must increase the output intensity for one or two
channels from 0 to the desired value by using the keys (CH1 )
for channel CH1 and/or (CH2 ) for channel CH2. If one or two
channels have been activated by this setting of a certain output
intensity (from 1 mA to a maximum of 90 mA), the pulse inten-
sity in mA for the respective channel or for the two channels is
shown on the display and the pulse output is, in addition to this,
confirmed by the yellow indicator lights for channel CH1 and/or
for channel CH2 lighting up. Every time you press one of the
keys (CH1 ) for channel CH1 and/or (CH2 ) for channel
CH2, the displayed value is increased by 1 mA (milliampere) whilst
an acoustic signal is generated. If you press and hold one of these
keys for several seconds, a quick continuous increase of the output
intensity by 10 mA is started, whereas each increase by 1 mA
(milliampere) is confirmed by an acoustic signal. If you release the
respective key, the output intensity remains set to the currently
reached value.
GB
4. PJN157-14_GA-GB_HHD_TEN250_31.03.14
Montag, 31. Mrz 2014 12:10:42
The keys (CH1 ) for channel CH1 and/or (CH2 ) for channel CH2 are used to
reduce the output intensity. Every time you press one of the keys, the displayed value is
reduced by 1 mA (milliampere) whilst an acoustic signal is generated. If you press and
hold one of these keys for several seconds, a quick continuous reduction of the output
intensity is started, whereas each reduction by 1 mA (milliampere) is confirmed by an
acoustic signal. You release the respective key, the output intensity remains set to the
currently reached value. If you set the output intensity to 0, the device switches off the
pulse output and returns to the basic mode. The yellow indicator lights for channel
CH1 and/or for channel CH2 go out. If you wish to switch off the device immediately,
press and hold the key ( ) for several seconds.
and returns to the basic mode. The output intensity is set to 0 and the yellow indicator
lights for channel 1 (CH1) and/or for channel 2 (CH2) go out. However, you can
immediately stop the application by pressing the key ( ). Then, the device returns to
the basic mode. If you wish to switch off the device completely, you must press the key
( ) for several seconds.
79
1
2
4
12
79
Fig. 14
18
Fig. 15
Fig. 16
11.8 Warning symbol for weak batteries
If the battery symbol starts to flash on the display (see Fig. 16),
the batteries are already weak. However, the device can still be
operated for a certain time. In this case, keep new batteries ready
in order to replace the used batteries with the new ones if required.
Please follow the instructions in the instruction manual on page 12
when changing the batteries.
If in any programme the intensity setting was increased from 0 to
any value on one or two channels (CH1) or (CH2), the device
switches into the operating mode and starts the application. The
intensity of the stimulation can be adjusted to the individual needs
of the user, with the highest intensity being 90 mA (milliampere).
The information about the selected output intensity in mA (milliam-
pere) and the remaining time in minutes is shown on the display
(see Fig. 14). The pre-programmed programmes (P01 etc.) have a
non-adjustable application time of 30 minutes per application.
After this time (the time information shown on the display is then 0
min.) has run out, the device automatically stops the pulse output
USAGE
4
4
11.7 Automatic keylock
If none of the keys is pressed in the operating mode, the device
switches off the blue display lighting after approx. 20 seconds and
activates the keylock that is shown on the display by means of the
flashing symbol (see Fig. 15). This keylock prevents the set
output intensity from being increased further. Thus, it can be
avoided that the intensity is increased unintentionally by pressing
the key in an uncontrolled manner or other undesired changes occur
whilst the device is operated. In order to deactivate the keylock,
press one of the two keys (CH1 ) for channel CH1 and/or
(CH2 ) for channel CH2.
GB
4. PJN157-14_GA-GB_HHD_TEN250_31.03.14
Montag, 31. Mrz 2014 12:10:42
NOTE: If none of the keys is pressed in the basic mode and in the setting mode, the
device switches off the blue display lighting after approx. 20 seconds. Approx. 1 minute
after the last key has been pressed, a short acoustic signal is generated; after approx. 2
minutes, two short acoustic signals are generated and, after approx. 3 minutes, three
short acoustic signals are generated. Afterwards, the device switches off automatically. If
desired or in an emergency situation, however, you can always switch off the device in
the operating, pause or setting mode at any time by pressing the key ( ) for several
seconds.
Switching off the device:
If the programme time has run out in the operating mode, the device stops the pulse
output after generating an acoustic signal and switches into the basic mode. Press and
hold the key ( ) for several seconds in order to switch off the device completely.
19
12
Fig. 17
Fig. 18
4
4
6
6
4
6
6
For the special programmes for 6 different parts of the body, press the
corresponding one-touch key (e. g. H for hand) in order to call the respective adjustable
user programme. On the left at the bottom of the display, the programme P01
12.1 Adjustable user programmes
The device is equipped with 5 adjustable user programmes in the
TENS mode and 9 adjustable user programmes in the EMS mode.
Each of the 6 special programmes for 6 different parts of the body
has one adjustable user programme. All these programmes start
with U (U1, U2 etc.)
12.0 Application instructions and mode settings
NOTE: For safety reasons, the pulse output is reset automatically to 0 if a pulse intensity
of 10 mA or more has been set and if there is an open circuit. This is for instance the
case if the cables of the electrodes are not connected or damaged. Then, the device
returns to the basic mode.
USAGE
12.2 Calling the adjustable programmes
Switch on the device by press the key ( ) and press the key
(P/II) in the TENS mode or EMS mode repeatedly in order
to call the adjustable user programmes until the first of the adjustable user programmes
with the designation U1 appears on the left at the bottom of the display. By pressing the
key (P/II) again, all existing programmes beginning with U are called one after the
other. Example: If, for example, a user programme (e. g. U1) was set in the TENS
programme, information according to Fig. P is shown on the display.
11.9 Pause mode and switching off the device
Pause mode: If you wish to pause during the application, you can
press the key (P/II) in the operating mode in order to access
the pause mode. The pulse output is interrupted and the yellow
indicator lights for channel 1 (CH1) and/or for channel 2
(CH2) go out. On the display, the PAUSE symbol above and the
symbol ( ) next to the minute information (see Fig. 17) will flash.
In order to continue the application, press the key (P/II) again
and the device will return to the operating mode and resume the
application.
GB
4. PJN157-14_GA-GB_HHD_TEN250_31.03.14
Montag, 31. Mrz 2014 12:10:42
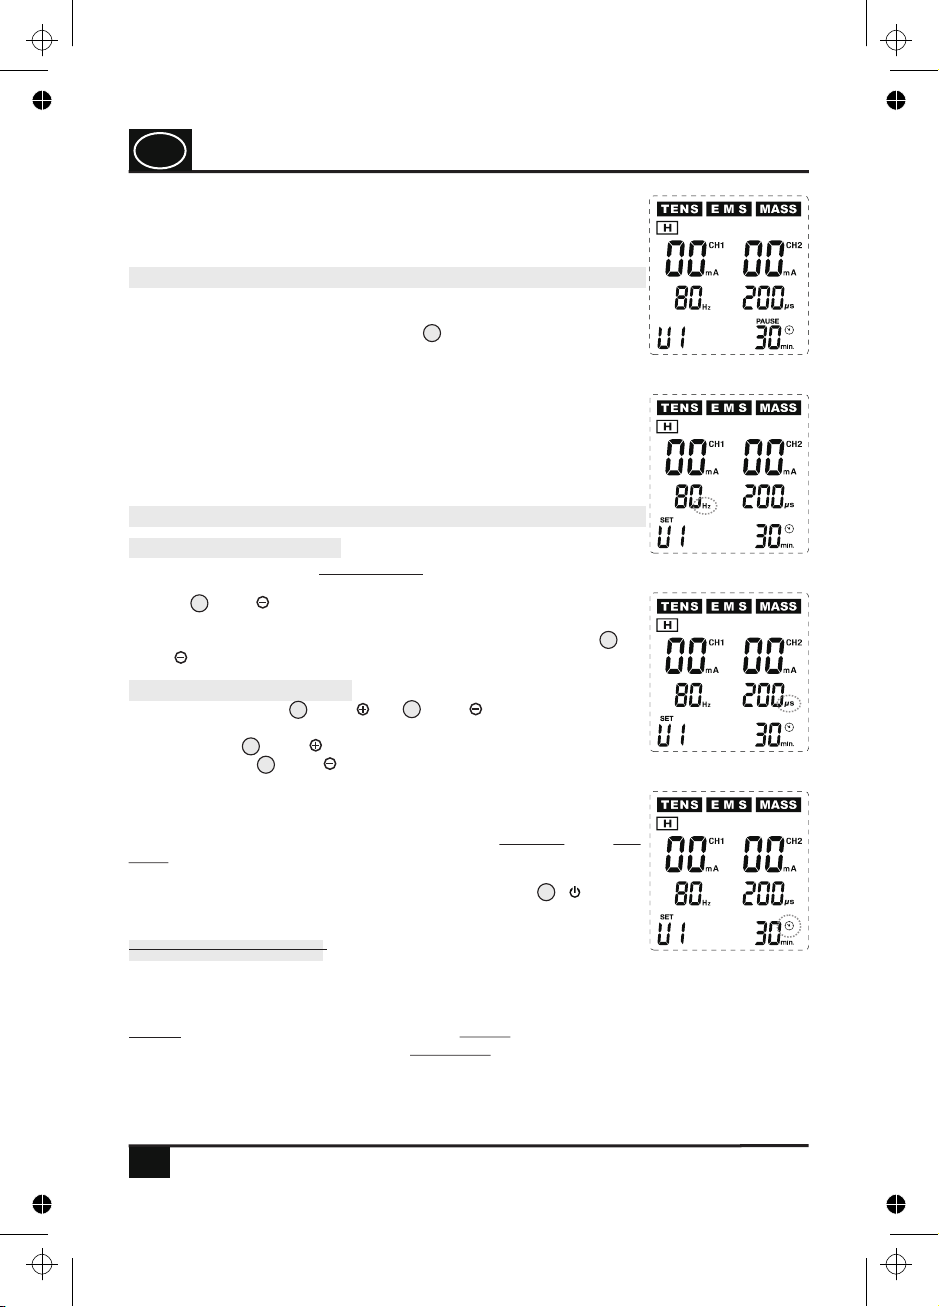
Selecting the parameters:
In the setting mode, the flashing value can always be set. First of
all, this is the pulse frequency setting (Hz flashes). By pressing
the key (CH1 ), you will reach the pulse duration setting (µs
flashes) and, by pressing this key again, the application time
setting in min. (clock symbol flashes). By pressing the key
(CH1 ) again, you return to the pulse frequency etc.
Fig. 19
Fig. 20
Fig. 21
Fig. 22
6
9
9
11
11
20
NOTE: In the programmes TENS U3 - U5, ranges instead of individual values can be set
depending on the programme. Here, two values (lower value and upper value) can be set
for pulse frequency in Hz (U4 and U5) and for pulse duration in µs (U3 - U5)!
Adjustable parameters:
Pulse frequency: 2 - 150 Hz (hertz)
Pulse duration: 50 - 350 µs (microseconds)
Application time: 5 - 90 min. (minutes)
is then shown. Now, press the corresponding one-touch key
repeatedly until the programme U1 appears on the left at the
bottom of the display (see Fig. 19).
USAGE
7
7
12.4 Selecting and setting the parameters
12.3 Setting mode of the U programmes
If you have selected one of the adjustable user programmes
according to section 12.1 (e. g. U1), you can reach the setting
mode by pressing and holding the key (P/II) for several
seconds until the display SET appears on the display via the
number of the selected user programme (e.g. U1), accompanied by
an acoustic signal. At the same time, Hz to the right of the display
of the pulse frequency starts flashing, which signals that this
value can be set now. You are now in the setting mode and can set
the values according to your needs one after the other for pulse
frequency (Hz) (see Fig. 20), pulse duration (µs) (see Fig. 21)
and application time (min.) (see Fig. 22).
4
Setting the parameters:
By pressing the keys (CH2 ) or (CH2 ), you can now
change the set values of the respectively selected area in single
steps. The key (CH2 ) is used for increasing the values,
whereas the key (CH2 ) is used for reducing the values. Each
keystroke is accompanied by an acoustic signal. If you press and
hold these keys for several seconds, a quick continuous increase or
reduction of the respective set values is started, whereas
confirmed by an acoustic signal. If you release the
respective key, the currently reached value remains set. If you have
set the values according to your needs, press the key ( ) in
order to save these values.
each
increase or reduction by one unit (Hz and min.: one step / µs: five
steps) is
GB
4. PJN157-14_GA-GB_HHD_TEN250_31.03.14
Montag, 31. Mrz 2014 12:10:42
Table of contents
Other Dittmann Fitness Equipment manuals


Popular Fitness Equipment manuals by other brands


G-FITNESS
G-FITNESS AIR ROWER user manual

CAPITAL SPORTS
CAPITAL SPORTS Dominate Edition 10028796 manual

Martin System
Martin System TT4FK user guide

CIRCLE FITNESS
CIRCLE FITNESS E7 owner's manual

G-FITNESS
G-FITNESS TZ-6017 user manual

Accelerated Care Plus
Accelerated Care Plus OMNISTIM FX2 CYCLE/WALK user manual


