Ditto Singer User manual
INSTRUCTION MANUAL
Singer®Ditto™
Let’s get started!

2
IMPORTANT SAFETY
INSTRUCTIONS
General Safety Instructions
•Read and understand the instructions before you use
the product.
•Keep the instructions at a suitable place close to the
product. Make sure to hand them over if the product
is given to a third party.
•This appliance is intended for use by adults. The
appliance can be used with adult supervision by (i)
children aged from 8 to 12 years and (ii) persons with
reduced physical, sensory or mental capabilities or
lack of experience and knowledge if they have been
given instruction concerning the use of the appliance
in a safe way and understand the hazards involved.
Cleaning and user maintenance shall not be made
by children without supervision. It is not allowed for
anyone to play with the machine. Children up to 8
years are not allowed to use the machine.
WARNING –TO REDUCE THE
RISK OF BURNS, FIRE, ELECTRIC
SHOCK, OR INJURY TO PERSON:
Safety Instructions for Assembly
•Assembly requires technical knowledge. Speak to a
person with the necessary knowledge if:
•you are uncertain if the selected installation location is
suitable.
•you do not understand all parts of the assembly
instructions.
•you do not have the necessary technical knowledge.
•If you are uncertain about the assembly and/or the
disassembly, do not assemble or dissemble the
product alone. The product is large and if the product
falls it can cause serious personal injury and/or
damage.
•Do not install the product if any parts are missing or
damaged. Contact customer service.
•To prevent injury, this product must be securely
attached to the floor and ceiling in accordance with
the assembly instructions.
•Keep children and pets at a suitable distance from the
work area during installation and/or when adjustments
are made.
•Do not attempt to change or modify the product
without permission from the manufacturer.
•Do not climb on the product.
•Do not hang any objects from the product.
Safety Instructions for Operation
•Use this product only for its intended use as described
in this manual. Use only attachments recommended
by the manufacturer as contained in this manual.
•Never operate this product if it has a damaged cord
or plug, if it is not working properly, if it has been
dropped or damaged, or dropped into water. Return
the product to the nearest authorized dealer or
service center for examination, repair, electrical or
mechanical adjustment.
•Never operate the product with any air openings
blocked. Keep air openings of the product free from
the accumulation of lint, dust, and loose cloth.
•Do not use outdoors.
•Do not use the product if it is wet.
•Do not look straight at the projector lens during
operation. The intense light beam may damage your
eyes.
•Do not block the projection lens or the air vent on the
projector with any objects when the product is under
operation as this could cause the objects to become
heated and deformed or even cause a fire.
•Always stay on the floor when you take a picture of
the cutting mat during calibration. There is a risk of
falling if you stand on a chair, a table or similar. Allow
enough room to stand back away from table or take
the photo from a high angle.
Electrical Safety
•Do not expose products to wet conditions. Water
entering a product will increase the risk of electric
shock.
•Do not abuse the cord. Never use the cord for
carrying, pulling or unplugging the product. Keep
cord away from heat, sharp edges or moving parts.
Damaged or entangled cords increase the risk of
electric shock.
•Never leave the product unattended when plugged
in. Always unplug this product from the electric
outlet immediately after use and before cleaning or
making any servicing adjustments mentioned in the
instruction manual.
•Always secure the cord in cord management hook
behind the bubble level.
Safety Instructions for Maintenance
•Never drop or insert any object into any opening.
•Do not unplug by pulling on cord. To unplug, grasp
the plug, not the cord.
•The projector becomes hot during operation. Let the
product become cool before maintenance.
•Do not attempt to refocus the projector. The system
does not have a focus button and it is optimally
focused for the projection distance as defined in the
setup.
•Replace damaged, worn or broken parts. Always use
original spare parts from the manufacturer. Other
spare parts can cause damage to the product and
increase the risk of accidents.

TABLE OF CONTENTS
IMPORTANT SAFETY INSTRUCTIONS................2
General Safety Instructions.................................... 2
Safety Instructions for Assembly ........................... 2
Safety Instructions for Operation........................... 2
Electrical Safety ..................................................... 2
Safety Instructions for Maintenance ...................... 2
Safety Definitions................................................... 3
Product overview ............................................... 4
Introduction ........................................................5
Document Description ......................................... 5
Tutorials ................................................................. 5
Product Description............................................... 5
Intended Use ......................................................... 5
Terminology........................................................... 5
Before you Assemble the Product......................... 5
Download the Ditto App ....................................... 5
To Prepare the Work Area .................................... 5
To Assemble the Beam.......................................... 6
To Attach the Projector.......................................... 7
To Assemble the Cutting Mat................................ 7
To Connect the Product......................................... 8
To Adjust the Projection ........................................ 8
To Attach the Cords............................................... 8
Operation ...........................................................8
Before Operation................................................... 8
To Connect to Ditto App ....................................... 8
Ditto App – Home Screen Overview ..................... 9
Ditto App – Start Menu Overview ......................... 9
Ditto App – Workspace Overview ......................... 10
To Connect the Ditto System ............................... 11
Home screen ......................................................... 11
Workspace............................................................. 12
Reconnect Wi-Fi Connection................................. 12
To Calibrate the Ditto System ............................... 12
To Select a Pattern Piece....................................... 13
To Remove a Pattern Piece or
Pattern Pieces from the Workspace ...................... 13
To Project the Pattern ............................................ 13
To Splice a Pattern Piece ....................................... 14
To Mirror a Pattern................................................. 15
To Convert a Cut-on-fold Pattern Piece ................ 15
Disassembly .......................................................15
Maintenance .......................................................16
To Clean the Product............................................. 16
To Examine the Product for Damage .................... 16
To Store the Product.............................................. 16
Troubleshooting and FAQ................................... 17
Troubleshooting..................................................... 17
Frequently Asked Questions ................................. 19
Certification requirements.................................. 20
Federal Communication Commission
Interference Statement.......................................... 20
Intellectual Property .............................................. 21
Patents and Patent Applications ........................... 21
Warranty ................................................................ 21
3
SAVE THESE INSTRUCTIONS
Safety Definitions
Warnings, cautions and notes are used to point out
especially important parts of the manual.
Warning! If you do not follow these instructions,
there is a risk of death or injury.
Caution! If you do not follow these instructions,
there is a risk of damage to the product, other
materials or the adjacent area.
Note! Information that is necessary for a given
situation.

4
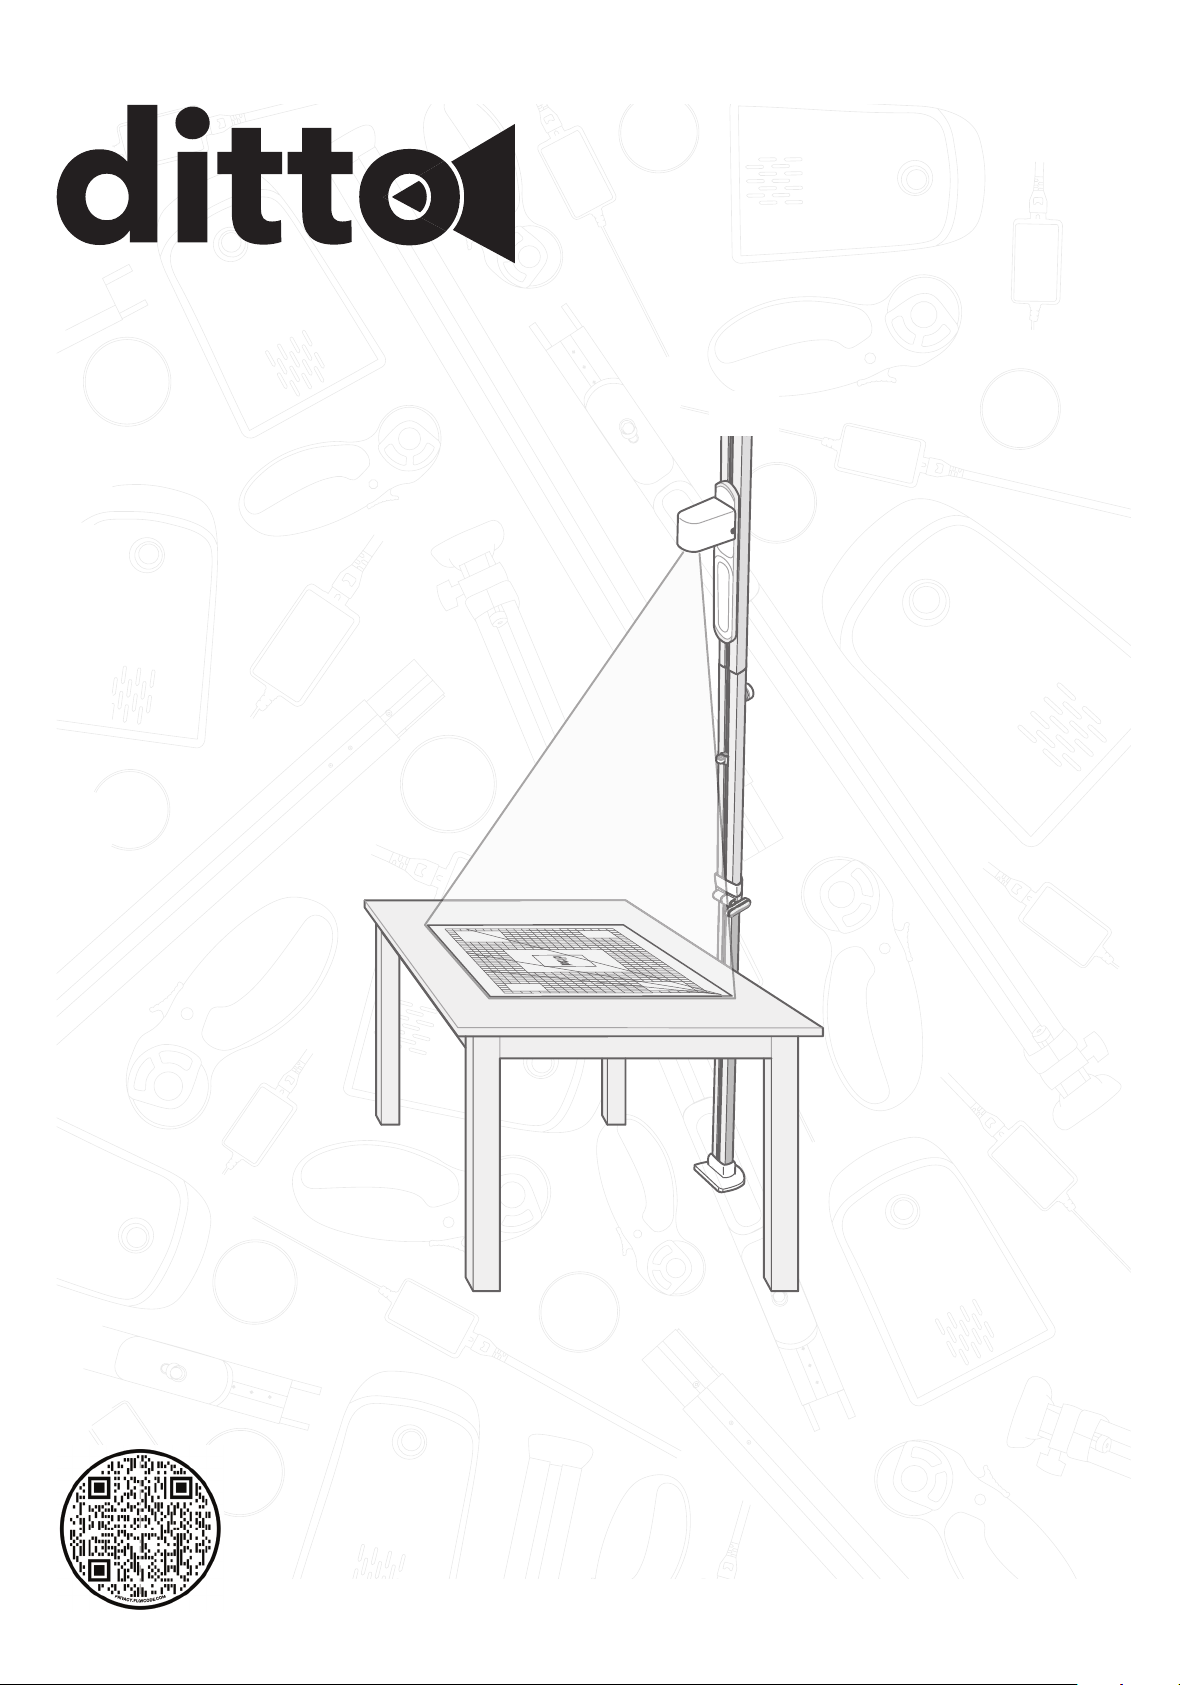
PRODUCT OVERVIEW
15
14
17
1
13
2
3
7
911
4
5
6
8
16
10
12
1. Foot pad
2. Base knob
3. Lower beam
4. Fabric weights (4)
5. Cord covers
6. Power cord and
adapter
7. Projector
8. Rotary cutter
9. Bubble level
10. Cord management
hook
11. Target stickers
12. Telescoping section of
the beam
13. Lock knob
14. Projector carrier
15. Upper beam
16. Ceiling pad
17. Cutting mat

5
Term Meaning
Splice target Use the target stickers on the splice
target projections when you splice a
pattern piece. When you move your
fabric to cut the next section, use the
target stickers and target projections
to keep the fabric pieces lined up
properly, frame by frame.
Workspace The area in the Ditto app where
the pattern pieces are arranged for
projecting onto the fabric.
SET UP
Before you Assemble the Product
1. Create an account at the Ditto web page on your
computer. www.dittopatterns.com/signup
2. When registered and signed in on your computer,
you can purchase and manage your subscription and
patterns on the website.
Note! A computer is required for these tasks. Do not
use a tablet or phone.
Download the Ditto App
1. Download the Ditto app on your mobile device.
Note! A mobile device is required for this task. Do
not use a computer.
2. Register in the Ditto app.
3. Follow the instructions that are given in the Ditto
app.
To Prepare the Work Area
Make sure that your work area meets these requirements:
•Flat work area with a minimum width of 37 in. x 25 in.
(94 cm – 63cm)
•Flat ceiling with a minimum height of 7.5 ft. – 10 ft.
(228 cm – 305 cm)
•Best possible Wi-Fi signal
•Power outlet within 10 ft. ( 3 m)
•Mobile device within 30 ft. (9 m) of the work area
Tip: Preferably use a tablet rather than a phone
when using the Ditto system. The larger screen
improves usability, making it easier to navigate the
system, and increases legibility.
INTRODUCTION
Document Description
This document contains instructions for setup, operation
and maintenance of the product. Contact customer
service for more information.
Tutorials
Video tutorial on how to setup your Ditto system, can
also be found on the web at
www.dittopatterns.com/tutorials
Product Description
This product is a beam mounted pattern projector. The
product is wirelessly connected to your mobile device
using the Ditto app and will project the pattern of your
choice.
Intended Use
Optimal use and maintenance are described in these
instructions. This product is not intended for industrial
use.
Additional assistance, by region, may be found on the
web at www.DittoPatterns.com or in the Ditto app under
“Customer Service”.
Terminology
Term Meaning
Beam The pole, that fits between floor
and ceiling, that the Ditto projector
attaches to.
Calibration Optimizes your projector to produce a
precise projection of the pattern piece
onto the work area.
Mirroring This function is the same as flipping
the pattern piece. Mirror a pattern
piece instead of cutting-on-fold. Use
the Mirror vertical or mirror horizontal
buttons in the Ditto app to flip a
pattern piece.
Projector A projector is an optical device that
displays an image of the pattern
pieces on your workspace onto a
surface, such as the cutting mat or a
piece of fabric. The projector enlarges
the pattern pieces to a precise pattern
in accurate size.
Splicing When a pattern piece is too large
for the workspace, it needs to be
sectioned into two or more separate
projections.

6
To Assemble the Beam
1. Press and hold the clips on the sides of the bubble
level.
2. Slide the bubble level into the tracks
of the lower beam with the bubble
facing the joint to the upper beam.
3. Slide the bubble level approximately 10 in. (25 cm)
down the lower beam.
4. Put the lower beam and the upper beam on the floor
or on a table.
5. Slide the lower beam and the upper beam together
(A).
6. Push and turn the lock knob (B) clockwise to lock the
beams together.
7. Loosen the base knob (C) of the beam to
allow the spring loaded foot to extend.
A
B
C
8. Lean the beam against a wall. Put the foot pad on
the floor approximately 1 ft. (30 cm) from the wall.
1 ft.
Note! Make sure that the height of the ceiling where
you assemble the beam is the same as the height of
the ceiling of the work area.
9. While standing on the foot pad, extend the
telescoping piece and raise the beam until it touches
the corner where the wall meets the ceiling. The
telescoping base will extend as you raise the beam.
10. Tighten the base knob when the upper beam is
touching the corner.
11. Now that the beam is set to the correct height, move
the beam to the work area.
Caution! Make sure that the beam is positioned
in an area where it can not be easily be bumped into
or hit while in operation mode.
12. With the beam at an angle, position the foot of
the beam about 1 in. (2.5 cm) from the workspace,
ensuring the flat side of the beam is facing the work
area.
13. Grip the beam and press it down towards
the floor to depress the spring loaded foot.

7
1 in.
Note! Face the flat side of the beam towards the
work area.
14. Position the beam vertically between the floor and
the ceiling and release the beam.
15. Adjust the beam by pressing down, repositioning
and releasing until the bubble in the bubble level is
centered.
Warning! After assembly, ensure that beam
is secured to both floor and ceiling. Carefully pull
the beam by hand to make sure that the beam still
stands steady between the floor and the ceiling. If
not secure in place, there is a risk of the beam falling
over and injuring people or causing damage to
furniture or floors, etc.
To Attach the Projector
1. Slide the projector carrier to eye level.
2. Attach the projector to the projector carrier with the
lens facing the ceiling.
3. Turn the projector 180 degrees counterclockwise
until it clicks into place, facing downward.
Click!
To Assemble the Cutting Mat
1. Unfold the cutting mat.
2. Put the cutting mat on the work area with the Ditto
logo facing away from the beam.
Caution! The cutting mat must lay completely
flat and fully on the work surface. Draping the
mat off the edge of a surface will result in poor or
incomplete calibration causing inaccurate pattern
piece projection.

8
To Connect the Product
1. Connect the end of the power cord to the projector.
2. Connect the power cord for the projector in a
grounded power outlet.
Caution! To disconnect the product from the
power outlet, pull the plug, not the power cord.
To Adjust the Projection
When the product is connected to a power outlet, a red
rectangle is projected onto the work area.
Caution! The red rectangle must be on top of the
white frame region of the cutting mat.
Have your room dimly lit so the projected frame is vivid
red.
•Slide the projector upwards to enlarge the size of the
red rectangle.
•Slide the projector downwards to
reduce the size of the red rectangle.
Note! Make sure that the bubble in the bubble level
remains centered while sliding the projector.
Note! It is of high importance that the projection is
fitted correctly on the cutting mat. It can take some
attempts for the result to be satisfactory.
To Attach the Cords
1. Put the power cord into the cord management hook
in the bubble level.
2. Put the power cord into the slot on the flat side of
the beam.
3. Put the cord covers over the cord, into
the slots and snap them into place.
OPERATION
Before Operation
Have your room dimly lit so the projected outlines will be
clearly visible.
To Connect to Ditto App
1. Log in to the Ditto app.
Note! You will remain logged in until you actively sign
out.
9
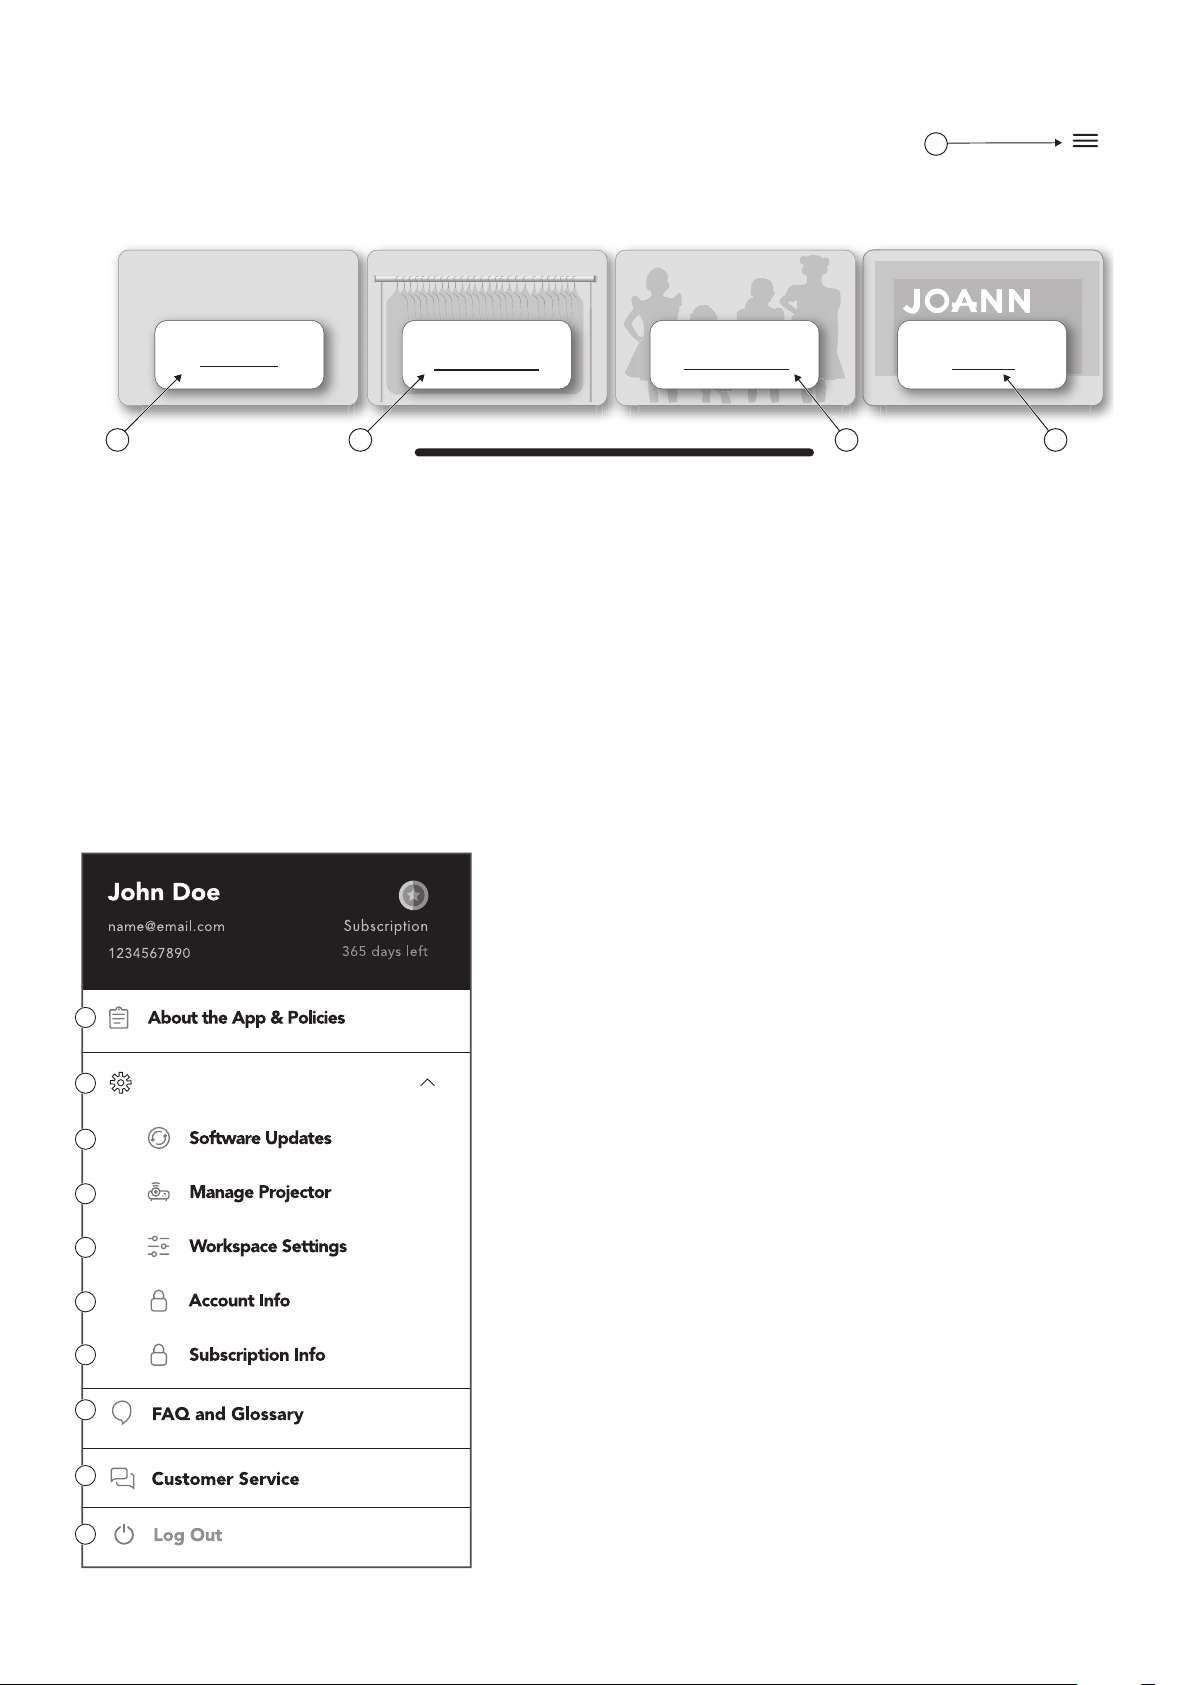
1. Start menu button
2. View Ditto tutorials
joann.com
Shop Fabric & Supplies
Hi there
Hi there
,
,
What would you like to do today?
Beam Setup &
Calibration Browse My Library dittopatterns.com
Pattern Library(5) More Patterns Available
1
2 3 4 5
1. Information about the Ditto app, privacy policies and user
terms.
2. Drop-down menu to access the Ditto system settings.
3. Check for and download the latest available Ditto system
updates.
4. Pair the Ditto app to the projector.
5. Settings options in the workspace.
6. Information regarding your current user account.
7. Get information or edit your subscription.
8. Answers to frequently asked questions, glossary and tips for
optimal use.
9. Contact information and customer service.
10. Sign out the logged-in user from the Ditto app.
Ditto App – Start Menu Overview
?
Settings
1
2
3
4
5
6
7
8
9
10
Ditto App – Home Screen Overview
3. Pattern library (number of
patterns)
4. Link to
DittoPatterns.com
to download more patterns
5. Link to www.Joann.com
to shop fabric and supplies
Note! The look of the Ditto app might vary depending on what mobile device and software release you are
using.
10
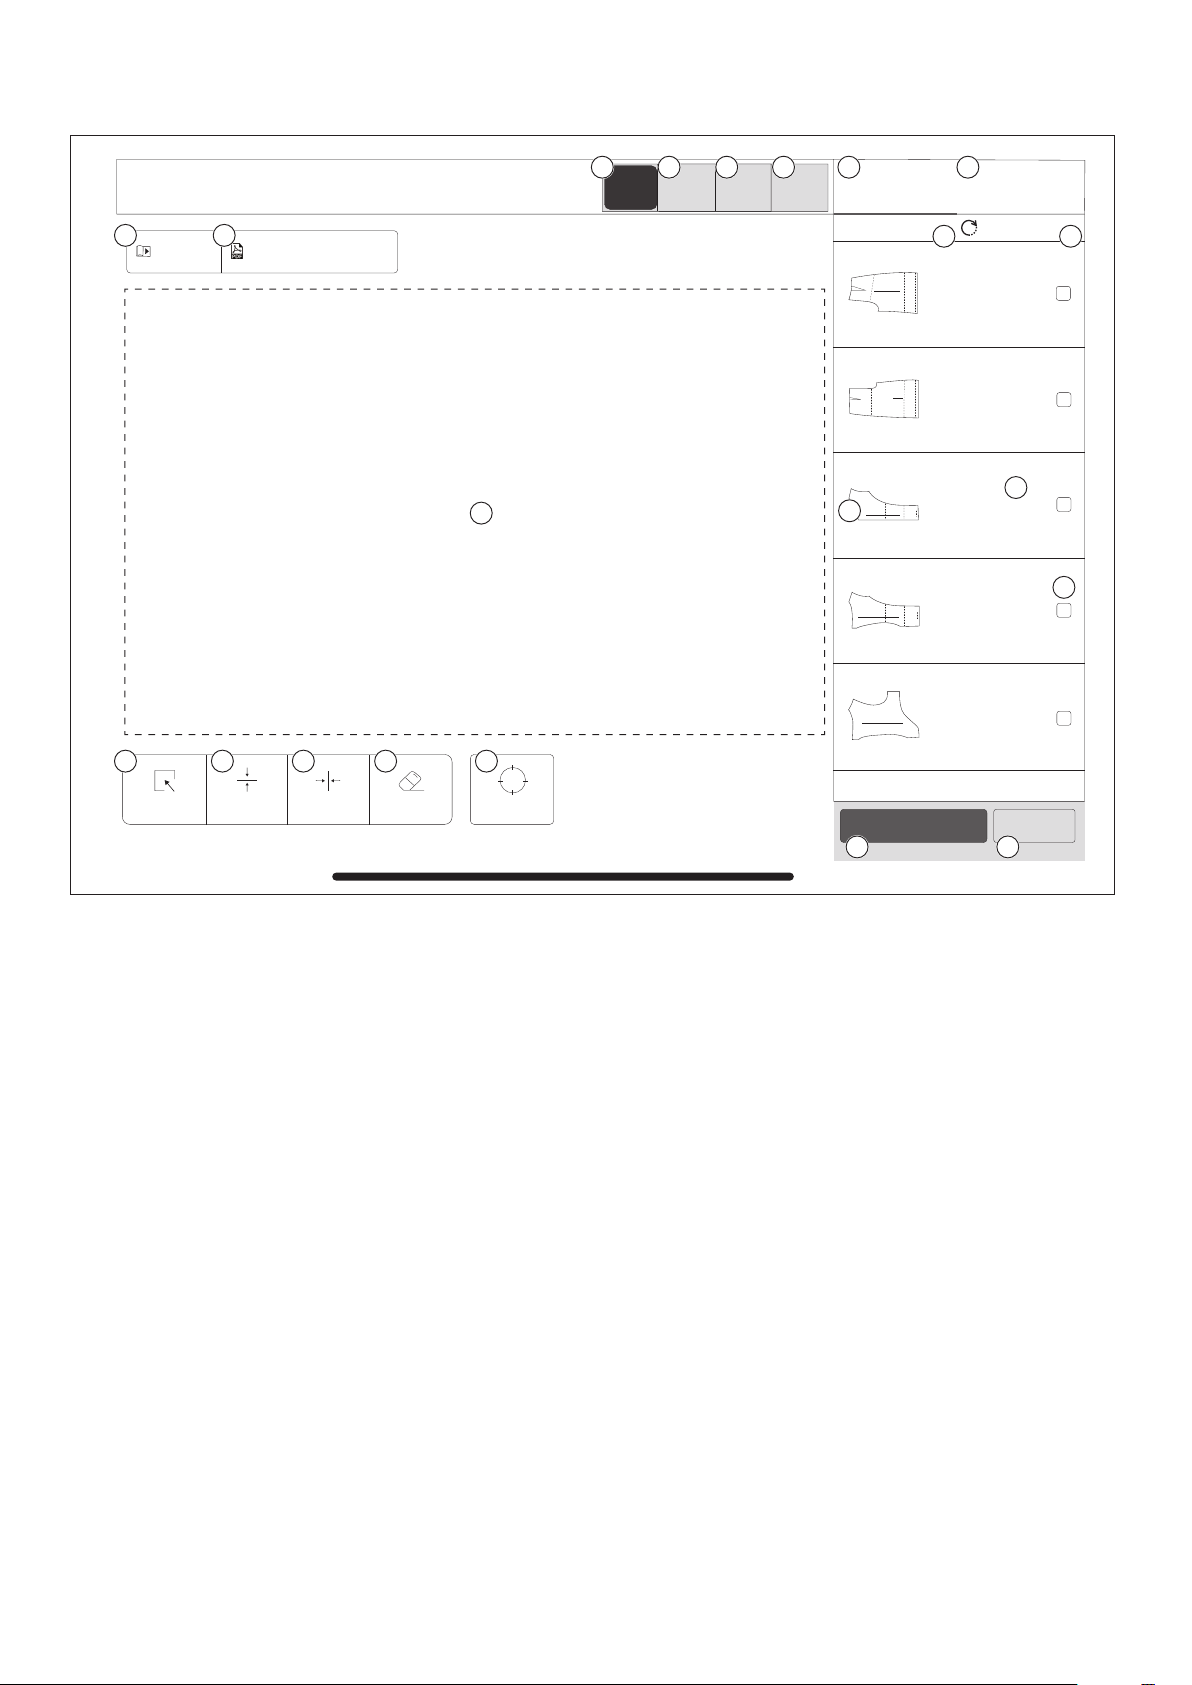
Other
#8 Pants Back
Cut 2
Cut 2
Cut 2
Cut 2
Cut 1 on fold
#7 Pants Front
#1 Upper
Center Front
#3 Upper
Center Back
#6 Back Facing
Pattern Pieces
Boat Neck Jumpsuit Reference Layout
SEND TO PROJECTOREXIT
Tutorial
Select AllMirror VMirror HClear Calibrate
Sewing Instructions
InterfacingLining
Garment
Reset0/17
41 2 3
5 6
7
8 9 10 11 12
13 14
15 16
17
19
20 21
18
1. Pattern component –
Garment
2. Pattern component –
Lining
3. Pattern component –
Interfacing
4. Pattern component
– Other (notions,
template pieces)
5. Ditto written and
video tutorials
6. Written sewing
instructions
7. Workspace
8. Select all button
9. Mirror vertical
10. Mirror horizontal
11. Clear selection in the
workspace
12. Connect to projector/
Calibrate the
projector
13. Selection of pattern
pieces
14. Reference layout /
Spliced pattern piece
map
15. Reset button
16. Number of completed
pattern pieces
17. Pattern pieces
18. Cutting instructions
for each pattern piece
19. Checkbox
20. Send the workspace
to the projector
21. Exit workspace button
Ditto App – Workspace Overview
11
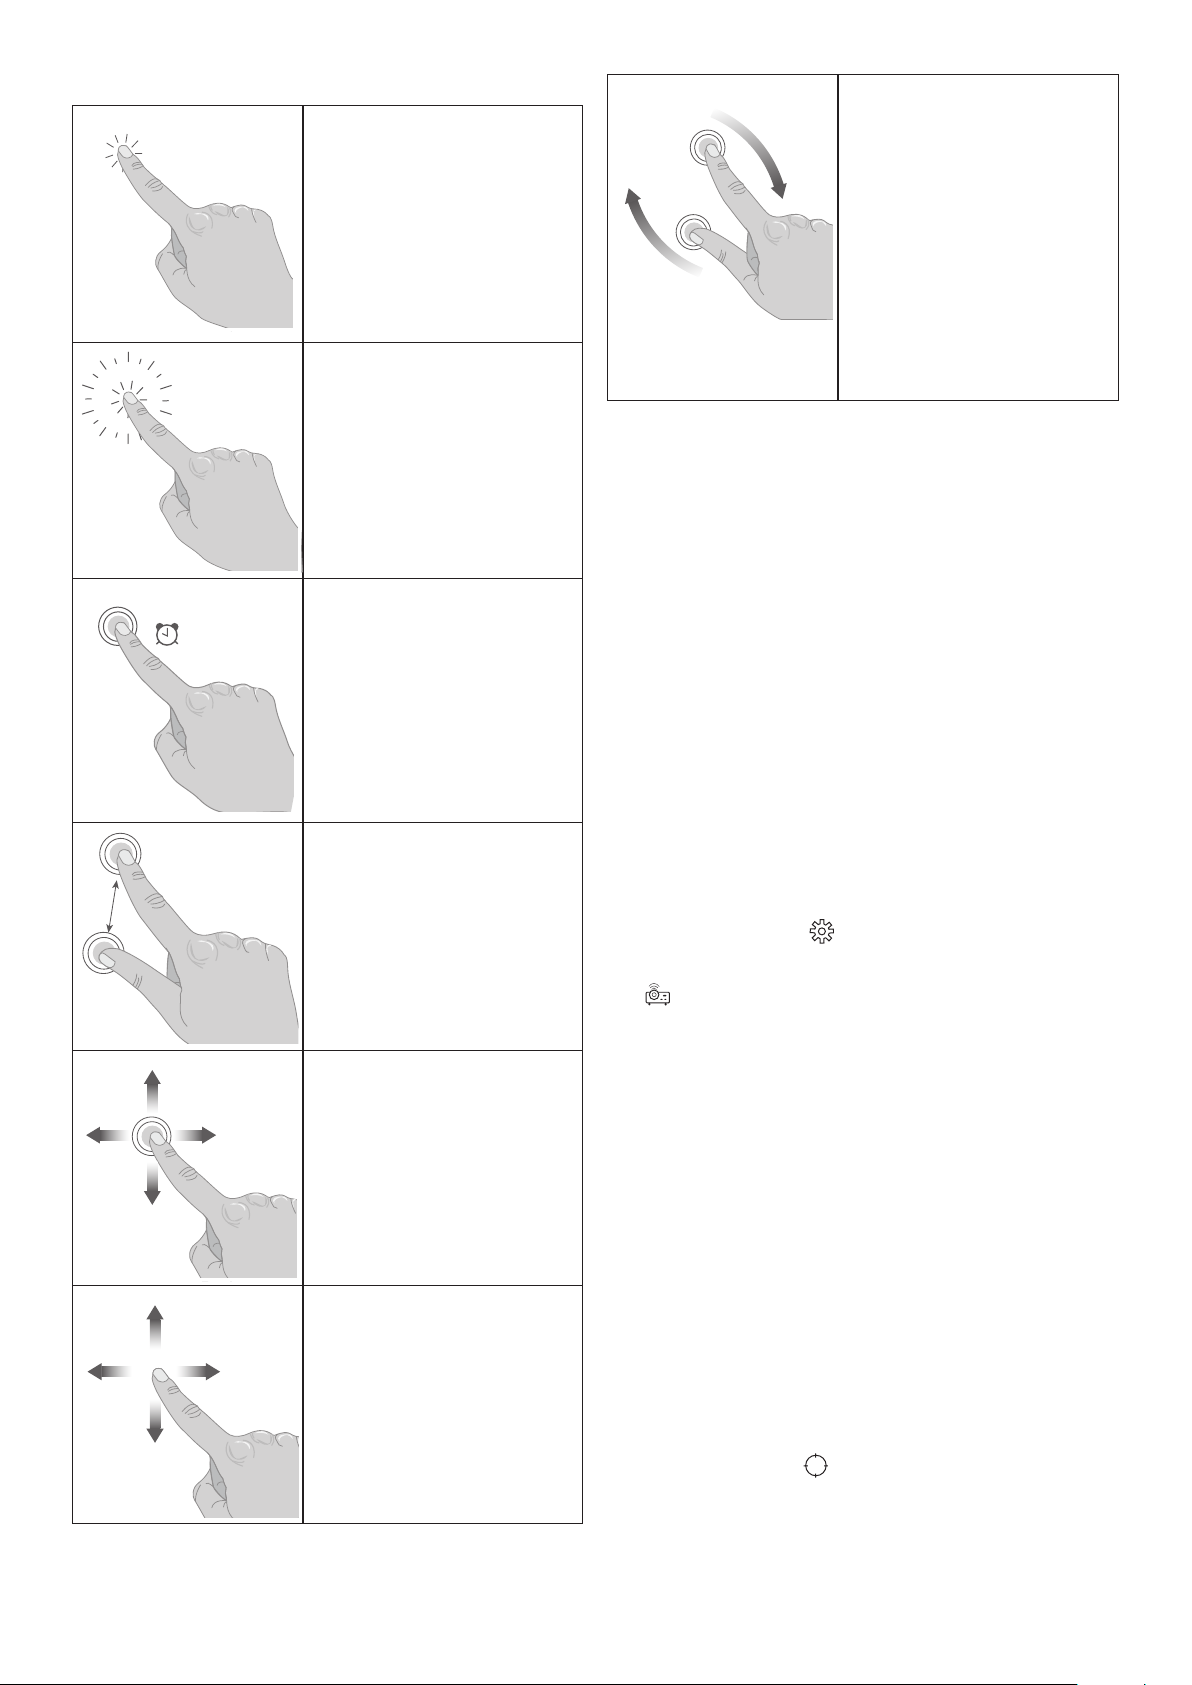
Gestures and Functions
Tap
Use 1 finger to select a
command or a pattern piece.
Double tap
Use 1 finger and tap the
pattern piece twice to
enlarge a thumbnail.
Long press-and-hold
Use 1 finger and long press-
and-hold to drag-and-drop a
pattern piece from the tally
bar to the workspace.
Pinch/Stretch
Use 2 fingers to zoom in or
out of the view in Sewing
Instructions. Pinch to
decrease the display view
and stretch to enlarge the
display view.
Press-and-Move
Use 1 finger to move
a pattern piece on the
workspace. Press-and-hold
and move your finger to
a different position on the
screen.
Swipe
Touch, move and release
your finger in a swift gesture
to swipe.
x2
Rotate
Use 2 fingers to rotate a
pattern piece within the
workspace. Press-and-hold
both fingers while rotating
one finger around the other.
Release the pattern piece
once the desired rotation
is achieved. Note that the
pattern piece cannot extend
beyond the workspace
boundary and will snap to
the nearest 45˚ position.
How To Connect the Ditto System
•Make sure to enable Bluetooth®and Wi-Fi on your
mobile device.
•Connect the Ditto app to the projector through the
Ditto app and not within device settings on your
mobile device.
•Use the main Wi-Fi in your home for optimal use.
Do not use a guest Wi-Fi. Guest Wi-Fi settings may
prevent device connection.
•There are two ways to connect the Ditto System –
through the app Settings (see “Home screen” below)
or the Workspace.
Home screen
1. Go to the Ditto app home screen.
2. Press the menu icon in the top right corner.
3. Select “Settings”.
4. Select “Manage Projector” in the drop-down menu.
5. Search for projectors.
6. Allow Ditto Patterns to find, connect and determine
the location of nearby devices.
7. Select the projector from the list.
8. Enter Wi-Fi password.
Note! Make sure to use the same network as
connected to your mobile device with the Ditto app
installed.
9. Click “Connect to Wi-Fi”.
Note! When the Ditto system is properly connected,
the projection will change from “Waiting to Connect”
to “Connected” under the Ditto logo.
Note! You can also connect the Ditto system by
selecting “Connect” in the Workspace in the Ditto
app.
12
Workspace
1. Click on the “Connect” button in the
workspace.
2. Allow Ditto Patterns to find, connect and determine
the location of nearby devices.
3. Select Bluetooth device, “Ditto”.
4. Select your network and enter the Wi-Fi password.
Note! Select the same network as connected to your
mobile device with the Ditto app installed.
5. Click “Ok”.
When the Ditto system is properly connected
the Connect button in the workspace will
be replaced with a Calibrate button. The
projection will change from “Waiting to
Connect” to “Connected” under the Ditto logo.
Connected
Reconnect Wi-Fi Connection
If the Ditto system loses Wi-Fi connection, a message
will appear on the screen and the projection will change
to “Waiting to Connect”. Reconnect the Ditto system
according to the instructions. Refer to “To Connect the
Ditto System” on page 11.
To Calibrate the Ditto System
Calibration is the process to remove distortion or skew
for an accurate projection. You need to calibrate the
Ditto system every time the product has been moved or
taken down, if the beam is accidentally knocked out of
place, or a different mobile device is used for the Ditto
app.
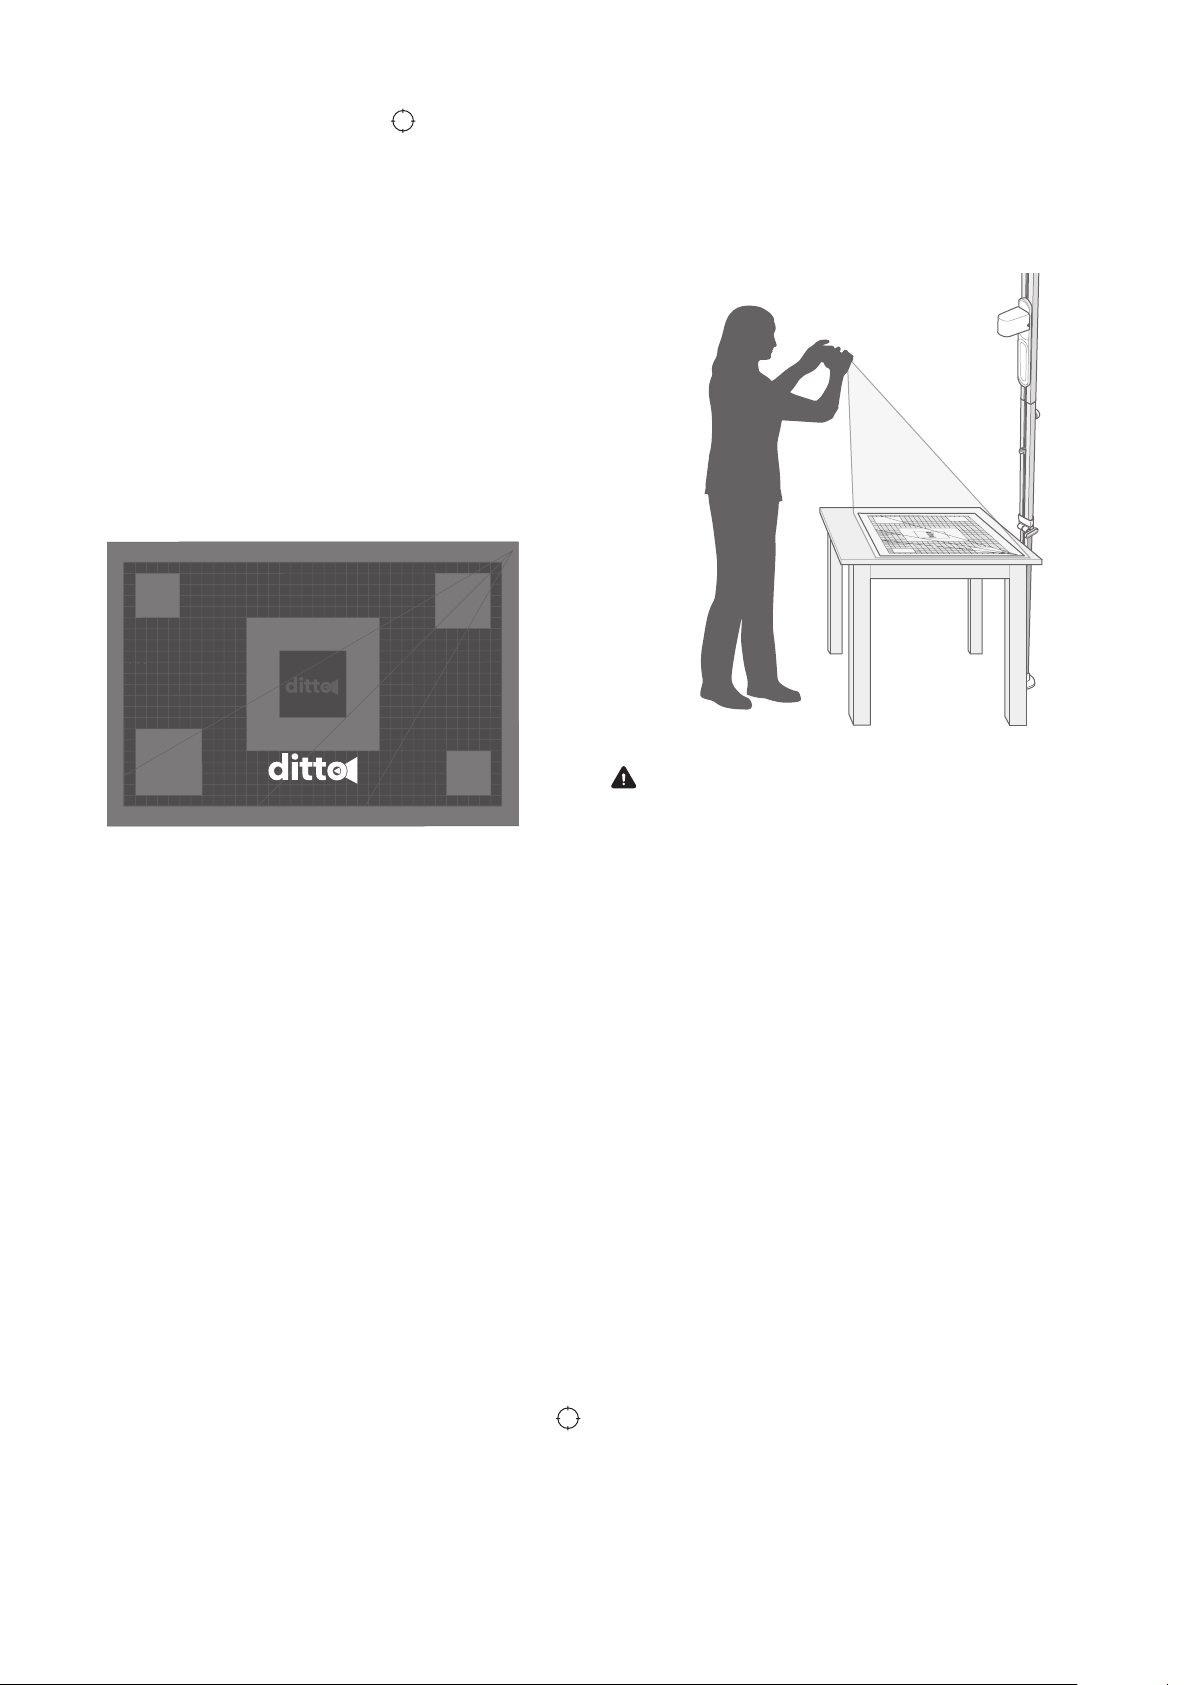
Note! Make sure that the cutting mat is clean and
free from markings, target stickers and loose items.
1. Have your room dimly lit.
2. Confirm that the Ditto system is connected to Wi-Fi.
3. Click on the “Calibrate” button in the workspace.
4. Select “Continue”.
Note! Make sure to allow camera access within the
app.
5. Follow the instructions in the app to confirm accurate
setup and projector height by aligning the red
rectangle on top of the white outline.
6. Stand on the opposite side of the projector
and follow the instructions in the app to
capture a photo when prompted. Make sure
to include all 4 corners of the cutting mat.
Warning! Always stand on the floor when you
take a picture of the cutting mat. There is a risk of
falling if you stand on a chair, a table or similar.
Allow enough room to stand back away from table
or take the photo from a high angle.
7. Select “Yes” when asked if the photograph is ready
to submit. The image usually takes a few seconds to
process.
8. The Ditto app will indicate if calibration is successful
or not.
Note! If the calibration fails, select one of the
following options:
•Tutorial – To view a video tutorial of the
calibration.
•Retry – Refer to steps 5-7 in “To Calibrate the
Ditto System”
•Skip calibration – If you have already calibrated
the system and have not moved the beam.

13
To Select a Pattern Piece
You can select a pattern from your pattern library or
download new patterns from DittoPatterns.com website.
The pattern pieces are shown in the scroll bar in the
workspace.
1. Tap to select one of your downloaded patterns in
“Pattern Library” to open the “Pattern Details”.
2. In “Pattern Details” select “Workspace”.
3. Please wait while the pattern is being processed by
the Ditto system. This can take a few minutes.
4. Access patterns pieces for different types of
materials by selecting “Garment”, “Lining” or
“Interfacing”. Depending on whichever you select,
the pattern pieces will update in the Pattern Pieces
scroll bar at the right.
5. To select your pattern piece, long press-and-hold
and then drag-and-drop the pattern piece to the
workspace.
Note! Double tap to enlarge a pattern piece on your
workspace.
Note! Patterns that are too large for the cutting area
are shown with arrows indicating the direction of
splicing.
Note! You can position multiple non-spliced pattern
pieces in the workspace at the same time.
6. Use 1 finger and Press-and-Move to move a pattern
piece in the workspace.
7. Use 2 fingers to rotate a pattern piece in the
workspace.
8. Fill the workspace with pattern pieces.
9. Press the checkbox next to the pattern piece to keep
track of which pieces have been cut.
Note! Select the “Reset” button if you want to
deselect all checkboxes.
10. If the system has been connected and calibrated the
“Send to Projector” button will be red. Select “Send
to Projector”. Please wait as this may take a few
seconds to project your workspace.
Note! You can exit the workspace at any time and
your project will be saved for later.
To Remove a Pattern Piece or Pattern
Pieces from the Workspace
1. Press on a pattern piece on your workspace to select
a pattern piece. The selected pattern piece will
highlight in red.
Note! You can select multiple pattern pieces at the
same time. You can also click on a pattern piece and
select “Select all” if you want to select all pattern
pieces on the workspace.
2. Select “Clear” to remove selected pattern piece(s)
from the workspace.
To Project the Pattern
When you have completed a layout in the workspace,
and the system is calibrated, you are ready to send the
pattern pieces to the projector.
1. Lay the fabric on the cutting mat.
2. Make sure that the fabric is flat and smooth.
3. Put the weights in the corners of the fabric to prevent
the fabric from moving around on the cutting mat.
Note! Make sure that the fabric is not hanging off the
side of the table. A heavy fabric will pull and wrinkle
the fabric resulting in a distorted projection.
4. Press the red “Send to Projector” button.
5. Use a temporary fabric marker to transfer any
markings from the pattern to the fabric.
Tip: For a cut on fold piece, you can mirror the
projected pattern piece and trace notations onto the
opposite side of the fabric.
Tip: Projected words can be difficult to read. Double
tap on the pattern piece in the workspace app to
zoom in/out to read pattern details on your mobile
device.
6. Use the rotary cutter or a pair of scissors to cut the
fabric.

14
To Splice a Pattern Piece
If you have a pattern piece that is too large for the
cutting mat, the pattern piece will need to be projected
as multiple frames. This is called “Splicing”.
Note! A spliced piece cannot be mirrored.
Note! No other pattern pieces can be in the
workspace at the same time as a spliced pattern
piece.
The spliced pattern pieces in the Ditto app are
marked with a red arrow that indicates the direction
of the splicing. The direction of the splicing can
be vertically, horizontally or in multiple directions
Cut 2
Cut 1 on fold
#1 Upper
Center Front
#3 Upper
Center Back
Note! When a large amount of fabric is needed,
make sure to fold the excess fabric on the table or
drape it onto a chair. If the fabric is draping down
over the edge of the table the weight of the excess
fabric can pull the complete fabric piece down.
Note! Always use fabric weights when splicing a
pattern piece to hold the fabric in place.
1. Add a pattern piece. Refer to steps 1-5 “To Select a
Pattern Piece” on page 13.
2. Press “Send to projector” to project the pattern
pieces. Refer to steps 1-4 in “To Project the Pattern”
on page 13.
Note! Red arrows will appear on the spliced pattern
piece in the workspace to indicate direction of
the splicing. Make sure that there is enough fabric
beyond the arrows to account for the entire pattern
piece.
3. Mark the projected red splice targets with the
provided target stickers. Do not remove the target
stickers until the entire pattern piece has been traced.
Note! The reference layout shows the splicing map
and which frame is being projected.
4. Use a temporary fabric marker to transfer any
markings from the pattern to the fabric.
5. Use the rotary cutter or a pair of scissors to cut the
fabric.
Note! If you are doing a multi-directional spliced
piece, we recommend that you trace the entire
projected piece before cutting your fabric.
6. When the first part of the pattern piece is cut
or traced, tap the red arrows in the workspace
to move the pattern piece to the next frame.
7. Send the pattern to the projector.
8. Follow the arrow directions to reposition the fabric.

15
9. Align pattern lines and target
stickers with new projected targets.
Note! The right scroll bar shows a Splicing Map of
the pattern that indicates which splice frame is being
projected.
To Mirror a Pattern
Mirroring is the same as flipping the pattern.
Note! Spliced pattern pieces cannot be mirrored
1. Select your pattern piece and drag-and-drop the
pattern piece to the workspace.
2. Tap the pattern piece on your workspace that you
want to mirror.
3. Select “Mirror vertical” to flip the pattern piece
vertically.
4. Select “Mirror horizontal” to flip the pattern piece
horizontally.
5. Select “OK”.
To Convert a Cut-on-fold Pattern
Piece
A sewing pattern that has two symmetrical sides can be
cut on the fold of your fabric. The Ditto app enables you
to convert a cut-on-fold pattern piece to a pattern for
unfolded fabric.
1. Select your pattern piece and drag-and-drop the
pattern piece to the workspace twice.
2. Mirror one piece across the fold line. Refer to “To
Mirror a Pattern” on page 15.
3. Use 1 finger and Press-and-Move to join the
pattern pieces together along the fold line.
5
5
5
5
Note! Do not cut the center fold line when cutting.
DISASSEMBLY
1. Disconnect the power plug from the power source.
2. Slide the projector cart down the beam to eye level.
3. Remove the cord covers.
4. Disconnect the power plug from the projector.
5. Make sure that the projector is not covering the joint
of the beam.
6. Turn the projector 180 degrees clockwise so the lens is
facing the ceiling pad.
7. Remove the projector and place it on a flat surface out
of the way.
8. Press down on the beam to depress the spring loaded
foot and tilt the beam to the side.
9. Put the beam on a table or on the floor
10. Loosen the base knob.
11. Slide the telescoping piece into the lower beam
12. Tighten the base knob.
13. Push and turn to loosen the center knob until it pops
up and turns freely. Note that the knob remains
connected to the beam.
14. Pull the two beam sections apart.

16
MAINTENANCE
Warning! Read and understand the safety
chapter before you do maintenance on the product.
Warning! Disconnect the power plug from the
power source before you do maintenance.
To Clean the Product
•Clean product with a clean and dry cloth.
•Clean the air vents with a brush. Make sure that the
air vents are not blocked.
Caution! Do not use water to clean the product.
Water can enter the product and cause short circuit
or damage to the product.
To Examine the Product for Damage
•Examine that the cord is not damaged.
•Examine the connections between the projector and
the adapter. Also examine the connection between
the adapter and the power outlet.
To Store the Product
•Before storage, let the projector cool completely.
•Disconnect the adapter from the projector during
storage.
•Attach the cord covers to the beam during storage.
•Preferably store the product in mounted position set
up at the work area. Alternatively store the product
leaning against the wall in a storage area with the
projector detached.
-The telescoping section can be locked in
compressed position, if needed.
•Store the product indoors and at room temperature.

17
TROUBLESHOOTING AND FAQ
Troubleshooting
The Wi-Fi
connection is lost.
Make sure to use the Ditto
system in a room with best
possible Wi-Fi signal.
Move your work area to a room
with good Wi-Fi coverage and
connect the Ditto system again.
Refer to “To Connect to Ditto
App” on page 7.
Workspace
The send to
projector button
isn’t active in the
workspace of the
app.
Make sure that the system is
connected to your Wi-Fi.
Make sure that the system has
been calibrated and confirm
calibration.
Note! The setup button will
turn red (active) when you
confirm the calibration.
Calibration
You cannot capture
an accurate photo
for the calibration.
Setup the mat on the short
end of a long table or consider
positioning the cutting mat on
the floor.
The work
environment is too
bright.
Have your room dimly lit
and close window blinds or
curtains. Make sure that the
overhead lighting is turned off.
Tip: If the room lighting cannot
be adjusted due to window
brightness, consider working
later in the day.
The work
environment is
creating a bright
spot on the cutting
mat.
Turn off overhead lights.
Tip: Turns lights off for
calibration success and turn
lights back on, if needed,
during pattern piece projection
and cutting.
Shadows are cast
over top of the
cutting mat.
Turn off overhead lights or
move anything in the work
environment if casting shadows
onto cutting mat.
General
problem Solution
Setup
You are not able
to set up the Ditto
beam.
Make sure you fulfill all the
setup requirements. Refer to
“To Prepare the Work Area” on
page 5.
You don’t have a
table for use with
the system.
Set up the beam in an empty
uncarpeted space. Place the
cutting mat on the floor next to
the beam and project onto the
cutting mat using the floor as
the cutting surface.
Projection
The projected image
is fuzzy and difficult
to read.
The projector must be at
the correct height in order
to achieve the pre-focused
setting. Refer to “Set up” on
page 5.
If the projected lines are
extremely blurry after
successful setup, the projector
could be faulty. Please contact
customer service.
You cannot see the
projected pattern
because of shadows
blocking the view.
Move to the other side of the
table and use a temporary
marker to trace difficult
sections to cut later.
Connection
You cannot connect
the Ditto system.
Make sure that the Bluetooth®
and Wi-Fi are enabled on your
mobile device.
Make sure that the mobile
device is in close proximity to
the projector.
Connect the Ditto app to the
projector through the Ditto app
and not within device settings
on your mobile device. Refer to
“To Connect to Ditto App” on
page 7.
Use the main Wi-Fi in your
home for optimal use. Do not
use a guest Wi-Fi. Guest Wi-Fi
settings may prevent device
connection.
18
The calibration
photo was taken
incorrectly.
Make sure that the full cutting
mat, with the calibration
projection over top, is captured
in the photograph before
submitting.
Make sure that the cutting
mat fills the majority of the
photograph space.
Make sure that the photograph
is taken from a top view. Stand
on the opposite side of the
projector, close to the center
of the cutting mat and take a
photograph from a high angle.
Preferably hold the mobile
device at eye level.
Warning! Always stay
on the floor when you take
a picture of the cutting mat.
There is a risk of falling if you
stand on a chair, a table or
similar.
Make sure to setup the system
with enough room on the
side of the table opposite the
beam. This enables you to
stand back away from table, to
capture a correct photograph
for the calibration of the
system.
Always capture the photo in
the landscape orientation.
If the projected calibration
image is significantly blurred,
confirm that the device is held
still during photo capture.
Confirm the device lens is
clean and free of smudges.
Improper setup.
The cutting mat must be
positioned accurately with the
logo legible from the opposite
side of the beam. The mat
must be fully on the table and
free of objects or markings.
Confirm that the red setup
image is accurately placed
overtop of the white region on
the cutting mat.
The projector must be
accurately setup to enable
optimized factory focus setting.
If calibration repeatedly fails,
and setup is confirmed to be
accurate, and the projection
still seems blurry, then the
system could be faulty. Please
contact customer service.
If calibration repeatedly fails, please contact customer
service.

19
Frequently Asked Questions
Question Answer
Can I set up on a drop ceiling? Yes. Carefully put the beam on the cross section of the ceiling
framework.
Can I set up the beam on ceilings higher than
10 ft. (304 cm)?
No. The beam is only suitable ceiling heights of 7.5 ft. to 10 ft. (228
to 304 cm).
Can I set up the beam to project onto the
floor?
Yes. Install the beam into place between floor & ceiling and lower
the projector and projector carrier to about 50 in. (127 cm) from the
floor surface.
Will I lose work in progress when I close a
pattern?
No. The workspace is automatically saved when you exit the Ditto
app.
I don’t want to continue receiving all the pop-
up notifications in the Ditto app. Can I turn
them off?
Yes. Turn off notifications in Settings on the Ditto app. Settings is
located in menu bar at the top right corner on the home screen.
What if I’m having trouble reading the words
and marks on my projected pattern?
Double tap the pattern piece in the workspace to bring a pop-up
zoom of the piece. Use two fingers to zoom in and out. You can also
put a piece of paper under the project image to see the markings
more clearly.
When do I need to calibrate? Every time the system is moved or the beam is accidentally
knocked out of place, or a different mobile device is used to project
patterns.
What do I do if my app shows calibration
success, but the projected image looks odd/
off?
Select the calibrate button again and redo the calibration process.
Are the seam allowances included in the
pattern pieces?
Yes. All seam allowances are included in the projection line. Seam
allowance amount can be found in the sewing instructions.
My lighting is off, what is the best way to fix
this?
Calibration works best in a dimly lit room. You may need to cover
any windows and dim the lights.
Where on the projection line should I cut my
fabric?
Cut in the middle of the projection line.
Do I need a rotary cutter to use this system? No. You can cut the projection with a pair of scissors or trace with a
marking tool and then cut with a pair of scissors.
How do I determine the size of fabric needed
for a spliced piece?
1) Lay out fabric. 2) Project the spliced pattern piece and measure
the first part of the spliced pattern piece. 3) Mark the location of the
splice target projections with the target stickers. 4) Move projection
and fabric to the other end of the spliced pattern piece. 5) Measure
from your marked targets to the other end of the projection.
Can I use another cutting mat with this
system?
It is not recommended. The included cutting mat is formatted
specifically for the calibration of the Ditto system to ensure exact
pattern positioning and measurements.
Caution! Do not to use the Ditto system cutting mat for
other crafts, as glue & paint will show up on your picture and
could alter your pattern marks.
What if I’m using a very thick fabric like
Sherpa, faux fur or heavy fleece?
When calibrating the projector, put the cutting mat on top of the
fabric. This enables the projector to calibrate the system based
on the thickness of the fabric. When the system is calibrated, put
the cutting mat back under the fabric. Trace or cut the fabric on
the wrong side of the fabric. Calibrate the projector again before
tracing or cutting additional fabrics of standard thickness.
Do I need to trace my pattern, or can I just
cut it by following the projection?
You can cut the fabric by following the projected pattern piece
lines. But we do recommend that you trace the pattern pieces when
there is a multi-directional splice required.

20
CERTIFICATION REQUIREMENTS
Federal Communication Commission Interference Statement
For the US and Canada
Responsible
party:
Singer Sourcing Limited LLC
1714 Heil Quaker Boulevard,
Suite 130, LaVergne, TN
37086
Product name: Singer®Ditto™
This device complies with Part 15 of the FCC Rules. Operation is subject to the following two conditions: (1) This
device may not cause harmful interference, and (2) this device must accept any interference received, including
interference that may cause undesired operation.
This equipment has been tested and found to comply with the limits for a Class B digital device, pursuant to part
15 of the FCC Rules. These limits are designed to provide reasonable protection against harmful interference in a
residential installation. This equipment generates, uses and can radiate radio frequency energy, and if not installed
and used in accordance with the instructions, may cause harmful interference to radio communications. However,
there is no guarantee that interference will not occur in a particular installation. If this equipment does cause harmful
interference to radio or television reception, which can be determined by turning the equipment off and on, the user
is encouraged to try to correct the interference by one or more of the following measures:
•Reorient or relocate the receiving antenna.
•Increase the separation between the equipment and receiver.
•Connect the equipment into an outlet on a circuit different from that to which the receiver is connected.
•Consult the dealer for help.
Table of contents


