manuals.online logo
Brands
  1. Home
  2. •
  3. Brands
  4. •
  5. Dj MOVEIS
  6. •
  7. Indoor Furnishing
  8. •
  9. Dj MOVEIS FARO 14.780 User manual

Dj MOVEIS FARO 14.780 User manual

DJ - Indústria e Comércio de Móveis Ltda.
Rua Juriti Vermelha nº 210 a 290 - Pq. Industrial V - Cx. Postal 2068 - CEP 86702-280 - Arapongas - Paraná - Brasil
Fone (55) (0**43) 3172-7777 - E-mail: [email protected] Site: www.djmoveis.ind.br
Medidas em mm
PIEZA
047 - Rústico Malbec
048 - Branco Brilho
055 - Off White
060 - Rústico Terrara
000 - Crú
Qt
PEÇAS
PIECE
N°
Cuidados para conservação e limpeza do móvel:
Não molhar o móvel e não expor em lugar úmido.
Do not moinsten the furniture and not to expose in moist places.
No moje el mueble y no ponga en local humedo.
Limpe com flanela limpa e seca.
For cleaning use a clean and dry cloth.
Limpe con franela limpia e seca.
Não usar produtos abrasivos.
Do not use abrasive products.
No utilice productos abrasivos.
x
Instruções para a montagem do produto:
É necessário uma pessoa para montar o produto.
It’s necessary one person to assembly the product.
Se requiere persona para montar el producto. una
Forrar o chão com o papelão das embalagens.
Cover the floor with the cardboard from the pack.
Cubra el suelo con el papelón de los embalajes.
14.780 - PAINEL EXTENSÍVEL FARO:
01
02
03
04
05
06
Painel Central Superior
Painel Central Inferior
Painel Esquerdo
Painel Direito
Prateleira
Suporte Painel/Parede
Upper Center Panel
Bottom Center Panel
Left Panel
Rigth Panel
Shelf
Support Panel/Wall
Panel central superior
Panel central inferior
Panel izquierdo
Panel Derecho
Estante
Soporte Pane/Pared
047
047
047
047
047
000
1
1
1
1
1
2
448x108x12
770x448x12
903x629x12
903x629x12
903x192x25
905x82x15
10
060
20 11070 120 130 140 150 160 170 180
30 80
40 9050 100 190
CÓDIGO DA COR / COLOR CODE / CÓDIGO DEL COLOR
04
03
01 05
02
06
06
Furadeira
Drilling machine
Taladro
Chave Philips
Philips Key
Llave Philips
Chave Fenda
Screwdriver
Llave Fenda
Martelo
Hammer
Martillo
Parafusadeira
Electric Screwdriver
Tornillo Eléctrico
Ferramentas necessárias (não fornecidas)
Required tools (not supplied)
Herramientas necesarias (no incluidas)
00000 00
000
ENTENDENDO OS CÓDIGOS:
Nº. da peça
Nº. of the piece
Nº. de la pieza
Nº. do lote
Nº. of the lot
Nº. del lote
Cód. do produto
Product Code
Cód. Del producto
0000 000 00
UNDERSTANDING THE CODES:
ENTENDIENDO LOS CÓDIGOS:
MEDIDAS (mm)
MEASURES (mm)
MEDIDAS (mm)
PANEL EXTENSIBLE FARO
FARO EXTENSIBLE PANEL
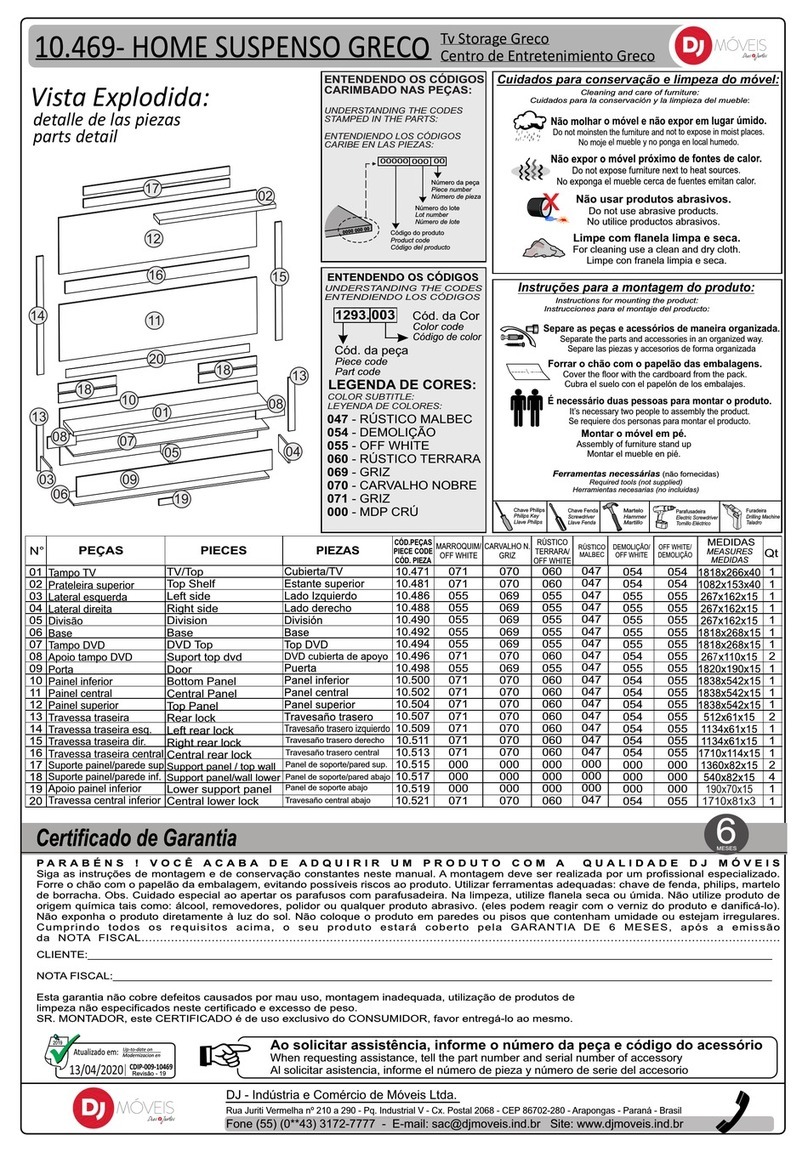
Vista Explodida
Detalle de las piezas
Parts detail
Acessórios/ Accessories/ Accesorios
Cód.
13380
1039
14428
1043
170
156
14427
183
1465
985
18549
Cód.Assist
Técnica
Parafuso 4,0 X 50 Cabeça Chata
Parafuso 4,0 X 22 Cabeça Chata
Parafuso 6,0X75 Cabeça Chata
Parafuso 4,0 X12 Cabeça Flangeada
Cavilha 8x20mm
Cavilha 6x30mm
Bucha Ux 8x50 Nylon com Aba
Passa Fio 40MM Preto 015
Distanciador 15MM Preto
Parafuso 4,0 X30 Cabeça Flangeada
Sache de Cola
Screw 4,0x50 flathead
Screw 4,0x22 flathead
Screw 6,0x75 flathead
Screw 4,0x12 head flange
Dowel 8x20mm
Dowel 6x30mm
Ux Bushing nylon with flap
Wire Pass 40mm
15mm Black Spacer
Screw 4,0x30 head flange
Glue
Tornillo 4,0 X 50 Cabeza Plana
Tornillo 4,0 X 2 Cabeza Plana
Tornillo 6,0 X 75 Cabeza Plana
Tornillo 4,0 X12 Cabeza
Pin 8x20mm
Pin 6x30mm
Manguito UX 8x50 com Pestaña
Passe Del Cable
Espaciador 15MM Negro
Tornillo 4,0 X30 Cabeza
Pegamento
A
B
C
D
E
F
G
H
I
J
K
4
20
4
4
8
1
4
1
2
4
1
Qd.
RÚSTICO
MALBEC
BRANCO
BRILHO
048
048
048
048
048
000
OFF
WHITE
055
055
055
055
055
000
060
060
060
060
060
000
RÚSTICO
TERRARA
CÓD.PEÇAS
PIECE CODE
CÓD. PIEZA
14997
14998
14999
15000
15001
15002
Ao solicitar assistência, informe o número da peça e código do acessório
When requesting assistance, tell the part number and serial number of accessory
Al solicitar asistencia, informe el número de pieza y número de serie del accesorio
2019
Modernizacion en
13/04/2020
CDIP-009-14780
Revisão - 09
CARVALHO
NOBRE
070
070
070
070
070
000
1º
4º
B K K
B
A
EE
F
2º
3º
F
To mount the Shelf insert the dowel in the Top hole of part nº 02
ATENÇÃO
ATENCIÓN
Para montagem da Prateleira encaixar a cavilha na
furação de Topo da peça nº02
ATTENTION
Para el montaje del estante encaje el perno en el taladrado superior de la
pieza nº02
AAAA
(3)
(3)
(3) (2)(1)
(2)
(1)
(3)
(1)
(2)
(2)
(1)
(1) (2) (3)
(3)(3) (2) (1)
(3)
E
E
B
B
B
B
04
02
04
04
03
05
02
05
03 02
E
E
B
B
B
B
04
03
02
14.780 - PAINEL EXTENSÍVEL FARO:
PANEL EXTENSIBLE FARO
FARO EXTENSIBLE PANEL
ATENCIÓN: Utilizar el accesorio (A) para la fijación del estante del panel
ATENÇÃO:Utilizar o acessório (A) para a fixação da
prateleira do painel.
CAUTION: Use the accessory (A) to secure the panel shelf.
ATENÇÃO MONTADOR: Verificar a opção de largura
(1360,1500 ou1600) antes de iniciar a montagem do painel.
As três marcações destacadas abaixo na peça 02 definem
a largura que o painel deve ser montado, siga o esquema :
ASSEMBLY ATTENTION: Check the width option (1360,1500 or 1600) before
starting the panel assembly.The three markings highlighted below in part 02 define
the width of the panel to be mounted, follow the diagram:
ATENCIÓN MONTADOR: Comprobar la opción de ancho(1360,1500 o 1600) antes
de iniciar el montaje del panel.Las tres marcas destacadas abajo en la pieza
02 definen el ancho que debe montarse el panel, siga el esquema:
Largura
Width
Ancho
1º 2º 3º
1600mm 1500mm 1360mm
Utilizar cola (K) entre
as peças (4) e (2)
Utilizar cola (K) entre
as peças (3) e (2)
Use glue (K) between
the parts (4) and (2
Use glue (K) between
the parts (3) and (2
Utilizar cola (K) entre
las piezas (4) y (2) Utilizar cola (K) entre
las piezas (3) y (2)
3º 1º
2º
2º
1º
3º
E
E
B
BB
B
01
03
05
04
02
5º
SR. MONTADOR
A partir deste passo da montagem o painel pode ser montado
de duas formas, com a prateleira na parte superior ou inferior.
Consulte o cliente para saber a forma que o painel será montado
E
B
14.780 - PAINEL EXTENSÍVEL FARO:
PANEL EXTENSIBLE FARO
FARO EXTENSIBLE PANEL
K
K
ATENÇÃO MONTADOR: Verificar a opção de largura
(1360,1500 ou1600) antes de iniciar a montagem do painel.
As três marcações destacadas ao lado na peça 01 definem
a largura que o painel deve ser montado, siga o esquema :
ASSEMBLY ATTENTION: Check the width option (1360,1500 or 1600) before
starting the panel assembly.The three markings highlighted below in part 01 define
the width of the panel to be mounted, follow the diagram:
ATENCIÓN MONTADOR: Comprobar la opción de ancho(1360,1500 o 1600) antes
de iniciar el montaje del panel.Las tres marcas destacadas abajo en la pieza
01 definen el ancho que debe montarse el panel, siga el esquema:
Largura
Width
Ancho
1º 2º 3º
1600mm 1500mm 1360mm
1º OPÇÃO
2º OPÇÃO
03
03
04
04
05
05
01
01
02
02
2º
2º 1º
1º 3º
3º
1º OPÇÃO
VISTA TRASEIRA
2º OPÇÃO
0404 03
1º 2º 3º
1500mm
1600mm
1360mm
Largura
Width
Ancho
três marcações destacadas nas peças (03) e (04) definem
a largura que o painel foi montado, siga o esquema
abaixo:
ATENÇÃO MONTADOR: Verificar a opção de largura
(1360,1500 ou1600) antes de colocar a peça (06). As
three markers highlighted in parts (03) and (04) define the width that the panel was
mounted, follow the diagram below:
ASSEMBLY ATTENTION: Check the width option
(1360,1500 or 1600) before placing the part (06). At
ATENCIÓN MONTADOR: Comprobar la opción de ancho(1360,1500 o 1600)
antes de colocar la pieza (06). la tres marcas destacadas en las piezas (03) y (04)
definen la anchura que el panel fue montado, siga el esquema abajo:
7º
6º
K
Aplicar cola sobre a peça 6
Aplicar cola
sobre la pieza 6
Apply cola
about part 6
K
06
E
B
J
I
IK
ATENÇÃO :Utilizar o acessório J
somente na furação indicada
ATECIÓN :Utilizar el accesorio J
sólo en el taladrado indicado
ATTENTION :Using the accessory J
only in the indicated hole
E
E
B
B
BB
B
J
J
J
J
B
B
B
I
DD
0404
03
06
K
K
J
J
B
B
30
30 I
D
SR. MONTADOR A partir de este paso del montaje, el panel puede
montarse de dos formas, con el estante en la parte superior o inferior.
Consulte al cliente para conocer la forma que el panel será montado
MR. ASSEMBLY From this step of the assembly the panel can be
mounted in two ways, with the shelf at the top or bottom. Consult the
customer to know the way the panel will be mounted
10º
8º
Posição do Suporte
Stand Position
Posición del soporte
06
CCCC
G
G
GG
5,0x70
C
G
9º
Vista Lateral do Painel
Side View of the Panel
Vista lateral del panel
Parede / Wall / Pared
2º OPÇÃO
1st OPTION
1º OPCIÓN
1º OPÇÃO
1st OPTION
1º OPCIÓN
H
11º
H
192 192441
1
kg
40
kg
1600/1500/1360
903
220
14.780 - PAINEL EXTENSÍVEL FARO:
PANEL EXTENSIBLE FARO
FARO EXTENSIBLE PANEL
Step 4 - Fasten the holder, part 06, with the bevelled side up.
3º Paso - Con un taladro, agujere las marcas en la pared utilizando una broca
8mm y encaje los casquillos plásticos (A) en los agujeros;
Step 3 - Using a drill, drill the markings on the wall using an 8mm drill bit and
attach the plastic bushings (A) to the holes;
4º Passo - Fixe o suporte, peça 06, com o lado chanfrado para cima.
4º Paso - Fije el soporte, pieza 06, con el lado biselado hacia arriba.
Step 2 - Mark the position of the holes in the wall, according to the distances from
step 7.
2º Paso - Marque la posición de los agujeros en la pared, según las distancias
del paso 7.
3º Passo - Com uma furadeira, fure as marcações na parede utilizando uma
broca 8mm e encaixe as buchas plásticas nos furos;
Step 1 - Consult the customer about the height at which the panel will be fixed,
we suggest 565mm from the floor to the first drilling.
1º Paso - Consulte al cliente en cuanto a la altura en que será fijado el panel,
sugerimos 565mm del suelo hasta la primera perforación.
1º Passo - Consulte o cliente quanto a altura em que será fixado o painel,
sugerimos 565mm do chão até a primeira furação.
2º Passo - Marque a posição dos furos na parede, conforme as distâncias do
passo 7.
Mr. Assembler follow the instructions below
for Fixing the TV panel on the wall:
Sr. Montador siga las siguientes instrucciones para
la fijación del panel de TV en la pared:
Posição dos furos de 8 medidas em milímetros.
Position of the holes of 8 measures in millimeters.
Posición de los agujeros de 8 medidas en milímetros.
Observação.:
Encaixe o Painel no suporte já fixado na parede.
Note.:
Attach the Panel on the stand already attached to the wall.
Nota.:
Encaje el panel en el soporte ya fijado en la pared.
PISO/ FLOOR
Aspecto Final
Final Aspect
(Medidas em mm)
(Measured in mm)
(Medidas en mm)

Other Dj MOVEIS Indoor Furnishing manuals

Dj MOVEIS 10.089 User manual

Dj MOVEIS

Dj MOVEIS 10.089 User manual

Dj MOVEIS 16226 User manual

Dj MOVEIS

Dj MOVEIS 16226 User manual

Dj MOVEIS BANCADA HAVANA 5625 User manual

Dj MOVEIS

Dj MOVEIS BANCADA HAVANA 5625 User manual

Dj MOVEIS BANCADA HAVANA 5625 User manual

Dj MOVEIS

Dj MOVEIS BANCADA HAVANA 5625 User manual

Dj MOVEIS Rack Verano User manual

Dj MOVEIS

Dj MOVEIS Rack Verano User manual

Dj MOVEIS HOME QUEBEC 15458 User manual

Dj MOVEIS

Dj MOVEIS HOME QUEBEC 15458 User manual

Dj MOVEIS Greco 10.469 User manual

Dj MOVEIS

Dj MOVEIS Greco 10.469 User manual

Dj MOVEIS Estante New Prisma 3325 User manual

Dj MOVEIS

Dj MOVEIS Estante New Prisma 3325 User manual

Dj MOVEIS ARES 18.736 User manual

Dj MOVEIS

Dj MOVEIS ARES 18.736 User manual

Popular Indoor Furnishing manuals by other brands

Forte KLZL1122 Assembling Instruction

Forte

Forte KLZL1122 Assembling Instruction

Twoey inside Reading Corner Seat 1 4050 Assembly instructions

Twoey inside

Twoey inside Reading Corner Seat 1 4050 Assembly instructions

Cooper Lighting PD7 specification

Cooper Lighting

Cooper Lighting PD7 specification

J.Burrows JBWINDSVBK Assembly instructions

J.Burrows

J.Burrows JBWINDSVBK Assembly instructions

FURNITUREBOX CALLA Assembly guide

FURNITUREBOX

FURNITUREBOX CALLA Assembly guide

Home Decorators Collection ALSTER TJ-0401V3622BR Assembly instructions

Home Decorators Collection

Home Decorators Collection ALSTER TJ-0401V3622BR Assembly instructions

DURAVIT White Tulip WT 7051 Mounting instructions

DURAVIT

DURAVIT White Tulip WT 7051 Mounting instructions

Forever Redwood MAYNARD WOOD SHOWER BENCH Assembly instructions

Forever Redwood

Forever Redwood MAYNARD WOOD SHOWER BENCH Assembly instructions

Coaster 4241 Assembly instructions

Coaster

Coaster 4241 Assembly instructions

College Bed Lofts Storage Drawers Assembly guide

College Bed Lofts

College Bed Lofts Storage Drawers Assembly guide

Niche NBC2930 Assembly instructions

Niche

Niche NBC2930 Assembly instructions

SJC brands tasman eco Vouge Assembly instruction

SJC brands

SJC brands tasman eco Vouge Assembly instruction

HURAKAN HKN KWS-21/0603 manual

HURAKAN

HURAKAN HKN KWS-21/0603 manual

ofichairs Hong kong manual

ofichairs

ofichairs Hong kong manual

Williams-Sonoma COLONIAL CANOPY BED QUEEN & KING manual

Williams-Sonoma

Williams-Sonoma COLONIAL CANOPY BED QUEEN & KING manual

Triarch 31431-35 Assembly instructions

Triarch

Triarch 31431-35 Assembly instructions

Grain MONTAUK MT3311 Assembly instructions

Grain

Grain MONTAUK MT3311 Assembly instructions

GreenForest BEARD QU BK Assembly instruction

GreenForest

GreenForest BEARD QU BK Assembly instruction

manuals.online logo
manuals.online logoBrands
  • About & Mission
  • Contact us
  • Privacy Policy
  • Terms and Conditions

Copyright 2025 Manuals.Online. All Rights Reserved.